3.- Networking
In this day and age a computer that is completely isolated from the outer world would be pretty much useless. Many everyday tasks like sending or receiving email, sharing files or querying a database require an external connection.
In order to communicate, the computers use a software component called a network protocol. We won’t go into the details of the different network protocols, as there are already many books on the subject. There are actually many network protocols but the de facto standard is the TCP/IP protocol.
3.1.- IPv4
This protocol was developed in the 70’s by the Defense Advance Research Projects Agency (DARPA). It is a hierarchical model that assigns every computer an IP address in the form of four octets x.x.x.x . Every address has a mask associated that consists of four octets too. We’ll see this a little more in detail.
As we mentioned earlier an IP address is represented by four numbers whose values range from 0 to 255. For example 192.168.10.19, 198.165.30.40, 88.43.53.12, etc… And this number has associated another parameter, the subnet mask. The subnet mask could be 255.255.255.0, 255.255.0.0, 255.240,0.0, etc… Let’s imagine we have a computer with the following parameters:
IP Address: 192.168.10.19
Network mask: 255.255.255.0
Now we must introduce a new concept, the Network address. This value will tell us whether two computers are in the same or in different networks. To obtain the Network address we check the values of the IP Address and the network mask in binary.
Ip Address: 11000000.10100100.00001010.00010011
Network mask: 11111111.11111111.11111111.00000000
The network address will be the part of the ip address that corresponds to the part of the network mask that has 1’s digits. In this example it will be.
Network Address: 11000000.10100100.00001010 192.168.10
As the Network Address needs to have a lenght of 4 octets too, the rest of the address will be completed with 0’s.
Network Address: 11000000.10100100.00001010.00000000 192.168.10.0
For two computers to communicate directly, they should have the same Network Address. In our example if we already have a server with the 192.168.10.19 IP address and the Network mask 255.255.255.0, we should use the same network address (and of course a different IP) for a new computer. One of the many valid IP address could be this one.
Ip Address: 192.168.10.20
Network Mask: 255.255.255.0
Network Address: 192.168.10.0
So, an IP address must always have a mask associated, otherwise we wouldn’t be able to determine the network it belongs to. In the previous examples we specified the ip address and the network mask as two independent values. But they can be represented in an abbreviated form. Let’s take the last example.
IP Address: 192.168.10.20 Network Mask: 255.255.255.0
If we translate the values into binary, we have this:
Ip Address: 11000000.10101000.00001010.00010010
Network Mask: 11111111.11111111.11111111.00000000
We see the network mask has 24 1’s so we could represent the Ip address and mask like this:
192.168.10.20/24
IP addresses can also be classified in many categories:
Class A:
The address begins with a 0. That is to say, every address from 1.x.x.x up to 127.x.x.x is considered to be an class A IP address.
Class B:
The address begins with 10. These IP addresses range from 128 to 191.x.x.x.
Class C:
In this case the address begins with 110. The valid range of addresses is 192.x.x.x to 224.x.x.x.
There is also a Class D and a Class E, used for specific purposes, but we wont get into the details.
3.1.1.- Special addresses
There are also a few addresses that were defined for specific purposes.
One example is the IP address 127.0.0.1, called loopback. Every single device that uses the TCP protocol is automatically assigned this address, even if it doesn’t have a network device and it hasn’t been assigned any other IP. By using this loopback address we can test the TCP protocol locally.
Some other network addresses are meant to be used in private LANs but not on the Internet, as they might not be unique. These addresses are:
10.0.0.0/8 172.16.0.0/12 192.168.0.0/16
So every IP address beginning to any of these networks is considered a private address.
3.1.2.- Unicast, multicast and broadcast
An IPv4 device can communicate directly with another IPv4 device establishing a one-to-one relation. This is called unicast.
But maybe this device wants to communicate with all the devices with the same network address. This is called a broadcast and it consists of the network address plus all the host bit filled with 1’s. For example if a computer has the 192.168.1.20/24 address and wants to send a broadcast it will send it to the 192.168.1.255 address.
And there is also a third scenario in which the computer wants to communicate with a few other computers in the same network, but not all of them. For this to work, these computers should share a multicast address. And this type of communication is called multicast.
3.1.3.- IPv4 configuration in CentOS
3.1.3.1.- Centos 6
To assign temporarily an IP address to our CentOS server we can use the ifconfig command. Executed with the -a parameter it will show all the Network Interfaces present, ignoring whether they are configured or not.
 1 [root@delphos ~]# ifconfig -a
 2 eth0      Link encap:Ethernet  HWaddr 00:0C:29:78:4C:B1
 3           UP BROADCAST RUNNING MULTICAST  MTU:1500  Metric:1
 4           RX packets:0 errors:0 dropped:0 overruns:0 frame:0
 5           TX packets:0 errors:0 dropped:0 overruns:0 carrier:0
 6           collisions:0 txqueuelen:1000
 7           RX bytes:0 (0.0 b)  TX bytes:55678099 (0.0 b)
 8           Interrupt:19 Base address:0x2000
 9
10 lo        Link encap:Local Loopback
11           inet addr:127.0.0.1  Mask:255.0.0.0
12           inet6 addr: ::1/128 Scope:Host
13           UP LOOPBACK RUNNING  MTU:16436  Metric:1
14           RX packets:19843 errors:0 dropped:0 overruns:0 frame:0
15           TX packets:19843 errors:0 dropped:0 overruns:0 carrier:0
16           collisions:0 txqueuelen:0
17           RX bytes:19601819 (18.6 MiB)  TX bytes:19601819 (18.6 MiB)
We can see there are two network interfaces in our server, lo (loopback) a virtual network interface used internally and eth0, which corresponds to an ethernet card. This last one is the interface we’ll have to use to configure the IP Address of our server.
1 [root@delphos ~]# ifconfig eth0 192.168.1.20 netmask 255.255.255.0 up
With ifconfig we can add a temporary IP, but in order to make this change persistent we’ll have to modify the network configuration of the system. We can do this by manually editing the /etc/sysconfig/network-scripts/ifcfg-eth0 file and adding the following lines:
1 IPADDR=192.168.10.19
2 BOOTPROTO=none
3 NETMASK=255.255.255.0
4 TYPE=Ethernet
We’ll also have to change the line “ONBOOT=no” to “ONBOOT=yes”, so that the network interface gets activated after every reboot. This procedure works perfectly but it is probably more convenient to use an automatic configuration tool such as system-config-network. This program is probably not installed by default so we’ll have to install it now. As we saw in the previous chapter we can use yum to identify the package associated to a command.
 1 [root@delphos ~]# yum --disablerepo=* --enablerepo=c6-media provides system-conf\
 2 ig-network
 3 Loaded plugins: fastestmirror
 4 Loading mirror speeds from cached hostfile
 5  * c6-media:
 6 file:///media/CentOS/repodata/repomd.xml: [Errno 14] Could not open/read file://\
 7 /media/CentOS/repodata/repomd.xml
 8 Trying other mirror.
 9 file:///media/cdrecorder/repodata/repomd.xml: [Errno 14] Could not open/read fil\
10 e:///media/cdrecorder/repodata/repomd.xml
11 Trying other mirror.
12 c6-media                                                 | 4.0 kB     00:00 ...
13 Warning: 3.0.x versions of yum would erroneously match against filenames.
14  You can use "*/system-config-network" and/or "*bin/system-config-network" to ge\
15 t that behaviour
16 No Matches found
17 [root@delphos ~]# yum --disablerepo=* --enablerepo=c6-media provides */system-co\
18 nfig-network
19 Loaded plugins: fastestmirror
20 Loading mirror speeds from cached hostfile
21  * c6-media:
22 system-config-network-tui-1.6.0.el6.2-1.el6.noarch : The Network Adminstration
23                                                    : Tool
24 Repo        : c6-media
25 Matched from:
26 Filename    : /usr/share/system-config-network
27 Filename    : /usr/bin/system-config-network
28 Filename    : /etc/pam.d/system-config-network
29 Filename    : /etc/security/console.apps/system-config-network
30 Filename    : /usr/sbin/system-config-network
So we install the package system-config-network-tui with this command: yum –disablerepo=* –enablerepo=c6-media install system-config-network-tui. Once the package is installed, we can launch the program with system-config-network (Fig. 44).
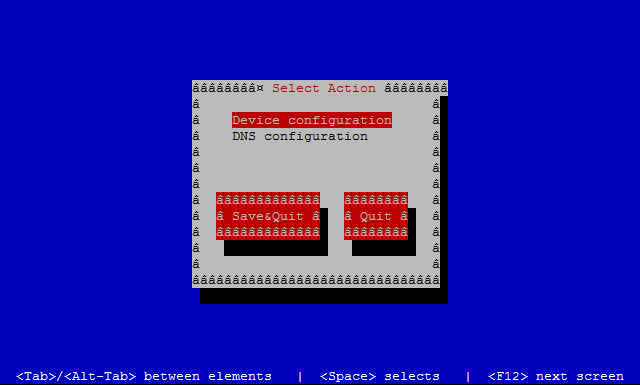
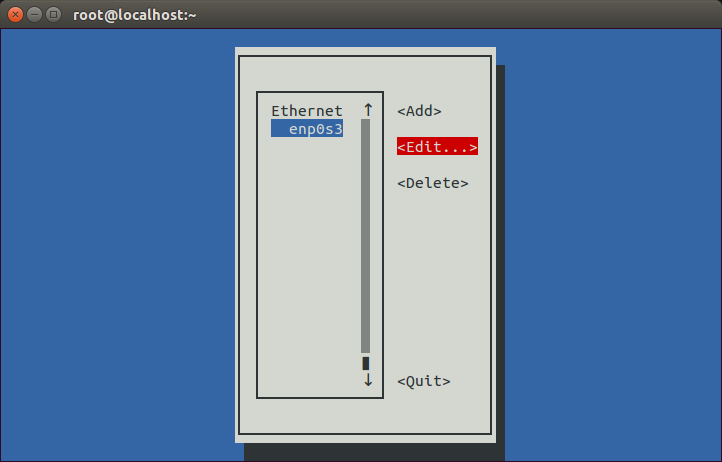
We select the option “Device configuration” and press enter. Now in the screen appears a list with the network interfaces (Fig. 45), in this case there is only one, we choose it and press enter again.
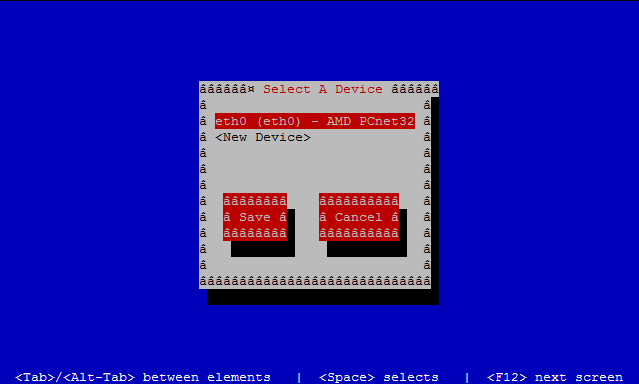
We fulfill the form and click on Ok->Save->Save & Quit (Fig. 46).
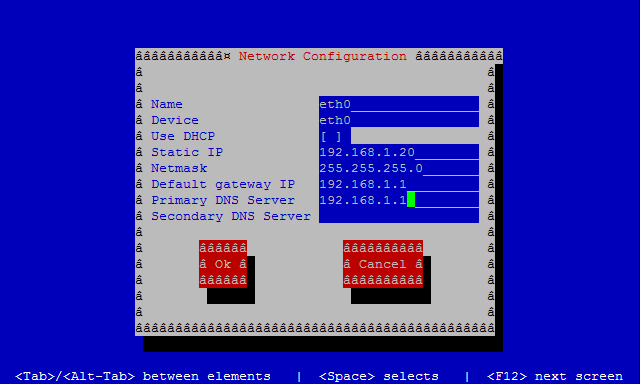
If we check again the /etc/sysconfig/network-scripts/ifcfg-eth0 file, we’ll see that it has updated the file contents. Nevertheless we’ll still have to change manually the parameter “ONBOOT=no” to “ONBOOT=yes”.
3.1.3.2.- Centos 7
In CentOS 7 the ifconfig command is not installed by default, as it is considered deprecated. The use of the utility ip is encouraged instead. We can add an IP address this way:
1 [root@Centos7 ~]# ip address add 192.168.1.202/24 dev enp0s3
We can also list the interfaces and their IP addresses associated.
 1 [root@Centos7 ~]# ip address show
 2 1: lo: <LOOPBACK,UP,LOWER_UP> mtu 65536 qdisc noqueue state UNKNOWN
 3     link/loopback 00:00:00:00:00:00 brd 00:00:00:00:00:00
 4     inet 127.0.0.1/8 scope host lo
 5        valid_lft forever preferred_lft forever
 6     inet6 ::1/128 scope host
 7        valid_lft forever preferred_lft forever
 8 2: enp0s3: <BROADCAST,MULTICAST,UP,LOWER_UP> mtu 1500 qdisc pfifo_fast state UP \
 9 qlen 1000
10     link/ether 08:00:27:a0:46:d2 brd ff:ff:ff:ff:ff:ff
11     inet 192.168.1.202/24 scope global enp0s3
12        valid_lft forever preferred_lft forever
As it happened in CentOS 6, the IP address we have just assigned will be temporary. If we want to make it persistent we’ll have to edit the /etc/sysconfig/network-scripts/ifcfg-enp0s3 file and add the following lines:
1 IPADDR=192.168.10.19
2 BOOTPROTO=static
3 NETMASK=255.255.255.0
4 TYPE=Ethernet
We’ll have to set the parameter ONBOOT=yes so that the network interface gets activated every time the system boots.
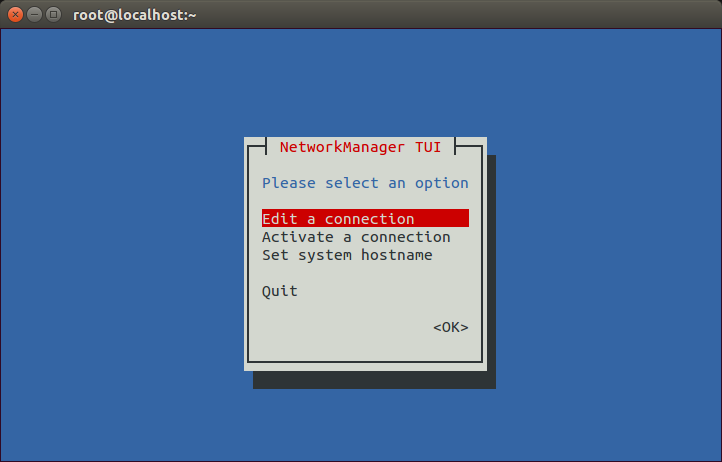
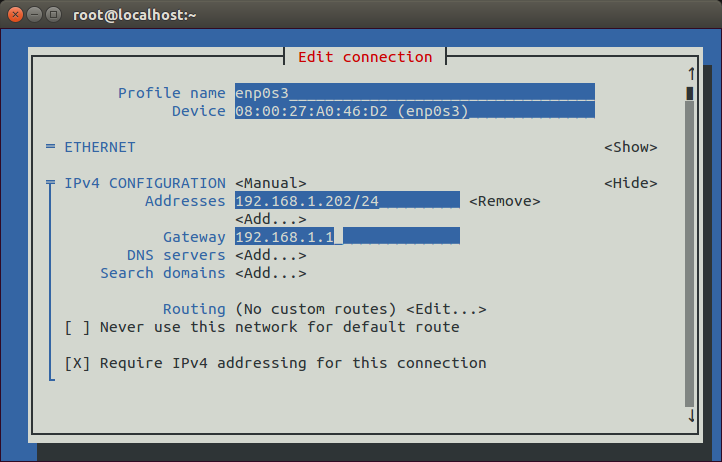
This way we have assigned a static IP address to the server, but it is more convenient to use a network utility. In CentOS 6 we used system-config-network, but this command is not available in CentOS 7, instead we must use nmtui (s. Fig. 47 and Fig. 48).
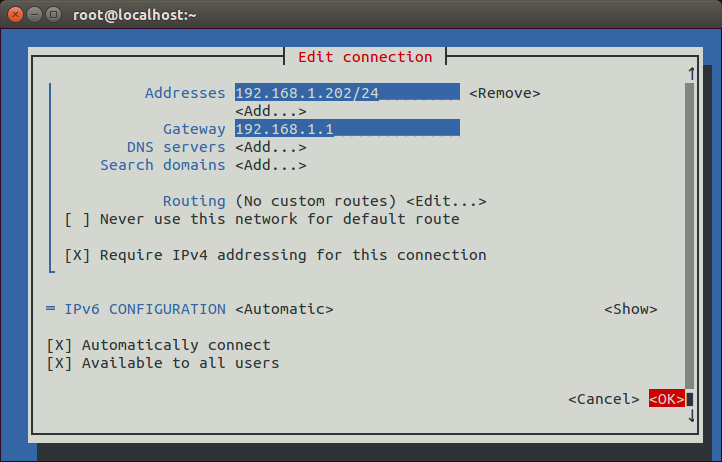
As we haven’t added a default gateway yet we’ll add it now (s. Fig. 49).
We accept the changes (s. Fig. 50).
And we restart the network service.
1 [root@localhost ~]# service network restart
2 Restarting network (via systemctl):                        [  OK  ]
Now we can check the default gateway currently configured with the ip command.
1 [root@localhost ~]# ip route show
2 default via 192.168.1.1 dev enp0s3  proto static  metric 1024
3 192.168.1.0/24 dev enp0s3  proto kernel  scope link  src 192.168.1.202
3.2.- IPv6
When the Internet grew in popularity at one point it became clear that there would come a day in which there would be no more IPv4 addresses available. IPv4 addreses are 4 bytes long, which allows for a maximum of approximately 4.2 billion addresses, whereas the human population is about 7 billion. Obviously not every human being has a computer with an Internet connection - this is specially true in poor countries - but every day more and more people get access to the Internet and it is not unusual at all to have a computer at the office, another computer at home and a smartphone all of them with access to the Internet. Besides, we should take into acount that every server on the Internet needs an unique IP address too.
Considering the facts, it seems pretty reasonable to think that IPv4 will no longer be able to comply with the needs of the Internet in the upcoming years. To solve this problem, the engineers of the IETF(Internet Engineering Task Force) have been working very hard until they came up with a new protocol which they called IPv6. IPv6 uses 128 bit addresses that allow for 3.4 * 10^38 addresses, which should be more than enough for a long time. IPv6 addresses are usually represented in 8 groups of 16 bits in hexadecimal format, like this:
fe80:0000:0000:0000:020c:29ff:fedf:d786/64
The /64 is used to represent the mask as we have seen when we talked about IPv4 addresses. This means that the first 64 bits of the address will define the network address.
When there are many consecutive zeros, the bigger group of zeros can be omitted.
fe80::020c:29ff:fedf:d786/64
As it happened with IPv4 addresses, a few IPv6 addresses have been assigned an special role. Those beginning by fe80 are considered to be link-local addresses. A concept similar to private addresses in the IPv4 world. Whenever a network interface is Ipv6 enabled an IPv6 address beginning with fe80 is assigned to it.
We can assign an IPv6 address to the interface eth0 with the command ip.
1 [root@delphos ~]# ip address add 2000::20c:29ff:fe78:4cb1/64 dev eth0
Now we can see the new ip assigned
 1 [root@delphos ~]# ifconfig eth0
 2 eth0      Link encap:Ethernet  HWaddr 00:0C:29:78:4C:B1
 3           inet addr:192.168.1.20  Bcast:192.168.1.255  Mask:255.255.255.0
 4           inet6 addr: 2000::20c:29ff:fe78:4cb1/64 Scope:Global
 5           inet6 addr: fe80::20c:29ff:fe78:4cb1/64 Scope:Link
 6           UP BROADCAST RUNNING MULTICAST  MTU:1500  Metric:1
 7           RX packets:3911047 errors:25 dropped:14 overruns:0 frame:0
 8           TX packets:264248 errors:0 dropped:0 overruns:0 carrier:0
 9           collisions:0 txqueuelen:1000
10           RX bytes:387910100 (369.9 MiB)  TX bytes:57615841 (54.9 MiB)
11           Interrupt:19 Base address:0x2000
12
13 [root@delphos ~]# ip address show dev eth0
14 2: eth0: <BROADCAST,MULTICAST,UP,LOWER_UP> mtu 1500 qdisc pfifo_fast state UNKNO\
15 WN qlen 1000
16     link/ether 00:0c:29:78:4c:b1 brd ff:ff:ff:ff:ff:ff
17     inet 192.168.1.20/24 brd 192.168.1.255 scope global eth0
18     inet6 2000::20c:29ff:fe78:4cb1/64 scope global
19        valid_lft forever preferred_lft forever
20     inet6 fe80::20c:29ff:fe78:4cb1/64 scope link
21        valid_lft forever preferred_lft forever
3.3.- Networking tools
3.3.1.- netstat
Every time a program needs to communicate with the network it uses what the TCP protocol calls “ports”. A “port” would be a mean to identify a Network service in the network. For instance, to communicate with a Web Server it would use the port 80, to connect to an FTP server we’d have to access to port 21, etc… That is, for every network service running in the server there would be (at least) one open TCP port.
If we want to know how many open ports we currently have we can use netstat. By default it will show only the ports with a connection established.
 1 [root@localhost ~]# netstat
 2 Active Internet connections (w/o servers)
 3 Proto Recv-Q Send-Q Local Address               Foreign Address             Stat\
 4 e
 5 tcp        0      0 192.168.1.20:ssh            192.168.1.1:49775           ESTA\
 6 BLISHED
 7 Active UNIX domain sockets (w/o servers)
 8 Proto RefCnt Flags       Type       State         I-Node Path
 9 unix  2      [ ]         DGRAM                    8587   @/org/kernel/udev/udevd
10 unix  10     [ ]         DGRAM                    10473  /dev/log
11 .
12 .
13 .
In this case we can see we have a single connected tcp port, the ssh port. The command shows many open unix sockets but we’ll ignore them by now. We can pass many options to netstat. Some of the more useful are: (-a) to show ALL the open ports and not only those already connected, (-p) to identify the program which opened the port, (-t) for TCP, (-u) for UDP or (-n) to show the port number instead of the port name. Let’s see an example
 1 [root@localhost ~]# netstat -aptn
 2 Active Internet connections (servers and established)
 3 Proto Recv-Q Send-Q Local Address               Foreign Address             Stat\
 4 e       PID/Program name
 5 tcp        0      0 0.0.0.0:22                  0.0.0.0:*                   LIST\
 6 EN      1107/sshd
 7 tcp        0      0 127.0.0.1:25                0.0.0.0:*                   LIST\
 8 EN      1183/master
 9 tcp        0      0 0.0.0.0:5672                0.0.0.0:*                   LIST\
10 EN      1196/qpidd
11 tcp        0      0 192.168.1.20:22             192.168.1.1:50316           ESTA\
12 BLISHED 6738/sshd
13 tcp        0      0 :::22                       :::*                        LIST\
14 EN      1107/sshd
15 tcp        0      0 ::1:25                      :::*                        LIST\
16 EN      1183/master
We get the list of all the open TCP ports, showing the port numbers, and the programs associated.
3.3.2.- lsof
Another really useful tool is lsof. It will probabbly not be installed by default, but we can install it with yum as we have seen before.
1 [root@localhost ~]# yum --disablerepo=* --enablerepo=c6-media provides lsof
2 Loaded plugins: fastestmirror
3 Loading mirror speeds from cached hostfile
4  * c6-media:
5 lsof-4.82-2.el6.i686 : A utility which lists open files on a Linux/UNIX system
6 Repo        : c6-media
7 Matched from:
8
9 [root@localhost ~]# yum --disablerepo=* --enablerepo=c6-media install lsof
This tool lists the open files in the system, but we can use it to see what process is listening in a given port.
1 [root@localhost ~]# lsof -i :53
2 COMMAND  PID  USER   FD   TYPE DEVICE SIZE/OFF NODE NAME
3 named   8616 named   20u  IPv6  27844      0t0  TCP *:domain (LISTEN)
4 named   8616 named   21u  IPv4  27849      0t0  TCP localhost:domain (LISTEN)
5 named   8616 named   22u  IPv4  27851      0t0  TCP 192.168.1.20:domain (LISTEN)
6 named   8616 named  512u  IPv6  27843      0t0  UDP *:domain
7 named   8616 named  513u  IPv4  27848      0t0  UDP localhost:domain
8 named   8616 named  514u  IPv4  27850      0t0  UDP 192.168.1.20:domain
3.3.3.- nmap
Sometimes we need to know the open ports that can be accesed through the network. It could happen that a service is listening in a port in the local machine, but a firewall or a filter of some kind exists between the server and the client. In this case, obviously, there would be no communication between the two computers. To prove whether a port is accesible or not we can use nmap.
The basic syntax is nmap name_or_ip:
 1 [root@localhost named]# nmap 192.168.1.20
 2
 3 Starting Nmap 5.21 ( http://nmap.org ) at 2014-08-03 02:31 CEST
 4 mass_dns: warning: Unable to determine any DNS servers. Reverse DNS is disabled.\
 5  Try using --system-dns or specify valid servers with --dns-servers
 6 Nmap scan report for 192.168.1.20
 7 Host is up (0.00071s latency).
 8 Not shown: 998 filtered ports
 9 PORT   STATE SERVICE
10 22/tcp open  ssh
11 53/tcp open  domain
12 MAC Address: 00:0C:29:78:4C:B1 (VMware)
13
14 Nmap done: 1 IP address (1 host up) scanned in 5.29 seconds
15 [root@localhost named]#
We can also specify the ports we want to check.
 1 [root@localhost named]# nmap -p 80,22 192.168.1.20
 2
 3 Starting Nmap 5.21 ( http://nmap.org ) at 2014-08-03 03:05 CEST
 4 mass_dns: warning: Unable to determine any DNS servers. Reverse DNS is disabled.\
 5  Try using --system-dns or specify valid servers with --dns-servers
 6 Nmap scan report for 192.168.1.20
 7 Host is up (0.00024s latency).
 8 PORT   STATE    SERVICE
 9 22/tcp open     ssh
10 80/tcp filtered http
11 MAC Address: 00:0C:29:78:4C:B1 (VMware)
12
13 Nmap done: 1 IP address (1 host up) scanned in 0.08 seconds
14 [root@localhost named]#
We can also get some more information about the services listening in every port.
 1 [root@localhost named]# nmap -sV 192.168.1.20
 2
 3 Starting Nmap 5.21 ( http://nmap.org ) at 2014-08-03 03:07 CEST
 4 Nmap scan report for delphos.olimpus.local (192.168.1.20)
 5 Host is up (0.00034s latency).
 6 Not shown: 998 filtered ports
 7 PORT   STATE SERVICE VERSION
 8 22/tcp open  ssh     OpenSSH 5.3 (protocol 2.0)
 9 53/tcp open  domain
10 MAC Address: 00:0C:29:78:4C:B1 (VMware)
11
12 Service detection performed. Please report any incorrect results at http://nmap.\
13 org/submit/ .
14 Nmap done: 1 IP address (1 host up) scanned in 16.86 seconds
15 [root@localhost named]#
3.3.4.- ping
One of the simplest an most useful utilities to diagnose networking problems is ping. With ping we simply send a small data packet to a destination. If the packet arrives, the destination usually will answer back.
1 [root@delphos ~]# ping 192.168.10.23
2 PING 192.168.10.23 (192.168.10.23) 56(84) bytes of data.
3 64 bytes from 192.168.10.23: icmp_seq=1 ttl=63 time=2.76 ms
4 64 bytes from 192.168.10.23: icmp_seq=2 ttl=62 time=1.59 ms
3.3.5.- ping6
Ping6 is the IPv6 version of the ping command. It works the same way but using IPv6 addresses.
1 [root@CentOS7 ~]# ping6 2001::20c:29ff:fe78:4cb2
2 PING 2001::20c:29ff:fe78:4cb2(2001::20c:29ff:fe78:4cb2) 56 data bytes
3 64 bytes from 2001::20c:29ff:fe78:4cb2: icmp_seq=1 ttl=64 time=0.083 ms
4 64 bytes from 2001::20c:29ff:fe78:4cb2: icmp_seq=2 ttl=64 time=0.080 ms
If we try to ping a link local address (those starting with fe80), we need to specify the interface. Otherwise we’d get an error.
 1 [root@delphos ~]# ping6 fe80::20c:29ff:fe78:4cb1
 2 connect: Invalid argument
 3 [root@delphos ~]# ping6 -I eth0 fe80::20c:29ff:fe78:4cb1
 4 PING fe80::20c:29ff:fe78:4cb1(fe80::20c:29ff:fe78:4cb1) from fe80::20c:29ff:fe78\
 5 :4cb1 eth0: 56 data bytes
 6 64 bytes from fe80::20c:29ff:fe78:4cb1: icmp_seq=1 ttl=64 time=3.70 ms
 7 64 bytes from fe80::20c:29ff:fe78:4cb1: icmp_seq=2 ttl=64 time=0.111 ms
 8 64 bytes from fe80::20c:29ff:fe78:4cb1: icmp_seq=3 ttl=64 time=0.044 ms
 9 ^C
10 --- fe80::20c:29ff:fe78:4cb1 ping statistics ---
11 3 packets transmitted, 3 received, 0% packet loss, time 2300ms
12 rtt min/avg/max/mdev = 0.044/1.285/3.701/1.708 ms