5.- DHCP
As we all know, to connect to a network every computer needs an IP address. In small networks is not a problem to assign manually a different IP address to every computer, but when working with tens or hundreds of network devices we’d need to be very careful in order not to make mistakes.
To make things easier we could delegate this task to the DHCP service. What DHCP does is esentially provide IP addresses to all the network devices.
In fact, it can provide not only IP addresses, but also parameters such as default gateway, dns server, etc…
The way the DHCP protocol works is quite simple. In the case of DHCPv4 -the DHCP version that works with IPv4- when the dhcp client boots up it sends a DHCP Discover message to the network, this way it tries to find a DHCP server available. If there is one (or more) DHCP servers in the network, it will answer back with a DHCP offer message. When the client gets one of these DHCP offer messages it will send back a DHCP request to the server, the server, in turn, replies with a DHCP ack and the address is assigned.

In the case of DHCPv6 the procedure is not the same but it doesn’t differs too much. Here the client sends a DHCP solicitation message, to which the server replies with an Advertise. Once the client gets the advertise message it sends a request back to the server and the server answers with a reply finishing the process.
5.1.- Installing a DHCP server
To convert our CentOS server into a DHCP server we just need to install the dhcp package.
1 [root@centos2 ~]# yum install dhcp
This will create a new service in /etc/init.d called dhcpd. As we did when we installed the DNS service, we configure the dhcpd service to start automatically with every reboot.
In CentOS 6:
1 [root@centos2 ~]# chkconfig dhcpd on
In CentOS 7:
1 [root@CentOS7 ~]# systemctl enable dhcpd
2 ln -s '/usr/lib/systemd/system/dhcpd.service' '/etc/systemd/system/multi-user.ta\
3 rget.wants/dhcpd.service'
The server configuration will be stored in two different files: /etc/dhcp/dhcpd.conf and /etc/dhcp/dhcpd6.conf. The first one will have the configuration options associated with IPv4, whereas the second one will do the same with IPv6 parameters. After a fresh install, both files are empty but we have two sample files we can use as a starting point: /usr/share/doc/dhcp-4.1.1/dhcpd.conf.example and /usr/share/doc/dhcp-4.1.1/dhcpd6.conf.example.
NOTE: The exact location of the sample files will differ according to the CentOS version we are using. For instance if we’re using CentOS 7.0 the files are located in /usr/share/doc/dhcp-4.2.5/dhcpd.conf.example and /usr/share/doc/dhcp-4.2.5/dhcpd6.conf.example
The easiest way to configure the new DHCP server is probably to overwrite the default (empty) configuration files with the two sample files previously mentioned.
1 [root@localhost ~]# cp /usr/share/doc/dhcp-4.1.1/dhcpd.conf.sample /etc/dhcp/dhc\
2 pd.conf
3 cp: overwrite `/etc/dhcp/dhcpd.conf'? y
4 [root@localhost ~]# cp /usr/share/doc/dhcp-4.1.1/dhcpd6.conf.sample /etc/dhcp/dh\
5 cpd6.conf
6 cp: overwrite `/etc/dhcp/dhcpd6.conf'? y
We’ll comment out all the lines in both files to start adding our directives one by one. We can do this easily with the sed and tee commands:
1 [root@localhost ~]# sed s/^/#/ /etc/dhcp/dhcpd.conf | tee /etc/dhcp/dhcpd.conf
2 [root@localhost ~]# sed s/^/#/ /etc/dhcp/dhcpd6.conf | tee /etc/dhcp/dhcpd6.conf
Now we’re ready to start configuring our DHCP server.
5.1.1.- DHCPv4
If we take a look at the /etc/dhcp/dhcpd.conf file we can see the many parameters we can assign to the DHCP clients, such as domain-name, domain-servers, etc…
To start with a very basic configuration we can create the following subnet:
1 subnet 192.168.1.0 netmask 255.255.255.0 {
2 range 192.168.1.40 192.168.1.43;
3 }
We have defined a range of addresses from 192.168.1.40 to 192.168.1.43, which will be assigned to the DHCP clients. Of course the DHCP server should have at least one IP address beloging to the 192.168.1.0/24 network. We can check that the syntax of the file is correct with the following command:
1 [root@localhost ~]# dhcpd -t /etc/dhcp/dhcpd.conf
2 Internet Systems Consortium DHCP Server 4.1.1-P1
3 Copyright 2004-2010 Internet Systems Consortium.
4 All rights reserved.
5 For info, please visit https://www.isc.org/software/dhcp/
6 Not searching LDAP since ldap-server, ldap-port and ldap-base-dn were not specif\
7 ied in the config file
In CentOS 7 the interface names are longer than they used to be in CentOS 6, so when checking the dhcpd.conf file syntax we might get this warning:
 1 [root@CentOS7 ~]# dhcpd -t /etc/dhcp/dhcpd.conf
 2 /etc/dhcp/dhcpd.conf: interface name too long (is 20)
 3
 4 This version of ISC DHCP is based on the release available
 5 on ftp.isc.org.  Features have been added and other changes
 6 have been made to the base software release in order to make
 7 it work better with this distribution.
 8
 9 Please report for this software via the CentOS Bugs Database:
10     http://bugs.centos.org/
11
12 exiting.
But this shouldn’t be a problem for the dhcpd service to work properly.
We start the service and the clients will be able to receive the addresses specified in the pool.
1 [root@localhost ~]# service dhcpd start
2 Starting dhcpd:                                            [  OK  ]
3 [root@localhost ~]#
If the client is a windows computer we can force it to renew its IP address this way (s. Fig. 55):
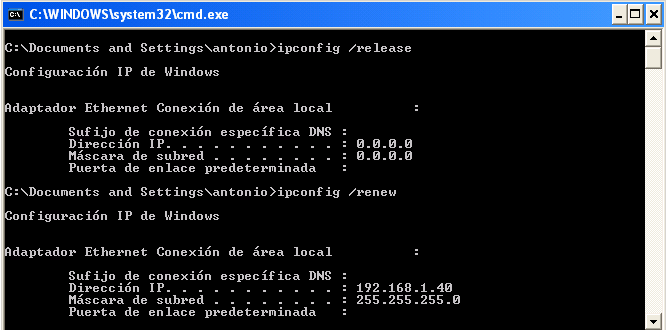
As we can see, the IP assigned is 192.168.1.40
We can also see it in the server itself, by looking at the /var/lib/dhcpd/dhcpd.leases file.
 1 .
 2 .
 3 .
 4 lease 192.168.1.40 {
 5 starts 5 2013/09/13 08:49:48;
 6 ends 5 2013/09/13 20:49:48;
 7 cltt 5 2013/09/13 08:49:48;
 8 binding state active;
 9 next binding state free;
10 hardware ethernet 00:0c:29:fe:08:d4;
11 uid "\001\000\014)\376\010\324";
12 clienthostname
13 "windowscli";
14 }
15 .
16 .
17 .
We have seen before that the server can provide more parameters to the client through DHCP. An example a bit more advanced could be this one.
1 subnet 192.168.1.0 netmask 255.255.255.0 {
2 range 192.168.1.40 192.168.1.43;
3 option domain-name-servers 192.168.1.133;
4 option routers 192.168.1.20;
5 }
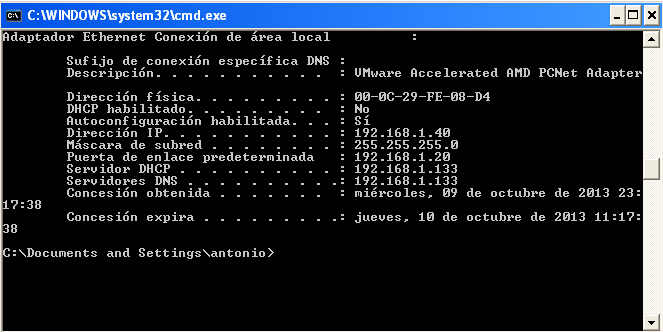
In this case we supply the default gateway and the name server address. If we force the client to renew the lease this is what we’ll see (s. Fig. 56).
Dynamically assigned IP’s could change through time, but the DHCP allows us to assign always the same IP to a certain client. To do it we just add the following directive.
1 host windowscli {
2 hardware ethernet 00:0C:29:FE:08:D4;
3 fixedaddress 192.168.1.55;
4 }
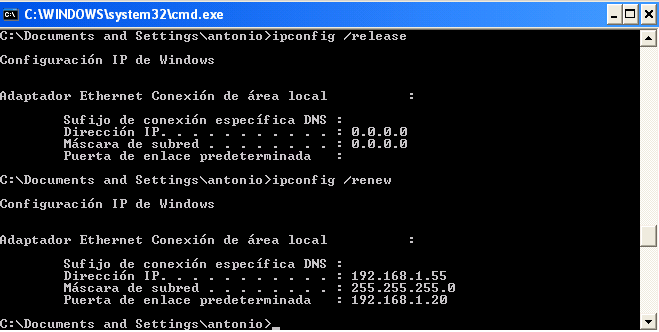
Once the dhcpd service is restarted, the client with the 00:0C:29:FE:08:D4 MAC address will always be assigned the IP 192.168.1.55 (s. Fig. 57).
Of course, the address specified shouldn’t be included in any range like the one we defined earlier. Otherwise, we take the risk of having two computers with the same IP address in the network, which is not a good idea at all!
5.1.2.- DHCPv6
The procedure to assign IPv6 parameters to the client through DHCP is almost the same than the one we saw for IPv4. But in this case the configuration file we have to modify is /etc/dhcp/dhcpd6.conf.
The options are quite similar, for instance to assign a single IPv6 address we shoud add this:
1 subnet6 fe80::/64 {
2         range6 fe80::4321 fe80::4322;
3 }
And when we’re done we start the dhcpd6 service.
In Centos 6:
1 [root@localhost dhcp]# service dhcpd6 restart
2 Starting dhcpd (DHCPv6):                                   [  OK  ]
In CentOS 7:
1 [root@CentOS7 ~]# systemctl restart dhcpd6
We’ll also have to permit in the firewall the traffic to udpv6 port 547.
In CentOS 6:
1 [root@localhost dhcp]# ip6tables -I INPUT 2 -m state --state NEW -m udp -p udp -\
2 -dport 547 -j ACCEPT
In CentOS 7:
1 [root@CentOS7 ~]# firewall-cmd --add-service=dhcpv6
2 success
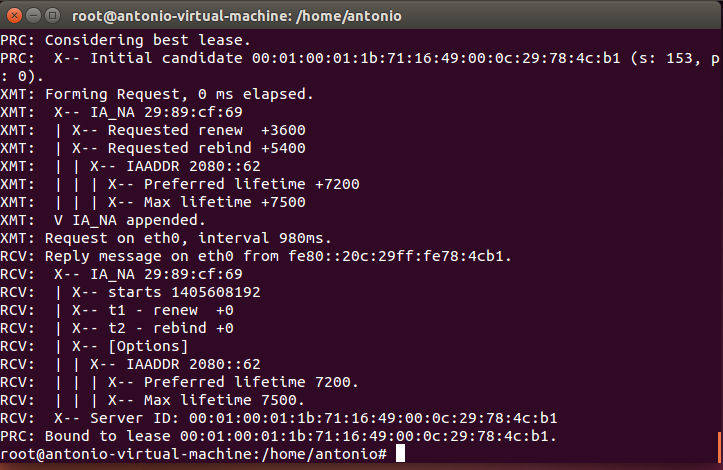
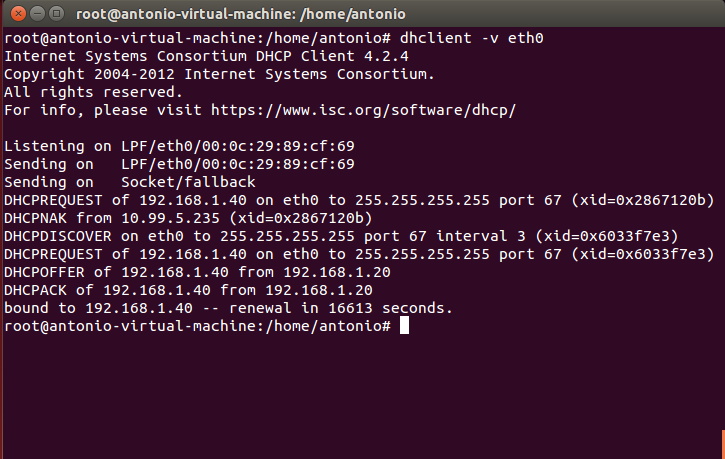
Now we force the client to ask for a lease. If the client is a Linux computer, we use the command dhclient with the parameter (-6) to specify IPv6.
1 [root@localhost dhcp]# dhclient -6 eth0 -v
If everything goes as expected we’ll see in the screen something like this(s. Fig. 58):
As we can see, the computer has now the new IPv6 address assigned (s. Fig. 59).
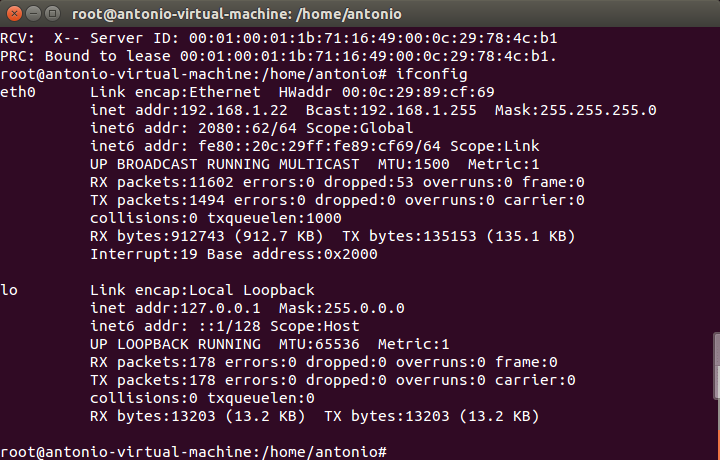
In the server we can also see the new lease in the file /var/lib/dhcpd/dhcpd6.leases.
1 ia-na "\376\017\000\016\000\001\000\001\030\210p\377\000\017\376\343\350]" {
2   cltt 0 2014/08/03 17:34:39;
3   iaaddr 2080::61 {
4     binding state active;
5     preferred-life 27000;
6     max-life 43200;
7     ends 1 2014/08/04 05:34:39;
8   }
9 }
5.2.- Troubleshooting and diagnostic tools
As it happens to be that the interaction between the DHCP server and the client takes place before a real TCP connection is established, the tools available to detect errors are somehow limited.
One thing that can be done is using the OS tools to force the renewal of an IP address.
In Windows:
1 ipconfig /release
2 ipconfig /renew
In Linux:
For DHCPv4:
1 dhclient -r
2 dhclient -s direccion_IP_del_servidor_dhcp
For DHCPv6:
1 dhclient -6 -r
2 dhclient -6
We can go one step forward and monitor the DHCP network traffic. We can easily do that with the following command:
1 [root@CentOS ~]# tcpdump -w salida.dump -s 1500 -vv port bootps or port bootpc
2 tcpdump: listening on eth0, link-type EN10MB (Ethernet), capture size 1500 bytes
In Centos 7 we’ll probably have to specify the interface name. As we saw previously we can list the interfaces with ip address show.
 1 [root@CentOS7 ~]# ip address show
 2 1: lo: <LOOPBACK,UP,LOWER_UP> mtu 65536 qdisc noqueue state UNKNOWN
 3     link/loopback 00:00:00:00:00:00 brd 00:00:00:00:00:00
 4     inet 127.0.0.1/8 scope host lo
 5        valid_lft forever preferred_lft forever
 6     inet6 ::1/128 scope host
 7        valid_lft forever preferred_lft forever
 8 2: eno16777736: <BROADCAST,MULTICAST,UP,LOWER_UP> mtu 1500 qdisc pfifo_fast stat\
 9 e UP qlen 1000
10     link/ether 00:0c:29:c4:f2:f2 brd ff:ff:ff:ff:ff:ff
11     inet 192.168.10.23/24 brd 192.168.10.255 scope global eno16777736
12        valid_lft forever preferred_lft forever
13     inet6 fe80::20c:29ff:fec4:f2f2/64 scope link
14        valid_lft forever preferred_lft forever
So in this example we have to specify the interface eno16777736.
1 [root@CentOS7 ~]# tcpdump -i eno16777736 -w salida.dump -s 1500 -vv port bootps \
2 or port bootpc
3 tcpdump: listening on eno16777736, link-type EN10MB (Ethernet), capture size 150\
4 0 bytes
Of course we’ll have to substitute eno16777736 for name of the interface in our server.
This way we tell tcpdump to record all traffic related with DHCPv4 (ports bootps and bootpc) in the salida.dump file. If we want to capture the DHCPv6 traffic the command will be similar:
1 [root@localhost ~]# tcpdump -w salidav6.dump -s 1500 -vv -i eth0 ip6
When we want to finish the capture we can do it at any time by pressing Ctrl-c.
The file generated can be read by tcpdump itself.
 1 [root@localhost ~]# tcpdump -r salidav6.dump -vv
 2 reading from file salidav6_2.dump, link-type EN10MB (Ethernet)
 3 21:08:00.663163 IP6 (hlim 1, next-header Options (0) payload length: 36) fe80::2\
 4 0c:29ff:fe78:4cb1 > ff02::16: HBH (rtalert: 0x0000) (padn)[icmp6 sum ok] ICMP6, \
 5 multicast listener report v2, length 28, 1 group record(s) [gaddr ff05::1:3 to_e\
 6 x { }]
 7 21:08:01.355955 IP6 (hlim 1, next-header UDP (17) payload length: 113) fe80::f97\
 8 8:3ba9:55c5:1d38.dhcpv6-client > ff02::1:2.dhcpv6-server: [udp sum ok] dhcp6 sol\
 9 icit (xid=5dbf1f (elapsed-time 1500) (client-ID hwaddr/time type 1 time 43447933\
10 9 000ffee3c6cf) (IA_NA IAID:234885118 T1:0 T2:0) (Client-FQDN) (vendor-class) (o\
11 ption-request DNS-name DNS vendor-specific-info Client-FQDN))
12 21:08:01.357247 IP6 (hlim 64, next-header UDP (17) payload length: 96) fe80::20c\
13 :29ff:fe78:4cb1.dhcpv6-server > fe80::f978:3ba9:55c5:1d38.dhcpv6-client: [udp su\
14 m ok] dhcp6 advertise (xid=5dbf1f (client-ID hwaddr/time type 1 time 434479339 0\
15 00ffee3c6cf) (server-ID hwaddr/time type 1 time 460396105 000c29784cb1) (status-\
16 code no addresses))
17 21:08:01.957120 IP6 (hlim 255, next-header ICMPv6 (58) payload length: 32) fe80:\
18 :fd53:b4bf:a082:24ab > fe80::20c:29ff:fe78:4cb1: [icmp6 sum ok] ICMP6, neighbor \
19 solicitation, length 32, who has fe80::20c:29ff:fe78:4cb1
20           source link-address option (1), length 8 (1): 24:be:05:05:4f:a9
21             0x0000:  24be 0505 4fa9
22 21:08:01.957160 IP6 (hlim 255, next-header ICMPv6 (58) payload length: 24) fe80:\
23 :20c:29ff:fe78:4cb1 > fe80::fd53:b4bf:a082:24ab: [icmp6 sum ok] ICMP6, neighbor \
24 advertisement, length 24, tgt is fe80::20c:29ff:fe78:4cb1, Flags [solicited]
25 21:08:01.960569 IP6 (hlim 1, next-header UDP (17) payload length: 115) fe80::3cf\
26 8:8ec6:71e3:61b8.dhcpv6-client > ff02::1:2.dhcpv6-server: [udp sum ok] dhcp6 sol\
27 icit (xid=73811e (elapsed-time 6300) (client-ID hwaddr/time type 1 time 42188220\
28 2 000ffee3de6f) (IA_NA IAID:234885118 T1:0 T2:0) (Client-FQDN) (vendor-class) (o\
29 ption-request DNS-name DNS vendor-specific-info Client-FQDN))
30 21:08:01.963141 IP6 (hlim 255, next-header ICMPv6 (58) payload length: 32) fe80:\
31 :20c:29ff:fe78:4cb1 > ff02::1:ffe3:61b8: [icmp6 sum ok] ICMP6, neighbor solicita\
32 tion, length 32, who has fe80::3cf8:8ec6:71e3:61b8
33           source link-address option (1), length 8 (1): 00:0c:29:78:4c:b1
34             0x0000:  000c 2978 4cb1
35 21:08:01.963671 IP6 (hlim 255, next-header ICMPv6 (58) payload length: 32) fe80:\
36 :3cf8:8ec6:71e3:61b8 > fe80::20c:29ff:fe78:4cb1: [icmp6 sum ok] ICMP6, neighbor \
37 advertisement, length 32, tgt is fe80::3cf8:8ec6:71e3:61b8, Flags [solicited, ov\
38 erride]
39           destination link-address option (2), length 8 (1): 00:0f:fe:e3:de:6f
40 .
41 .
42 .
But it is probably much clearer opening the file in wireshark. Wireshark is a graphic network protocol analyzer currently available for Linux, MacOS X as well as for Windows. It can be installed in CentOS with yum (yum install wireshark), or it can be directly downloaded from https://www.wireshark.org and installed in Windows or MacOS X.
Wireshark is a graphic application so it needs a graphic environment to run. This is not a problem in Windows and MacOS X, but in the case of Linux the graphic environment might not be installed by default. If that’s the case we shoud install it with “yum groupinstall desktop” (in CentOS). Another possible solution could be to export the X11 protocol to another computer with X windows, but that’s something we’ll see later when we talk about Remote Access.
Anyway, if we want to open the files in a different machine we should transfer them. If the destination computer is a Linux box we can use scp (see the upcoming section Remote Access for more details). Or, if we want to copy the file to a Windows machine we could use a program like WinSCP.
Once transferred the file, we can open it in Wireshark through File -> Open and we’ll see something similar to the Fig. 60 and Fig. 61.
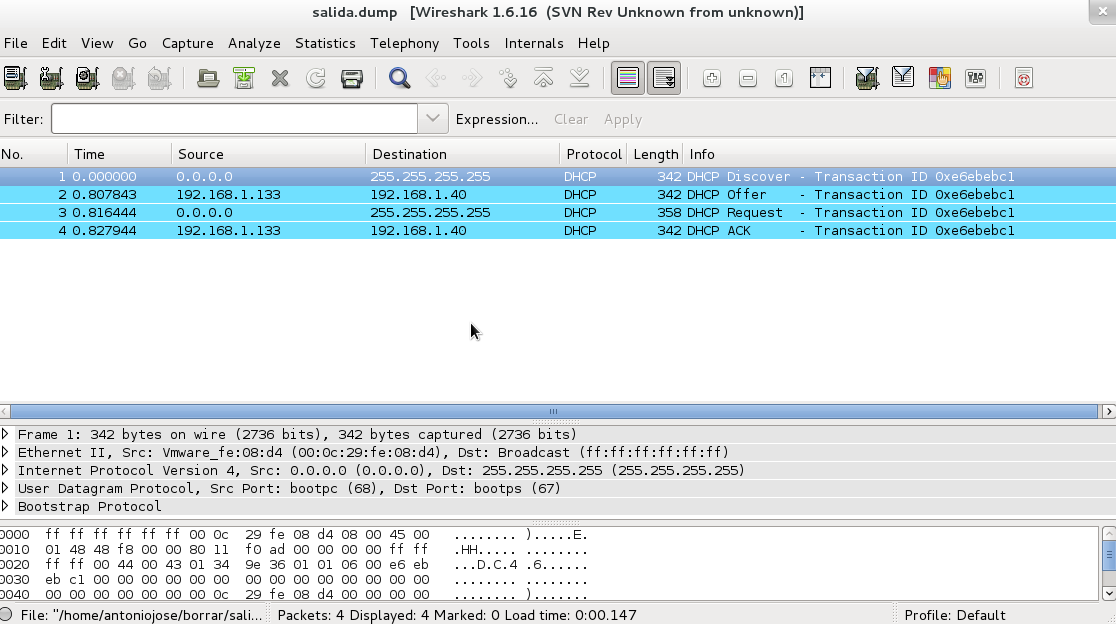
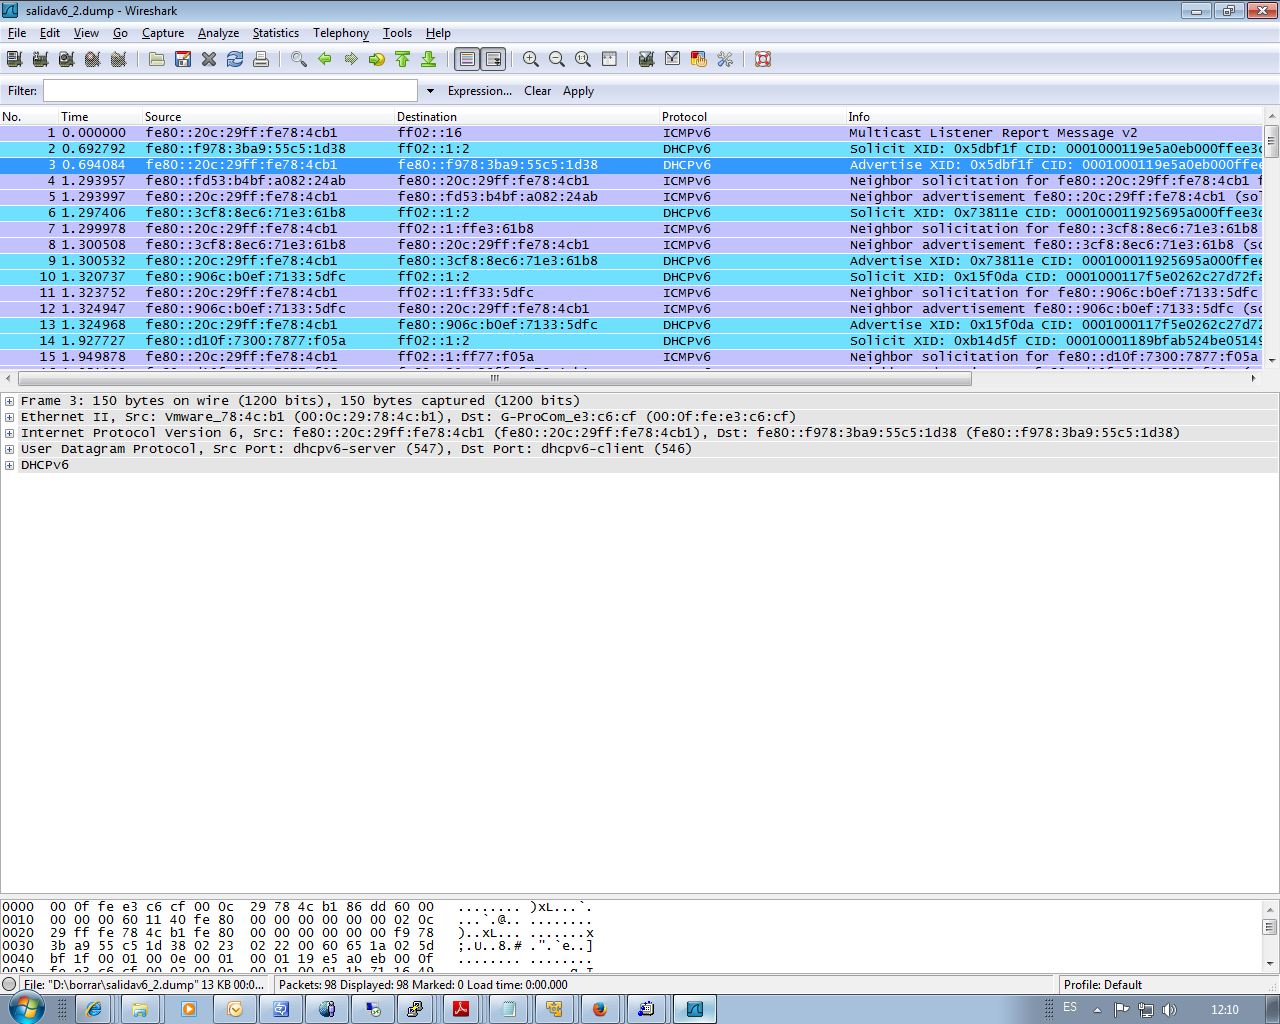
In both cases we can see the interaction between the server and the DHCP client. By clicking any packet we can see more details as the address offered, the lease time, etc…
5.3.- DHCP and DNS Dynamic update
As we have seen, the Domain Name System states that a name corresponds to a certain Ip address. On the other hand, the DHCP service is in charge of assigning IP addresses to the clients.
So if we have in our network a DNS and DHCP server, the clients will be assigned IP addresses that could change in time, so the list of names and associated IPs has to be updated accordingly every time a change takes place. In order to achieve that, we can use the Dynamic DNS Update. This requires some changes in the configuration of both DNS and DHCP server. From now on we suppose we have a working DNS server with at least a master zone. We’ll assume DNSSEC is not activated so we need the following parameters in /etc/named.conf.
1 dnssec-enable no;
2 dnssec-validation no;
Besides, the zone files shouldn’t be signed, so instead of olimpus.local.zone.signed we should use olimpus.local.zone.
 1 .
 2 .
 3 .
 4 zone "olimpus.local" IN {
 5         type master;
 6         file "olimpus.local.zone";
 7         notify yes;
 8 };
 9 .
10 .
11 .
To allow for the dynamic updating of a zone file we must add the following directive in the zone definition.
1 allow-update { localhost; };
This means that the localhost is authorized to update the zone. Of course this is only valid if the DHCP server and the DNS server are actually the same, otherwise we’ll have to change localhost with the address of the DHCP server. The corresponding section of the /etc/named.conf would be something like this.
 1 .
 2 .
 3 .
 4 zone "olimpus.local" IN {
 5         type master;
 6         file "olimpus.local.zone";
 7         notify yes;
 8         allow-update { localhost; };
 9 };
10
11 zone "1.168.192.in-addr.arpa" IN {
12         type master;
13         file "192.168.1.zone";
14         notify yes;
15         allow-update { localhost; };
16 };
17
18 zone "0.0.0.0.0.0.0.0.0.0.0.0.0.8.e.f.ip6.arpa" IN {
19         type master;
20         file "fe80.0.0.0.zone";
21         notify yes;
22         allow-update { localhost; };
23 };
24
25 .
26 .
27 .
After checking there are no errors, we restart the service.
1 [root@centosv6 ~]# namedcheckconf
2 [root@centosv6 ~]# service named restart
3 Stopping named: . [ OK ]
4 Starting named: [ OK ]
When activating this characteristic, bind doesn’t change the zone files inmediately. Instead, it maintains a jnl file for each zone where it stores the changes. Because of this we need to be sure that the directory where the zone files are stored has the appropiate permissions.
1 [root@localhost named]# ls -ld /var/named/
2 drwxr-x---. 5 root named 4096 Aug  3 16:25 /var/named/
In this case we need to add write permission to the group named.
1 [root@localhost named]# chmod g+w /var/named/
2 [root@localhost named]# ls -ld /var/named/
3 drwxrwx---. 5 root named 4096 Aug  3 16:25 /var/named/
We’ll have to check SELinux too, as there is a value that could affect.
1 [root@centosv6 ~]# getsebool named_write_master_zones
2 named_write_master_zones > off
If this value is set to “off” bind won’t be able to create the necessary files, so we’d have to change it with the following command.
1 [root@centosv6 ~]# setsebool -P named_write_master_zones on
2 [root@localhost ~]# getsebool named_write_master_zones
3 named_write_master_zones --> on
Now we’ll make a little test to check that everything is working as expected. First of all we see the registers in the zone.
 1 [root@localhost ~]# dig @192.168.1.20 axfr olimpus.local
 2
 3 ; <<>> DiG 9.7.3-P3-RedHat-9.7.3-8.P3.el6 <<>> @192.168.1.20 axfr olimpus.local
 4 ; (1 server found)
 5 ;; global options: +cmd
 6 olimpus.local.          172800  IN      SOA     olimpus.local. root.olimpus.loca\
 7 l. 2014090103 60 7200 604800 172800
 8 olimpus.local.          172800  IN      DNSKEY  256 3 5 AwEAAb386KgB7QrWAWBZ9+uS\
 9 aHjHmpW+3TpcGkCfh9T4Znl6BJVb/kPp 6DmfeTRzjFUQSbAGRiI3yvzJ9+iEUhradME=
10 olimpus.local.          172800  IN      DNSKEY  257 3 5 AwEAAeGilVrj9hxnmjRY9Yd9\
11 SqrBMwtiqKwfSda3wXhnd3koFZQzVI12 9xRVxEhaXpQvcH4tZG724hE/NF/zq6jIH2q6OtU0poslWLn\
12 RTE4Cte0E MP/Q4dSpSzLqjT4+cPrwFyfgvv7q+dHBHJ0TiWJjeSffFDFcACPfqY3K IFHNxgD3bBwdO\
13 /GXgLDACBVoH7qVCNRBosuji24lmxwYu9qO0qX5sTF1 mhmKpOm4u02CEVhSnTeXlER4XermehqLhOLl\
14 odWlR75EmAYc13SvMS9C oFc66eXEOpSLOl7F9eZQ/RHh/Wobx74moN1uSwP32fTYhJZr3GXOTey+ kf\
15 npvhBIxXRa6nbB2jfLsN0PMb4ZEYTAXOICtevRDYptuM3ytakPd3el Nfrmpx9vxkFMye1/18diS/VWX\
16 D7RBc8wpbK0aQBMYV94dKhBa3F6SV9t bXF7nTadG7k0I+US0kUSfppCjWr+TTwdfvGRe/M7XPM1riBv\
17 /zUgSp7X zOKWdYT2mQjPR4xl21FcsSwytehCWoS+xGEd3y9AaW7RHAwPjeexMR30 458/h1cqQcEsQC\
18 Qltl3uboqjFon3s4iHcHIqtpnBUC/TaonMA39pBTXt VFPO+EV3YJBKFgGf1qZRW9aFAU+BHAnaRt2sv\
19 PmBId7n4O778a14Jgac o4b64Y6Ij3Mx8as5
20 olimpus.local.          172800  IN      NS      delphos.olimpus.local.
21 olimpus.local.          172800  IN      NS      prometheus.olimpus.local.
22 olimpus.local.          172800  IN      MX      10 prometheus.olimpus.local.
23 aphrodite.olimpus.local. 172800 IN      A       192.168.1.22
24 delphos.olimpus.local.  172800  IN      AAAA    fe80::20c:29ff:fe78:4cb1
25 delphos.olimpus.local.  172800  IN      A       192.168.1.20
26 dns.olimpus.local.      172800  IN      CNAME   delphos.olimpus.local.
27 mail.olimpus.local.     172800  IN      CNAME   prometheus.olimpus.local.
28 prometheus.olimpus.local. 172800 IN     AAAA    fe80::20c:29ff:feeb:4443
29 prometheus.olimpus.local. 172800 IN     A       192.168.1.21
30 vulcan.olimpus.local.   172800  IN      AAAA    fe80::20c:29ff:fedf:d786
31 vulcan.olimpus.local.   172800  IN      A       192.168.1.23
32 olimpus.local.          172800  IN      SOA     olimpus.local. root.olimpus.loca\
33 l. 2014090103 60 7200 604800 172800
34 ;; Query time: 4 msec
35 ;; SERVER: 192.168.1.20#53(192.168.1.20)
36 ;; WHEN: Mon Aug  4 06:49:34 2014
37 ;; XFR size: 16 records (messages 1, bytes 989)
We’ll try to add the register neptune.olimpus.local and delete the register vulcan.olimpus.local. To do it we’ll use the tool nsupdate. When typing nsupdate we enter a new shell in which we can indicate the server we want to update, as well as the type of update. Let’s see an example:
1 [root@localhost named]# nsupdate
2 > server 192.168.1.20
3 > update delete vulcan.olimpus.local
4 >
5 > ^C[root@localhost named]#
We connect to the server 192.168.1.20 and we try to delete the record vulcan.olimpus.local with the command update delete. After that we could have typed “send” to actually execute the command sequence but pressing the ENTER key has the same effect. Once finished we press Ctrl-C.
As we didn’t see any error message we could assume everything worked, but we can check it with the dig command.
 1 [root@localhost named]# dig @192.168.1.20 axfr olimpus.local
 2
 3 ; <<>> DiG 9.7.3-P3-RedHat-9.7.3-8.P3.el6 <<>> @192.168.1.20 axfr olimpus.local
 4 ; (1 server found)
 5 ;; global options: +cmd
 6 olimpus.local.          172800  IN      SOA     olimpus.local. root.olimpus.loca\
 7 l. 2014090104 60 7200 604800 172800
 8 olimpus.local.          172800  IN      DNSKEY  256 3 5 AwEAAb386KgB7QrWAWBZ9+uS\
 9 aHjHmpW+3TpcGkCfh9T4Znl6BJVb/kPp 6DmfeTRzjFUQSbAGRiI3yvzJ9+iEUhradME=
10 olimpus.local.          172800  IN      DNSKEY  257 3 5 AwEAAeGilVrj9hxnmjRY9Yd9\
11 SqrBMwtiqKwfSda3wXhnd3koFZQzVI12 9xRVxEhaXpQvcH4tZG724hE/NF/zq6jIH2q6OtU0poslWLn\
12 RTE4Cte0E MP/Q4dSpSzLqjT4+cPrwFyfgvv7q+dHBHJ0TiWJjeSffFDFcACPfqY3K IFHNxgD3bBwdO\
13 /GXgLDACBVoH7qVCNRBosuji24lmxwYu9qO0qX5sTF1 mhmKpOm4u02CEVhSnTeXlER4XermehqLhOLl\
14 odWlR75EmAYc13SvMS9C oFc66eXEOpSLOl7F9eZQ/RHh/Wobx74moN1uSwP32fTYhJZr3GXOTey+ kf\
15 npvhBIxXRa6nbB2jfLsN0PMb4ZEYTAXOICtevRDYptuM3ytakPd3el Nfrmpx9vxkFMye1/18diS/VWX\
16 D7RBc8wpbK0aQBMYV94dKhBa3F6SV9t bXF7nTadG7k0I+US0kUSfppCjWr+TTwdfvGRe/M7XPM1riBv\
17 /zUgSp7X zOKWdYT2mQjPR4xl21FcsSwytehCWoS+xGEd3y9AaW7RHAwPjeexMR30 458/h1cqQcEsQC\
18 Qltl3uboqjFon3s4iHcHIqtpnBUC/TaonMA39pBTXt VFPO+EV3YJBKFgGf1qZRW9aFAU+BHAnaRt2sv\
19 PmBId7n4O778a14Jgac o4b64Y6Ij3Mx8as5
20 olimpus.local.          172800  IN      NS      delphos.olimpus.local.
21 olimpus.local.          172800  IN      NS      prometheus.olimpus.local.
22 olimpus.local.          172800  IN      MX      10 prometheus.olimpus.local.
23 aphrodite.olimpus.local. 172800 IN      A       192.168.1.22
24 delphos.olimpus.local.  172800  IN      AAAA    fe80::20c:29ff:fe78:4cb1
25 delphos.olimpus.local.  172800  IN      A       192.168.1.20
26 dns.olimpus.local.      172800  IN      CNAME   delphos.olimpus.local.
27 mail.olimpus.local.     172800  IN      CNAME   prometheus.olimpus.local.
28 prometheus.olimpus.local. 172800 IN     AAAA    fe80::20c:29ff:feeb:4443
29 prometheus.olimpus.local. 172800 IN     A       192.168.1.21
30 olimpus.local.          172800  IN      SOA     olimpus.local. root.olimpus.loca\
31 l. 2014090104 60 7200 604800 172800
32 ;; Query time: 4 msec
33 ;; SERVER: 192.168.1.20#53(192.168.1.20)
34 ;; WHEN: Mon Aug  4 07:27:58 2014
35 ;; XFR size: 14 records (messages 1, bytes 938)
As expected, there is no longer a vulcan.olimpus.local. Now we’ll try to add the new record.
 1 [root@localhost named]# nsupdate
 2 > server 192.168.1.20
 3 > update add neptune.olimpus.local 172800 A 192.168.1.240
 4 > update add neptune.olimpus.local 172800 AAAA fe80::20c:29ff:fe78:abcd
 5 > send
 6 >
 7 > ^C[root@localhost named]#
 8
 9 [root@localhost named]# dig @192.168.1.20 axfr olimpus.local
10
11 ; <<>> DiG 9.7.3-P3-RedHat-9.7.3-8.P3.el6 <<>> @192.168.1.20 axfr olimpus.local
12 ; (1 server found)
13 ;; global options: +cmd
14 olimpus.local.          172800  IN      SOA     olimpus.local. root.olimpus.loca\
15 l. 2014090106 60 7200 604800 172800
16 olimpus.local.          172800  IN      DNSKEY  256 3 5 AwEAAb386KgB7QrWAWBZ9+uS\
17 aHjHmpW+3TpcGkCfh9T4Znl6BJVb/kPp 6DmfeTRzjFUQSbAGRiI3yvzJ9+iEUhradME=
18 olimpus.local.          172800  IN      DNSKEY  257 3 5 AwEAAeGilVrj9hxnmjRY9Yd9\
19 SqrBMwtiqKwfSda3wXhnd3koFZQzVI12 9xRVxEhaXpQvcH4tZG724hE/NF/zq6jIH2q6OtU0poslWLn\
20 RTE4Cte0E MP/Q4dSpSzLqjT4+cPrwFyfgvv7q+dHBHJ0TiWJjeSffFDFcACPfqY3K IFHNxgD3bBwdO\
21 /GXgLDACBVoH7qVCNRBosuji24lmxwYu9qO0qX5sTF1 mhmKpOm4u02CEVhSnTeXlER4XermehqLhOLl\
22 odWlR75EmAYc13SvMS9C oFc66eXEOpSLOl7F9eZQ/RHh/Wobx74moN1uSwP32fTYhJZr3GXOTey+ kf\
23 npvhBIxXRa6nbB2jfLsN0PMb4ZEYTAXOICtevRDYptuM3ytakPd3el Nfrmpx9vxkFMye1/18diS/VWX\
24 D7RBc8wpbK0aQBMYV94dKhBa3F6SV9t bXF7nTadG7k0I+US0kUSfppCjWr+TTwdfvGRe/M7XPM1riBv\
25 /zUgSp7X zOKWdYT2mQjPR4xl21FcsSwytehCWoS+xGEd3y9AaW7RHAwPjeexMR30 458/h1cqQcEsQC\
26 Qltl3uboqjFon3s4iHcHIqtpnBUC/TaonMA39pBTXt VFPO+EV3YJBKFgGf1qZRW9aFAU+BHAnaRt2sv\
27 PmBId7n4O778a14Jgac o4b64Y6Ij3Mx8as5
28 olimpus.local.          172800  IN      NS      delphos.olimpus.local.
29 olimpus.local.          172800  IN      NS      prometheus.olimpus.local.
30 olimpus.local.          172800  IN      MX      10 prometheus.olimpus.local.
31 aphrodite.olimpus.local. 172800 IN      A       192.168.1.22
32 delphos.olimpus.local.  172800  IN      AAAA    fe80::20c:29ff:fe78:4cb1
33 delphos.olimpus.local.  172800  IN      A       192.168.1.20
34 dns.olimpus.local.      172800  IN      CNAME   delphos.olimpus.local.
35 mail.olimpus.local.     172800  IN      CNAME   prometheus.olimpus.local.
36 neptune.olimpus.local.  172800  IN      AAAA    fe80::20c:29ff:fe78:abcd
37 neptune.olimpus.local.  172800  IN      A       192.168.1.240
38 prometheus.olimpus.local. 172800 IN     AAAA    fe80::20c:29ff:feeb:4443
39 prometheus.olimpus.local. 172800 IN     A       192.168.1.21
40 olimpus.local.          172800  IN      SOA     olimpus.local. root.olimpus.loca\
41 l. 2014090106 60 7200 604800 172800
42 ;; Query time: 3 msec
43 ;; SERVER: 192.168.1.20#53(192.168.1.20)
44 ;; WHEN: Mon Aug  4 07:33:30 2014
45 ;; XFR size: 16 records (messages 1, bytes 990)
The record was created successfully. The DNS server is ready to receive the updates from the DHCP. But before that, we need to make some changes to the DHCP configuration.
In the /etc/dhcpd/dhcpd.conf file we’ll have to add the following lines:
1 .
2 .
3 .
4 ddns-update-style interim;
5 ignore client-updates;
6 .
7 .
8 .
This way we activate the DNS dynamic updates. Some clients might try to update themselves their information in the DNS, we tell the server to ignore them, so it is only the DHCP the one that updates that information. We should also specify the zones we are updating.
1 zone olimpus.local. {
2          primary 192.168.1.20;
3        }
4
5
6 zone 1.168.192.in-addr.arpa. {
7          primary 192.168.1.20;
8        }
And, of course, we also have to update the pool definition with the parameters needed:
 1 .
 2 .
 3 .
 4 subnet 192.168.1.0 netmask 255.255.255.0 {
 5         range 192.168.1.40 192.168.1.43;
 6 	option domain-name-servers 192.168.1.20;
 7 	option routers 192.168.1.1;
 8 	option domain-name "olimpus.local";
 9 }
10 .
11 .
12 .
Now we restart the service and force the address renewal in the client (s. Fig 62).
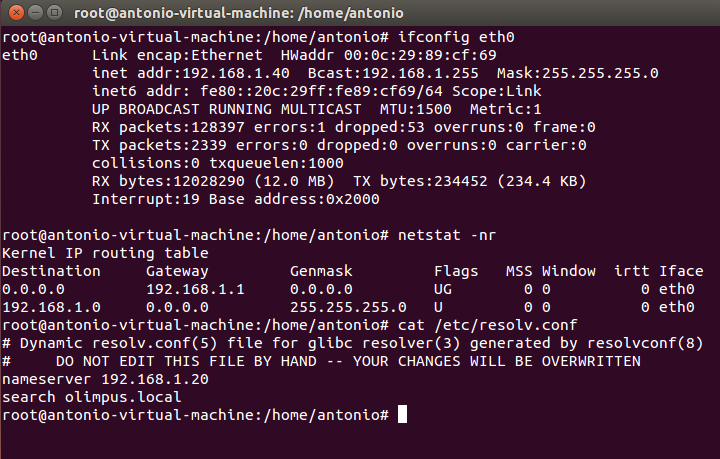
We see that the client got the IP address, Gateway and DNS server from the DHCP server (s. Fig 63). Let’s see whether the DNS zone was updated accordingly.
 1 [root@localhost named]# dig @192.168.1.20 axfr olimpus.local
 2
 3 ; <<>> DiG 9.7.3-P3-RedHat-9.7.3-8.P3.el6 <<>> @192.168.1.20 axfr olimpus.local
 4 ; (1 server found)
 5 ;; global options: +cmd
 6 olimpus.local.          172800  IN      SOA     olimpus.local. root.olimpus.loca\
 7 l. 2014090107 60 7200 604800 172800
 8 olimpus.local.          172800  IN      DNSKEY  256 3 5 AwEAAb386KgB7QrWAWBZ9+uS\
 9 aHjHmpW+3TpcGkCfh9T4Znl6BJVb/kPp 6DmfeTRzjFUQSbAGRiI3yvzJ9+iEUhradME=
10 olimpus.local.          172800  IN      DNSKEY  257 3 5 AwEAAeGilVrj9hxnmjRY9Yd9\
11 SqrBMwtiqKwfSda3wXhnd3koFZQzVI12 9xRVxEhaXpQvcH4tZG724hE/NF/zq6jIH2q6OtU0poslWLn\
12 RTE4Cte0E MP/Q4dSpSzLqjT4+cPrwFyfgvv7q+dHBHJ0TiWJjeSffFDFcACPfqY3K IFHNxgD3bBwdO\
13 /GXgLDACBVoH7qVCNRBosuji24lmxwYu9qO0qX5sTF1 mhmKpOm4u02CEVhSnTeXlER4XermehqLhOLl\
14 odWlR75EmAYc13SvMS9C oFc66eXEOpSLOl7F9eZQ/RHh/Wobx74moN1uSwP32fTYhJZr3GXOTey+ kf\
15 npvhBIxXRa6nbB2jfLsN0PMb4ZEYTAXOICtevRDYptuM3ytakPd3el Nfrmpx9vxkFMye1/18diS/VWX\
16 D7RBc8wpbK0aQBMYV94dKhBa3F6SV9t bXF7nTadG7k0I+US0kUSfppCjWr+TTwdfvGRe/M7XPM1riBv\
17 /zUgSp7X zOKWdYT2mQjPR4xl21FcsSwytehCWoS+xGEd3y9AaW7RHAwPjeexMR30 458/h1cqQcEsQC\
18 Qltl3uboqjFon3s4iHcHIqtpnBUC/TaonMA39pBTXt VFPO+EV3YJBKFgGf1qZRW9aFAU+BHAnaRt2sv\
19 PmBId7n4O778a14Jgac o4b64Y6Ij3Mx8as5
20 olimpus.local.          172800  IN      NS      delphos.olimpus.local.
21 olimpus.local.          172800  IN      NS      prometheus.olimpus.local.
22 olimpus.local.          172800  IN      MX      10 prometheus.olimpus.local.
23 antonio-virtual-machine.olimpus.local. 21600 IN TXT "0020ebba00f97540d54b8850290\
24 bf1ecb7"
25 antonio-virtual-machine.olimpus.local. 21600 IN A 192.168.1.40
26 aphrodite.olimpus.local. 172800 IN      A       192.168.1.22
27 delphos.olimpus.local.  172800  IN      AAAA    fe80::20c:29ff:fe78:4cb1
28 delphos.olimpus.local.  172800  IN      A       192.168.1.20
29 dns.olimpus.local.      172800  IN      CNAME   delphos.olimpus.local.
30 mail.olimpus.local.     172800  IN      CNAME   prometheus.olimpus.local.
31 neptune.olimpus.local.  172800  IN      AAAA    fe80::20c:29ff:fe78:abcd
32 neptune.olimpus.local.  172800  IN      A       192.168.1.240
33 prometheus.olimpus.local. 172800 IN     AAAA    fe80::20c:29ff:feeb:4443
34 prometheus.olimpus.local. 172800 IN     A       192.168.1.21
35 olimpus.local.          172800  IN      SOA     olimpus.local. root.olimpus.loca\
36 l. 2014090107 60 7200 604800 172800
37 ;; Query time: 2 msec
38 ;; SERVER: 192.168.1.20#53(192.168.1.20)
39 ;; WHEN: Mon Aug  4 14:00:23 2014
40 ;; XFR size: 18 records (messages 1, bytes 1077)
Exactly!, a new record antonio-virtual-machine.olimpus.local. was added. If we check now the reverse zone we’ll see that it has been updated too.
 1 [root@localhost named]# dig -x 192.168.1.40 @192.168.1.20
 2
 3 ; <<>> DiG 9.7.3-P3-RedHat-9.7.3-8.P3.el6 <<>> -x 192.168.1.40 @192.168.1.20
 4 ;; global options: +cmd
 5 ;; Got answer:
 6 ;; ->>HEADER<<- opcode: QUERY, status: NOERROR, id: 2528
 7 ;; flags: qr aa rd ra; QUERY: 1, ANSWER: 1, AUTHORITY: 2, ADDITIONAL: 4
 8
 9 ;; QUESTION SECTION:
10 ;40.1.168.192.in-addr.arpa.     IN      PTR
11
12 ;; ANSWER SECTION:
13 40.1.168.192.in-addr.arpa. 21600 IN     PTR     antonio-virtual-machine.olimpus.\
14 local.
15
16 ;; AUTHORITY SECTION:
17 1.168.192.in-addr.arpa. 172800  IN      NS      prometheus.olimpus.local.
18 1.168.192.in-addr.arpa. 172800  IN      NS      delphos.olimpus.local.
19
20 ;; ADDITIONAL SECTION:
21 delphos.olimpus.local.  172800  IN      A       192.168.1.20
22 delphos.olimpus.local.  172800  IN      AAAA    fe80::20c:29ff:fe78:4cb1
23 prometheus.olimpus.local. 172800 IN     A       192.168.1.21
24 prometheus.olimpus.local. 172800 IN     AAAA    fe80::20c:29ff:feeb:4443
25
26 ;; Query time: 0 msec
27 ;; SERVER: 192.168.1.20#53(192.168.1.20)
28 ;; WHEN: Mon Aug  4 14:40:14 2014
29 ;; MSG SIZE  rcvd: 229
5.3.1.- Use of keys
Before, we have used the directive allow-update{localhost;}; in order to allow the updates.
Nevertheless it is far more common and more appropriate indeed to use keys with this goal in mind. This way we can be sure that the only DHCP server to update the DNS zones is the official server and not a rogue DHCP server that might exist in the network, because the right DHCP server will be the only one with the right key.
To generate the key we can use the command dnssec-keygen that we saw already when talking about DNSSEC.
1 [root@centosv6 ~]# dnssec-keygen -a HMAC-MD5 -b 128 -n HOST dhcp-dns
2 Kdhcp-dns.+157+29271
In this example we use the algorithm (-a) HMAC-MD5 to generate a key with a length (-b) of 128 bytes. This key will be associated to a machine (-n HOST), to the DHCP server to be exact.
Once executed, two files are generated in the working directory.
1 Kdhcp-dns.+157+29271.key Kdhcp-dns.+157+29271.private.
If we see the contents of the .private file we see the value of the key.
1 [root@localhost ~]# cat Kdhcp-dns.+157+48018.private
2 Private-key-format: v1.3
3 Algorithm: 157 (HMAC_MD5)
4 Key: N4+TL8rf+DqJMX8WlZGKQg==
5 Bits: AAA=
6 Created: 20140805052812
7 Publish: 20140805052812
8 Activate: 20140805052812
Now we add a new entry in the /etc/named.conf file to define the key we just created.
 1 .
 2 .
 3 .
 4 key dhcp-dns
 5 {
 6         algorithm HMAC-MD5;
 7         secret N4+TL8rf+DqJMX8WlZGKQg==;
 8 };
 9 .
10 .
11 .
Obviously we need to change the definition of the zones, and substitute the allow-update{ localhost; }; directive.
 1 .
 2 .
 3 .
 4 zone "olimpus.local" IN {
 5         type master;
 6         file "olimpus.local.zone";
 7         notify yes;
 8         allow-update { key dhcp-dns; };
 9 };
10
11 zone "1.168.192.in-addr.arpa" IN {
12         type master;
13         file "192.168.1.zone";
14         notify yes;
15         allow-update { key dhcp-dns; };
16 };
17
18 zone "0.0.0.0.0.0.0.0.0.0.0.0.0.8.e.f.ip6.arpa" IN {
19         type master;
20         file "fe80.0.0.0.zone";
21         notify yes;
22         allow-update { key dhcp-dns; };
23 };
24 .
25 .
26 .
We restart the service to apply the changes. And we begin configuring the DHCP server. As we did on the DNS server, we also need to add a key entry in the /etc/dhcp/dhcpd.conf file.
 1 .
 2 .
 3 .
 4 key dhcp-dns
 5 {
 6         algorithm HMAC-MD5;
 7         secret N4+TL8rf+DqJMX8WlZGKQg==;
 8 }
 9 .
10 .
11 .
And we change the corresponding zone definitions in the same dhcpd.conf file.
 1 .
 2 .
 3 .
 4 zone olimpus.local. {
 5         primary 192.168.1.20;
 6         key dhcp-dns;
 7         }
 8
 9
10 zone 1.168.192.in-addr.arpa. {
11         primary 192.168.1.20;
12         key dhcp-dns;
13         }
14 .
15 .
16 .
We restart the DHCP server and we force the renewal of the IP address in the client (Fig. 64).
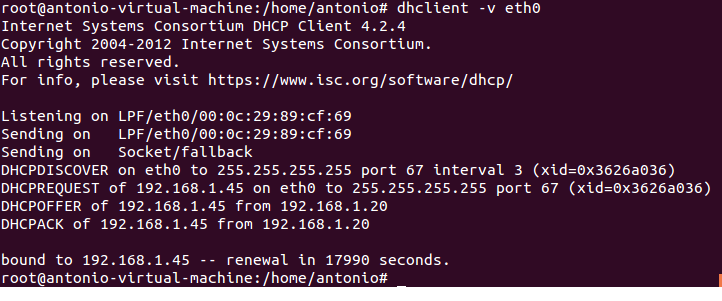
We see that the client has been assigned a new IP. Let’s see whether the DNS record has been updated.
 1 [root@localhost ~]# dig @localhost olimpus.local axfr
 2
 3 ; <<>> DiG 9.7.3-P3-RedHat-9.7.3-8.P3.el6 <<>> @localhost olimpus.local axfr
 4 ; (2 servers found)
 5 ;; global options: +cmd
 6 olimpus.local.          172800  IN      SOA     olimpus.local. root.olimpus.loca\
 7 l. 2014090111 60 7200 604800 172800
 8 olimpus.local.          172800  IN      NS      delphos.olimpus.local.
 9 olimpus.local.          172800  IN      NS      prometheus.olimpus.local.
10 olimpus.local.          172800  IN      MX      10 prometheus.olimpus.local.
11 olimpus.local.          172800  IN      DNSKEY  256 3 5 AwEAAb386KgB7QrWAWBZ9+uS\
12 aHjHmpW+3TpcGkCfh9T4Znl6BJVb/kPp 6DmfeTRzjFUQSbAGRiI3yvzJ9+iEUhradME=
13 olimpus.local.          172800  IN      DNSKEY  257 3 5 AwEAAeGilVrj9hxnmjRY9Yd9\
14 SqrBMwtiqKwfSda3wXhnd3koFZQzVI12 9xRVxEhaXpQvcH4tZG724hE/NF/zq6jIH2q6OtU0poslWLn\
15 RTE4Cte0E MP/Q4dSpSzLqjT4+cPrwFyfgvv7q+dHBHJ0TiWJjeSffFDFcACPfqY3K IFHNxgD3bBwdO\
16 /GXgLDACBVoH7qVCNRBosuji24lmxwYu9qO0qX5sTF1 mhmKpOm4u02CEVhSnTeXlER4XermehqLhOLl\
17 odWlR75EmAYc13SvMS9C oFc66eXEOpSLOl7F9eZQ/RHh/Wobx74moN1uSwP32fTYhJZr3GXOTey+ kf\
18 npvhBIxXRa6nbB2jfLsN0PMb4ZEYTAXOICtevRDYptuM3ytakPd3el Nfrmpx9vxkFMye1/18diS/VWX\
19 D7RBc8wpbK0aQBMYV94dKhBa3F6SV9t bXF7nTadG7k0I+US0kUSfppCjWr+TTwdfvGRe/M7XPM1riBv\
20 /zUgSp7X zOKWdYT2mQjPR4xl21FcsSwytehCWoS+xGEd3y9AaW7RHAwPjeexMR30 458/h1cqQcEsQC\
21 Qltl3uboqjFon3s4iHcHIqtpnBUC/TaonMA39pBTXt VFPO+EV3YJBKFgGf1qZRW9aFAU+BHAnaRt2sv\
22 PmBId7n4O778a14Jgac o4b64Y6Ij3Mx8as5
23 antonio-virtual-machine.olimpus.local. 21600 IN TXT "0020ebba00f97540d54b8850290\
24 bf1ecb7"
25 antonio-virtual-machine.olimpus.local. 21600 IN A 192.168.1.45
26 aphrodite.olimpus.local. 172800 IN      A       192.168.1.22
27 delphos.olimpus.local.  172800  IN      A       192.168.1.20
28 delphos.olimpus.local.  172800  IN      AAAA    fe80::20c:29ff:fe78:4cb1
29 dns.olimpus.local.      172800  IN      CNAME   delphos.olimpus.local.
30 G99D02467402cor.olimpus.local. 21600 IN TXT     "31cd0178098b2d89febcf6fb6c86a02\
31 352"
32 G99D02467402cor.olimpus.local. 21600 IN A       192.168.1.40
33 mail.olimpus.local.     172800  IN      CNAME   prometheus.olimpus.local.
34 neptune.olimpus.local.  172800  IN      A       192.168.1.240
35 neptune.olimpus.local.  172800  IN      AAAA    fe80::20c:29ff:fe78:abcd
36 prometheus.olimpus.local. 172800 IN     A       192.168.1.21
37 prometheus.olimpus.local. 172800 IN     AAAA    fe80::20c:29ff:feeb:4443
38 olimpus.local.          172800  IN      SOA     olimpus.local. root.olimpus.loca\
39 l. 2014090111 60 7200 604800 172800
40 ;; Query time: 1 msec
41 ;; SERVER: ::1#53(::1)
42 ;; WHEN: Tue Aug  5 04:49:47 2014
43 ;; XFR size: 20 records (messages 1, bytes 1156)
The IP address for the machine antonio-virtual-machine.olimpus.local was actually updated.