4.- DNS
The number of interconnected computers is growing day by day. It is possible to design a hierarchical network addressing schema that assigns network addresses according to the computer physical location, but even in this case, it will allways be easier to refer to the computers by using names instead of IP addresses. A local DNS server will allow us to establish a direct relation between a computer name and an IP address which, in turn, will make much easier to identify a local machine.
4.1.- DNS Service
In order to communicate with each other, every computer in the network must be assigned a unique IP address. It could be said that there is a certain analogy with a phone network, in which a phone number identifies a single device and makes it possible for it to communicate with the other phones.
Working with IP Addresses is fine for computers, but it is also cumbersome for the people. It would be necessary to remember the IP address of every single device we wanted to connect to. It is definitely much more convenient using names like www.google.es or www.redhat.com, which are much easier to remember.
Internally, the computers communicate with each other by using their IP addresses, not their associated domain names. So it is necessary to have a system which is able to determine the IP Addres(es) associated with a domain name.
So, for instance, when we type http://www.google.es in our favorite Web browser, our PC has to be able to know the actual IP address associated with the name www.google.es. Once it finds out that the IP address is 173.194.41.215 it establishes a connection and shows the Web page to the user.
If we had written in the address bar http://173.194.41.215 it wouldn’t have been necessary to ask about the IP address of www.google.es.
A DNS Server is a machine that keeps a list of associations name - IP address. In the early days of the Internet this was achieved with a single text file that all computers had to know in order to communicate with each other. This file is /etc/hosts, and it is still present in every computer. It can be used to provide some sort of basic name resolution. For instance we could open the file /etc/hosts and add the following line:
1 192.168.10.19 www.dummy-domain.com
From now on, every time our computer needs to know the address of the name www.dummy-domain.com it will assume this IP address is 192.168.10.19.
 1 [root@localhost ~]# cat /etc/hosts
 2 127.0.0.1   localhost localhost.localdomain localhost4 localhost4.localdomain4
 3 ::1         localhost localhost.localdomain localhost6 localhost6.localdomain6
 4 192.168.10.19   dummy-server.example.com
 5 192.168.10.19   www.dummy-domain.com
 6 [root@localhost ~]# ping www.dummy-domain.com
 7 PING www.dummy-domain.com (192.168.10.19) 56(84) bytes of data.
 8 64 bytes from dummy-server.example.com (192.168.10.19): icmp_seq=1 ttl=64 time=0\
 9 .056 ms
10 64 bytes from dummy-server.example.com (192.168.10.19): icmp_seq=2 ttl=64 time=0\
11 .058 ms
12 64 bytes from dummy-server.example.com (192.168.10.19): icmp_seq=3 ttl=64 time=0\
13 .052 ms
14 ^C
15 --- www.dummy-domain.com ping statistics ---
16 3 packets transmitted, 3 received, 0% packet loss, time 2459ms
17 rtt min/avg/max/mdev = 0.052/0.055/0.058/0.006 ms
Using the host file for name resolution can still be appropriate for small networks, but as the Internet began to grow it became pretty clear that a new name resolution system was needed. And so the DNS service was developed.
A DNS server mantains a database with all the IP addresses and names included in its domain. Of course a single DNS server can’t store all the IP addresses that exist in the world, on the contrary they usually keep only the information about their domain.
The DNS servers are organized in a hierarchical way, as it can be seen in Fig. 51, so, when the assigned DNS can’t resolve a name, it will pass the request to another DNS server form an upper layer. It’s easy to understand with an example.
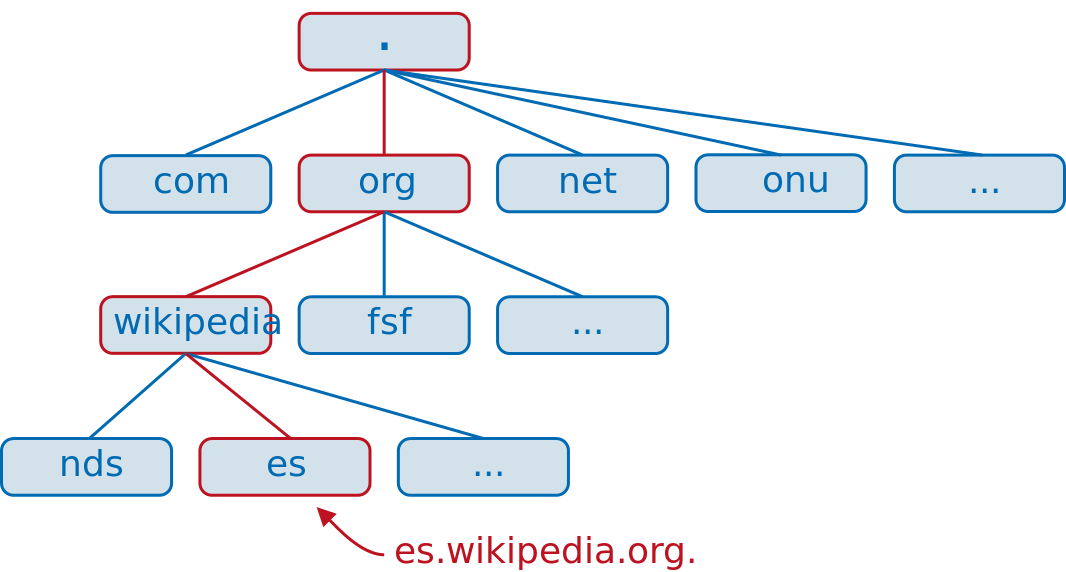
Let’s say we are sitting in front of a computer in the acme.net domain and we want to access the web es.wikipedia.org. The computer will query its local DNS server about the name es.wikipedia.org, but this server only knows about www.acme.net, mail.acme.net, etc… so it decides to query the .net server. The .net server doesn’t know about es.wikipedia.org so it has to query the root (.) server. The root server doesn’t know the exact address of es.wikipedia.org but it knows the address of the .org server, so it passes the query to this server. The .org server then will query the wikipedia.org server and this server will finally tell the IP address associated with the name es.wikipedia.org, the answer will be passed back to the DNS server in acme.net which, in turn, will give that information to the computer that requested it.
4.2.- Installing a DNS server
To illustrate what we have seen we are going to install a working DNS server. The package we’ll need to install is bind. If we already have an Internet connection we can use use yum without the –disablerepo and –enablerepo options, as it will download the software from the preconfigured Internet repositories. We can also pass the -y parameter to automatically answer yes to any confirmation message. Otherwise, if we still haven’t got an Internet connection we’ll have to use the options we saw earlier and make sure that the DVD is mounted.
1 [root@localhost ~]# yum -y install bind
4.2.1.- Starting the service in CentOS 6
Once installed, we should have a new script in the /etc/init.d directory. This script will be called named.
1 [root@localhost ~]# ls /etc/init.d/named
2 /etc/init.d/named
We can check the status of this new installed service by calling the script with the status parameter.
1 [root@localhost ~]# /etc/init.d/named status
2 rndc: neither /etc/rndc.conf nor /etc/rndc.key was found
3 named is stopped
Or we can use the service command.
1 [root@localhost ~]# service named status
2 rndc: neither /etc/rndc.conf nor /etc/rndc.key was found
3 named is stopped
In both cases we’re told that named is stopped. And a couple of files seem to be missing too. We’ll get more into detail in a moment. Anyway, we can start the service with the following command:
1 [root@localhost ~]# service named start
2 Starting named:                                            [  OK  ]
3 [root@localhost ~]# service named status
4 rndc: neither /etc/rndc.conf nor /etc/rndc.key was found
5 named (pid  1570) is running...
Now we should make sure that the service starts everytime the system boots. We can check this with chkconfig.
1 [root@localhost ~]# chkconfig --list named
2 named           0:off   1:off   2:off   3:off   4:off   5:off   6:off
We can see that, right now, named is not configured to be active on any of the 6 runlevels. We will change this.
1 [root@localhost ~]# chkconfig named on
2 [root@localhost ~]# chkconfig --list named
3 named           0:off   1:off   2:on    3:on    4:on    5:on    6:off
Now named will be started in every runlevel except 0 (shutdown), 1 (single user) or 6 (reboot) We haven’t talked about runlevels so far, but we can say that it is the way the OS has to identify if the machine is shutdown (runlevel 0), in single user mode(runlevel 1), in multiuser text mode with limited networking, in multiuser text mode with full networking(runlevel 3), in graphic multiuser mode (runlevel 5) or rebooting (runlevel 6).
4.2.2.- Starting the service in CentOS 7
In Centos 7 the service management has undergone many changes and the system no longer uses the scripts in /etc/init.d, except for a few services. The rest of the services are managed by systemd.
To check the status of a service we’ll have to use the systemctl command.
1 [root@Centos7 ~]# systemctl status named
2 named.service - Berkeley Internet Name Domain (DNS)
3    Loaded: loaded (/usr/lib/systemd/system/named.service; disabled)
4    Active: inactive (dead)
We see that the service is stopped, so we start it.
 1 [root@Centos7 ~]# systemctl start named
 2 [root@Centos7 ~]# systemctl status named
 3 named.service - Berkeley Internet Name Domain (DNS)
 4    Loaded: loaded (/usr/lib/systemd/system/named.service; disabled)
 5    Active: active (running) since dom 2014-11-23 01:05:36 CET; 4s ago
 6   Process: 2855 ExecStart=/usr/sbin/named -u named $OPTIONS (code=exited, status\
 7 =0/SUCCESS)
 8   Process: 2853 ExecStartPre=/usr/sbin/named-checkconf -z /etc/named.conf (code=\
 9 exited, status=0/SUCCESS)
10  Main PID: 2857 (named)
11    CGroup: /system.slice/named.service
12            └─2857 /usr/sbin/named -u named
13
14 nov 23 01:05:37 Centos7 named[2857]: validating @0x7fa9c062ff10: . NS: veri...un
15 nov 23 01:05:37 Centos7 named[2857]: validating @0x7fa9c062ff10: . NS: no v...nd
16 nov 23 01:05:37 Centos7 named[2857]: error (no valid RRSIG) resolving './NS...53
17 nov 23 01:05:37 Centos7 named[2857]: error (network unreachable) resolving ...53
18 nov 23 01:05:37 Centos7 named[2857]: validating @0x7fa9c062ff10: . NS: veri...un
19 nov 23 01:05:37 Centos7 named[2857]: validating @0x7fa9c062ff10: . NS: no v...nd
20 nov 23 01:05:37 Centos7 named[2857]: error (no valid RRSIG) resolving './NS...53
21 nov 23 01:05:37 Centos7 named[2857]: validating @0x7fa9c062ff10: . NS: veri...un
22 nov 23 01:05:37 Centos7 named[2857]: validating @0x7fa9c062ff10: . NS: no v...nd
23 nov 23 01:05:37 Centos7 named[2857]: error (no valid RRSIG) resolving './NS...53
24 Hint: Some lines were ellipsized, use -l to show in full.
The service is running now, but we have to make sure that it starts every time the system boots.
1 [root@Centos7 ~]# systemctl enable named
2 ln -s '/usr/lib/systemd/system/named.service' '/etc/systemd/system/multi-user.ta\
3 rget.wants/named.service'
We can check that the service is actually enabled with the following command.
1 [root@Centos7 ~]# systemctl list-unit-files --type=service
It will list all the services installed in the computer.
1 UNIT FILE                                   STATE
2 auditd.service                              enabled
3 .
4 .
5 .
6 named.service                               enabled
7 .
8 .
9 .
4.3.- Installing a master server
Before we move on to the next step we’ll talk a bit more about the types of DNS servers:
As we already know, a DNS server translates names into IP addresses. But it can do this through different approaches:
- Cache only server. In this case, the server doesn’t hold any information about the associations name - IP address, so it has to query another server. But once it gets an answer it keeps it in the cache, so that when another client performs the same query it can respond quickly without forwarding the request to another server.
- Master server. The server holds a copy of the names and IPs of the computers belonging to the domain. What is called a zone. This server has authority to change the IP associated to a certain name, as well as add or delete new registers.
- Slave server. The server holds a copy of the zone too, but it is a read-only one. The server has all the information it needs to answer queries about the domain, but it cannot change, add or delete any register.
We have already installed the software necessary but, obviously, we still haven’t configured it. Let’s assume we manage a domain called olimpus.local, and a few machines called prometheus, zeus, aphrodite, etc… and we want to make sure that when a client computer searchs for the computer aphrodite.olimpus.com it gets its IP address asociated. In order to achieve this, we’ll have to create the zone. Let’s see the procedure step by step.
The main configuration file of the DNS server is /etc/named.conf. Right after a fresh installation it will look like this:
 1 //
 2 // named.conf
 3 //
 4 // Provided by Red Hat bind package to configure the ISC BIND named(8) DNS
 5 // server as a caching only nameserver (as a localhost DNS resolver only).
 6 //
 7 // See /usr/share/doc/bind*/sample/ for example named configuration files.
 8 //
 9
10 options {
11         listen-on port 53 { 127.0.0.1; };
12         listen-on-v6 port 53 { ::1; };
13         directory       "/var/named";
14         dump-file       "/var/named/data/cache_dump.db";
15         statistics-file "/var/named/data/named_stats.txt";
16         memstatistics-file "/var/named/data/named_mem_stats.txt";
17         allow-query     { localhost; };
18         recursion yes;
19
20         dnssec-enable yes;
21         dnssec-validation yes;
22         dnssec-lookaside auto;
23
24         /* Path to ISC DLV key */
25         bindkeys-file "/etc/named.iscdlv.key";
26 };
27
28 logging {
29         channel default_debug {
30                 file "data/named.run";
31                 severity dynamic;
32         };
33 };
34
35 zone "." IN {
36         type hint;
37         file "named.ca";
38 };
39
40 include "/etc/named.rfc1912.zones";
This is the configuration file of a CentOS 6 server, in CentOS 7 the file is slightly different but the way to configure it is exactly the same in both cases.
These are some of the most important options:
1 listen-on port 53 { 127.0.0.1; };
2 listen-on-v6 port 53 { ::1; };
The server will listen only in the localhost address, that is, it won’t be accesible from other computers on the network. As we want to be able to query the DNS server from other computers we will change these two lines.
1 listen-on port 53 { any; };
2 listen-on-v6 port 53 { any; };
3
4
5 directory       "/var/named";
This only means that the default directory for the zone files will be in /var/named. We don’t need to change this.
1 allow-query { localhost; };
We want the server to answers queries from any computer, so we change this value.
1 allow-query     { any; };
2
3 zone "." IN {
4         type hint;
5         file "named.ca";
6 };
This is the only zone defined so far in the configuration file. The top most zone in the hierarchy. If we open the /var/named/named.ca file we will see that it contains the address of the root servers on the Internet. Here we will need to tell the server about our domain olimpus.local. Below the “.” zone definition we will type this:
1 zone "olimpus.local" IN {
2     type master;
3     file "olimpus.local.zone";
4 };
We can now save the changes. To make sure the syntax of the file named.conf is correct we can use named-checkconf.
1 [root@localhost ~]# named-checkconf
2 [root@localhost ~]#
As we can see, the program didn’t show any output so we can assume the syntax is correct. If there were a syntax error the program would tell us about it. For instance, if we had forget a curly bracket we could get a message like this.
1 [root@localhost ~]# named-checkconf
2 /etc/named.conf:26: '}' expected near ';'
But now we have to create the /var/named/olimpus.local.zone file. As expected, the file needs to have a proper syntax. If we’re creating a zone file from scratch and we don’t remember all the details about the syntax we can take a look at some of the sample files in the /usr/share/doc/bind-9.7.3/sample directory. In fact, the /usr/share/doc folder is always very helpful when we try to configure or tune a service, as we can find there plenty of sample configuration files of almost all the software installed in the server.
The zone file should be something like this:
 1 ;
 2 ;Data file for olimpus.local
 3 ;
 4 $TTL 2D
 5 olimpus.local.  IN SOA olimpus.local. root.olimpus.local. (
 6                 2014082701;       Serial
 7                 1D;             Refresh
 8                 2H;             Retry
 9                 1W;             Expire
10                 2D);            Default TTL
11
12         IN NS delphos.olimpus.local.
13         IN MX 10 prometheus.olimpus.local.
14
15 delphos         IN A    192.168.1.20
16 prometheus      IN A    192.168.1.21
17 aphrodite       IN A    192.168.1.22
18 delphos         IN AAAA fe80::20c:29ff:fe78:4cb1
19 dns             IN CNAME        delphos
20 mail            IN CNAME        prometheus
The lines beginning with “;” are comments used to clarify the content of the file. After that, we define the parameters associated with the zone file, such as the refresh and retry rates, the expire time and the default TTL. Every zone file must have a serial number associated, this number will be used when replicating information between DNS servers, to know wether there is a newer version of a zone file.
1 IN NS delphos.olimpus.local.
This is a NS register, it tells what are the name servers of olimpus.local. This is a mandatory register. In this case the only name server is delphos.olimpus.local but we could have many of them.
1 IN MX 10 prometheus.olimpus.local.
Similarly, we define here the mail server for the olimpus.local domain and the priority associated (10). In this case, we have only a mail server but we could have two or even more, and assign different priorities to every one of them according to their processing power. We’ll see this again when we talk about the mail service.
1 delphos         IN A    192.168.1.20
2 prometheus      IN A    192.168.1.21
3 aphrodite       IN A    192.168.1.22
Now we have a list with all the machines in the zone and their IP address associated. These are called type A registers.
1 delphos IN AAAA fe80::20c:29ff:fe78:4cb1
In addition we can associate names and IPv6 addresses, that’s what AAAA registers are for.
1 dns             IN CNAME        delphos
2 mail            IN CNAME        prometheus
And finally we have a couple of CNAME registers, which work as alias. That is, the client will be able to ping delphos.olimpus.local or dns.olimpus.local indistinctly.
Once we’re done, we can check the syntax with the named-checkzone command.
1 [root@localhost named]# named-checkzone olimpus.local olimpus.local.zone
2 zone olimpus.local/IN: loaded serial 20140827
3 OK
We start now the named service.
In CentOS 6:
1 [root@localhost named]# service named start
2 Starting named:                                            [  OK  ]
In CentOS 7:
1 [root@Centos7 ~]# systemctl start named
Apparently everything was fine, but to make sure we’ll query the DNS server for the address of the delphos.olimpus.local machine. We’ll see later in more detail some of the tools we can use to check the DNS service, but to make sure our name server is working we’ll introduce here the dig command.
Dig allows us to query the DNS server we choose. To check our new name server we could type this:
1 [root@localhost named]# dig @192.168.1.20 delphos.olimpus.local
2 -bash: dig: command not found
As we have mentioned several times before, if the utility is not installed by default we’ll have to find out the package it belongs to and install it. From now on we won’t insist again in this subject.
 1 [root@localhost named]# yum --disablerepo=* --enablerepo=c6-media provides dig
 2 Loaded plugins: fastestmirror
 3 Loading mirror speeds from cached hostfile
 4  * c6-media:
 5 Warning: 3.0.x versions of yum would erroneously match against filenames.
 6  You can use "*/dig" and/or "*bin/dig" to get that behaviour
 7 No Matches found
 8 [root@localhost named]# yum --disablerepo=* --enablerepo=c6-media provides */dig
 9 Loaded plugins: fastestmirror
10 Loading mirror speeds from cached hostfile
11  * c6-media:
12 32:bind-utils-9.7.3-8.P3.el6.i686 : Utilities for querying DNS name servers
13 Repo        : c6-media
14 Matched from:
15 Filename    : /usr/bin/dig
16
17 [root@localhost named]# yum --disablerepo=* --enablerepo=c6-media install bind-u\
18 tils
19 Loaded plugins: fastestmirror
20 Loading mirror speeds from cached hostfile
21  * c6-media:
22 Setting up Install Process
23 Resolving Dependencies
24 --> Running transaction check
25 ---> Package bind-utils.i686 32:9.7.3-8.P3.el6 will be installed
26 --> Finished Dependency Resolution
27
28 Dependencies Resolved
29
30 ================================================================================
31  Package           Arch        Version                    Repository       Size
32 ================================================================================
33 Installing:
34  bind-utils        i686        32:9.7.3-8.P3.el6          c6-media        177 k
35
36 Transaction Summary
37 ================================================================================
38 Install       1 Package(s)
39
40 Total download size: 177 k
41 Installed size: 423 k
42 Is this ok [y/N]: y
43 Downloading Packages:
44 Running rpm_check_debug
45 Running Transaction Test
46 Transaction Test Succeeded
47 Running Transaction
48   Installing : 32:bind-utils-9.7.3-8.P3.el6.i686                            1/1
49
50 Installed:
51   bind-utils.i686 32:9.7.3-8.P3.el6
52
53 Complete!
54 [root@localhost named]#
Now we can actually perform the query…
 1 [root@localhost named]# dig @192.168.1.20 delphos.olimpus.local
 2 ; <<>> DiG 9.7.3-P3-RedHat-9.7.3-8.P3.el6 <<>> @192.168.1.20 delphos.olimpus.loc\
 3 al
 4 ; (1 server found)
 5 ;; global options: +cmd
 6 ;; Got answer:
 7 ;; ->>HEADER<<- opcode: QUERY, status: NOERROR, id: 27770
 8 ;; flags: qr aa rd ra; QUERY: 1, ANSWER: 1, AUTHORITY: 1, ADDITIONAL: 1
 9
10 ;; QUESTION SECTION:
11 ;delphos.olimpus.local.         IN      A
12
13 ;; ANSWER SECTION:
14 delphos.olimpus.local.  172800  IN      A       192.168.1.20
15
16 ;; AUTHORITY SECTION:
17 olimpus.local.          172800  IN      NS      delphos.olimpus.local.
18
19 ;; ADDITIONAL SECTION:
20 delphos.olimpus.local.  172800  IN      AAAA    fe80::20c:29ff:fe78:4cb1
21
22 ;; Query time: 7 msec
23 ;; SERVER: 192.168.1.20#53(192.168.1.20)
24 ;; WHEN: Sat Aug  2 10:42:07 2014
25 ;; MSG SIZE  rcvd: 97
26
27 [root@localhost named]#
We wanted to query the 192.168.1.20 server, so we pass it as a parameter(@192.168.1.20). We can see that the query executed correctly (status: NOERROR). In addition the server reported that delphos.olimpus.local has the IPv4 address 192.168.1.20 and the IPv6 address fe80::20c:29ff:fe78:4cb1, which is correct.
It looks like we have a working DNS server, but unfortunately this is not completely true. So far we have a way to translate names into IP addresses. This is what is called direct lookup, but we should also have a way to translate IP addreses into machine names (reverse lookup). To achieve this the procedure is quite similar to what we have seen before.
In the /etc/named.conf file we’ll define the new zone that provides the reverse lookup. We’ll type it just below the olimpus.local zone.
1     zone "1.168.192.in-addr.arpa" IN {
2             type master;
3             file "192.168.1.zone";
4     };
The format x.x.x.in-addr.arpa, where x.x.x is the network address in reverse order, is a standard way of naming reverse zones.
Now we create the /var/named/192.168.1.zone file. The syntax is quite similar to the one used in the file olimpus.local.zone.
 1 $TTL 2D;
 2 1.168.192.in-addr.arpa. IN SOA delphos.olimpus.local. root.olimpus.local. (
 3                         2014082701      ;serial
 4                         259200          ;refresh(3 days)
 5                         14400           ;retry(4 hours)
 6                         18140           ;expire(3 weeks)
 7                         604800          ;minimum(1 week)
 8                         )
 9                 NS delphos.olimpus.local.
10
11 20              PTR delphos.olimpus.local.
And we check it.
1 [root@localhost named]# named-checkzone 1.168.192.in-addr.arpa 192.168.1.zone
2 zone 1.168.192.in-addr.arpa/IN: loaded serial 2014082701
3 OK
We restart the service…
In CentOS 6:
1 [root@localhost named]# service named restart
2 Stopping named:                                            [  OK  ]
3 Starting named:                                            [  OK  ]
In CentOS 7:
1 [root@Centos7 ~]# systemctl restart named
…and query the server with dig.
 1 [root@localhost named]# dig @192.168.1.20 -x 192.168.1.20
 2
 3 ; <<>> DiG 9.7.3-P3-RedHat-9.7.3-8.P3.el6 <<>> @192.168.1.20 -x 192.168.1.20
 4 ; (1 server found)
 5 ;; global options: +cmd
 6 ;; Got answer:
 7 ;; ->>HEADER<<- opcode: QUERY, status: NOERROR, id: 62275
 8 ;; flags: qr aa rd ra; QUERY: 1, ANSWER: 1, AUTHORITY: 1, ADDITIONAL: 2
 9
10 ;; QUESTION SECTION:
11 ;20.1.168.192.in-addr.arpa.     IN      PTR
12
13 ;; ANSWER SECTION:
14 20.1.168.192.in-addr.arpa. 172800 IN    PTR     delphos.olimpus.local.
15
16 ;; AUTHORITY SECTION:
17 1.168.192.in-addr.arpa. 172800  IN      NS      delphos.olimpus.local.
18
19 ;; ADDITIONAL SECTION:
20 delphos.olimpus.local.  172800  IN      A       192.168.1.20
21 delphos.olimpus.local.  172800  IN      AAAA    fe80::20c:29ff:fe78:4cb1
22
23 ;; Query time: 2 msec
24 ;; SERVER: 192.168.1.20#53(192.168.1.20)
25 ;; WHEN: Sat Aug  2 11:28:31 2014
26 ;; MSG SIZE  rcvd: 136
As it happened before, we can see the query executed without errors (status: NOERROR), and the server answered that the IPv4 address 192.168.1.20 is assigned to the server delphos.olimpus.local.
Finally we’ll create the reverse zone for IPv6. We open the /etc/named.conf file again and add the following lines.
1 zone "0.0.0.0.0.0.0.0.0.0.0.0.0.8.e.f.ip6.arpa" IN {
2         type master;
3         file "fe80.0.0.0.zone";
4 };
As we see, the standard name is similar to the one used with IPv4 zones, it also consists of the network address in reverse order but now the suffix is ip6.arpa.
As for the /var/named/fe80.0.0.0.zone this is what we’ll type.
 1 $TTL 172800 ; 2 days
 2 0.0.0.0.0.0.0.0.0.0.0.0.0.8.e.f.ip6.arpa. IN SOA delphos.olimpus.local. root.oli\
 3 mpus.local. (
 4                         2014082701      ;serial
 5                         259200          ;refresh(3 days)
 6                         14400           ;retry(4 hours)
 7                         18140           ;expire(3 weeks)
 8                         604800          ;minimum(1 week)
 9                         )
10
11                                 NS delphos.olimpus.local.
12 1.b.c.4.8.7.e.f.f.f.9.2.c.0.2.0 IN PTR delphos
And we check the result.
1 [root@localhost named]# named-checkzone 0.0.0.0.0.0.0.0.0.0.0.0.0.8.e.f.ip6.arpa\
2  fe80.0.0.0.zone
3 zone 0.0.0.0.0.0.0.0.0.0.0.0.0.8.e.f.ip6.arpa/IN: loaded serial 2014082701
4 OK
We restart the named service and query the server again.
 1 [root@localhost named]# dig @192.168.1.20 -x fe80::20c:29ff:fe78:4cb1
 2
 3 ; <<>> DiG 9.7.3-P3-RedHat-9.7.3-8.P3.el6 <<>> @192.168.1.20 -x fe80::20c:29ff:f\
 4 e78:4cb1
 5 ; (1 server found)
 6 ;; global options: +cmd
 7 ;; Got answer:
 8 ;; ->>HEADER<<- opcode: QUERY, status: NOERROR, id: 29346
 9 ;; flags: qr aa rd ra; QUERY: 1, ANSWER: 1, AUTHORITY: 1, ADDITIONAL: 2
10
11 ;; QUESTION SECTION:
12 ;1.b.c.4.8.7.e.f.f.f.9.2.c.0.2.0.0.0.0.0.0.0.0.0.0.0.0.0.0.8.e.f.ip6.arpa. IN PT\
13 R
14
15 ;; ANSWER SECTION:
16 1.b.c.4.8.7.e.f.f.f.9.2.c.0.2.0.0.0.0.0.0.0.0.0.0.0.0.0.0.8.e.f.ip6.arpa. 172800\
17  IN PTR delphos.0.0.0.0.0.0.0.0.0.0.0.0.0.8.e.f.ip6.arpa.
18
19 ;; AUTHORITY SECTION:
20 0.0.0.0.0.0.0.0.0.0.0.0.0.8.e.f.ip6.arpa. 172800 IN NS delphos.olimpus.local.
21
22 ;; ADDITIONAL SECTION:
23 delphos.olimpus.local.  172800  IN      A       192.168.1.20
24 delphos.olimpus.local.  172800  IN      AAAA    fe80::20c:29ff:fe78:4cb1
25
26 ;; Query time: 1 msec
27 ;; SERVER: 192.168.1.20#53(192.168.1.20)
28 ;; WHEN: Sat Aug  2 11:58:03 2014
29 ;; MSG SIZE  rcvd: 191
Everything is working fine now, so we’ll configure it to start automatically after a reboot. There are different ways to do it, for example in CentOS 6 we can use chkconfig.
1 [root@localhost ~]# chkconfig named on
2 [root@localhost ~]# chkconfig --list named
3 named           0:off   1:off   2:on    3:on    4:on    5:on    6:off
In CentOS 7 we should use the systemctl command.
1 [root@localhost ~]# systemctl enable named
From now on, every time we restart the server the named service will be activated.
Now we’ll be able to resolve the domain names we have defined in our zones, but if we want our server to resolve internet domain names such as www.google.com, we’ll need to forward those requests to an external DNS server. If the external DNS server IP address is 192.168.1.1, we need to include the following lines in the /etc/named.conf file:
1 forwarders {
2                 192.168.1.1;
3         };
These previous lines should be included in the general options section, so the configuration file should remain like this:
 1 options {
 2         listen-on port 53 { any; };
 3         listen-on-v6 port 53 { any; };
 4 .
 5 .
 6 .
 7 forwarders {
 8                 192.168.1.1;
 9         };
10 .
11 .
12 .
4.4.- Client configuration
In Linux we can see the current DNS client configuration in the /etc/resolv.conf file.
1 [root@delphos ~]# cat /etc/resolv.conf
2 nameserver 192.168.1.20
3 search olimpus.local
In this example, the client will send the DNS requests to the server at 192.168.1.20. If no DNS suffix is provided it will automatically add “olimpus.local”.
We can edit this file by hand, but it is usually more convenient to use one of the administrative tools every Linux distro has at our disposal. For instance in CentOS 6 we can use the program system-config-network, in CentOS 7 there isn’t a system-config-network program, but there is a similar one called nmtui, in Suse we can do the same thing with Yast, in Ubuntu we can open “System Settings”, and then go to network.
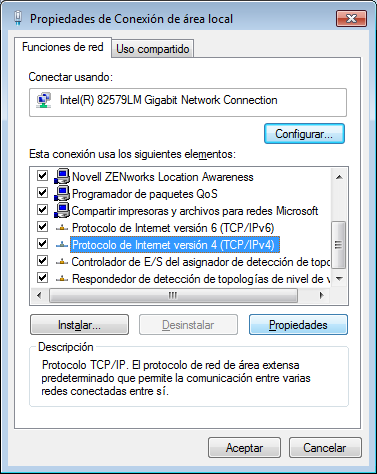
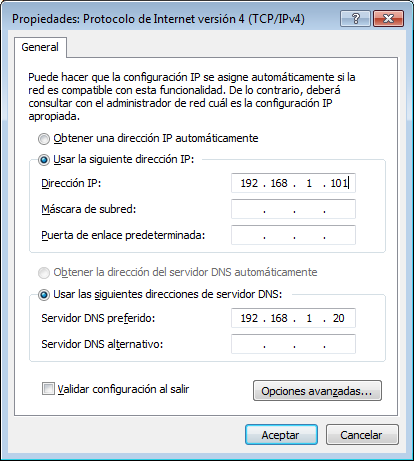
On the other hand in Windows we have to edit the LAN connection and then edit the properties of TCP/IP (Fig. 52 and Fig. 53).
Of course for clients to be able to access the DNS server we need to allow traffic to port 53 UDP in the firewall.
In CentOS 6:
1 [root@delphos ~]# iptables -I INPUT 2 -m state --state new -p udp --dport 53 -j \
2 ACCEPT
In CentOS 7:
1 [root@CentOS7 ~]# firewall-cmd --add-service=dns
2 success
In the case of CentOS 7, with the previous command we have allowed traffic to port 53 for both protocols UDP and TCP. We can see more details about the firewall included in CentOS 7 in the section 10 of this book.
4.5.- Slave servers and zone transfers
At this point we have a name server that holds all of the information of the olimpus.local zone. As we will see along this book, the DNS is of an utmost importance as it affects many other services, so needless to say, a shutdown of the service can be a complete disaster for our network. To try and minimize this risk we could install another server to provide the name service too. This new server would be a slave server, that is a server with a read-only copy of the zone files. It would be able to answer queries but it wouldn’t be able to update the information. Thus we have two servers to share the load, besides, if the master server becomes completely unusable we could easily transform the slave server into a master server.
We have seen in a previous chapter how to install CentOS, so we’ll assume we have a working CentOS server. We’ll install the bind package as we saw before. The named.conf file will have to be modified to add the following lines:
 1 zone "olimpus.local" IN {
 2 type slave;
 3 file "slaves/olimpus.local.zone";
 4 masters {
 5 		192.168.1.20;
 6 	};
 7 };
 8
 9 zone "1.168.192.in-addr.arpa" IN {
10         type slave;
11         file "slaves/192.168.1.zone";
12 	masters {
13                 192.168.1.20;
14         };
15
16 };
17
18 zone "0.0.0.0.0.0.0.0.0.0.0.0.0.8.e.f.ip6.arpa" IN {
19         type slave;
20         file "slaves/fe80.0.0.0.zone";
21 	masters {
22                 192.168.1.20;
23         };
24
25 };
Basically we name our zones, we declare them to be slave zones and tell the server about the master servers, 192.168.1.20 in this case.
Of course we’ll have to make the same changes we made in the master server to make sure that the server listens in all the network addresses, and it can be queried by anybody.
1 listen-on port 53 { any; };
2 listen-on-v6 port 53 { any; };
3 allow-query     { any; };
We’ll also have to make some minor changes in the zone files of the master server. We’ll create another NS register for the slave server. If the new server is prometheus the new line would be like this:
1 .
2 .
3 .
4 IN NS delphos.olimpus.local.
5 IN NS prometheus.olimpus.local.
6 .
7 .
8 .
This should be done in the olimpus.local.zone, 192.168.1.zone and fe80.0.0.0.zone files. In addition, we should also notify the slave server whenever the zone file is updated. For that, we use the notify yes directive in the zone definition of the named.conf file:
 1 zone "olimpus.local" IN {
 2         type master;
 3         file "olimpus.local.zone";
 4         notify yes;
 5 };
 6
 7 zone "1.168.192.in-addr.arpa" IN {
 8         type master;
 9         file "192.168.1.zone";
10         notify yes;
11 };
12
13 zone "0.0.0.0.0.0.0.0.0.0.0.0.0.8.e.f.ip6.arpa" IN {
14         type master;
15         file "fe80.0.0.0.zone";
16         notify yes;
17 };
In the slave server the named service should be able to create the zone files in the /var/named/slaves folder, so we’ll make sure the user named has the rights to write into that directory.
1 [root@localhost named]# ls -ld slaves/
2 drwxrwx---. 2 named named 4096 Dec  8  2011 slaves/
We have already seen SELINUX briefly. It could be described as a security mechanism that creates another layer of protection against unauthorized access and limits the damage a hacker could do to the system. SELinux limits what a process can do, that includes of course the named service. We’ll see how to make named work with it.
First, we check if SELinux is active:
1 [root@localhost named]# sestatus
2 SELinux status:                 enabled
3 SELinuxfs mount:                /selinux
4 Current mode:                   enforcing
5 Mode from config file:          enforcing
6 Policy version:                 24
7 Policy from config file:        targeted
We also have to check the SELinux booleans associated with the DNS service.
1 [root@localhost named]# getsebool -a | grep named
2 named_write_master_zones --> off
This parameter implies that named won’t be allowed to write the zone files. Obviously this would make fail the zone transfer so we have to change the value to on.
1 [root@localhost named]# setsebool named_write_master_zones on
2 [root@localhost named]# getsebool -a | grep named
3 named_write_master_zones --> on
We’ll make the change permanent with (-P)
1 [root@Centos7b ~]# setsebool -P named_write_master_zones 1
When transferring zones, the slave server will need to connect to port 53 on the master server. Obviously this port needs to be accessible from the slave server. To check it we can execute the nmap program from the slave server.
 1 [root@localhost named]# nmap -p 53 192.168.1.20
 2 Starting Nmap 5.21 ( http://nmap.org ) at 2013-11-12 01:12 CET
 3 mass_dns: warning: Unable to determine any DNS servers. Reverse DNS is disabled.\
 4  Try using --system-dns or specify valid servers with --dns-servers
 5 Nmap scan report for 192.168.1.20
 6 Host is up (0.00026s latency).
 7 PORT   STATE    SERVICE
 8 53/tcp filtered domain
 9 MAC Address: 00:0C:29:78:4C:B1 (VMware)
10
11 Nmap done: 1 IP address (1 host up) scanned in 0.06 seconds
As we see, the port is being filtered. We’ll have to open the port in the firewall in the master server. We’ll also see the use of the firewall in more detail later in this book. Now we’ll just explain how to open the port. Depending on whether we are using CentOS 6 or CentOS 7 the way to do it will be different.
In CentOS 6 we can list the firewall configuration by typing iptables -L in the master server.
 1 [root@localhost named]# iptables -L
 2 Chain INPUT (policy ACCEPT)
 3 target     prot opt source               destination
 4 ACCEPT     all  --  anywhere             anywhere            state RELATED,ESTAB\
 5 LISHED
 6 ACCEPT     icmp --  anywhere             anywhere
 7 ACCEPT     all  --  anywhere             anywhere
 8 ACCEPT     tcp  --  anywhere             anywhere            state NEW tcp dpt:s\
 9 sh
10 REJECT     all  --  anywhere             anywhere            reject-with icmp-ho\
11 st-prohibited
12
13 Chain FORWARD (policy ACCEPT)
14 target     prot opt source               destination
15 REJECT     all  --  anywhere             anywhere            reject-with icmp-ho\
16 st-prohibited
17
18 Chain OUTPUT (policy ACCEPT)
19 target     prot opt source               destination
By default, only connections to the ssh port are allowed. We’ll have to add the following line to permit access to port 53.
1 [root@localhost named]# iptables -I INPUT 5 -m state --state NEW -m tcp -p tcp -\
2 -dport 53 -j ACCEPT
We insert a new input rule in the 5th position. We specify that new connections to the port 53 should be allowed. Once established the new connection, further traffic will be allowed too, as specified on the line:
1 ACCEPT     all  --  anywhere             anywhere            state RELATED,ESTAB\
2 LISHED
The complete set of firewall rules could be similar to this:
 1 [root@localhost named]# iptables -L
 2 Chain INPUT (policy ACCEPT)
 3 target     prot opt source               destination
 4 ACCEPT     all  --  anywhere             anywhere            state RELATED,ESTAB\
 5 LISHED
 6 ACCEPT     icmp --  anywhere             anywhere
 7 ACCEPT     all  --  anywhere             anywhere
 8 ACCEPT     tcp  --  anywhere             anywhere            state NEW tcp dpt:s\
 9 sh
10 ACCEPT     tcp  --  anywhere             anywhere            state NEW tcp dpt:d\
11 omain
12 REJECT     all  --  anywhere             anywhere            reject-with icmp-ho\
13 st-prohibited
14
15 Chain FORWARD (policy ACCEPT)
16 target     prot opt source               destination
17 REJECT     all  --  anywhere             anywhere            reject-with icmp-ho\
18 st-prohibited
19
20 Chain OUTPUT (policy ACCEPT)
21 target     prot opt source               destination
In CentOS 7 is also possible to use iptables but it is recommended to use the firewall-cmd command instead. First of all we need to find out the default zone.
1 [root@localhost ~]# firewall-cmd --get-default-zone
2 public
And then, we list the services allowed.
1 [root@localhost ~]# firewall-cmd --zone=internal --list-services
2 ssh
In this case only the ssh service is allowed, we’ll need to add the dns service.
1 [root@localhost ~]# firewall-cmd --zone=internal --add-service=dns
2  success
If now we repeat the test with nmap from the slave server, we’ll see that the port is open.
 1 [root@localhost named]# nmap -p 53 192.168.1.20
 2
 3 Starting Nmap 5.21 ( http://nmap.org ) at 2013-11-12 01:31 CET
 4 mass_dns: warning: Unable to determine any DNS servers. Reverse DNS is disabled.\
 5  Try using --system-dns or specify valid servers with --dns-servers
 6 Nmap scan report for 192.168.1.20
 7 Host is up (0.0020s latency).
 8 PORT   STATE SERVICE
 9 53/tcp open  domain
10 MAC Address: 00:0C:29:78:4C:B1 (VMware)
11
12 Nmap done: 1 IP address (1 host up) scanned in 0.07 seconds
We’ll do the same in the slave server, so that zone tranfers can take place in both directions.
We will also change the following directives of the named.conf file in both servers, which are used with DNSEC.
1 dnssec-enable no;
2 dnssec-validation no;
Now we can check if the transfer zone actually works by restarting the named service on the slave server.
In CentOS 6:
1 [root@localhost named]# service named restart
2 Stopping named:                                            [  OK  ]
3 Starting named:                                            [  OK  ]
4 [root@localhost named]#
In CentOS 7:
1 [root@Centos7 ~]# systemctl restart named
If everything is OK we shoud now have three files in the /var/named/slaves folder.
1 [root@localhost named]# ls /var/named/slaves/
2 192.168.1.zone  fe80.0.0.0.zone  olimpus.local.zone
Now every time we modify a zone in the master server we’ll update the serial number, thus the change should be replicated to the slave server. For example, let’s say we add a new server vulcan with IPv4 192.168.1.23 and IPv6 fe80::20c:29ff:fedf:d786/64.
We add the new A and AAAA registers in the zone file.
 1 .
 2 .
 3 .
 4 delphos         IN A    192.168.1.20
 5 prometheus      IN A    192.168.1.21
 6 aphrodite       IN A    192.168.1.22
 7 vulcan          IN A    192.168.1.23
 8
 9 delphos         IN AAAA fe80::20c:29ff:fe78:4cb1
10 prometheus      IN AAAA fe80::20c:29ff:feeb:4443
11 vulcan          IN AAAA fe80::20c:29ff:fedf:d786
12 .
13 .
14 .
And we add the PTR registers in the reverse zone files.
1 .
2 .
3 .
4 22              PTR vulcan.olimpus.local.
5 .
6 .
7 .
8 6.8.7.d.f.d.e.f.f.f.9.2.c.0.2.0 IN PTR vulcan
Finally we update the serial number in all the three files.
1 2014090102; Serial
The update of the zone files shoud take place at one moment or another depending on the parameters defined in the zones themselves. But, anyway we can force the zone transfer with the rndc command (see section 4.6.1 on how to install it). We execute it from the slave server.
1 rndc retransfer olimpus.local
After a few seconds master and slave will have the same information. We can check it by querying both servers with the dig command. From the slave server we can query both servers. First we query the slave server itself.
 1 [root@localhost ~]# dig @192.168.1.21 prometheus.olimpus.local
 2
 3 ; <<>> DiG 9.7.3-P3-RedHat-9.7.3-8.P3.el6 <<>> @192.168.1.21 prometheus.olimpus.\
 4 local
 5 ; (1 server found)
 6 ;; global options: +cmd
 7 ;; Got answer:
 8 ;; ->>HEADER<<- opcode: QUERY, status: NOERROR, id: 18441
 9 ;; flags: qr aa rd ra; QUERY: 1, ANSWER: 1, AUTHORITY: 2, ADDITIONAL: 3
10
11 ;; QUESTION SECTION:
12 ;prometheus.olimpus.local.      IN      A
13
14 ;; ANSWER SECTION:
15 prometheus.olimpus.local. 172800 IN     A       192.168.1.21
16
17 ;; AUTHORITY SECTION:
18 olimpus.local.          172800  IN      NS      prometheus.olimpus.local.
19 olimpus.local.          172800  IN      NS      delphos.olimpus.local.
20
21 ;; ADDITIONAL SECTION:
22 delphos.olimpus.local.  172800  IN      A       192.168.1.20
23 delphos.olimpus.local.  172800  IN      AAAA    fe80::20c:29ff:fe78:4cb1
24 prometheus.olimpus.local. 172800 IN     AAAA    fe80::20c:29ff:feeb:4443
25
26 ;; Query time: 1 msec
27 ;; SERVER: 192.168.1.21#53(192.168.1.21)
28 ;; WHEN: Sun Aug  3 04:40:00 2014
29 ;; MSG SIZE  rcvd: 166
And then we query the master server, to see if the 2 answers are the same. We must take into account that the firewall might be blocking the query. In order to allow zone transfers we opened before the firewall for connections to tcp port 53, nevertheless DNS queries don’t use TCP port 53, but UDP port 53. If this is the case, we’ll have to open UDP port 53 in the firewall.
In Centos 6:
1 [root@localhost ~]# iptables -I INPUT 4 -p udp --dport 53 -j ACCEPT
In CentOS 7:
The same command we used to allow zone transfers will permit both transfers and queries.
1 [root@localhost ~]# firewall-cmd --zone=internal --add-service=dns
2 success
Now we can perform the query…
 1 [root@localhost ~]# dig @192.168.1.20 prometheus.olimpus.local
 2
 3 ; <<>> DiG 9.7.3-P3-RedHat-9.7.3-8.P3.el6 <<>> @192.168.1.20 prometheus.olimpus.\
 4 local
 5 ; (1 server found)
 6 ;; global options: +cmd
 7 ;; Got answer:
 8 ;; ->>HEADER<<- opcode: QUERY, status: NOERROR, id: 57417
 9 ;; flags: qr aa rd ra; QUERY: 1, ANSWER: 1, AUTHORITY: 2, ADDITIONAL: 3
10
11 ;; QUESTION SECTION:
12 ;prometheus.olimpus.local.      IN      A
13
14 ;; ANSWER SECTION:
15 prometheus.olimpus.local. 172800 IN     A       192.168.1.21
16
17 ;; AUTHORITY SECTION:
18 olimpus.local.          172800  IN      NS      prometheus.olimpus.local.
19 olimpus.local.          172800  IN      NS      delphos.olimpus.local.
20
21 ;; ADDITIONAL SECTION:
22 delphos.olimpus.local.  172800  IN      A       192.168.1.20
23 delphos.olimpus.local.  172800  IN      AAAA    fe80::20c:29ff:fe78:4cb1
24 prometheus.olimpus.local. 172800 IN     AAAA    fe80::20c:29ff:feeb:4443
25
26 ;; Query time: 2 msec
27 ;; SERVER: 192.168.1.20#53(192.168.1.20)
28 ;; WHEN: Sun Aug  3 05:42:05 2014
29 ;; MSG SIZE  rcvd: 166
As we can see, the result is the same in both cases.
4.6.- DNSSEC
The domain name service is of an utmost importance in any network infrastructure, but unfortunately is quite vulnerable to attacks. If a malicious hacker manages to inject wrong dns answers in the network they’d be able to control the traffic. For example, let’s say a user wants to check their mail and so it tries to access http://gmail.com, if an attacker can send a DNS reply for the domain gmail.com the user’s computer will try to access the wrong gmail.com.
To minimize this risk DNSSEC was developed. DNSSEC doesn’t actually avoids these attacks but it makes possible to detect them. It works by signing the zone files so that we know if an unauthorized change took place. To use DNSSEC first we must generate two keys for our zone.
We’ll need to generate two sets of keys, the Zone Signing Keys (ZSK) and the Key Signing Keys (KSK). First we create the ZSK.
1 [root@localhost named]# dnssec-keygen -a RSASHA1 -b 512 -n ZONE olimpus.local
2 Generating key pair.....++++++++++++ ....++++++++++++
3 Kolimpus.local.+005+08586
The process of generating the keys can take very very long, up to several hours. If we want to speed up the process we can install haveged, which acts as a random number generator. The package haveged currently is not included as part of the CentOS 6 software packages, but it can be installed from the Internet. On the other hand, if we’re working with CentOS 7 we can download it from the EPEL repository. This repository is not part of the default repositories for CentOS 7 but it can be configured very easily by executing the following command:
1 [root@CentOS7 ~]# yum install epel-release
And now, we generate the KSK. As we said before, it can take quite a long time.
1 [root@localhost named]# dnssec-keygen -f KSK -a RSASHA1 -b 4096 -n ZONE olimpus.\
2 local
3 Generating key pair.............++..............................................\
4 ..........................................++
5 Kolimpus.local.+005+35116
Now we’ll have to add the key files we created before to the zone file.
1 [root@localhost named]# cat Kolimpus.local.*.key >> olimpus.local.zone
And sign the zone file.
1 [root@localhost named]# dnssec-signzone -N increment -o olimpus.local olimpus.lo\
2 cal.zone
3 Verifying the zone using the following algorithms: RSASHA1.
4 Zone signing complete:
5 Algorithm: RSASHA1: KSKs: 1 active, 0 stand-by, 0 revoked
6                     ZSKs: 1 active, 0 stand-by, 0 revoked
7 olimpus.local.zone.signed
Now we have a new olimpus.local.zone.signed file. We’ll have to change the definition of the olimpus.local zone in /etc/named.conf to point to this new file.
 1 .
 2 .
 3 .
 4 zone "olimpus.local" IN {
 5         type master;
 6         file "olimpus.local.zone.signed";
 7         notify yes;
 8 };
 9 .
10 .
11 .
And we restart the named service.
In CentOS 6:
1 [root@localhost named]# service named restart
2 Stopping named:                                            [  OK  ]
3 Starting named:                                            [  OK  ]
IN CentOS 7:
1 [root@CentOS7 named]# systemctl restart named
To make sure that DNSSEC is actually working we can query for the DNSKEY record of the domain like this:
 1 [root@localhost ~]# dig @192.168.1.20 DNSKEY olimpus.local. +multiline
 2 ;; Truncated, retrying in TCP mode.
 3
 4 ; <<>> DiG 9.7.3-P3-RedHat-9.7.3-8.P3.el6 <<>> @192.168.1.20 DNSKEY olimpus.loca\
 5 l. +multiline
 6 ; (1 server found)
 7 ;; global options: +cmd
 8 ;; Got answer:
 9 ;; ->>HEADER<<- opcode: QUERY, status: NOERROR, id: 48176
10 ;; flags: qr aa rd ra; QUERY: 1, ANSWER: 2, AUTHORITY: 0, ADDITIONAL: 0
11
12 ;; QUESTION SECTION:
13 ;olimpus.local.         IN DNSKEY
14
15 ;; ANSWER SECTION:
16 olimpus.local.          172800 IN DNSKEY 257 3 5 (
17                                 AwEAAeGilVrj9hxnmjRY9Yd9SqrBMwtiqKwfSda3wXhn
18                                 d3koFZQzVI129xRVxEhaXpQvcH4tZG724hE/NF/zq6jI
19                                 H2q6OtU0poslWLnRTE4Cte0EMP/Q4dSpSzLqjT4+cPrw
20                                 Fyfgvv7q+dHBHJ0TiWJjeSffFDFcACPfqY3KIFHNxgD3
21                                 bBwdO/GXgLDACBVoH7qVCNRBosuji24lmxwYu9qO0qX5
22                                 sTF1mhmKpOm4u02CEVhSnTeXlER4XermehqLhOLlodWl
23                                 R75EmAYc13SvMS9CoFc66eXEOpSLOl7F9eZQ/RHh/Wob
24                                 x74moN1uSwP32fTYhJZr3GXOTey+kfnpvhBIxXRa6nbB
25                                 2jfLsN0PMb4ZEYTAXOICtevRDYptuM3ytakPd3elNfrm
26                                 px9vxkFMye1/18diS/VWXD7RBc8wpbK0aQBMYV94dKhB
27                                 a3F6SV9tbXF7nTadG7k0I+US0kUSfppCjWr+TTwdfvGR
28                                 e/M7XPM1riBv/zUgSp7XzOKWdYT2mQjPR4xl21FcsSwy
29                                 tehCWoS+xGEd3y9AaW7RHAwPjeexMR30458/h1cqQcEs
30                                 QCQltl3uboqjFon3s4iHcHIqtpnBUC/TaonMA39pBTXt
31                                 VFPO+EV3YJBKFgGf1qZRW9aFAU+BHAnaRt2svPmBId7n
32                                 4O778a14Jgaco4b64Y6Ij3Mx8as5
33                                 ) ; key id = 9187
34 olimpus.local.          172800 IN DNSKEY 256 3 5 (
35                                 AwEAAb386KgB7QrWAWBZ9+uSaHjHmpW+3TpcGkCfh9T4
36                                 Znl6BJVb/kPp6DmfeTRzjFUQSbAGRiI3yvzJ9+iEUhra
37                                 dME=
38                                 ) ; key id = 28332
39
40 ;; Query time: 2 msec
41 ;; SERVER: 192.168.1.20#53(192.168.1.20)
42 ;; WHEN: Sun Aug  3 20:11:10 2014
43 ;; MSG SIZE  rcvd: 647
As we see, the query was answered correctly.
4.7.- Diagnostic tools
4.7.1.- rndc
Rndc is a great tool to manage the name server. If we remember, when we checked the status of the named service we saw a message saying “rndc: neither /etc/rndc.conf nor /etc/rndc.key was found”. These two files are needed by the command rndc to work. Rndc is a front-end to control the DNS server, so we’ll have to modify /etc/named.conf to allow rndc to manage the server. We can do it by hand, but is much easier to do it by typing rndc-confgen. This command will show a sample rndc.key and rndc.conf file that we can use.
Rndc-confgen will have to generate keys so it can take it as long as a few minutes to complete. A bit of patience is needed.
 1 [root@localhost ~]# rndc-confgen
 2 # Start of rndc.conf
 3 key "rndc-key" {
 4         algorithm hmac-md5;
 5         secret "Yg1R5vvMWBu/+P9RxCKm8g==";
 6 };
 7
 8 options {
 9         default-key "rndc-key";
10         default-server 127.0.0.1;
11         default-port 953;
12 };
13 # End of rndc.conf
14
15 # Use with the following in named.conf, adjusting the allow list as needed:
16 # key "rndc-key" {
17 #       algorithm hmac-md5;
18 #       secret "Yg1R5vvMWBu/+P9RxCKm8g==";
19 # };
20 #
21 # controls {
22 #       inet 127.0.0.1 port 953
23 #               allow { 127.0.0.1; } keys { "rndc-key"; };
24 # };
25 # End of named.conf
So we create a file named /etc/rnc.conf:
 1 # Start of rndc.conf
 2 key "rndc-key" {
 3         algorithm hmac-md5;
 4         secret "Yg1R5vvMWBu/+P9RxCKm8g==";
 5 };
 6
 7 options {
 8         default-key "rndc-key";
 9         default-server 127.0.0.1;
10         default-port 953;
11 };
12 # End of rndc.conf
And we modify the /etc/named.conf as instructed. Adding the lines generated by rndc-confgen.
We restart the service and try to execute rndc.
 1 [root@localhost named]# rndc status
 2 version: 9.7.3-P3-RedHat-9.7.3-8.P3.el6
 3 CPUs found: 1
 4 worker threads: 1
 5 number of zones: 22
 6 debug level: 0
 7 xfers running: 0
 8 xfers deferred: 0
 9 soa queries in progress: 0
10 query logging is OFF
11 recursive clients: 0/0/1000
12 tcp clients: 0/100
13 server is up and running
To see the options available we can use the -h option
 1 [root@localhost named]# rndc -h
 2 Usage: rndc [-b address] [-c config] [-s server] [-p port]
 3         [-k key-file ] [-y key] [-V] command
 4
 5 command is one of the following:
 6
 7   reload        Reload configuration file and zones.
 8   reload zone [class [view]]
 9                 Reload a single zone.
10   refresh zone [class [view]]
11                 Schedule immediate maintenance for a zone.
12   retransfer zone [class [view]]
13                 Retransfer a single zone without checking serial number.
14   freeze        Suspend updates to all dynamic zones.
15   freeze zone [class [view]]
16                 Suspend updates to a dynamic zone.
17   thaw          Enable updates to all dynamic zones and reload them.
18   thaw zone [class [view]]
19                 Enable updates to a frozen dynamic zone and reload it.
20   notify zone [class [view]]
21                 Resend NOTIFY messages for the zone.
22   reconfig      Reload configuration file and new zones only.
23   sign zone [class [view]]
24                 Update zone keys, and sign as needed.
25   loadkeys zone [class [view]]
26                 Update keys without signing immediately.
27   stats         Write server statistics to the statistics file.
28   querylog      Toggle query logging.
29   dumpdb [-all|-cache|-zones] [view ...]
30                 Dump cache(s) to the dump file (named_dump.db).
31   secroots [view ...]
32                 Write security roots to the secroots file.
33   stop          Save pending updates to master files and stop the server.
34   stop -p       Save pending updates to master files and stop the server
35                 reporting process id.
36   halt          Stop the server without saving pending updates.
37   halt -p       Stop the server without saving pending updates reporting
38                 process id.
39   trace         Increment debugging level by one.
40   trace level   Change the debugging level.
41   notrace       Set debugging level to 0.
42   flush         Flushes all of the server's caches.
43   flush [view]  Flushes the server's cache for a view.
44   flushname name [view]
45                 Flush the given name from the server's cache(s)
46   status        Display status of the server.
47   recursing     Dump the queries that are currently recursing (named.recursing)
48   validation newstate [view]
49                 Enable / disable DNSSEC validation.
50   *restart      Restart the server.
51   addzone ["file"] zone [class [view]] { zone-options }
52                 Add zone to given view. Requires new-zone-file option.
53   delzone ["file"] zone [class [view]]
54                 Removes zone from given view. Requires new-zone-file option.
55
56 * == not yet implemented
57 Version: 9.7.3-P3-RedHat-9.7.3-8.P3.el6
4.7.2.- dig
We have already seen this tool, we can use it to query a DNS server and specify the type of register we want to know about. For instance, to know the mail server of the domain olimpus.local we’d type this:
 1 [root@localhost ~]# dig mx @192.168.1.21 olimpus.local
 2
 3 ; <<>> DiG 9.7.3-P3-RedHat-9.7.3-8.P3.el6 <<>> mx @192.168.1.21 olimpus.local
 4 ; (1 server found)
 5 ;; global options: +cmd
 6 ;; Got answer:
 7 ;; ->>HEADER<<- opcode: QUERY, status: NOERROR, id: 3247
 8 ;; flags: qr aa rd ra; QUERY: 1, ANSWER: 1, AUTHORITY: 2, ADDITIONAL: 4
 9
10 ;; QUESTION SECTION:
11 ;olimpus.local.                 IN      MX
12
13 ;; ANSWER SECTION:
14 olimpus.local.          172800  IN      MX      10 prometheus.olimpus.local.
15
16 ;; AUTHORITY SECTION:
17 olimpus.local.          172800  IN      NS      prometheus.olimpus.local.
18 olimpus.local.          172800  IN      NS      delphos.olimpus.local.
19
20 ;; ADDITIONAL SECTION:
21 prometheus.olimpus.local. 172800 IN     A       192.168.1.21
22 prometheus.olimpus.local. 172800 IN     AAAA    fe80::20c:29ff:feeb:4443
23 delphos.olimpus.local.  172800  IN      A       192.168.1.20
24 delphos.olimpus.local.  172800  IN      AAAA    fe80::20c:29ff:fe78:4cb1
25
26 ;; Query time: 12 msec
27 ;; SERVER: 192.168.1.21#53(192.168.1.21)
28 ;; WHEN: Sun Aug  3 04:37:03 2014
29 ;; MSG SIZE  rcvd: 182
If we don’t want to be overwhelmed with so much information we can tell dig not to show all the details of the query (+noall) and include only the answer itself(+answer).
1 [root@localhost ~]# dig +noall +answer mx @192.168.1.21 olimpus.local
2 olimpus.local.          172800  IN      MX      10 prometheus.olimpus.local.
We can also ask for a complete zone transfer.
 1 [root@localhost ~]# dig axfr @192.168.1.20 olimpus.local
 2
 3 ; <<>> DiG 9.7.3-P3-RedHat-9.7.3-8.P3.el6 <<>> axfr @192.168.1.20 olimpus.local
 4 ; (1 server found)
 5 ;; global options: +cmd
 6 olimpus.local.          172800  IN      SOA     olimpus.local. root.olimpus.loca\
 7 l. 2014090103 60 7200 604800 172800
 8 olimpus.local.          172800  IN      NS      delphos.olimpus.local.
 9 olimpus.local.          172800  IN      NS      prometheus.olimpus.local.
10 olimpus.local.          172800  IN      MX      10 prometheus.olimpus.local.
11 aphrodite.olimpus.local. 172800 IN      A       192.168.1.22
12 delphos.olimpus.local.  172800  IN      AAAA    fe80::20c:29ff:fe78:4cb1
13 delphos.olimpus.local.  172800  IN      A       192.168.1.20
14 dns.olimpus.local.      172800  IN      CNAME   delphos.olimpus.local.
15 mail.olimpus.local.     172800  IN      CNAME   prometheus.olimpus.local.
16 prometheus.olimpus.local. 172800 IN     AAAA    fe80::20c:29ff:feeb:4443
17 prometheus.olimpus.local. 172800 IN     A       192.168.1.21
18 vulcan.olimpus.local.   172800  IN      AAAA    fe80::20c:29ff:fedf:d786
19 vulcan.olimpus.local.   172800  IN      A       192.168.1.23
20 olimpus.local.          172800  IN      SOA     olimpus.local. root.olimpus.loca\
21 l. 2014090103 60 7200 604800 172800
22 ;; Query time: 6 msec
23 ;; SERVER: 192.168.1.20#53(192.168.1.20)
24 ;; WHEN: Sun Aug  3 05:46:46 2014
25 ;; XFR size: 14 records (messages 1, bytes 373)
4.7.3.- host
Host is a tool quite similar to dig, the syntax is slightly different though.
1 [root@localhost ~]# host prometheus.olimpus.local 192.168.1.20
2 Using domain server:
3 Name: 192.168.1.20
4 Address: 192.168.1.20#53
5 Aliases:
6
7 prometheus.olimpus.local has address 192.168.1.21
8 prometheus.olimpus.local has IPv6 address fe80::20c:29ff:feeb:4443
4.8.- Troubleshooting
As every sysadmin knows, unfortunately incidents happen, and sometimes the things don’t work as expected, or don’t work at all. These are some of the most common scenarios we could see.
4.8.1.- A computer can’t resolve names
If there is only a small percentage of computers that cannot resolve names, that is probably a problem with the client computers themselves. We’ll have to check that the computer has set correctly the address of the DNS server in the network. In the case of a Linux, this is configured in the file /etc/resolv.conf. For instance, if the DNS server is 192.168.1.20, the /etc/resolv.conf file should be something like this.
1 [root@localhost ~]# cat /etc/resolv.conf
2 nameserver 192.168.1.20
If the file is correct we’d have to check also the network configuration and the physical connection to the network.
4.8.2.- Many computers can’t resolve names
If there are many computers unable to resolve names there might be some problem with the DNS server itself. First of all we’ll have to check that the service is running.
 1 [root@localhost ~]# service named status
 2 version: 9.7.3-P3-RedHat-9.7.3-8.P3.el6
 3 CPUs found: 1
 4 worker threads: 1
 5 number of zones: 22
 6 debug level: 0
 7 xfers running: 0
 8 xfers deferred: 0
 9 soa queries in progress: 0
10 query logging is OFF
11 recursive clients: 0/0/1000
12 tcp clients: 0/100
13 server is up and running
14 named (pid  8616) is running...
If the service is up and running the next step we should take is to make sure that the service can be accessed from the network. As we said before, the DNS queries are addressed to UDP port 53 in the server, so we can use nmap from a client computer to check whether the port is open or not.
1 [root@localhost ~]# nmap -sU -p 53 192.168.1.20
2
3 Starting Nmap 5.21 ( http://nmap.org ) at 2014-08-03 05:40 CEST
4 Nmap scan report for delphos.olimpus.local (192.168.1.20)
5 Host is up (0.00085s latency).
6 PORT   STATE    SERVICE
7 53/udp filtered domain
8 MAC Address: 00:0C:29:78:4C:B1 (VMware)
In this case the port is filtered, that’s the reason why the clients can’t resolve names, they’re unable to contact the name server.
 1 [root@localhost ~]# nmap -sU -p 53 192.168.1.20
 2
 3 Starting Nmap 5.21 ( http://nmap.org ) at 2014-08-03 06:23 CEST
 4 Nmap scan report for delphos.olimpus.local (192.168.1.20)
 5 Host is up (0.00033s latency).
 6 PORT   STATE SERVICE
 7 53/udp open  domain
 8 MAC Address: 00:0C:29:78:4C:B1 (VMware)
 9
10 Nmap done: 1 IP address (1 host up) scanned in 0.07 seconds
But now the port is open. We should perform a query from the client computer by using dig or host.
 1 [root@localhost ~]# dig @192.168.1.20 delphos.olimpus.local
 2
 3 ; <<>> DiG 9.7.3-P3-RedHat-9.7.3-8.P3.el6 <<>> @192.168.1.20 delphos.olimpus.loc\
 4 al
 5 ; (1 server found)
 6 ;; global options: +cmd
 7 ;; Got answer:
 8 ;; ->>HEADER<<- opcode: QUERY, status: NOERROR, id: 51991
 9 ;; flags: qr aa rd ra; QUERY: 1, ANSWER: 1, AUTHORITY: 2, ADDITIONAL: 3
10
11 ;; QUESTION SECTION:
12 ;delphos.olimpus.local.         IN      A
13
14 ;; ANSWER SECTION:
15 delphos.olimpus.local.  172800  IN      A       192.168.1.20
16
17 ;; AUTHORITY SECTION:
18 olimpus.local.          172800  IN      NS      delphos.olimpus.local.
19 olimpus.local.          172800  IN      NS      prometheus.olimpus.local.
20
21 ;; ADDITIONAL SECTION:
22 delphos.olimpus.local.  172800  IN      AAAA    fe80::20c:29ff:fe78:4cb1
23 prometheus.olimpus.local. 172800 IN     A       192.168.1.21
24 prometheus.olimpus.local. 172800 IN     AAAA    fe80::20c:29ff:feeb:4443
25
26 ;; Query time: 2 msec
27 ;; SERVER: 192.168.1.20#53(192.168.1.20)
28 ;; WHEN: Sun Aug  3 06:26:04 2014
29 ;; MSG SIZE  rcvd: 166
In this case the DNS server seems to be working fine. The client made a query and got an answer.
 1 [root@localhost ~]# dig @192.168.1.20 neptune.olimpus.local
 2
 3 ; <<>> DiG 9.7.3-P3-RedHat-9.7.3-8.P3.el6 <<>> @192.168.1.20 neptune.olimpus.loc\
 4 al
 5 ; (1 server found)
 6 ;; global options: +cmd
 7 ;; Got answer:
 8 ;; ->>HEADER<<- opcode: QUERY, status: NXDOMAIN, id: 60601
 9 ;; flags: qr aa rd ra; QUERY: 1, ANSWER: 0, AUTHORITY: 1, ADDITIONAL: 0
10
11 ;; QUESTION SECTION:
12 ;neptune.olimpus.local.         IN      A
13
14 ;; AUTHORITY SECTION:
15 olimpus.local.          172800  IN      SOA     olimpus.local. root.olimpus.loca\
16 l. 2014090103 60 7200 604800 172800
17
18 ;; Query time: 2 msec
19 ;; SERVER: 192.168.1.20#53(192.168.1.20)
20 ;; WHEN: Sun Aug  3 06:26:21 2014
21 ;; MSG SIZE  rcvd: 80
On the other hand, in this case the server answered the query, but it couldn’t find any neptune.olimpus.local register. It might not exist in the zone or maybe the server has an outdated zone file.
4.8.3.- Master and slave server don’t have the same information
If the slave server has outdated information, we need to know whether there is a problem with zone transfers. As we have seen, we can use dig on the slave server to request a zone transfer.
1 [root@localhost ~]# dig axfr @192.168.1.20 olimpus.local
2 ;; Connection to 192.168.1.20#53(192.168.1.20) for olimpus.local failed: host un\
3 reachable.
In this case we couldn’t perform the zone transfer, the TCP port 53 on the master server is probably closed or filtered.
 1 [root@localhost ~]# dig axfr @192.168.1.20 olimpus.local
 2
 3 ; <<>> DiG 9.7.3-P3-RedHat-9.7.3-8.P3.el6 <<>> axfr @192.168.1.20 olimpus.local
 4 ; (1 server found)
 5 ;; global options: +cmd
 6 olimpus.local.          172800  IN      SOA     olimpus.local. root.olimpus.loca\
 7 l. 2014090103 60 7200 604800 172800
 8 olimpus.local.          172800  IN      NS      delphos.olimpus.local.
 9 olimpus.local.          172800  IN      NS      prometheus.olimpus.local.
10 olimpus.local.          172800  IN      MX      10 prometheus.olimpus.local.
11 aphrodite.olimpus.local. 172800 IN      A       192.168.1.22
12 delphos.olimpus.local.  172800  IN      AAAA    fe80::20c:29ff:fe78:4cb1
13 delphos.olimpus.local.  172800  IN      A       192.168.1.20
14 dns.olimpus.local.      172800  IN      CNAME   delphos.olimpus.local.
15 mail.olimpus.local.     172800  IN      CNAME   prometheus.olimpus.local.
16 prometheus.olimpus.local. 172800 IN     AAAA    fe80::20c:29ff:feeb:4443
17 prometheus.olimpus.local. 172800 IN     A       192.168.1.21
18 vulcan.olimpus.local.   172800  IN      AAAA    fe80::20c:29ff:fedf:d786
19 vulcan.olimpus.local.   172800  IN      A       192.168.1.23
20 olimpus.local.          172800  IN      SOA     olimpus.local. root.olimpus.loca\
21 l. 2014090103 60 7200 604800 172800
22 ;; Query time: 6 msec
23 ;; SERVER: 192.168.1.20#53(192.168.1.20)
24 ;; WHEN: Sun Aug  3 05:46:46 2014
25 ;; XFR size: 14 records (messages 1, bytes 373)
Now the transfer zone was correct. We can use rndc to request a zone transfer on the slave server.
1 [root@localhost ~]# rndc retransfer olimpus.local
2 [root@localhost ~]#
4.9.- Log files
Maybe the most important tool when troubleshooting are the log files. In a default installation of bind, the log file will be /var/named/data/named.run. This is defined in the following lines of the /etc/named.conf file:
1 logging {
2         channel default_debug {
3                 file "data/named.run";
4                 severity dynamic;
5         };
6 };
By watching this file we can monitor the state of the server. For instance, this could be part of the log file.
 1 .
 2 .
 3 .
 4 received control channel command 'stop'
 5 shutting down: flushing changes
 6 stopping command channel on 127.0.0.1#953
 7 no longer listening on ::#53
 8 no longer listening on 127.0.0.1#53
 9 no longer listening on 192.168.1.20#53
10 exiting
11 zone 0.in-addr.arpa/IN: loaded serial 0
12 zone 1.0.0.127.in-addr.arpa/IN: loaded serial 0
13 zone 1.168.192.in-addr.arpa/IN: loaded serial 2014090102
14 zone 1.0.0.0.0.0.0.0.0.0.0.0.0.0.0.0.0.0.0.0.0.0.0.0.0.0.0.0.0.0.0.0.ip6.arpa/IN\
15 : loaded serial 0
16 zone 0.0.0.0.0.0.0.0.0.0.0.0.0.8.e.f.ip6.arpa/IN: loaded serial 2014090102
17 zone olimpus.local/IN: loaded serial 2014090103
18 zone localhost.localdomain/IN: loaded serial 0
19 zone localhost/IN: loaded serial 0
20 .
21 .
22 .
In this case we can see that the name server stopped and started to load the zone files again.