8. Updating server data
8.1 Action parameters
When updating server data, you need to pass information from the browser to your application. This is simply handled by the routing system which will call your actions with parameters.
Let’s look again at the default route in the Global.asax file
Note the {id} part? It means that anything coming after the action name (and separated from it by a slash sign) will be considered as an id parameter. And that this parameter is optional.
In order to get this parameter, all you have to do is add a parameter with the same name to you action method. For instance :
Considering the default route, this action can be called simply by typing the following URL :
In that case, our ProductsController.Action1 method will be invoked with a value of abcd for its id parameter.
We could add as many parameters as needed to our action and modify the route accordingly. Needless to say that parameters should be short, since they add up to the URL length.
Whatever happens, we can also pass action parameters using query parameters. Consider for instance the following action :
In order to invoke it with an id value of 15 and a newName value of sandwich, we can simply use the following URL
Note that sandwich is passed as a query parameter since it’s not part of the route definition. We could also modify the route definition - or add a new one - in order to make it part of the URL.
8.2 Word of caution about URLs
As we saw earlier, route definitions may change later, for instance in order to improve SEO or provide user-friendly URLs. Which means it’s important not to rely on them in your views.
The following view code will break if the route change, so avoid using it :
<a href="/home/index/3">Some page</a>
Instead, you should prefer :
or even :
<a href="@Url.Action("Index", "Home", new { id=3 })">\
Some page</a>
8.3 Do-it-yourself 8 - Display product details
8.4 HTTP Post parameters
Providing action parameters through the URLs is adapted for short parameters that can appear to the user. In case you want to pass longer action parameters or hide them from the URL, you can pass them as form data. It’s almost as simple.
The view should declare a form in order to have the parameters sent :
<form method="post">
    First Name: <input name="firstname" type="text" />
    <input type="submit" />
</form>
In order to get the parameter, all that our view needs to to is declare a parameter with the same name :
Note the [HttpPost] attribute attached to the action method. By default, an action only reacts to HTTP GET requests, that’s why we need it for a HTTP POST.
Now, if you don’t want ASP.NET MVC to generate part of your form, you can use an HTML helper. Our view above would become
The same would go for the HTML input field and submit.
8.5 Passing a full blown object
ASP.NET MVC can make your job easy when you need to update full objects. Let’s suppose you created a Person class :
You can write an action that takes a Person object as a parameter
All you need to do is to make sure that the incoming HTTP request contains parameters whose names match the properties declared in the Person class. ASP.NET will create a Person instance and pass it to your action.
For instance, we could write the following matching view :
8.6 Sit and watch - Basic product calculator
Let’s begin with a simple example. I want to create a page that allows users to compute the product of two numbers. Easy. I’ll first write a ViewModel class :
As seen earlier, a ViewModel can have properties for everything that is input by and output to the user.
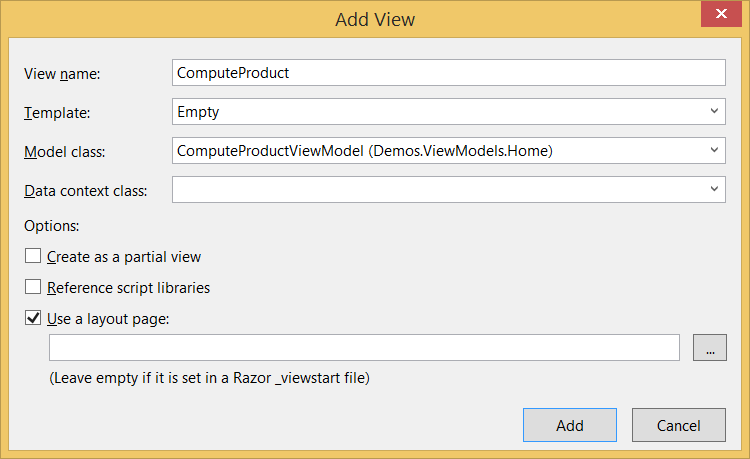
I’ll then add a ComputeProduct action method to my Home controller. Note that it takes two parameters: the numbers to multiply :
Now I’ll right-click the ComputeProduct method and select Add View... from the contextual menu, then select an Empty template and my ViewModel as a model for my view :
As my view code I’ll type :
<h2>Product of two numbers</h2>
@using (Html.BeginForm())
{
@Html.TextBoxFor(m => m.Number1)
@Html.TextBoxFor(m => m.Number2)
<input type="submit" value="Compute" />
}
<label>Result: @Html.DisplayFor(m=>m.Result)</label>
Not much new here, except for the use of two HTML helpers
- Html.TextBoxFor generates an input field for a given model member
- Html.Diplay generates a display element for a given model member
Both come in very handy since they take a lambda expression that provides your model and expects the member for with to generate the HTML element. Since we have a typed model thanks to the @model directive, it’s plain easy to type thanks to IntelliSense and C# type-inference. Try it in your own Visual Studio and you’ll be surprised how streamlined the experience is.
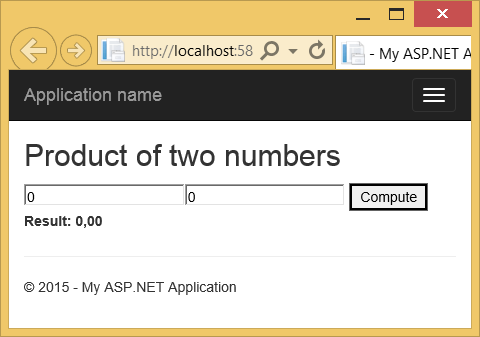
Let’s run our view (Debug / Start Without Debugging menu). We get the following result in our browser :
Of course, if works. When we input some numbers and click the Compute button, we get our result :
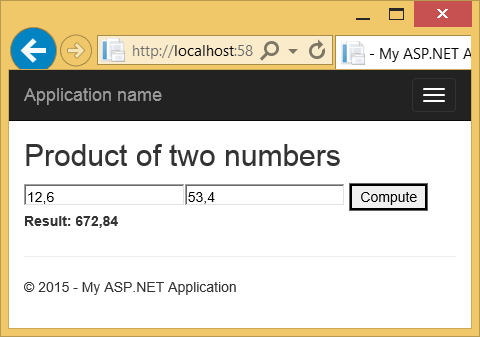
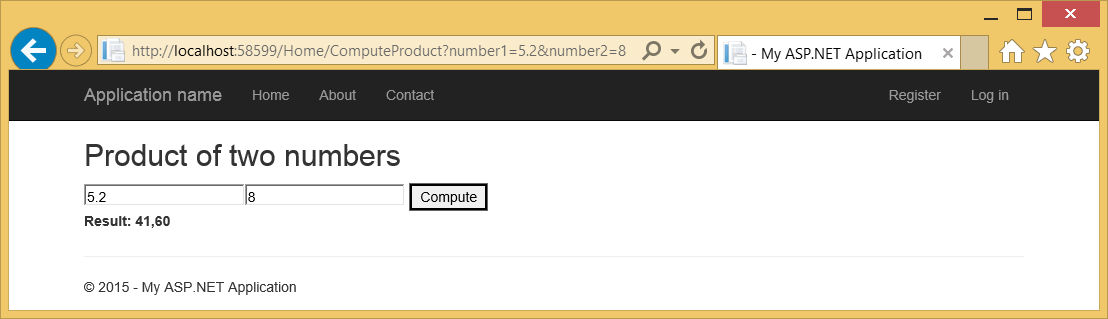
It works. No surprise. Just one more thing: remember we can provide action parameters using URL query parameters? It works here too. If we call our calculator view using the following URL :
…we get the following result without event clicking the Compute button (notice the URL) :