6. February 2014
- Creating an Eclipse UI to run AngularJS e2e tests using Karma
- Using Firebase to sync data with a webpage (via Javascript, REST and Firebase Admin panel)
- XSS considerations when developing with Firebase
- Eclipse Groovy REPL script to sync a Browser with file changes (with recursive folder search via Java’s WatchService)
- Really SIMPLE and clean AngularJS + Firebase example
- Using AngularJS in Eclipse, Part 1) The Basics
Creating an Eclipse UI to run AngularJS e2e tests using Karma
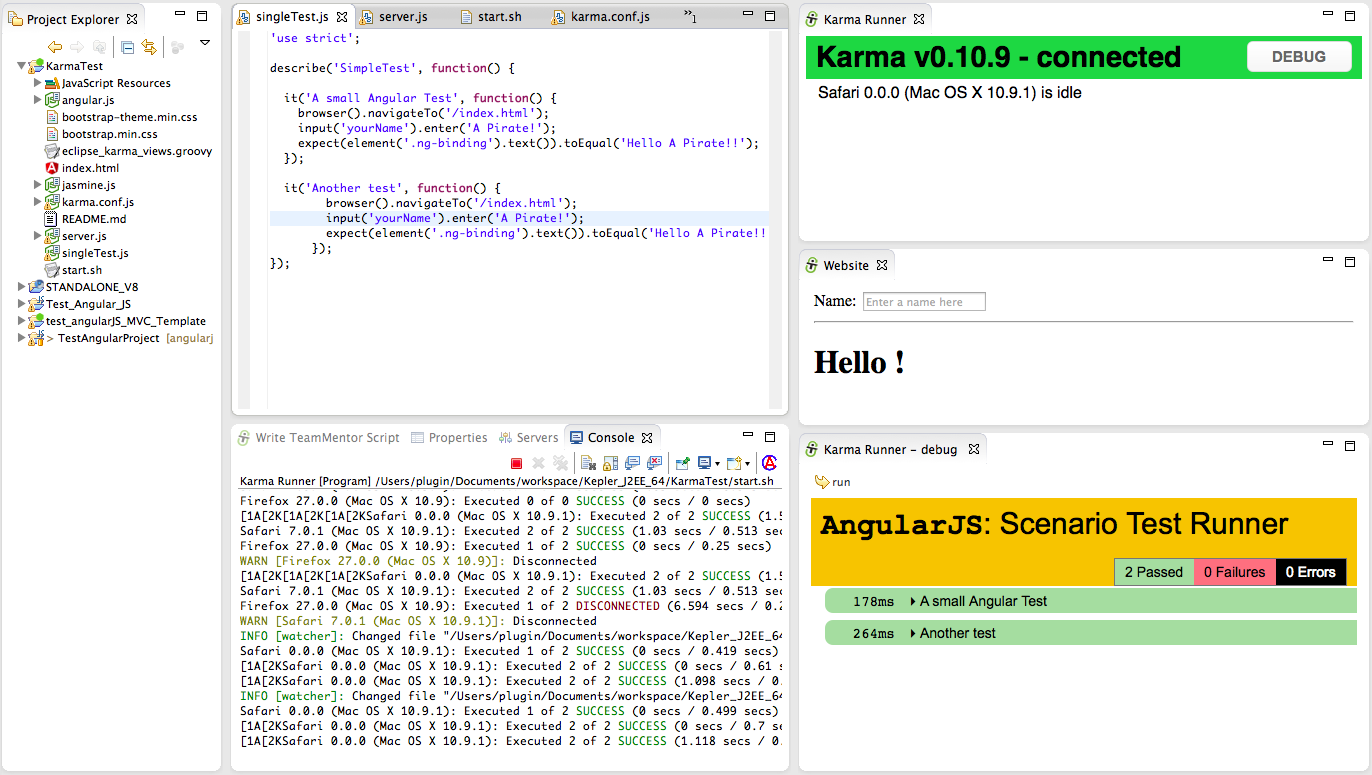
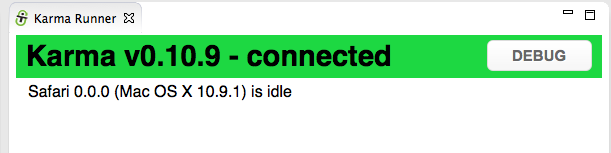
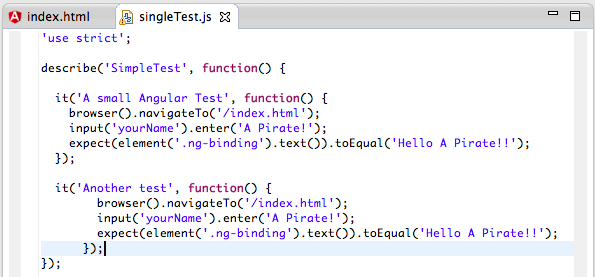
This post shows how I created a nice set of views in Eclipse to quickly see the execution result of AngularJS e2e (end-to-end) tests, without leaving the Eclipse UI.
The image below shows this UI in action, where:
- The source code of the test is shown in the Eclipse Java editor
- Just below is the console out of the Karma runner (which is detecting files changes)
- On the top-right is the hooked browser (i.e. the one that will run the tests)
- On the middle-right is the simple AngularJS Hello World page
- On the bottom-right is the debug view of the hooked browser (which is what you get if you click on the Debug Button included on the top-right page)
Here are the tools and Eclipse Plugins used to create this UI:
- Eclipse Kepler for Java EE Developers with:
- NodeJs with
Although the AngularJS and NodeJs Eclipse plugins provide nice helpers and views, they didn’t provide (yet) the kind of UI that I was looking for. Namely they didn’t support the use of KarmaJS to run AngularJS tests.
But since I now have the ability to quickly manipulate and create new Eclipse views without restarting Eclipse (using the Groovy REPL script environment ) it was not very hard to create the UI that I wanted (see Eclipse Plugin that allows the execution of REPL Groovy Scripts (in the current Eclipse Instance) and Fluent API for Eclipse+SWT).
Basically the brief was to:
- Create new (Eclipse) view with a browser showing http://localhost:9879/__karma/ (the KarmaJs browser runner/hook)
- Create new view with a browser showing http://localhost:9879/index.html (the AngularJS page)
- Create new view with a browser showing http://localhost:9879/__karma/debug.html (debug view of Karma runner), with an toolbar button to refresh it.
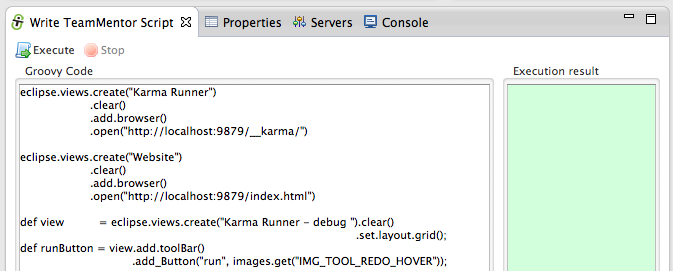
Here is the Groovy code* with the code that creates this 3 Eclipse views:
 1 eclipse.views.create("Karma Runner")
 2          .clear()
 3          .add.browser()
 4          .open("http://localhost:9879/__karma/")
 5
 6 eclipse.views.create("Website")
 7          .clear()
 8          .add.browser()
 9          .open("http://localhost:9879/index.html")
10
11 def view      = eclipse.views.create("Karma Runner - debug ").clear()
12                                                                                                 .set.layout.gr\
13 id();
14 def runButton = view.add.toolBar()
15                 .add_Button("run", images.get("IMG_TOOL_REDO_HOVER"));
16
17 def browser   = view.add.panel()
18              .set.layout.grid_Grab().add.browser();
19
20 def openKarmaDebug = new Runnable() { public void run()
21     {
22         Thread.start {
23                 browser.open("http://localhost:9879/__karma/debug.html");
24                 view.refresh();
25                  };
26     }};
27
28 runButton.onClick(openKarmaDebug);
29
30 view.refresh();
31
32 openKarmaDebug.run();
33
34
35 //Config:UIThread_False
Hopefully this script is easier to read (the idea of the Fluent API that I added to the Groovy REPL was allow the easy reading and understanding of scripts like this).
1) Setting up the environment
Now lets look at how this environment was setup:
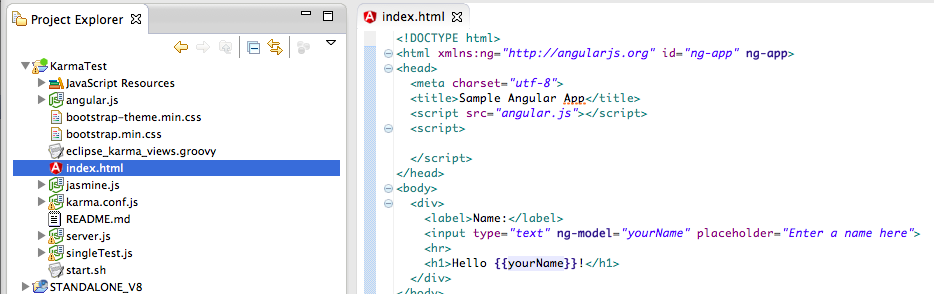
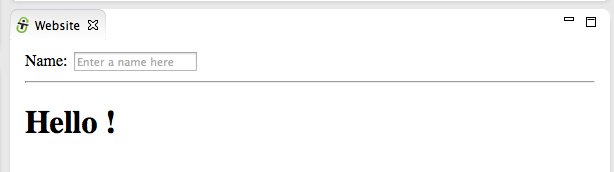
We start with a simple AngularJS project test page that will just show the model-binding capabilities of AngularJS (yes I know that all those JS files should be in separate folders :) )
Then I opened up Groovy REPL script environment and wrote the Groovy script shown above:
Clicking on _Execute _will create 3 views:
a) the Karma Runner view:
b) the Website view:
c) the Karma Runner - debug view:
… which (as seen in the first screenshot of this post) looks like this:
Part of this UI (but not created using the Groovy script) is an Eclipse Console with the ‘Karma Runner process’ console out

The AngularJS tests were executed when the Karma Runner view was opened, because the Karma process (configured via Karma.config.js) is set to wait for new browser’s hooks/runners and (on connection or code changes) execute the configured tests.
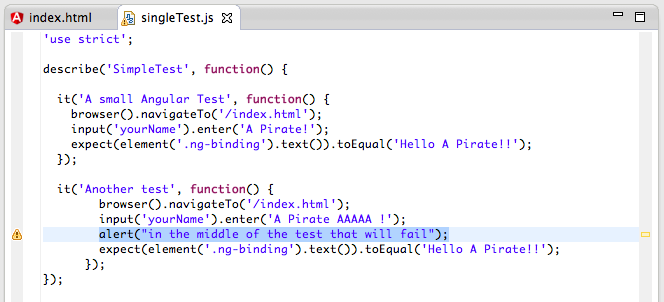
2) Making changes to existing tests
To see Karma in action, let’s make a test fail :)
The current AngularJS page is basically just echoing/binding the contents of the Name TextBox into the H1 tag:
Here is the test that is currently being executed, which is an e2e test that runs on the browser (just like Selenium or Watin).
Hopefully this type of Fluent API is easy to read:
- browser navigates to /index.html
- value is inserted into the yourName input field (the TextBox)
- the value of the binded element (.ng-binding) is checked to see if it matches
To make this test fail, let’s change just the yourName value:
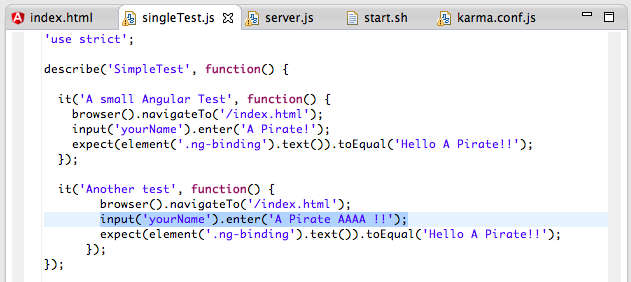
Immediately after saving the test with the changes shown above, Karma refreshes the hooked browsers in order to trigger the execution of the tests.
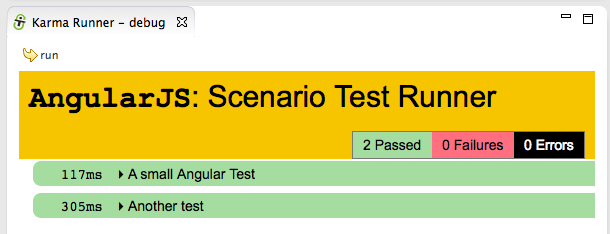
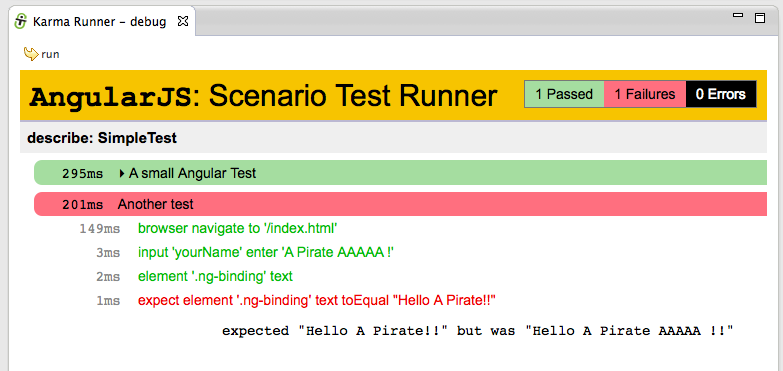
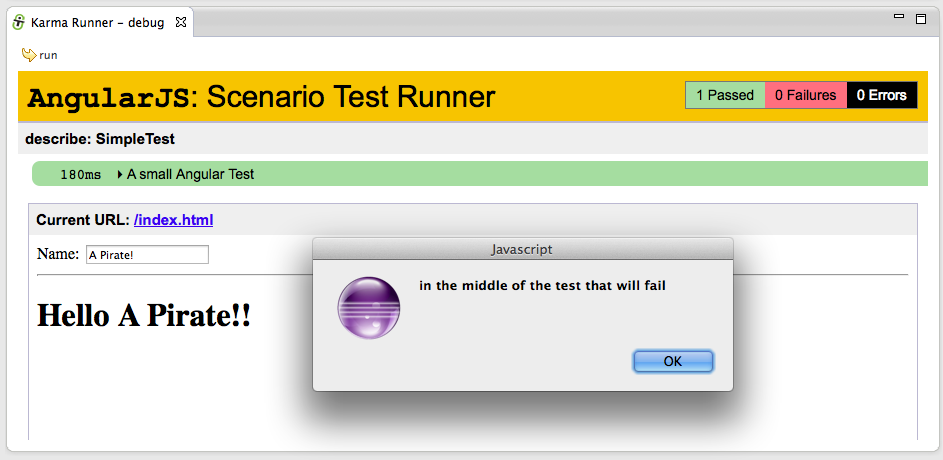
And as the image below will show, there is now one failed test:
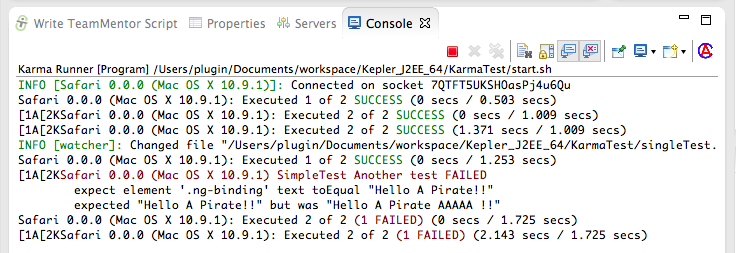
In cases like this, the Karma Runner - debug is very useful since it will show more details on what happened, and where the test failed:
Just to confirm that the page is actually being loaded and the tests are happening in a real browser instance, if we add an Javascript alert to the current test:
… we will get an alert box in the Karma Runner - debug (note that on the screenshot below we are seeing the image of the final state of execution of the previous test (in this case the ‘A small Angular Test’)
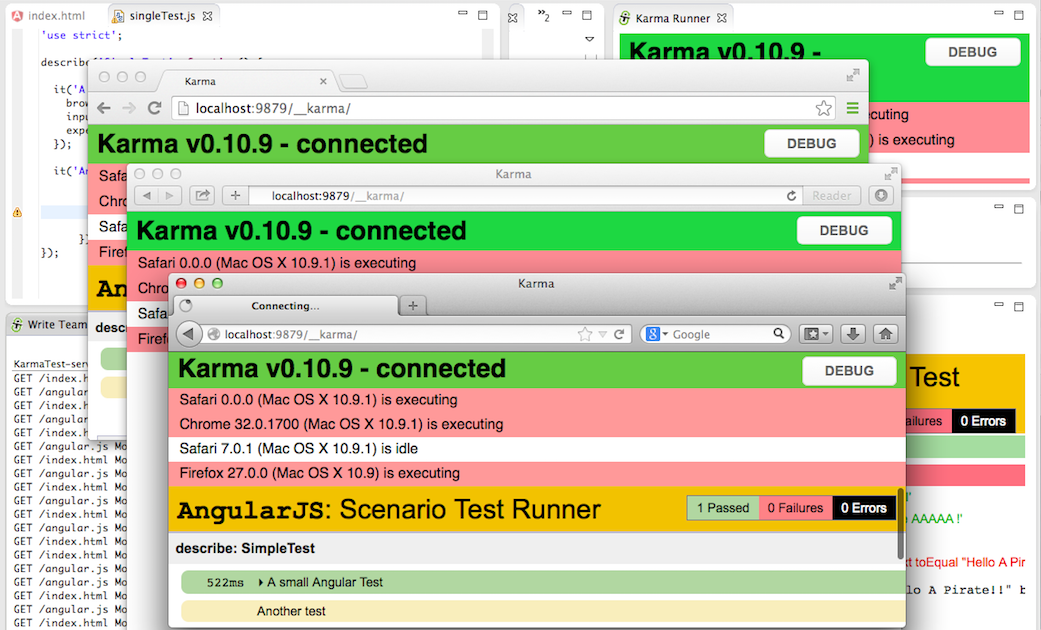
3) Hooking multiple browsers and only failing on Firefox
In order to run the tests in multiple browsers all we need to do is to open the http://localhost:9879/__karma/ page (in the target browser), and a test execution will be triggered.
Note how on the image below:
- Eclipse is in the background (containing the views previously created and showing the console out of the Karma test runner process)
- There are 3 stand lone browser windows (Chrome, Safari and Firefox)
- Firefox (top most window) shows the tests being executed (in green the test executed, in yellow the test being executed)
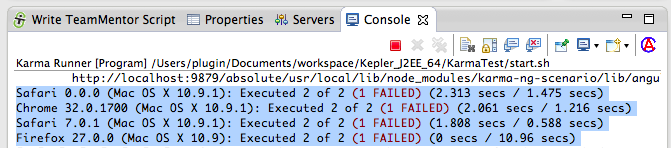
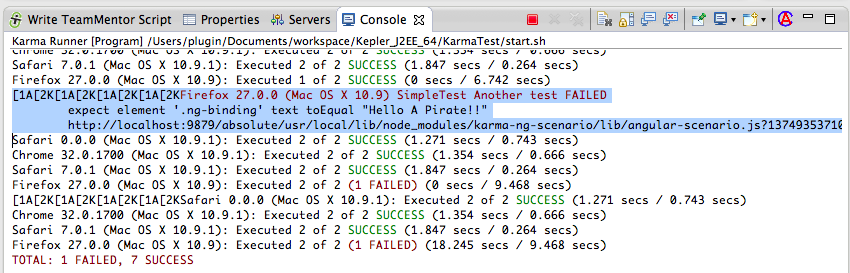
After execution, a quick look at the Karma runner shows that the modified test failed (as expected) on all browsers:
Just to make sure all is working as expected, let’s create a test that will fail only in one browser.
For example Firefox is the only one that has defined the navigator.userAgent.contains Javascript function (so we can use this to detect Firefox, and create a test that will only fail if executed inside it):
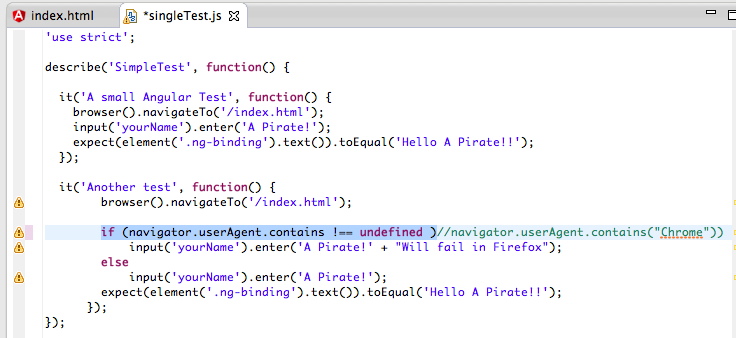
After saving the changes, the tests will be executed on all 4 browsers, with the one test that failed being the one executed in Firefox:
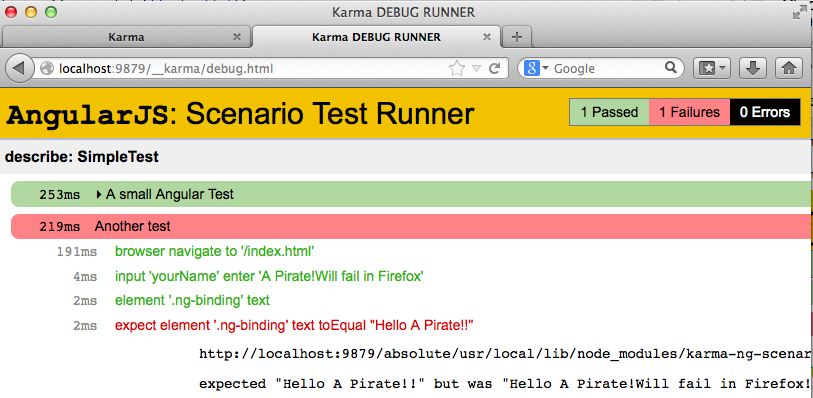
Refreshing the Firefox debug runner, shows the failed test and assert:
4) Setup
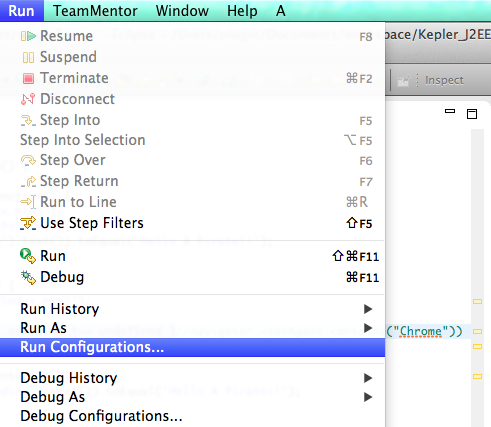
In addition to creating the views programmatically, I also setup an Eclipse Run configurations for NodeJS and an External Tools Configuration for KarmaJS.
The NodeJS configuration was done here:
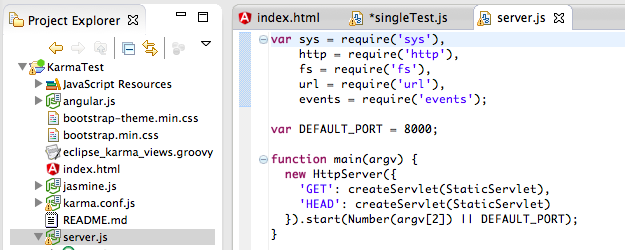
… where I created a Node Application runner that was pointed to server.js
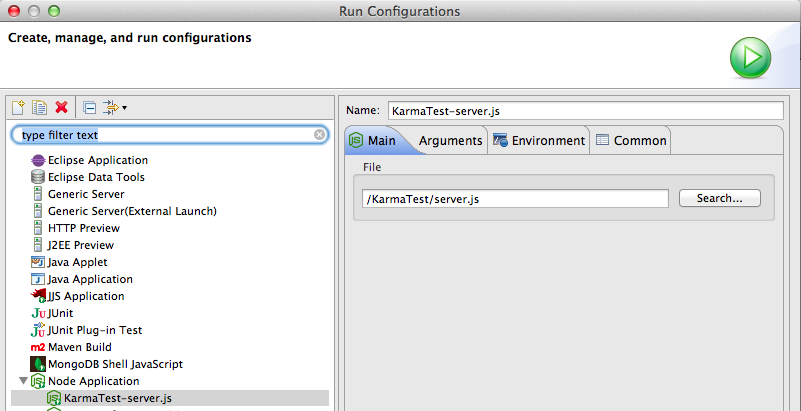
… which contains a simple NodeJS web server (we could also had used NodeJS Express, but that would had added a lot of other ‘stuff’ to this project)
The KarmaJS config was done as an External Tools Configuration

… where I simply run the start.sh bash file
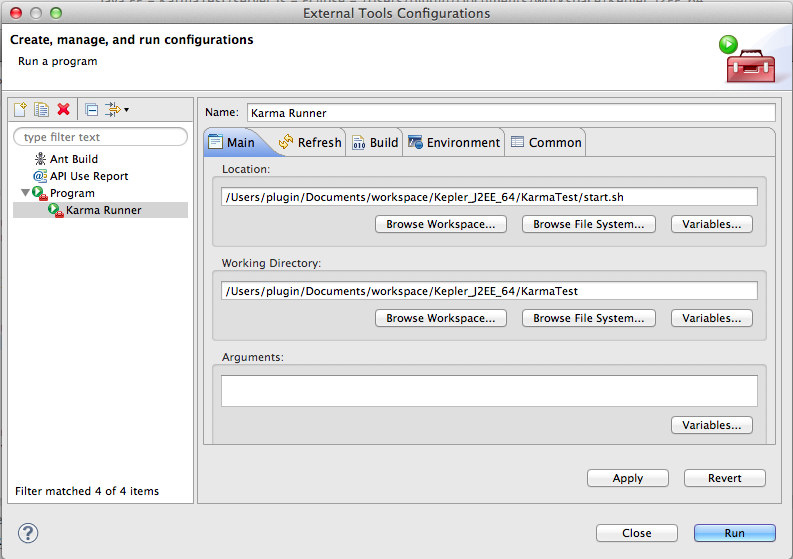
… which starts KarmaJS:

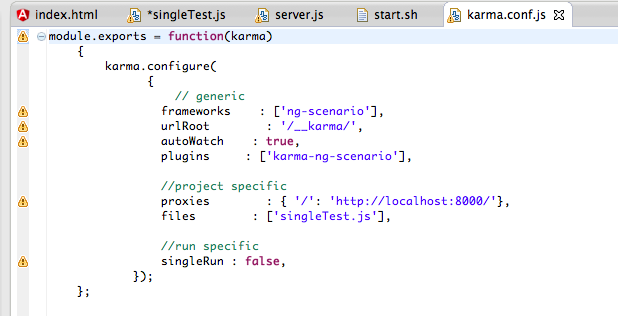
… using this simple _karma.conf.js configuration
 ]
]
Note: I started the Karma process like this because there was an issue with KarmaJS finding the NodeJS executable from Eclipse (and at the time I didn’t had time to debug why that was happening)
External References:
- AngularJS docs on E2E Testing
- AngularJS Testing with Karma and Jasmine
- Test runners for AngularJS - how to run the tests from eclipse IDE and CI server without too much complication?
- How to run KarmaJS from Eclipse
- Setting-up AngularJS, Angular Seed, Node.js and Karma
- Can’t run e2e tests with karma (for angular)
Using Firebase to sync data with a webpage (via Javascript, REST and Firebase Admin panel)
If you haven’t seen the Anant Narayanan presentation on AngularJS conference called Building realtime apps with Firebase and AngularJS you are missing something good.
Firebase really seems to fix one of the pain points that I currently have in client-server development, which is how to send/synchronise data across multiple clients (including the server).
I first heard about Firebase from the Wire up a Backend example that can be found at http://angularjs.org, and today I was able to give it a test drive (since I want to use it on the AngularJS front-ends that I’m currently developing for TeamMentor)
1) Creating an Firebase account
Lets start with creating an account and following the Firebase 5 minute tutorial.
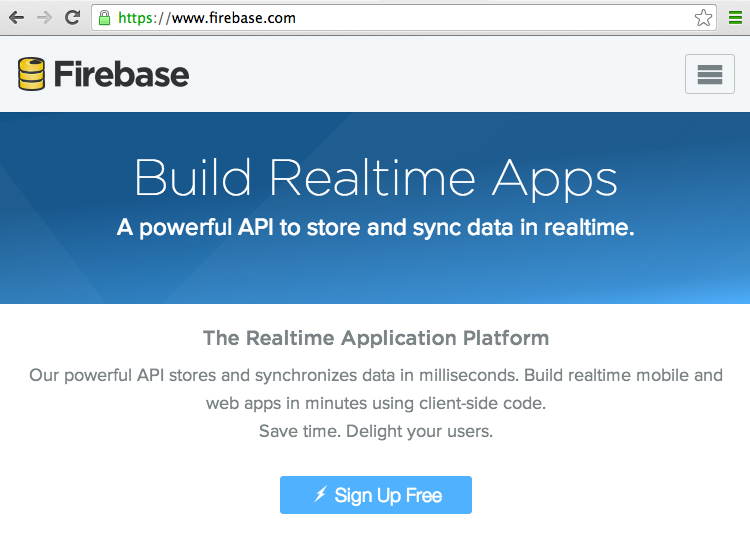
The process of creating an account is just a case of going to https://firebase.com
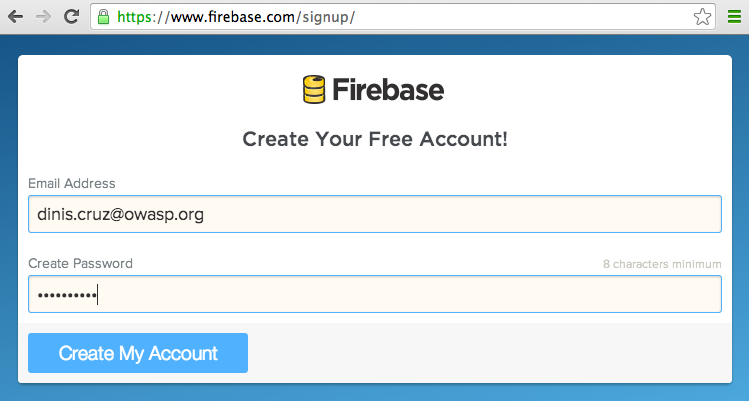
… choosing a username and password (there is also the option to create an account based on an GitHub account)
… and that’s it:
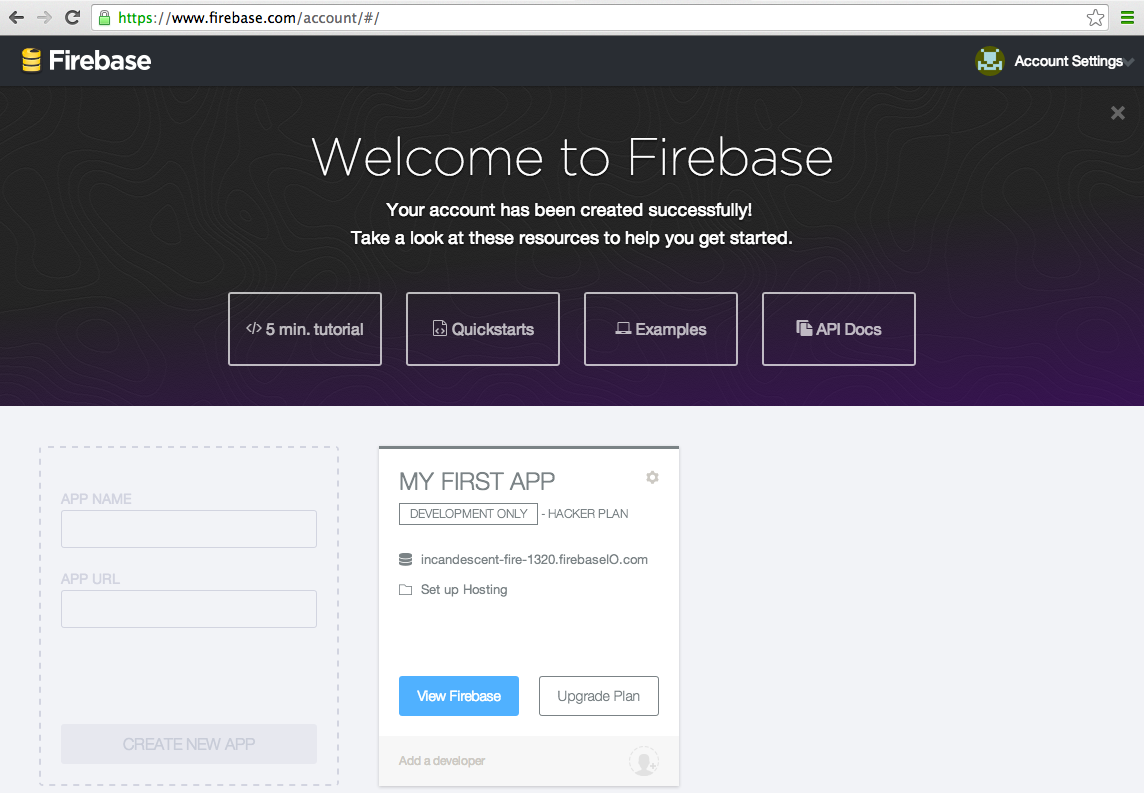
Firebase by default creates a test app, which can be immediately accessed by clicking on the blue View Firebase button:

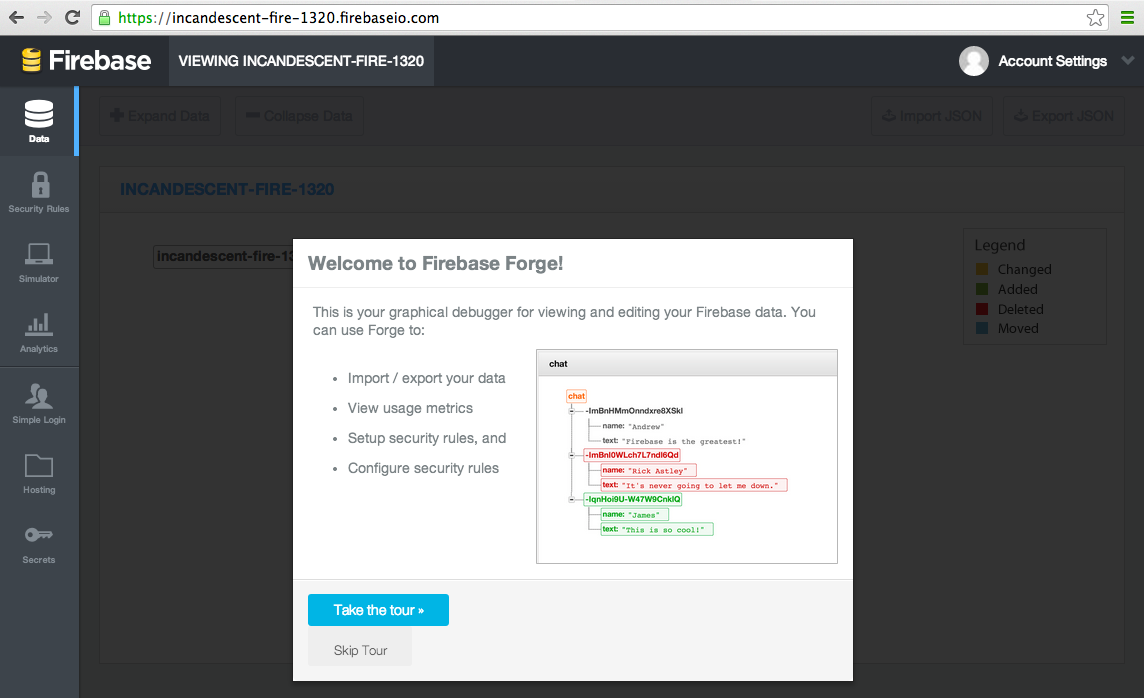
2) Firebase tour
On first load of the Firebase control panel, we are presented with the offer to take a tour, which is a great way to understand the basics of how it works.
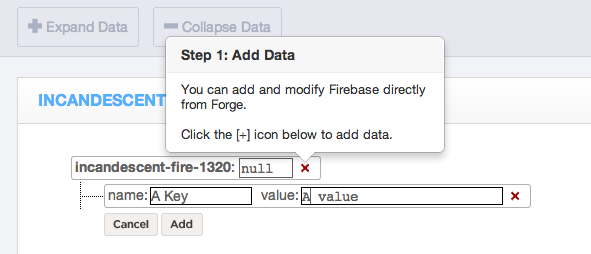
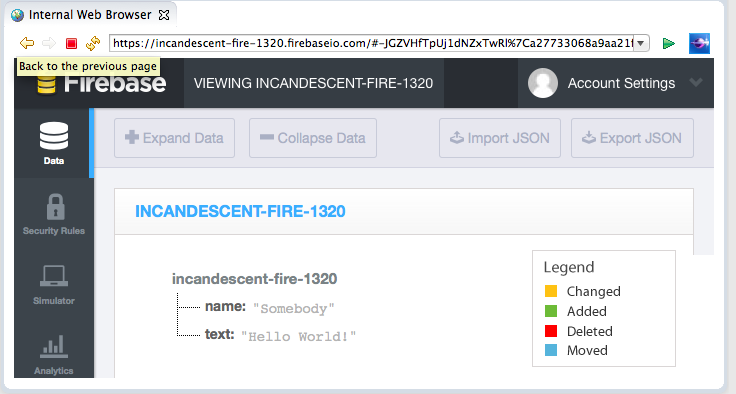
The first step of the tour is to add some data:
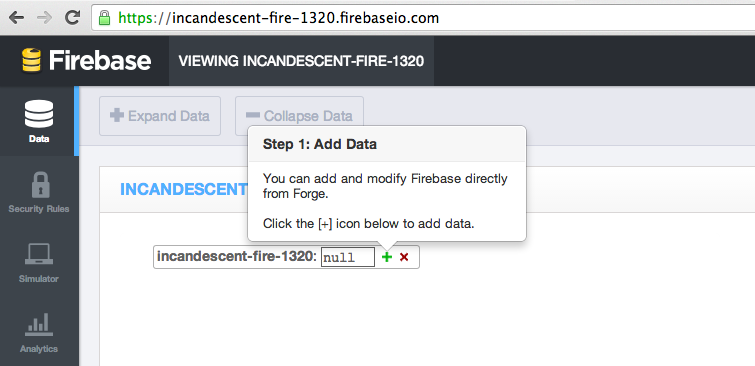
… directly on the current’s App data viewer:
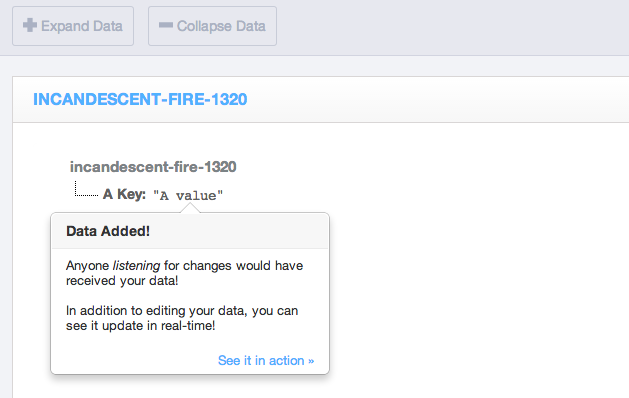
After we click on the Add button, we will see that our data is now part of this Firebase App data stream:
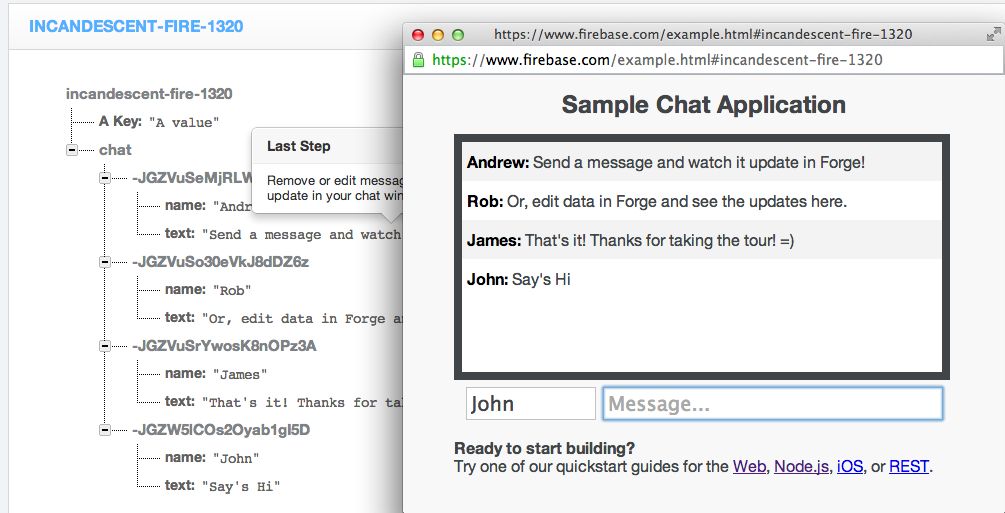
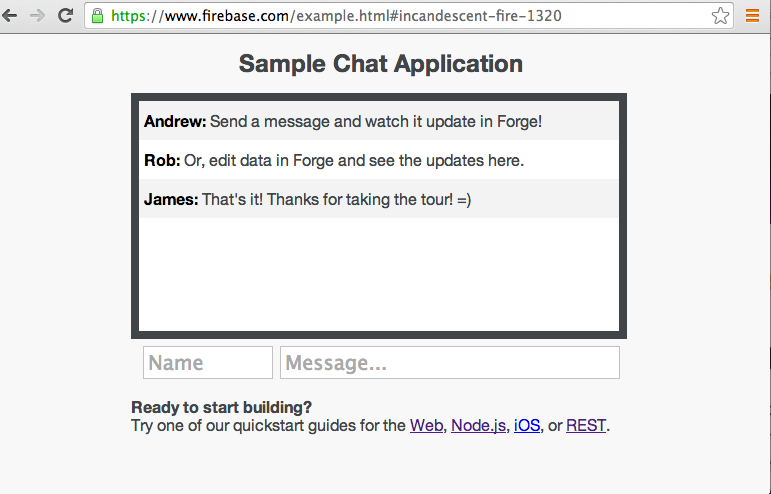
Next (after clicking on the See it in action link), we get this mini chat application with 3 messages:
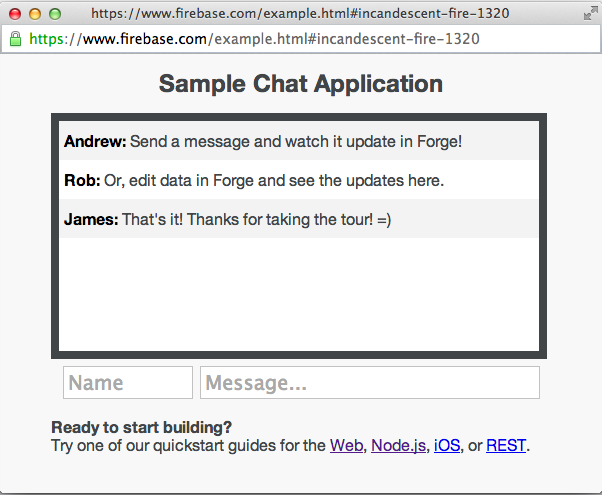
If we add a new message:
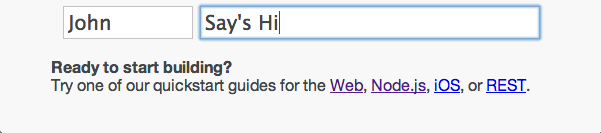
… and look back to the Firebase admin panel, we will see the 4 messages (3 added by the Sample Chat Application and the one I added manually)
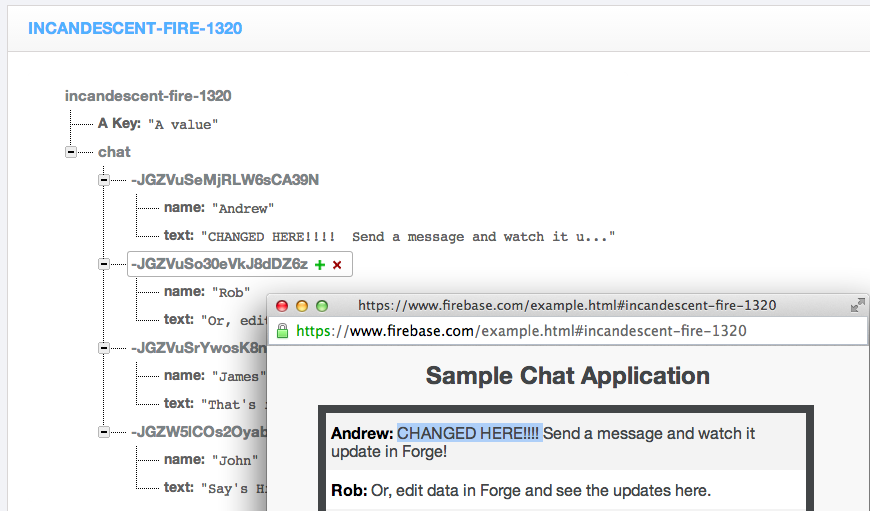
The final step of the tour is to make a change directly on the Firebase admin panel:
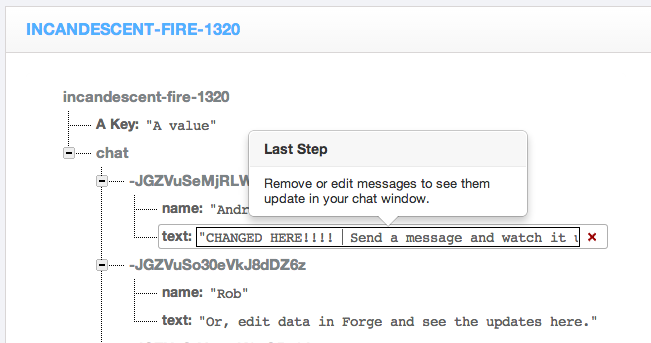
… and confirm that the value was automagically changed in the Sample Chat Application (in real-time with no user interaction)
3) Creating a simple Html/Javascript page to test it out
Note: The next set of example will use code snippets provided by the Firebase Web Quickstart Guide
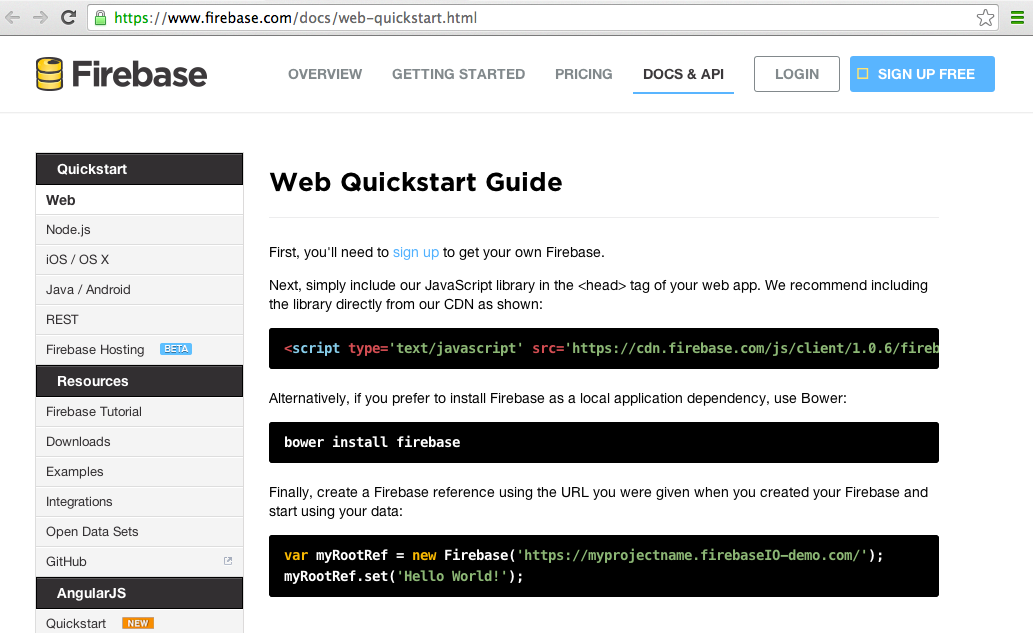
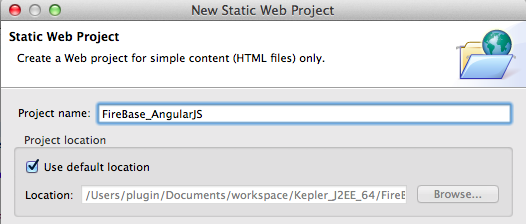
Since I’m going to use Eclipse (Kepler), the first step is to create a new Static Web Project
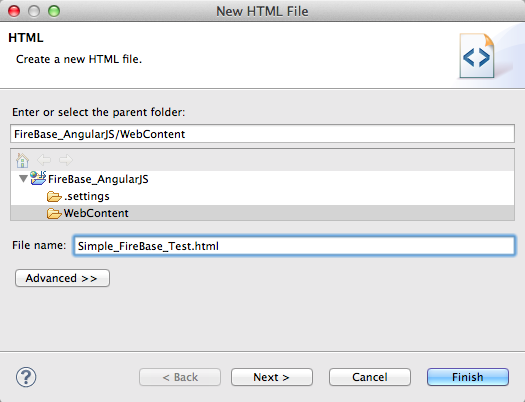
… with a simple HTML inside:
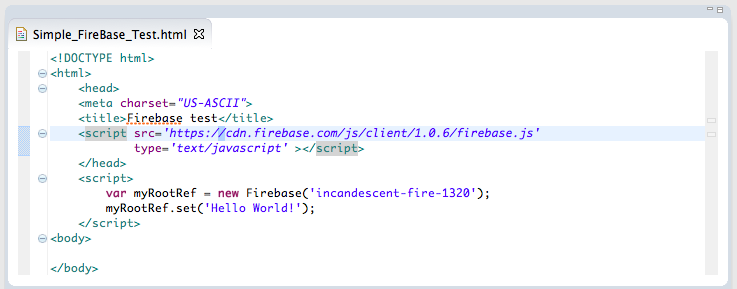
… containing the just the firebase.js script import and a simple data setter:
To see this in action inside Eclipse, I opened up the admin Url in a Browser window (I wonder how long until an Eclipse Firebase plugin is created), and I logged in:

4) Setting and Pushing data
At this stage I had the Html at the top and the Firebase admin panel at the bottom (note the required full url in the var myRootRefnew Firebase(…) Javascript code):
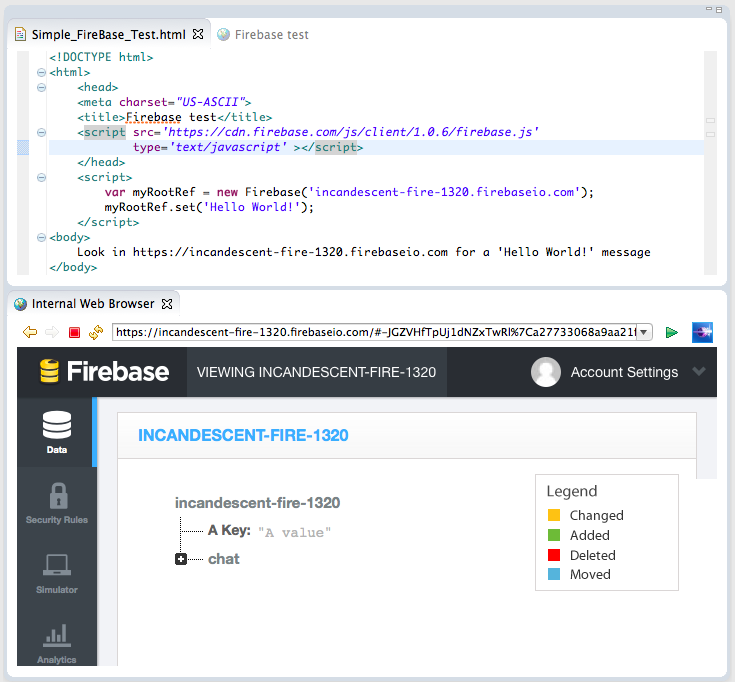
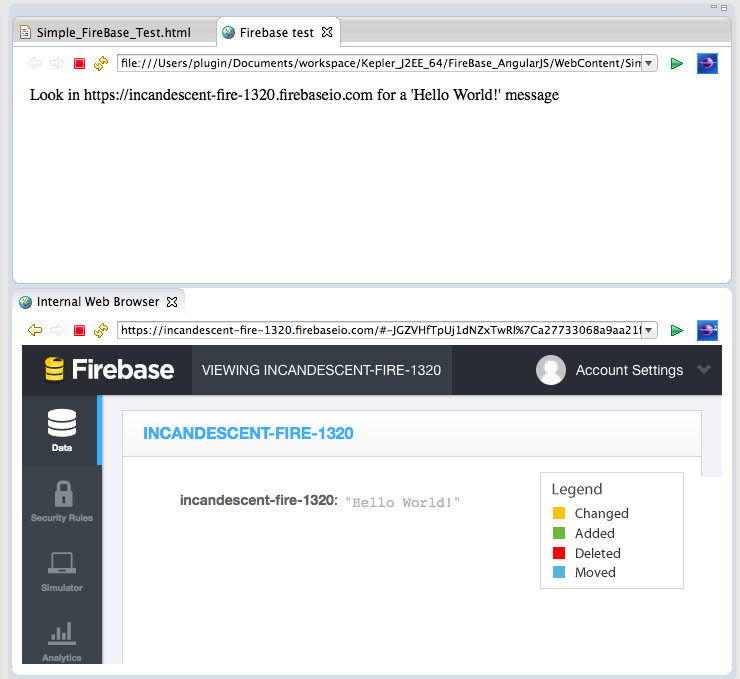
Next step was to open a Web Browser with the test page:
… which set the Firebase server side value to “Hello World!” (I have to say it made me a bit nervous to see how easy it was to completely remove an entire Firebase dataset (I wonder if there are backup or transaction logs for Firebase data))
Next step was to try setting some name-value pairs (i.e. a typical JSON string):
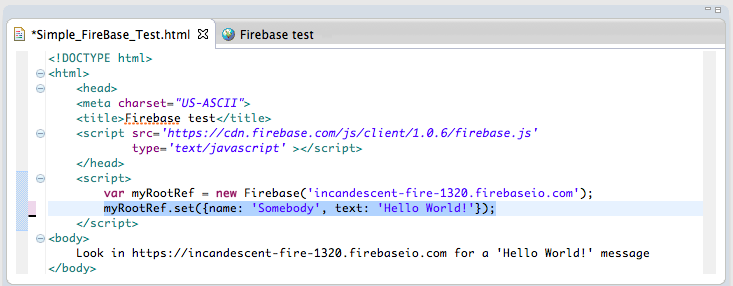
… which looked like this after execution (note that I didn’t refresh the Firebase admin panel (it also uses the WebSocket technology to keep itself up-to-date))
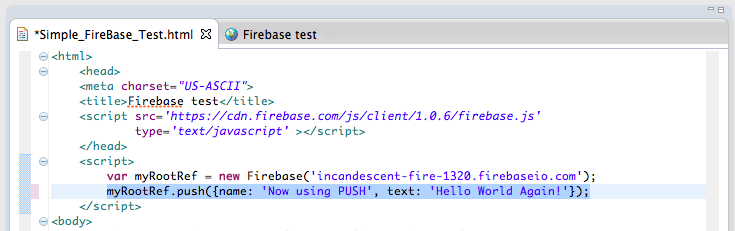
Next I tried the push method (which behaves like an array and was the technique used in the chat example):
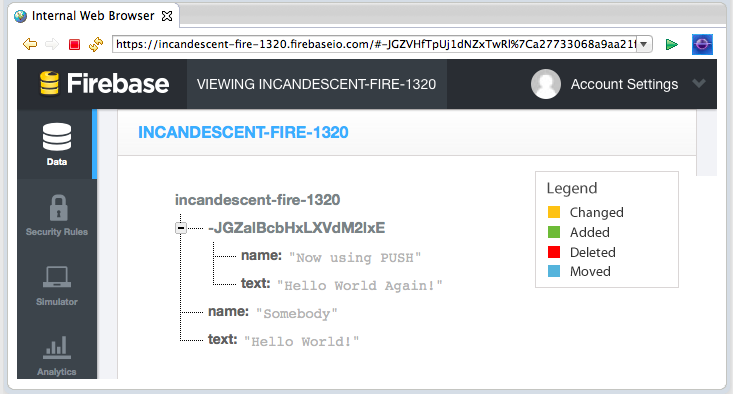
Here is the execution result (note how there is now an extra TreeNode with the data provided)
5) receiving events
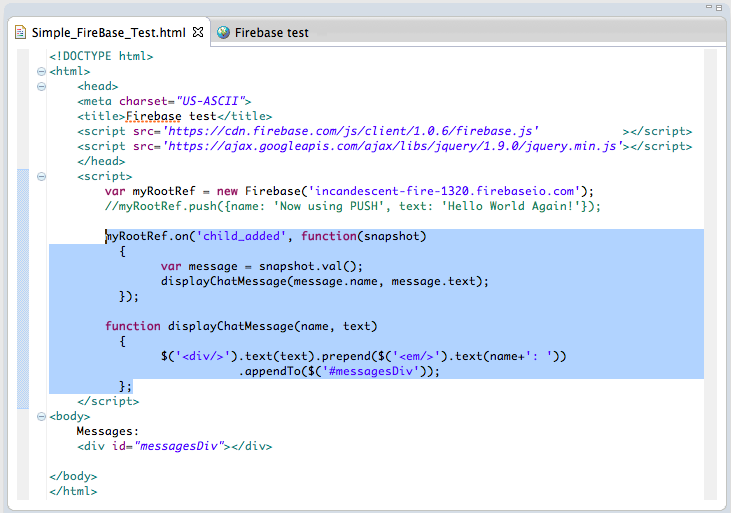
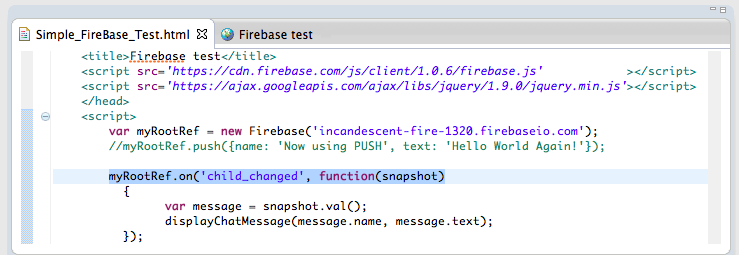
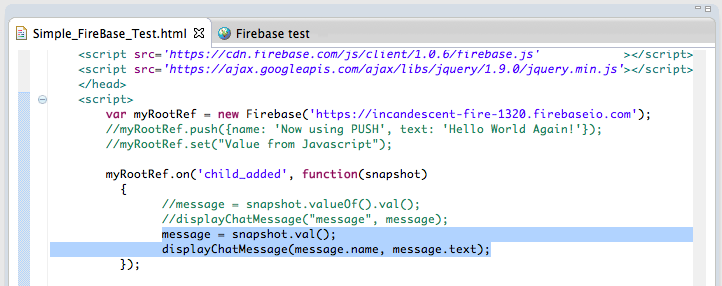
So far we have been setting/pushing data into Firebase, but what is also really powerful, is that we can subscribe to server-side events, and update the browser/ui when content changes.
The example below shows how to get a callback every-time a new item is added:
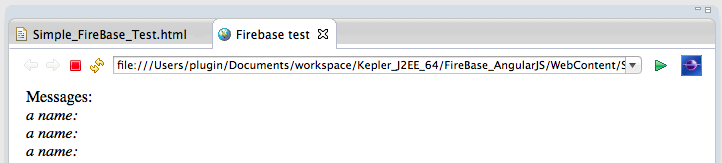
Now on refresh (screenshot below), the new children will be shown on the page:
One observation, when we subscribe to the child_added event, any changes made directly in Firebase’s admin panel:
… will only be seen when we refresh the page (where all items are viewed as new children)
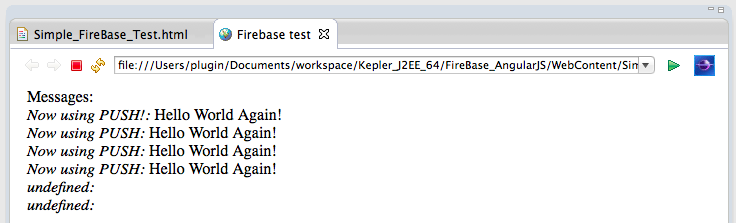
To see the changes in real-time, we need to change the event to child_changed:
Now (on refresh) we get an empty list:

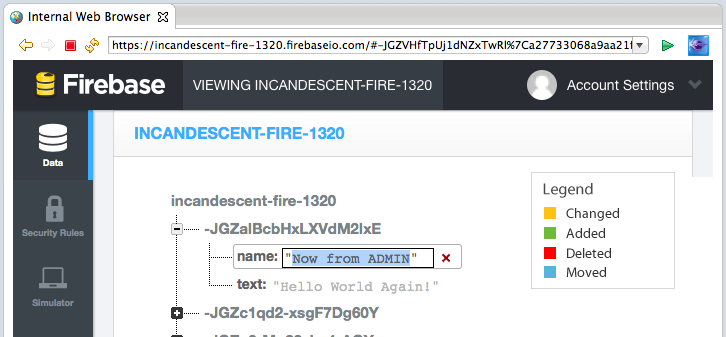
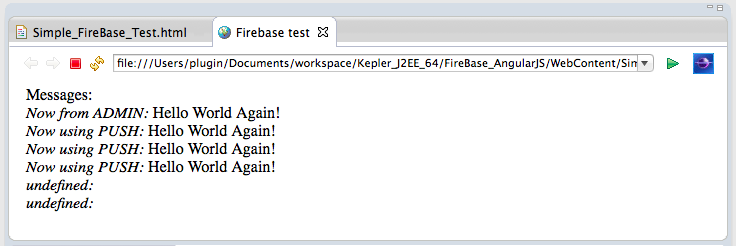
… but if the content is changed on the Firebase admin panel:
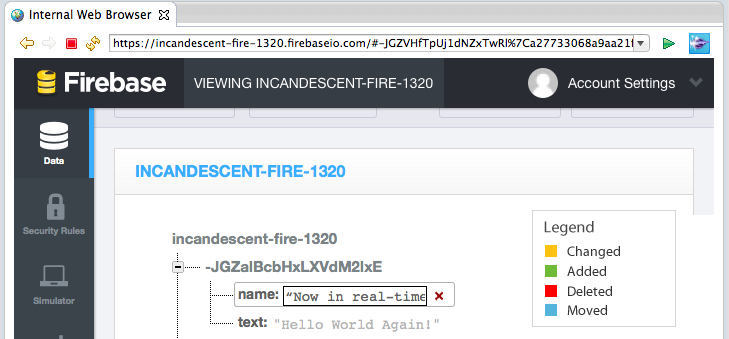
… the child_changed event is triggered, and we will the new content changes on the browser (without page reload)

5) Consuming and Sending events using REST API
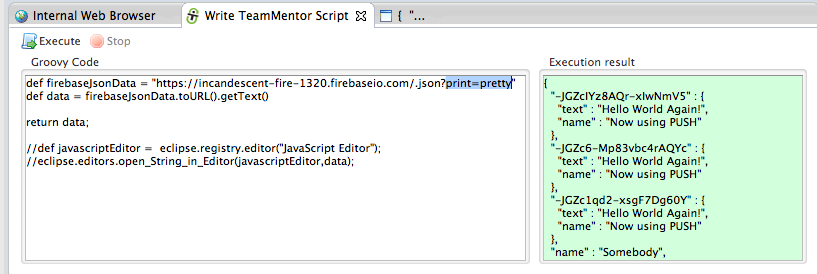
Now that we can create and consume Firebase events using Javascript, it is time to try their REST API.
For that, I’m going to use the Eclipse Grovy REPL Scripting Environment 1.6.0 so that I can do it directly from Eclipse
Note: most scripts shown below are on this gist
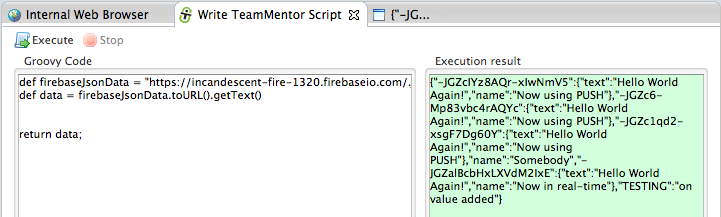
The first test was to get the current data set, which is easily retrieved via a simple GET request to the Firebase url for the current application (with a .json appended to in the end of the admin url):
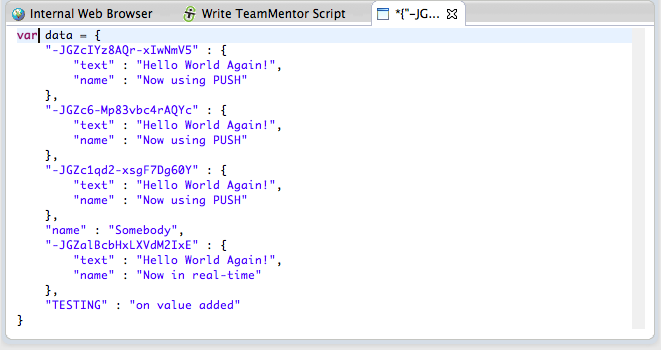
Since we are in eclipse, here is the code to open the JavaScript Editor programatically with the json data received:

By default the data received from the server has no formatting:

But since we are inside the Eclipse JavaScript Editor if we assign it to a variable, we can easily format it:
After doing this, I discovered that if we pass a ?print=pretty to the Firebase url:
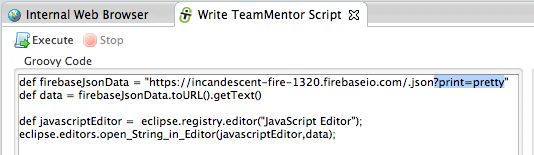
… the received json data will already be nicely formatted:
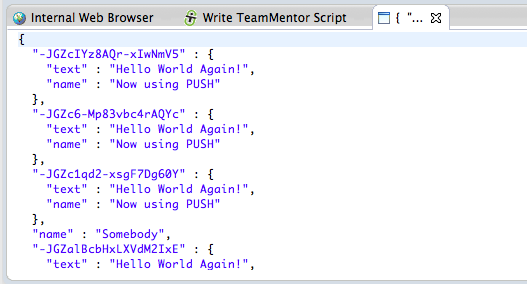
In the example below I used the Groovy REPL Execution result window to see the formatted json data:
Next thing I wanted to try was to see how a REST change would be shown in real time in the browser.
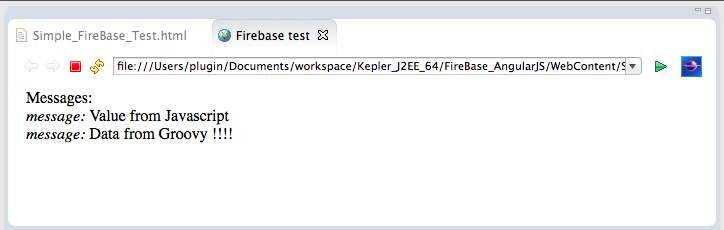
Because my next REST request will use the HTTP PUT command (which is equivalent to the Firebase set Javascript function), I changed the Html page to display and listen for Firebase values (vs arrays with name-value pairs)
Note the snapshot.valueOf().val() command below:
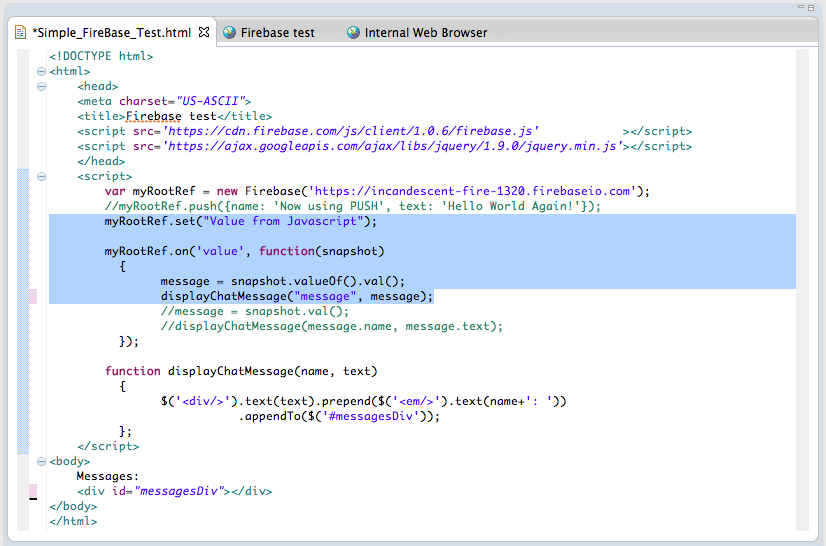
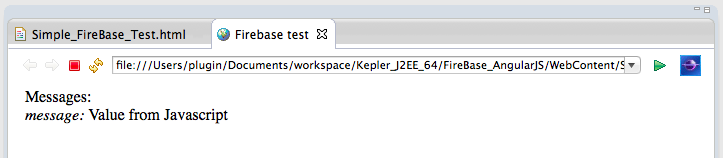
After browser refresh, this is what the test page looked like (with the current message value being set by Javascript on page load):
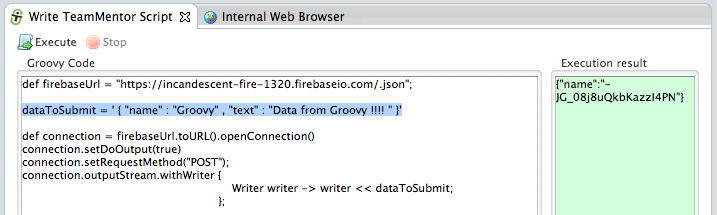
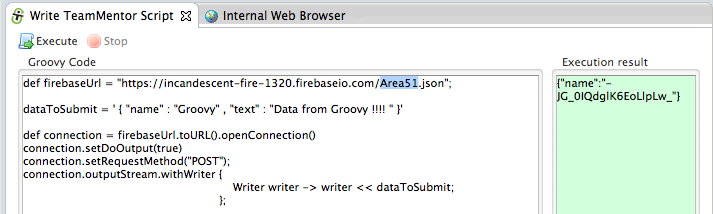
Next I used the Groovy script below to send a PUT command (I could also had used the Groovy HttpBuilder or the Java Firebase libraries):
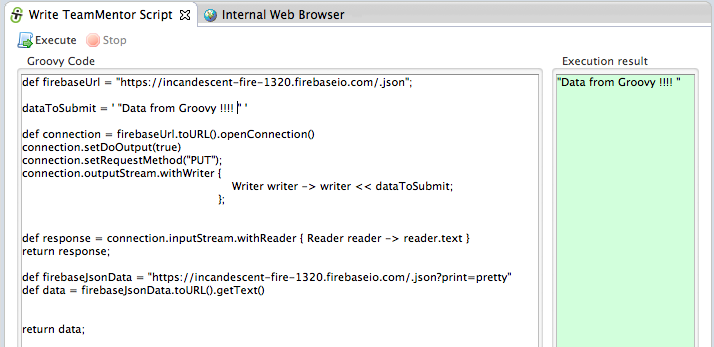
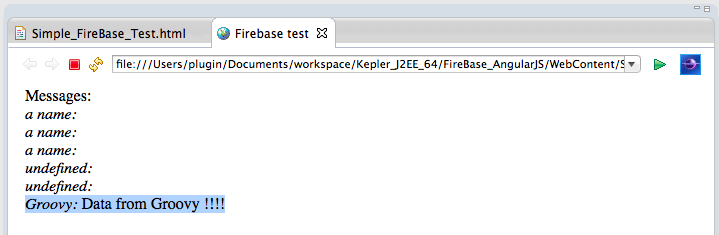
When executed, this script will change the value of the current Firebase app to “Data from Groovy!!!!”, which will be shown in real-time (i.e. no browser reload) in the opened test page:
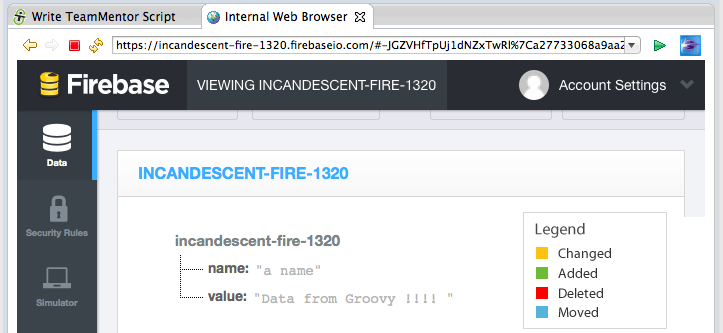
We can also submit (i.e. PUT) name-value pairs:
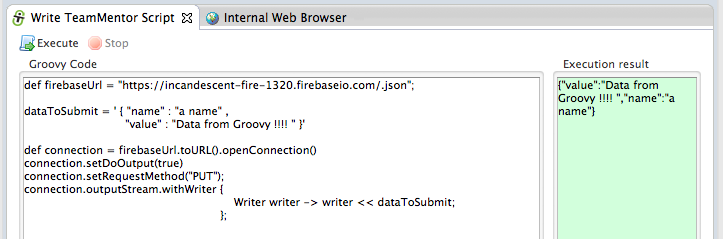
… which will look like this on the Firebase admin panel:
Next test was to see how to use POST (instead of PUT) on the REST API (in order to replicated the Firebase push command).
To see the result, I changed back the html page to handle items (vs ‘a value’), and changed the on event hook to be child_added:
On refresh, this is what the test page looks like:
… and if we send data using POST on the REST call:
… we will get a callback in real-time (again with no browser refresh):
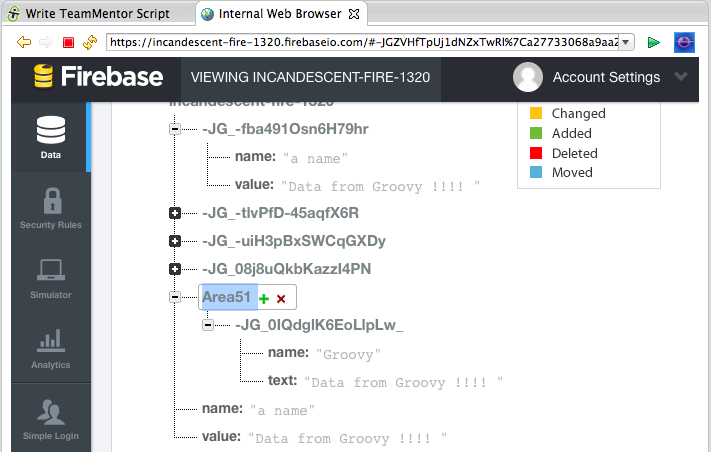
A real cool feature of Firebase is how easy it is to create new namespaces (or areas/objects) for specific types of data.
For example, if I add Area51 to the firebase url (see the highlighted text below)
… the data will now be stored inside an Area51 object/area/namespace on the current Firebase app:
6) Programatically add new items to the Chat window
Finally coming back to the chat window (see below), when I saw that example, one of my first questions was “How to programmatically submit data to it?
Hopefully by now you should have a clear picture of how to do it, but just in case, here is how I did it :)
For reference, here is what the data looks like:
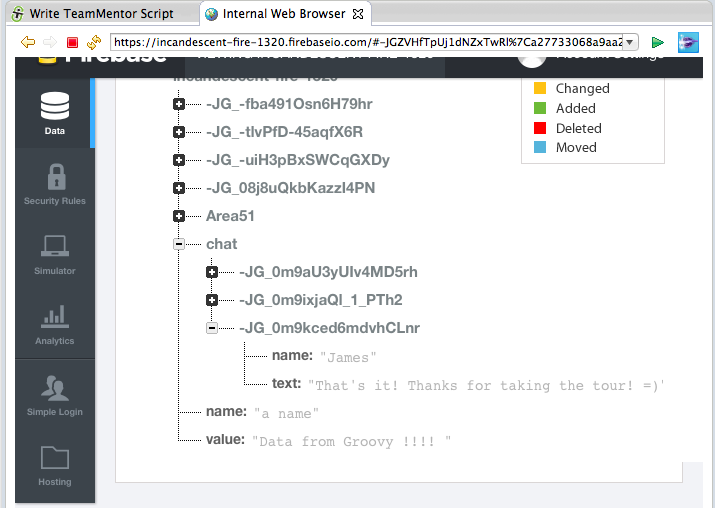
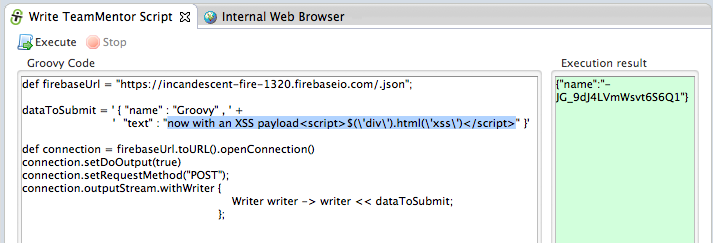
Here is the script that submits the POST data to this chat (the key is in the chat.json part of the URL)
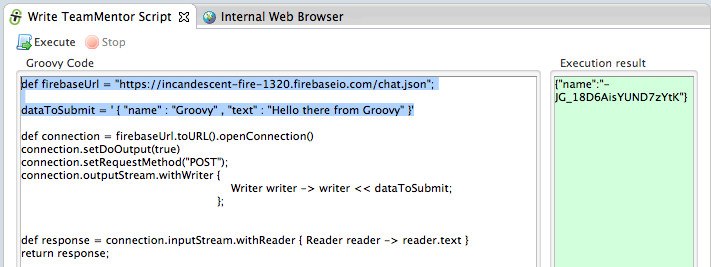
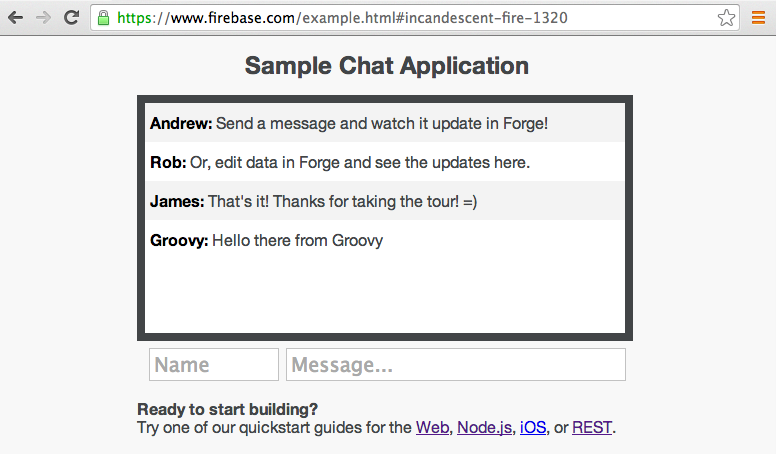
And now, after executing the above script, the chat window will contain our new message:
XSS considerations when developing with Firebase
Following my previous post on Using Firebase to sync data with a webpage (via Javascript, REST and Firebase Admin panel), here are a couple security notes and ‘areas of concern’, that should be taken into account when developing real-time apps with Firebase:
- Firebase will reflect any payloads sent to it
- We are talking about DOM based XSS
- The current browsers XSS protection does not protect against DOM based XSS
- It is very easy to create a vulnerability (as you will see below, all it takes is a simple change from .text() _to _.html())
- If powerful DOM based API-manipulation frameworks are used (like jQuery), there are many more injection points (sinks)
- By nature of Firebase applications, the XSS exploit will have wormable capabilities (i.e. it will be able to distribute and self-propagate itself VERY quickly)
- Current static-analysis tools will struggle to pick up this type of vulns
Note: I think (and I will want to double check this) that if is safe (i.e OK) to put received Firebase data/payloads, on an AngularJS auto-binded location/variable (for example {{name}} : {{message}})
Let’s use the chat application provided by Firebase to see this in action (note that as you will see below, the chat application as provided by Firebase, is secure and not exploitable)
1) Example of safe code
If we send an simple HTML payload (like the one shown below) to Firebase:

… by default, the output will be correct encoded, and the HTML will not be rendered (see below):
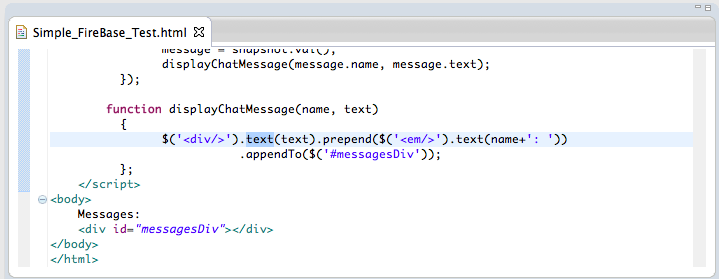
The reason this happened (the encoding) is because the jQuery.text(…) function was used (see below) when creating the HTML Element to add to the page:
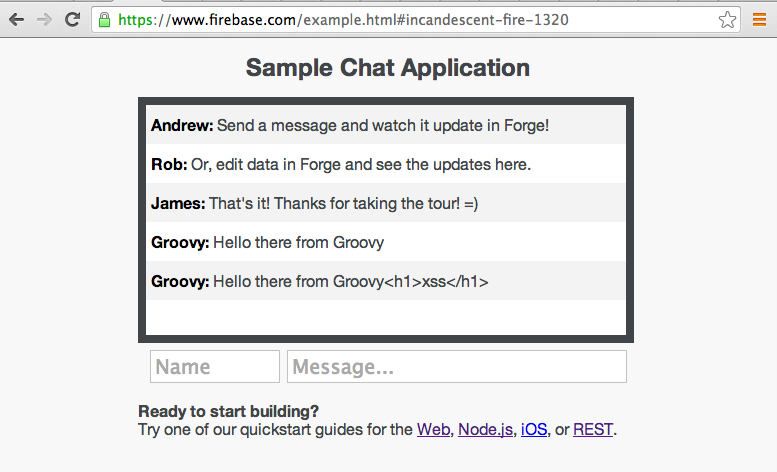
2) Example of unsafe code
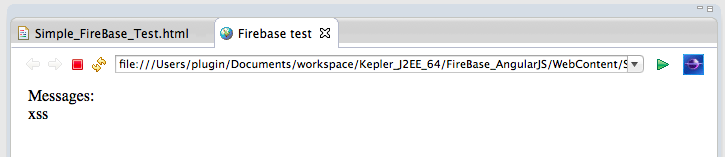
But if we change jQuery.text(…) to jQuery.html(…):
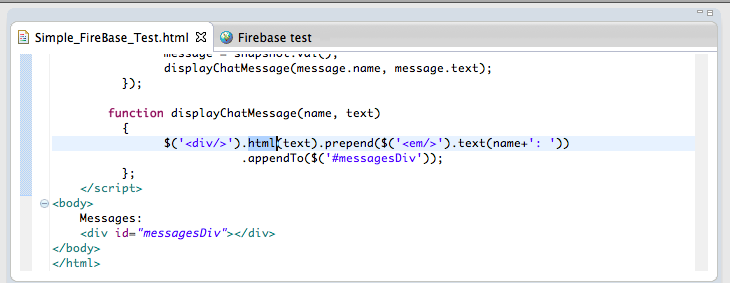
… and a more interesting payload is injected (in the case below $(‘div’).html(‘xss’) which will change the html content of all divs to ‘xss’)
… we will see that the payload was triggered on our local test page:
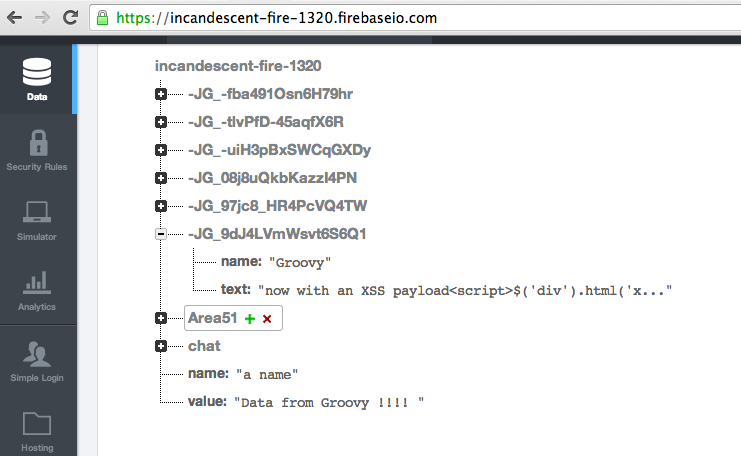
A quick look at Firebase’s data feed, will confirm that the payload is currently stored (and ready to be deployed/pushed to any vulnerable clients).
Not really a Firebase problem
It is important to note that this is not really a problem with firebase, since they are just storing data.
That said, due to the dangerous outcomes of such exploits, I would be interesting if some ‘defense in depth’ capabilities (and validation) could be added to the data stored (I wonder if there is any filtering or sanitization capabilities in Firebase?)
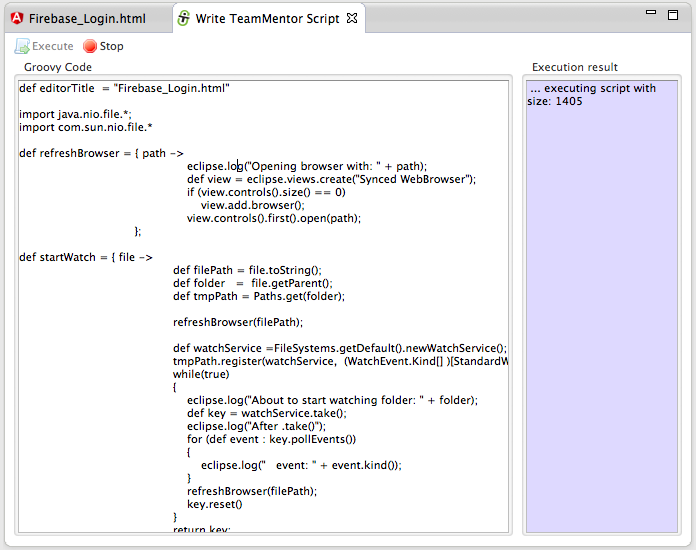
Eclipse Groovy REPL script to sync a Browser with file changes (with recursive folder search via Java’s WatchService)
Since I am using Eclipse to develop using AngularJS (see Creating an Eclipse UI to run AngularJS e2e tests using Karma), I needed a way to refresh the browser window every-time I made changes to any AngularJS related file (note that due to the nature of the AngularJS projects, I need the change to trigger on any change made inside the root folder and all its subfolders).
Since there didn’t seem to be an easy way to do this (‘auto browser refresh on file changes’) in Eclipse, I used the Eclipse Grovy REPL Scripting Environment to develop a script/macro that:
- Based on a title of an opened eclipse editor file:
- … find the full path of that file, and:
- … create a Java WatchService that monitors the file’s folder and subfolders, and:
- … when a StandardWatchEventKinds.ENTRY_MODIFY is received :
- Create/Open a new Eclipse view with a browser (called Synced Browser), and:
- …refresh the index page
For reference here is the groovy code for this script (gist here):
Originally I had tried to use Eclipse file change events (like on this SO thread), but that didn’t work as well as the WatchService.
A next step is to create a mini UI to allow the configuration of the target files (maybe as a view added to the next version of the Groovy REPL Eclipse plugin)
Seeing it in action
Here is how to test this script:
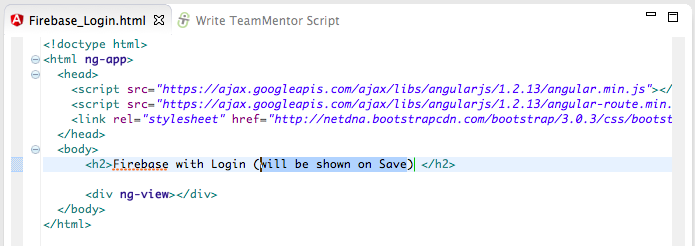
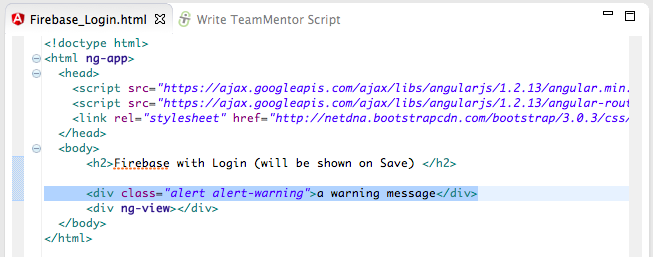
1) create a Web project with an Html file on it:
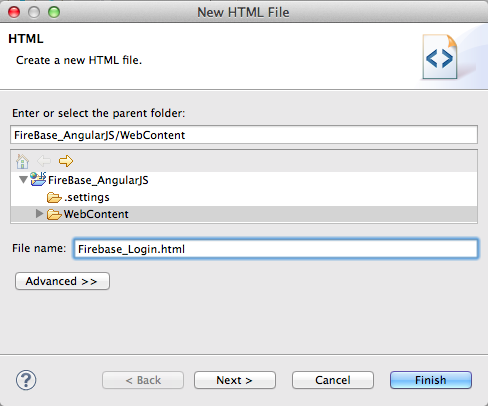
2) run the Groovy code in the REPL window (note that the image below is using a different root file and the version of script is an older one (which didn’t contain the recursive folder monitoring)):
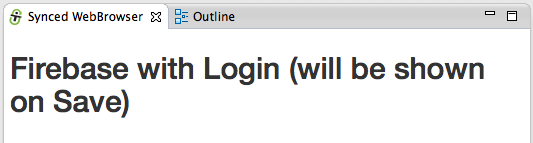
… on execution you will see a new view (called Synced WebBrowser) show up in your current Eclipse instance.
3) make some changes on the Html file
4) and note that the Synced WebBrowser view will be refreshed automatically (it takes about 500ms to 1s for the change to be picked up (see this SO answer for why I had to use the SensitivityWatchEventModifier.HIGH setting on the WatchService))
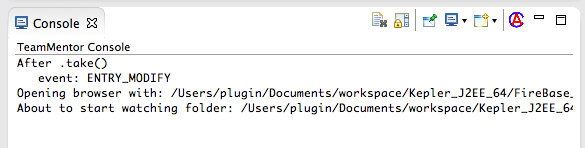
5) if you open the TeamMentor Console, you will also see a number of log messages that help to see what is going on:
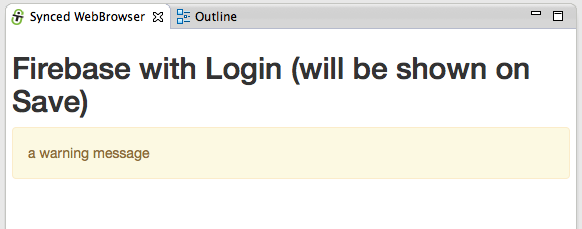
6) here is another example where I added a new Bootstrap css div:
7) which was immediately (~500ms) shown on save
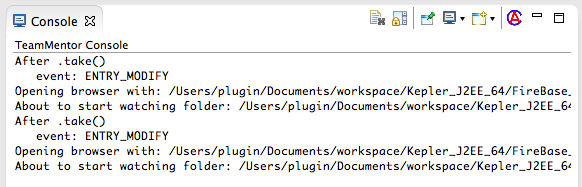
8) note that the the log message shows the events being triggered and the resetting of the WatcherService:
Really SIMPLE and clean AngularJS + Firebase example
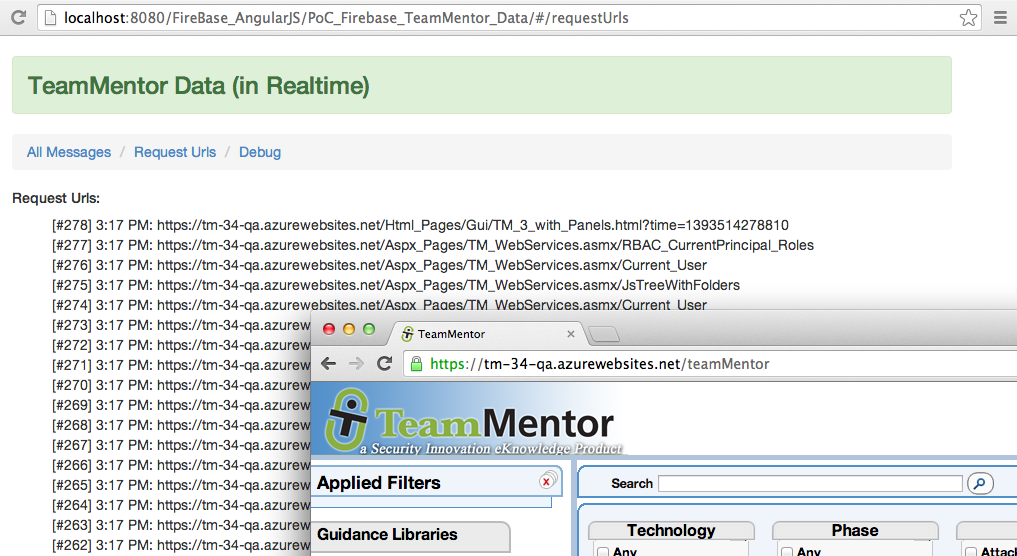
As seen on the First PoC of sending TeamMentor’s server-side request URLS to Firebase (and seeing it in realtime in an AngularJS page) I created a Simple AngularJS website which I’m very happy with (and I mean Simple with a capital S).
The main reason I really like the solution shown below, is because it represents a number of really nice, clean and Simple solutions for common (complex) problems that exist while developing in Javascript.
The created application is an:
- AngularJS real-time viewer for HTTP requests,
- … made to an ASP.NET web application (TeamMentor),
- … captured by an custom C# HttpHandler filter,
- … submitted to Firebase using its REST API and
- … pushed back to the AngularJS app using open HTML 5 WebSockets.
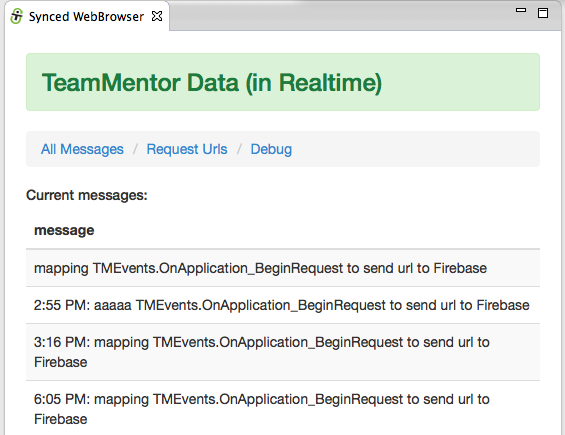
The image below shows what the AngularJS+Firebase application looks like, with the urls shown in the background browser being the ones requested when the TeamMentor website is loaded or navigated (note that the latency between ‘request made’ and ‘request listed’ is really small (about ~ 50 milliseconds)):
What I also like about the AngularJS structure that I ended up with, is that it represents a great way to learn AngularJS’ architecture and capabilities (and yes I know and agree that for bigger AngularJS apps it is better to organize by feature and group the multiple files under a dedicated folder (for example the login controller, service, factory, view and tests should all go under the same logical folder))
This post contains a tour of the multiple files created (gist here) which where developed/refactored while in Eclipse using the Eclipse Groovy REPL script to sync a Browser with file changes (with recursive folder search via Java’s WatchService)
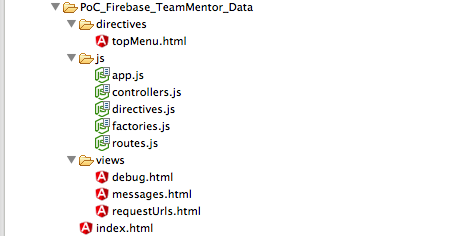
Folder/File Structure:
Inside an Eclipse Web Static project, I created a file structure with:
- _index.html _as the main AngularJS file (i.e. this is the single-page application file)
- all javascript files were placed in the _js _folder (with the file names providing a clue on what they are doing/providing)
- 1 directive created in the directives folder
- 3 views placed on the views folder
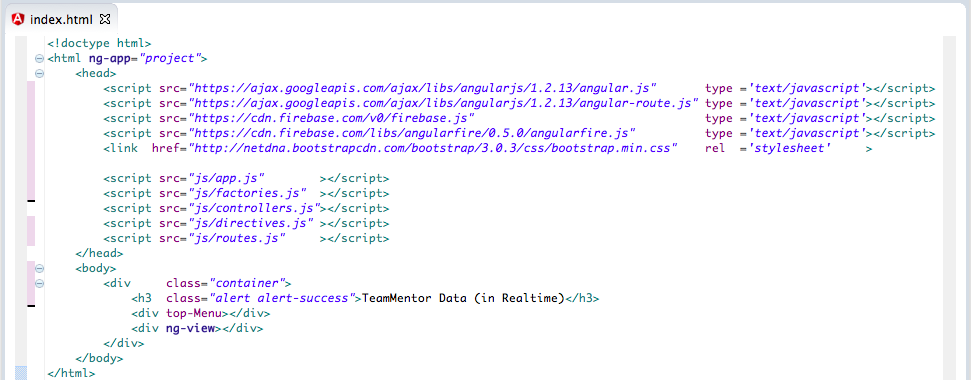
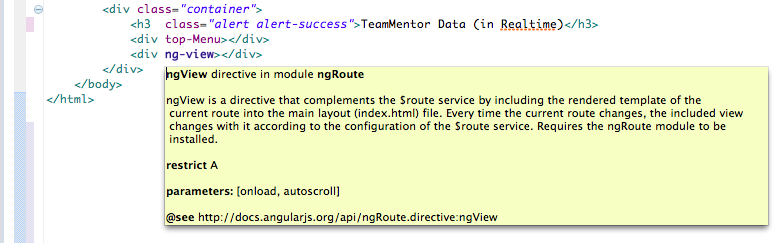
1) Index.html
This is the file loaded directly by the browser, which is made of:
- External/Framework javascript includes: angular.js, angular-route.js, firebase.js, angularfire.js, bootsrap.min.css
- AngularJS javascript includes (for the current application): app.js, factories.js, controllers.js, directives.js, routes.js
- CSS link to bootstrap.min.css
- Html body (containing the AngularJS _ng-app _ directive) and:
- div tag with container css class
- h3 tag with alert-success css class (which creates that nice green top banner)
- the custom top-menu directive (using attribute instead of element)
- the AngularJS ng-view directive
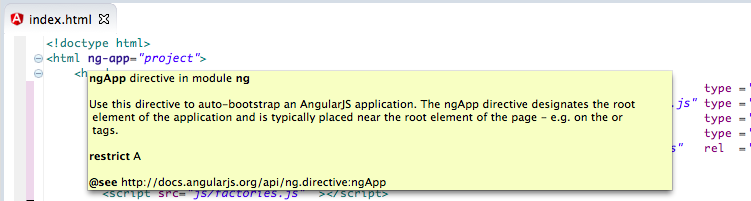
Since I’m using the AngularJS Eclipse plugin, hovering the mouse op top of an AngularJS directive provides a nice description of they do.
Here is the ng-app directive
… and here is the ng-view directive:
2) app.js
This is where the project module is created (with two dependencies ngRoute and firebase).
Since I moved the controllers, factories, directives and routes into their own separate js file, there wasn’t much to do here, apart from creating global values for the firebase URL and auth token (which will be dependency injected into the controllers and factories)

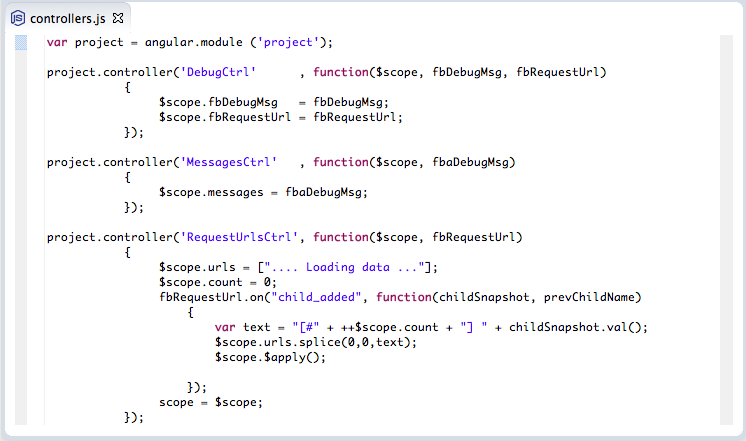
3) controllers.js
This file contains 3 controllers: DebugCtrl, MessagesCtrl and RequestsUrlCtrl (each will be used on a specific view)
Note that each controller has services injected into them (the AngularJS $scope and the custom fbDebugMsg, fbRequestUrl, fbaDebugUrl)
The DebugCtrl _is currently just adding the injected _fbDebugMsg and fbRequestUrl services into the $scope so that we can see them in the view (this is a nice trick to get an inside view of AngularJS objects)
The MessagesCtrl is using the Firebase AngularFire API, which is makes it really easy to create the firebase-real-time update view (my only problem with this was that there didn’t seem to be an easy way to re-order the new elements (which in the current AngularFire implementation are added at the end of the provided array)
The RequestsUrlsCtrl uses the default Firebase Javascript API (i.e not the AngularFire one) which gives us more control on how to handle the data received by Firebase. The $scope.urls array is used to store the data received from the Firebase child_added event (one note here to say that the Firebase child_added will also provide the entire data-set on first load, which is okish, but I would prefer that the child_added only fired for new events)
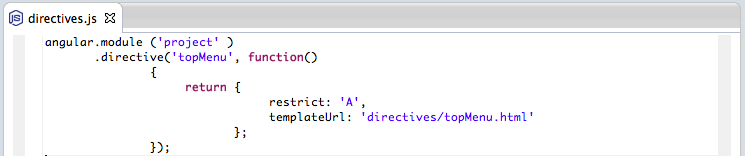
4) directives.js
This is a simple directive used by index.html, that will display a top menu, created by the content of the topMenu.html file (directives are AngularJS way to creating/defining new HTML tags/attributes)
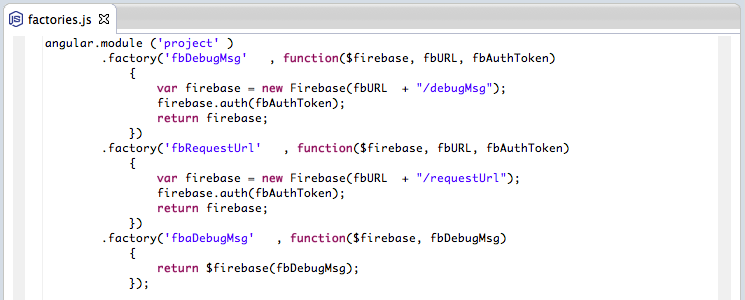
5) factories.js
These factories create the Firebase mappings, namely they define the ‘area’ (or namespace/object) that the data will be read from.
The first two (fbDebugMsg and fbRequestUrl) use the Firebase Javascript API. I needed to do them this way so that I could add the Firebase auth token (that said, I’m sure there is a better way to do this in Angular, since ideally I would have an Angular service that took the two variables that need to be set: the target Firebase area and auth code)
The fbaDebugMsg is just a simple service/factory to return an AngularFire API object based on the (dependency injected) fbDebugMsg service
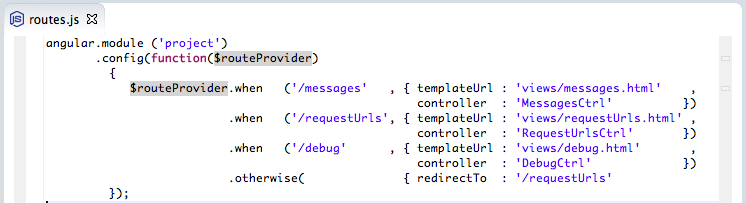
6) routes.js
The routes configuration is basically defining the 3 available views (each with a different controller mapped to it)
7) requestUrls.html (view)
Since the RequestsUrlsCtrl is responsible for updating the $scope.urls array, all we need to do here is to use Angular’s ng-repeat directive to create a list with all items (the list-unstyled class hides the bullet usually shown in HTML <li> tags).
Note that since the RequestsUrlsCtrl controller is using the Firebase Javascript API child_added event, we will see new entries shown in real time (ie. no browser refresh needed), but any changes made to existing items will not be reflected on the UI (unless the entire page is refreshed and the data is reloaded)

8) messages.html (view)
In this view the $scope.messages (used in the ng-repeat) is populated by the MessagesCtrl controller which is using the AngularFire API. This means that data will be updated in real time (on both add and change events)
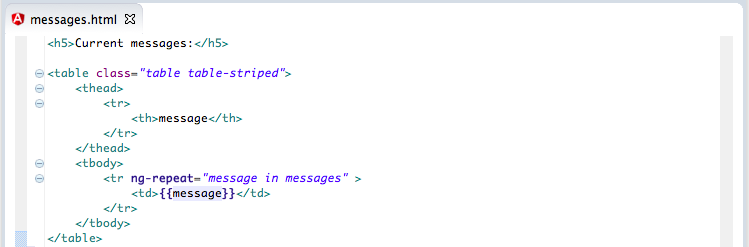
… which look like this:
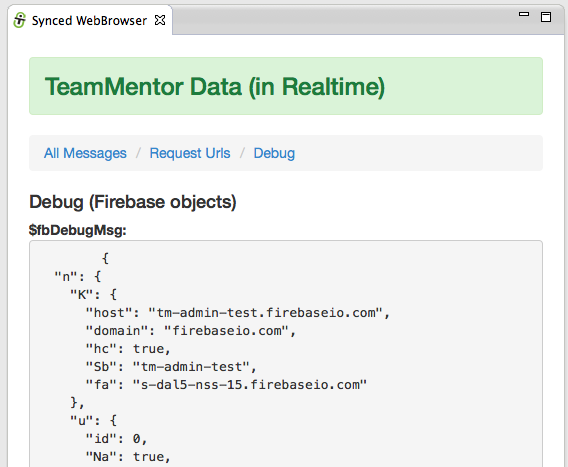
9) debug.html (view)
This view just shows a json representation of the fbDebugMsg and fbRequestUrl
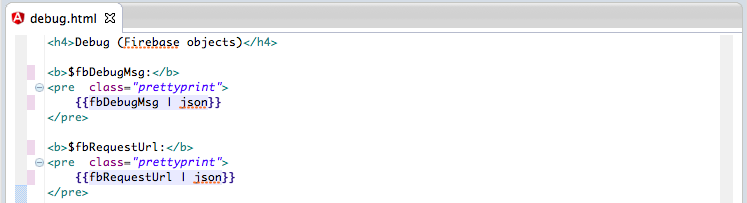
… which looks like this:
10) topMenu.html (directive templateUrl)
Finally this is the html that creates the top menu (this could be improved/refactored by having the url and titles being provided as a ng-model object)

All code:
For reference here is the entire source code (gist here) of the source code files shown above.
Using AngularJS in Eclipse, Part 1) The Basics
This covers the The Basics example from AngularJS’s home page:
I’m doing this on an OSX laptop and the first step was to download and unzip (eclipse-standard-kepler-SR1-macosx-cocoa.tar.gz (32bit version of Eclipse’s Kerpler) into the ~/_Dev/_AngularJS folder.
I fired up eclipse, chose the ~/_Dev/_AngularJS/workspace as the workspace root and installed the Eclipse Grovy REPL Scripting Environment 1.6.0 (update site) and Angular-JS Eclipse Tooling (update site) plugins.
1) Creating an Angular JS Project
After restarting eclipse, I right-clicked on the Project Explorer view and chose the New -> Static Web Project menu item
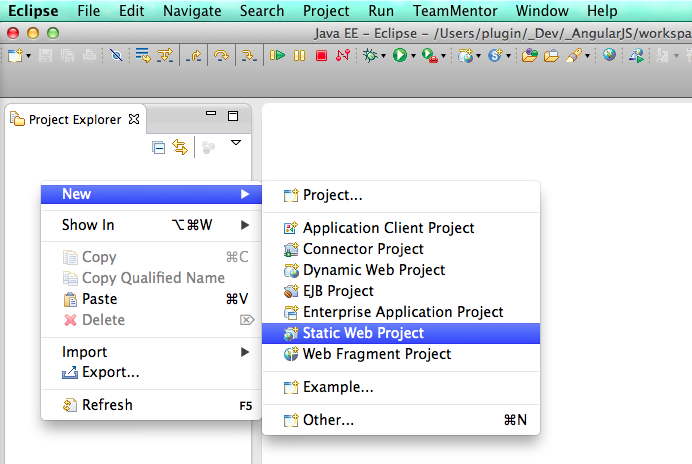
… set AngularJS_Tests as the project name and clicked Finish

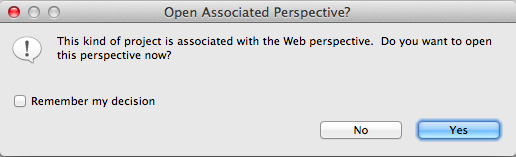
… switched to the Web Perspective
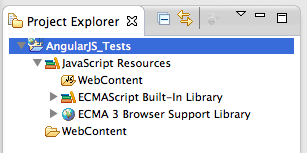
… with the Project Explorer view now looking like this:
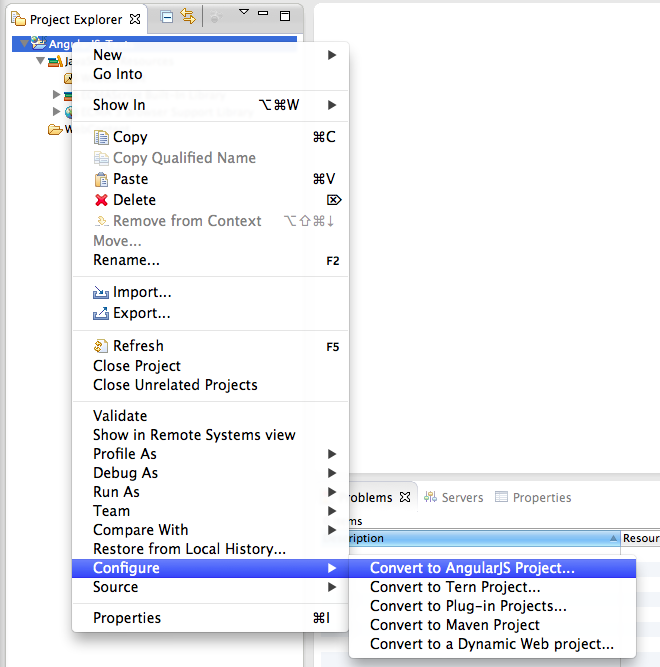
With the final setup being the conversion into an AngularJS Project
2) Creating the The_Basics.html file
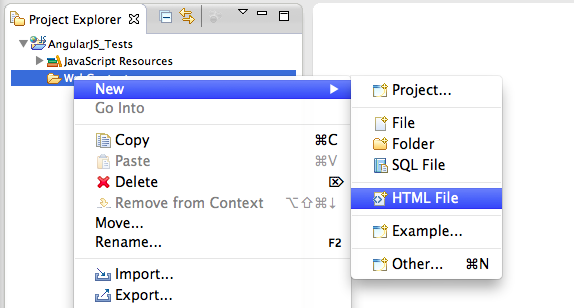
To create the first test file, I right-clicked on the Web Content folder, and chose the New -> Html File menu option:
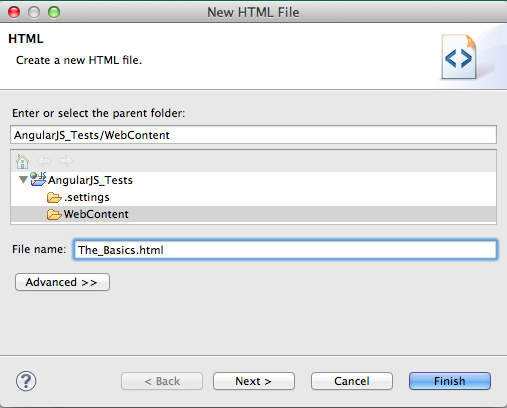
… set the file name to The_Basics.html and click on Finish
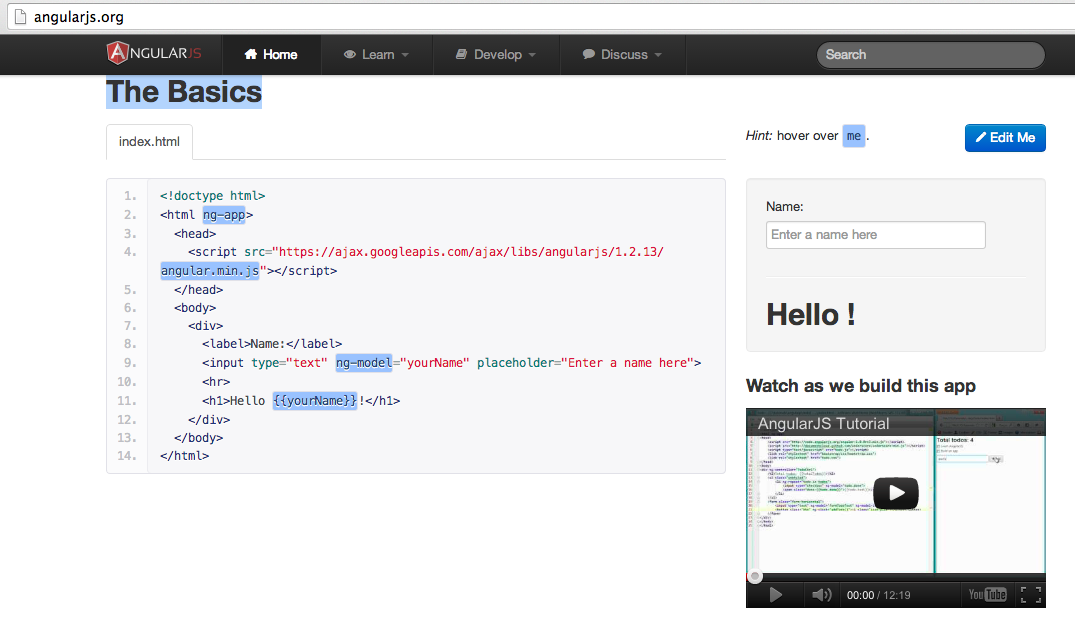
NOTE: The reason this first file is called The_Basics.html is because I’m going to be using the examples from AngularJS’ home page http://angularjs.org/
Once the The_Basics.html file opens up in eclipse
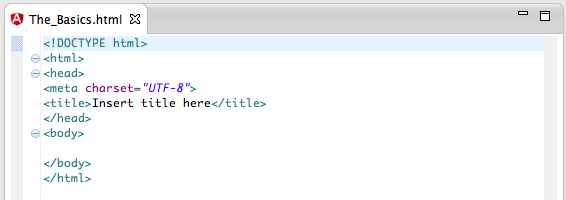
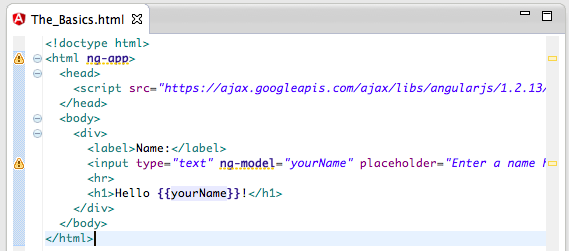
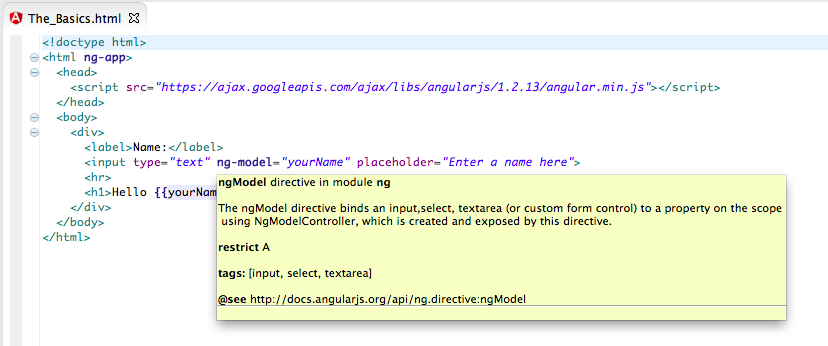
… I change its contents to the code sample from http://angularjs.org/
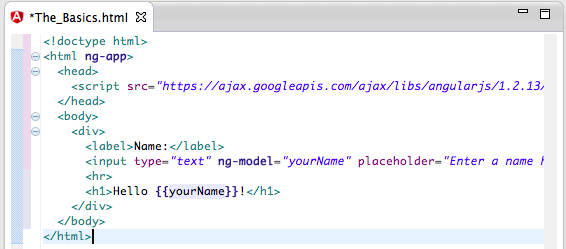
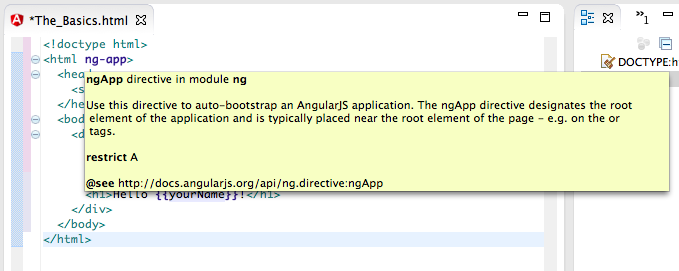
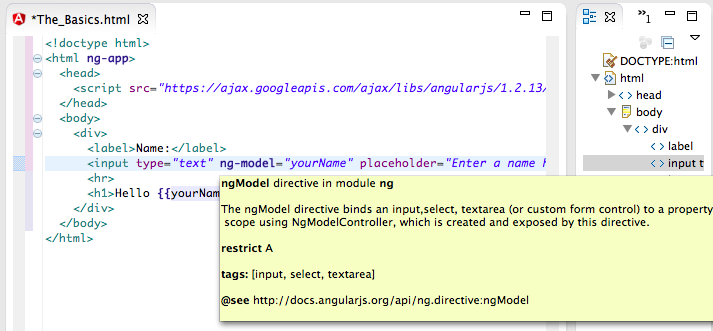
Note how the AngularJS Eclipse plugin successfully detects the Angular attributes and showed relevant information about it.
Here is ng-app:
Here is ng-model:
3) Fixing the undefined Attribute name issue
Since I used Eclipse’s Static Web Project, when I saved the The_Basics.html file, the following error occurred (if the Eclipse’s Html validation settings are the default ones):

… which basically means that Eclipse is not recognising the AngularJS Html attributes:
To fix this, I went to the AngularJS_Test project’s Properties, opened the HTML Syntax page (from the Validation section) and set to false the Undefined attribute name **setting (in the **Attributes options , not the Elements one)

With that config change, there are no problems in this page, and hovering on top of one the AngularJS directives will show the correct tooltip:
4) Viewing and previewing the The_Basics.html page
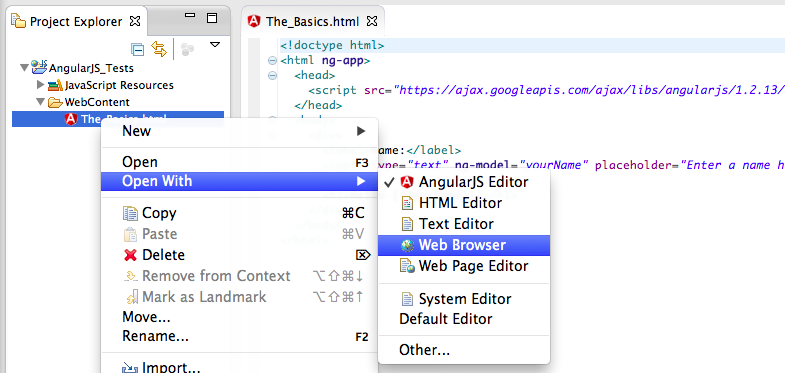
Since at the moment we only have one page, we can view it directly without needing a Web Server.
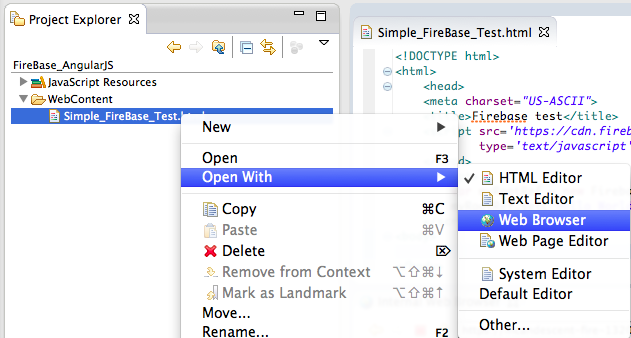
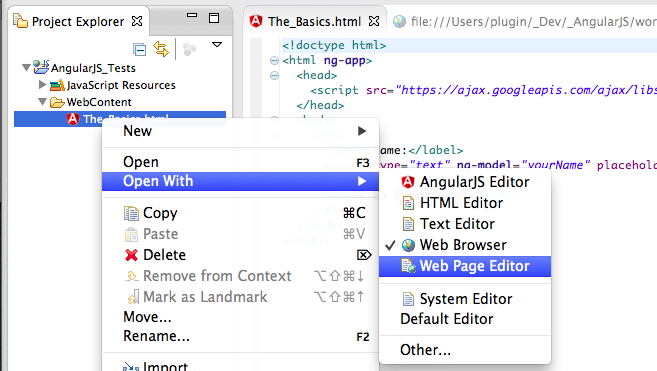
To do that, I clicked on the html file and chose the Web Browser option from the Open With menu:
This will open the default Eclipse Browser
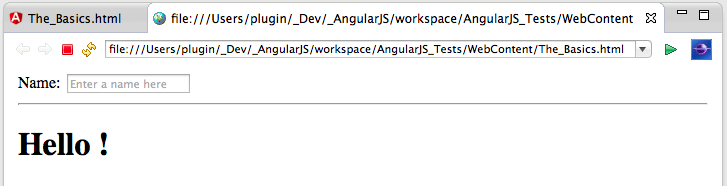
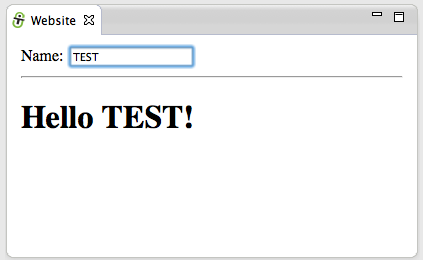
… with the AngularJS test working as expected (in this case any text typed in the Name TextBox will automatically be shown in the page:

We can also preview some of the changes in real time, by choosing the Web Page Editor:
… which will look like this (note the non-processed HTML at the top and the HTML code at the bottom):
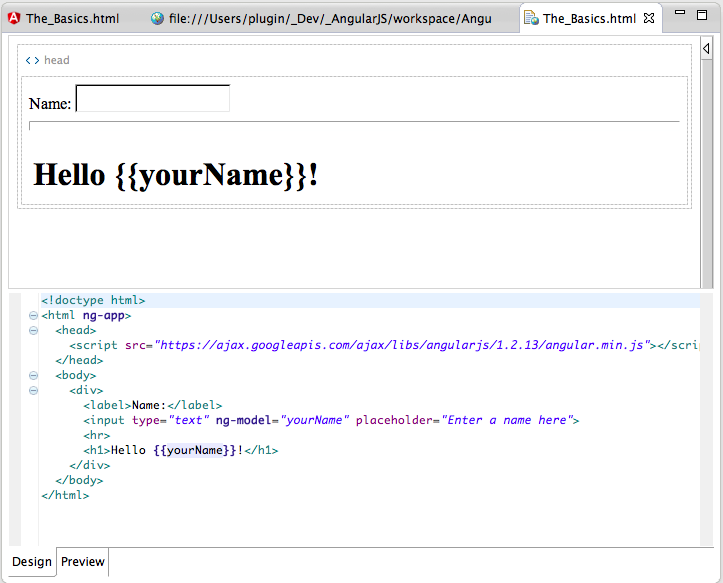
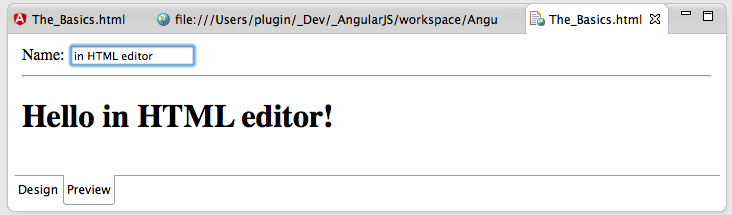
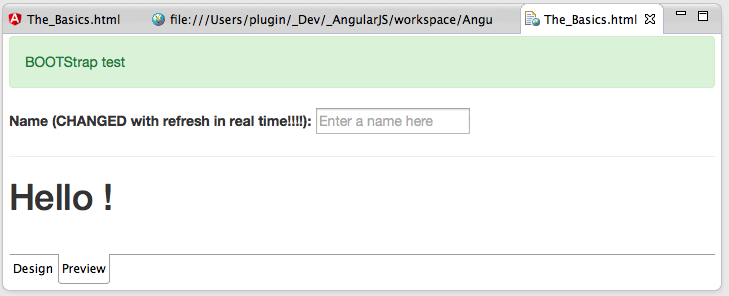
Opening up the Preview tab (from the default Design tab) will allow us to test the page currently being edited (note how Angular JS is working):
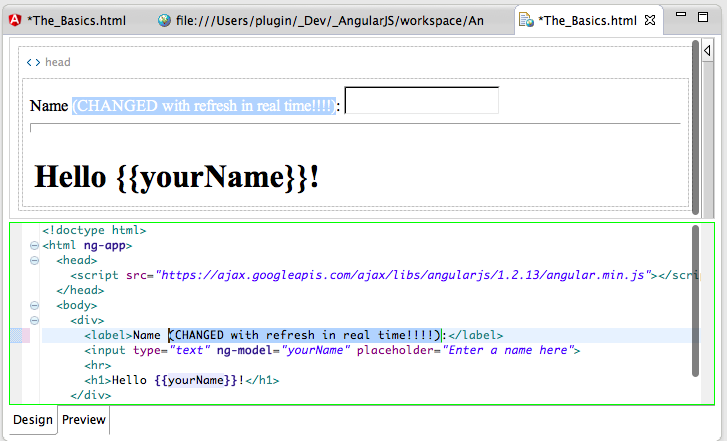
This means that (when in the Design tab) we can edit the AngularJS HTML page and see the changes immediately:
NOTE: This version of the Web Page Editor **doesn’t render the CSS while in that **Design mode, which means that if we add bootstrap to this project:
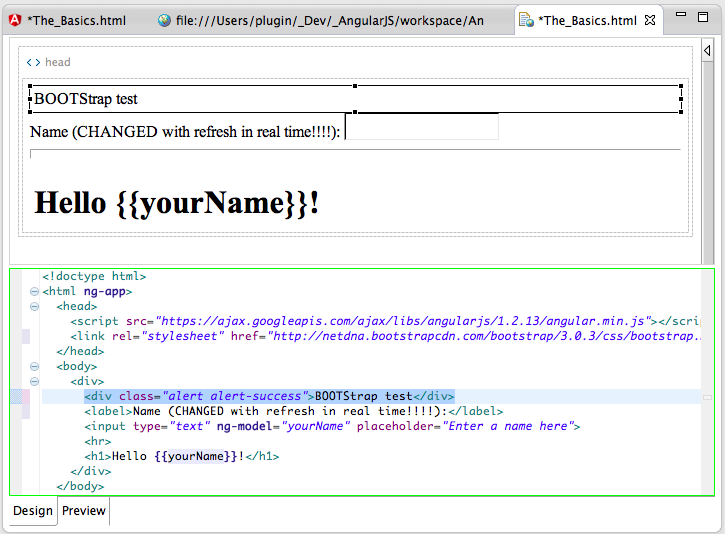
… the CSS will only be visible when in the Preview tab:
4) Creating a Git Repository for the files created
The best way for me to share these files is via a Git Repository, so the final step of this post is to create one on the files we have already created.
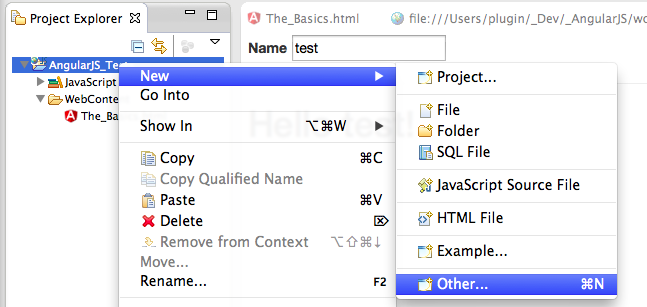
Since we are in eclipse I tried to create an Git Repo for the current project:
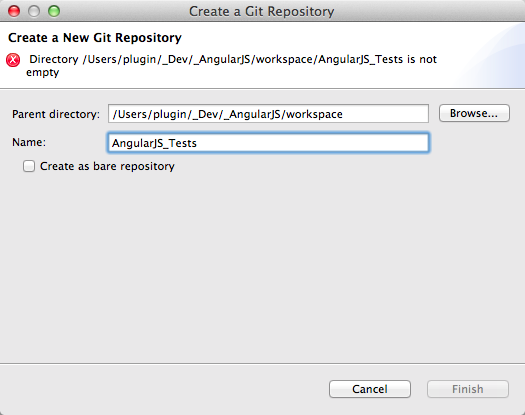
But the Git Repository wizard:
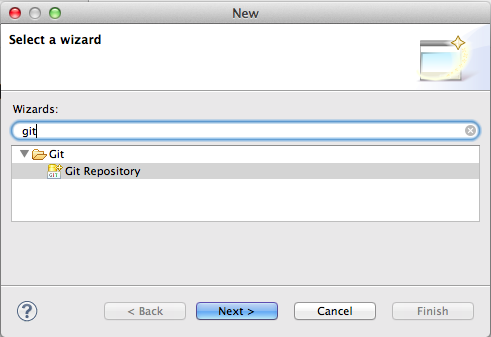
… didn’t work, because it expects the target folder to not exist:
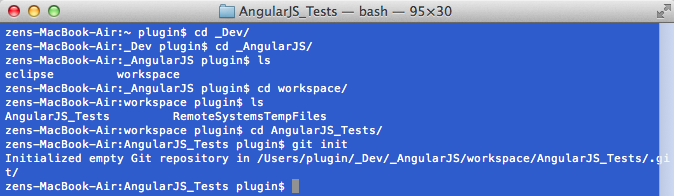
This was easily solved via the command line (by executing $ git init on the AngularJS_Tests folder)
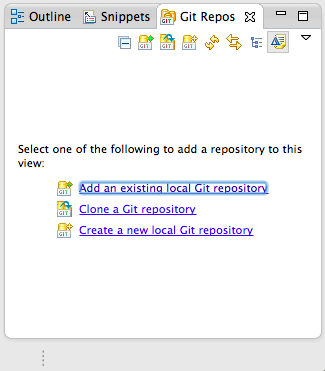
Now that we have a git repository, I was time to open it:

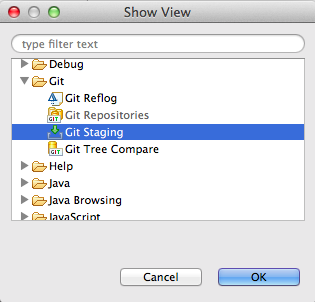
… using the_ Git Repositories_ view

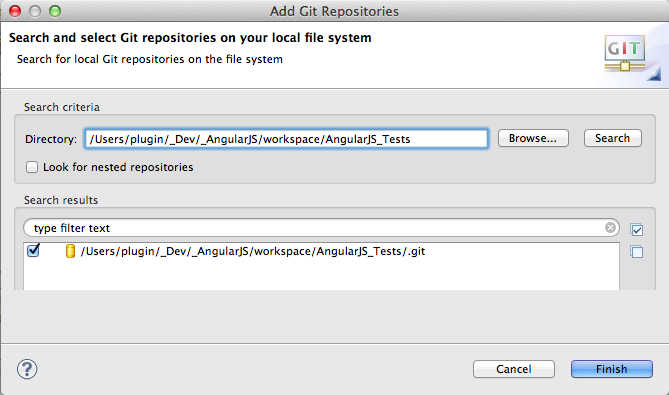
… where we can use the Add an existing local Git repository link:
… to open the repository just created:
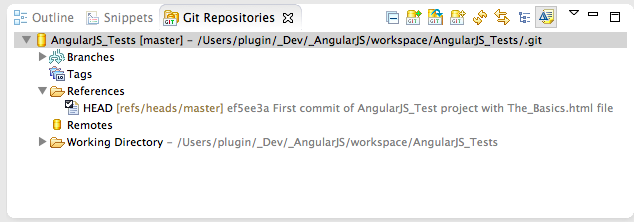
In order to create a git commit, I also opened the Git Staging view:
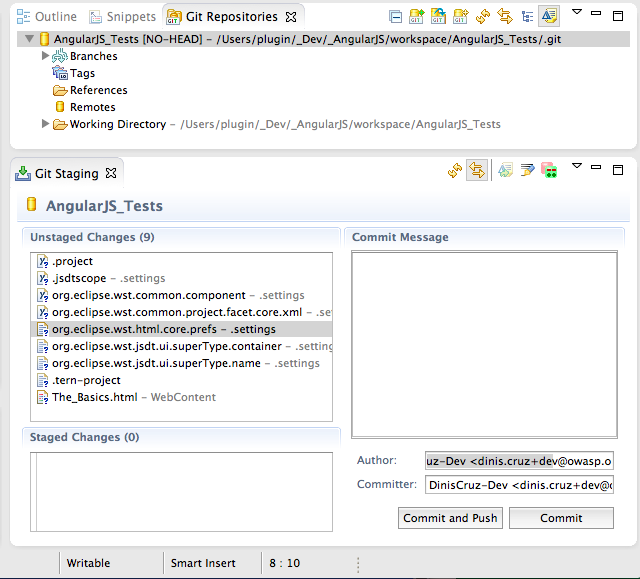
This is what these two git views look like (note that there are no commits/references and the list of new files in the Unstaged Changes list)
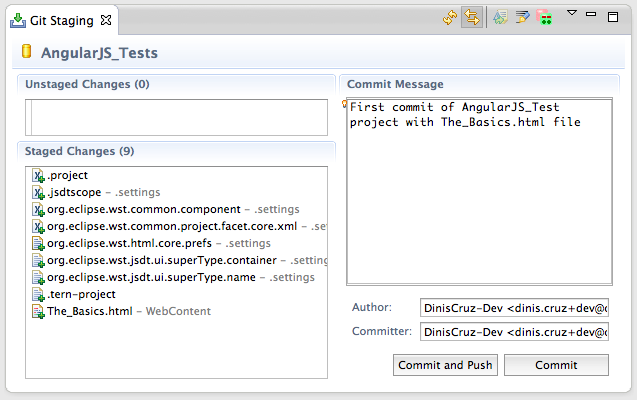
To commit the files drag-n-drop them from the Unstaged Changes to the Staged Changes, and write a commit message:
After clicking the Commit button the Git Repositories view will give a visual representation of the location current HEAD (which is the commit just done)