Preparation and Warnings
This is Just a Personal Story, Not a Guide
This is not “a complete guide to climbing Mount Fuji”. Instead, it’s a recounting of my own experience climbing the Yoshidaguchi trail of Mount Fuji, including a discussion of what I brought, what I enjoyed and what I would have possibly done differently.
I am Not a Mountain Guide
I am not a mountain guide. I am not certified in anything. I am not qualified to charge any money to take anyone up any mountain—and despite what you may read on the internet, Mount Fuji is a mountain, not a walk in the park.
If you want a guided climb of Mount Fuji, I have read very good things about Fuji Mountain Guides. They offer 2-day Mount Fuji tours.
Only Climb Mount Fuji In The Official Climbing Season
Mount Fuji has an official climbing season which lasts for about 2 months in summer. Only climb Mount Fuji in the official climbing season.
See http://www.fujisan-climb.jp/en/season/index.html for the exact dates of the official climbing season.
Outside of the official climbing season, the weather is worse and the mountain hotels are closed.
There is No Water and No Food in the 12 Kilometers from the Base (850m) to Fifth Station (~2300m)
The only place you can get food and water is at the mountain hotels. These start after 5th station, and continue all the way to 9th station as you zigzag up the mountain toward the peak.
However, between the base of the Yoshidaguchi trail (at 850 meters) and the Fifth Station (at about 2300 meters) there are no mountain hotels, and thus no food or water.
None.
So, you need to bring enough water, sports drinks and food for a 12 kilometer hike in the forest with about 1500 meters of elevation gain.
You will probably want to have at least 6 liters to 8 liters of water and sports drinks. I’d recommend something like 2 liters of water and 6 liters of Pocari Sweat or Aquarius, to replenish electrolytes.
Now, I was paranoid about running out, so I brought too much. Specifically, as discussed later, I brought 15.2 liters of sports drinks and water. If you’re good at math, you’ll realize this weighed 15.2 kilograms, which is over 33 pounds! While this meant that I had enough for the entire ascent and descent, it was excessive.
There is No Water or Food on the Descent to Fifth Station
The mountain hotel at 9th station is the last mountain hotel where you can get food or water, so ensure you get enough for the entire descent to fifth station. (Yes, you’ll just be thinking about reaching the peak when you’re there, but think about the descent too!)
Wind Can Kill You
Even though the Yoshidaguchi trail of Mount Fuji is a proper hike which does not turn into not rock climbing (I don’t do rock climbing), wind can still be dangerous.
Wind can kill you on Mount Fuji.
(Well, technically, it would be the landing that would kill you, after the falling which was caused by the wind. But the point stands.)
This is true in any season. Wind can be very dangerous even in summer. Now, this is especially true in the off-season, which is why it’s important to only climb Mount Fuji in the official climbing season.
Wind on or near Mount Fuji can be dangerous not just for people hiking Mount Fuji—see this Reddit thread which referenced this disaster.
Weather Conditions and Temperature Both Change Drastically at Different Elevations
The weather on Mount Fuji changes dramatically as you go higher.
If you hike the Yoshidaguchi trail, you start in Fujiyoshida city (at 850 meters) and end on top of Mount Fuji (at 3705 meters or 3776 meters, depending on whether you walk around the crater).
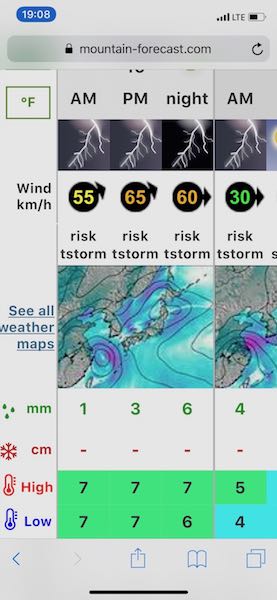
There is a great website, mountain-forecast.com which has different forecasts for Mount Fuji for various elevations:
For the temperature at the base of the Yoshidaguchi trail, see Accuweather for Fujiyoshida City.
For example, I hiked the Yoshidaguchi trail on August 15 and 16. When I started, the high temperature that day for Fujiyoshida City was 35 degrees Celsius (95 degrees Fahrenheit), and the forecasted low at the sumit according to mountain-forecast.com was 6 degrees Celsius (42.8 degrees Fahrenheit).
That’s a temperature difference of 29 degrees Celsius or 52.2 degrees Fahrenheit!
Now, it was probably a few degrees cooler since I started my hike by 10 AM, and the forecasted high temperature for the summit was 7 degrees Celsius, but even then, the temperature drop was easily more than 20 degrees Celsius.
So, bring proper cold weather hiking clothes with you, including a Gore-tex jacket, Gore-tex pants, a warm base layer, something warm for your core, and proper hiking boots. Don’t be one of those people wearing shorts, a T-shirt and a hoodie—that will just lead to you being miserable and either giving up or wishing you had.
Also, note that weather forecasts are just that—forecasts. Weather forecasts are not weather guarantees.
Pay attention to the conditions as well at different elevations. It’s nicer to hike in sunshine than in a thunderstorm, and being struck by lightning can ruin anyone’s day. To quote the Yoshida Trail map:
“If the sky shows signs of lightning, take refuge in one of the mountain huts and wait until the storm passes before continuing your hike.”
Most importantly, pay careful attention to the Wind km/h section at different elevations, especially for the summit. Exercise caution, and don’t even think about going if it’s at 70 km/h or above. When I did the climb, the summit forecast was for winds between 55 km/h and 65 km/h, and it was difficult even at that wind speed. If the wind becomes unsafe, taking refuge in a mountain hut would be a good idea.
Besides just checking mountain-forecast.com before going to Mount Fuji, you can also check it from your iPhone or Android phone when you’re on Mount Fuji—you can get cell phone reception at many places on Mount Fuji, so you absolutely should bring your phone. This way, you can check mountain-forecast.com again at the Yoshidaguchi Fifth Station, so that you can make a final go/no-go decision.
(Also, get a waterproof case for your phone, or a Ziploc bag, so that you can use your phone in the rain.)
Extra Lithium Ion Batteries
Since you will be using your phone to do important things like check weather forecasts and look at AllTrails and Google Maps, I strongly recommend buying a backup external Lithium Ion battery, and fully charging it beforehand. I bought a 10,000 mAh one from a store in Shinjuku, and it was enough to charge my iPhone at least once, as well as charging my Apple Watch a couple times. (Yes, it’s fun to absolutely demolish your daily move and exercise goals.)
Make Sure You Have Trekking Poles!
In case you did not pack trekking poles, go buy some.
If you are climbing Mount Fuji from the base, you absolutely need trekking poles. Not want. Need.
Yes, many people who start halfway up get a souvenir wooden pole when climbing Mount Fuji, and get stamps burned into it at various stations. However, it’s much better to finish the climb, and that means trekking efficiently—especially if you’re starting from the base of the Yoshidaguchi trail.
Also, even if you think trekking poles are self-explanatory, you need to watch this video on how to use trekking poles correctly. I watched this video before climbing Mount Fuji, and I realized I had both been holding my poles wrong, and using them wrong.
I would not have finished this hike without trekking poles.
Get aluminum trekking poles, not carbon fiber ones. Carbon fiber poles can snap: I’ve snapped a cheap Costco one back at home, catching it in some rock on the descent of Mount Finlayson near Victoria, Canada. It’s bad enough when something like that happens, just as when carbon fiber sticks shatter in hockey. However, halfway up Mount Fuji it’s a lot harder to get a new stick!
In Tokyo, there’s a store called L Breath in Shinjuku which has a good selection. I bought an amazing pair of Black Diamond FLZ aluminum poles there. I highly recommend these poles: they worked perfectly for me on Mount Fuji. Again, I chose aluminum, since carbon fiber poles can snap, and I absolutely did not want that to happen halfway up Mount Fuji.
Make sure the trekking poles fit your height! I’m 6’3“, and in Japan it’s reasonably difficult to get trekking poles which are long enough. Most of the poles, even in L Breath, were a maximum of 120 cm. These poles went from 120 cm to 140 cm in length, which was perfect for my height: it was very helpful to shorten them to below 125 cm on parts of the ascent, and then to have them above 135 cm on parts of the descent.
(Yes, I bought trekking poles in Japan: I had been travelling with some cheap carbon fiber ones which I bought at Costco in Canada, but I actually forgot them on a train near Izumo. They weren’t super collapsible, and I’d put them above the seat by themselves but kept my backpack with me. Then when I got off the train, I took my backpack but forgot to look up and get them. So, I bought the Black Diamond ones when I got back to Tokyo. They are amazing poles, and they served me very well on Mount Fuji. For all I know, it could be lucky that I lost the Costco poles: since they were carbon fiber, snapping halfway through the climb would have ruined everything. Also, since the Black Diamond ones are more collapsible, I can more easily fit them inside my backpack, meaning I won’t be forgetting them on any trains!)
Bring a Headlamp
Since you will be using trekking poles, you can’t use a flashlight while also using two trekking poles—unless that flashlight is strapped to your head. It turns out that this is a thing, called a headlamp.
I used my headlamp for only 5 minutes, since I decided that walking in the dark was not for me. (I ate dinner at the first mountain hotel I found, and I stopped for the night at the second one.)
It’s absolutely essential to bring a headlamp. Walking in the dark on a mountain is dangerous, but doing so without light is suicidal. And even if you plan to only hike in daylight, it gets dark fast. (When I stopped for dinner it was light; when I finished my dinner it was dark—and I ate Cup Noodles, since the proper kitchen had just closed.)
Bring Cash
The mountain hotels only take cash. So, if you want anything to eat or drink, or anywhere to sleep, bring cash. You should bring about 30,000 yen in cash, preferably in 1000 yen notes. The mountain hotels cost about 5000 or 6000 yen per night, and you’ll be forking out lots of yen in 300-600 yen amounts whenever you want to eat or drink anything. Also, bring about 1000 yen in 100 yen coins. (The toilets cost 200 yen donations each. You’ll probably accumulate lots of 100 yen coins when spending your cash, but it would be shitty to run out!)
Book a Spot at a Mountain Hotel In Advance
If you know you are definitely fit enough to make the full hike and you have a good idea of how far you will go, I recommend phoning ahead and booking a spot at one of the mountain hotels. You don’t want to be stuck without a place to sleep! (As I discuss later, I wasn’t sure how far I would get on the first day, or whether I was fit enough to do the full hike, so I didn’t actually do this. Hopefully this book helps you make an informed decision about whether, and where, to book.)
Bears
There are signs warning about bears on the bottom half of the Yoshidaguchi trail. It’s not a good idea to startle bears, so take appropriate precautions. Also, the bottom half of the Yoshidaguchi trail is almost completely deserted. So, if you are hiking alone and get attacked by one of the bears that the signs warn you about, no one may find you (or your body) for several hours.
Official Warnings
The Yoshida Trail map also includes a number of warnings which I will quote here:
Altitude Sickness
“Do not continue hiking if you feel any symptoms of altitude sickness (such as headaches or nausea).”
Rest Areas
“Only rest in areas that are safe. Do not rest where there are ‘caution for falling rocks’ warnings or in areas where the path is narrow.”
Mount Fuji is an Active Volcano
“Mt. Fuji is an active volcano. If the eruption alert level is raised while you are going up or down the mountain, start your descent at once. If by any chance an eruption occurs, immediately find refuge in places such as a nearby mountain hut or hiding place and act according to the instructions of officials.”
Helmets
“Let’s wear a helmet in case of falls, falling rocks and sudden eruptions.”