Set up Your App for Sale on FastSpring
In this chapter, we’ll configure your app listing for your very own store. FastSpring will process your purchases. Their backend will take care of all the license code generation during the checkout process. This is part of the “order fulfillment” we’re going to configure.
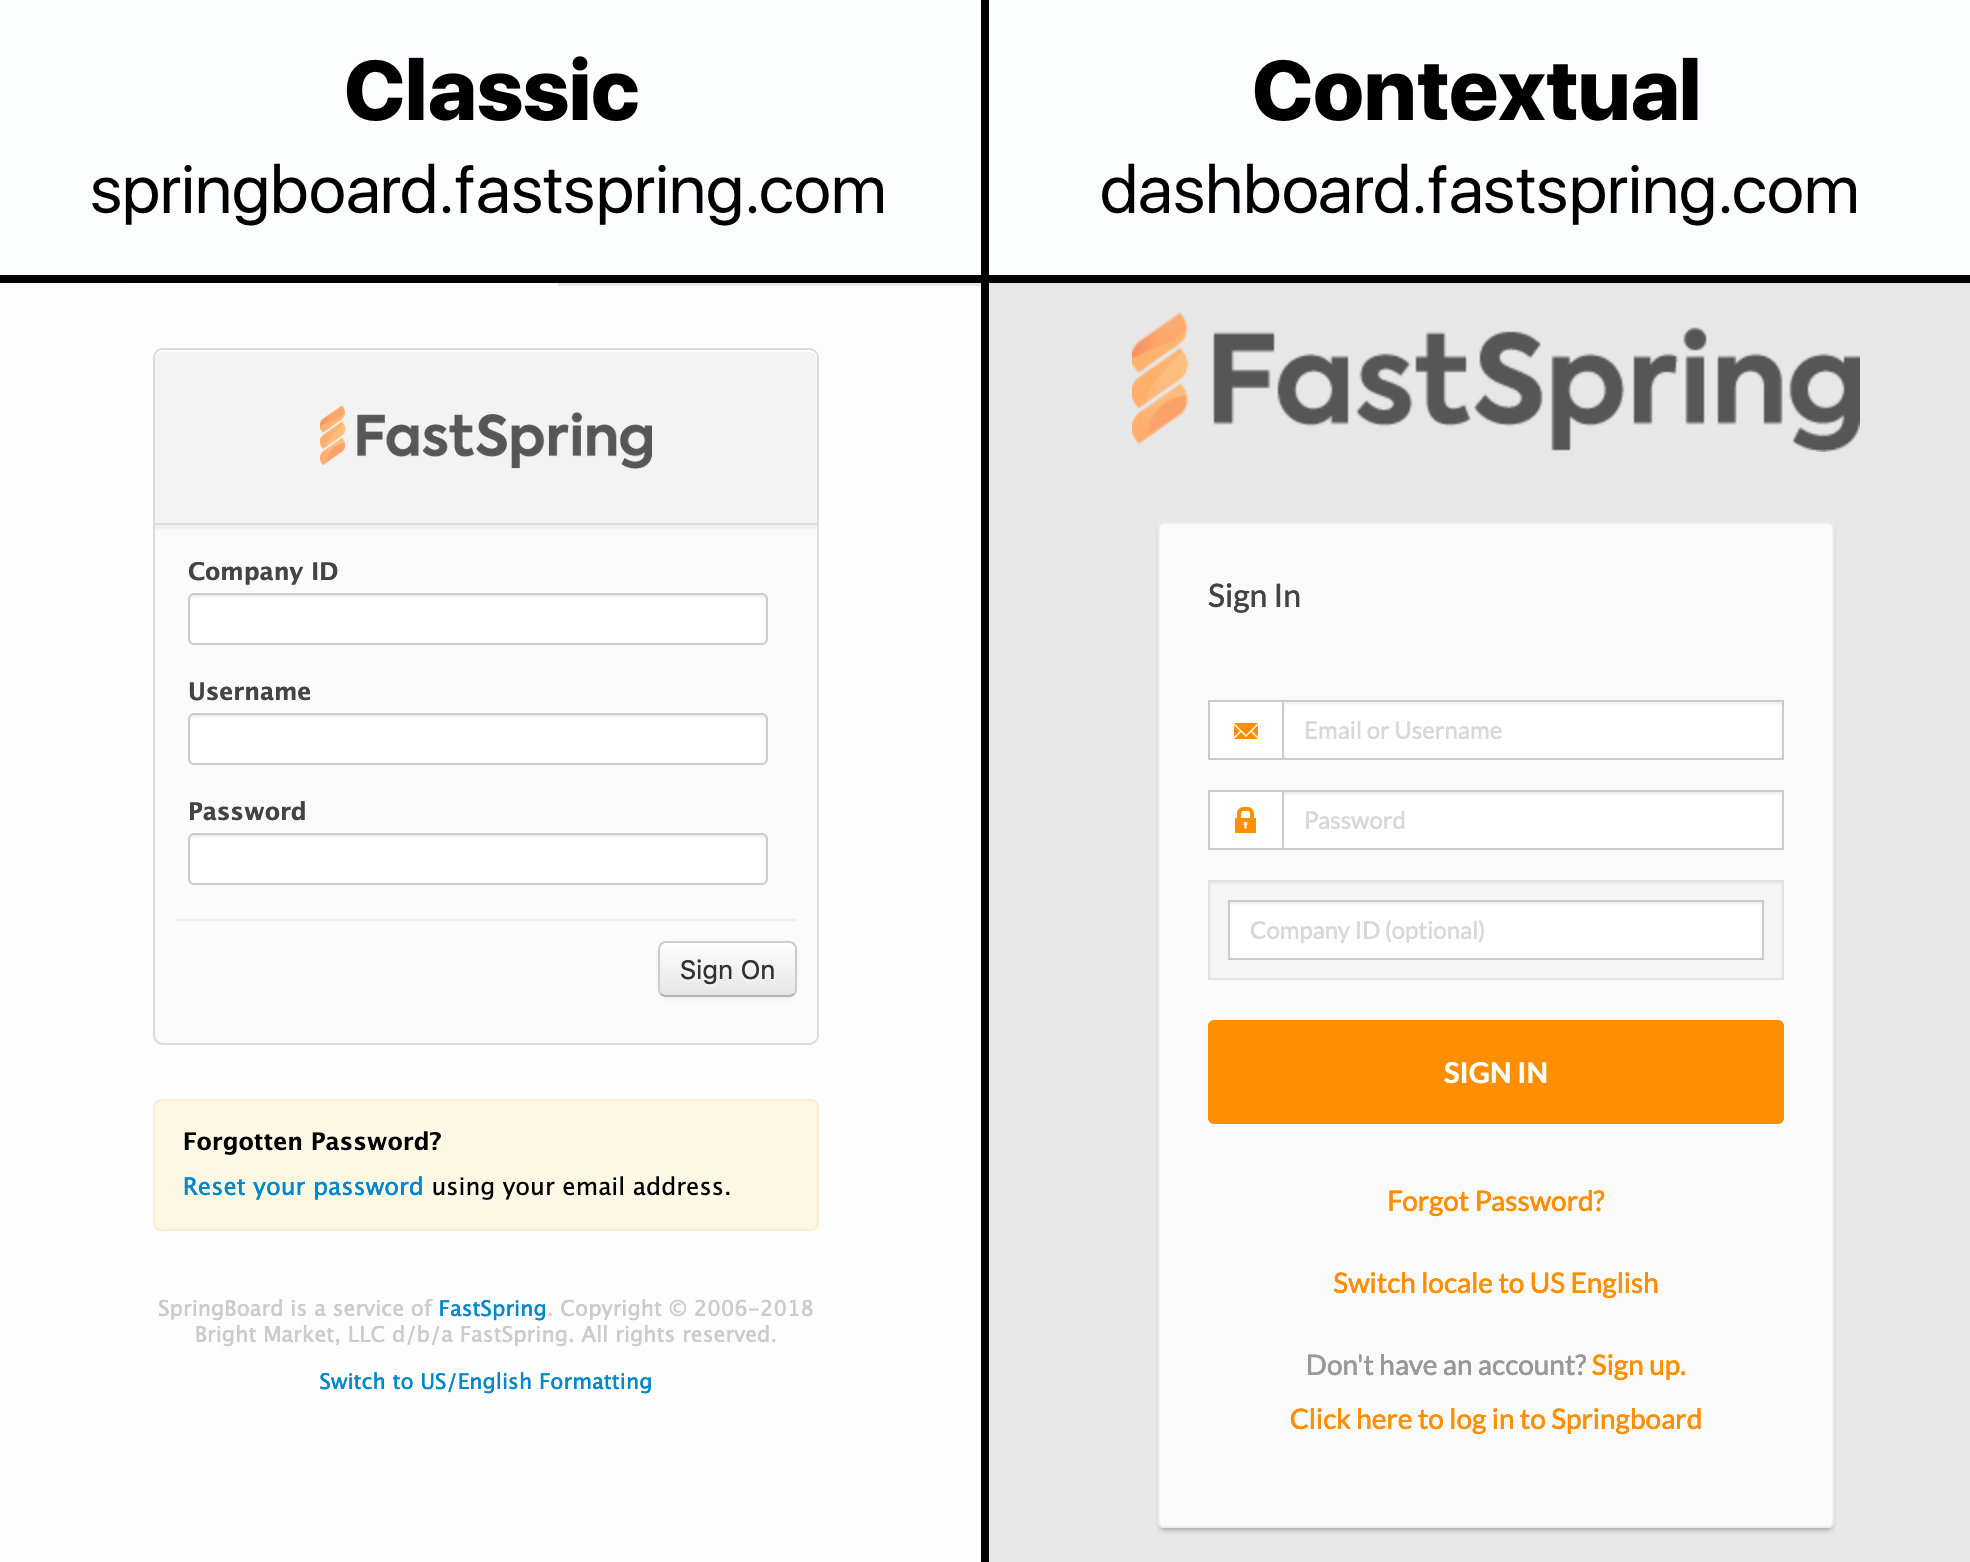
FastSpring offers two store backends in parallel: The old one, called “Classic Commerce”, and the new one introduced in 2016, called “Contextual Commerce”. Both systems differed for quite a while, but nowadays, I think it’s safe to say that Contextual is the clear winner for app developers because it is on par in features and even exceeds Classic. You get a proper REST API in Contextual, and a much nicer checkout experience. Order confirmation emails aren’t ugly anymore, either!
I’ll show you how you can set up both store backends, but will focus on the functionality of Contextual because it’s clearly the way forward.
To see what you can do with the Contextual store, have a look at the examples and demos on https://www.fastspringexamples.com/. You’ll see that the FastSpring Contextual Commerce backend can power a shopping cart on your own website. The examples include a preview of different settings, too, for example how the checkout form differs from selling digital to selling physical goods.
Contextual is the new default when you create an account. You can later opt-in to add access to the Classic store to your account via a support ticket. The same applies if you find you didn’t get access to the Contextual backend initially: just ask the support team to put you on the other backend, too.
To get started, head to FastSpring’s sign-up page if you don’t have an account already. Account activation may take a little while because it involves a human.
If you already have an account set-up, great! Proceed to the next section in this chapter.
If you still wait for account approval, you may want to skim the following sections to get a feel for the process and the parts involved, and come back later to create the store listing. In the meantime, head to the next chapter and learn how you can prepare your app to be activated via license codes.
Setting Up Your App as a Product Listing
Let’s make sure you got access to the Contextual store, first. It’s pretty easy to discern Classic from Contextual by their URL and looks. When you get your login link, you can infer the backend you got access to by the URL and the looks of the login form.
Sign in to your Contextual Dashboard. After signing in, you have to set up your app for sale. In the process, I’ll help you find your way around in the FastSpring backend.
This is our action plan:
- We will create a new product listing with details for your app, plus set up the license generator.
- We will configure two separate store fronts, so you know how to do this whenever you need to. One is a regular checkout page with a shopping basket you can link people to, the other is a popup you can embed on your website for a faster checkout experience.
- Finally, we’ll be putting the app on both stores’s virtual shelves, so to speak.
I’ll be saying “product listing” and “app” interchangeably here. Keep in mind that you can sell all kinds of goods on FastSpring. It can be any digital good, like software, music, e-books, service subscriptions – you name it. FastSpring even allows to configure production and shipment of CDs, for example. Or you can create a jewelry store. Naturally, FastSpring’s wording is very general to fit all users. So don’t look for the words “application” or “software” when you navigate around on FastSprings dashboard or in the docs, they use the more general term “product” everywhere.
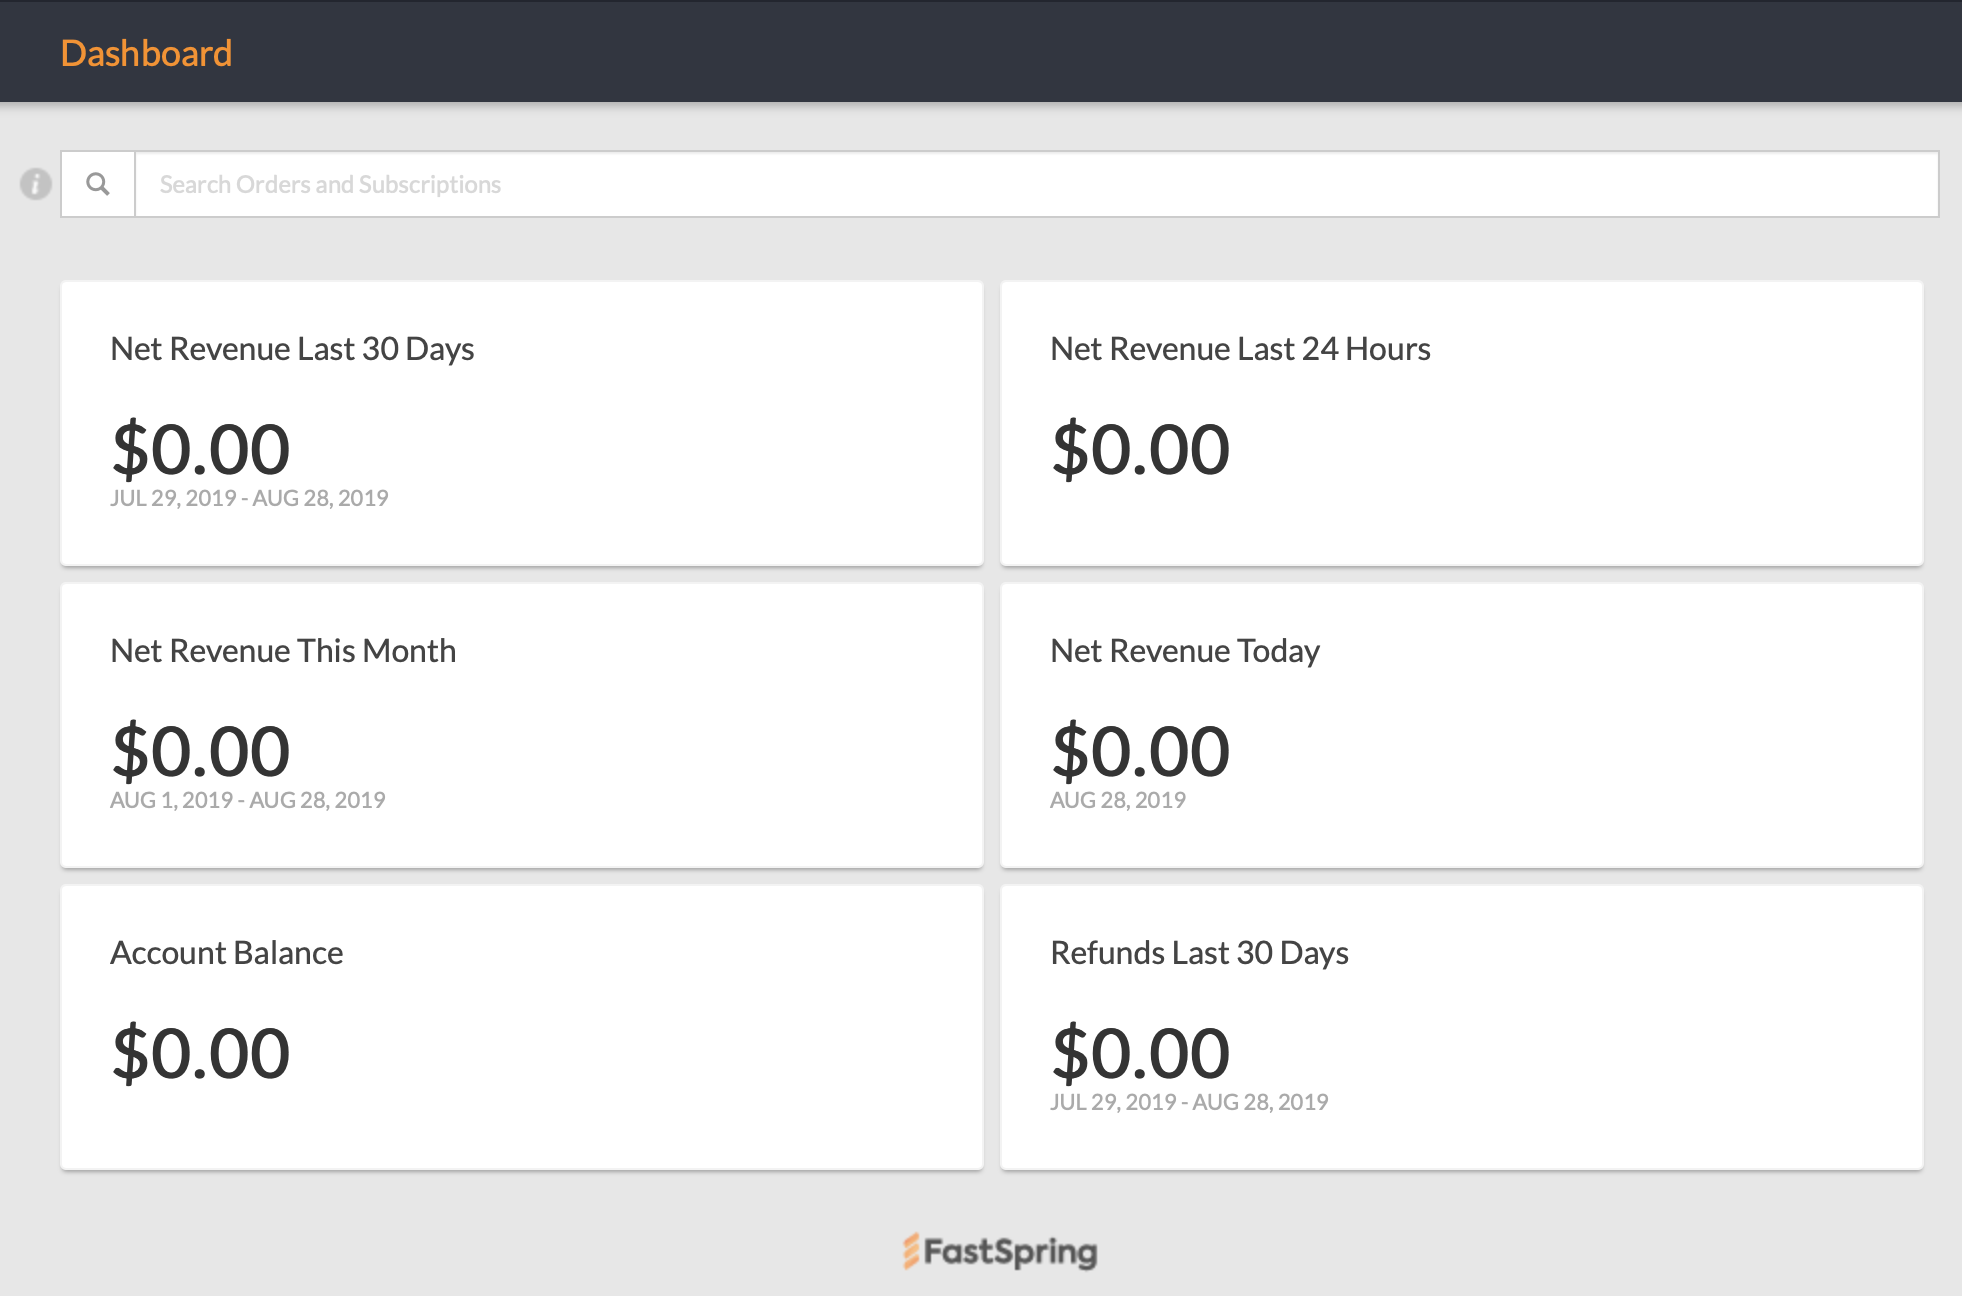
Most navigational tasks in the backend are split up in two tiers: the topmost navigation bar, which is static, and a page sub-menu just below it. In the Dashboard right after logging in, the sub-menu is empty save for the page title, “Dashboard”. You’ll want to keep an eye on this part of the navigation since it will present options, save and cancel buttons, and sometimes “go back” navigation action.
Create your first product listing
Click the “Products” main menu item to go to the listing of all your products in the current store.
The sub-menu now displays different tabs, “Products” (active), “Bundles”, and “Subscriptions”, which show your product listings by the respective type. To the right, it has a “Create Product” button. Click that.
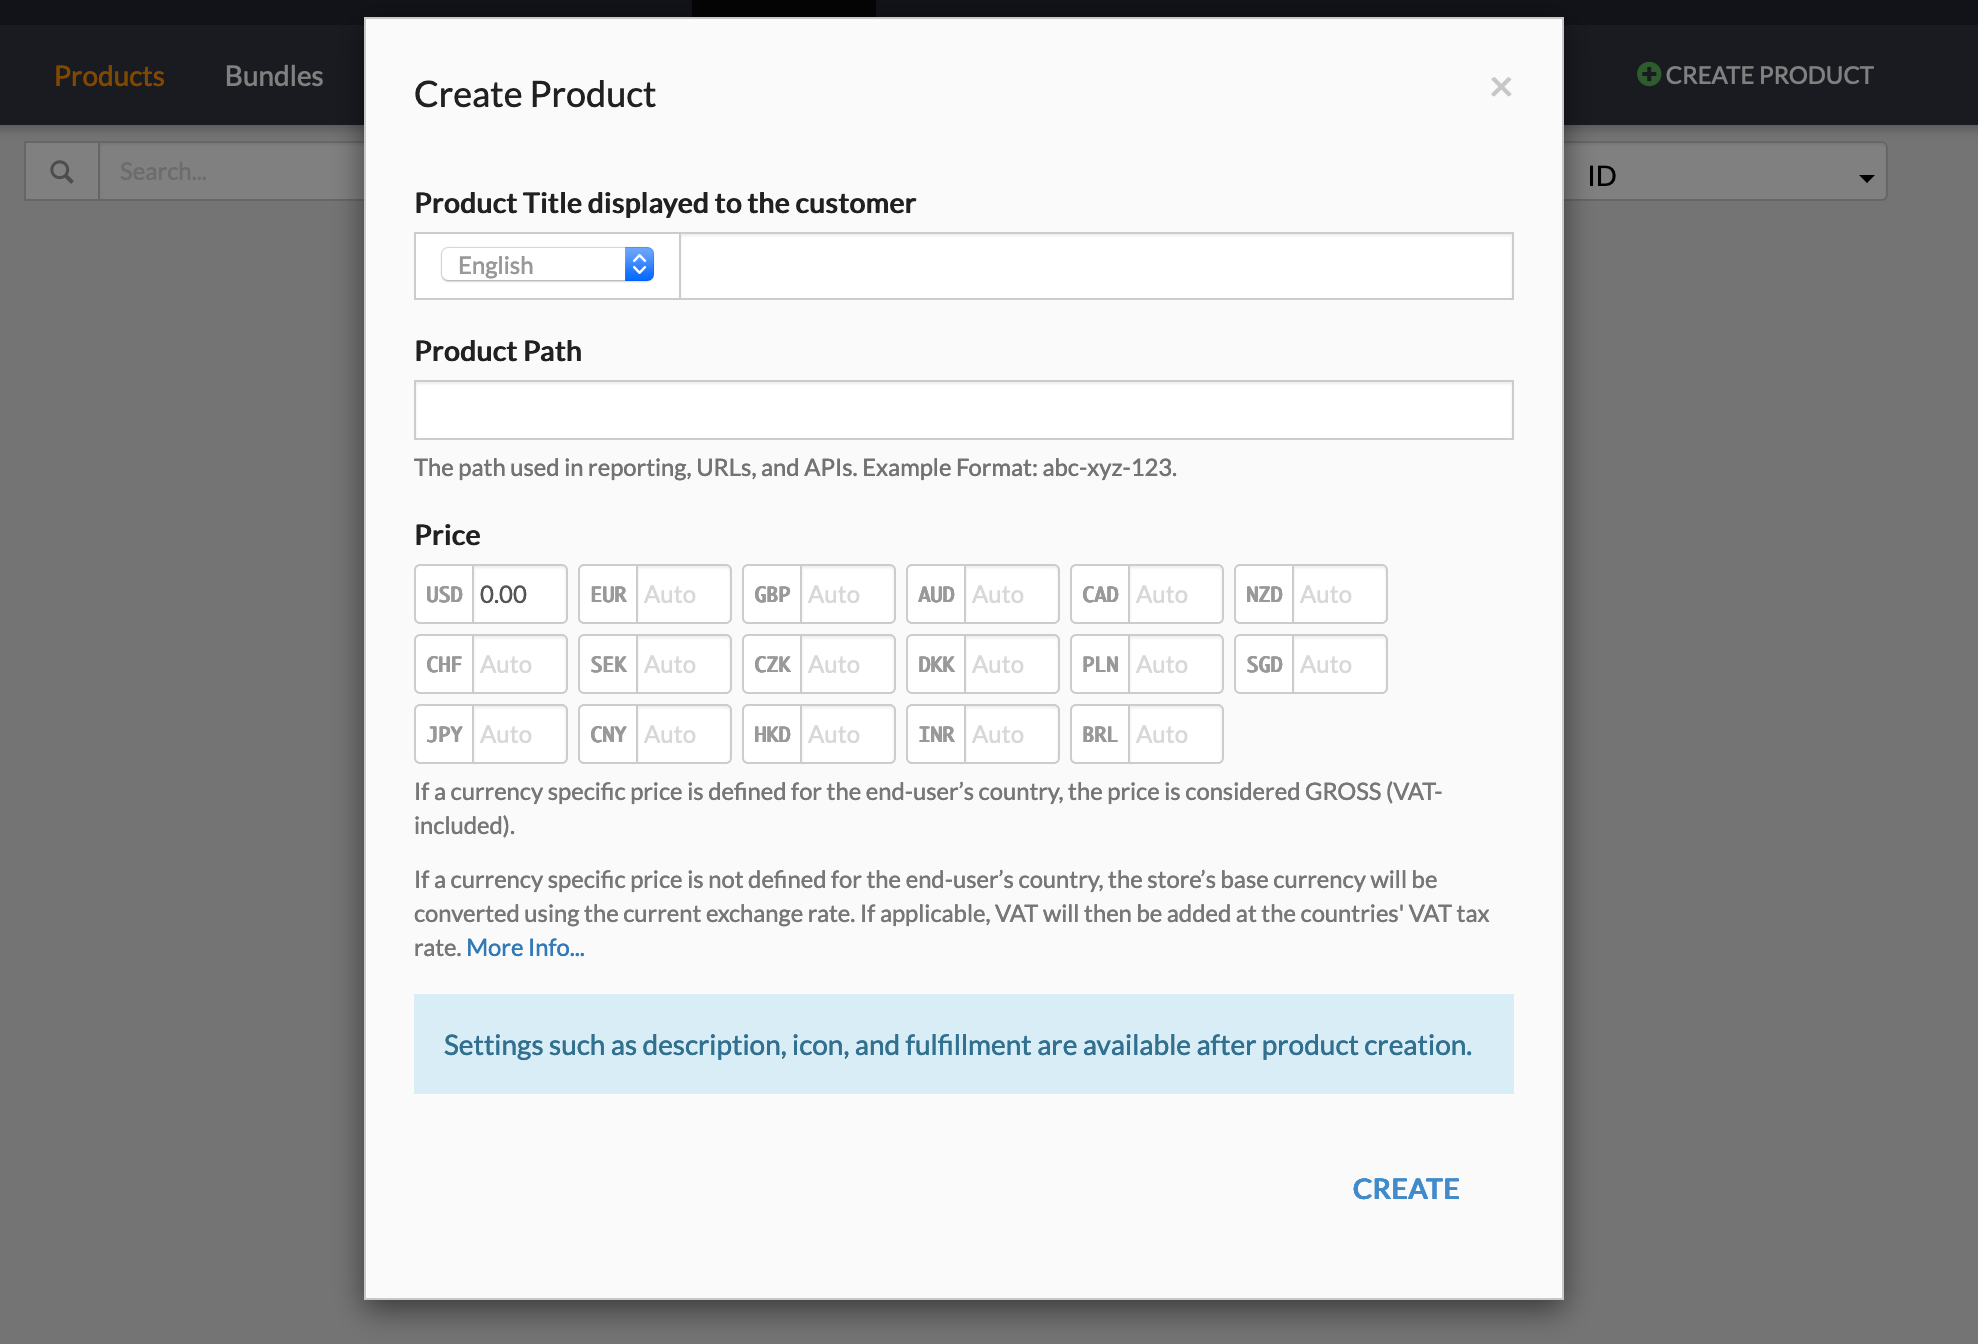
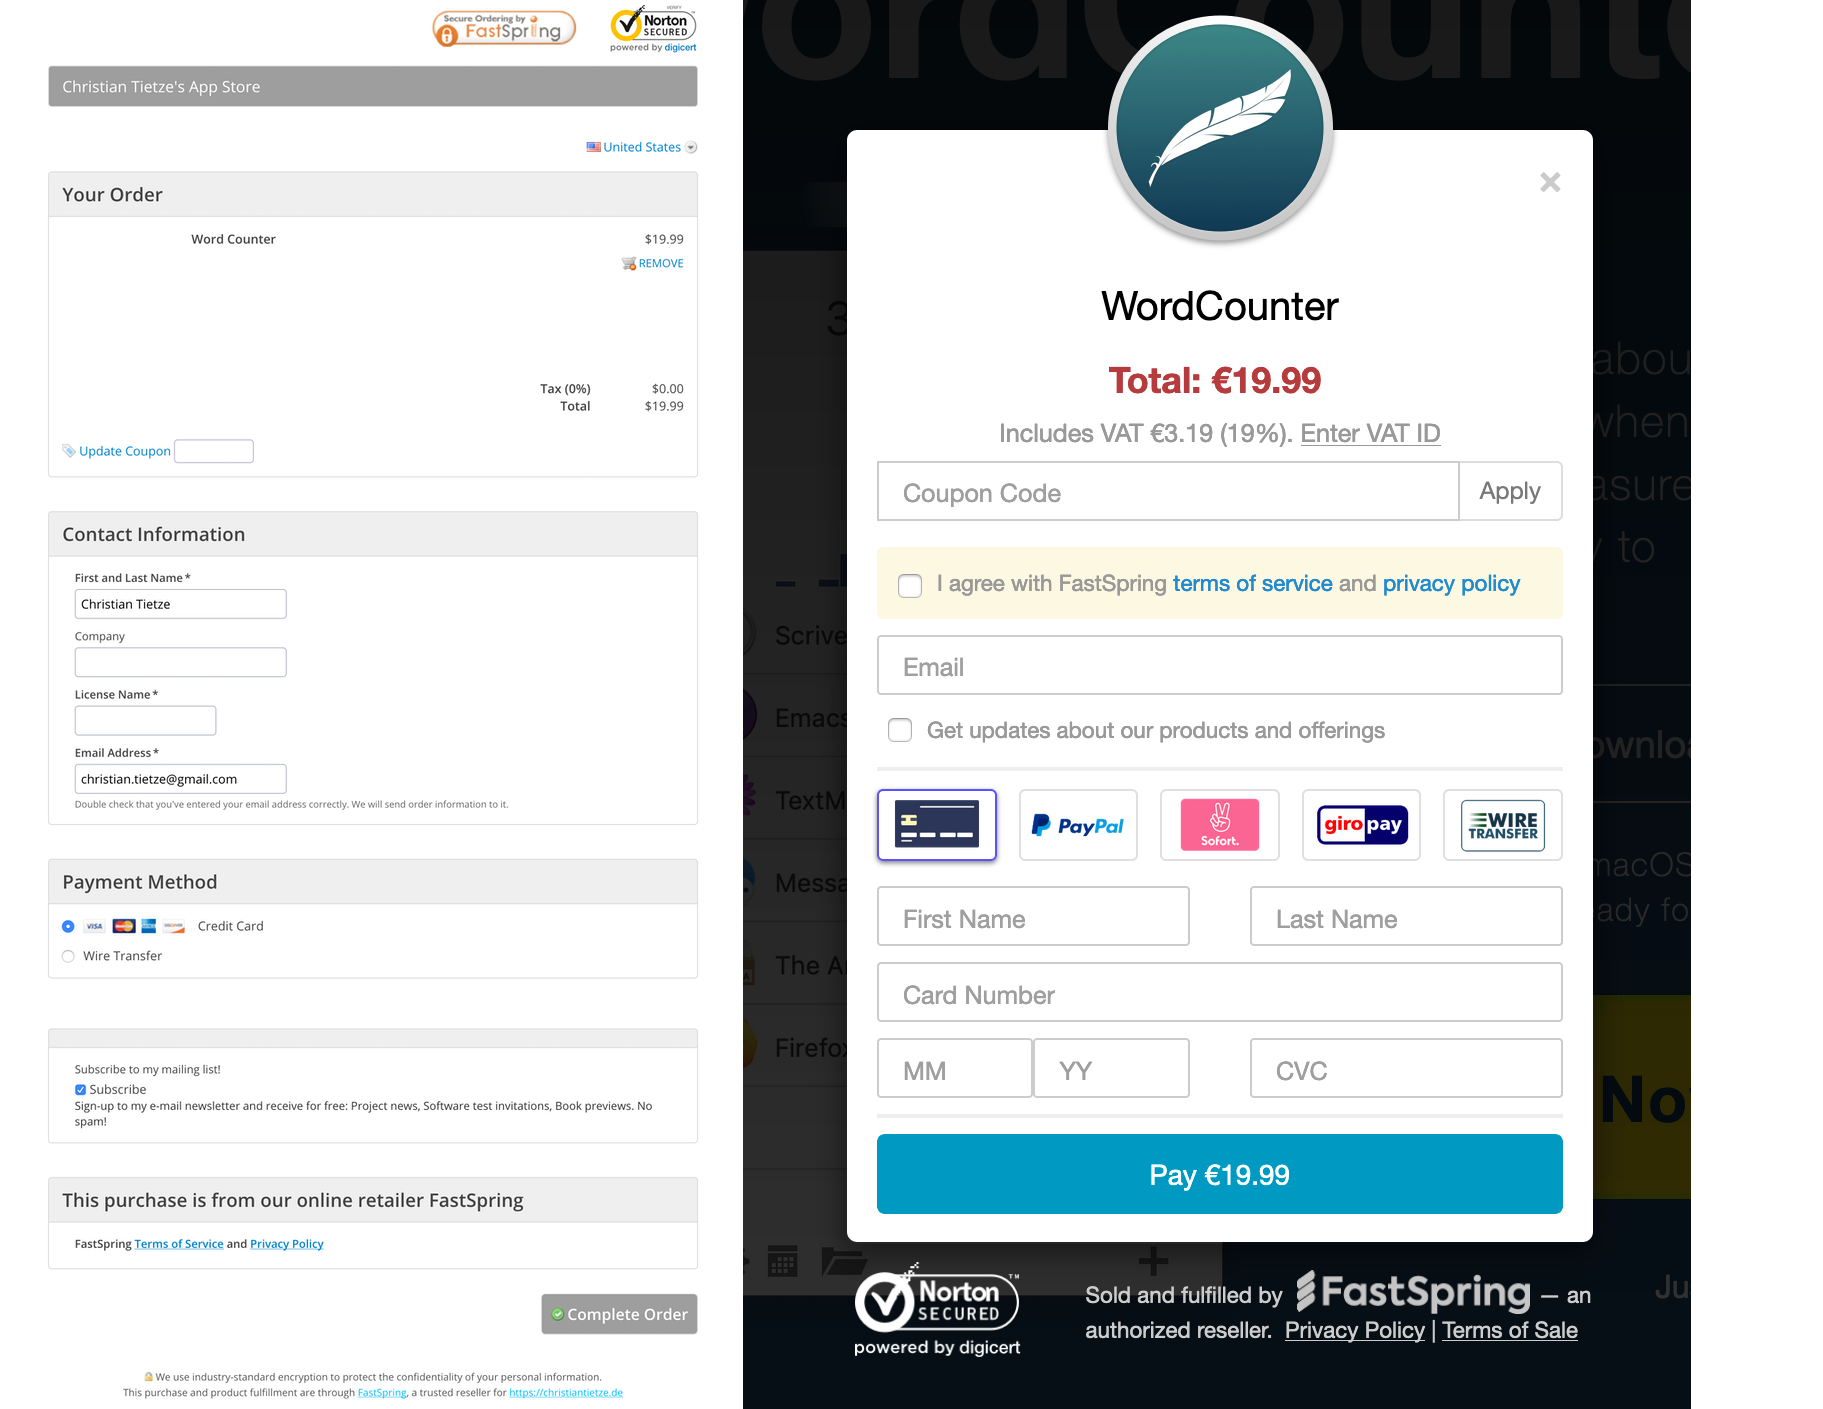
We are going to call the app “My New App” in this book. That’s the “Product Title” displayed to the customer. You may customize the app’s product path for store URLs or leave the default.
Make sure to add a price. (I’ll use USD 50.) The default reference currency is USD. You can leave other currencies empty to have them automatically calculated during the order checkout process based on current exchange rates, but not USD. When you remove the USD value, the product will be free for U.S. customers. Exchange rates are not used for conversion from e.g. EUR to USD, only the other way around! So do make sure to never leave the USD field blank.
Hit the “Create” button and have a look at the product detail page you are redirected to.
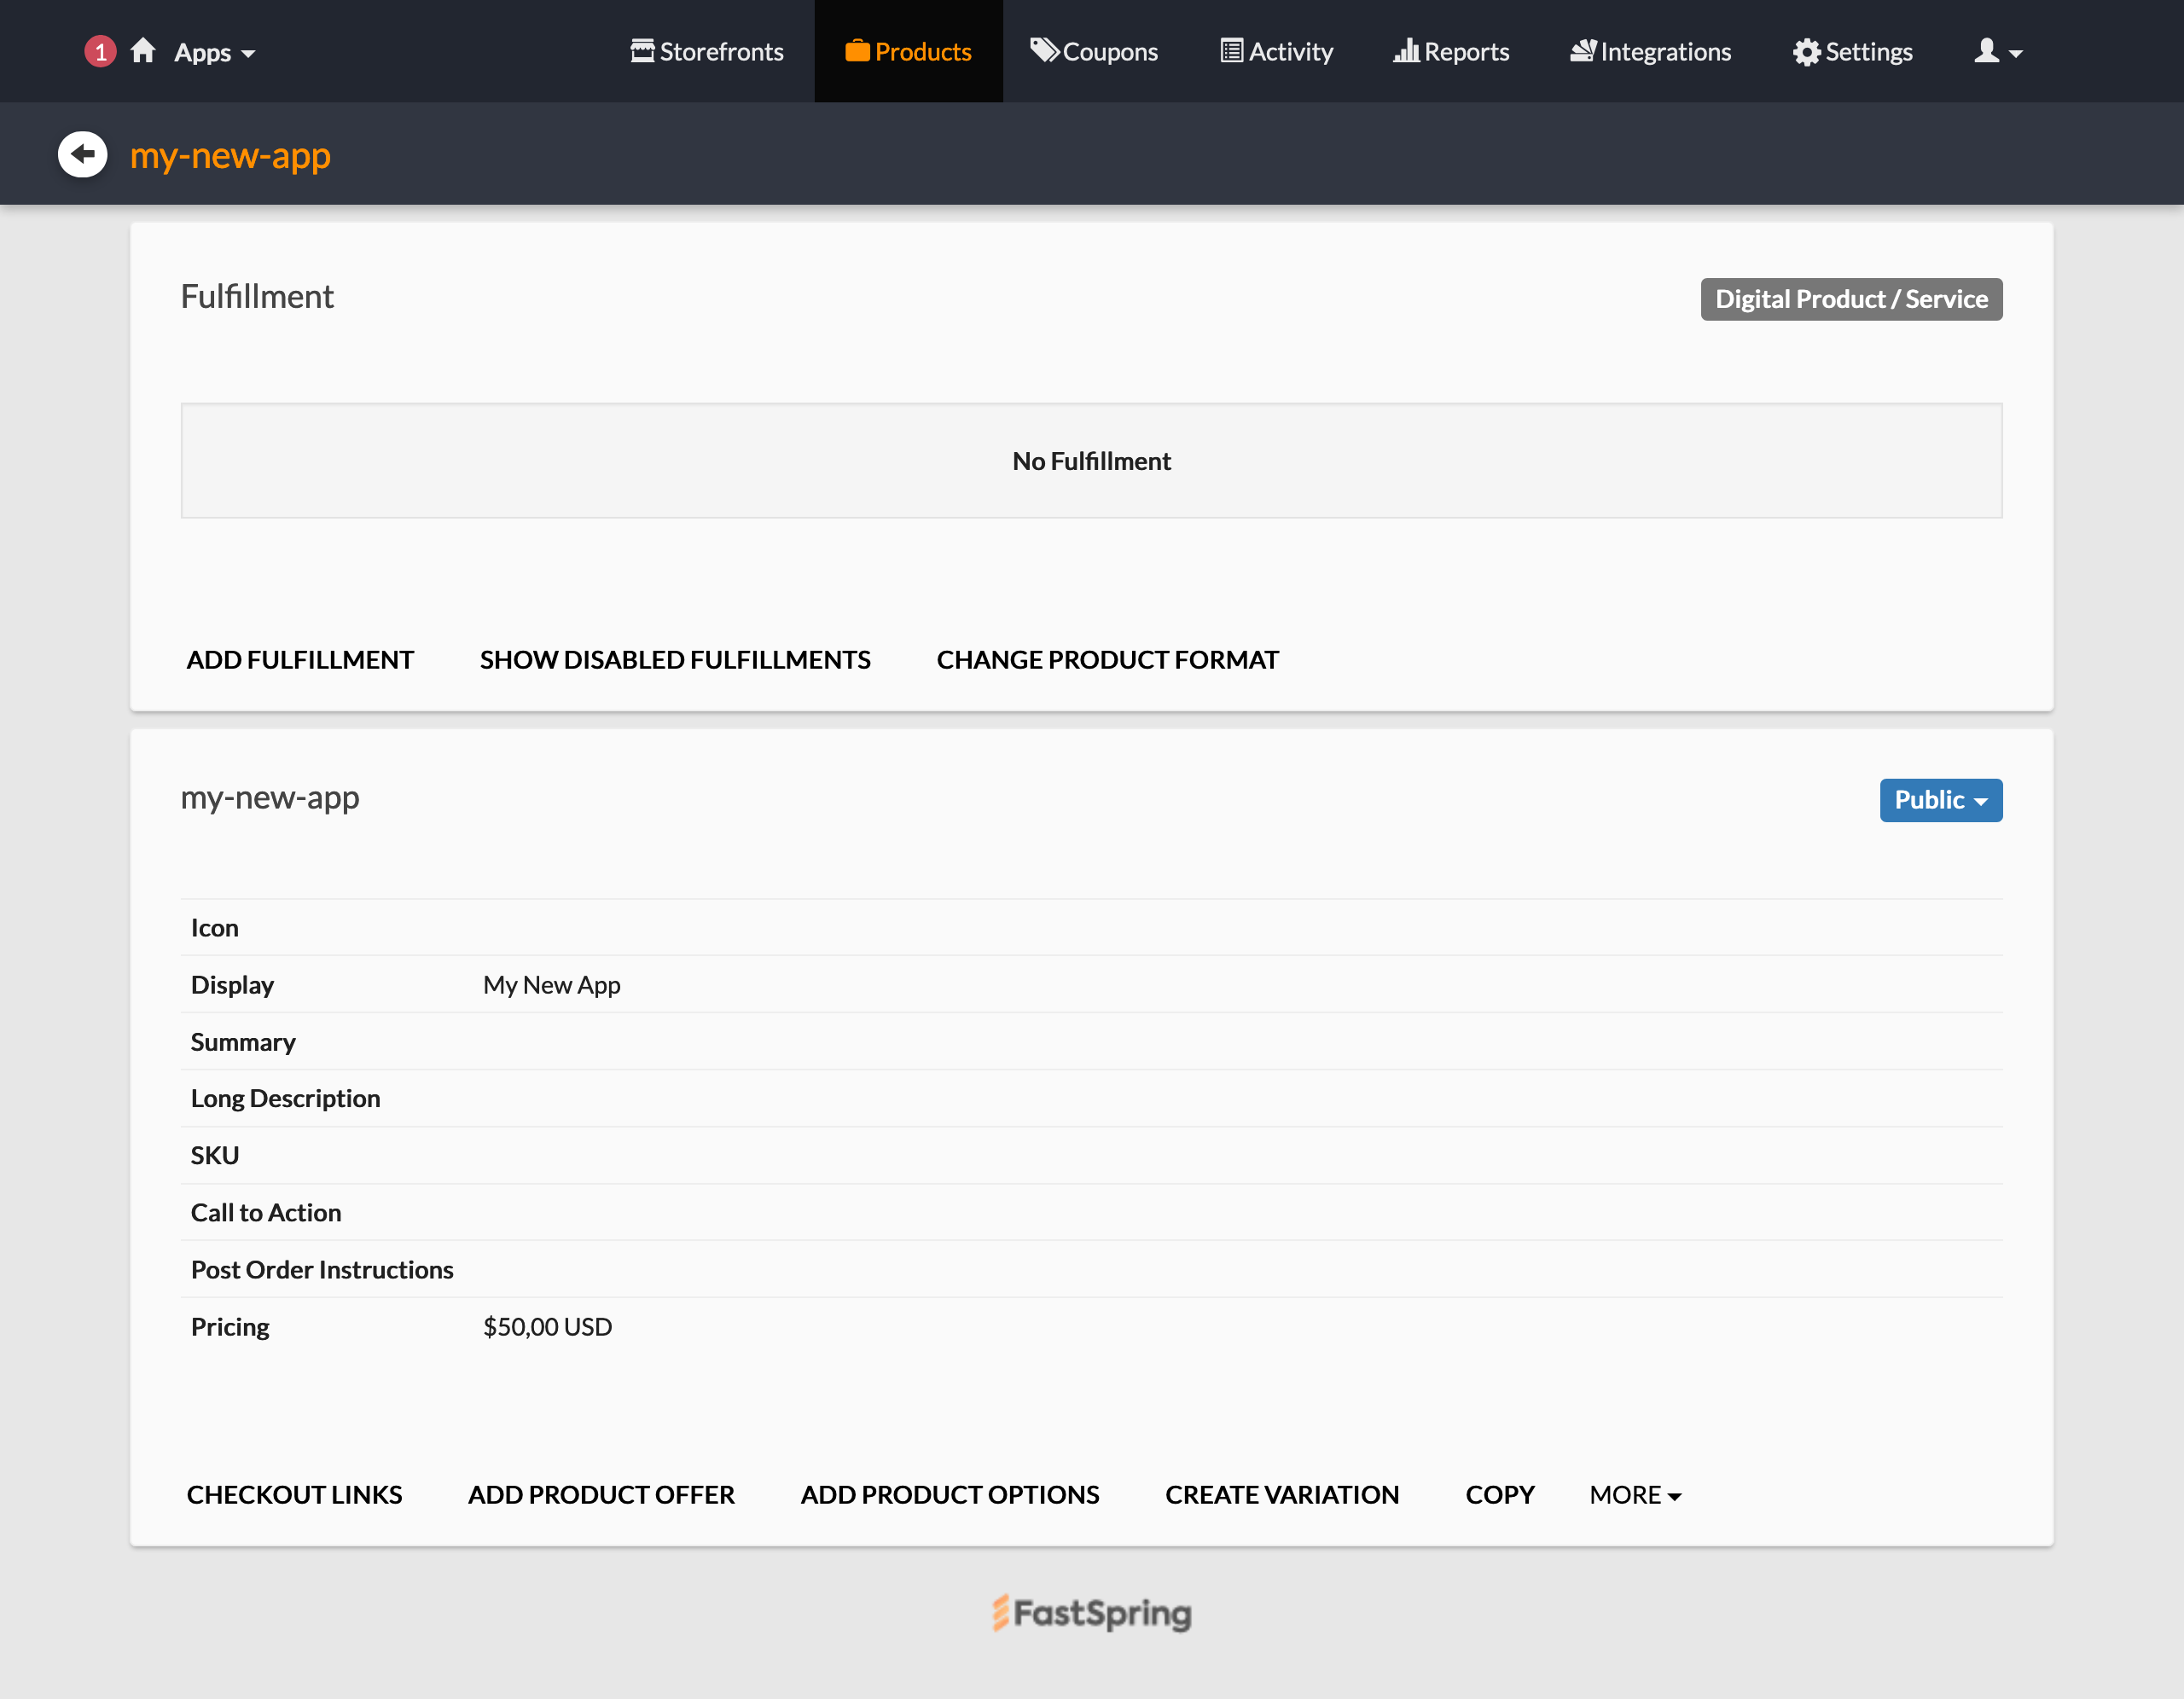
The sub-menu now displays the product path (“my-new-app”) and a backward navigation button.
In the content part, there are two groups.
The first is titled “Fulfillment”; that’s a list of actions performed by the system when an order completes. We will be setting up the license generator here in a minute.
The second group has the product path again as title and shows the details of the product listing for store fronts. You can customize the product icon, title, short summary for product listings, and long description for product detail pages in the store. It’s not mandatory, but I suggest you write different dummy strings into these fields to see where the details are actually displayed.
Keep an eye on the “Post Order Instructions” field in the second group. That’s Markdown-formatted text customers will see when they complete a purchase. You can include app activation instructions and a thank you note here, as we will be doing later.
In the top-right corner of the product listing group is a button titled “Public”. This affects whether customers can see the product in your live storefronts. I think it’s good practice to immediately switch that to “Private” until you’re finished with the product setup.
Product customization options explained
The action links at the very bottom of this group are:
- “Checkout Links”: click on that to quickly access a test storefront with the product details.
- “Add Product Offer”: use this to display special offers in your store fronts. Once this product is in the basket, these offers will be displayed to the visitor as a cross-sell or upsell. It can make sense to have a discounted product variant that you exclusively use for these scenarios but which are otherwise hidden from the store.
- “Add Product Option”: use this for example to model different pricing tiers for subscription services. Additionally, you can offer multiple choice options to e.g. pick parts of a whole. I don’t know what possible use this has for software apart from bundles, which I suggest you create differently, but it’s there if you need it.
- “Create Variation”: use this to prepare a variant of the product that inherits all of the base product’s properties, but where you can override the price, icon, descriptions, etc. One scenario is to create a variation with the same price set at a 30% discount as an internal offer, so it isn’t available in the storefronts directly, and then use this variation for cross-selling or upselling from other products. Like upsell your ebook at a huge discount when prospects add your online video course to their shopping basket.
- “Copy” really should be titled “Duplicate”, because it creates a new base product based on the current settings.
- “More” hides the product deletion link, and “Custom Attributes”, which is a custom key–value dictionary tied to the current product variant. This could be useful for API calls and other automation tasks.
You see, FastSpring is very flexible when it comes to designing product variants. With the “Checkout Links” action, you can preview most things in your store quickly – once you have a storefront set up, that is, which we haven’t. We’ll get there right after we finish the product setup.
I played around with offers and product variants for a while and would like to share my experience so far to give you some perspective.
Product variants can be used for marketing campaigns
Product variants at a discount are useful for campaigns like newsletter or blog sponsorships.
You can share the direct link to the variant with a selected group of people while everyone else will see the default price. You can also customize the variant’s description and title to reflect this is a special offer for this special audience, only.
Little things like that can make the checkout experience feel more personal. In more technical terms, you could say this is a potential means to heighten community loyalty when you make them feel special and acknowledge their being in-group.
Coupon codes offer a similar device: you can add an “Applied Discount Reason” that’s displayed right below the discounted price and is a good opportunity to say “Hi” to readers of a blog.
On top, a discounted variant’s price reduction can also be time limited: then the discount is good for the duration of your campaign, and then the price goes up again to the default value. You don’t need to delete the product variant in this case, and thus will not break the precious incoming links.
Cross-sell, upsell, and app bundles
The cross-sell and upsell options are nice to offer incentives like “buy my book at 50% off when you buy my video course”. I think that these options shine when you have different types of products in your store that people might not shop for together. They are also useful when you have a very broad roster of products, for example when you want to recommend a particular pair of gloves that goes well with a merino wool scarf in your custom-tailored clothes shop.
For my apps, I found bundles to be more useful than the cross-sell or upsell, though.
Here’s an example: I want to offer my apps TableFlip and WordCounter together at a discount. Say each costs $15; then buying both should cost $25 instead of the regular $30. Using upsells for this, I’d have to create a $10 variant for both apps to lower the sum total, and then set up an offer for each product that uses the respective variant. This may work for two apps, but the possible combinations grow exponentially.
Bundles are a much better device to implement this. You can set a bundle price and lump together all the apps, effectively overriding their price. When the customer picks any app that is also available in the bundle, you can offer to “complete” the bundle and swap the single items from the shopping cart with the bundle product. Because this is so useful, we’ll discuss the setup and implications of bundles in a dedicated section in the appendix.
If you want to see how bundles, product alternatives, upsell and cross-sell options look in a store, head to https://www.fastspringexamples.com/ and have a look at the “Advanced Selling Products” examples at the bottom of the left navigation sidebar.
Product fulfillments in detail
To complete the app setup in your store, we’ll need to wire the license generator to create a new license for every purchase. Automatic actions on order completion are called “fulfillment”.
Have a closer look at the “Fulfillment” group on the product page. By default, the group displays “Digital Product/Service” in a label in its top-right corner, a “No Fulfillment” placeholder in the middle, and a couple of actions at the bottom.
“Add Fulfillment” and “Show Disabled Fulfillments” are self-explanatory, and we’ll have a look at available fulfillments in a second. The third action, “Change Product Format”, allows you to switch from digital to physical goods and enable shipment. The choice you make here affects the available fulfillment options. If you sell amazing swag for your brand like coffee mugs and t-shirts, or if you offer printed books, this might be worth a second look one day. For now, we’ll stick to digital products without physical shipment.
When you pick “Add Fulfillment”, you’ll be presented with four options:
- “Send Email”, which is useful to send a personalized message to customers. You can also include the license keys and other niceties like app activation links in these emails. We will have a look at this once the license generator is working.
- “Generate a License” is exactly what we’re going to pick; but first have a look at the other options.
- “Provide a File Download” is meant for a different business model involving protected, time-limited downloads. Since we’re locking our app’s functionality behind a paywall that requires a license, it doesn’t make sense to also limit the download. Quite the contrary: I suggest you make the app free to download and test-drive for a while instead to create more interest in your app. With the approach laid out in this book, this option is not very useful.
- “Create a Signed PDF” is not useful for our purposes, but you can pick this option if you sell ebooks in your store. You can have the customer name printed on every page of the PDF, which is supposed to prevent file sharing to some extent. I do like that this feature exists, but I doubt it’ll really protect your content from being pirated.
Configure License Code Generation via CocoaFob
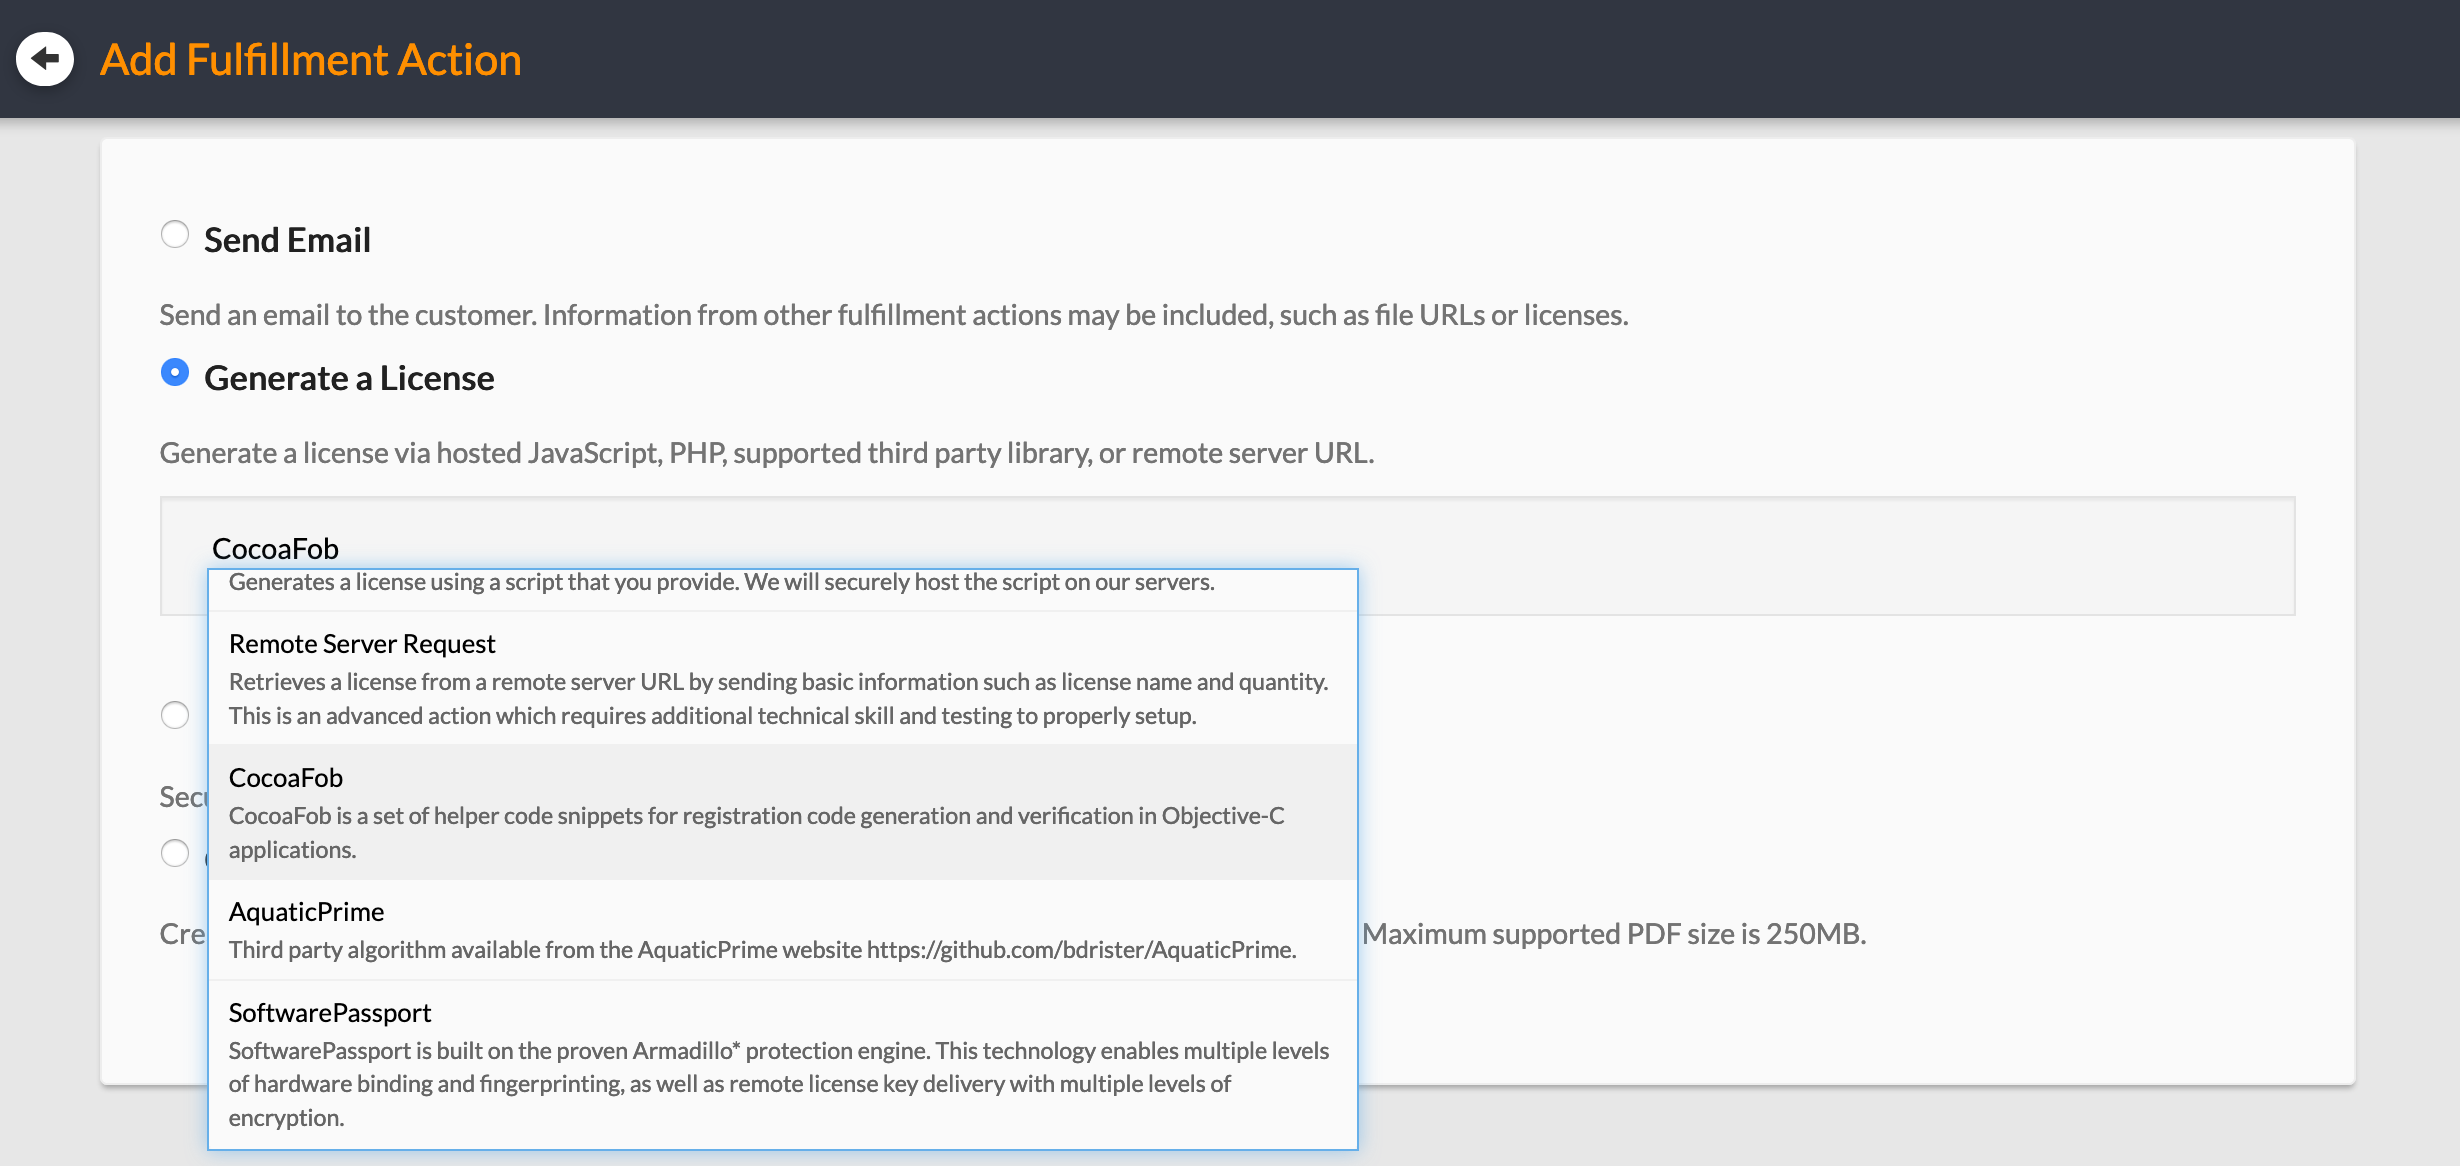
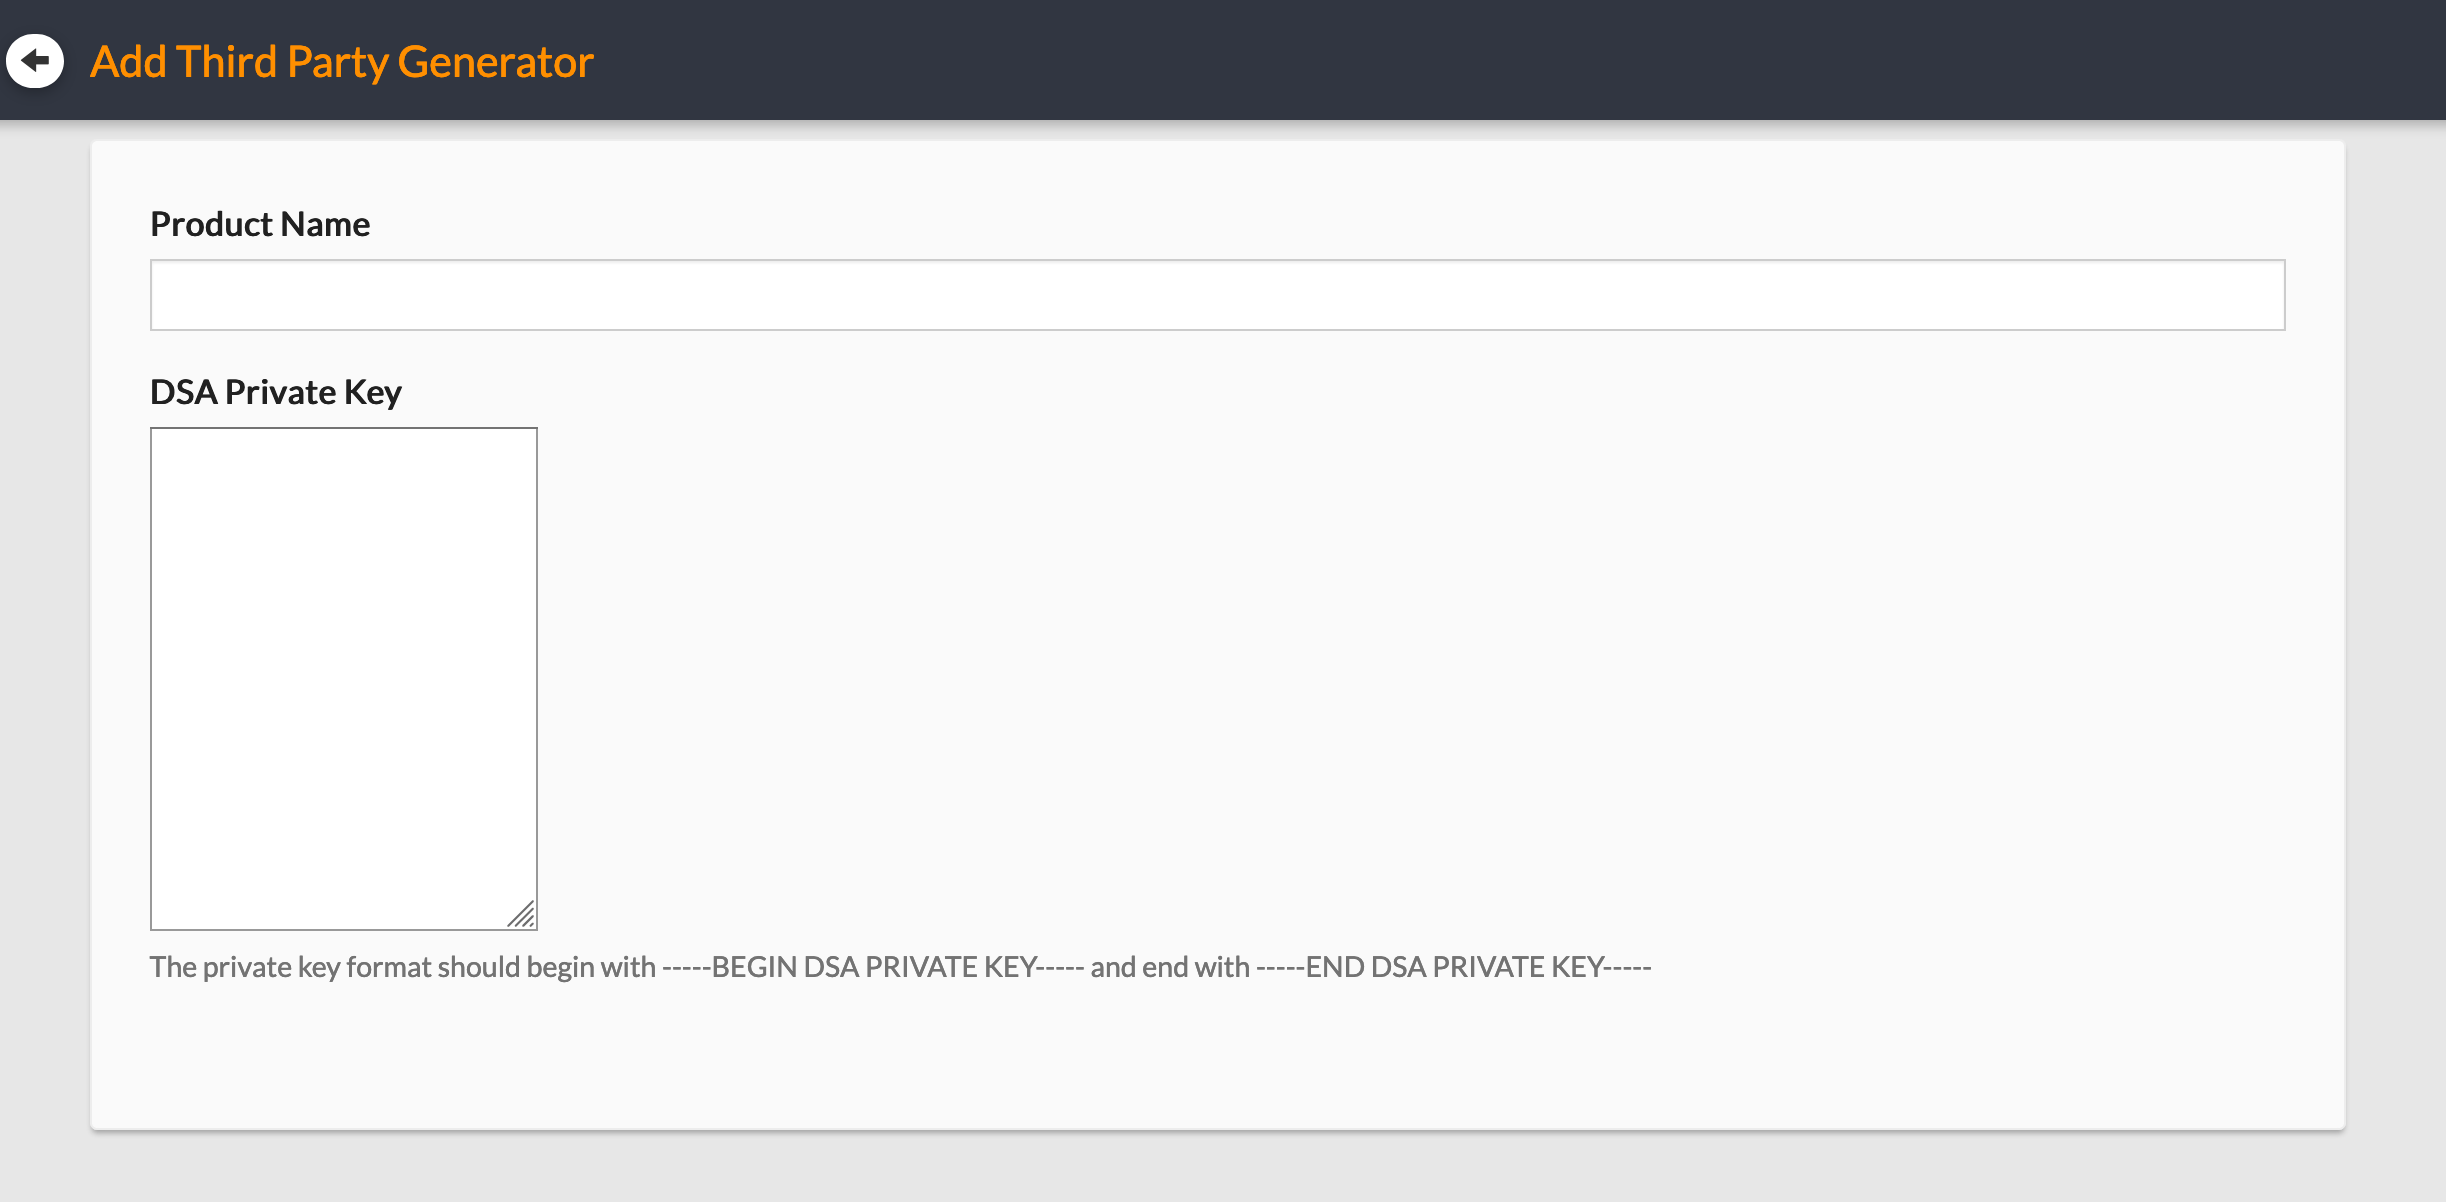
In case you haven’t followed the fulfillment details so far, click on the “Add Fulfillment Action” button in the top group of your app product listing screen. There, pick “Generate a License”, and then choose “CocoaFob” from the list of license generators.4 Hit the “Next” button to set up the generator.
In the setup form, pick a “Product Name” for CocoaFob to use for the license generator when encoding the license details into a license code. This could be the same as the product path in FastSpring, e.g. “my-new-app”, a numeric product identifier, or any other unique string.
You will be using the same string in your app later to decode a license code and then verify its contents. For example, if I decode a license in my Mac app TableFlip and the resulting product name turns out to be “duke-nukem-forever” or something, I don’t want the license to pass even though I was able to decode it successfully. Don’t worry, though, this example is totally made up. In practice, a mixup like this shouldn’t be possible because the keys used during license code creation will be different for each app and the decoding step should fail. You cannot unlock app A with a code for app B since the apps supposedly use different keys during the encoding step.
What is a good product name for a license code generator and it’s counterpart, the license code verifier in your app? After all, you set up all this to prevent software piracy to some extent. Thinking about potential hackers of your verification code, they might indeed an easier time scanning app for a string that corresponds to the app’s name, like “mynewapp”. A random product name like “/g}eJ3U8bG29r+wfcZ;” will be much harder to guess, and then locate in a hex dump of the application binary. I think this is a bit overkill, though. The potential security upside is negligible: if someone has the means to perform these kinds of actions to crack your code, you likely won’t hinder them much by obfuscating the CocoaFob product name string. As mortal human beings, we app developers prefer sensible strings naturally, and I think it’s okay to roll with this impulse. It’s much easier to detect the typos in “mnyweapp” than it is in a nonsensical string of random characters.
But please, do consider both approaches carefully. The obfuscation may appeal to you for good reason. Then again, with every action you take on the copy protection front, you also send a message to yourself and reinforce your beliefs. Do you want this message to say “I am very freaked out about my things being stolen” and “the world is dangerous”, or rather one along the lines of “people should be incentivized to pay for quality products” and “the world deserves an app as good as mine” and stop there? – I personally want to spread my stuff. But I cannot afford to do it for free, or I’ll starve. I’m not worried about piracy. Folks who really use my apps professionally will pay anyway. It seems people are inclined to hunt for paid apps and sustainable businesses instead of free apps because they are worried about the continued development and support of tools they rely on. This is true for professionals looking for better tools; less so for gamers, I would think. I also don’t create freeware applications most of the time and try to charge even a small amount not because I’m greedy, but because one of my core beliefs is that nobody can afford not to pay for professional app development in the long run. At least not in the world we inhabit, where you need to work to make money to survive. This is just another opportunity to do some soul-searching, get clarity about what you value, and be honest with yourself.
With a product name set, the “DSA Private Key” finally comes next.