Sample App 1: How to Verify License Codes in Your App
According to the license template I recommended earlier, #{product},#{name} produces a license code that is just an encrypted form of, for example, “MyNewApp,Christian Tietze”.
A license code is invalid when checked against that template if it satisfies at least one of the following criteria:
- The license code is not a string that was encrypted by a private key which matches the public key used by the app for decrypting.
- Parsing the decrypted string doesn’t meet expectations because the expected product name doesn’t match or is missing, or
- because the extracted licensee name doesn’t match what the user entered.
As we’ve discussed, the algorithm can be adjusted a fair bit. You can try different keys to decrypt; and you can try different license templates upon failure to support both personalized and non-personalized license codes.
We need to utilize the CocoaFob algorithm to decrypt a code and then create an abstraction of all the info we need in the application so we have something to work with. This can look like the types I sketched a few chapters ago. Missing from the short segue into modeling a state machine’s state back then was the implementation of services that perform the work and react to changes. This chapter is dedicated to implement all that, but without the additional work of implementing a trial mode. You will learn what the essence of locking functionality away behind license code paywalls means. In the next chapter, we will build upon all this and add a time-based trial.
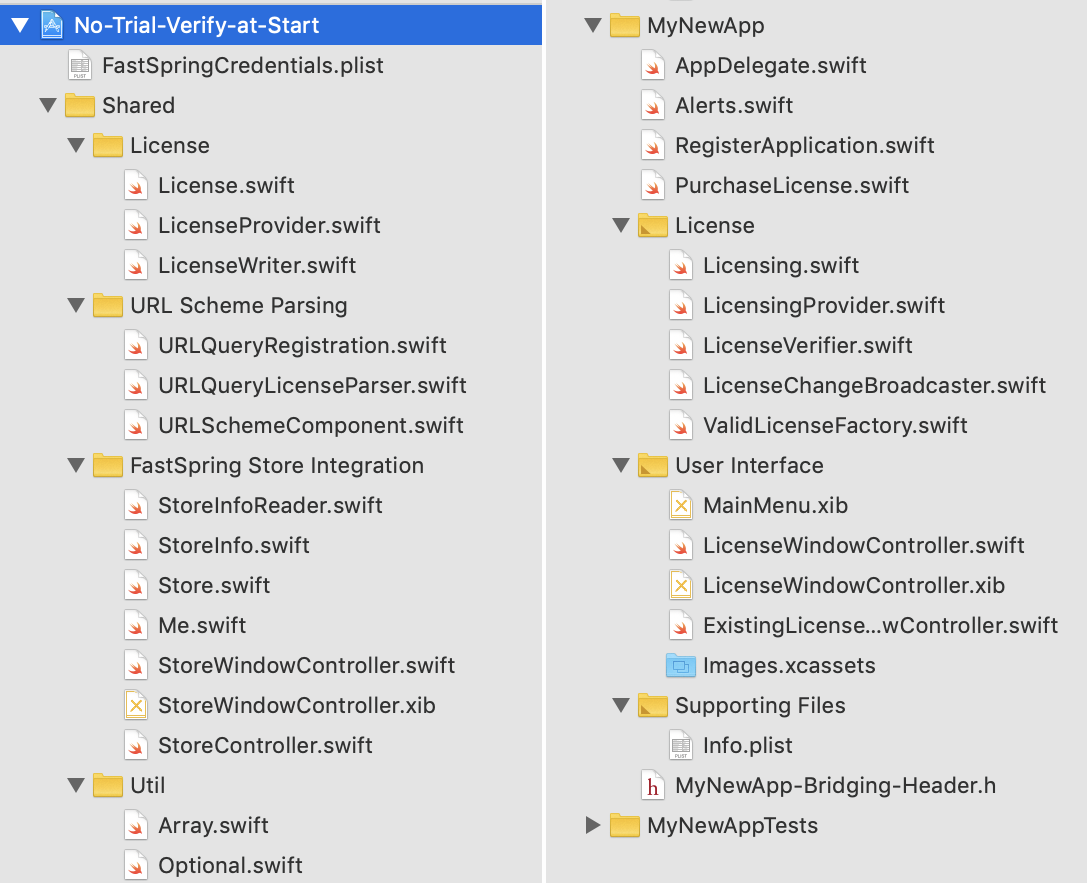
You can find a fully functional sample app in the book’s code repository. It’s inside the aptly named No-Trial-Verify-at-Start folder. Should any direct link ever break, head over to my website which should be around for as long as the internet and I stay alive in one way or another: https://christiantietze.de/
Embedding CocoaFob
Since Swift 2, CocoaFob provides native implementations. We’re all set for Swift 5 and will be prepared for Swift 6 once it hits, too.
If you require instructions about how to set up the lib for Objective-C, please refer to the appendix.
The original repository is located at https://github.com/glebd/cocoafob.
You can consume the code in your app in different ways. To reduce the amount of build tools you need to follow along, I’ll stick to a manual checkout with git submodule. We’ll do that in a minute.
If you have CocoaPods, you can instead add an entry to your Podfile. Since CocoaFob is not registered in the CocoaPods base repository, refer to its GitHub location directly:
use_frameworks!

source 'https://github.com/CocoaPods/Specs.git'
platform :osx, '10.10'

pod 'CocoaFob',
     :git => 'https://github.com/glebd/cocoafob',
     :branch => 'master',
     :inhibit_warnings => true
If you use Carthage (like I do for most of my macOS projects), then this will be enough:
The sample code uses git submodules directly. I tend to group all external dependencies into an “External” folder according to a convention I picked up years ago. You might be used to put external dependencies into “Vendor”. We’ll be using my old convention for the sample projects because … that’s the way I set them up initially back in 2015, duh.
From the project root of your project, these are the commands you’d have to enter at the command line to checkout cocoafob:
$ mkdir External
$ cd External/
$ git submodule add git://github.com/glebd/cocoafob.git
In the dark ages, you had to add a couple of files from the Swift source code folder manually to your project, thus exposing the license verification code to the whole app. Nowadays, all the cool kids use proper Swift modules for their libraries, and so shall we.
The Swift 5 version of the framework is located in the External/cocoafob/swift5/ subfolder. There is an Xcode project that you can use to build the framework, and then embed the build product in your app.
If you don’t know how this works, these are the steps I recommend to add CocoaFob to your project in a reliable way:
- Drag & drop the
CocoaFob.xcodeprojproject file into your app’s Xcode project navigator. (I suggest you drop it in the project root somewhere below the production code and test group.) This will not yet create a dependency. You need to link against the framework product of the newly added subproject, and embed the framework inside the app. - Click on your app project root item in Xcode,
- select the app target in the project details view,
- then select the “General” tab to show the app target’s settings.
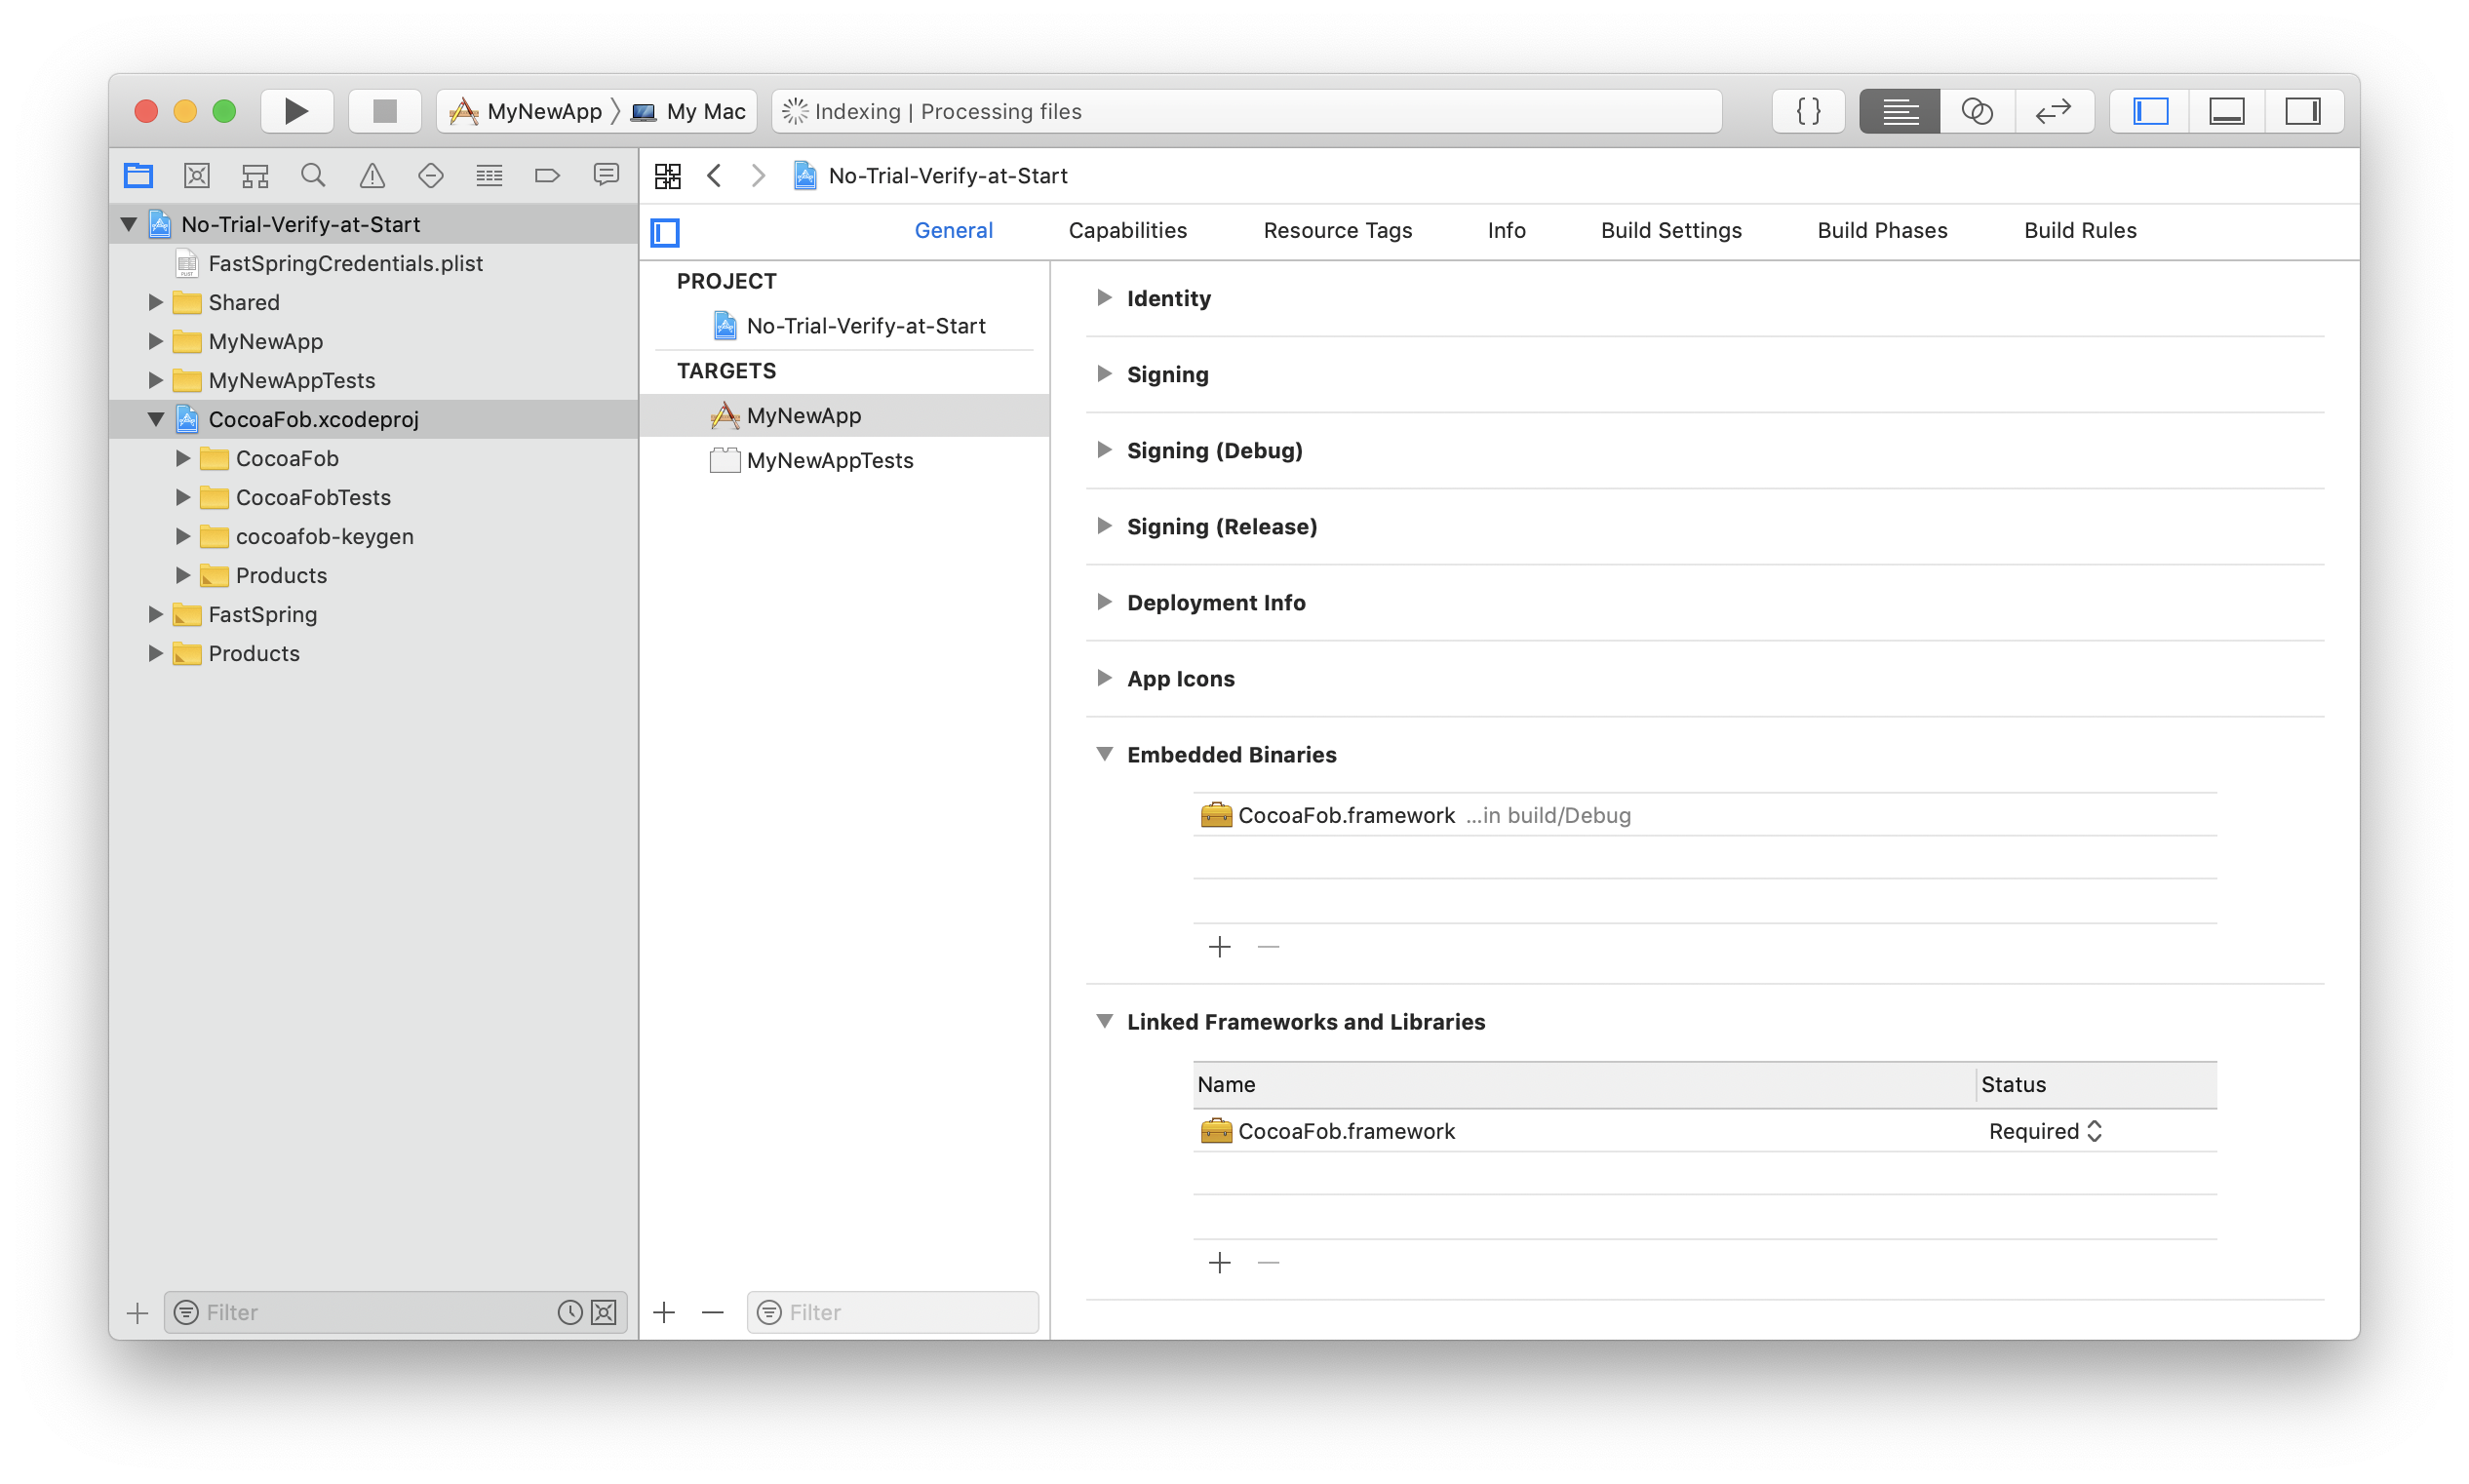
- At the bottom you have the “Embedded Binaries” and “Linked Frameworks and Libraries” sections. Click on the “+” button of “Embedded Binaries” and select any of the
CocoaFob.frameworkentries the displayed dialog will offer. If you’ve never done this before, you’ll notice how adding the framework to “Embedded Binaries” has also affected the “Linked Frameworks and Libraries” section. It won’t work the other way around, though: linking does not imply embedding, but embedding implies linking, as far as Xcode is concerned. - As a side effect, this will also make Xcode build the CocoaFob framework when needed when building the app. You can verify this by heading to the “Build Phases” tab of the project navigator and then check the topmost “Target Dependencies” section, which will now list
CocoaFob.framework.
Now you’re all set. For reference, you can have a look at the sample apps from the book’s accompanying source code material. They use the same approach.
User Interface to Enter License Information
With the LicenseVerifier service object we can test if license information is valid, and RegisterApplication executes the appropriate command. Your application will need to provide a form for the user to provide this information. This section focuses on how to wire UI components to do the job.
First, where do you place the form?
In most apps, I’ve discovered a “Register APPNAME …” or “License APPNAME …” main menu item somewhere. Sometimes it’s buried in the Help menu, sometimes it’s below the menu item for preferences in the submenu with the app’s name. Dockless apps that only add an icon to the menu bar have this, too. It’s typically, but not always, located in a contextual menu that opens under the menu bar icon.
You can also have a preference pane. Most apps have some sort of preferences window anyway, so adding a pane dedicated to entering license information can make sense. You can, and I think should, combine this with a main menu item, even though the preferences already have a standard menu item. The main menu offers full-text search via the help menu and thus is super accessible.
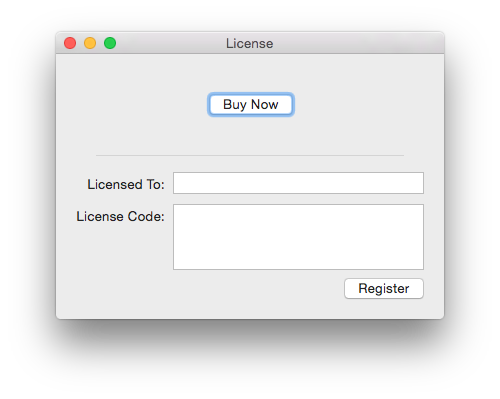
To maximize flexibility in case you copy and paste the interface implementation to your app, I decided to roll with a dedicated license window for this book’s sample app. You can copy it as is and display it as a dialog window or as a window-modal sheet, or you only take the content view and paste it into a preference view controller.
Creating a window like the one pictured above is very easy in Xcode’s Interface Builder, so I won’t bore you with the details of adding labels and text fields to a view.
When you set the interface up, you could, in theory, use Cocoa Bindings to populate the form fields with values from UserDefaults directly. I suggest you don’t. Changes to the text fields would be stored immediately while you type. That renders the “Register” button useless, because no matter if you press it or not, the text fields’s contents are saved immediately. That’s weird, to say the least. You could implement validation of live user input, but I cannot imagine a straight-forward solution that doesn’t bother the user while they enter their name. Also, you don’t want accidental key presses to immediately persist the now invalid license information. I think it’s not worth the hassle; don’t use Cocoa Bindings here and validate input on button press instead. Only store valid license information via RegisterApplication, which we already have implemented.
Window and event handler architecture
I tried to both maximize reusability and show useful macOS architectural patterns at the same time here. The basic message is:
- treat your window controllers and view controllers as view components, and make them as dumb and short as possible,
- separate window controller from sub-view controllers where possible, and
- put your windows in separate Nibs or Storyboards instead of sticking them in the
MainMenuthat comes with the project template.
For pragmatic reasons, it can make sense to not have both a NSWindowController and a NSViewController. If your window has a single user interface element, then why bother? These heuristics have proven to be useful in the community and during my practice. Apply them and deviate from them with reason.
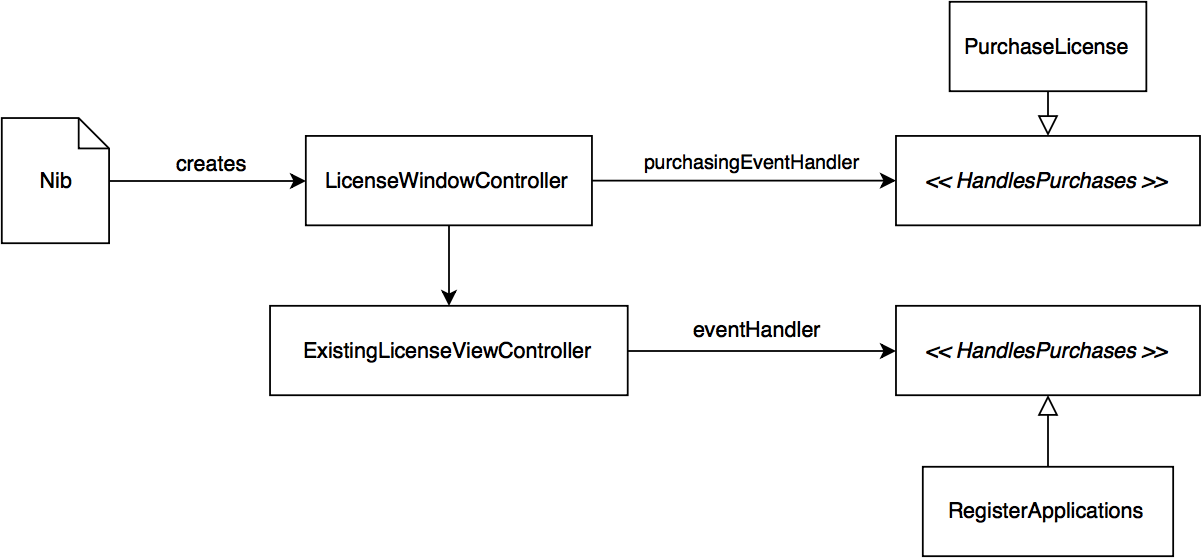
The LicenseWindowController object is the main entry point and created through the Nib. This could nowadays have been a Storyboard just as well. The point is to extract it into its own Interface Builder file: it makes you suffer less when the files get corrupted or Xcode doesn’t behave anymore and you need to recreate the UI, and it reduces merge conflicts in team projects. The window controller handles “Buy Now” button presses directly and delegates to a purchaseEventHandler, a service that conforms to the HandlesPurchases protocol. I didn’t extract a PurchaseViewController to handle this event because the overhead isn’t worth the design purity in my book. We’ll have a look at an implementation of the HandlesPurchases type later.
An ExistingLicenseViewController then actually handles form input events and reacts to the “Register” action. It’s owned by LicenseWindowController. It delegates license verification through its HandlesRegistering protocol to the RegisterApplication service that we will make conform to it.
View controller implementation
We focus on ExistingLicenseViewController here to have a closer look at user input handling.
 1 protocol HandlesRegistering: class {
 2     func register(name: String, licenseCode: String)
 3 }
 4
 5 class ExistingLicenseViewController: NSViewController {
 6     // MARK: UI Components
 7
 8     @IBOutlet weak var licenseeTextField: NSTextField!
 9     @IBOutlet weak var licenseCodeTextField: NSTextField!
10     @IBOutlet weak var registerButton: NSButton!
11
12     // MARK: Action handler
13
14     var eventHandler: HandlesRegistering?
15
16     @IBAction func register(sender: AnyObject) {
17         let name = licenseeTextField.stringValue
18         let licenseCode = licenseCodeTextField.stringValue
19         eventHandler?.register(name: name, licenseCode: licenseCode)
20     }
21
22     // MARK: Display Commands
23
24     func displayEmptyForm() {
25         licenseeTextField.stringValue = ""
26         licenseCodeTextField.stringValue = ""
27     }
28
29     func displayLicense(license: License) {
30         licenseeTextField.stringValue = license.name
31         licenseCodeTextField.stringValue = license.key
32     }
33 }
This, again, should appear to be a very simple implementation. This is what view controllers ought to do: react to user input, and delegate to other objects for more meaty actions as soon as possible. In your applications, you will find that method after method is added to view controllers over time to implement the various delegate methods already. You don’t want to have more in the view controllers than absolutely necessary.
As a benefit, this kind of approach to programming view controllers makes them easily testable. Have a look at the tests in the sample app code to see how I test the Interface Builder connections and the action-handler’s entry points. Here’s just a couple:
 1 class ExistingLicenseViewControllerTests: XCTestCase {
 2     var controller: ExistingLicenseViewController!
 3
 4     override func setUp() {
 5         // Load the window controller from its nib ...
 6         let windowController = LicenseWindowController()
 7         _ = windowController.window
 8         // ... and then get the initialized controller:
 9         controller = windowController.existingLicenseViewController
10     }
11
12     func testLicenseeTextField_IsConnected() {
13         XCTAssertNotNil(controller.licenseeTextField)
14     }
15
16     func testLicenseCodeTextField_IsConnected() {
17         XCTAssertNotNil(controller.licenseCodeTextField)
18     }
19
20     // ...
21
22     func testDisplayEmptyForm_EmptiesTextFields() {
23         controller.licenseeTextField.stringValue = "something"
24         controller.licenseCodeTextField.stringValue = "something"
25
26         controller.displayEmptyForm()
27
28         XCTAssertEqual(controller.licenseeTextField.stringValue, "")
29         XCTAssertEqual(controller.licenseCodeTextField.stringValue, "")
30     }
31
32     func testDisplayLicense_FillsLicenseTextFields() {
33         let license = License(name: "a name", licenseCode: "a code")
34         controller.licenseeTextField.stringValue = ""
35
36         controller.display(license: license)
37
38         XCTAssertEqual(controller.licenseCodeTextField.stringValue, "a code")
39     }
40 }
In the last section, you might wonder why we didn’t start writing the registration code into the “Register” button’s action handler, directly into the view controller. Having seen the implementation of the view controller, this might still be a puzzle. It’s because encapsulating this simple piece of logic telegraphs to any reader of your code that this is a cohesive sequence. To put it into a function with a name, or a type, makes the sequence a thing. It’s not just a concept in your head, but a thing with a name in the realm of your code. All this is the foundation of object-oriented programming, of course: to encapsulate things that belong together in objects and then treat these as cohesive wholes. Here, having a service object at hand makes form field validation a trivial matter. That’s nice.
React to license change events to unlock functionality
You know RegisterApplication already. Adding conformance to HandlesRegistering is a one-liner because the method signatures match up already.
To have the app do something interesting, I’ve added sending a notification when the registering succeeds:
 1 class RegisterApplication: HandlesRegistering {
 2     // ...
 3
 4     // Newly added dependency:
 5     let changeBroadcaster: LicenseChangeBroadcaster
 6
 7     func register(name: String, licenseCode: String) {
 8         guard let license = licenseFactory.license(
 9                 name: name,
10                 licenseCode: licenseCode) else {
11             displayLicenseCodeError()
12             return
13         }
14
15         licenseWriter.store(license)
16         // This call is new:
17         changeBroadcaster.broadcast(.registered(license))
18     }
19     // ...
20 }
The broadcaster is a very simple object that wraps a call to NotificationCenter.post in broadcast:
 1 class LicenseChangeBroadcaster {
 2     let notificationCenter: NotificationCenter
 3
 4     public init(notificationCenter: NotificationCenter = .default) {
 5         self.notificationCenter = notificationCenter
 6     }
 7
 8     public func broadcast(_ licensing: Licensing) {
 9         notificationCenter.post(
10             name: Licensing.licenseChangedNotification,
11             object: self,
12             userInfo: licensing.userInfo())
13     }
14 }
This makes it easy to write test doubles or mocks to verify the call to LicenseChangeBroadcaster.broadcast with the proper Licensing object, instead of having to verify that an NSNotifications is being passed on, and inspecting what it looks like, including the userInfo dictionary. A test double to verify calls of broadcast is much simpler to write.
Because the service sends a notification, other components can loosely couple to the success of registering the app. In the sample application, we do not allow using the main application interface until the app is unlocked. AppDelegate is the gatekeeper here, but you may subscribe different components separately, and put the main unlock functionality anywhere else. The AppDelegate in the sample app subscribes to the licenseChangedNotification and locks or unlocks the main app accordingly, like this:
 1 @NSApplicationMain
 2 class AppDelegate: NSObject, NSApplicationDelegate {
 3     func applicationDidFinishLaunching(_ aNotification: Notification) {
 4         observeLicenseChanges()
 5         // Unlocking upon app launch, either by reading from UserDefaults
 6         // and processing the value directly, or by going
 7         // through `RegisterApplication`, which will trigger the
 8         // callback for you.
 9     }
10
11     private func observeLicenseChanges() {
12         NotificationCenter.default.addObserver(
13             self,
14             selector: #selector(AppDelegate.licenseDidChange(_:)),
15             name: Licensing.licenseChangedNotification,
16             object: nil)
17     }
18
19     @objc func licenseDidChange(_ notification: Notification) {
20         guard let userInfo = notification.userInfo,
21             let licensing = Licensing.fromUserInfo(userInfo)
22             else { return }
23
24         switch licensing {
25         case .registered(_):
26             unlockApp()
27
28         case .unregistered:
29             // If you support un-registering, or use this callback
30             // to figure out the initial state, lock the app again here:
31             lockApp()
32         }
33     }
34
35     private func lockApp() { ... }
36     private func unlockApp() { ... }
37 }
Now that’s a demonstration of a monolithic license-based lock. You could also lock certain features, and have specific components lock/unlock themselves based on license change events. That’s a good idea if your AppDelegate grows unwieldy already. Keep this in mind if you think about implementing in-app purchases of any kind. That amounts to the same: features are locked/unlocked separately.
In the sample app, I added code to read license information from UserDefaults and set up the initial state accordingly. In most of the apps I shipped so far, I transitioned to a different approach. During the app launch sequence, I make the existing services send a licenseChangedNotification, too. So the app launch and a user-initiated change event are treated the same. The loose coupling helps with that since the notification subscriptions have to be written anyway, and I don’t need to establish a new route just for the launch sequence. I start with locked components at first, and since the app launch triggers a synchronous notification dispatch on the main thread, the components will unlock instantly. There’s no visible flicker or anything.
I suggest you strive for the same: unify the locking and unlocking wherever possible.
For the sake of experimenting and learning how to treat the events, I found it immensely useful to have two different entry points to feature unlocking at first, though. There’s not much to learn, so once you get the hang of it and know that things work as expected, you can easily unify the processes.
With the AppDelegate responding to license change events, and the view controller–event handler architecture from above, we can now display the license info UI, register the app, and unlock features without tight coupling.
In fact, you can put the exact code from the sample into your own application, change a few parameters, and then write appropriate locking and unlocking logic. That’s all there is in terms of the most basic copy protection.