MicroPython
What is MicroPython?
MicroPython is a programming language that is an implementation of the core of Python 3 and includes a small subset of the Python standard library. The simplicity of the Python programming language makes it an excellent choice for beginners who are new to programming and hardware. However, in spite of its name, MicroPython is reasonably full-featured and supports most of Python’s syntax so if you’re comfortable with Python you will be in familiar territory.
MicroPython is optimised for microcontrollers and microcomputers. It is a firmware solution designed to run in constrained environments while allowing a small subset of standard libraries into embedded programming.
MicroPython firmware can run in a footprint of 256 Kilobytes and 16 Kilobytes of RAM. The means we can write clean and simple Python code to control hardware instead of having to use complex low-level languages like C.
So let’s get started!
Connect our Pico
Automatically Installing the Firmware
With Thonny running, connect the Pico to the computer via the cable with the micro USB connector.
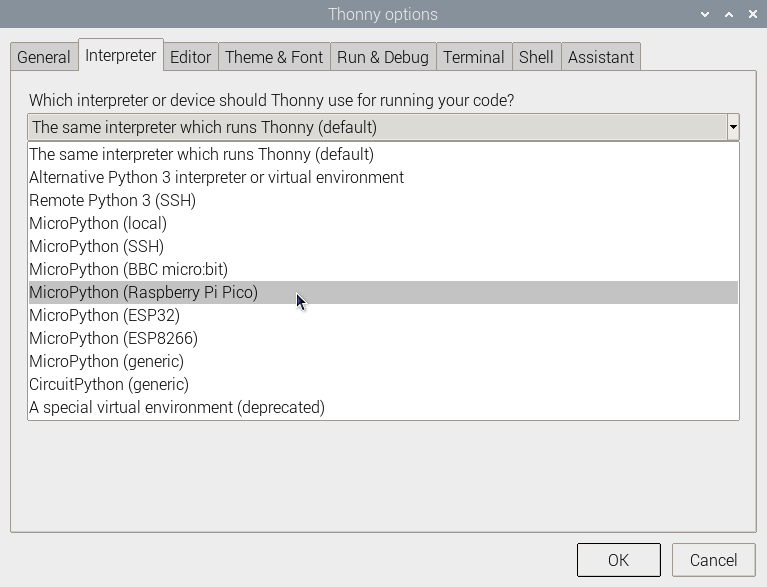
In Thonny go to Tools > Options and click on the Interpreter tab. From the interpreter dropdown list select MicroPython (Raspberry Pi Pico).
The firmware update dialogue box will open.
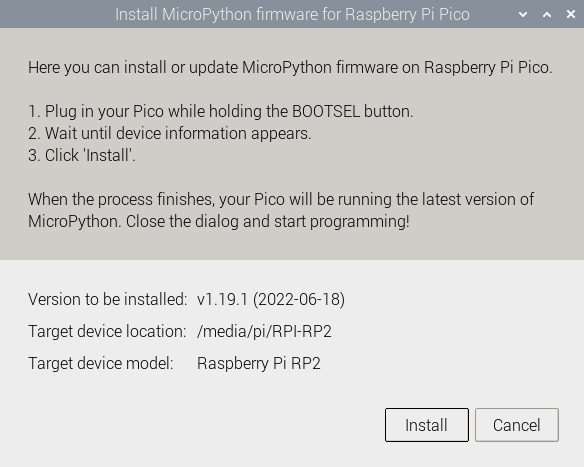
Click on ‘Install’ and once complete we should see the notification in the lower right hand side of the Thonny application indicating that we are running MicroPython on the Raspberry Pi Pico.
Manually Installing the Firmware
Because the Pico W is quite new at time of writing (2022-09-03), we need to be using the latest unstable version of the firmware for it to operate to it’s full potential (at least for the moment).
To load that firmware, download the latest firmware from here.
Then, with the Pico W disconnected from the Pi, press the BOOTSEL button (on the Pico) and plug in the Pico while holding the button down.
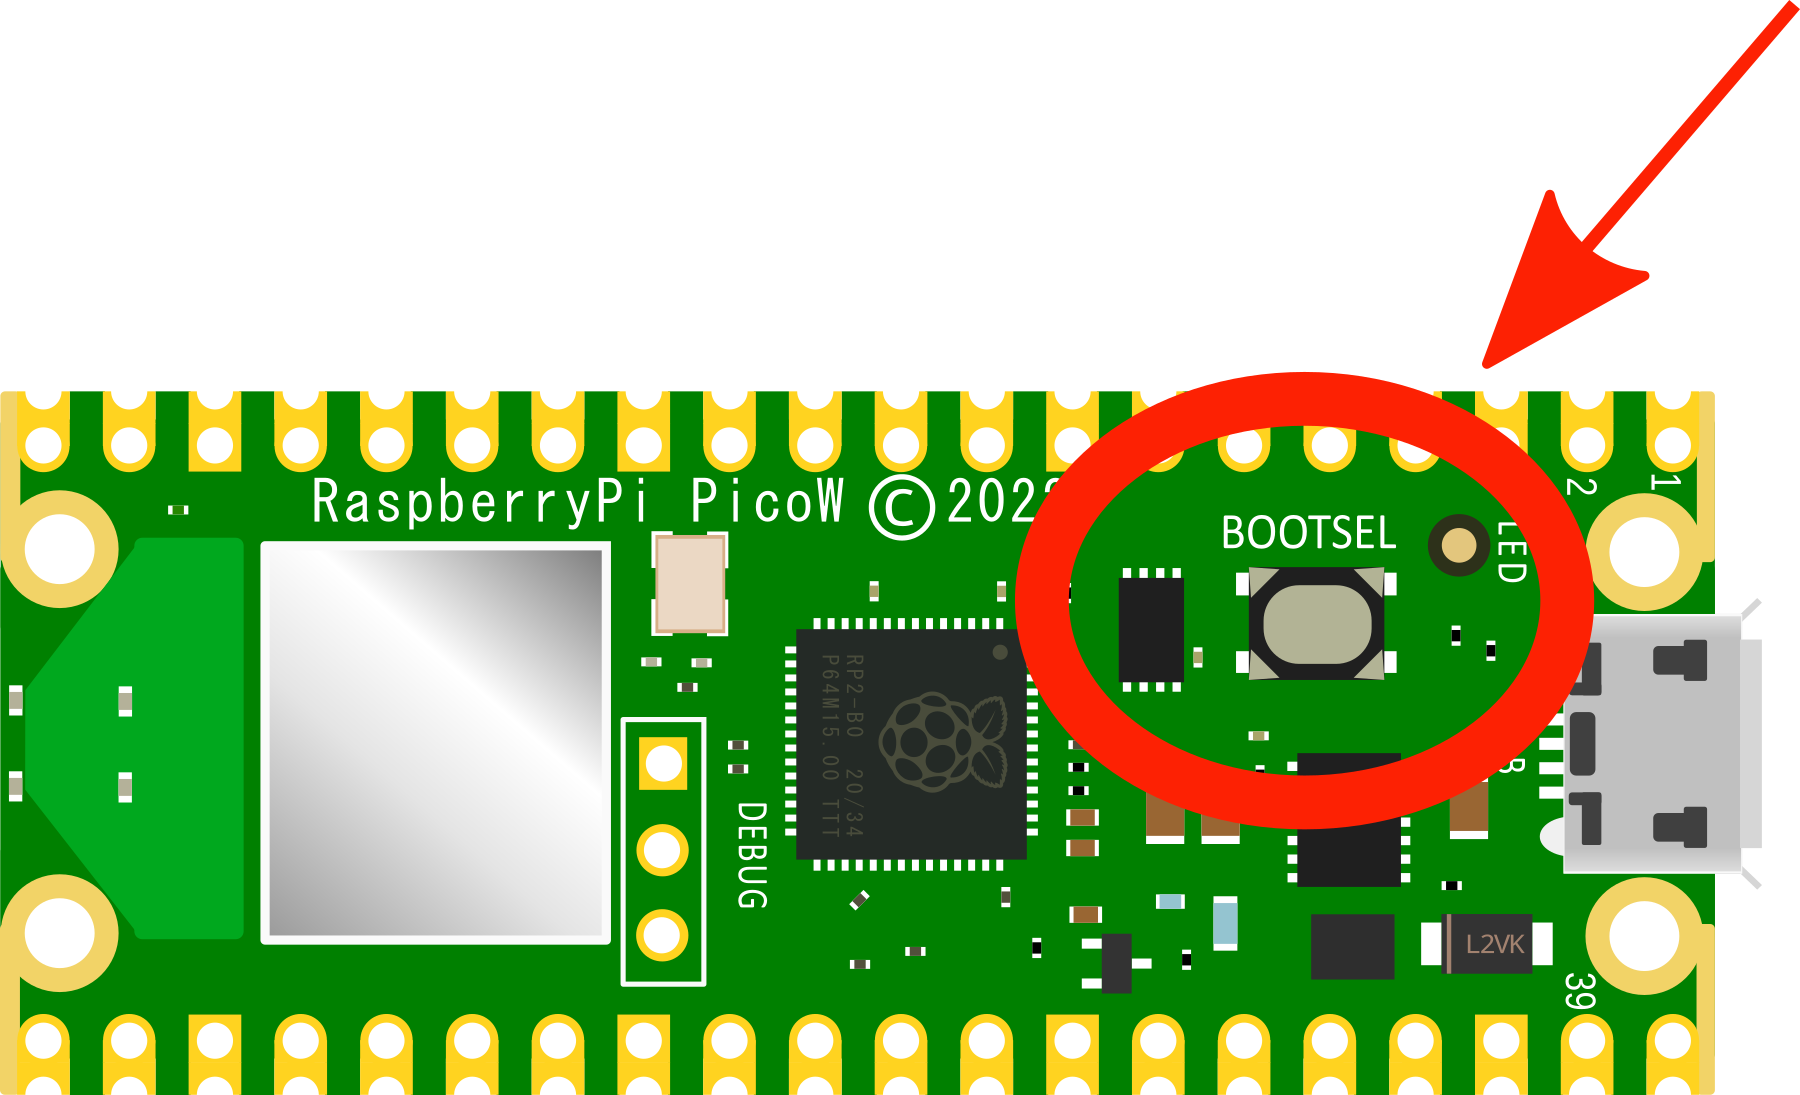
Then release the BOOTSEL button. This will make the Pico act like a mass storage device.
Copy the unstable firmware onto the Pico (just drag it and drop it). Wait for a moment and it will install itself. Once completed, we should see a very modern version of the firmware noted in the Thonny Shell.
Updating Firmware
Because the firmware for the Pico will improve over time, it’s generally a good thing to have it’s firmware updated to the most recent version.
To do this, on the Thonny menu go to Tools >> Options and then select the ‘Interpreter’ tab
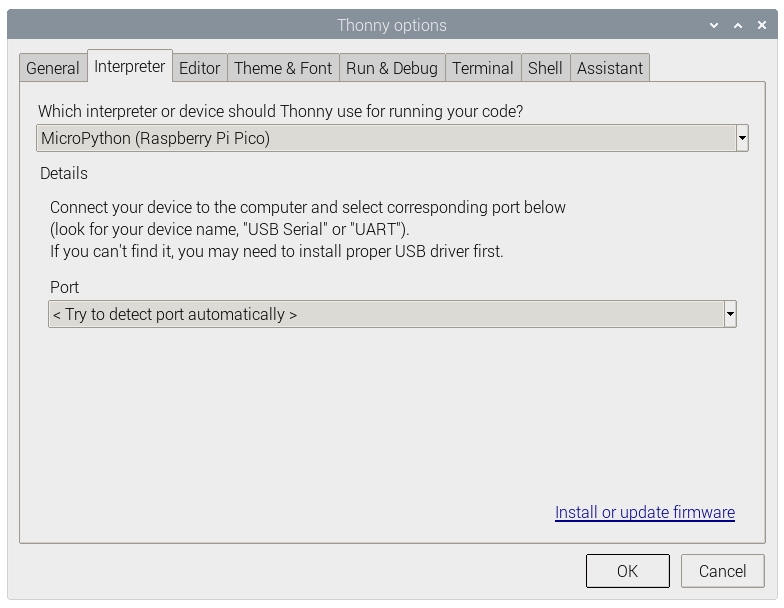
Assuming that we have the correct device selected, select the ‘Install or update firmware’ link.
The firmware update dialogue box will open.
Follow the instructions to plug in the Pico while holding the BOOTSEL button. Once the device information appears (or at the least, the ‘Install’ button isn’t greyed out), click on ‘Install’.
The firmware should be automatically copied from MicroPython.org and installed. I have had an error occur (‘socket.timeout’) in the past, but I just simply clicked on ‘Install’ again and it proceeded without problem.
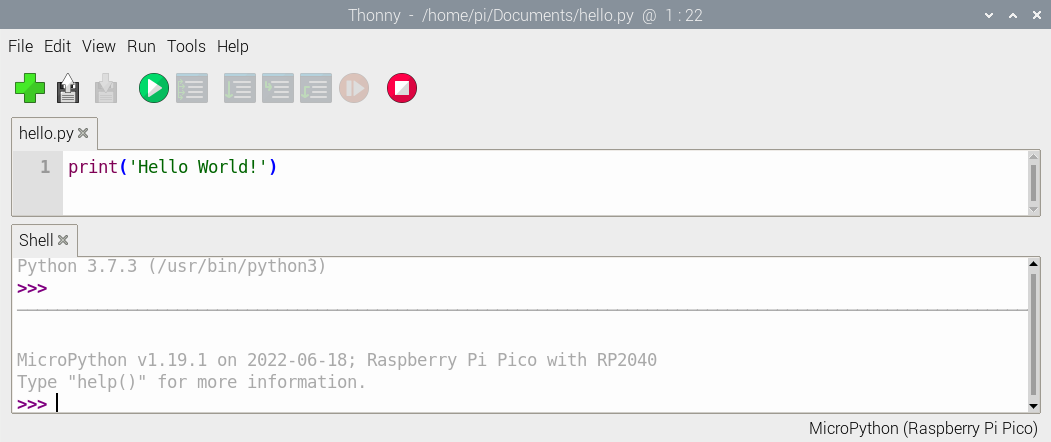
Close the Options dialog box and press the ‘Stop / Reset’ button on Thonny and we should see our new version of MicroPython displayed at the bottom of the Shell.
Use the Shell
Now we have our Pico connected to our computer and the MicroPython (Raspberry Pi Pico) interpreter in use on Thonny.
This means we can type commands directly into the Shell and have them run on our Pico.
Now we are going to get a little more practical :-).
MicroPython uses hardware-specific modules, such as one called machine, that we can use to program our Pico.
We can create a machine.Pin object to correspond with the on-board LED, which, on the Pico W can be accessed using the reference LED in code.
If you set the value of the LED to 1, it turns on.
Enter the following code in the Thonny editor pane, making sure that we press ‘Enter’ after each line.
from machine import Pin
led = Pin('LED', Pin.OUT)
led.value(1)
If we then press the ‘Run’ icon, a dialog box will come up asking where we want to save our code. This time we’re going to save it to the Pico.

Give the code an appropriate name like led.py and save it. It’s important that we use the file extension ‘py’ as this is what will help the Pico determine how to operate the file.
We should now see the on-board LED light up! Our code has had an effect on the physical world!!!
Edit the code to set led.value to 0 and press the run icon again’ This should turn the LED off.
Turn the LED on and off as many times as you like. Go on. You deserve it :-).
But really… That’s a pretty manual process right? Time to automate!
Blink the on-board LED
It’s time to write a MicroPython program to blink the on-board LED on and off.
Click in the main editor pane of Thonny.
Enter the following code to toggle the LED.
from machine import Pin
import time

led = Pin('LED', Pin.OUT)

while (True):
    led.toggle()
    time.sleep(.2)
Click the Run button to run/save your code. Again, save onto the Pico and a file name like blink.py seems appropriate
We should see the on-board LED turn on and off until we click the Stop button.
Now we’re really starting to cook. But we can do better! Let’s make the led start blinking automatically whenever the Pico is powered on.
Automatically run your program
If you want to run your Raspberry Pi Pico without it being attached to a computer, you need to use a power supply that will conform to the details we laid out earlier for connecting to power. By far and away the easiest method is to simply use a USB power plug.
To automatically run a MicroPython program, all we need to do is save it to the device with the name main.py. Whenever the Pico is powered up, if it sees a file named ‘main.py’ it will automatically start it up.
With our blink.py program in Thonny, go to File >> Save as… Select the Raspberry Pi Pico as the location to save to and name our file main.py.
You can now disconnect our Raspberry Pi Pico from your computer and use a micro USB cable to connect it to a mobile power source, such as a battery pack or a wall-wart.
Once connected, the main.py file should run automatically and our LED will blink!
This is a pretty cool moment because it puts together a bunch of different capabilities that open up a world of new possibilities.
We now know how to program our Raspberry Pi Pico using a language that will allow us to interact with peripherals (all be it an on-board one) and to have that program automatically start whenever our Pico is plugged in.
I think that we’re ready to move on to some tips and tricks :-).