Project 1 – Basic app with animated transitions
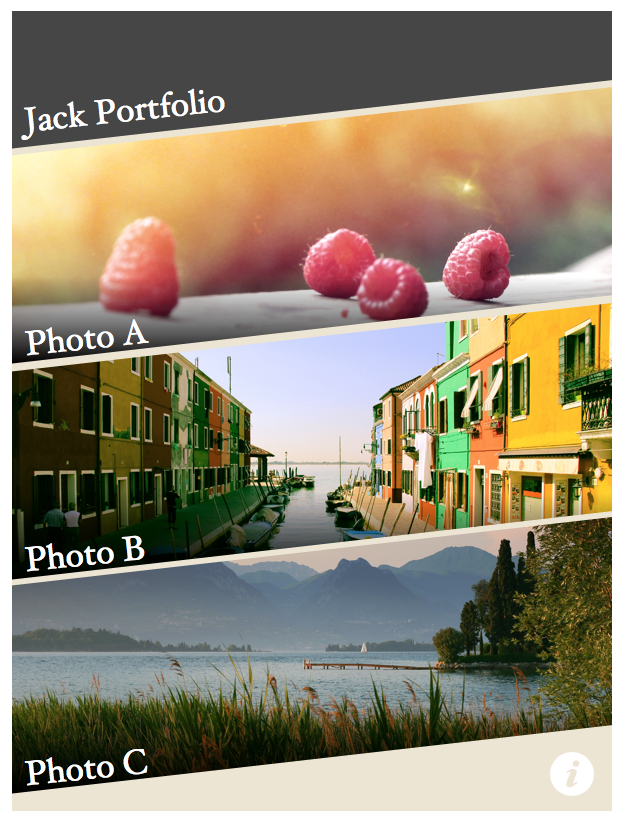
In this project, we are going to build a designer portfolio. There is stylish navigation menu, animated transitions and static photos viewer.
I have recorded a video of the app example that shows the animated transition. You may take a look to have a better understandings on what we are building.
Mission Checklist
We are going to build the portfolio project by following these tasks.
- Setting up the project and GulpJS.
- Setting up the canvas and CreateJS library.
- Defining scene as container inheritance.
- Adding static stylish menu.
- Displaying another scene after menu selection.
- Animating transition between scenes.
- Optimizing the rendering for retina display.
Project Preparation
Throughout the project, we need several graphic files to complete the project. Please download the files via the following link.
http://mak.la/cjs-proj1.zip
After you downloaded the file, you will see the following files in the bundle.
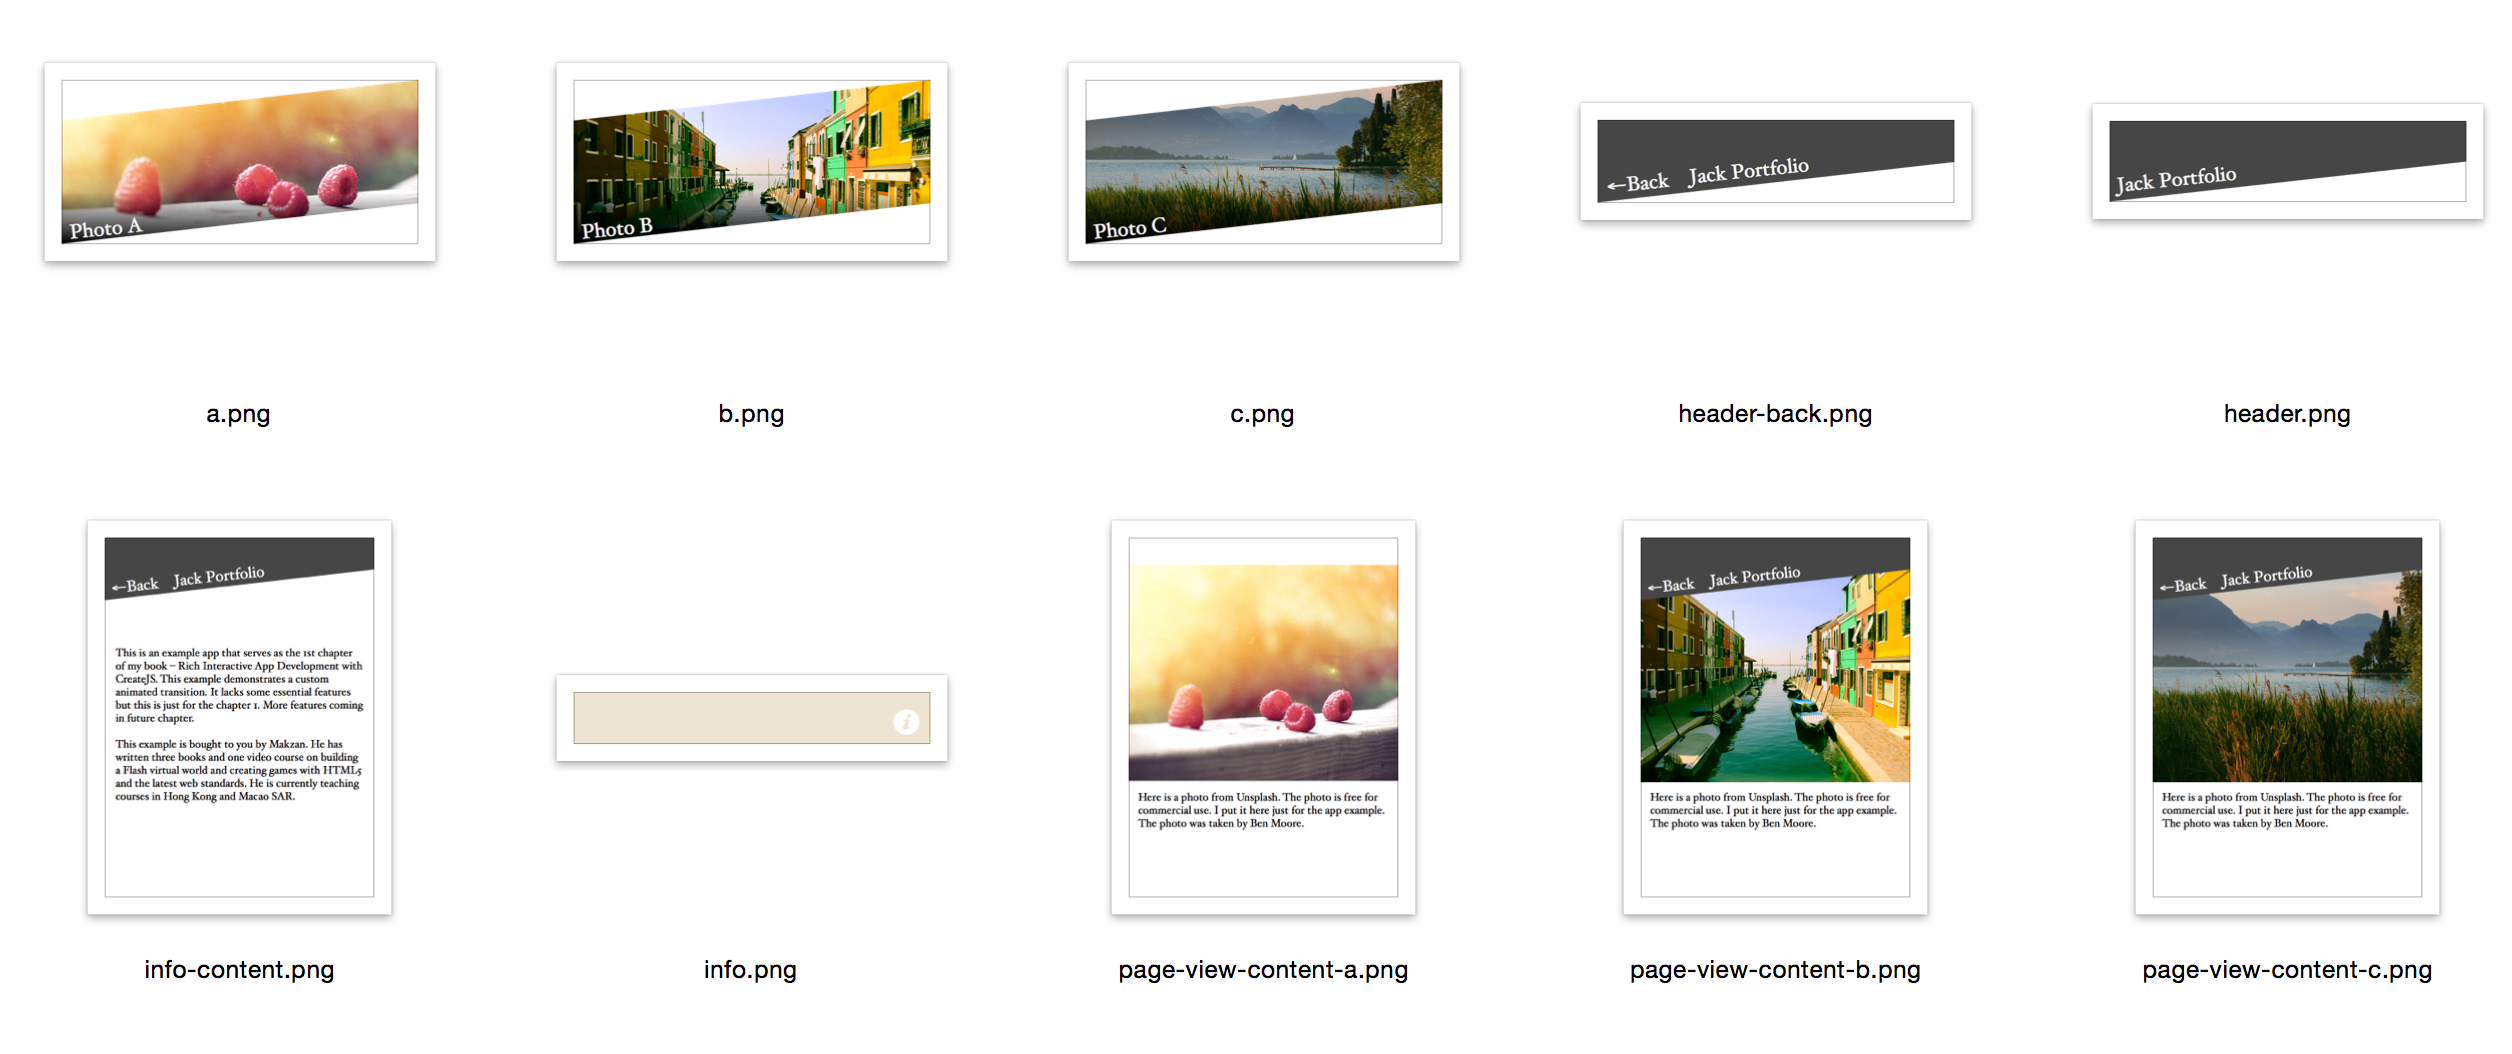
images/
images/header.png
...
scripts/transitions.js
graphics_src/transitions.fla
The transitions.js file is the animated transition exported from the Adobe Flash. If you don’t have the Adobe Flash, you can just use this file who comes with 2 transitions to follow the example. If you have Flash, however, you can open the transitions.fla file and customize the transition animation. You may even create new transition effects. We will talk about this later.
1. Setting up the project and GulpJS
In this step, we prepare the compiling environment for our project.
Preparation
Make sure we have nodejs and npm installed. npm is the package modules manager for nodejs. It’s included inside nodejs installer package.
Time for Action—Setting up the project folder
In this steps, we will initial our project with the GulpJS compiling automation setup.
- First, let’s create a folder for all the files in this project. The following is the initial file structure setup.
Gulpfile.js
Gulpfile.coffee
package.json
app/index.html
app/images/
app/scripts/
app/scripts-src/
app/scripts-src/app.coffee
app/scripts-src/setting.coffee
app/styles/
app/styles/app.css
- We can generate the
package.jsonfile via thenpm initmethod. After we go through thenpm initprocess, we can then install the plugins via the following shell command.$npminstall--save-devgulpcoffee-scriptgulp-coffeegulp-concat - After step 2, node.js should have written the following content into the
package.jsonfile. Check if you get similar result.package.json 1{2"name":"JackPortfolio",3"version":"1.0.0",4"description":"An example for my book Rich interactive app development with C\5reateJS",6"main":"Gulpfile.js",7"scripts":{8"test":"echo \"Error: no test specified\" && exit 1"9},10"author":"Makzan",11"license":"MIT",12"devDependencies":{13"coffee-script":"^1.8.0",14"gulp":"^3.8.9",15"gulp-coffee":"^2.2.0",16"gulp-concat":"^2.4.1"17}18} - Gulp always looks for the
Gulpfile.jsfile when we execute the gulp tasks. If we want to write the Gulp tasks in CoffeeScript syntax, we need to load the CoffeeScript compiler in theGulpfile.jsand include the.coffeeversion of the GulpFile.gulp.js 1require('coffee-script/register');2require('./Gulpfile.coffee'); - Now we can write our Gulp pipeline in CoffeeScript. The following configuration defines how the compiler should compile our source files. It also defined a
watchtask that watch any changes of.coffeefile and go through thejstask automatically.gulp.coffee 1gulp =require'gulp'2coffee =require'gulp-coffee'3concat =require'gulp-concat'45gulp.task'js',->6gulp.src[7'app/scripts-src/setting.coffee'8'app/scripts-src/app.coffee'9]10.pipecoffee()11.pipeconcat'app.js'12.pipegulp.dest'app/scripts/'131415gulp.task'watch',->16gulp.watch'app/scripts-src/**/*.coffee',['js']1718gulp.task'default',['js','watch'] - We create 2 CoffeeScript files to see if our
Gulpfileworks. They areapp.coffeeandsetting.coffee. We will add real code logic into these files in next step.app.coffee 1console.log"App – Testing GulpJS setup."setting.coffee 1console.log"Setting – Testing GulpJS setup." - Now we can run
gulpin the terminal:1$./node_modules/.bin/gulp - We should see an
app.jsfile is generated with the following content.app.js 1(function(){2console.log("Setting – Testing GulpJS setup");34}).call(this);56(function(){7console.log("App – Testing GulpJS setup.");89}).call(this);
If you get the same result, that means our setup works.
What just happened?
We just set up the assets compiling tool chain. After setting up the building streamline, we are ready to dig into the early project development in next task.
NPM init
The development environment uses Node.js, although the project is for web browser. We need to setup the project folder with an npm—Node.js Package Manager. We can execute npm init and following the steps to generate a package.json file in the project directory.
After created the package.json file, we called the npm install.
1 $ npm install --save-dev gulp coffee-script gulp-coffee gulp-concat
The command installs the required package to compile our source code into JavaScript file. We used --save-dev which records the provided Node.js package as dependency libraries inside the package.json.
2. Setting up the canvas and CreateJS library
In this step, we setup the canvas and the CreateJS for the project.
Preparation
We need the CreateJS library. The easiest way to include the CreateJS is via the distribution of content delivery network.
http://code.createjs.com/
Optionally, we can download the code from the CreateJS github repository and host the files ourselves.
https://github.com/createjs
Time for Action—Setting up the Canvas and CreateJS Stage
Let’s follow the following steps to setup our canvas and CreateJS library.
- In the
index.html, we prepare the basic HTML structure.index.html 1<!DOCTYPE html>2<htmllang="en">3<head>4<metacharset="utf-8">5<metaname="viewport"content="width=device-width, initial-scale=1">6<metaname="apple-mobile-web-app-capable"content="yes">7<title>Jack Portfolio</title>8<linkrel="stylesheet"href="styles/app.css">9</head>10<body>11<!-- The app element -->12<divid="app">13<canvasid="app-canvas"width="300"height="400"></canvas>14</div>1516<!-- We load the JavaScript after content -->17<scriptsrc="http://code.createjs.com/easeljs-0.7.1.min.js"></script>18<scriptsrc="http://code.createjs.com/tweenjs-0.5.1.min.js"></script>19<scriptsrc="http://code.createjs.com/movieclip-0.7.1.min.js"></script>20<scriptsrc="scripts/app.js"></script>21</body>22</html> - We have minimal styling in this task because our focus is on the canvas element. Add the following CSS to the
styles/app.cssfile.styles/app.css 1/* Ensure the box sizing is the modern one. */2*{3box-sizing:border-box;4}56/* Basic reset */7body{8margin:0;9padding:0;10}1112/* canvases sit inside the #app frame. It’s similar to layers. */13#app>canvas{14position:absolute;15top:50%;16left:50%;17height:400px;18width:300px;19margin-top:-200px;20margin-left:-150px;21} - We created a file named
setting.coffeewhich holds our global app configuration variables. Add the following width and height setting to the file.setting.coffee 1# a global app object.2this.exampleApp?={}34# Configurations5this.exampleApp.setting ={6width:3007height:4008} - Then we create the entry point of our app in the
app.coffee. Add the following code to the file.app.coffee 1# a global app object.2this.exampleApp?={}34cjs =createjs5setting =this.exampleApp.setting67classApp8# Entry point.9constructor:->10console.log"Welcome to my portfolio."11@canvas =document.getElementById("app-canvas")12@stage =newcjs.Stage(@canvas)1314cjs.Ticker.setFPS601516# make sure the stage refresh drawing for every frame.17cjs.Ticker.addEventListener"tick",@stage181920# Start the app21newApp() - We have created the app’s foundation. Although we don’t see any content yet, the app foundation is ready and we can add our scene to the app in next step.
What just happened?
We just created the basic canvas app and CreateJS setup. In next step, we’ll build our scene. Let’s take a look at each part of code in this step.
Viewport
<meta name="viewport" content="width=device-width, initial-scale=1">
We target the app to be a mobile application. So we need to set a viewport. Mobile web browser simulate the device width as a desktop monitor to provide a better viewing experience for most desktop-only website. Viewport lets web designer tells the mobile browser the display configurations we want.
The default viewport of mobile web browser is about 980px. If we have created the styles dedicated to narrow screen, such as 320px width, we should change the viewport width to reflect the real device width.
Web app capable
<meta name="apple-mobile-web-app-capable" content="yes">
We want to provide an app experience to the user. When user add the web app into home screen, normal web pages act as bookmark. Tapping on them launch the mobile safari. After we set the apple-mobile-web-app-capable, the home screen bookmark acts like a real app. It has its own we view without the Safari user interface. It also has its own app switching screen in the multitask screen when user clicked the home button twice.
Default value when variable is undefined
this.exampleApp ?= {}
The equivalent way in JavaScript is:
if (this.exampleApp == null) this.exampleApp = {}
We can also express the same meaning with the following line, which looks cleaner.
this.exampleApp = this.exampleApp || {}
Centering the canvas
The canvas has fixed dimension. We can use the following styles to center aligning the canvas at the middle of the page.
1 #app > canvas {
2   position: absolute;
3   top: 50%;
4   left: 50%;
5   height: 400px;
6   width: 300px;
7   margin-top: -200px;
8   margin-left: -150px;
9 }
The code is inspired from the following CSS-Tricks website which shares different styling approaches to center elements.
http://css-tricks.com/centering-css-complete-guide/
CreateJS class
The class in CreateJS allows us to define a class definition and then we can create instance via the new method.
1 class App
2   # Entry point.
3   constructor: ->
4
5 # Start the app
6 new App()
The simplicity of the CoffeeScript is it allows us to define and extends new classes.
Let’s take a look at the JavaScript from the CoffeeScript generator.
 1 var App;
 2
 3 App = (function() {
 4   function App() {}
 5
 6   return App;
 7
 8 })();
 9
10 new App();
In JavaScript, we can create a new object instance by using new on a defined function.
3. Defining scene as container inheritance
In this step, we define the Scene class which every page view builds on top of it.
Time for Action
Let’s follow the steps to define a Scene class.
- We create a dedicated file for the scenes definition. Add the following code to the
scenes.coffee.scenes.coffee 1#aglobalappobject.2this.exampleApp?={}34#alias5cjs=createjs6setting=this.exampleApp.setting78classSceneextendscjs.Container9constructor:(bgColor='blue')->10#CreateJSsuperconstructor11@initialize()1213#Drawashapeasthebackgroundcolor14ifbgColor!=undefined15shape=newcjs.Shape()16shape.graphics17.beginFillbgColor18.drawRect0,0,setting.width,setting.height1920#Addtheshapetothedisplaylist,viausingaddChild21@addChildshape2223#exporttoglobalappscope24this.exampleApp.Scene=Scene - In the
app.coffee, we create the Scene instance and add it to the stage. This is a testing scene, we are going to change it to the real scene in next step. {title=”app.coffee”} Scene = this.exampleApp.Scene1classApp2constructor:->3...4#Temporarytestingscene5testScene=newScene('gold')6@stage.addChildtestScene - We have created a new file
scenes.coffee, we need to include it into the GulpJS pipeline. Add the file into thegulp.srcarray.Gulpfile.coffee 1gulp.task'js',->2gulp.src[3'./app/scripts/setting.coffee'4'./app/scripts/scenes.coffee'5'./app/scripts/app.coffee'6]7.pipecoffee()8.pipeconcat'app.js'9.pipegulp.dest'./app/scripts/'
What just happened?
We have defined a Scene class and added a testing scene object to the stage.
Vector shape drawing
A shape is vector graphic that we express in mathematics. It’s like giving instruction on what the shape should look like.
1 shape = new cjs.Shape()
2 shape.graphics
3   .beginFill "white"
4   .drawRect 0, 0, 100, 50
For every created display object, we need to add it to the display list. The following code assumes that we are adding the shape to a container.
@addChild shape
If we are adding the shape to the stage, we can call the stage.addChild because the stage is a container.
Class inheritance in CoffeeScript
The CoffeeScript inheritance took us 3 lines to inherit class.
1 class Scene extends cjs.Container
2   constructor: (bgColor='blue')->
3     @initialize()
In the generated code. It would take 13 lines of code in JavaScript, not including the _extends helper function.
 1 var Scene,
 2   __hasProp = {}.hasOwnProperty,
 3   __extends = function(child, parent) { for (var key in parent) { if (__hasProp.\
 4 call(parent, key)) child[key] = parent[key]; } function ctor() { this.constructo\
 5 r = child; } ctor.prototype = parent.prototype; child.prototype = new ctor(); ch\
 6 ild.__super__ = parent.prototype; return child; };
 7
 8 Scene = (function(_super) {
 9   __extends(Scene, _super);
10
11   function Scene(bgColor) {
12     if (bgColor == null) {
13       bgColor = 'blue';
14     }
15     this.initialize();
16   }
17
18   return Scene;
19
20 })(cjs.Container);
Actually, all the CreateJS follows its own way to create the object inheritance structure. The following source code of the Shape class shows how CreateJS inherits.
{title=”Shape.js, from CreateJS”}
(function() {
“use strict”;
 1   var Shape = function(graphics) {
 2     this.initialize(graphics);
 3   };
 4   var p = Shape.prototype = new createjs.DisplayObject();
 5   Shape.prototype.constructor = Shape;
 6
 7   // public properties:
 8
 9     p.graphics = null;
10
11   // constructor:
12
13     p.DisplayObject_initialize = p.initialize;
14
15     p.initialize = function(graphics) {
16       this.DisplayObject_initialize();
17       this.graphics = graphics ? graphics : new createjs.Graphics();
18     };
19
20
21     p.isVisible = function() {
22       ...
23     };
24
25
26     p.DisplayObject_draw = p.draw;
27
28
29     p.draw = function(ctx, ignoreCache) {
30       ...
31     };
32
33
34     p.clone = function(recursive) {
35       ...
36     };
37
38     p.toString = function() {
39       ...
40     };
41
42   createjs.Shape = Shape;
43 }());
Exporting the class definition
We separate each part of code into its own file. The benefit of having separated files is that we can modularity logic into very specific domain. For every specific module, we only focus on its own logic. This helps making each parts less bugs.
It is a good practice that each file is separated. The compiled JavaScript of each files are put into an isolated function group by default. If we need to expose specific variables to other files, we can reference them to the global object under the app namespace.
this.exampleApp.Scene = Scene
Then we can reference the exported Class in another file.
Scene = this.exampleApp.Scene
4. Adding static stylish menu
In this step, we implement the menu scene and put menu item on it.
Time for Action
Let’s follow the steps to create the menu scene.
- We create the our menu scene. Let’s add the code to
scenes.coffee.scenes.coffee 1classSceneAextendsScene2constructor:->3super('#EDE4D1')45header=newcjs.Bitmap'images/header.png'6header.scaleX=header.scaleY=0.57@addChildheader89info=newcjs.Bitmap'images/info.png'10info.y=35611info.scaleX=info.scaleY=0.512@addChildinfo1314photoA=newcjs.Bitmap'images/a.png'15photoA.y=3816photoA.scaleX=photoA.scaleY=0.517@addChildphotoA1819photoB=newcjs.Bitmap'images/b.png'20photoB.y=14621photoB.scaleX=photoB.scaleY=0.522@addChildphotoB2324photoC=newcjs.Bitmap'images/c.png'25photoC.y=25326photoC.scaleX=photoC.scaleY=0.527@addChildphotoC2829#exporttoglobalappscope30this.exampleApp.SceneA=SceneA - Make sure we import any newly created class into our App scope in order to use them.
app.coffee 1#alias2cjs=createjs3setting=this.exampleApp.setting4Scene=this.exampleApp.Scene5SceneA=this.exampleApp.SceneA - In the app logic, we replace the old
Sceneby the newly createdSceneAclass.app.coffee 1classApp2constructor:->3...4sceneA=newSceneA()5@stage.addChildsceneA
What just happened?
We created a new scene by inheriting the original Scene class definition. The inheritance allows us to define custom scene easily.
5. Displaying another scene after menu selection
In this step, we build a simple scene manager to control the presence of different scenes.
Preparation
Our scene management is inspired from the navigation controller in iOS. The navigation controller stores a stack of added scene. Developers that use this manager can push and pop scenes.
Time for Action
Let’s follow the steps to create our own scene manager for the app.
- We have more than 1 scene in our app. To make things easier, we design a scene manager that manage the scene displaying and leaving. we create a new file named
scene-management.coffeefor this logic. Then put the following code into the newly created file.scene-management.coffee 1#aglobalappobject.2this.exampleApp?={}34#Anobjecttomanagescene,undertheappnamespace.5this.exampleApp.sceneManager={6stage:undefined7scenes:[]8lastScene:->@scenes[@scenes.length-1]9resetWithScene:(scene)->10@scenes.length=011@scenes.pushscene12@stage.addChildscene13popScene:->14@stage.removeChild@lastScene()15@scenes.pop()16@lastScene().mouseEnabled=true17pushScene:(scene)->18@lastScene().mouseEnabled=false19@scenes.pushscene20@stage.addChildscene21} - We create more scenes to test our example. Add the
SceneBto thescenes.coffee.scenes.coffee 1classSceneBextendsScene2constructor:(contentId='a')->3super('white')45content=newcjs.Bitmap"images/page-view-content-#{contentId}.png"6content.scaleX=content.scaleY=0.57@addChildcontent89header=newcjs.Bitmap'images/header-back.png'10header.scaleX=header.scaleY=0.511@addChildheader1213header.on'click',->14sceneManager.popScene() - Then we create the
SceneInfo.scenes.coffee 1classSceneInfoextendsScene2constructor:->3super('white')45content=newcjs.Bitmap"images/info-content.png"6content.scaleX=content.scaleY=0.57@addChildcontent89@on'click',->10sceneManager.popScene() - Make sure we export the newly defined class so that the
App, which is in another file, can access to these classes.app.coffee 1#exporttoglobalappscope2this.exampleApp.SceneA=SceneA3this.exampleApp.SceneB=SceneB4this.exampleApp.SceneInfo=SceneInfo - In the
scenes.coffeefile, we add the click event handling to the menu elements. Tapping the elements will lead to a new scene to display the image or the information scene.scenes.coffee 1sceneManager=this.exampleApp.sceneManager23info=newcjs.Bitmap'images/info.png'4info.y=3565info.scaleX=info.scaleY=0.56@addChildinfo7info.on'click',->8scene=newSceneInfo()9sceneManager.pushScenescene1011#Menuitem112photoA=newcjs.Bitmap'images/a.png'13photoA.y=3814photoA.scaleX=photoA.scaleY=0.515@addChildphotoA16photoA.on'click',->17scene=newSceneB('a')18sceneManager.pushScenescene1920#Menuitem221photoB=newcjs.Bitmap'images/b.png'22photoB.y=14623photoB.scaleX=photoB.scaleY=0.524@addChildphotoB25photoB.on'click',->26scene=newSceneB('b')27sceneManager.pushScenescene2829#Menuitem330photoC=newcjs.Bitmap'images/c.png'31photoC.y=25332photoC.scaleX=photoC.scaleY=0.533@addChildphotoC34photoC.on'click',->35scene=newSceneB('c')36sceneManager.pushScenescene - We have created a few new scenes. Make sure we have aliased these new classes in the
app.coffeefile.app.coffee 1#alias2cjs=createjs3setting=this.exampleApp.setting4sceneManager=this.exampleApp.sceneManager5SceneA=this.exampleApp.SceneA6SceneB=this.exampleApp.SceneB7SceneInfo=this.exampleApp.SceneInfo - In the main
Applogic, We removed the old Scene creation logic and make use of thesceneManagerto handle the scene visualization.app.coffee 1classApp2constructor:->3...45sceneA=newSceneA()6@stage.addChildsceneA78sceneManager.stage=@stage910scene=newSceneA()11sceneManager.resetWithScenescene - We created new files so we need to include the files in the Gulpfile compiling pipeline.
Gulpfile.coffee 1gulp.task'js',->2gulp.src[3'./app/scripts/setting.coffee'4'./app/scripts/scene-manager.coffee'5'./app/scripts/scenes.coffee'6'./app/scripts/app.coffee'7]8.pipecoffee()9.pipeconcat'app.js'10.pipegulp.dest'./app/scripts/'
What just happened?
The scene manager is an object without class definition. We put it on the exampleApp namespace to let other modules access it.
There are 2 properties, stage and scenes. The stage is refer to the target container that holds the scenes. The scenes is an array of the scenes we have added to the stage.
Then we defined 3 essential methods, resetScene, pushScene and popScene, and 1 helper method, lastScene.
The resetWithScene clears the scenes array to provide a clean state. Then it add the give scene as the first scene, as known as root scene in such kind of navigation pattern.
The pushScene takes the given new scene object and add to the scenes stack. Then it displays the new added scene to the screen.
The popScene, on the other hand, remove the last scene from the screen and from the scenes stack. That’s why we have a helper method that returns the last scene.
6. Animating transition between scenes
In this step, we make use of the exported Flash animation to build the animated transition effect.
Preparation
Before we begin, make sure we have the transitions.js file ready in the scripts folder. We include the file into the index.html before loading our main App logic.
1 ...
2   <script src="http://code.createjs.com/easeljs-0.7.1.min.js"></script>
3   <script src="http://code.createjs.com/tweenjs-0.5.1.min.js"></script>
4   <script src="http://code.createjs.com/movieclip-0.7.1.min.js"></script>
5   <script src="scripts/transitions.js"></script>
6   <script src="scripts/app.js"></script>
7 </body>
Time for Action
Let’s work on the following steps to add the animated transition to the app.
- In the
scene-manager.coffee, we add one new methodpushSceneWithTransitionwhich add the animated transition while switching scenes.scene-manager.coffee 1this.exampleApp.sceneManager={2...3pushSceneWithTransition:(scene,transitionClassName)->4transition=newlib[transitionClassName]()5transition.x=setting.width/26transition.y=setting.height/278scene.visible=false910@pushScenescene1112#ThetransitionanimationinFlashshoulddispatch`sceneShouldChange`eve\13nt.14transition.on'sceneShouldChange',->15scene.visible=true1617@stage.addChildtransition18} - In the
scenes.coffee, we change to use the newpushSceneWithTransitionmethod.scenes.coffee 1classSceneAextendsScene2constructor:->34...5info.on'click',->6scene=newSceneInfo()7sceneManager.pushSceneWithTransitionscene,'TransitionAnimationA'89...10photoA.on'click',->11scene=newSceneB('a')12sceneManager.pushSceneWithTransitionscene,'TransitionAnimationB'1314...15photoB.on'click',->16scene=newSceneB('b')17sceneManager.pushSceneWithTransitionscene,'TransitionAnimationB'1819...20photoC.on'click',->21scene=newSceneB('c')22sceneManager.pushSceneWithTransitionscene,'TransitionAnimationB'
What just happened?
We have added a custom animated transition when we switch scene in the app.
Adding the generated transition
Any exported Flash movieclip is put into a lib namespace. For example, if the movieclip name is AnimatedBall, we can create an instance by using new lib.AnimatedBall().
In our code, the transition class name is a variable. By using the array notation instead of dot notation, we can create new instance of a class where the class name is variable.
new lib[transitionClassName]()
Custom event: sceneShouldChange
In the scene manager, we listen to the sceneShouldChange event and toggle the new scene’s visibility.
1 transition.on 'sceneShouldChange', ->
2   scene.visible = true
This relies on the Flash animation which dispatches the event at the middle of the transition animation.
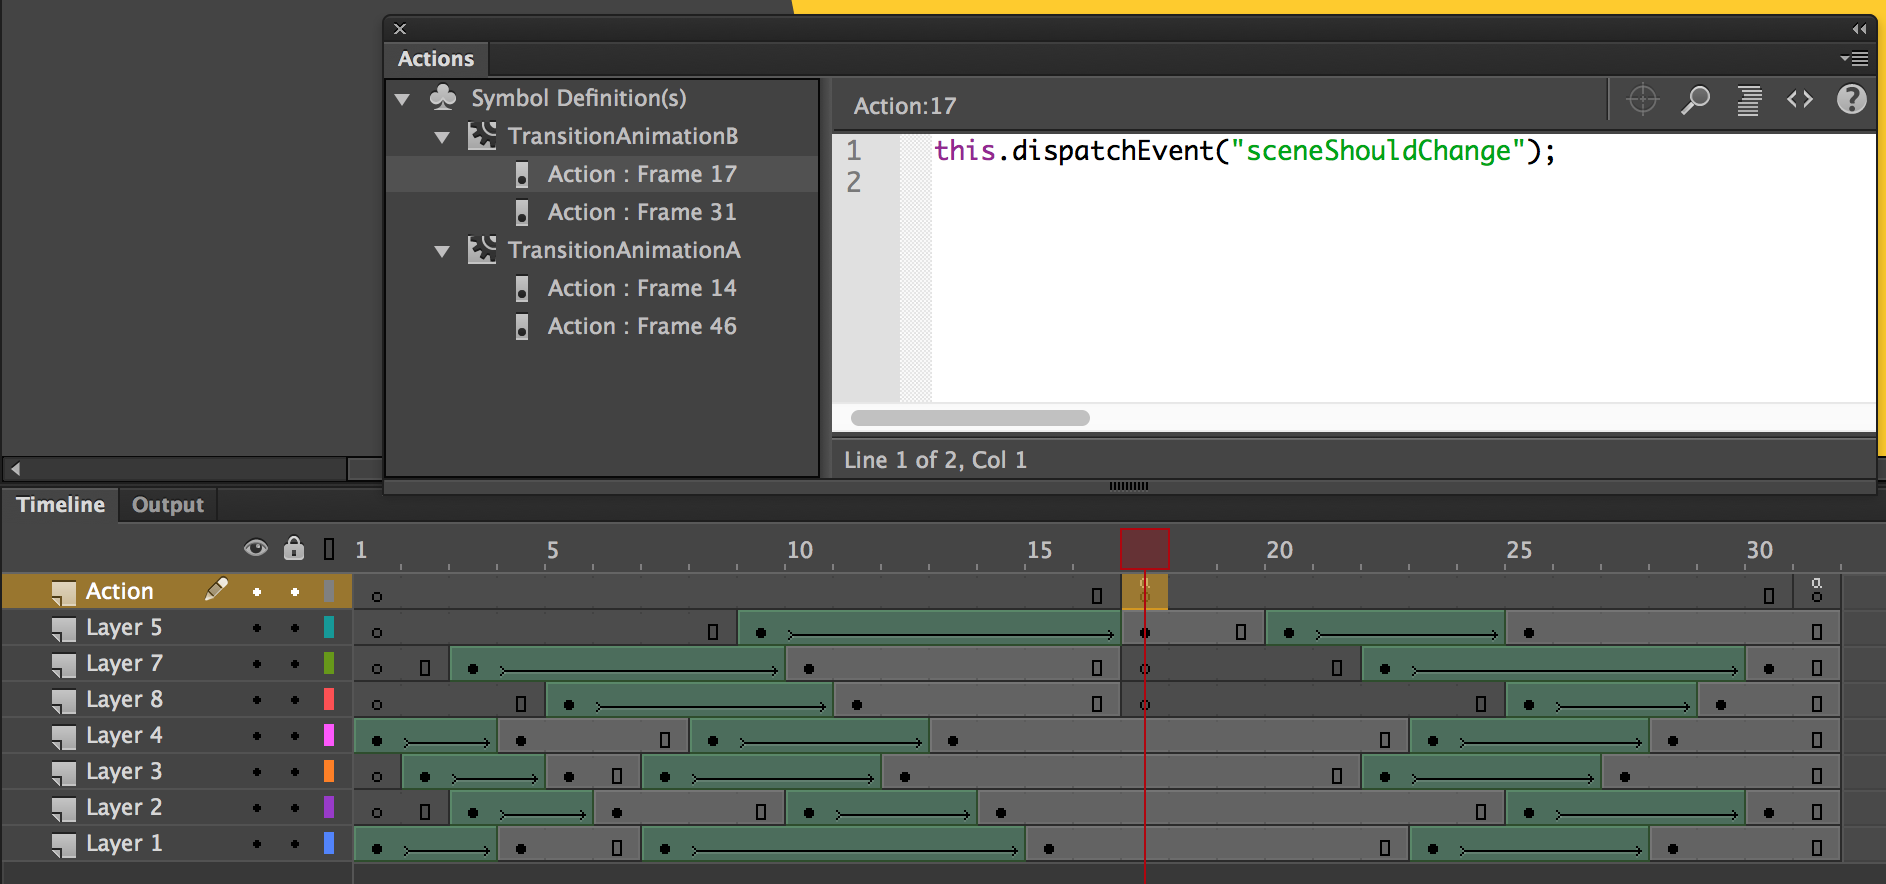
In the screenshot, you will find an action is defined in the middle of the transition animation. When the animation reaches this frame, it dispatch the event. We capture this custom event in the scene manager to actually switch the scene.
7. Optimizing for retina display
We may find the app looks blurry when we test the web app in iPhone or Android device with high-definition display. That’s because the retina display trys to render the graphics by doubling our pixels. In this step, we optimize the canvas rendering in retina display.
Time for Action
Let’s add the retinalize utility via the following steps.
- The
retinalizemethod is kind of utility that’s independent to our logic. We create a new fileutility.coffeeand place the following code inside it.utility.coffee 1retinalize =(canvas, stage) ->2# We skip the logic if the device is not retina3# or it doesn’t support the pixel ratio4returnif(window.devicePixelRatio)56# cache the pixel ratio7ratio =window.devicePixelRatio8# get the original canvas dimension9height =canvas.getAttribute('height')10width =canvas.getAttribute('width')1112# set the new dimension with ratio multiplication13canvas.setAttribute('width',Math.round(width*ratio))14canvas.setAttribute('height',Math.round(height*ratio))1516# ensure the canvas CSS style follows the original dimension17canvas.style.width =width+"px"18canvas.style.height =height+"px"1920# scale the entire stage so we can use the original coordinate in our app.21stage.scaleX = stage.scaleY =ratio - We can then call the retinalize method after we initialize the canvas and stage variable.
app.coffee 1classApp2#Entrypoint.3constructor:->4console.log"Welcome to my portfolio."5@canvas=document.getElementById("app-canvas")6@stage=newcjs.Stage(@canvas)78window.utility.retinalize(@canvas,@stage) - We have created a new file. As usual, we include the new file in our compiling pipeline. Add the following highlighted line to the
Gulpfile.coffee.Gulpfile.coffee 1gulp.task'js',->2gulp.src[3'./app/scripts/setting.coffee'4'./app/scripts/retinalize.coffee'5'./app/scripts/scene-manager.coffee'6'./app/scripts/scenes.coffee'7'./app/scripts/app.coffee'8]9.pipecoffee()10.pipeconcat'app.js'11.pipegulp.dest'./app/scripts/'
What just happened?
When the browser detects the display has a higher devicePixelRatio, which means for every ‘point’ of the display, it renders more than 1 pixels. For such types of display, we enlarge the canvas content while keeping the dimension of the <canvas> element unchanged. This allows the retina display to render the graphics in its native pixel resolution, and hence make the canvas graphics looks sharp.
Further challenges
There are some essential features we haven’t implemented in the example app.
For example, we don’t have scrolling in the menu scene so we can’t display more photos.