1 Getting Started with NeuroTask Scripting
1.1 What Are Scripts and Why Do We Need Them?
Suppose, you want to make a word recall experiment where you present eight words on the screen, one by one. Each word is to be shown for 2 s, followed by a 1 s pause. After all the words have been presented, you want to ask the subject to type all the words remembered into a large text box, in any order. In other words, you have an idea for an experiment that specifies step-by-step what you want to happen. If you wrote down these steps in a plain English list, it might look something like this:
- Show word 1 for 2 s
- Pause 1 s
- Show word 2 for 2 s
- Pause 1 s
- …
- Show word 8 for 2 s
- Pause 1 s
- Have subject write down the words remembered
The ellipses (…) above replace showing words 3 through 7, which are skipped over to avoid repetition.
This step-by-step plan is, in fact, already very close to a script that you’d write in NeuroTask. The only difference is that scripts use a specific, standardized format for writing the steps that tell the computer what you want it to do. A NeuroTask script that would achieve the steps above would look something like this:
text("word 1");
await(2000);
clear();
await(1000);

text("word 2");
await(2000);
clear();
await(1000);

...

text("word 8");
await(2000);
clear();
await(1000);

largeinput("Write down the words you remember");
As you can see, the first line of the script is an instruction to the computer to show a word. This instruction to show a word is called the text function. Functions appear on new lines, and can be thought of as commands for the computer - the action you want it to perform next. Next, there is an instruction to wait until 2000 ms have passed (time is measured in milliseconds in NeuroTask). The waiting instruction is called the await function. Then comes the clear function, which gives the instruction to clear the screen of any words. Finally, after all the words have been shown and cleared, there is the largeinput function, which instructs the computer to show a large text box where the subject can type the words that they remember.
You will also notice that there are parens (i.e., round brackets), quotation marks, and semi-colons. Using punctuation (part of what is known as syntax) is an important part of writing scripts in this specific, standardized format that computers can decipher. Parens follow functions (such as await and clear, seen above) and contain details the computer needs to complete the function (such as how long to wait, or what words to show). Quotation marks tell the computer that you’re entering what’s called string - a string of letters that the computer doesn’t need to decipher, just a piece of content for it to use (such as some text you’d like it to display to the subject). Semi-colons act as the period at the end of each step in your instructions. They allow the computer to break down your instructions into step-by-step pieces. Once you know how to translate your plan into a script, you can instantly run it online, and have others (your subjects) run it too.
1.2 Scripting Psychological Experiments
So, we’ve learned that scripts tell the subject’s computer what stimuli to present and which data to collect from the subjects. The team at NeuroTask Scripting has worked hard to make frequently-used experimental tasks easy to script, even for a beginner.
NeuroTask scripts are written in JavaScript, the programming language that is built into all internet browsers such as Internet Explorer, Safari, Chrome, and even the browsers on your smart phone. This means that the internet-based experiments created with NeuroTask Scripting will run on virtually any computer with an internet connection. Creating web-based experiments from scratch, i.e., without NeuroTask Scripting is quite difficult and involved. With NeuroTask, it is a breeze. It is quite feasible to write a full-blown experiment in one hour. But don’t take our word for it. See for yourself.
For those of you who are already experienced JavaScript programmers, it is important to know that we are not limiting your use of JavaScript. You also have all of the Dojo and jQuery libraries at your disposal, included by default, and it is possible to pull in other libraries as well. We are, in fact, using a superset of JavaScript, called StratifiedJS, which adds even more functionality and additional (optional) libraries.
Writing Scripts
There are two steps to creating an online experiment script, and step 2 is optional:
- Write your experiment script
- (Optional) Make and upload your stimuli
You’re done! Your script is automatically ‘live’ on the internet and it has its own unique web address (also known as its URL). You can email this web address to friends and family, put the link on Facebook, etc. If participants do your experiment and you have a paid NeuroTask package, their data will automatically be saved in your NeuroTask Scripting account, where you can easily download it in Excel or other formats. This streamlined method of easy experiment sharing and automatic data collection is the same whether you are running a simple pilot or informal experiment, or whether you are running a large experiment or using subjects from crowdsourcing websites such as Amazon’s Mechanical Turk.
Then, wait as your data comes in and start analyzing. While you are waiting, it is possible to see who has already completed your experiment using the session monitor (found at this icon:  ).
).
1.3 Scripts
The Structure of an Experiment Script
Most experimental tasks in psychology involve about the same steps. These steps must be expressed somehow in a script. In an online experiment, you will typically:
- Welcome the subject
- Ask for informed consent
- Give instructions
- Present stimuli (such as words)
- Record responses (such as words remembered)
- Debrief, where you may thank the subject for participating
Let’s look at a short example script that does most of this.
Your first script: A small experiment
Guess what the following script is doing. Well, the title sort of gives it away, at least if you have followed an introductory course on psychology. Note that light bluish green text in italics that follows two forward slashes is commentary that the computer will overlook. Using this commentary feature when scripting is very handy for writing “notes to self”, organizing your script, reminding yourself the purpose of each section, and adding explanation for others who may read your script. This script would run perfectly in NeuroTask. All black and red text is necessary to its function, whereas all green text that follows two forward slashes could be removed with no affect.
 1 text("Try to remember the following three letters");
 2 await(5000); // 5000 ms or 5 s
 3
 4 text("YHZ");
 5 await(3000);
 6
 7 text("Now, count back in threes starting with 307: 307, 304, 301,...");
 8 await(25000);
 9
10 input("Write down the letters remembered","brown_peterson");
11
12 text("Thank you for participating!");
13 await(3000);
If you actually did this experiment online, you would see a white screen (i.e., a blank web page) with the words, “Try to remember the following three letters” (the quotation marks would not be shown).
After five seconds, the text would change into “YHZ”.
Then, the count-back instruction would appear for a longish 25 s period, during which the subject would supposedly count back in threes.
After this 25 s interval, a text box would appear with the label, “Write down the letters remembered” above it. There is an “OK” button below the text box that is automatically generated by the input function so that subjects can move forward when they’ve finished typing.
After pressing “OK”, the words “Thank you for participating!” appear for 3 s and the subject is finished. The computer has reached the end of the script, and the screen reads a simple “Powered by NeuroTask Online Experiments” (during which the script is saving any remaining unsaved data points).
Though this script is short, it contains most of the steps of a standard experiment, and it can easily be changed to contain different stimuli, as we will illustrate below. The presentation time of the text may be varied from very long to ultra-short, instructions may be made more elaborate, and so on. So, we see that this brief script is a miniature model for a whole range of memory experiments.
The Brown-Peterson Task is a classic experiment in memory psychology in which John Brown, in 1958, and later, Lloyd and Margaret Peterson, in 1959, showed that even three letters are forgotten in as little as 15 seconds, but only if the subjects are not allowed to consciously rehearse them. Rehearsal is typically prevented by having subjects count backward in threes. The effect is not obtained, however, in the first trial, i.e., after having studied just one letter triplet; the task should be repeated several times with different letter triplets, while making sure that subjects are not secretly rehearsing the letters in the 25 s interval. Experiments like this were early evidence that conscious rehearsal is important for the maintenance of short-term memory and that without it, short-term memory fades very quickly.
Walking through Script 1.1
Let’s walk through the script in small steps, starting with line 1:
1 text("Try to remember the following words");
Here, we see the text() function with the message, “Try to remember the following words”. The quotation marks tell the system it is text. The formal word for text in many computer languages is string, as in: a string of characters. You can also use single quotation marks instead of double quotation marks, which would read: text('Welcome'). We call text() a function and “Try to remember the following words” the argument of the function text(). A function is a general action you’d like the computer to carry out, and the argument provides the details of how you’d like that action done (in this case, what specifically the text should say). Arguments of a function must always be enclosed in round brackets: ( and ).
The semi-colon ; at the end of a line in a script helps the system to distinguish between subsequent script statements. It is like the full-stop (period) at the end of a sentence, which signals to us, the human reader, that one sentence ends and the next one starts. The semi-colon may be left out, especially when each statement is on its own line as is the case here, but it is highly recommended to always add it1.
Now, let’s look at line 2:
2 await(5000); // 5000 ms or 5 s
This line uses the await() function with the argument 5000. When await() is called like this, the computer will pause its execution of the the script for 5000 ms, and then continue. Note that the number of ms is denoted as 5000 and not “5000” (or ‘5000’). That is because it is an integer number which the computer system can read automatically, unlike strings which require quotation marks.
There is also an addition in line 2 that reads: // 5000 ms or 5 s. This is a comment, which is completely ignored by the system. It is handy to include comments as notes to oneself or to others. Here, we make clear that 5000 means: 5000 ms. A // comment only runs to the end of the line, meaning that when the computer encounters //, it will stop reading that line and skip immediately to the start of the next line. With multiple lines of comments, you must repeat the // at the beginning of each line, e.g.,
// Starting a comment.
// Continuing it on the next line.
// As many times as we'd like.
There is also a type of comment that spans many lines. It starts with /* and ends with */, both on their own line (with no text before or after them on their line), e.g.,
/*
   Starting a comment
   that spans many lines.
   It will just continue
   Until we decide to stop it with an asterisk and forward slash.
*/
Make sure you start with /* and end with */ exactly in that order. People familiar with SPSS may forget the forward slash, because in SPSS comments are indicated with * alone, but in JavaScript (and therefore in NeuroTask), leaving out the forward slashes will cause an error.
So, there are two type of comments:
- Single line, beginning with
// - Line-spanning, beginning with
/*and ending with*/
On lines 4 through 8, the following two statements in the script follow exactly the same show this text for this many milliseconds pattern, except with different arguments:
4 text("YHZ");
5 await(3000);
6
7 text("Now, count back in threes starting with 307: 307, 304, 301,...");
8 await(25000);
On line 10, the user’s response is recorded with the line:
10 input("Write down the letters remembered","brown_peterson");
The input() function requires a label as its argument, in this case: “Write down the letters remembered”. The input() function displays this label with a text box (i.e., a text input field) below it, in which the user can type the letters that they remember. Below that is an “OK” button. The second argument, “brown_peterson”, is optional (though highly recommended) and is the name given to the variable that is created to store whatever the subject types into the text area.
Now you may wonder, “What is happening with the subject’s answers?”. All responses (that come from buttons, text inputs, drop-down select lists, checked boxes, etc. — formally called form controls or controls for short) will be saved automatically into your account’s data area. viewable both at the Data Dashboard page (found at this icon:  ) and, in a different layout, at the Logged Data page (found at this icon:
  ). You can inspect these responses and download the data in Excel and other formats. It is important to give meaningful names to your variables, so that later you know what the values in your data tables represent.
If you don’t provide a name for the variable, the subject’s input will be saved under an automatically-generated name, such as “input_1”. In a small experiment this may not present any problems, but when your experiment collects a lot of data (i.e., multiple variables), mistakes are easily made. It is therefore highly recommended to create meaningful names for all recorded data.
The last lines of the script show a thank you message for 3 s. After this, the NeuroTask branding screen appears signalling that the experiment is over.
13 text("Thank you for participating!");
14 await(3000);
Script 1.2: A free recall experiment
Let’s take Script 1.1 and turn it into a free recall test with eight words. Each word is shown for 2 s, then it is removed from the screen, followed by 1 s pause, after which the subsequent word is shown.
 1 text("Try to remember the following words");
 2 await(5000); // 5000 ms or 5 s
 3
 4 text("glass");
 5 await(2000);
 6 clear();
 7 await(1000);
 8
 9 text("chair");
10 await(2000);
11 clear();
12 await(1000);
13
14 text("train");
15 await(2000);
16 clear();
17 await(1000);
18
19 text("balloon");
20 await(2000);
21 clear();
22 await(1000);
23
24 text("horse");
25 await(2000);
26 clear();
27 await(1000);
28
29 text("curtain");
30 await(2000);
31 clear();
32 await(1000);
33
34 text("pencil");
35 await(2000);
36 clear();
37 await(1000);
38
39 text("baker");
40 await(2000);
41 clear();
42 await(1000);
43
44 text("Now, count back in threes starting with 307: 307, 304, 301,...");
45 await(20000);
46
47 largeinput("Write down the words remembered","words_remembered");
48
49 text("Thank you for participating!");
We introduce a new function here, clear(), which removes the current text from the screen, i.e., clearing it. The rest of the script is highly similar to Script 1.1. A small difference between Scripts 1.1 and 1.2 is that in 1.2 we use largeinput() instead of input(). The difference is that largeinput() gives a large text box, of about five rows, in which the subject can type their responses, whereas input() gives just a single line text box, which may feel cramped when typing up to eight words:
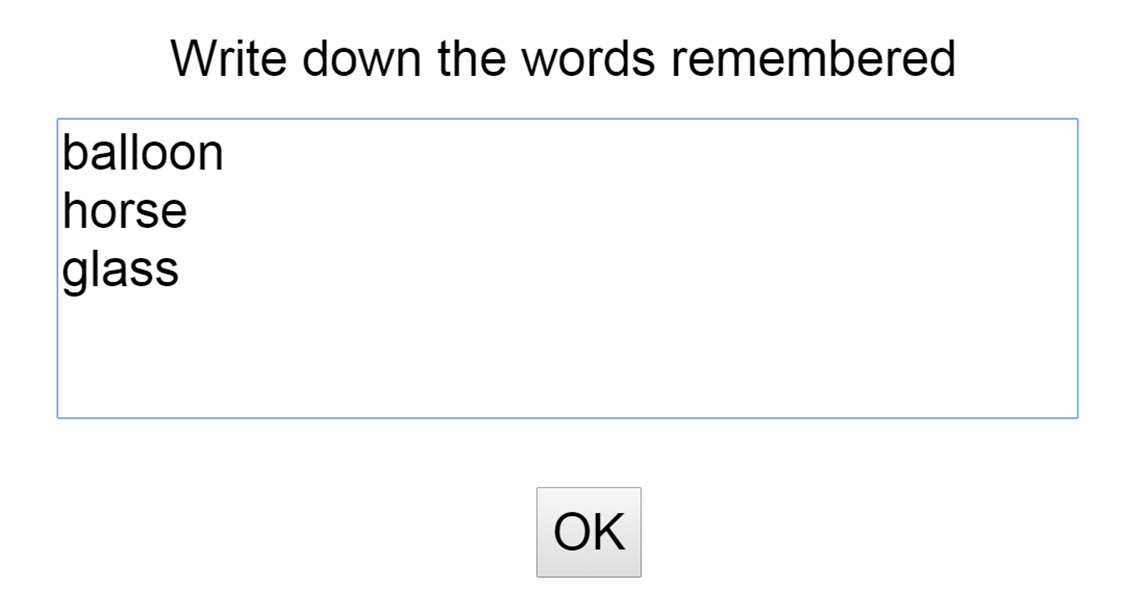
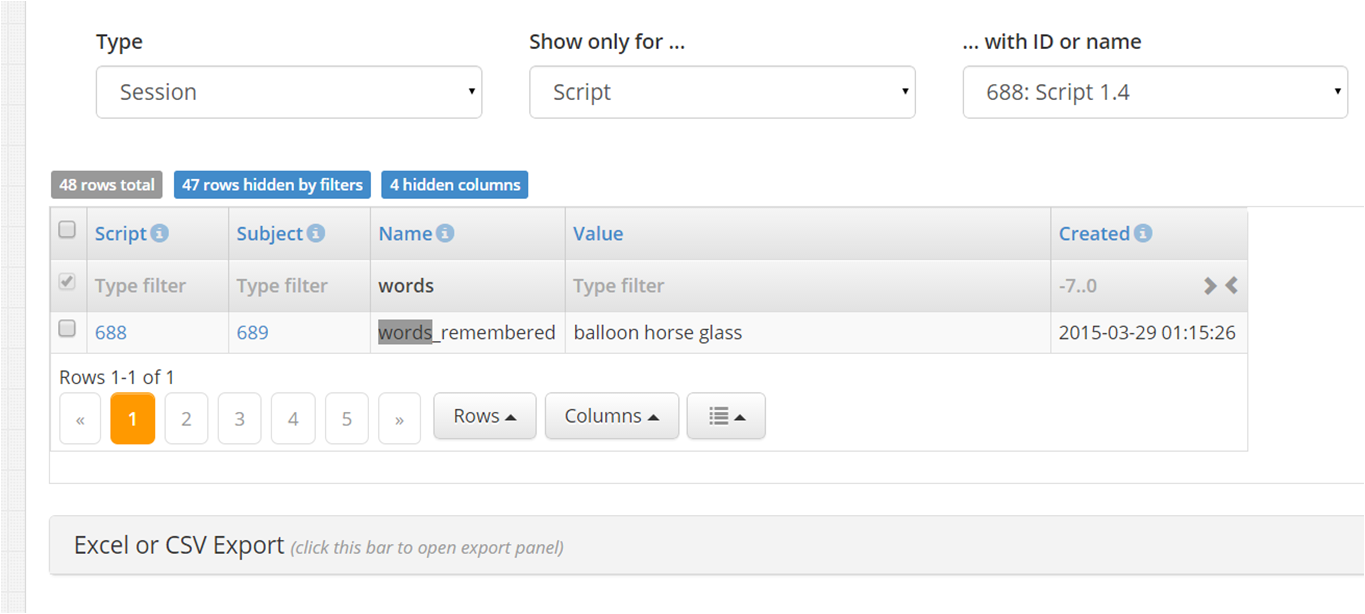
largeinput() text box.If your subjects did this task online, you would see their answers, exactly as they typed them in, under the label “words_remembered” in the data area (Data Dashboard or Logged Data pages) of this experiment script:
Perhaps, we should here point out why we used an underscore in "words_remembered" and not a space. The reason is that variable names cannot contain spaces in JavaScript. An underscore is often used instead of a space.
Script 1.3: A shorter script with a for loop
Our third script creates an experiment identical to 1.2, but achieves it with a much simpler script thanks to two new concepts: array and for() loops. There is nothing wrong with Script 1.2, but some might find it a bit long and if you wanted to make an adjustment, such as presenting the words for 3200 instead of 2000 ms, you would have to adjust each trial individually. This is both tedious and prone to error, especially in larger scripts.
Whenever there is a highly repetitive pattern in a script, it is a good idea to rewrite it using a so called loop. Take a look at the rewritten script:
 1 var i;
 2 var words = ["glass", "chair", "train", "balloon",
 3                  "horse", "curtain", "pencil", "baker"];
 4
 5 text("Try to remember the following words");
 6 await(5000); // 5000 ms or 5 s
 7
 8 for (i = 0; i < words.length; i = i + 1)
 9 {
10     text(words[i]);
11     await(2000);
12     clear();
13     await(1000);
14 }
15
16 text("Now, count back in threes starting with 307: 307, 304, 301,...");
17 await(20000);
18
19 largeinput("Write down the words remembered","words_remembered");
20
21 text("Thank you for participating!");
22 await(3000);
White Space
You may insert arbitrary white space (spaces, tabs, and newlines) almost anywhere in a script, which can be useful if you want to make the layout of your scripts more legible. For example, in the demonstration scripts thus far, we have used empty lines to create groupings to help see the structure of the script. These empty lines are completely ignored by the computer system, as is most other white space. There are very few places where you cannot add arbitrary white space, but they are rather intuitive, such as within a string (e.g., if we wrote "gla ss" the computer would not ignore the white space and would dutifully display “gla ss” on the screen) and within numbers (e.g., exponents such as 2e10 will not be correctly interpreted as exponents if written 2 e 10).
Variables
You may notice the use of the word var, which stands for variable. Unlike the lines of script that we’ve seen so far, which have been more action-based (e.g., functions that we ask the computer to perform), variables allow us to simply introduce some content (such as the word list that is our experiment’s stimuli) to which we can refer later in the script. Introducing variables is a bit like listing the ingredients in a recipe. For example, a recipe might list “Apples: 4, peeled, and cut into 1cm slices” at the beginning of the recipe, then later, in the action-based part of the recipe, simply refer to doing something with “the apples”.
Variables are used to store (and later, to access) information in scripts. You can think of variables like storage cubbies. First, you create a variable simply by writing var followed by the variable a name (e.g., writing “var i” or “var words”). In JavaScript, variables names can contain numbers and underscores, but may not start with a number. They are case-sensitive, meaning that variables word, Word, WORD would be considered three completely different variables. This tells the system that we will want to store some data (values) and require memory space to do so. It creates an empty storage cubby, labelled with the name you gave it. This is called declaring a variable. You may declare a new variable at any point in a script.
Assigning Values to Variables
After declaring a variable, you can put something (or even some things) in that storage cubby (variable) for safe keeping. This is called assigning value to a variable. What makes variables so useful is that you can add to or swap out the contents of your storage cubby at any time, and also refer to the storage cubby name to see what’s inside it (to access its current value). The rest of this section, 1.3, will show why this is useful.
The first variable in the script has a very short name. It is called i. We will capitalize on the fact that variable values can be changed, and use i to count (or keep track of) how many words we’ve shown on the screen from our word list. To use i as a counter, we set its initial value to 0. The equal sign is used to assign a value to a variable. So, i = 0 means, “Give i the value 0”. This equals sign and the value to its right are called the assignment. Throughout the script, we will use a function to tell the computer to increase the current value of i by 1 each time that a word is displayed, thus keeping count of how many have been shown.
The second variable is declared in line 2. We have called this variable words. The variable words is immediately assigned a value in the form of an array (i.e., list) of strings (i.e., words), which correspond to the stimulus words from Script 1.2. Here, we see that variables (storage cubbies) can hold not just one item (value), but also many items (an array of values). Again, the value of words is set using the equal sign =, followed by the array of words.
You can also assign the result of some calculation to a variable. For example, when you do:
i = 60*24;
the system would first calculate the result of the expression 60*24 (meaning 60 times 24), which equals 1440, and then assign that value to i. So, the above statement is equivalent to:
i = 1440;`
You can also put names of variable on the right-hand side of an assignment, like this:
minutes = 60;
hours = 24;
i = minutes * hours;
Again, i would be 1440 after these lines had been processed. While the example above is not very practical (it’s just a long-winded way of writing a calculation that we could do faster), we see how putting variables on the right-hand side of an assignment can be useful in Script 1.3. To use i as a counter, we use the existing value of i on the right-hand side, add 1 to that, and assign this new result to i, overwriting the existing value, like so:
i = i + 1;
So, if i was 0 at before this assignment, it is 0 + 1 (i.e., 1) after the assignment. This is one way to increase the value of i by 1. In script 1.3, we tell the computer to do this each time it displays a word. You could also decrease i by 1, like so:
i = i - 1;
or multiply i by 2:
i = 2*i;
Arrays
An array in JavaScript is a type of list that can be compared to a wide storage unit containing many items, all lined up in a row. The items in an array are called elements. The elements in an array are numbered starting at 0 (and not at 1). This is automatic and cannot be changed. All elements of an array must be separated by commas, or else they will be seen as one element. To indicate to the system that words is an array (not just one value), the list of values must be put inside square brackets [ and ]. The word glass is in position 0, the word chair is in position 1, etc. When we want to access an element of our array (e.g., to display it on the screen) we do so by writing the name of the array followed by the position in square brackets. To get element 0, we would write words[0], which would produce the word “glass”.
Each array has a length (i.e., number of elements) and this value can be found by writing words.length. The dot . indicates that we are accessing a property of the array. Here, words.length is 8, because there are 8 words in the array. So although the length of words is 8, its elements are numbered 0 to 7.
for loops
Another new part of script 1.3 is the for loop, which tells the system to loop back over a portion of the instructions (the part inside the curly brackets that follow) for a specific number of times, before continuing onto the rest of the script:
 8 for (i = 0; i < words.length; i = i + 1)
 9 {
10     text(words[i]);
11     await(2000);
12     clear();
13     await(1000);
14 }
In plain English, line 8 would say: “Start with i equalling 0. If the current value of i is less than the length of words, do the steps in the curly brackets below, then add 1 to the value of i.”
The index of a variable refers either to the current or to a specific value of the variable, depending on what kind of variable it is. Because i is a counter variable with only one value at any given time (that keeps track of how many times the loop has run), index i refers to its current value. The words variable, on the other hand, contains an array, so “words index 0” (written “words[0]”) would refer to the specific value in position 0 of the array, i.e., the word “glass”.
Parts of a for loop: Head and Body
The for loop always has the same shape: it has a head and body. The head always looks like this, with three arguments separated by semi-colons:
for (initialization; condition; step)
The body is the part in curly brackets:2
{
    ...
}
In the head, the initialization sets variable i to its initial value (in this case, i = 0).
The condition indicates when to stop. In this case, the condition says i < words.length. Since the variable words contains an array of 8 elements (words), words.length is 8. Therefore, as long as the count of words that have been presented is 7 or below, the loop will run again (recall that word counting started at 0). When the loop reaches the point that i is 8, the condition will be false, because 8 < 8 is not true. Since 8 < 8 is not true, the statements (i.e., lines of script) in the body will not be executed anymore, and the system will move on to processing the next line of script after the closing bracket of the body.
The step part of the head of the for loop determines how the index (i.e., current value of)i will be changed after each repetition of the loop. In most cases, it is increased by 1 (called an increment). In other situations, it can be more useful to decrease it by 1 (called a decrement) or to change it in some other way.
It is important to know that even if, for some reason, you do not want to specify part of the head, you still need to write both semi-colons. This way, the system knows whether to interpret the statements as the initialization, the condition, or the step. For example, if you chose to initialize the index of i before the loop, which is perfectly fine, you would still need to put in both semi-colons, as follows:
var i = 0;
var m = words.length;

for (; i < m; i = i + 1)
{
    // body
}
Increment
In JavaScript, the expression i = i + 1 has a short-hand form which can be used instead: ++i. This step of “plus 1” is known as increment3 i. Similarly, --i is short-hand for i = i - 1 and is known by decrement i. These short-hands do not achieve anything different; they are simply more concise forms.
Declaring Multiple Values at Once
Another short-hand exists for declaring several variables in a row. When several var expressions follow each other, you can combine them using a comma and only write var once, as follows:
var i,
    m = words.length;
Given that white space (such as spaces and newlines) is irrelevant, you may find the following layout, which has the same meaning, easier to read:
var i,
m = words.length;
Using the shorthands of increment and declaring multiple values at once, the whole loop would then look like this. This is the format of the for loop that you will see most often:
var i,
    m = words.length;

for (i = 0; i < m; ++i)
{
    // body
}
Script 1.4: Even shorter scripts with getwords()
Script 1.3 is already a rather mature script that can easily be maintained. Many people, however, prefer to go one step further and separate their scripts from their stimuli. In the case of words (or sentences, or sentence fragments), NeuroTask offers the function getwords() that allows you to do this easily. The procedure is to first make a text file (i.e., with the extension “.txt”) that contains the stimulus words without quotation marks, but separated by commas. Spaces after each comma are optional. For example, the file called words.txt might contain:
glass,chair,train,balloon,horse,curtain,pencil,baker
This file must be uploaded with NeuroTask’s Upload Files feature (found at this icon:  ).
).
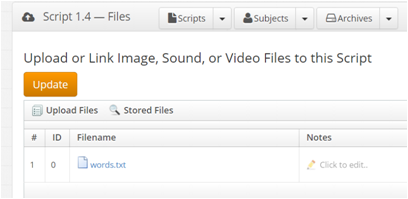
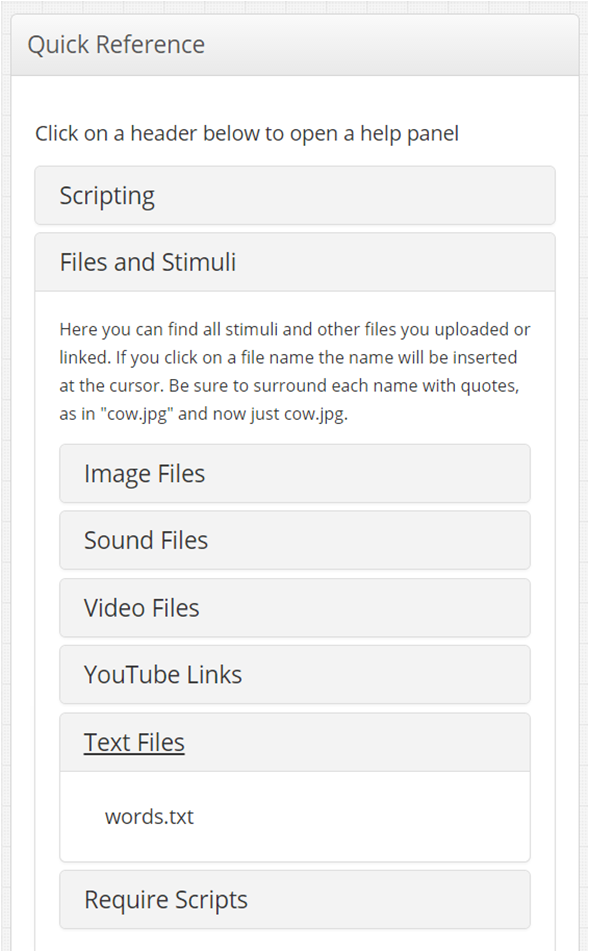
You can verify whether the upload was successful, because if it was, the filename will appear in the Quick Reference side panel next to your script (look under Files and Stimuli: Text Files). If you see it, it means it has been successfully uploaded and is ready to be used within the script.
The script then becomes:
getwords(). 1 var i,
2 words = getwords("words.txt");
3
4 text("Try to remember the following words");
5 await(5000); // 5000 ms or 5 s
6
7 for (i = 0; i < words.length; ++i)
8 {
9 text(words[i]);
10 await(2000);
11 clear();
12 await(1000);
13 }
14
15 text("Now, count back in threes starting with 307: 307, 304, 301,...");
16 await(20000);
17 largeinput("Write down the words remembered","words_remembered");
18 text("Thank you for participating!");
19 await(3000);
The benefit of using this method is that you can upload a file with different words at any point. Also, the words do not need to be wrapped in quotation marks to make them strings, which can save time when a word list is quite long. Additionally, files may be shared among scripts, which is relevant for researchers running multiple studies or conditions that use the same stimuli.
1.4 You have started with online experiments!
Even though the scripts in this chapter have been short and simple, they were not trivial. The Brown-Peterson script could serve as a demonstration for students, especially if it were repeated a few times with different letter stimuli. The free recall script could be used as an excellent basis for, well, any type of free recall experiment. Both types of scripts record the behavior of the subjects using the input field. In the next chapter, we will look at how you can record other types of behavior and measure reaction times.