Operating System: Raspbian - Jessie
An operating system is software that manages computer hardware and software resources for computer applications. For example Microsoft Windows could be the operating system that will allow the browser application Firefox to run on our desktop computer.
Variations on the Linux operating system are the most popular on our Raspberry Pi. We will be using the ‘Raspbian’ Linux distribution which is based on Debian Linux. There are two editions of Raspbian available, ‘Wheezy’ and ‘Jessie’. Jessie is the most modern stable version and therefore it can be expected to support the widest range of hardware and software. This guide is written demonstrating the use of Jessie
Linux is a computer operating system that is can be distributed as free and open-source software. The defining component of Linux is the Linux kernel, an operating system kernel first released on 5 October 1991 by Linus Torvalds.
Linux was originally developed as a free operating system for Intel x86-based personal computers. It has since been made available to a huge range of computer hardware platforms and is a leading operating system on servers, mainframe computers and supercomputers. Linux also runs on embedded systems, which are devices whose operating system is typically built into the firmware and is highly tailored to the system; this includes mobile phones, tablet computers, network routers, facility automation controls, televisions and video game consoles. Android, the most widely used operating system for tablets and smart-phones, is built on top of the Linux kernel. In our case we will be using a version of Linux that is assembled to run on the ARM CPU architecture used in the Raspberry Pi.
The development of Linux is one of the most prominent examples of free and open-source software collaboration. Typically, Linux is packaged in a form known as a Linux distribution, for both desktop and server use. Popular mainstream Linux distributions include Debian, Ubuntu and the commercial Red Hat Enterprise Linux. Linux distributions include the Linux kernel, supporting utilities and libraries and usually a large amount of application software to carry out the distribution’s intended use.
A distribution intended to run as a server may omit all graphical desktop environments from the standard install, and instead include other software to set up and operate a solution stack such as LAMP (Linux, Apache, MySQL and PHP). Because Linux is freely re-distributable, anyone may create a distribution for any intended use.
Sourcing and Setting Up
On our Windows desktop machine we are going to download the image (*.img) files for each distribution and write it onto a MicroSD card. This will then be installed into the Raspberry Pi.
Downloading
We should always try to download our image files from the authoritative source and we can normally do so in a couple of different ways. We can download via bit torrent or directly as a zip file, but whatever method is used we should eventually be left with an ‘img’ file for our distribution.
To ensure that the projects we work on can be used with the full range of Raspberry Pi models (especially the B2 and B3) we need to make sure that the versions of the image files we download are from 2015-01-13 or later. Earlier downloads will not support the more modern CPUs.
Writing the Operating System image to the SD Card
Once we have an image file we need to get it onto our SD card.
We will work through an example using Windows 7, but for guidance on other options (Linux or Mac OS) raspberrypi.org has some great descriptions of the processes here.
We will use the Open Source utility Win32DiskImager which is available from sourceforge. This program allows us to install our disk image onto our SD card. Download and install Win32DiskImager.
You will need an SD card reader capable of accepting your MicroSD card (you may require an adapter or have a reader built into your desktop or laptop). Place the card in the reader and you should see a drive letter appear in Windows Explorer that corresponds with the SD card.

Start the Win32 Disk Imager program.
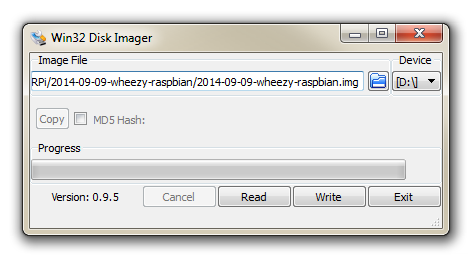
Select the correct drive letter for your SD card (make sure it’s the right one) and the disk image file that you downloaded. Then select ‘Write’ and the disk imager will write the image to the SD card. It can vary a little, but it should only take about 3-4 minutes with a class 10 SD card.
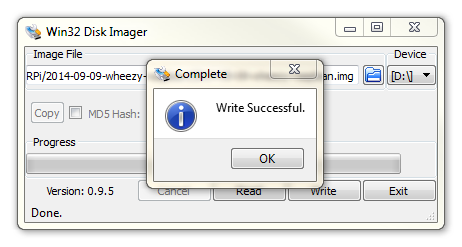
Once the process is finished exit the disk imager and eject the card from the computer and we’re done.
Welcome to Raspbian (Debian Jessie)
The Raspbian Linux distribution is based on Debian Linux. There are two editions published. ‘Wheezy’ and ‘Jessie’. You might well be asking if that detail matters a great deal. Well, it kind of does since Debian is such a widely used distribution that it allows Raspbian users to leverage a huge quantity of community based experience in using and configuring the software. The Wheezy edition is the earlier of the two and has been the stock edition from the inception of the Raspberry Pi till the end of 2015. Jessie is the latest stable version and is therefore the preferred option (and the one that we will use).
Downloading
The best place to source the latest version of the Raspbian Operating System is to go to the raspberrypi.org page; http://www.raspberrypi.org/downloads/.
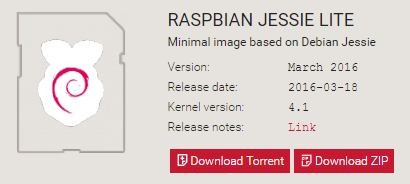
For the Jessie version of Raspbian there are actually two alternatives available for download. There is a full desktop option that will provide us with a GUI and lots of fanciness or a ‘Lite’ version that has a minimal amount of software loaded. We will be using the ‘Lite’ version since our installation has no requirement to use a GUI and the extraneous software would just be using up space on the storage or processing power if it was operating.
You can download via bit torrent or directly as a zip file, but whatever the method you should eventually be left with an ‘img’ file for Raspbian.
To ensure that the projects we work on can be used with either the B+, B2 or B3 models we need to make sure that the version of Raspbian we download is from 2015-01-13 or later. Earlier downloads will not support the more modern CPUs of the B2 or B3.
Installing Raspbian
Make sure that you’ve completed the previous section on downloading and loading the image file and have a Raspbian disk image written to a MicroSD card. Insert the card into the slot on the Raspberry Pi and turn on the power.
You will see a range of information scrolling up the screen before eventually being presented with textual prompt.
Congratulations, you have a working Raspberry Pi and are ready to start getting into the thick of things!
You are currently looking on the ‘Command Line’ or the ‘CLI’ (Command Line Interface). This is an environment that a great number of Linux users feel comfortable in and from here they are able to operate the computer in ways that can sometimes look like magic. Brace yourself… We are going to work on the command line for quite a bit while working on the Raspberry Pi. This may well be unfamiliar territory for a lot of people, but rest assured, once you get familiar with it you will realise its usefulness.
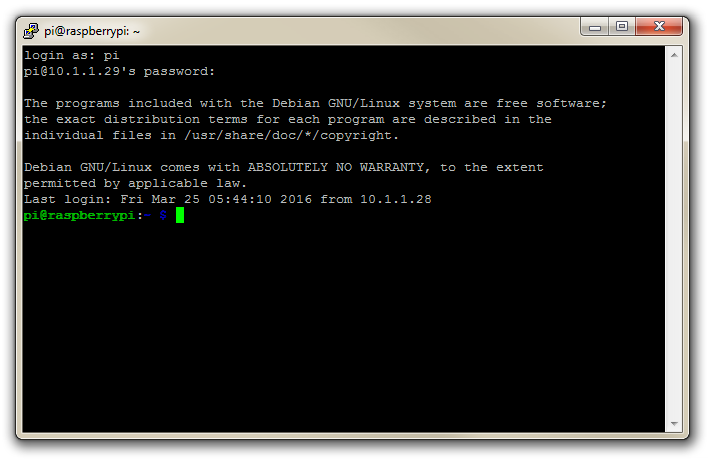
The default username and password is:
Username: pi
Password: raspberry
We are going to use this user as our default through the installation process. From here you can login as ‘pi’ by entering the username (‘pi’) and password (‘raspberry’).
Once logged in we’ll do a bit of house keeping.
It is a good idea to run the Raspberry Pi Software Configuration tool once we’re logged in as it enables full use of the storage on the SD card and changes in the locale and keyboard configuration.
Type in the following line which will start the configuration tool;
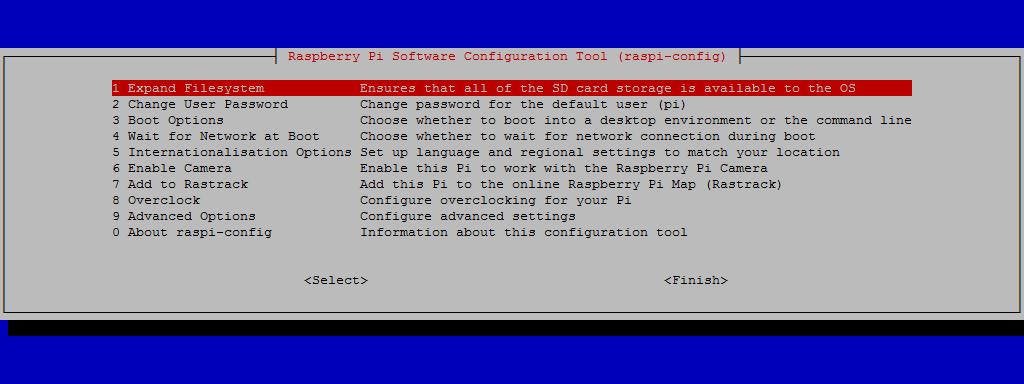
Using this tool you can first ensure that all of the SD card storage is available to the Operating System. Using the tab key, select the ‘Expand Filesystem’ option which will be quickly completed and we will be informed that it will become operative upon the next reboot. You may want to change the ‘Internationalisation Options’ depending on your location. This can be done using the arrow keys to move to this option and then using the tab key again to select. Follow the prompts to set up the Pi appropriately.
Once this has been completed select finish. This will allow you reboot the Pi and take advantage of the full capacity of the SD card.
Once the reboot is complete you will be presented with the console prompt to login again.
Software Updates
Now we need to make sure that we have the latest software for our system. This is a useful thing to do as it allows any additional improvements to the software you will be using to be enhanced or security of the operating system to be improved. This is probably a good time to mention that you will need to have an Internet connection available.
To do this make sure you are logged in and type in the following line which will find the latest lists of available software;
You should see a list of text scroll up while the Pi is downloading the latest information.
Then we want to upgrade our software to latest versions from those lists using;
The Pi should tell you the lists of packages that it has identified as suitable for an upgrade and along with the amount of data that will be downloaded and the space that will be used on the system. It will then ask you to confirm that you want to go ahead. Tell it ‘Y’ and we will see another list of details as it heads off downloading software and installing it.
At this point we have Raspbian installed, updated and ready to go.
Static IP Address
To make our use of Nagios on a Raspberry Pi truly flexible we will want to untether it from the keyboard / mouse and screen. This means that we will be accessing the Pi remotely from another computer.
Enabling remote access is a really useful thing. To do so we will want to assign our Raspberry Pi a static IP address.
An Internet Protocol address (IP address) is a numerical label assigned to each device (e.g., computer, printer) participating in a computer network that uses the Internet Protocol for communication.
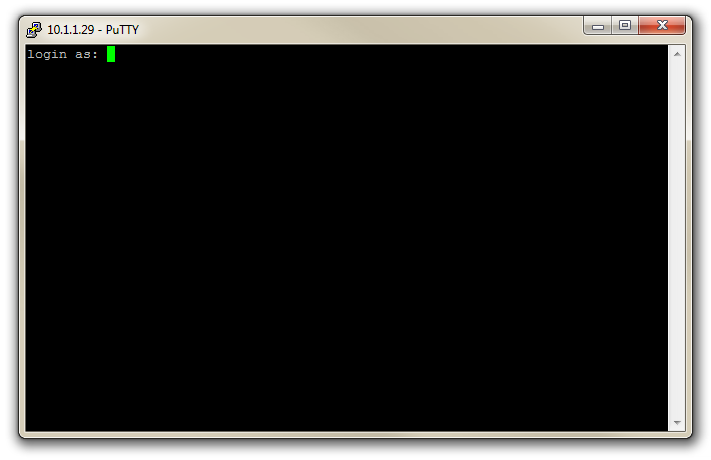
There is a strong likelihood that our Raspberry Pi already has an IP address and it should appear in conjunction with the ‘login’ prompt when you first boot up;
The My IP address... part may appear just above or around 15 lines above the login line, depending on what boad or version of ‘Debian Jessie’ we are using. In this example the IP address 10.1.1.29 belongs to the Raspberry Pi.
This address will probably be a ‘dynamic’ IP address and could change each time the Pi is booted. For the purposes of using the Raspberry Pi as a web platform a database or with remote access we need to set a fixed IP address.
This description of setting up a static IP address makes the assumption that we have a device running on the network that is assigning IP addresses as required. This sounds like kind of a big deal, but in fact it is a very common service to be running on even a small home network and it will be running on the ADSL modem or similar. This function is run as a service called DHCP (Dynamic Host Configuration Protocol). You will need to have access to this device for the purposes of knowing what the allowable ranges are for a static IP address. The most likely place to find a DHCP service running in a normal domestic situation would be an an ADSL modem or router.
The Netmask
A common feature for home modems and routers that run DHCP devices is to allow the user to set up the range of allowable network addresses that can exist on the network. At a higher level you should be able to set a ‘netmask’ which will do the job for you. A netmask looks similar to an IP address, but it allows you to specify the range of addresses for ‘hosts’ (in our case computers) that can be connected to the network.
A very common netmask is 255.255.255.0 which means that the network in question can have any one of the combinations where the final number in the IP address varies. In other words with a netmask of 255.255.255.0 the IP addresses available for devices on the network 10.1.1.x range from 10.1.1.0 to 10.1.1.255 or in other words any one of 256 unique addresses.
CIDR Notation
An alternative to specifying a netmask in the format of ‘255.255.255.0’ is to use a system called Classless Inter-Domain Routing, or CIDR. The concept is that you can add a specification in the IP address itself that indicates the number of significant bits that make up the netmask.
For example, we could designate the IP address 10.1.1.17 as associated with the netmask 255.255.255.0 by using the CIDR notation of 10.1.1.17/24. This means that the first 24 bits of the IP address given are considered significant for the network routing.
Using CIDR notation allows us to do some very clever things to organise our network, but at the same time it can have the effect of freaking people out by introducing a pretty complex topic when all they want to do is get their network going :-). So for the sake of this explanation we can assume that if we wanted to specify an IP address and a netmask, it could be accomplished by either specifying each seperatly (IP address = 10.1.1.17 and netmask = 255.255.255.0) or in CIDR format (10.1.1.17/24)
Distinguish Dynamic from Static
The other service that our DHCP server will allow is the setting of a range of addresses that can be assigned dynamically. In other words we will be able to declare that the range from 10.1.1.20 to 10.1.1.255 can be dynamically assigned which leaves 10.1.1.0 to 10.1.1.19 which can be set as static addresses.
You might also be able to reserve an IP address on your modem / router. To do this you will need to know what the MAC (or hardware address) of the Raspberry Pi is. To find the hardware address on the Raspberry Pi type;
(For more information on the ifconfig command check out the Linux commands section)
This will produce an output which will look a little like the following;
(4.7 KiB) TX bytes:4792 (4.6 KiB)
The figures 00:08:C7:1B:8C:02 are the Hardware or MAC address.
Because there are a huge range of different DHCP servers being run on different home networks, I will have to leave you with those descriptions and the advice to consult your devices manual to help you find an IP address that can be assigned as a static address. Make sure that the assigned number has not already been taken by another device. In a perfect World we would hold a list of any devices which have static addresses so that our Pi’s address does not clash with any other device.
For the sake of the upcoming projects we will assume that the address 10.1.1.230 is available.
Default Gateway
Before we start configuring we will need to find out what the default gateway is for our network. A default gateway is an IP address that a device (typically a router) will use when it is asked to go to an address that it doesn’t immediately recognise. This would most commonly occur when a computer on a home network wants to contact a computer on the Internet. The default gateway is therefore typically the address of the modem / router on your home network.
We can check to find out what our default gateway is from Windows by going to the command prompt (Start > Accessories > Command Prompt) and typing;
This should present a range of information including a section that looks a little like the following;
The default router gateway is therefore ‘10.1.1.1’.
Edit the dhcpcd.conf file
On the Raspberry Pi at the command line we are going to start up a text editor and edit the file that holds the configuration details for the network connections.
The file is /etc/dhcpcd.conf. That is to say it’s the dhcpcd.conf file which is in the etc directory which is in the root ((/) directory.
To edit this file we are going to type in the following command;
The nano file editor will start and show the contents of the dhcpcd.conf file which should look a little like the following;
We are going to add the information that tells the network interface to use eth0 at our static address that we decided on earlier (10.1.1.230) along with information on the netmask to use (in CIDR format) and the default gateway of our router. To do this we will add the following lines to the end of the information in the dhcpcd.conf file;
Here we can see the IP address and netmask (static ip_address=10.1.1.230/24), the gateway address for our router (static routers=10.1.1.1) and the address where the computer can also find DNS information (static domain_name_servers=10.1.1.1).
Once you have finished press ctrl-x to tell nano you’re finished and it will prompt you to confirm saving the file. Check your changes over and then press ‘y’ to save the file (if it’s correct). It will then prompt you for the file-name to save the file as. Press return to accept the default of the current name and you’re done!
To allow the changes to become operative we can type in;
This will reboot the Raspberry Pi and we should see the (by now familiar) scroll of text and when it finishes rebooting and we log in you should see;
's password:
The programs included with the Debian GNU/Linux system are free software;
the exact distribution terms for each program are described in the
individual files in /usr/share/doc/*/copyright.
Debian GNU/Linux comes with ABSOLUTELY NO WARRANTY, to the extent
permitted by applicable law.
Last login: Sat Mar 26 07:53:39 2016 from 10.1.1.28
pi@raspberrypi:~ $
Which tells us that the changes have been successful (bearing in mind that the IP address above should be the one you have chosen, not necessarily the one we have been using as an example).
Remote access
To allow us to work on our Raspberry Pi from our normal desktop we can give ourselves the ability to connect to the Pi from another computer. The will mean that we don’t need to have the keyboard / mouse or video connected to the Raspberry Pi and we can physically place it somewhere else and still work on it without problem. This process is called ‘remotely accessing’ our computer .
To do this we need to install an application on our windows desktop which will act as a ‘client’ in the process and software on our Raspberry Pi to act as the ‘server’. The way that we are going to accomplish this task is via what’s called SSH access.
Remote access via SSH
Secure Shell (SSH) is a network protocol that allows secure data communication, remote command-line login, remote command execution, and other secure network services between two networked computers. It connects, via a secure channel over an insecure network, a server and a client running SSH server and SSH client programs, respectively (there’s the client-server model again).
In our case the SSH program on the server is running sshd and on the Windows machine we will use a program called ‘PuTTY’.
Setting up the Server (Raspberry Pi)
This is definitely one of the easiest set-up steps since SSH is already installed on Raspbian.
To check that it is there and working type the following from the command line;
The Pi should respond with the message that the program sshd is running.
(/lib/systemd/system/ssh.service; enabled)
Active: active (running) since Sat 2016-03-26 08:50:20 NZDT; 1min 53s ago
Main PID: 626 (sshd)
CGroup: /system.slice/ssh.service
├─626 /usr/sbin/sshd -D
├─664 sshd: pi [priv]
├─674 sshd: pi@pts/0
├─677 -bash
├─690 /bin/sh /etc/init.d/ssh status
└─698 /bin/systemctl status ssh.service
Installing SSH on the Raspberry Pi.
If for some reason SSH is not installed on your Pi, you can easily install with the command;
Once this has been done SSH will start automatically when the Raspberry Pi boots up.
Setting up the Client (Windows)
The client software we will use is called ‘Putty’. It is open source and available for download from here.
On the download page there are a range of options available for use. The best option for us is most likely under the ‘For Windows on Intel x86’ heading and we should just download the ‘putty.exe’ program.
Save the file somewhere logical as it is a stand-alone program that will run when you double click on it (you can make life easier by placing a short-cut on the desktop).
Once we have the file saved, run the program by double clicking on it and it will start without problem.
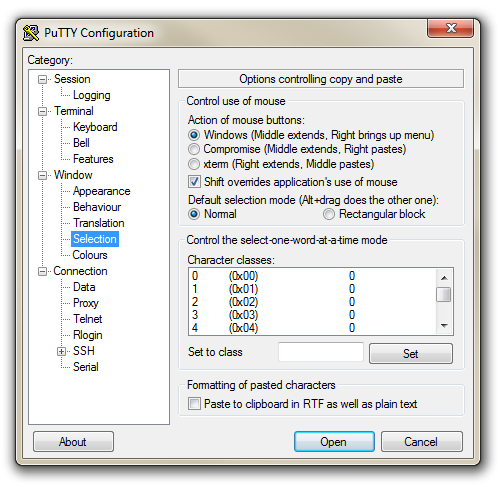
The first thing we will set-up for our connection is the way that the program recognises how the mouse works. In the ‘Window’ Category on the left of the PuTTY Configuration box, click on the ‘Selection’ option. On this page we want to change the ‘Action of mouse’ option from the default of ‘Compromise (Middle extends, Right paste)’ to ‘Windows (Middle extends, Right brings up menu)’. This keeps the standard Windows mouse actions the same when you use PuTTY.
Now select the ‘Session’ Category on the left hand menu. Here we want to enter our static IP address that we set up earlier (10.1.1.230 in the example that we have been following, but use your one) and because we would like to access this connection on a frequent basis we can enter a name for it as a saved session (In the screen-shot below it is imaginatively called ‘Nagios Pi’). Then click on ‘Save’.
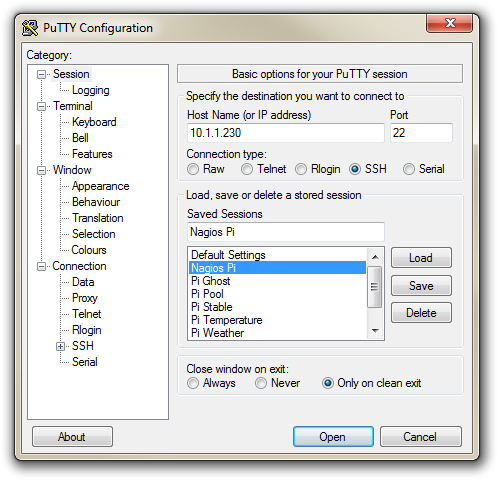
Now we can select our Raspberry Pi Session (per the screen-shot above) and click on the ‘Open’ button.
The first thing you will be greeted with is a window asking if you trust the host that you’re trying to connect to.
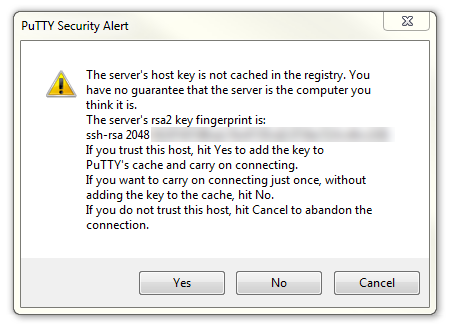
In this case it is a pretty safe bet to click on the ‘Yes’ button to confirm that we know and trust the connection.
Once this is done, a new terminal window will be shown with a prompt to login as: . Here we can enter our user name (‘pi’) and then our password (if it’s still the default it is ‘raspberry’).
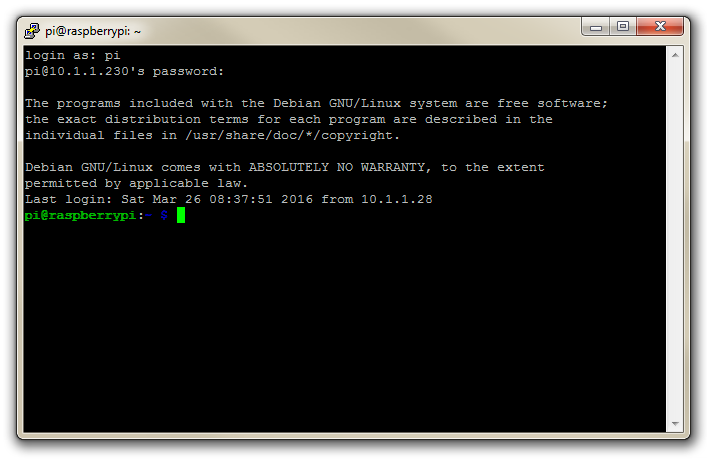
There you have it. A command line connection via SSH. Well done.
As I mentioned at the end of the section on remotely accessing the Raspberry Pi’s GUI, if this is the first time that you’ve done something like this it can be a very liberating feeling.