8 7 Working with text
Text is an important feature of vector graphics. Whether you are creating a diagram, chart, illustration, logo or whatever, there is a good chance you will need to include text at some point. This book contains mainly text, and you are reading it electronically, it will most likely be stored in a vector format such as PDF.
In this chapter we will look at how to handle text in Pycairo, including:
- Adding simple text labels to an image.
- Choosing the font and size of your text.
- Aligning text with other objects.
- Text effects such as outlined text, gradient fills and text shaped holes.
- Making text follow a curve or path.
- The basic concepts of more advanced typography.
8.1 7.1 Text is just shapes
At its most basic level, text is just a collection of shapes. Take a look at the huge text below:

Each letter is just a shape, created from straight lines and Bezier curves. And ultimately, Pycairo will draw each letter as a shape.
8.2 7.2 How Pycairo handles text
Of course, text isn’t really just shapes. Those shapes have meaning - they are letters that combine to make words and sentences.
Trying to add text to your file by drawing the shape of each character would be ridiculously difficult and tedious. Pycairo handles text at a higher level. You normally specify the text as a text string, then set the size and font that you require.
You will no doubt be familiar with fonts, if you have ever used any kind of office application. You select a font to control the typeface that is used to display or print text. But what is a font? In simple terms, it is a file that defines the shapes of every letter, number and symbol in some defined character set, for a particular typeface.
When you add text in Pycairo, you use a normal Python string of characters. When you go to create a PNG file, Pycairo looks up the shape of each character in the selected font file, then renders it to pixels in the usual way. The font file also contains information about the size of each character, and Pycairo uses this information to correctly position each character in the string.
Here is the code to draw a simple text string:
ctx.select_font_face("Arial")
ctx.set_font_size(50)

ctx.set_source_rgb(0, 0, 0)
ctx.move_to(100, 200)
ctx.show_text("text")
Here are the basic stages:
- Use
select_font_faceto choose the font our text. This is exactly the same as choosing a font in a word processor or spread sheet. - Use
set_font_sizeto set the size. With the default scaling, this is the approximate character size in pixels (see later for an exact definition). - Set the colour to black in the usual way, with
set_sorce_rgb. - Use
move_toto set the current point. This will be the starting point if the text (the baseline position of the first character). - Finally
show_textdraws the characters.
Here is the result:
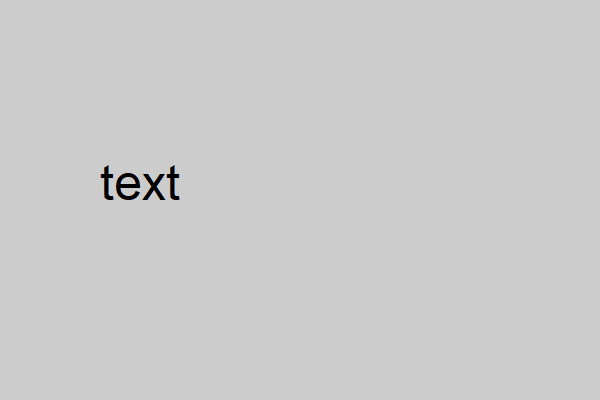
Notice that we only need to specify the one position (100, 200). This is the position of the first ‘t’ in the string. The remaining characters ‘e’, ‘x’ and ‘t’ are positioned automatically, using character metrics supplied by the font.
8.3 7.3 Fonts
Most computers have a selection of fonts installed on them. These can come from various sources:
- A default set of common fonts will have been supplied with the operating system.
- Many applications that support text formatting will come their own fonts, which are installed when the application is installed.
- The user may have manually installed additional fonts, either free fonts from various websites, or commercial fonts that have been purchased.
Each font is stored in its own file in a standard format (there are several different formats that are all well supported), and usually placed in a special system folder (eg c:WindowsFonts on Windows). This means that all your fonts from whatever source are potentially available to all your applications, and generally Pycairo can use them too.
Although there are many different fonts, but they mainly fit into five different families - serif, sans serif, monospace, cursive, and display. These are general categories, so some fonts might not fit easily into any of these families, but most do. This code displays an example of each type of font:
ctx.set_font_size(40)
ctx.set_source_rgb(0, 0, 0)

ctx.select_font_face("Times")
ctx.move_to(50, 100)
ctx.show_text("Serif - Times")

ctx.select_font_face("Arial")
ctx.move_to(50, 150)
ctx.show_text("Sans serif - Arial")

ctx.select_font_face("Courier New")
ctx.move_to(50, 200)
ctx.show_text("Monospace - Courier")

ctx.select_font_face("Freestyle Script")
ctx.move_to(50, 250)
ctx.show_text("Cursive - Freestyle Script")

ctx.select_font_face("Dayton")
ctx.move_to(50, 300)
ctx.show_text("Display - Dayton")
Here is the resulting image:
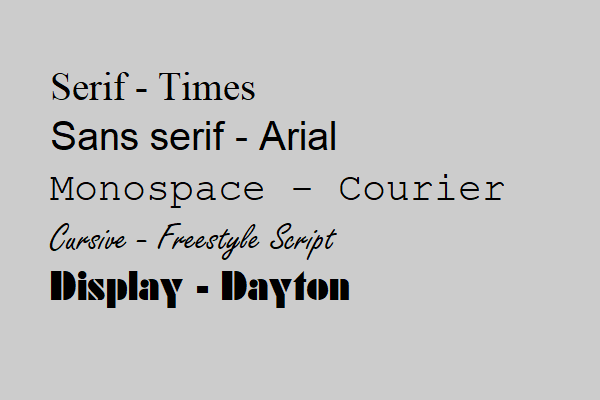
Your computer might not have a copy of each of the particular fonts in this example, but you you should be able choose a similar alternative if you want to run the code.
Serif fonts have marks (called serifs) that decorate the letter shapes. Sans serif fonts have a plainer design. This diagram shows the difference (the serifs on the ‘S’ are circles in red):
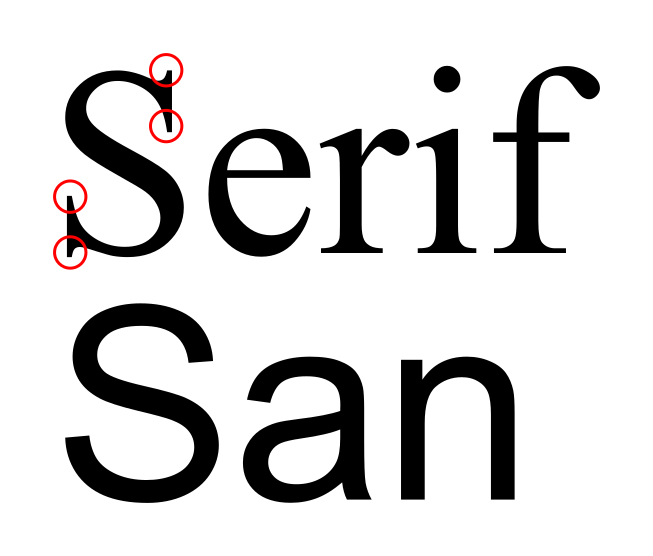
There is a general belief that a well designed serif font is easier to read, perhaps because the letter shapes are more distinctive so the brain finds them easier and quicker to recognise. Traditionally, books, newspapers and magazines have used serif fonts for the main body text, and often sans serif fonts for headlines as they look neater. However, fonts are subject to fashion like everything else, and at the time of writing many websites use sans serif fonts throughout.
The fonts above, like most fonts, are proportionally spaced fonts. This means that different characters have different widths. For example, a letter ‘m’ in wider than a letter ‘i’. With Monospace fonts, all characters have exactly the same width. This is shown below, the top line is a monospaced font, the bottom line is a proportionally spaced font.
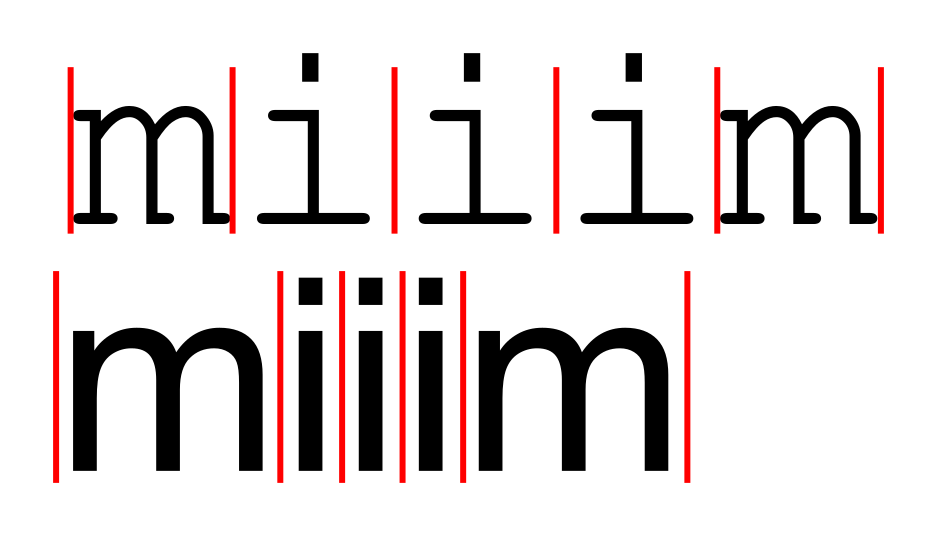
Proportionally spaced fonts are generally preferred for most text, because the text looks more appealing, it is easier to read and you can get more text on the page without affecting readability. Monospace fonts are only really used where you have a specific reason to want characters that line up down the page in columns. The most common application is computer programming, where text is pretty much always shown in a monospace font.
While serif, san serif and monospaced fonts have specific uses, the remaining font families exist solely for artistic effect. Cursive fonts are fonts that resemble handwriting. This can be in any style - formal or informal, joined up or separate characters. They can be used to indicate informality, or to show quoted text, or just to look nice.
Display fonts are basically everything else. Fonts that are unusual or designed to stand out or grab your attention. Heavily stylised fonts, novelty fonts, etc. They are often used on product packaging, SALE signs in shops, company logos and so on. They vary in readability, but you probably wouldn’t want to read a novel printed with a display font.
8.4 7.4 Font size
The set_font_size function sets the size of the font (and therefore the size of any text you create with that font). But what exactly does the size value mean?
Font size is measured in user units - the same units you use when setting the line width. As a rule of thumb, the font size indicates the height of the text, from the top of the tallest alphabetic character such as a capital ‘A’, right down to the bottom of the tail of a character such as ‘g’. Here is an example:
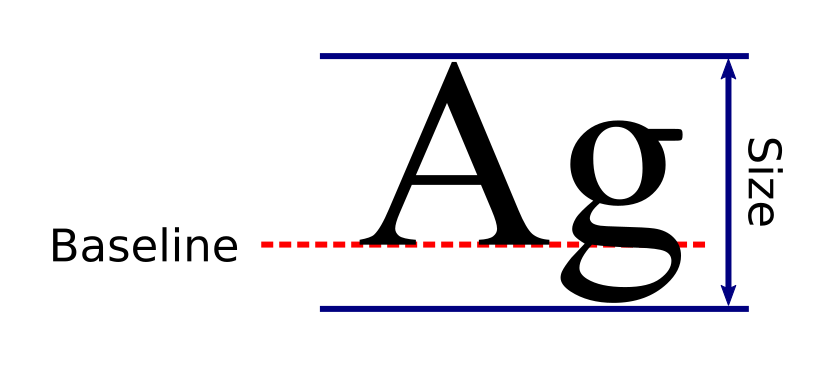
As you can see, the size includes a small extra margin above and below. Most fonts tend to do this.
If this seems a little vague, there is a good reason. There are no fixed rules about how a particular font interprets the size value, it is largely down to the font designer to decide what they provide when the user asks for a particular sized font. Most fonts behave as described here, but if you are using a font you haven’t used before there may be some variation, so experiment first.
Also be aware that there is no guarantee that every single character in the font will fit within the specified height. For many fonts, all characters will be within the bounds, but some fonts might behave differently, for example some fonts have brackets that are larger than the normal alphabetic characters.
When using the default scaling (if you haven’t applied any scaling via the Context.scale function or similar) one user unit is equal to one pixel, so for example a font size of 50 will produce text that is about 50 pixels high when you use Pycairo to create a PNG file.
8.4.1 7.4.1 Point size
Font size is usually measured in points. There are exactly 72 points in an inch, so a point is approximately a third of a mm (1 point is actually 0.352778 mm to 6 decimal places).
Thus, for example, text in an 18 point font would be expected to be 18/72 inches (ie 0.25 inches) tall, from the top of an ‘A’ to the tail of a ‘g’.
Point size mainly matters if you are intending to print the output, and you want the text on the physical printed page to be a specific size. You would need to take account of your printing resolution.
To give an example, suppose we wanted to print 18 point text, on a printer whose resolution was 144 pixels per inch. 18 point text should be 0.25 inches tall, which for the printer corresponds to 36 pixels, so you would want to create an image with text that is 36 pixels tall. At default scaling you would therefore need to set a font size of 36.
8.4.2 7.4.2 Em squares
So far we have dealt with fonts that contain characters from the Latin character set (that is, letters A-Z and a-z). We have defined the font height as the height of these characters. Any other characters, such as punctuation, numbers, symbols, are assumed to be proportional to the size of the letters.
What if we were dealing with a non-Latin character set, for example a Chinese font? It might not have any Latin characters at all, so how would we specify its size?
We can solve this by generalising the idea of the height, and instead defining a square that fits around most of the characters. It is called the em square, and the size of that square is the em size:
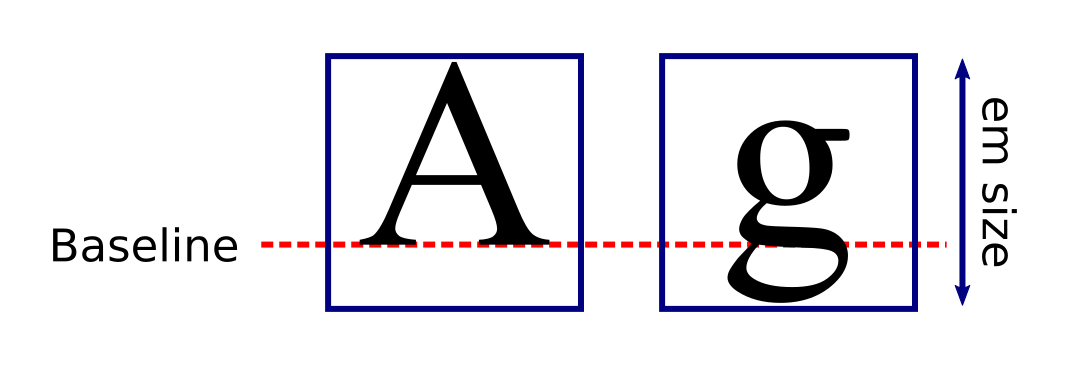
For Latin character fonts, the characters tend to be tall rather than wide, so the size of the em square is usually determined by the hight of the characters. In other words, the em size is the same as the font height.
For some other writing systems where characters are wide rather than tall, the em square size is determined by the width of the characters in the font.
Remember that the em square is there to indicate the size of the font, it is not intended to be used for measuring the character spacing. In the example above, the em square is much wider than the ‘A’ or ‘g’ characters. That doesn’t mean that you have to space put huge spaces between the characters!
8.5 7.5 Font style
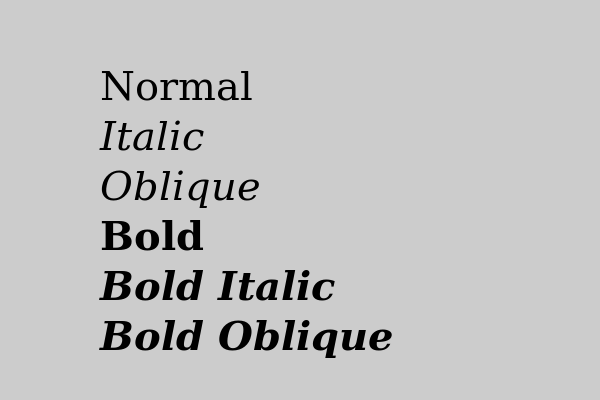
In addition to the normal font style, text is often displayed in italic or bold styles. These styles are applied via optional parameters when you create the font.
Here is how to create italic fonts:
ctx.select_font_face('Serif', cairo.FontSlant.NORMAL)
ctx.select_font_face('Serif', cairo.FontSlant.ITALIC)
ctx.select_font_face('Serif', cairo.FontSlant.OBLIQUE)
The first example creates normal text using the default serif font. The font slant parameter is optional in this case, it defaults to NORMAL if it is left off.
The second and third examples create italic and oblique serif fonts.
Here is how to create bold fonts:
ctx.select_font_face('Serif', cairo.FontSlant.NORMAL, cairo.FontWeight.BOLD)
ctx.select_font_face('Serif', cairo.FontSlant.ITALIC, cairo.FontWeight.BOLD)
ctx.select_font_face('Serif', cairo.FontSlant.OBLIQUE, cairo.FontWeight.BOLD)
The first example creates a bold font.
The second and third examples create a font that is both bold and italic/oblique.
Here are examples of each case using the default serif font:
8.6 7.6 Text extents
The font size gives us control of the nominal size of the font. The text extents tell us the exact size of a particular text string when rendered with the current font. To be precise, they tell us the rectangle around the area that will be marked when we paint the text.
The Context function text_extents returns a Pycairo TextExtents object (which behaves much like a tuple). Here is an example:
xbearing, ybearing, width, height, dx, dy = ctx.text_extents('Xyz')
text_extents accepts a string. It calculates the extents of the string, and returns the TextExtents object, which we unpack into 6 variables. Here is an example:
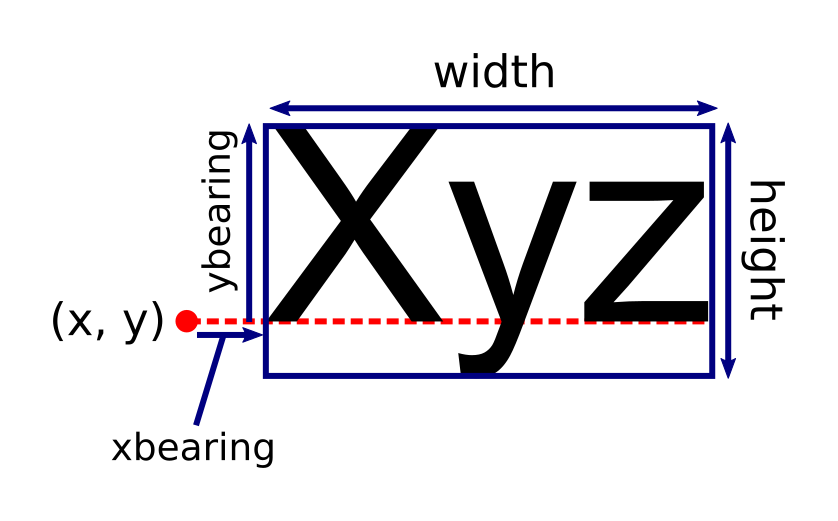
In the diagram, the red dot represents the point (x, y) where the text will be positioned. This corresponds to the current point when show_text is called. For Latin characters, it will generally be on the text baseline.
The width and height give the size of the rectangle than tightly encloses the marked area when the text is painted. These numbers will always be non-negative. It is possible for the width and height to be zero - for example if the string contained only space characters, it wouldn’t mark the page at all so the marked area would have zero width and height.
The xbearing is the distance from the point (x, y) to the left hand side of the text. The number is positive if, as shown, the text rectangle starts to the left of the point. It is negative if the text rectangle starts to the right of the point. For Latin characters, this offset is usually very small or zero, but can be positive or negative.
The ybearing is the distance from the point (x, y) to the top of the text rectangle. For Latin characters, the text will normally extend above the baseline, so the ybearing is usually negative. That isn’t always the case, as we will see below.
dx and dy tell us where we should place the next text string if we want it to follow on directly from the current text. We will cover this later.
8.7 7.7 Text extent examples
In the image below, we show several text strings. For each string we show its text extents as a red outline, and the text position (x, y) as a red dot:
The text rectangle is calculated as follows:
- The top left corner is at location
(x + xbearing, y + ybearing). - The size of the rectangle is
widthbyheight.
Here are the text extents:
| String | xbearing | ybearing | width | height | dx | dy |
|---|---|---|---|---|---|---|
| ABC | -3.0 | -73.0 | 206.0 | 74.0 | 206.0 | 0.0 |
| acg | 3.0 | -53.0 | 153.0 | 74.0 | 161.0 | 0.0 |
| ~= | 3.0 | -50.0 | 109.0 | 30.0 | 116.0 | 0.0 |
| ___ | -2.0 | 14.0 | 173.0 | 6.0 | 168.0 | 0.0 |
For the string ‘ABC’ the xbearing is -3, indicating that the string starts very close to the point (x, y) This is generally true of Latin character strings. The width is simply the width of the string as it is displayed.
The ybearing is -73, indicating that the top of the text rectangle is well above the baseline. The height is 74. This means that the bottom of the rectangle is 1 below the text baseline. That is because the text contains capital letters with no tails, so the text doesn’t extend much below the baseline.
For the string ‘acg’, the ybearing is -53 but the height is 74. This indicates that the top of the text rectangle is well above the baseline, but the bottom of the rectangle is well below the baseline. That is due to the tail of the ‘g’ character.
The string ‘~=’ contains two characters which hover above the baseline. The ybearing i -50 but the height is only 30, which mean the entire text rectangle is up above the baseline, as you would expect.
The final string consists of three underscore characters ‘___’. Underscores are unusual because they are placed below the baseline. In this case the ybearing is positive (because the top of the rectangle is below the baseline).
8.8 7.8 Text alignment
We can use the text extents to align text. AS an example we will look at how to align text to the left, right and centre. Here is a function that displays a string left-aligned to the point (x, y):
def left_align(ctx, x, y, text):
    ctx.move_to(x, y)
    ctx.set_source_rgb(0, 0, 0)
    ctx.show_text(text)
This is fairly standard, it sets the current point to (x, y), sets the colour to black, then shows the text using the current font and size. The text will be automatically left-aligned because that is Pycairo’s default.
Here is the code to right-align text to the point (x, y):
def right_align(ctx, x, y, text):
    xbearing, ybearing, width, height, dx, dy = ctx.text_extents(text)
    ctx.move_to(x - width, y)
    ctx.set_source_rgb(0, 0, 0)
    ctx.show_text(text)
In this case we make an extra call to text_extents. The only value we are really interested in is the width value.
We set the current point to (x - width, y). This means that the starting point of any text string depends on its width. It will always start at x - width, which means that the string will always end at (x, y).
We can also centre-align text by setting the current point to (x - width/2, y):
def center_align(ctx, x, y, text):
    xbearing, ybearing, width, height, dx, dy = ctx.text_extents(text)
    ctx.move_to(x - width/2, y)
    ctx.set_source_rgb(0, 0, 0)
    ctx.show_text(text)
Here is an example of these three functions in action:
This is the code used to create the image above:
ctx.set_font_size(50)
ctx.select_font_face('Arial')

left_align(ctx, 50, 100, 'Left')
left_align(ctx, 50, 150, 'Aligned')
left_align(ctx, 50, 200, 'Text')

center_align(ctx, 300, 250, 'Center')
center_align(ctx, 300, 300, 'Aligned')
center_align(ctx, 300, 350, 'Text')

right_align(ctx, 550, 100, 'Right')
right_align(ctx, 550, 150, 'Aligned')
right_align(ctx, 550, 200, 'Text')
Notice that all the left_align calls use an x value of 50. That means that the left hand side of all three strings will be aligned at x position 50. All the center_align calls use an x value of 300. That means that the centre of all three strings will be aligned at x position 300. Similarly the right_align calls all align the right hand side of the text at 550.