IX More object-oriented programming
86. Introduction
Now that you have a handle on constructing classes we’ll explore the various Groovy constructs for creating a more extensible codebase:
- Interfaces: define a set of method signatures that are then implemented by a class (or classes).
- Traits: add abilities to a class
- Inheritance: Allows a class to inherit the functionality of another class and extend it.
- When
ChildClassinherits fromParentClass, we say thatChildClassis a subclass ofParentClassand thatParentClassis a superclass ofChildClass1.
- When
First up, we’ll look at how to organise your code before those classes get out of hand.
The Shapes demo
Throughout this section I’ll build up an example library for working with two-dimensional shapes. You’ll see this in chapters with the The shapes demo prefix and a full listing is available as an appendix.
As the Shapes demo source code is laid out as a larger project and divided into packages, you won’t be able to run it
via groovyConsole.
To support you in trying out the demo I’ve setup the shapes demo
mini site. This provides a number of handy resources:
- A guide to building (compiling) the code both directly using
groovycand with the Gradle build tool. - Links to download the code
- Various reports on the code
Once you’ve read through the chapters in this section, head to the shapes demo mini site and give it a try.
87. Organising your code
When you start writing larger code bases you’ll need to think about how to organise your code. You don’t have to do this if you’re using Groovy to write scripts that can fit into a reasonable file size (say, 400 lines) but really large files can become difficult to scroll through and debug. There are two complementary tactics you can use when working with larger bodies of code:
- Break the code into packages
- Put the code files into a directory structure that reflects your package structure
We’ll start by looking at packages and then move onto directory structures.
Packages
Code that doesn’t specify a package is said to be in the default package. Most of the code we’ve looked at so far has been lacking a specific package and is automatically put into the default package - this is perfectly fine for small applications and scripts. However, once you start to build larger codebase you’ll want to start breaking your classes, enums, interfaces etc into separate files and collect them into packages.
The generally agreed approach to structuring larger codebases is to:
- Declare one structure (e.g. class, interface, enum) per file
- Name the file after the structure declared in the file. For example, if you declare
class Person{...}then name the filePerson.groovy - Place these files into one or more packages
Following this approach will help you avoid a mess of files that makes it hard to debug problems later.
Let’s take a look at a basic example in which I have a script that declares a Person class and then tries to do something
with it:
package mypackage

class Person {
    def name = ''
}

def jim = new Person()
println jim.name
If I put the above script into a file named Person.groovy and try to run it with groovy Person.groovy
it will give me the following error:
org.codehaus.groovy.control.MultipleCompilationErrorsException: startup failed:
Person.groovy: 3: Invalid duplicate class definition of class mypackage.Person :\
 The source Person.groovy contains at least two definitions of the class mypacka\
ge.Person.
One of the classes is an explicit generated class using the class statement, the\
 other is a class generated from the script body based on the file name. Solutio\
ns are to change the file name or to change the class name.
 @ line 3, column 1.
   class Person {
   ^

1 error
Essentially, this is caused by Groovy trying to create a Person class around the def jim = new Person() - Groovy
assumes that you want to create a class with the same name as the file but you have already declared a Person class in the file.
If we’re following the rule of “One structure per file”, we should only declare the Person class in Person.groovy:
package mypackage

class Person {
    def name = ''
}
In the same directory we’ll then create Main.groovy and put it into the mypackage.app package as follows:
package mypackage.app

import mypackage.Person

def jim = new Person(name: 'Jim')
println jim.name
Note that I’m actually creating two packages:
-
mypackagewill contain thePersonclass -
mypackage.appwill contain theMainclass
As Person isn’t in the same package as Main, we need to import it using the fully qualified name for the Person
class: mypackage.Person.
Compiling and running
Now that you have a Person.groovy file and a Main.groovy file you can run
groovyc Main.groovy Person.groovy
to compile the two files1. Once groovyc has completed you’ll notice the following:
- A
mypackagesubdirectory has been created and containsPerson.class - A
mypackage/appsubdirectory has been created and containsMain.class
If I now run groovy Main I’ll get Jim’s name displayed as I expect but be warned that, whilst this call to groovy is
using the compiled Person class, it is actually using the Main.groovy file and not the compiled version. In most cases
you would keep Main.groovy as a script and not worry about putting it into a package - this is just for demonstration
purposes.
You can run your compiled Groovy classes using Java by doing the following:
- Download the groovy-all jar into the directory containing the
mypackagesubdirectory. - Now run
java -cp groovy-all-2.4.4.jar:. mypackage.app.Main
- Short form:
groovyc *.groovy↩
88. Naming your packages
If all Groovy and Java programmers just relied on the default package or mypackage it’d be almost impossible to
share code as it’s extremely likely more than one Person class would be created. The package naming convention helps to avoid this and there are two key elements to remember:
- Package names are written in lower-case to avoid clashing with elements such as class names.
- It is recommended that a reversed domain name is used as the base package name
The first point is straight-forward so let’s explore the second. If you or the company you work for own a domain name,
you basically just reverse it and then prefix specific package names. For example, as I own the groovy-tutorial.org
domain I should use:1
org.groovy_tutorial.mypackage
I would use org.groovy_tutorial as the basis and then start with a prefix that reflects a project or library name for
which I’m developing (e.g. org.groovy_tutorial.shapes). If I didn’t own a domain I could have used the name
of the site on which my code is hosted:
com.github.groovy_tutorial.shapes_demo
I’m not pretending to own github.com but I’ve also included the organisation name and project name to ensure uniqueness.
One final point to remember is that your chosen package name needs to be based on something that’s not likely to change
and isn’t pinned to a single person. I’ve seen email addresses used (e.g. com.gmail.example) but this isn’t the best idea.
Just take a moment before committing to a package name - you’ll thank yourself if the code is still going in five years.
- I’ve converted the hyphen (
-) to an underscore (_) as package names can’t contain a hyphen (and domain names can’t contain an underscore).↩
89. Packages and directory structure
Groovy is very forgiving and I can put all of my code files in a single directory, regardless of which package I say they’re
in. This, however, is poor practice and I should create a directory structure that mirrors my package structure. In the last
example I had two packages, mypackage and the sub-package mypackage/app and, when compiled, the following directory structure
appeared:
mypackage/
├── Person.class
└── app
    └── Main.class
This structure reflects the one I should be using in my source:
mypackage
├── Person.groovy
└── app
    └── Main.groovy
Here’s the logic:
-
Person.groovyis in themypackagepackage so I create amypackagedirectory and putPerson.groovyin there -
Main.groovyis in themypackage.apppackage:- As
appis a subpackage ofmypackageso I should create anappsubdirectory undermypackageand placeMain.groovythere.
- As
Once I’ve shuffled the files into the new structure I can compile them with:
groovyc -d classes mypackage/Person.groovy mypackage/app/Main.groovy
You’ll find the compiled class files in the classes directory (as set by the -d switch).
At this point you’re probably thinking that having to individually name all of the directories in a large codebase is going to be unwieldy and you’re absolutely correct. Once you get beyond a few files you’ll turn to a build system such as Gradle.
90. The Shapes demo - packages
You’ll find the following packages in the shapes demo source code:
org.groovy_tutorial.shapesorg.groovy_tutorial.shapes.triangleorg.groovy_tutorial.shapes.app
These are all organised under the src/main/groovy directory:
└── org
    └── groovy_tutorial
        └── shapes
            ├── Circle.groovy
            ├── Rectangle.groovy
            ├── ShapeUtil.groovy
            ├── Sides.groovy
            ├── Square.groovy
            ├── Triangle.groovy
            ├── TwoDimensionalShape.groovy
            ├── app
            │   ├── Main.groovy
            │   └── package-info.groovy
            ├── package-info.groovy
            └── triangle
                ├── TriangleEquilateral.groovy
                ├── TriangleIsosceles.groovy
                ├── TriangleRightAngled.groovy
                ├── TriangleSubtype.groovy
                └── package-info.groovy
Within each package’s folder you’ll notice a package-info.groovy file. This isn’t a script but the documentation for the
package. The groovydoc system will use this file when preparing the application’s documentation.
For further information, please check out the JavaDoc documentation section on “Package Comment Files”.
91. Interfaces
Interfaces provide a set of method signatures that are intended to be implemented by classes - they are an extremely useful construct that allows you to define a “contract” between your code and other developers.
Let’s take a look at an example:
interface SocialNetwork {
    Member friend(Member friend)
    Member unFriend(Member enemy)
}
The syntax looks much like that of a class but you’ll notice two key differences:
- The keyword
interfaceis used to declare an interface - There are two method signatures (
friendandunFriend) but I haven’t provided the code body for the method
That last point is an important one: interfaces don’t define implementations, they are used to define an API that is implemented by one or more classes. Well thought out interfaces are integral to code that can be reused and maintained over time. Some developers will start a new coding effort by determining the interfaces they’ll need by asking “what elements will interact and how?”.
An interface can’t be instantiated (e.g. SocialNetwork network = new SocialNetwork()) as it doesn’t actually do (implement) anything.
In order to implement an interface, the implements keyword, followed by the interface’s name, is used in the class declaration:
class Member implements SocialNetwork {
    String name
    def friends = [] as Set

    @Override
    Member friend(Member friend) {
        friends << friend
        friend
    }

    @Override
    Member unFriend(Member enemy) {
        friends -= enemy
        enemy
    }
}
In class Member implements SocialNetwork we bind the Member class to the SocialNetwork interface. This then means that
the class needs to provide implementations of the friend and unFriend methods. In the example above you’ll note that I’ve
annotated each implemented method with @Override. This indicates to the Groovy compiler that those two methods are related to
method signatures from an interface that is being implemented1.
Groovy (and Java) classes can implement more than one interface by listing them after the implements keyword - just
use a comma (,) between each interface:
interface SocialNetwork {
    Member friend(Member friend)
    Member unFriend(Member enemy)
}

interface Posts {
    Map getPosts()
    void addPost(String title, String body)
}

class Member implements SocialNetwork, Posts {
    String name
    def friends = [] as Set
    Map posts = [:]

    @Override
    Member friend(Member friend) {
        friends << friend
        friend
    }

    @Override
    Member unFriend(Member enemy) {
        friends -= enemy
        enemy
    }

    @Override
    void addPost(String title, String body) {
        posts << [title: body]
    }
}
I’ve provided a full code listing of the example below so that you can take this for a test spin in the groovyConsole:
interface SocialNetwork {
    Member friend(Member friend)
    Member unFriend(Member enemy)
}

interface Posts {
    Map getPosts()
    void addPost(String title, String body)
}

class Member implements SocialNetwork, Posts {
    String name
    def friends = [] as Set
    Map posts = [:]

    @Override
    Member friend(Member friend) {
        friends << friend
        friend
    }

    @Override
    Member unFriend(Member enemy) {
        friends -= enemy
        enemy
    }

    @Override
    void addPost(String title, String body) {
        posts << [title: body]
    }
}

def jim = new Member(name: 'Jim')
def gina = new Member(name: 'Gina')
def andrew = new Member(name: 'Andrew')

jim.with {
    println 'Jim makes some friends: '
    friend(gina)
    friend(andrew)
    friends.each { println " - $it.name" }

    println '\nJim makes an enemy of Andrew'
    unFriend(andrew)

    println '\nJim now has these friends: '
    friends.each { println " - $it.name " }

    println '\nAdding a post'
    addPost('My weekend', 'Just hung out and stuff')
    println getPosts()
}
- It’s also used for methods overriding those declared in a superclass.↩
92. Referring to objects by their interface
An interface defines functionality rather than state. In many cases you just want to interact with a specific
set of an object’s functionality and referring to the interface rather than a specific class can make your code more adaptable.
Two interfaces, java.util.Map and java.util.List, come to mind when considering this:
-
java.util.Mapis implemented in a range of classes:-
java.util.Propertiesis used when reading and writing property files -
java.util.LinkedHashMapretains the order in which keys are inserted (and is used when youdef myMap = [:]) -
java.util.concurrent.ConcurrentHashMapprovides for full concurrency in retrievals and updates
-
-
java.util.List-
java.util.ArrayListprovides a resizable array (and is used when youdef myList = []) -
java.util.Stackis a last-in-first-out (LIFO) stack
-
So whilst I might choose a specific implementation class for my variable because of a need such as speed or concurrency,
other parts of my code may be more interested in the interface level (e.g. java.util.Map).
When declaring a variable I can provide an interface as the data type, e.g. Map posts = [:]. This means that I don’t
really care which implementation of Map is assigned to posts, I’ll only be accessing the methods declared by Map
(e.g. keySet). In a slightly more convoluted example, Posts p = new Member() indicates that the variable p is only
interested in the Member object’s Posts functionality.
Whilst handy for variable declaration, referring to interfaces when defining method parameters is extremely useful as it
makes the method more abstract. Consider a method that will accept a Map parameter and iterate through it:
def displayKeys(Map m) {
    for (key in m.keySet()) {
        println key
    }
}

def myMap = [name: 'Bill', id: '1234']

displayKeys myMap
It’s a rather useless example but the point is that the displayKeys method can accept any value for parameter m,
provided m is an instance of a class that implements the Map interface. If I’d been specific and written the method
signature as def displayKeys(LinkedHashMap m), my method has a far narrower field of usage. As I’m just using the Map
interface’s keySet method, I don’t really need to limit the possible values for m.
Obviously, if you want/need to constrain usage to a specific implementation, you would declare that as the data type for the parameter.
If the method needed the storeToXML functionality of java.util.Properties then I’d need to use that instead of
java.util.Map - just take a moment to make sure it’s really required.
93. General advice for interfaces
Groovy interfaces don’t allow default methods
Java interfaces allow you to provide implementation for a method. Such methods are referred to as “default methods” as any implementing class doesn’t have to provide their own implementation. This might be helpful when an interface needs to be updated/improved as it saves having to go through an existing codebase and providing the implementation. However, it’s also a bit of a trap as that approach “wedges” in functionality that may not really fit the implementing classes (and their subclasses).
Groovy’s traits gives you a neater approach to this.
The constant interface antipattern
In my earlier examples I omitted the fact that you can declare constants in an interface. At first glance this might sound like I’ve denied a useful piece of functionality but, in reality, the declaration of constants inside an interface isn’t a good idea. Consider the following example:
interface SocialNetwork {
    static final MAX_FRIENDS = 100

    Member friend(Member friend)
    Member unFriend(Member enemy)
}
The example above provides a strong example as to how this is a bad idea as MAX_FRIENDS really is an implementation detail
and, furthermore, the interface construct doesn’t let us actually enforce the logic. The SocialNetwork interface
relies on implementing classes to make the link.
If you focus your interfaces on providing method signatures, your code will be easier to maintain. When you need to define constants, consider the following alternatives:
- For enumerated constants, definitely use an enum
- If the constant is part of a class’s logic, declare the constant with the class
- Consider creating a utility class that defines general constants of use in your program
94. The Shapes demo - Interfaces
One interface is defined within the shapes library: TwoDimensionalShape:
TwoDimensionalShape interfacepackage org.groovy_tutorial.shapes
/**
* An interface for basic two-dimensional objects
*
* @see <a href="https://en.wikipedia.org/wiki/List_of_two-dimensional_geometric\
_shapes">
* Wikipedia: List of two-dimensional geometric shapes</a>
*
* @author Duncan Dickinson
*/
interface TwoDimensionalShape {
/**
* The length of the path surrounding a 2D shape
* @see <a href="https://en.wikipedia.org/wiki/Perimeter">Wikipedia: Perimet\
er</a>
* @return the perimeter of the shape
*/
BigDecimal getPerimeter()
/**
* The extent of a 2D shape in a plane
* @see <a href="https://en.wikipedia.org/wiki/Area">Wikipedia: Area</a>
* @return the area of the shape
*/
BigDecimal getArea()
/**
* A handy display string
* @return a text representation of the shape
*/
String getDisplayInfo()
/**
* @return the name of the shape
*/
String getShapeName()
}
The interface is declared using the interface keyword followed by the name: interface TwoDimensionalShape.
Within the interface is the following method signatures:
-
BigDecimal getPerimeter(): will return the shape’s perimeter -
BigDecimal getArea(): will return the shape’s area -
String getDisplayInfo(): is used to prepare a handy description of the shape -
String getShapeName(): returns the name of the shape (e.g. square or circle)
Each method signature is listed without a definition block ({...}) and it is up to the implementing class(es) to provide the “body” of the definition. The Circle class does just that:
Circle classpackage org.groovy_tutorial.shapes
import static java.lang.Math.PI
import groovy.transform.EqualsAndHashCode
import groovy.transform.ToString
/**
* Describes a circle
* @author Duncan Dickinson
*/
@EqualsAndHashCode(includes = 'radius')
@ToString(includeNames = true, includeFields = true, includePackage = true)
final class Circle implements TwoDimensionalShape {
private static final String SHAPE_NAME = 'Circle'
/** The radius of the circle */
final BigDecimal radius
/** The circle's perimeter (circumference) */
final BigDecimal perimeter
/** The circle's area */
final BigDecimal area
/**
*
* @param radius the radius of the circle (must be a positive number)
* @throws IllegalArgumentException if radius <= 0
*/
Circle(BigDecimal radius) throws IllegalArgumentException {
ShapeUtil.checkSidesException(radius)
this.radius = radius
this.perimeter = calculatePerimeter(radius)
this.area = calculateArea(radius)
}
/**
* Helper function - defers to calculatePerimeter
* @see #calculatePerimeter(Number)
* @param radius
* @return the circumference (perimeter)
* @throws IllegalArgumentException if radius <= 0
*/
static BigDecimal calculateCircumference(Number radius) throws IllegalArgume\
ntException {
calculatePerimeter(radius)
}
/**
* Calculates the perimeter of a circle using the formula: p = 2*Pi*r
* @param radius
* @return the perimeter
* @throws IllegalArgumentException if radius <= 0
*/
static BigDecimal calculatePerimeter(Number radius) throws IllegalArgumentEx\
ception {
ShapeUtil.checkSidesException(radius)
(2 * PI * radius) as BigDecimal
}
/**
* Calculates the area of a circle using the formula: a = Pi*r^2
* @param radius
* @return the area
* @throws IllegalArgumentException if radius <= 0
*/
static BigDecimal calculateArea(Number radius) throws IllegalArgumentExcepti\
on {
ShapeUtil.checkSidesException(radius)
(PI * radius**2) as BigDecimal
}
/**
* Calculates the circle's diameter using the formula: d = 2r
* @param radius
* @return the diameter
* @throws IllegalArgumentException if radius <= 0
*/
static BigDecimal calculateDiameter(Number radius) throws IllegalArgumentExc\
eption {
ShapeUtil.checkSidesException(radius)
(radius * 2) as BigDecimal
}
@Override
String getDisplayInfo() {
"$SHAPE_NAME: radius = $radius; diameter = $diameter; \
circumference = ${circumference}; area = ${area}"
}
/**
* Just a convenience - equivalent to getPerimeter
* @return the circumference
*/
BigDecimal getCircumference() {
perimeter
}
/**
* A pseudo getter
* @return the diameter
*/
Number getDiameter() {
calculateDiameter(this.radius)
}
@Override
String getShapeName() {
SHAPE_NAME
}
}
You’ll notice that the Circle class doesn’t explicitly provide an implementation for getPerimeter() and
getArea() as Groovy will generate these for the member fields.
95. Traits
Where classes can be used to describe real or virtual “things”, traits provide a construct for describing an ability or a set of related abilities. Let’s consider two contexts in which we might use traits:
- Using a
classwe might describe anAnimalin terms of its features (diet,distribution) and then enhance theAnimalwith traits such asHopping(for a wallaby) orClimbing(for a koala) or both (for a tree kangaroo). - A
BankAccountclass would have its properties (balance,accountHolder) but different accounts provides different abilities (or a combination thereof) such asDeposit,OverdraftorCurrencyConversion.
It’s sometimes difficult to determine where a set of methods might instead be better grouped as a trait but the following may help your decision making:
- If the methods describe an ability or feature that is common to a variety of classes they’re a good candidate for a trait
- Even if this is at the abstract level and would need to be more specific for subtypes1 - a wallaby hops differently to a frog.
- Where the various methods manipulate properties or fields that are otherwise not accessed or only read by the class.
Let’s take a look at an example trait:
trait Running {
    void startEvent() {
        println 'Ready, set, go!'
    }
}

class SportingEvent implements Running {
    String name
}

SportingEvent stawellGift = new SportingEvent(name: 'The Stawell Gift')

println "Welcome to $stawellGift.name"
stawellGift.startEvent()
This type of layout is much as we saw for class and interface definitions:
- The declaration starts with the
traitkeyword followed by the trait’s name - We use the CamelCase format for the trait’s name - as we did for classes and interfaces
- Similar to a class, the body of the trait then provides the required properties, fields and methods
- In the
Runningtrait you can see that there’s only one method declared:startEvent().
- In the
When it comes to use the trait in a class, the implements key is used: class SportingEvent implements Running. The class declaration can implement zero or more traits in the same way it can implement zero or more interfaces. In fact, a class declaration can implement a mix of traits and interfaces as can be seen in the snippet below:
class SportingEvent implements SafetyCheck, Running, Swimming {...}
At a guess, the Running and Swimming elements are traits and the SafetyCheck element could be a trait or an interface - we’d need to check the source code or groovydoc.
- We’ll look into this further in the chapter on Inheritance.↩
96. Trait properties and fields
Traits can also declare properties:
trait Running {
    Integer distance

    void startEvent() {
        println 'Ready, set, go!'
    }
}

class SportingEvent implements Running {
    String name
}

SportingEvent stawellGift = new SportingEvent(name: 'The Stawell Gift', distance\
: 120)

println "Welcome to $stawellGift.name - a ${stawellGift.distance}m race"
stawellGift.startEvent()
As you can see in the example above, the Running trait’s distance property essentially becomes a property of the SportingEvent class. As for classes, getters and setters are generated for properties but you can supply your own if you need additional functionality.
Fields within traits are somewhat different to those in classes. This can get a bit tricky so let’s lay out the example code first:
trait Running {

    Integer distance

    public String raceType = 'foot race event'

    private Integer maxCompetitors = 10

    void startEvent() {
        println 'Ready, set, go!'
    }

}

class SportingEvent implements Running {
    String name

    String describeEvent() {
        "This is a ${Running__raceType} for ${Running__maxCompetitors} competito\
rs"
    }
}

SportingEvent dash = new SportingEvent()

assert dash.Running__raceType == 'foot race event'
assert dash.Running__maxCompetitors == 10

dash.Running__maxCompetitors = 99
assert dash.Running__maxCompetitors == 99

println dash.describeEvent()
In the Running trait above you can see:
- One property (as before):
Integer distance - A public field:
public String raceType = 'foot race event' - A private field:
private Integer maxCompetitors = 10
Unlike properties, we cannot refer to a field as though it was a member of the SportingEvent class. In order to access the public and private fields I need to call dash.Running__raceType and dash.Running__maxCompetitors respectively. This notation uses the trait’s fully qualified name followed by two underscores then the field: <PackageName>_<TraitName>__<fieldName> and is needed both in the implementing class and external code.
The fully qualified name format is a bit odd but, as we’ve looked at packages earlier it should be possible to clarify this:
- For a trait that is in the default package (i.e. not explictly put in a package), we just need
<TraitName>__<fieldName>- as seen inRunning__raceType - For a trait in a package, each package level is separated by an underscore (
_):- If
Runningwas declared in theeventspackage:events_Running__raceType - If
Runningwas declared in theevents.trackpackage:events_track_Running__raceType - and so on…
- If
97. Trait methods
Trait-defined methods are much the same as we saw with classes but the private access modifier prevents us from calling a trait’s private methods. In the example below, the call to the private SportingEvent.rigWinner method (race.rigWinner()) will work but the call to the Running trait’s private method (race.slow()) will cause a groovy.lang.MissingMethodException:
trait Running {
    void startEvent() {
        println 'Ready, set, go!'
    }

    private String slow() {}
}

class SportingEvent implements Running {
    String name

    private String rigWinner() {
        'We know that Jane will win this'
    }
}

SportingEvent race = new SportingEvent(name: 'The Dodgy Race')

println "Welcome to $race.name"
println race.rigWinner()
race.slow()
98. Trait static members
As demonstrated in the example below, traits can have static properties, fields and methods:
trait Running {
    static final MAX_DISTANCE = 10_000

    static public final MAX_COMPETITORS = 12

    static describeRules() {
        println 'Here are the rules of running....'
    }
}

class SportingEvent implements Running {

}

assert SportingEvent.MAX_DISTANCE == 10_000

assert SportingEvent.Running__MAX_COMPETITORS == 12

SportingEvent.describeRules()
- Accessing a static property:
SportingEvent.MAX_DISTANCE - Accessing a static field:
SportingEvent.Running__MAX_COMPETITORS - Accessing a static method:
SportingEvent.describeRules()
Static member support doesn’t appear to be “fully baked” at this time so it’s a good idea to keep an eye on the Groovy documentation.
99. The class-trait relationship
When a trait is implemented by a class, the relation can be seen as the trait is “folded” into the implementing class. We saw this when we called the SportingEvents constructor and could see the Running trait’s properties. Because of this relationship, traits can refer to this to access instance members.
The code below reveals that a trait’s class is that of the implementer:
trait MyTrait {
    Class whoIsThis() {
        this.class
    }
}

class MyClass implements MyTrait {}

assert new MyClass().whoIsThis() == MyClass
In the next example you can see this being used internal to the trait (this.distance = distance) and the class (${this.name}) but also from the class into the trait (${this.distance}):
this, againtrait Running {
Integer distance
void setDistance(distance) {
if (distance > 10_000) {
throw new IllegalArgumentException('Surely you can\'t run that far')
}
this.distance = distance
}
}
class SportingEvent implements Running {
String name
def getAdvert() {
"${this.name} is a ${this.distance}m event"
}
}
SportingEvent groovySprint = new SportingEvent(name: 'The Groovy 500', distance:\
500)
println groovySprint.advert
Self types
That last example could have been rewritten such that the getAdvert() method is declared in the trait (rather than the class):
thistrait Running {
Integer distance
void setDistance(distance) {
if (distance > 10_000) {
throw new IllegalArgumentException('Surely you can\'t run that far')
}
this.distance = distance
}
def getAdvert() {
"${this.name} is a ${this.distance}m event"
}
}
class SportingEvent implements Running {
String name
}
SportingEvent groovySprint = new SportingEvent(name: 'The Groovy 500', distance:\
500)
println groovySprint.advert
This works fine as SportingEvent has a name property but there’s nothing enforcing this and you’re exposed to the risk of a groovy.lang.MissingPropertyException being raised at runtime if the method/property/field can’t be found.
The @groovy.transform.SelfType annotation is used if a trait needs to be tied to a specific implementing class. The example below demonstrates the Running trait annotated with @SelfType(SportingEvent), indicating that the trait should only by implemented by SportingEvent (or one of its subclasses):
@SelfType annotationimport groovy.transform.SelfType
@SelfType(SportingEvent)
trait Running {
Integer distance
void setDistance(distance) {
if (distance > 10_000) {
throw new IllegalArgumentException('Surely you can\'t run that far')
}
this.distance = distance
}
def getAdvert() {
"${this.name} is a ${this.distance}m event"
}
}
class SportingEvent implements Running {
String name
}
By setting @SelfType(SportingEvent) we can ensure that Groovy will refuse to compile the following attempt:
class Imposter implements Running {}
Just be mindful with this capability - you want to make sure that you aren’t coupling your classes and traits too much. Thankfully, @SelfType can also be passed an interface, allowing for a more broadly implemented trait.
100. Traits and interfaces
As Groovy’s interfaces don’t support default implementations it may be tempting to favour traits. This isn’t a good idea and you should try to describe interactions within your code and with other developers via an API described in interfaces.
Once you’ve described your interface, a trait can implement the interface in the same manner as classes do, through the use of the implements keyword:
interface Locomotion {
    String getDescription()
}

trait Hopping implements Locomotion {
    @Override
    String getDescription() {
        'hop hop hop'
    }
}
101. Implementing multiple traits
As mentioned earlier, a class can implement more than one trait. This is straight-forward if the traits don’t intersect in terms of members (properties/fields/methods), as is the case in the example below:
trait Hopping {
    String hop() { 'I am hopping' }
}

trait Climbing {
    String climb() { 'I am climbing' }
}

class TreeKangaroo implements Hopping, Climbing {}

TreeKangaroo lumholtz = new TreeKangaroo()

println lumholtz.hop()
println lumholtz.climb()
There’s nothing too difficult in the TreeKangaroo example but what if the traits had methods with the same name? Let’s belabour the sporting example one last time!
I believe that the Triathlon consists of three parts - Running, Swimming, and Riding - and the example below sets up each of these as traits that implement the same interface:
interface Event {
    void startEvent()
}

trait Running implements Event {
    @Override
    void startEvent() {
        println 'Start the running event'
    }
}

trait Swimming implements Event {
    @Override
    void startEvent() {
        println 'Start the swimming event'
    }
}

trait Riding implements Event {
    @Override
    void startEvent() {
        println 'Start the riding event'
    }
}

class Triathlon implements Running, Swimming, Riding {

}

Triathlon competition = new Triathlon()

competition.startEvent()
It’s easy to see that the Triathlon class now has three possibilities when competition.startEvent() is called. In this scenario, Groovy will use the trait that was declared last - Riding. I’ve listed my traits in the order I want to run the events but I really do want to run all three events.
Groovy lets me manually determine how the colliding trait members will be treated. First of all, the Triathlon class will need to provide its own void startEvent() method. Then each trait’s startEvent() method will need to be called using the <TraitName>.super. prefix - e.g. Running.super.startEvent().
In the improved Triathlon example below you’ll notice that I’ve decided to implement the Event interface as a triathlon is an event consisting of three events:
class Triathlon implements Event, Running, Swimming, Riding {
    @Override
    void startEvent() {
        Running.super.startEvent()
        Swimming.super.startEvent()
        Riding.super.startEvent()
    }
}
This will now give me the three-stage event I was after.
Before leaving this topic, there are some things to note about the example:
- The traits don’t have to implement the same interface, there just needs to be a collision in one or more of the trait members
- I didn’t have to override the
startEventmethod - I could have used any name - but that would return to Groovy’s default of using thestartEventmethod of the last trait declared - Use of the
<TraitName>.super.prefix doesn’t have to occur just in cases of a collision - you may just use it to clarify a section of code. - Concepts such as overriding and
superwill be covered more fully in the chapter on Inheritance.
102. The Shapes demo - Traits
The Sides trait is based on the notion that a two-dimensional shape consists of a set of sides (edges). In most cases there’d be at least 3 sides to a 2D shape (circles being the exception with 1 side) and it’s possible to determine a shape’s perimeter by adding up the lengths of the sides. In the Sides trait I wanted to provide classes with the ability to name each side using a single lower-case letter (e.g. a, b, c) and associate the side’s length.
Let’s take a look at the code for the Sides trait and then examine its components.
Sides traitpackage org.groovy_tutorial.shapes
/**
* A basic trait describing the outer edges (sides) of a 2D shape.
*
* This trait uses the missingProperty method to allow implementations
* to define sides using lower case characters (e.g. a, b, c). These properties \
must:
* <ul>
* <li>Be a single, lower-case character (matching Sides.SIDE_NAME_PATTERN)<\
/li>
* <li>Be only assigned a positive numeric value</li>
* </ul>
*
* Once getPerimeter is called, the sides map is locked down and can't be modifi\
ed.
*
* @author Duncan Dickinson
*/
trait Sides {
/** Defines the acceptable naming strategy for sides */
static final SIDE_NAME_PATTERN = /[a-z]/
/** Used to hold the named list of sides */
private final Map sideMap = [ : ]
/** The perimeter, as determined by the sum of the sides */
private BigDecimal perimeter = null
/**
* Calculates the perimeter of the shape (once).
* After calling this method, the sides are locked down and you can't add or\
edit them
* via propertyMissing
* @return the sum of the sideMap (the perimeter)
*/
BigDecimal getPerimeter() {
perimeter = perimeter ?:sideMap.values().sum().toBigDecimal()
}
/**
* @return a CLONE of the sideMap
*/
Map getSideMap() {
sideMap.clone() as Map
}
/**
* Gets the value for a named side
* @param name the name of the side (e.g. a, b, c)
* @return the value of the side
* @throws MissingPropertyException if name not found
*/
def propertyMissing(String name) throws MissingPropertyException {
if (name.matches(SIDE_NAME_PATTERN)) {
return sideMap.get(name)
}
throw new MissingPropertyException("Property $name not found")
}
/**
* Sets the length (value) for a named side
* @param name the name of the side
* @param value the length of the side
* @return the value back to the caller
* @throws ReadOnlyPropertyException if the perimeter has been calculated
* @throws IllegalArgumentException if the value <= 0
* @throws MissingPropertyException if name doesn't match SIDE_NAME_PATTERN
*/
def propertyMissing(String name, value)
throws ReadOnlyPropertyException, IllegalArgumentException, MissingP\
ropertyException {
if (name.matches(SIDE_NAME_PATTERN)) {
if (perimeter) {
throw new ReadOnlyPropertyException(name, Sides)
}
if (value in Number) {
ShapeUtil.checkSidesException(value)
sideMap.put(name, value as Number)
return sideMap.get(name)
}
throw new IllegalArgumentException("The value [$value] is not a posi\
tive number.")
}
throw new MissingPropertyException("Property $name not found")
}
}
Reviewing the code you’ll see:
- Each side will be added to the
sideMapwith a lower-case letter as the key and the side’s length as the value- The
SIDE_NAME_PATTERNprovides a very basic pattern to limit the acceptable keys - The
getSideMap()will return a clone1 ofsideMap- this helps protect the property from changing externally to the trait.
- The
- The
perimeterfield will hold the perimeter of the shape- This is calculated via the
getPerimeter()method (more on this in a moment) - Note how the perimeter is calculated only once
- This is calculated via the
Aside from the items listed above, you’ll notice two versions of the propertyMissing method. This is a special Groovy method that is called when a getter or setter is called on a property that doesn’t exist. The propertyMissing(String name) is called when code attempts to access (get) a non-existent property and propertyMissing(String name, value) is called when an attempt is made to mutate (set) a non-existent property. The getter is reasonably straight-forward as it just checks that the requested property name matches the SIDE_NAME_PATTERN and, if so, tries to access the property from sideMap.
The setter version of propertyMissing is a little more complex and, stepping through the method, we can see:
- The requested property
namemust matchSIDE_NAME_PATTERN - If the
perimeterhas already been calculated we throw an exception assideMapis locked down onceperimeterhas been set - The
valuefor the side (it’s length) must be aNumber - A utility method
ShapeUtil.checkSidesExceptionis called to ensure thatvalue > 0as we don’t want negative- or zero-length sides - Once all of those preconditions are met the property can be set
All of this results in the Sides trait providing implementing classes with not only the ability to store a list of sides and calculate the perimeter but also lets them use a nice letter-based notation for the sides.
Both the Triangle and Rectangle classes implement the Sides trait as well as the TwoDimensionalShape interface. By implementing Sides, these classes are provided with an implementation of the getPerimeter() method required by the TwoDimensionalShape interface.
We can see the interaction between the a shape class and the Sides trait by examining the Rectangle class:
Rectangle classpackage org.groovy_tutorial.shapes
import groovy.transform.EqualsAndHashCode
import groovy.transform.ToString
/**
* Describes a rectangle
*
* @author Duncan Dickinson
*/
@EqualsAndHashCode(includes = 'length,width')
@ToString(includeNames = true, includeFields = true, includePackage = true)
class Rectangle implements TwoDimensionalShape, Sides {
private static final String SHAPE_NAME = 'Rectangle'
/** The area of the rectangle */
final BigDecimal area
/**
*
* @param length
* @param width
* @throws IllegalArgumentException if one of the sides <= 0
*/
Rectangle(Number length, Number width) throws IllegalArgumentException {
a = length
b = width
c = length
d = width
//Calling this causes the Sides trait to calculate the perimeter
//and lock off its sideMap
this.perimeter
this.area = length * width
}
@Override
String getDisplayInfo() {
"$SHAPE_NAME: length = $a; width = $b; perimeter = $perimeter; area = $a\
rea"
}
@Override
String getShapeName() {
SHAPE_NAME
}
}
Most of Rectangle’s use of the trait is seen in the constructor as we set the sides of the rectangle though a really easy-to-understand notation:
a = length
b = width
c = length
d = width
The use of the Sides trait means that instances of Rectangle can use notation such as myRectangle.a.
The Rectangle constructor also calls this.perimeter so as to calculate the perimeter - not because we specifically need it in the constructor but because it locks down the set of sides for the rectangle instance.
- Cloning was mentioned previously↩
103. Inheritance
Inheritance provides a strategy for building up new types by drawing upon existing implementations. In Groovy this focuses on the class structure and we can use inheritance to create a class that builds on and refines the concepts defined in another class. This approach is supported by the interface structure for defining programming interfaces and the traits structure for encapsulating abilities or features that could be applicable to one or more classes.
The options available in Groovy for combining these three structures are as follows:
- Interfaces can:
- Implement zero or more interfaces
- Traits can:
- Implement zero or more interfaces
- Implement zero or more traits
- Classes can:
- Implement zero or more interfaces
- Implement zero or more traits
- Extend zero or one class
The extends keyword is the gateway to inheritance in Groovy and the spartan example below demonstrates a how a we declare that a class (SuperHero) will inherit from another class (Person):
class Person {}

class SuperHero extends Person {}
Some inheritance theory
Before we go much further into how inheritance is undertaken I’d like to explore some background aspects that are worth your consideration.
- Subclass and superclass
- When
ChildClassinherits fromParentClass, we say thatChildClassis a subclass ofParentClassand thatParentClassis a superclass ofChildClass - Overriding
- When
ChildClasssubtypesParentClassandChildClassprovides a method with the same signature as a method declared inParentClass(or a supertype thereof and so on) then that method is said to beoverridden. - Overriding provides a mechanism for the subtype to provide a more specific implementation than the supertype’s.
- Single and multiple inheritance
- Groovy supports single inheritance which means that a class can only be a subclass of a single superclass.
- Other languages, such as C++, allow for multiple inheritance and this allows a class to have more than one superclass.
- Multiple inheritance can suffer from the diamond problem in which the multiple paths through which subtyping occurs can make it difficult to determine the origin of an overridden method.
- Groovy’s class inheritance, being based in single inheritance, doesn’t suffer from this problem as there is only one path back through the hierarchy.
- However, Groovy classes can implement multiple traits and this can lead to the same problems encountered in multiple inheritance. The two approaches to resolving this (manual- or automatic-resolution) were discussed in the chapter on Traits.
- Implementation inheritance or interface inheritance
- Inheritance is often viewed through two facets: implementation inheritance or interface inheritance.
-
Interface inheritance occurs when the implements keyword is used by a class to inherit an
interface. - Implementation inheritance occurs when the extends keyword is used by a class to inherit from another class.
- As an interface contains no implementation the implementing class can’t be “injured” through its association with the interface unless the author of the interface changes the method signatures. This shouldn’t happen if the interface is well designed. The class implementing the interface is wholly responsible for the implementation details for the interface’s methods.
- A subclass can be significantly injured by changes in the superclass as implementation inheritance reuses the parent class’s implementation and this is a form of coupling that can silently introduce bugs into your program.
- The lure of reuse through implementation inheritance is often in its perceived time-saving value. However, as requirements change and the classes are refactored and other changes made, the use of implementation inheritance can create a house of cards. Interface inheritance, by not passing through implementation, avoids this.
- Composition can combine the benefit of reuse seen in implementation inheritance with the flexibility and independence of interface inheritance.
- Aim to use interface inheritance heavily and implementation inheritance sparingly.
- Leaky implementation/abstraction
- Inheritance may help in terms of code-reuse but it’s important to make sure that a class correctly encapsulates the desired concepts and doesn’t suffer from implementation leakage. As a superclass gets more complex or the subtype hierarchy gets deeper, implementations from higher-level supertypes start to build up and the lower-level subclasses end up with a large number of methods that may have no utility to that class. This will also blow out the number of tests you’ll need.
- Composition
- The super-/sub-class association in implementation inheritance works well when the subclass truly is a refined definition (subtype) of the superclass. I find that the relationship usually breaks down once the superclass becomes quite complex and the leaks start to pour out. If you find that you’re constantly changing a superclass in order to resolve issues in a subclass it’s probably time to rethink the design and consider composition.
- In composition the candidate superclass is used as a member variable of the candidate subclass. Instead of using
extends, the subclass just declares a member variable (a property or field) that holds an instance of the candidate superclass. At that point the candidate superclass isn’t actually a superclass, it’s just a member variable. - Sometimes human language leads us astray and the notion of a
StudentClassListmakes us think that such a class couldextendan existingListimplementation. However, it’s likely thatStudentClassListreally just needs aListas a member variable and will provide a set of methods to manage the business logic around the list. - It is often safer to use composition instead of inheritance if you’re considering creating a subclassing a class in a package that you don’t have control over. Whilst your class might just be a wrapper class brokering the interaction between its interface and the member variable, this is very useful if the other class changes.
- It can be tempting to use implementation inheritance to “pass down” useful instance methods. Where this occurs it’s likely to be more useful take the composition approach or consider providing such methods as
static, especially if the method logic is broadly useful.
A quick web search on these topics will yield a wealth of articles that will help you refine your practice. I’d also recommend “Effective Java (2nd edition)” by Joshua Bloch as a great starting place.
104. Subclassing
As we saw in the previous chapter, the extends keyword announces that a class is a subclass of another:
class Person {}

class SuperHero extends Person {}
Let’s put something a little more useful together:
class Person {
    String name

    String toString() {
        "Name: $name"
    }
}

class SuperHero extends Person {
    String superHeroName

    String toString() {
        "Name: $superHeroName (alias: $name)"
    }
}

SuperHero groovyMan = new SuperHero(name: 'Gary Grails', superHeroName: 'Groovy \
Man!')

println groovyMan
In the expanded example you can see the following:
- The
Personclass is much like we’ve seen previously - it provides anameproperty and atoString()method -
SuperHeroextendsPerson:- By extending
Person, the SuperHero class has (inherits) thenameproperty -
SuperHeroalso has asuperHeroNameproperty - An implementation of
toString()is provided to give more details about the hero
- By extending
In order to create a new instance of SuperHero, the Groovy-supplied constructor is called and the name and superHeroName properties set:
new SuperHero(name: 'Gary Grails', superHeroName: 'Groovy Man!')
The script will output:
Name: Groovy Man! (alias: Gary Grails)
At this point the SuperHero class demonstrates two aspects of inheritance:
- Subclasses inherit the superclass’s properties and these are accessible to the subclass’s instances
- By providing a
toStringmethod that has the same signature as the superclass,SuperHerois said tooverridethe supertype’s declaration of the method.
The next example builds just slightly on the previous:
super on a SuperHeroclass Person {
String name
String toString() {
"Name: $name"
}
}
class SuperHero extends Person {
String superHeroName
@Override
String toString() {
"Name: $superHeroName\nAlias:\n ${super.toString()}"
}
}
SuperHero groovyMan = new SuperHero(name: 'Gary Grails', superHeroName: 'Groovy \
Man!')
println groovyMan
The script will output:
Name: Groovy Man!
Alias:
  Name: Gary Grails
- The
@Overrideannotation signals that thetoStringmethod provided inSuperHerois overriding a method defined by the superclass.- This is a helpful annotation as Groovy will throw a compilation error if no pre-defined method signature exists - for example, if I mistyped the method as
tooString. - In fact I could have used the
@Overrideannotation in thePersonclass as well becausetoStringis a method defined injava.lang.Object, the superclass for all Groovy classes.
- This is a helpful annotation as Groovy will throw a compilation error if no pre-defined method signature exists - for example, if I mistyped the method as
- The
SuperHeroimplementation oftoStringincludes the call tosuper.toString(). Thesuperkeyword allows subclasses to specifically access the superclass’s methods and member variables (properties and fields) 1
It is possible to access the superclass’s constructors from within a subclass constructor:
super in a constructorclass Person {
String name
Person(String name) {
this.name = name
}
}
class SuperHero extends Person {
String superHeroName
SuperHero(String name, String superHeroName) {
super(name)
this.superHeroName = superHeroName
}
}
SuperHero groovyMan = new SuperHero('Gary Grails', 'Groovy Man!')
assert groovyMan.name == 'Gary Grails'
assert groovyMan.superHeroName == 'Groovy Man!'
The call to super(name) invokes a call to the Person(String name) constructor and Groovy determines the matching constructor by the parameters being passed. Importantly, the call to the superclass constructor (super()) must occur first - before any other statements in the constructor.
Type comparison
The in operator2 makes it possible to determine if one class extends another class or implements an interface or a trait. The example below demonstrates a set of checks against the SuperHero class
class Person {}

interface SuperPower {}

trait Flying implements SuperPower {}

class SuperHero extends Person implements Flying {}

assert SuperHero in Object
assert SuperHero in Person
assert SuperHero in Flying
assert SuperHero in SuperPower
Where the example above investigates the SuperHero class, the example below is somewhat more useful as it checks to see what’s available to a variable (superGroovy):
class Person {}

interface SuperPower {}

trait Flying implements SuperPower {}

class SuperHero extends Person implements Flying {}

def superGroovy = new SuperHero()

assert superGroovy in Person
assert superGroovy in SuperHero
assert superGroovy in SuperPower
assert superGroovy in Flying

assert superGroovy.class == SuperHero
The ability to check superGroovy in Flying is useful before we push superGroovy off a building and expect him not to hit the pavement!
- We also saw
superin the chapter on traits when considering a trait that implements other traits.↩ - Refer back to the chapter on Object Operators↩
105. Final Classes and Methods
A class marked with the final modifier cannot be extended (subclassed) by another class. In the example below we draw a line at SuperHero and the attempt to create a SuperSuperHero will cause a compilation error:
final cannot be extendedclass Person {
//...
}
final class SuperHero extends Person {
//...
}
//This isn't allowed as SuperHero is declared as final
class SuperSuperHero extends SuperHero {
//...
}
Why do this? Whilst reuse is highly regarded in programming it’s important to keep good encapsulation and code maintainability in mind. By marking a class as final we can lock down the implementation and ensure that no-one is tempted into believing that we’ll support their subclass implementation.
When a method is marked as final it cannot be overridden. This is very useful if you want to block future implementations from altering the implementation. In the example below, the getName method in SuperHero is marked as final and the attempt by the BizarroSuperHero to override it will cause a compilation error:
final cannot be overriddenclass Person {
private String name
final setName(name) {}
}
class SuperHero extends Person {
final String getName() {
'Unknown'
}
}
class BizarroSuperHero extends SuperHero {
//This will NOT be allowed:
String getName() {
name
}
}
Importantly, marking a method as final does not transfer to its overloaded siblings. In the example below, I try to protect my hero’s identity but am not thorough enough:
final cannot be overriddenclass Person {
String name
}
class SuperHero extends Person {
final String discoverName() {
'Unknown'
}
String discoverName(Boolean mindRead) {
'Unknown'
}
final setName(name) {}
}
class BizarroSuperHero extends SuperHero {
//This WILL be allowed:
@Override
String discoverName(Boolean mindRead) {
name
}
}
def batBoy = new BizarroSuperHero(name: 'Bryce Rain')
assert batBoy.discoverName() == 'Unknown'
assert batBoy.discoverName(true) == 'Bryce Rain'
In that last example, the BizarroSuperHero can’t override String discoverName() but is allowed to override String discoverName(Boolean mindRead). If I’d been thorough in my information hiding attempts I’d have marked all discoverName methods as final or been really certain and marked SuperHero as final.
106. Abstract classes
When a class is marked with the abstract modifier it cannot be instantiated. The code below will cause a compilation error:
abstract class Thing {}

def myObj = new Thing()
The main reason you would create an abstract class is to establish a base class for a number of subclasses. This is somewhat similar to an interface as abstract classes usually also define one or more method signatures that need to be implemented. Unlike interfaces, abstract classes can provide a mix of method signatures and method implementations.
The abstract modifier can be attached to a method signature to indicate that a subclass will need to provide an implementation for the method. A class containing an abstract method must also be marked as abstract. In the code below, the abstract Thing class provides an abstract describe() method signature which is then implemented in the Blob subclass:
abstract class Thing {
    abstract String describe()

    @Override
    String toString() {
        'This is a thingy'
    }
}

class Blob extends Thing {
    String describe() {
        'I am an amorphous blob'
    }
}

def myObj = new Blob()
assert myObj.describe() == 'I am an amorphous blob'
Some things to keep in mind:
- Abstract classes can implement interfaces and traits
- The abstract class may choose not to provide an implementation of some or all of the interface methods - any missing implementations must be provided by the class extending the abstract class.
- You can provide class (static) methods in an abstract class - however,
staticmethods can’t be abstract. - An abstract class can extend (subclass) another abstract class
- The subclass doesn’t need to implement any/all of the abstract methods of the superclass - the responsibility is passed down to a non-abstract subclass
- This option is rarely useful and interfaces are likely to be a better approach
Before committing to an abstract class it’d be well worth your time determining if a combination of an interface and a “base” concrete class; or an interface and a trait; or just an interface; wouldn’t be more flexible. If you’re wanting to create a subtype then it’d be worth using an interface for this purpose and then implementing a concrete base class. In some cases an abstract class is just used to provide class methods but it is likely that a utility class containing these methods is a better idea.
107. The Shapes demo - Inheritance
The class hierachy for the Shapes demo is provided below:
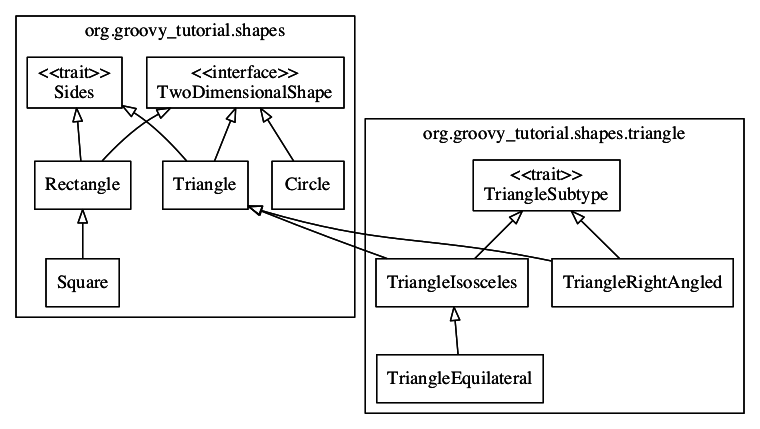
Inheritance is used in a number of places:
- The
Squareclass is a subclass ofRectangleas squares are a special type of rectangle in which all four sides have the same length.-
Squaredoesn’t need to do much over the already providedRectangleclass
-
- The
Triangleclass is extended by two subtypes:TriangleRightAngledandTriangleIsosceles-
TriangleEquilateralis a subclass ofTriangleIsosceles
-
The three Triangle subtypes encapsulate specific refinements such as the definition of the sides and refinement of the calculateArea calculation. By making calculateArea a static method, each subtype makes the calculation easily available to other code as well as tying the calculateArea instance method to the static method.
The Square, TriangleRightAngled and TriangleEquilateral classes are both declared as final because I decided they couldn’t be refined any further. This is an important aspect to designing/developing classes: only allow for inheritance if you will support it. By marking these classes as final I’ve indicated that the implementations can’t/shouldn’t be further enhanced. Naturally, another developer could extend Triangle with their own implementation as it isn’t marked as final because I believe Triangle to be a sound generic basis for describing triangles.