I Getting started
1. Introduction
Getting to know a new programming language can be both fun and, sometimes, frustrating. In this section we’ll get Groovy installed, write the mandatory “Hello, World” program and look at some of the basic aspects of Groovy.
2. Installing Groovy
There are a few methods for installing Groovy on your system and this section will describe the basics for getting started. Before you get started make sure that any installations are for the versions listed in the table below:
| System | Version |
|---|---|
| Java JDK | 8 (7 is fine too) |
| Groovy | 2.4.0 (or higher) |
Don’t Install Groovy
I know this chapter is about installing Groovy but perhaps it’s worth leaving this until later. The Groovy web console is an online Groovy console that should let you run most of the sample code provided in this book. Provided you have web access you can skip through to the next chapter and get straight into writing some code!
However, please note that the web console has some limitations and won’t run code that attempts to access URLs and files.
Install a Java Virtual Machine
All methods for installing Groovy require that you have a Java Virtual Machine (JVM) installed. For the purposes of this book we’ll use the Java 8 SE JDK (Java 8 Standard Edition Development Kit). You’ll notice that Java 8 may also be represented as Java 1.8 - the former is the Java Platform version number (8) and the latter is the version string (1.8).
To install the Java JDK, head to the Oracle site and locate the download appropriate to your platform: Oracle JDK Downloads. For the most part these installs are straight-forward and have enough associated documentation so we won’t go through this step-by-step.
Before moving onto the Groovy installation I’d like to make you aware that the Oracle JDK is not the only version of the JDK available. As you become more comfortable with working in a Java-based environment you might like to take a look at the Open JDK.
Install Groovy
Once you have the JDK installed it’s time to get Groovy. We’ll be using Groovy 2.4 throughout this book. Other (newer) versions may work fine - it’s just that the examples used throughout the book have been tested against Groovy 2.4.
The following subsections will guide you through an installation based on which platform you’re using.
Windows
The Groovy Download page includes links to a Windows installer - download this and run the installer using the provided defaults (it’s as easy as that).
Just make sure you’re downloading a 2.4.x version!
Checking for Groovy in the Start Menu
Once you have the JDK and Groovy installed you should see the GroovyConsole application in your Windows 7 Start menu. Start up the GroovyConsole application and you should be good to go.
Mac OSX and Linux
SDKMAN! is the best tool for getting Groovy running on your system. The homepage is http://sdkman.io/ but you don’t need to visit it to run an installation.
If you are comfortable with using the terminal then you just need to run the following command as a regular user1:
curl -s get.sdkman.io | bash
Once SDKMAN! has been installed, run the following command to determine which versions of Groovy are available:
sdk list groovy
You’ll see a large table of version numbers but are most interested in those marked with 2.4.x - you’ll want the version with the highest value of x (e.g. 2.4.4). To install Groovy you now just call sdk as below:
sdk install groovy 2.4.4
Checking Groovy (all platforms)
Once you have the JDK and Groovy installed, run the following command to double-check your Groovy version:
groovy -v
You should see something like the following output:
Groovy Version: 2.4.0 JVM: 1.8.0_31 Vendor: Oracle Corporation OS: Mac OS X
This tells me that I am running:
- Groovy 2.4.0
- The Oracle Java 8 JVM
- The Apple Mac OS X operating system
Alternatives
The Groovy Download page provides binary and source releases for Groovy. These are perfectly fine to use but you’ll need to setup your system path to get up and running.
For those on Mac OS X you can also explore one of the following package manager options:
Linux users may find Groovy packages in their distribution’s package repository but check the version being installed.
- The
curlcommand line tool is used for transferring data. It’s very likely that your Linux distribution’s package manager (yum,apt-getetc) includes a copy of cURL but if it doesn’t, visit http://curl.haxx.se/ to download it.↩
3. Your first lines of Groovy
The Groovy Console provides a handy environment for preparing and testing basic Groovy scripts. In order to open the console you need to start a command line (or terminal) session and enter the following command:
&
The Groovy Console should look something like the following screen grab:
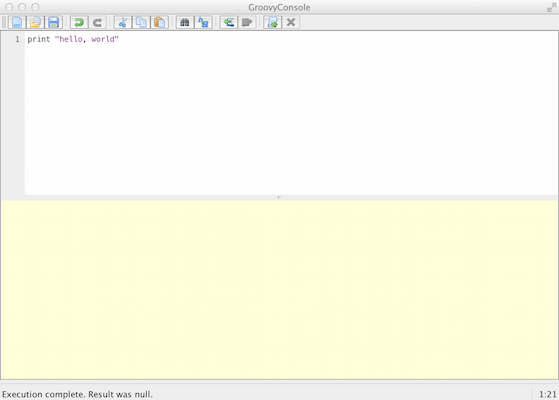
The main parts of the console are:
- The top half is the editor area for adding your Groovy script
- The bottom half is the output area that displays the results of your script
- The menu provides the standard tools for opening and saving files (
File) and cut/copy/paste (Edit) - The
Scriptmenu gives you a number of functions you’ll use as you work through this book:-
Runwill run the script -
Run Selectionallows you to select (highlight) part of your script and run only that section
-
- The
Viewmenu lets you reset the output area (Clear Output)- I’d suggest that you select
Auto Clear Output on Runas this helps reduce confusion
- I’d suggest that you select
Once you have the Groovy Console open, enter the following line in the editor area:
print 'hello, world'
Once that’s ready, go to the menu and select Script -> Run and you should see your output in the bottom half of the window something like the image below:
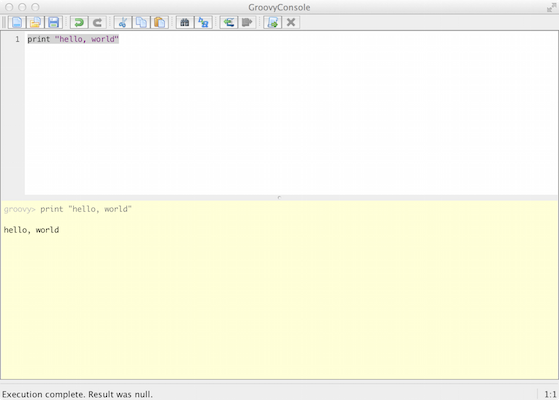
If you see the output hello, world then congratulations - you’ve taken your first step into a larger world.
Examining the script
Our first Groovy script is very simple: it uses the print method (function) to output the string hello world to the console.
For those that have come from languages such as C++ and Java the script print "hello, world" probably appears to be missing items such as imported libraries for output and “container” or “boilerplate” code that sets up the context of the code. In fact, if we were to write this code in Java it would look something like:
class Hello {
    public static void main(String[] args) {
        System.out.print("hello, world");
    }
}
When I look at the code above I see why Groovy is so appealing to me:
- Groovy lets me focus on solving the problem and not working through so much decoration code.
- Groovy doesn’t need semi-colons at the end of each statement
- Groovy essentially builds the
Helloclass around the script
- The Groovy code is much more readable and this should help reduce bugs (or at least make finding them easier)
- Most Java code is valid Groovy code - you can copy that Java code into the Groovy Console and run it - it will work
- Groovy lets you use the comprehensive standard Java libraries and the extensive third-party libraries written by the Java developer community.
- But also extends these standard libraries with some great timesavers.
Groovy gives us the brevity and flexibility of a scripting language (such as Python, Ruby and Perl) whilst letting us tap into the galaxy of existing Java libraries.
4. Running a script
Now that we can output something to the screen, let’s try and make our example a little more personal. Clear the Groovy Console editor and enter the following:
println "hello, ${args[0]}"
Before we try to run this, let’s look at what’s in the code:
-
printhas becomeprintln- this does the same thing as our previous use ofprintbut adds a new line at the end of the output.- This makes the output easier to read when we’re running on the command line
- Instead of the text
worldwe’re now using${args[0]}:-
argsis a variable (an array1) that holds any command-line arguments we pass to the script- You may have noticed
String[] argsin the Java version ofhello, world- essentially Groovy is writing that segment of code for you. -
args[0]is the first element in theargsarray - this is the first parameter (command-line argument) passed to the script
- You may have noticed
- The
${...}notation tells Groovy that the contents need to the resolved into a value - in this case Groovy needs to determine the value ofargs[0]before displaying the output
-
Don’t worry if this appears to be a big jump from our hello, world - there’s a range of concepts being introduced and we’ll work through them in this tutorial section. For now, put the code into your Groovy Console and know that, when run, your script will say hello to a specified person.
You now need to save your script so go to the File menu and select Save. When prompted, name the file Hello.groovy and save it into a directory you can access.
Unfortunately we can’t run this script in the Groovy Console as it doesn’t provide an option for passing in a command-line parameter. Follow this process to run the script:
- Open a command prompt (terminal) and change to the directory (
cd) into which you savedHello.groovy. - Type the command
groovy Hello.groovy Newmanand press thereturnkey
You should see the following output:
hello, Newman
Of course you can change “Newman” to be any name so feel free to try out your name, the dog’s name etc. However, make sure you add a name - your script needs that parameter or you’ll see a disconcerting error.
- More about arrays in a little bit↩
5. Compiling Groovy
You can compile a Groovy script into a class file - the same type of file that Java developers compile their code into. The resulting class file is in bytecode format that can be read by the Java Virtual Machine (JVM). Once compiled to bytecode, Groovy code can work on the same JVM that runs existing Java systems - this is extremely handy if you work in a Java-centric organisation but want to use Groovy.
In order to compile Hello.groovy we will use the groovyc command in the command-prompt as follows:
groovyc Hello.groovy
When you look at the directory contents you should now see a file named Hello.class. Don’t try to read the contents of the file - it’s now in bytecode.
We’ll explore this further in the Organising your code chapter.
6. Comments
Comments are not read by the Groovy compiler - they’re purely used to help humans follow your code. They’re really important once your code becomes more complex and your programs larger. Key places you’ll see/use comments are:
- When a complex algorithm is being used
- When specific business logic is being implemented
- For documenting interfaces that other coders will use
- To remind you why you chose one approach over another - really handy when you revisit the code in 6-weeks and say “why did I do it that way?”.
Single-line comments
A single-line comment is introduced with two forward slash characters (//):
//This is a single-line comment
println "hello, world"
Single-line comments can be appended to a Groovy statement:
def radius = 10
def pi = 3.14 //This is not very precise
def area = pi * (radius * radius)
Multi-line comments
A multi-line comment is introduced by the characters /* and terminated with the characters */. Generally, the /* and */ appear on their own line:
/*
This is a multi-line comment
and here is the second line
*/
Multi-line comments are most commonly formatted with an asterisk (*) on each line, aligned with the introductory asterisk as follows:
/*
 * This is a multiline comment
 * and here is the second line
 */
Multi-line comments can be introduced and terminated on a single line:
/* This is a multiline comment on a single line */
Nesting within a multi-line comment is not possible, rendering the following code invalid:
/*
 * Multi-line comments cannot
 * /* be nested */
 */
Usage to avoid
In a similar vein to single-line comments, multi-line comments can be appended to a statement. However, the single-line comment is generally more readable than the following example:
def radius = 10
def pi = 3.14 /* This is not very precise */
def area = pi * (radius * radius)
Even less expected is a multi-line comment appended to a statement in the following manner:
def radius = 10
def pi = 3.14 /* This is not very precise
                and should really use java.lang.Math.PI */
def area = pi * (radius * radius)
In such a case the multi-line comment should appear above the statement being discussed:
def radius = 10
/*
 * This is not very precise
 * and should really use java.lang.Math.PI
*/
def pi = 3.14
def area = pi * (radius * radius)
Use of a comment within a statement should never be contemplated as it results in code that is hard to read:
def radius = 10
def pi = 3.14
def area = pi * /* I should find out how to square */ (radius * radius)
Groovydoc
Java provides a very handy tool for documenting the outward-facing aspects of your code - i.e. those items that others may reuse - it’s called javadoc1. Groovy has its own version called groovydoc. Essentially this is the same tool as javadoc but is run over groovy code.
- See the Javadoc guide↩
7. Statements
A Groovy statement is generally completed by an end-of-line (EOL) character such as a carriage return:
def num = 21
println num
A semicolon (;) can be used to explicitly mark the end of a statement however this is deemed to be redundant in most cases and spoils readability:
def num = 21;
println num;
The backslash (\) is used indicates that a statement continues on the next line. The example below uses continuation to break up a long statement:
def solution =  1 * 2 * 3 \
                * 4 * 5 * 6
Without the backslash the code above would cause an error but a minor rewrite will work:
def solution =  1 * 2 * 3 *
            4 * 5 * 6
I would suggest the first version is easier to read and explicitly indicates that you intend to carry into the next line. However, statements can span multiple lines without a backslash provided Groovy can determine that the lines make up a single statement. This feature should be utilised if it aids in improved readability - this is often referred to as line-wrapping. For example, an array declaration that provides a number of entries may be written as:
def myArray = ['Tasmania', 'Victoria', 'New South Wales', 'Queensland', 'Western\
 Australia', 'South Australia']
The judicious use of line-wrapping may improve readability:
def myArray = ['Tasmania',
               'Victoria',
               'New South Wales',
               'Queensland',
               'Western Australia',
               'South Australia']
It is difficult to provide specific metrics regarding readability in these cases and the programmer is left to determine the best use of white space and placement.
Usage to avoid
A semicolon can be used to separate two statements appearing on the same line:
def num = 1 + 1; println num
The presentation of multiple statements in a single line should be avoided - it’s not easy to read and is likely to trip you up at some point.
Groovy is very forgiving of statements spread over more than one line but usage such as the one below should be avoided as it reduces readability. For example, the following code will actually work but it looks odd and isn’t worth the hassle:
def num = 1 +
1
println num
8. The assert statement
The assert statement is perhaps out of order being described here but it will be relied on in many code examples.
The assert statement evaluates a boolean expression (one that is true or false). If the result is false then the assertion has failed, the program is halted and an error is reported. The following example provides an obviously incorrect statement:
assert 1 == 2
An expression can be appended to the assert statement after a colon (:):
assert true == false : 'true cannot be false'
The second expression can be anything Groovy can evaluate and the result is used in the error message. The following example will (unhelpfully) place the number “8.0” in the error message:
assert true == false : Math.sqrt(64)
Handling failed assertions
For the purposes of our tutorial scripts, using asserts is a handy way to demonstrate a result for a problem. However, it’s not good practice to have a program suddenly just quit when an assertion fails. When you start writing large programs, your code should aim to “fail gracefully” unless it’s really in a position where bailing out is the only option.
Groovy (unlike Java) does not provide a mechanism for turning off assertions so be careful about where you use the assert statement in larger systems. Remember that a failed assert raises an Error (which signals a critical problem) rather than an Exception (from which a program is more likely to recover). Arguably, in running (production) systems, assertions are best suited to dark places in code that should never be reached - they flag when the extremely unlikely condition has happened.
The error raised by a failed assertion can be caught within a try-catch and handled but this isn’t how errors are usually treated (we normally just let them happen). The following example illustrates a class handling a failed assertion by logging the problem - don’t be concerned if you don’t follow the code as it utilises a number of concepts not yet visited:
import groovy.util.logging.*

@Log
class AssertionTest {
    static void runTest() {
        try {
            assert true == false : 'true cannot be false'
        } catch(AssertionError err) {
            log.severe "An assertion failed ${err}"
        }
    }
}

AssertionTest.runTest()
The section on Exceptions will explain this syntax in more depth.
Although it’s Java-focussed, check out the Programming with Assertions guide for more information.
9. Reserved Words
| abstract | as | assert | boolean | break |
| byte | case | catch | char | class |
| const | continue | def | default | do |
| double | else | enum | extends | false |
| final | finally | float | for | goto |
| if | implements | import | in | instanceof |
| int | interface | long | native | new |
| null | package | private | protected | public |
| return | short | static | strictfp | super |
| switch | synchronized | this | threadsafe | throw |
| throws | trait | transient | true | try |
| void | volatile | while |
Groovy relies of a number of key words that it reserves for its own use. This means that you shouldn’t use these words for the names of variables and other items you declare. For example, the code below won’t run as package is a reserved word:
def package = 'my package'
10. Packages
Except for very small programs, most Groovy and Java-based programs are made up of packages of code:
- The
packagekeyword is used to designate that a class is part of a package and we’ll cover this more fully in the Organising your code chapter. - The
importkeyword is used to import classes from other packages into a program.
Consider the sample code below:
package test

import java.time.Year

println Year.now()
I’ve indicated that this code:
- Is part of a
packagenamedtest - Needs to use the
Yearclass defined in thejava.timepackage
This notion of packaging allows for thousands of developers to create classes and packages without clashing. If another developer creates a Year class but puts it into a package with a name other than java.time then all will be well. Oh, and you’d never start your own package name with java. - that really won’t work out well for you1.
Before you write any new code you should always check out these resources in the order I’ve given below:
Using the order I’ve provided above lets you look at the libraries providing the Groovy approach first (the GAPI and GDK) then looking at the Java standard library (JDK).
For the rest of this chapter I’ll focus on import as that will help us in the early set of tutorials.
Using import
You can import other classes in a variety of manners - let’s take a look.
Basic Imports
The basic form of imports are the most commonly seen and you should get accustomed to them pretty quickly.
import java.time.Year- This will import the
Yearclass from thejava.timepackage import java.time.*- This is a star (wildcard) import
- This will import all classes in the
java.timepackage
Static imports
Static imports can help your code look a little cleaner as they give you an easy way to refer to useful constants and functions (methods) declared in other code packages2.
import static java.lang.Math.PI- This is a static import
- This lets you import static items from another class
- In this example I’ve imported the
PIconstant from thejava.lang.Mathclass and can now use it as if it was just part of my code:println PI import static java.lang.Math.PI as pi- This is a static import with aliasing
- This is the same as the previous
importbut I can use theaskeyword to rename the item being imported - I’ve decided to usePIbut refer to it using the lowercase form (pi) import static java.util.UUID.randomUUID as generateId- This is also a static import with aliasing but I’ve imported the
randomUUIDstatic method and given in the aliasgenerateId - I can now call
println generateId()in my program import static java.lang.Math.*- This is a static star import and will import all static elements described in
Mathand let me refer to them directly in my program.
I’ve thrown the term static around a lot here - don’t worry too much about this for now as we’ll really only need basic imports for now. The notion of static will be covered when we get to object-oriented Groovy.
Built in Libraries
The following libraries are imported into Groovy by default - you don’t need to do anything to start using them:
java.io.*java.lang.*java.math.BigDecimaljava.math.BigIntegerjava.net.*java.util.*groovy.lang.*groovy.util.*
Groovy is able to make use of classes within these packages without explicitly importing them. You can still declare them with import and you’ll notice various development environments (IDEs) will do this regardless of Groovy’s default - either way it’ll be groovy.
Useful third-party libraries
There is an extensive body of existing Java libraries available to the Groovy developer and it’s best to do some investigating before you write your own code - re-using well-supported libraries is a real time saver - here’s a couple to take a look at:
In the olden days (in Java-time) you’d often have to download the third-party library you wanted, download any other libraries it depended on, store them in the correct place (called a Classpath) and then you could start using it. Time went by and systems such as Apache Maven came along to make it easier to grab a copy of your dependencies. This then lead to The (Maven) Central Repository and made it even easier to grab the libraries you needed.
- There’s actually a package naming convention that is very easy to follow.↩
- We’ll describe how these are written in the Class Methods and Variables chapter.↩
11. Grape
Whilst you can use Maven or (even better) Gradle to grab dependencies, Groovy includes a dependency manager called Grape that you can start using straight away.
Say I wanted to grab a copy of my favourite web page and had worked out that Apache’s HTTP Components would really help me. I can search the Maven Central Repository and find what I need. In fact, that web page even tells me how to use the library with Grape:
@Grapes(
@Grab(group='org.apache.httpcomponents', module='httpcomponents-client', version\
='4.4')
)
Grape uses annotations - essentially the “at” (@) sign followed by a name - to do its thing. In the example above:
-
@Grapesstarts of the grape listing- You need this if you’re grabbing several libraries in the same segment (node) of your code - we can actually ignore this in smaller examples.
- Each grape is declared using
@Graband providing the following:- The
groupthat holds the module - The name of the
module - The required version of the
module
- The
In the code below I use the Apache HTTP Components library to report on the HTTP status line from my request to “http://www.example.org”. I’ve trimmed off the @Grapes as I just need to Grab one module:
@Grab(group='org.apache.httpcomponents', module='httpclient', version='4.3.6')
import org.apache.http.impl.client.HttpClients
import org.apache.http.client.methods.HttpGet

def httpclient = HttpClients.createDefault()
def httpGet = new HttpGet('http://www.example.org')
def response = httpclient.execute(httpGet)

println response.getStatusLine()
You can use a short-form version of @Grab using the format <group>:<module>:<version> - this would let us use the following:
@Grab('org.apache.httpcomponents:httpclient:4.3.6')
Once you start building more complex programs you will probably turn to Gradle but Grape works just fine for these tutorials.