Chapter 4 - Audio Device Setup
To use Tracktion, it is essential to configure it to work with your audio interface. While Tracktion does work with internal audio, most users will use an external audio interface. Tracktion supports Core Audio on Mac. Tracktion supports ASIO and Windows Sound (WASAPI) on PCs.
This chapter covers the essential steps to get your audio interface configured as an audio device in Tracktion. The steps are simple and important so you can hear playback.
Audio Device Setup Setup on Mac
Here is how this works in OS X.
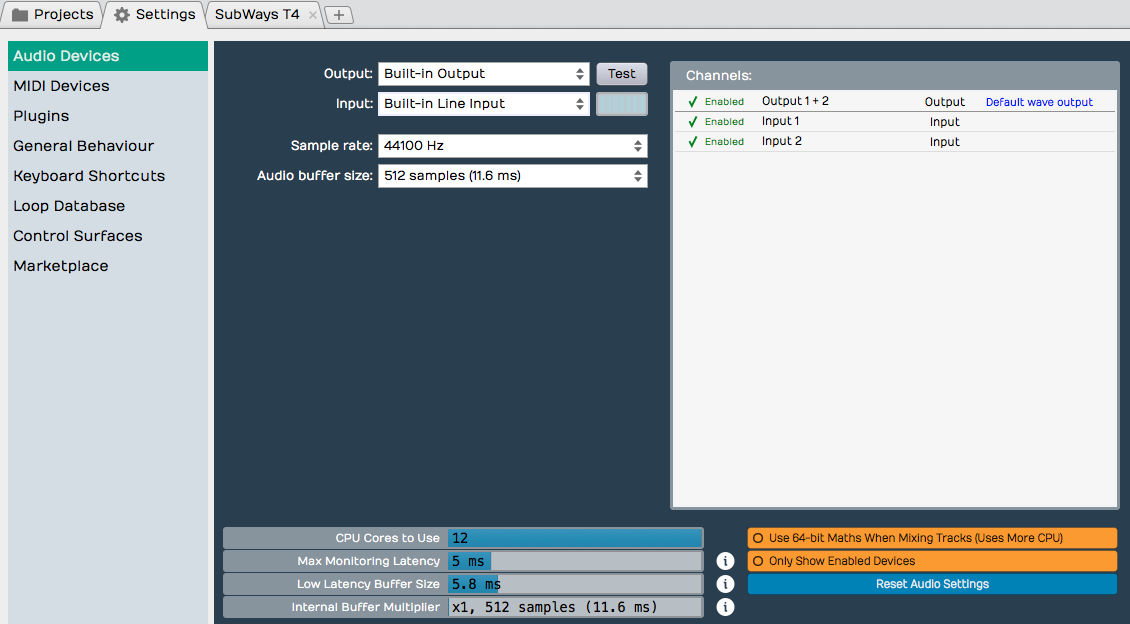
- Click on the Settings tab then select the Audio Devices page.
- Select an output Device. Assuming you have necessary drivers installed and the device hooked up, it should appear as an option for the Output: property.
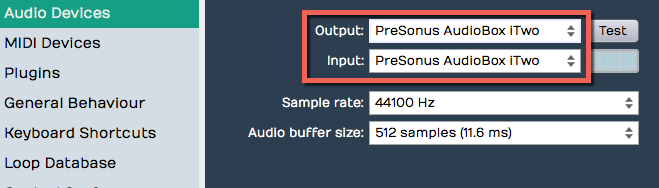
- Select an Input device

- Test Button
- There is a convenient Test button next to the audio device parameter. Click it, to send a short test tone to the output. If you hear the tone you are pretty much good to go at this point.
Audio Device Setup in Windows
This is a walkthrough of the audio device settings for Windows. If you haven’t already, navigate to Settings tab > Audio Devices page.
- Audio Device Type
- Tracktion gives Windows users four choices for audio device type.
- Windows Audio
- Windows Audio (Exclusive)
- DirectSound
- ASIO
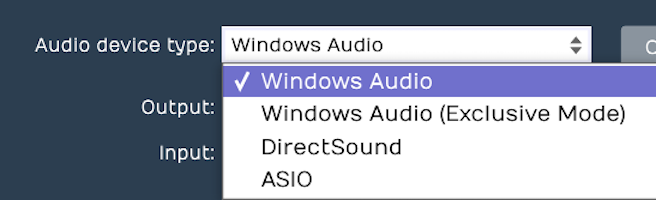
So which to choose? Any of them might work with your computer but there are definite differences and best choices here.
- ASIO
- This is the best choice if you are using an external audio interface. You will need to install the manufacturer’s driver. The good news is will usually give you the best low latency performance for recording and playback. Many modern audio interfaces include a mixer apps to control low latency mixing within the unit. When using ASIO, you just choose the device and it is set for both inputs and outputs.
- Windows Audio
- Use this if running Windows Vista/7/9/10 on your computer and using the internal sound on your machine. Great for using a laptop directly while traveling. This device type uses WASAPI (Windows Audio Session API) which offers nicely optimized access from applications software to audio I/O. Windows Audio will also function with USB Audio Class 1 interfaces.
- Windows Audio (Exclusive Mode)
- This is the same as Windows Audio but Tracktion will not allow any other applications to use the audio interface while running. For the lowest latency and most critical applications choose this when using your internal sound.
- DirectSound
- Choose this when using Windows XP with your internal sound. This is not a good choice for Windows Vista/7/8/10. For Windows 8 and 10, it is deprecated and might not work at all.
Choosing the Audio Interface
With the audio device type set, you can now choose any audio interface connected to your computer or the internal sound. Select your device if it’s not already shown for the Device: property.
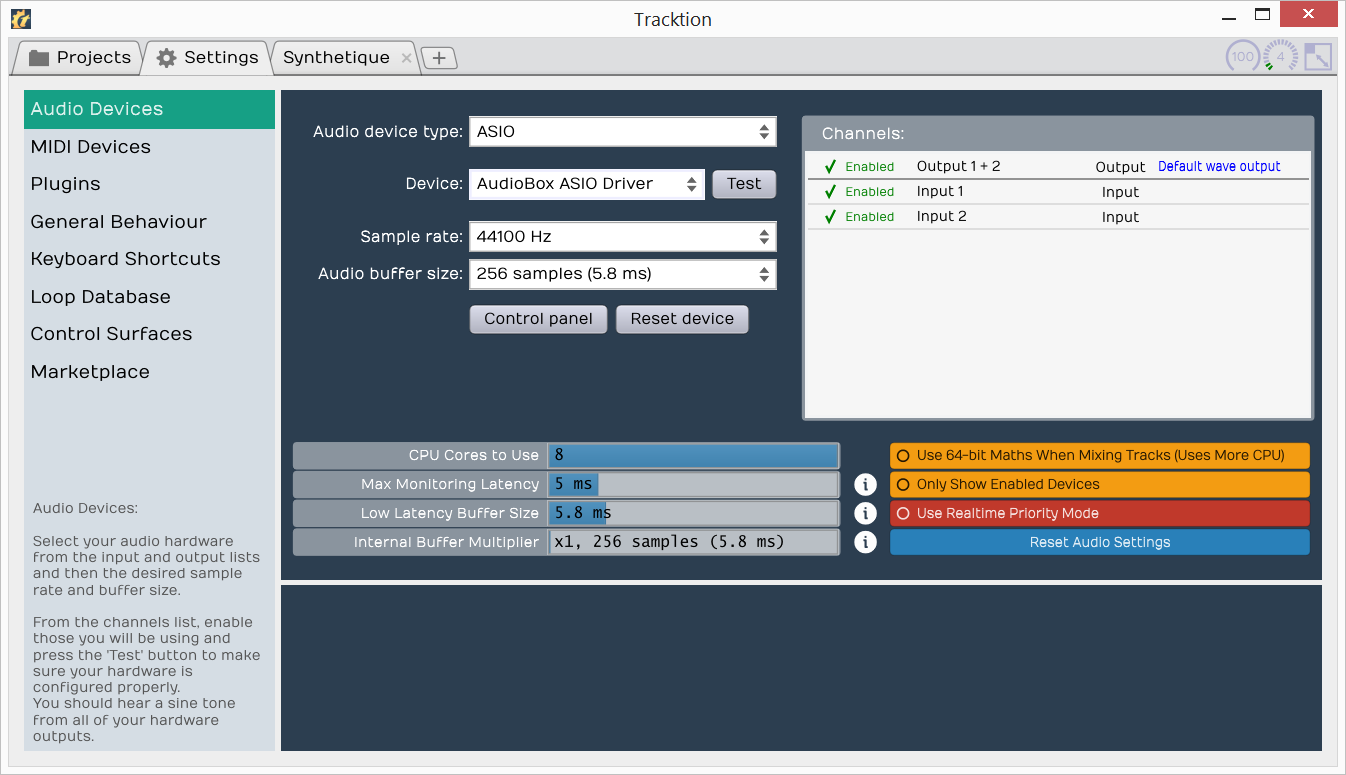
- Control Panel
- On some but not all audio interfaces, the Control panel button will open the manufacturer’s driver control panel to set the buffer size. Many audio interfaces don’t allow you to set the buffer size or the sample rate through host software. If that is the case, locate the control panel software on your system, and open it. Set the Sample Rate and Audio buffer size there. In some cases, you will need to restart Tracktion for the change to take effect.
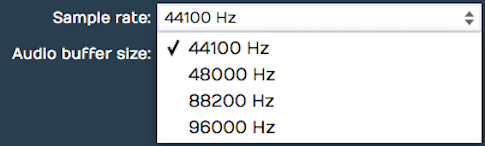
Setting the Sample Rate
The default for the sample rate is 44100 Hz which matches the sample rate for CDs. I would suggest choosing that unless you have a reason to choose a different sample rate.
Testing for Audio Playback
It is a good idea to test playback to make sure you get sound and a full stereo image. Here is one way to do that:
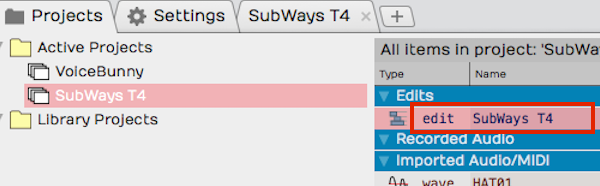
- Go back to the Projects tab and select one of the demo tunes - Subways is a good choice.
- Locate the Edit on the right (SubWays T4) and double-click to open it.
- Click Play (spacebar) and you should hear music!
About Latency
The process of mixing your tracks together, calculating digital effects, and triggering instrument samples takes time in any DAW. It is impossible for digital mixing to happen instantly. The amount of time your computer needs to compute, process, mix and playback from input to output is called ‘latency.’ Latency is the amount of time you allow the computer think and is normally measured in milliseconds - from just a few to several hundred milliseconds.
During playback, latency is detected only as a delay between hitting play and hearing playback. This results in a barely detectible lag in the transport functions and doesn’t cause much trouble.
Latency during overdubbing is more of an issue. If you are hearing playback of existing tracks a bit late, then what you are recording is not going line up correctly because your timing reference is shifted - late or early. Even a few milliseconds will effect feel. At 30 or 60 milliseconds, the timing will seem off. This can have an impact on the feel of the recording or even make it the timing seem completely off.
For these reasons, DAWs have latency compensation. Following recording, the audio tracks are essentially shifted to compensate for latency in the A/D process, mixing, and plugin DSP processing.
Managing Latency
Audio buffer size by default is 512 samples (11.6 ms) on OS X and 256 samples (5.8 ms) on Windows. On modern Mac computers, you can usually run with the buffer size set to 256 as well.
Let’s consider a latency of 11 ms. In reality, 11 ms is a very short period of time. In the real world if you are playing a MIDI controller into a virtual instrument, there will be an 11 ms lag between when you play a note and when you hear the note. It’s the same thing if you’re working with a virtual guitar amp or amp simulator. When you play a note the guitar you hear the sound 11 ms later. Sound travels through air at the rate of approximately one foot per second(0.3 meters per second). So this latency is like playing with your guitar amp or keyboard monitor 11 feet (3.4 meters) away. There is a delay but you might get by. At 6 ms delay, usually the delay is barely noticeable.
With computer recording, we alway aim to strike a balance between noticeable latency and getting clean playback. Why not just lower it all the way down? Because, the computer needs time to ‘think’ and produce the sounds and process effects. If we get to aggressive with lowering the buffer, the computer starts to complain in the form of pops, clicks, dropouts, and the like. So during recording you might keep this lower, during editing and mixing you can increase it.
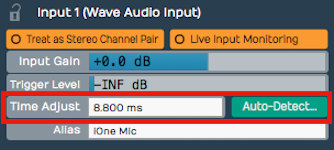
Calibrating Input Latency Compensation
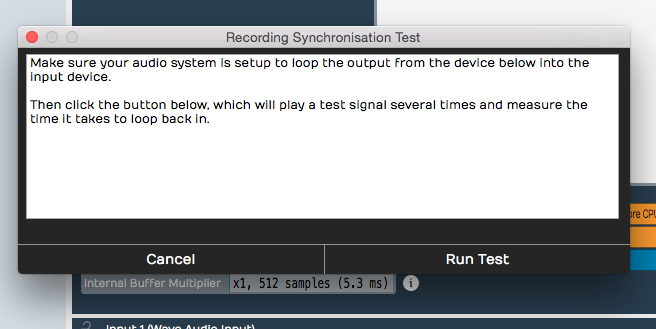
If you use Tracktion for any overdubbing, this is possibly the most important lesson in this book. Tracktion requires you to run Auto-Detect using a loopback connection on your audio interface.
Here are the steps:
- Turn off your monitor speakers!
- Make sure any input monitoring knobs, buttons, or mixers or off or turned down.
- Connect one output back to one of the inputs. To make it simple, connect the left output to input one.
- Turn the gain up about half way on the input.
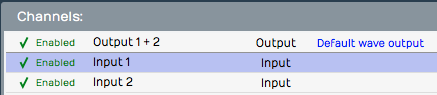
- In Tracktion go to Settings > Audio Devices.
- In the Channels list click on one of the Inputs
- In the Properties section click Auto-Detect.
- Click Run Test. Tracktion will send a short test signal from the output to the input. It will calculate the delay between output and input.
- Click Apply and Traction will copy the delay value to the Time Adjust property.
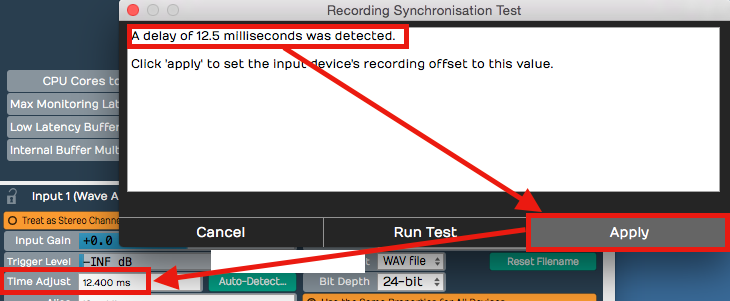
For recordings to be aligned during overdubs, you must repeat this every time you make a change to the Sample rate or Audio buffer size. If you don’t, your recordings will be several milliseconds out of alignment with existing tracks.
Other Audio Device Settings
We just covered the essential things to get going. There are more settings here that you might be curious about. To be complete, here is an explanation of each!

- CPU Cores to Use
- This can be set from one to the number available. Usually you leave this at the maximum cores available. The maximum is typically the number of hardware cores in your CPU times two. For example, if you run a four-core processor, the maximum cores will be reported as eight. If you are running some other software alongside Tracktion that needs more CPU power, then you can reduce this number to make Tracktion leave some cores open for other tasks CPU. Cases where this is necessary are rare except when debugging specific problems.
- Use 64-bit Maths When mixing Tracks
- I normally leave this on. If you have a nice fast computer you can leave that on. It gives you a little bit more headroom in the mix engine. You probably won’t notice much difference if it’s on or off. If you have a very old computer with limited CPU, leave it off. By default it’s off; I usually leave 64-bit maths turned on.
- Only Show Enabled Devices
- The Channels list on the Audio Devices page includes a check mark next to each input and output. Click that check mark and it turns to a red ‘X.’ This disables that hardware and after that Tracktion will no longer present it an option in other menus. Well, this setting Only Show Enabled Devices will hide disabled inputs or outputs when turned on. I usually leave it off.
- Max Monitoring Latency
- This is the maximum allowed latency when in low latency monitoring mode. If latency exceeds this, Tracktion will shut off some plugins. I suggest you leave this at the default 5 ms and don’t worry about it. It has no effect unless you engage low latency mode.
- Low Latency Buffer Size
- This is the alternative buffer size to use when in low latency mode. Leave this at the default and don’t worry about. It also has no effect unless you engage low latency mode.
- Internal Buffer Multiplier
- Another setting related to low latency mode. Usually just leave this set at 1X and forget it.
Resetting to the Defaults
If you are playing around with the values on this page and you just don’t know how they should be set, click Reset Audio Settings.
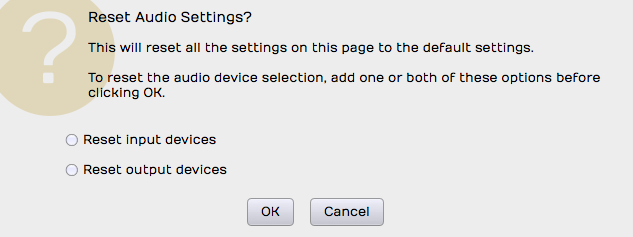
Leave the page at the defaults and press OK. This resets the page to the factory settings.
If you tick Reset input devices option, all the settings for input devices will get reset. Those include Input gain, Trigger level, Time adjust, and recording options.
If you tick Reset output devices then the output options are reset. Output options include Treat as stereo pair, Dithering Enabled, Left/Right Reversed and Alias parameters.
Moving On
Audio device setup is straightforward apart from running the Auto-Detect loopback test. Even so, you don’t need to fully understand everything on the Audio Devices page. Follow the guidelines in this chapter and you will be ready to move on!