Part 3: The Story Lifecycle
So what do #smallbatches actually look like? They usually manifest as User Stories (stories).
You may have used User Stories in your team before, but I’m going to give you a few more constraints, tips and suggestions to get more out of them.
The first thing we need to get straight is the Story Lifecycle. This is a cycle defined in our #agileforteams process first, and then supported by our tool, Tracker, second.
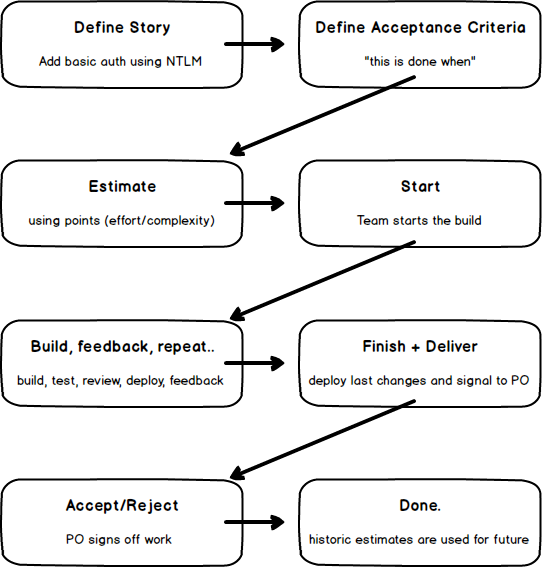
The above direction of flow indicates that stories must evolve in this sequence. For example: We can not start a story without first putting an estimate against it.
The other thing you’ll notice is that I prefer not to use the term “done” very much. Done is overused in the Agile space and in my opinion is often ambiguous: code complete? pushed to the server? built? integrated? deployed (to where)? signed off or just waiting around? To solve this ambiguity teams often adopt a documented Definition Of Done but while I’ve used those in the past and agree they’re valuable, you don’t always need them. “Done” in the above image means the end of life of a story: It’s in PRODUCTION or a PROD-like environment (heavily, if not completely integrated) and the customer or Product Owner has accepted it. When the Product Owner accepts something, they then transfer the ownership from the build team to themselves. This is where value is created.
The #agileforteams process is a very “customer direct”, hands-on, human-centric and collaborative way of working.
Writing a high-quality Story
In the same way that there is no “right way to do agile”, there is no perfect way to write a story either. Here’s how I’ve been doing it for the past few years. Start with this and then adapt to suit your team over time.
The conventional User Story syntax looks like this:
As a
<user role>, I want to<what do build>so that<value to be realised>
An example story might be:
As an Admin, I want to see the last page requested for each user session, so that I can see where users abandoned
or
As a new customer, I want to hide the optional sign up fields, so that there is a less confronting form and we get less churn
The important elements here are:
- The
<user role>or the point of view for the story. Who is this for, or what is the role of the user who will be experiencing this feature or behaviour? - The thing you want to do or build:
<what do build>. This is a summary of the body of the story. It’s the work to be done. - Lastly we have the
<value to be realised>. This is the most important in my experience. It conveys to the team why we should be doing this work.
With that last point in mind, #agileforteams adopts the following syntax:
STI
<value to be realised>[, AA<user role>], IWT<what do build>
As you can see, I’ve changed the order, made the <user role> optional and created some shorthand so that we’re largely reading important words rather than “convention bloat”.
- STI: So that I..
- AA: As a..
- IWT: I want to..
Some examples using the new form:
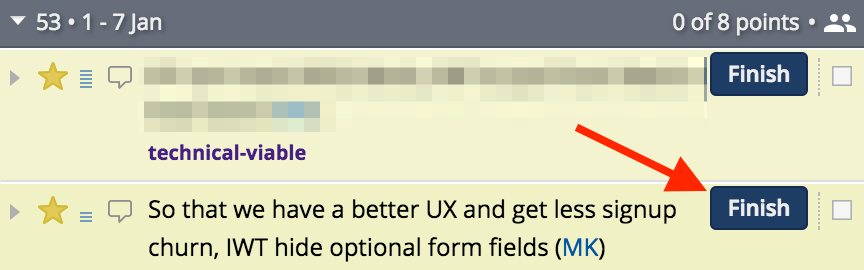
So that we have a better UX and get less signup churn, IWT hide optional form fields
or
STI can better track user abandonment, AA Admin, IWT list the last page requested for a Session
or
STI can tell if the documentation has been updated, IWT publish a version token in the footer
These are the story names or titles. These would be on the front of the physical card (if we used a physical wall) and so are contextualised at a “high level” and omit most of the detail.
Many teams trying Scrum or other agile patterns often omit the <value to be realised> when it’s at the end of the line. It’s also sometimes harder to form this part. Compare that with Add first part of commit hash to page footer - easy! I know what to do. But maybe we don’t know why. Or maybe, we think we know why and odds are that as a developer, I want something for different reasons to the PO or even the end user. The core value of a story can only be understood when we define the why explicitly. This is why the <value to be realised> is required and first. It also helps one justify whether we should even have the story at all - if you can’t answer why? then maybe you don’t need the story. The PO “owns” the product, but I encourage all members of the Build Team to occasionally challenge a story as a humble conversation with the PO. If done well, we are sometimes able to influence a PO to self discovery and cutting a feature out entirely. This always a positive thing.
In my experience, many more stories using the conventional syntax start with “As a user”. This bothered me over time, and like any good code refactor, after a lot of usage and waste, I decided to cut it out. And by “cut it out” I mean, make the <user role> optional.
Feel free to expand the “STI” and “IWT” shorthand as necessary to make the story title readable, as I did in the examples above.
Any member of the Build Team can create a story. But it’s the PO and Build Team together, who define it. That is to say that the second step in the Story Lifecycle, Define Acceptance Criteria, must be completed by the PO and at least one other member of the Build Team. Suffice to say that we want to avoid wasted communications, so having a developer and the PO (and others) together to Define the story, will likely avoid unnecessary to and fro.
Defining a high-quality Story
On the back of a story card usually we have the Acceptance Criteria (AC). These are the conditions that need to be met for the work to be considered complete. Usually they are statements expressed in the positive future tense like so:
- Address, Nickname and Social Media Handle fields are hidden on initial load
- We include a “Show optional fields” link above the hidden area
- When link is clicked, the hidden section and fields are shown
- “Show optional fields” is removed after first click. There is no “re-hiding” behaviour
As a clarity tool and reinforcement mechanism for PO and developer, we use the expression “this is done when” instead of Acceptance Criteria. It’s more “plain language” and readable. It also makes more explicit the notion that “we are finished” when we satisfy these conditions. I’m sure I don’t have to tell you developers about the pain of POs changing their minds and scope creep. A developer wants to be confident about when they are finished and confident that the PO will accept the work they’ve done.
Most stories, if small enough, will be completely defined with a good title, a few bullet points/notes and sometimes a sketch or marked-up screenshot. As an example, the completely defined story might contain only the following:
So that we have a better UX and get less signup churn, IWT hide optional form fields
this is done when:
- Address, Nickname and Social Media Handle fields are hidden on initial load
- We include a “Show optional fields” link above the hidden area
- When link is clicked, the hidden section and fields are shown
- “Show optional fields” is removed after first click. There is no “re-hiding” behaviour
NOTE: might want to use
visibility: hidden;instead ofdisplay: none;due to existing JS complexity on that page.
This would be enough for the team to begin estimation and get it delivered.
As you can see, the team uncovered a potential implementation detail in the course of discussing the requirements with the PO and added it to the story as a note. This is fine but should be kept to a minimum. Sometimes this happens at definition stage, sometimes at estimating; but be sure to keep it separate from the formal this is done when. Try to phrase story definition as user-oriented or implementation agnostic as possible. This gives the developers the freedom to innovate and the PO confidence about meeting their objectives.
Estimating a Story
Remember how I said that if you only take one action from this ebook to your team it should be the Retro? Well, the second most critical action to your #agileforteams process is the Estimation; specifically consistent and repeatable estimation. Sometimes this is called Backlog Grooming or Backlog Refinement. Those terms don’t work for me because they suggest that it’s kinda optional, and for us, it isn’t. Other teams call it “pointing [a story]” and you’ll see why below.
Not every Agile process will be scientific. Many of the common agile patterns don’t need to be. Scrum practitioners will generally apply the following but, as usual, I’m going to refine it a little more for you so that it’s not only easier to use, but substantially more valuable.
Don’t get stressed or hung up on being careful to ensure that you pull off estimation activities “by the book” because I’ve said it’s so important. Just carry these tips with you and try to throw a new one in each time and eventually, over time, you’ll find a consistent groove.
Being able to reliably predict future delivery rates based on historic delivery rates requires control. Controlling the inputs ensures more accuracy for the outputs. It’s just science.
The rules for our estimation are the following:
- We use “points” instead of hours or person-days. Our points are a Fibonacci sub-set: 1, 2, 3, 5, 8 and “too big”.
- We use Planning Poker for “throwing down a number” and we use our hands to do it. Avoid apps and playing cards if possible. Like the Retro voting, we don’t reveal votes until everyone has silently selected a number. Everyone reveals together.
- When there is only a single size difference (eg. min is 3 and max is 5) we “go large” (select the 5).
- Use all 10 fingers to indicate “too big” and as early as possible, break these down into 2 or more smaller stories.
- When there is wider deviation, a “low ball” team member gives reasons for their low vote and the “high ball” member explains theirs too. Then discuss.
- Limit discussions (strictly 2 mins if you have a lot of stories to estimate; use a stopwatch) and invite a second vote to zoom in on a number. Two, maybe three, rounds of voting should be enough to get to the same number or a single size difference. If not, split the story or create a Chore to investigate the requirements further.
- Log blocking questions for the PO, update the AC/this is done when as you better understand the story, and add notes/reference links to the description while you’re discussing the work.
- Log the agreed estimate/points number at the end and quickly move on to the next story.
Have a look at the following scenario and then after, I’ll unpack some of the details.
I know this example doesn’t cover all the scenarios and variables but I’ll try to cover many questions I hear frequently and some of the more common variations.
-
Let’s start with story points.
Developers are notorious at estimating very inaccurately when it comes to hours and days. Just ask any project manager. It’s also a recipe for bias too - I want to show my team and myself that I have a handle on something and I can do it (quickly), so I’m mentally incentivised to offer a smaller than reasonable number. Most developers often estimate by a factor of 0.5 or smaller when using linear time.
Points push all that to one side and free a technical team member to think more clearly. We usually say that points are in terms of “relative complexity or effort”. Complexity works for some personality types. Effort for others. The other thing to note is that a 2 is not necessarily twice as much as a 1. Think of 1, 2, 3, 5 and 8 simply as containers. 5 is the “middle of the road” container and 1 is the smallest thing the team will ever do. In that “1 container” might go a one line change that takes 10 mins or a re-styling effort of 3 hours. But it’s the smallest so the smallest items of relatively the same size get a 1.
8 on the other hand is absolutely the biggest thing any member of the team wants to commit to in an iteration. If your iterations are 1 week and Bob thinks the story can be done in a week but Sarah thinks longer, then it’s more than an 8, and should be broken down. -
Less tools is more.
Avoid the Planning Poker cards and apps and just stick to your hands. This also influenced the selection of Fibonacci numbers.
We don’t use the size0because it’s somewhat confusing and dangerous (like a Chore - more later).
We don’t use more numbers because you get diminishing returns by increasing the resolution of estimates too much further. Tracker also offers “t shirt sizes” S, M and L which I’ve found helpful for planning heaps of work up front very quickly but not particularly practical for day to day work or new teams to this process. -
At all times, remember: we’re just estimating.
I’m preaching to myself here. I often have to remind myself that these are all just estimates. It helps you relax a little and not apply as much pressure to yourself (and your team mates) and sometimes get to a number quicker. -
Use the Done column to reset your base of reference.
I didn’t include this in the narrative above because if you’re estimating regularly (every 2-3 days), each team member subconsciously knows the relative scale of each point container. But on more occasions than not, it’s helpful to pull up the Done column in Tracker and refresh the team on what each size means, using recently completed work:
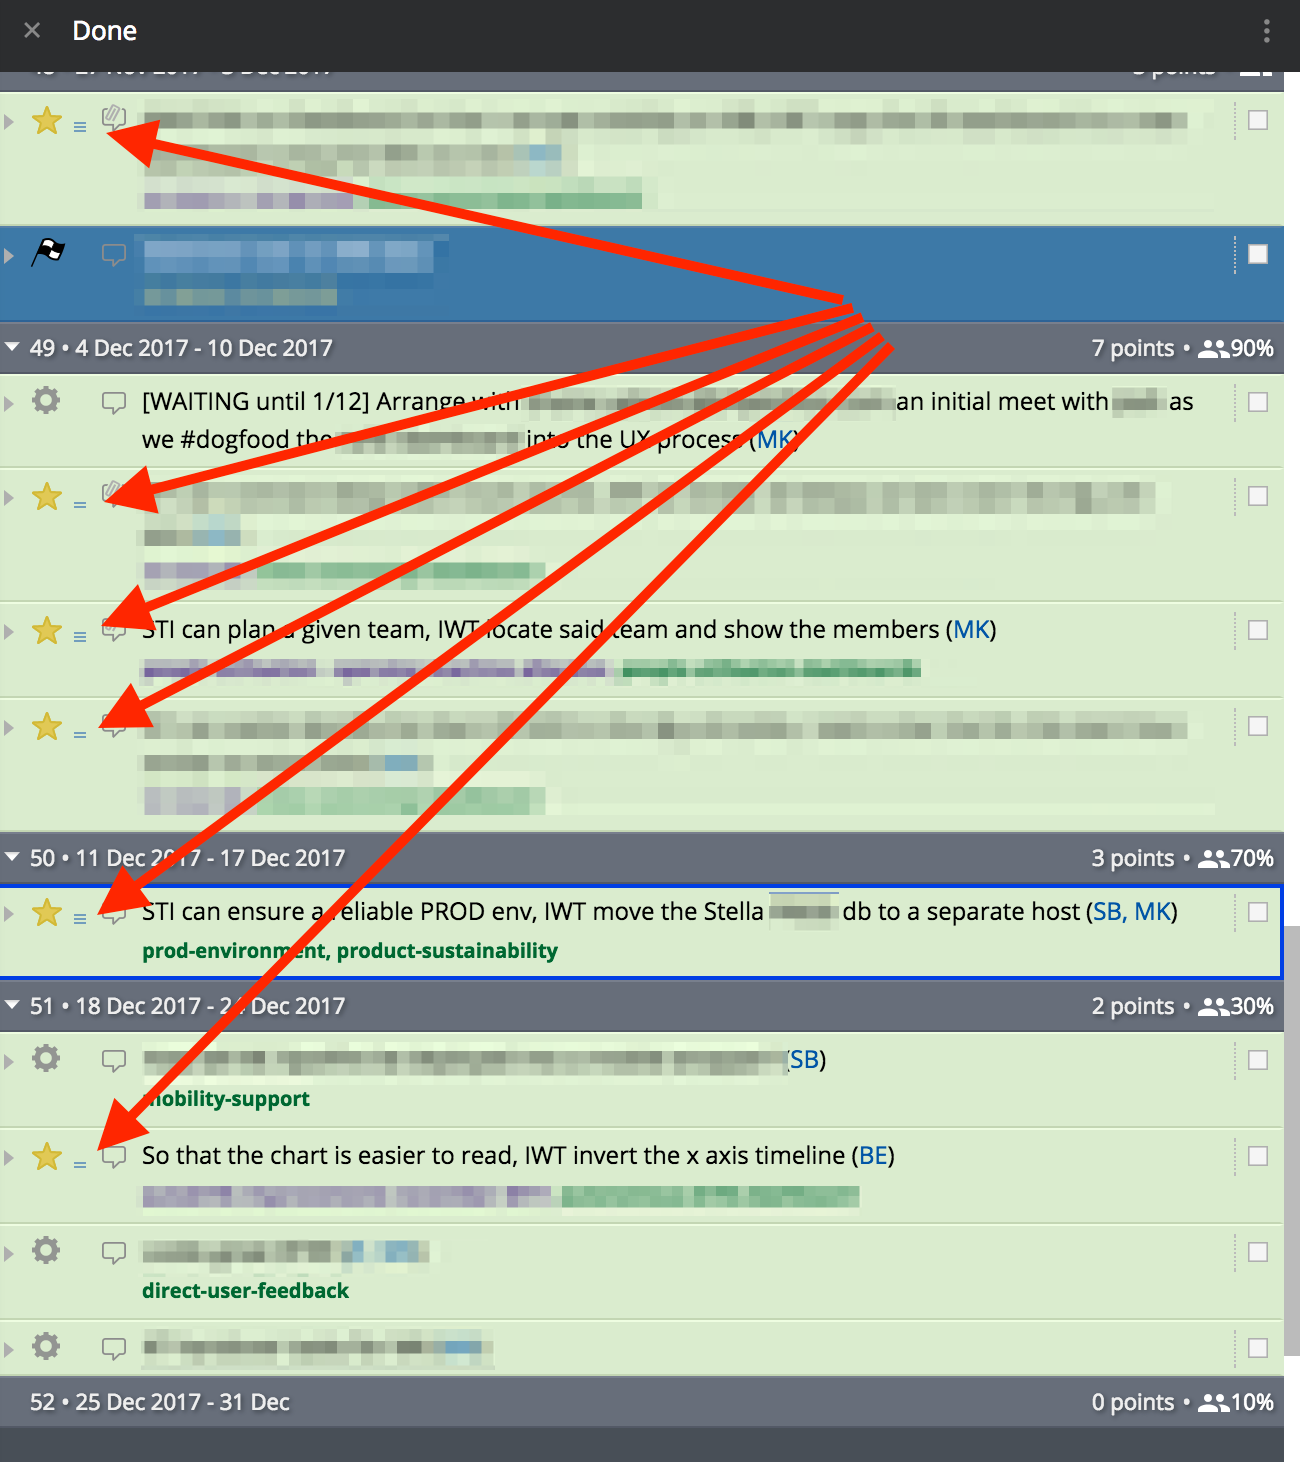 Scroll to the bottom of the Done column (most recent completed iteration) and work back until you find 1 or two of the various sizes that the team is debating match the container for the current story being estimated. This is another mechanism to ensure consistency over time for the estimation inputs. You’re essentially reminding each team member “what a 3 looks like” or “what a 5 looks like” prior to each silently forming their estimate. This historic reference is vital in ensuring that work of the same relative size receives the same estimate over and over again.
 -
PO does not vote.
After a story is defined, the developers usually estimate it. Sometimes other members of the build team can help but this activity must absolutely exclude the PO. The PO has a conflict of interest when it comes to estimating how big a story is, so they need to stay out. If your PO can sit in on the discussion to answer questions and further clarify, then that can be helpful but I’ve found they often influence the estimate, sometimes simply by being present. If you can find a way to meet with the PO and clarify the AC separately and estimate without the PO, I think you will have more success. Discuss in your Retro if you have issues.
This, like many practices, simply gets better over time. It’s ok for it to be little slow at first. Like commits, stories, iterations and release phases, the smaller you can batch things, the faster you’ll cycle and quicker you and your team will learn.
Starting
Train yourself to get over the fear of starting!
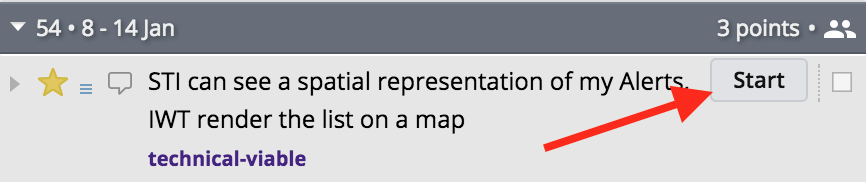
For some reason, even folks who are engaged to use Tracker seem to be hesitant to clicking Start. I think I’ve done it too and here’s why:
Aside from the automatic ownership assignment the tool makes when a user clicks Start, there is a physiological commitment you’re making. In a working environment where everyone is cross-skilled (ideally) and can pick up any story, it’s easy to think “Oh, I’ll leave that one for Sarah and get the next one.”
Please don’t do this!
Grab your lightsaber, adopt your attack posture, click the Start button and then get it shipped!
There is this unknown time where developers implicitly “start” a story before clicking the button. They’re looking at code, trying to understand the requirements and to some degree planning how they will execute the build. This is great and real work that needs to be done. But rather than “evaluating the work” (coz that’s what you’re really doing), indicate to the rest of the team that you’ve taken it on by clicking Start. Then the story moves from the Backlog to the Current (Current Iteration - the work that is now in progress) column and everyone can see what everyone else is working on. During that “evaluation period”, your team mate might become blocked or idle and she might pick up the same story because according to Tracker, no one is currently working on it - now it becomes waste. So please, click Start.
The other reason clicking Start is so important is because #agileforteams doesn’t subscribe to (the conventional implementation of) Standups. Unless you’ve found a way to make the daily Stand Up meeting more valuable, its usual goals are to surface to the team what each member (a) did yesterday, (b) will do today and (c) whether there are any blockers/impediments.
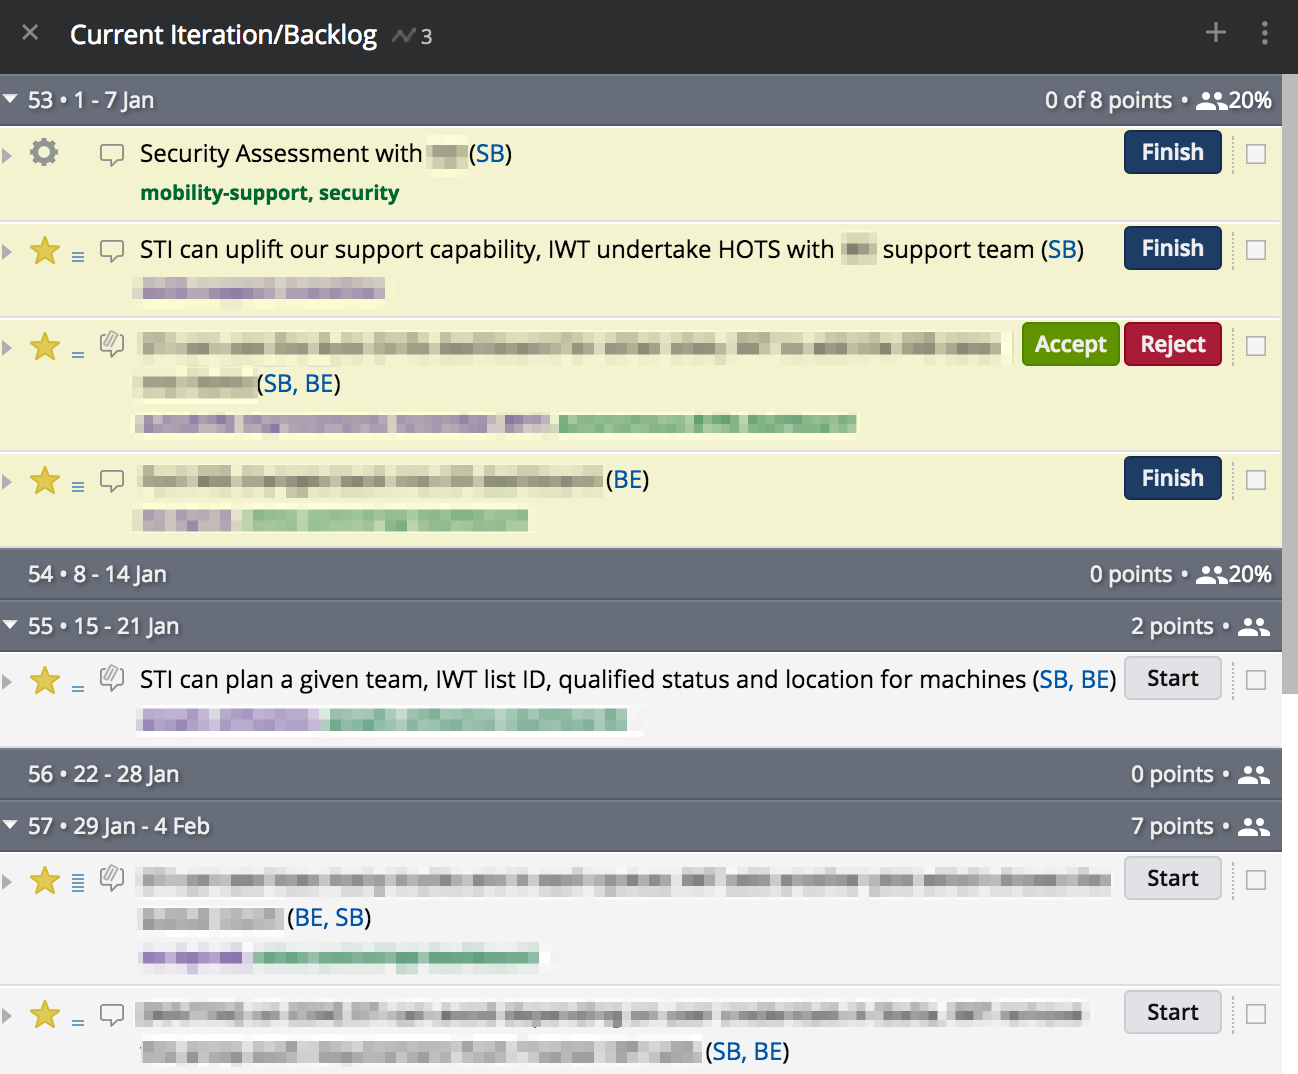
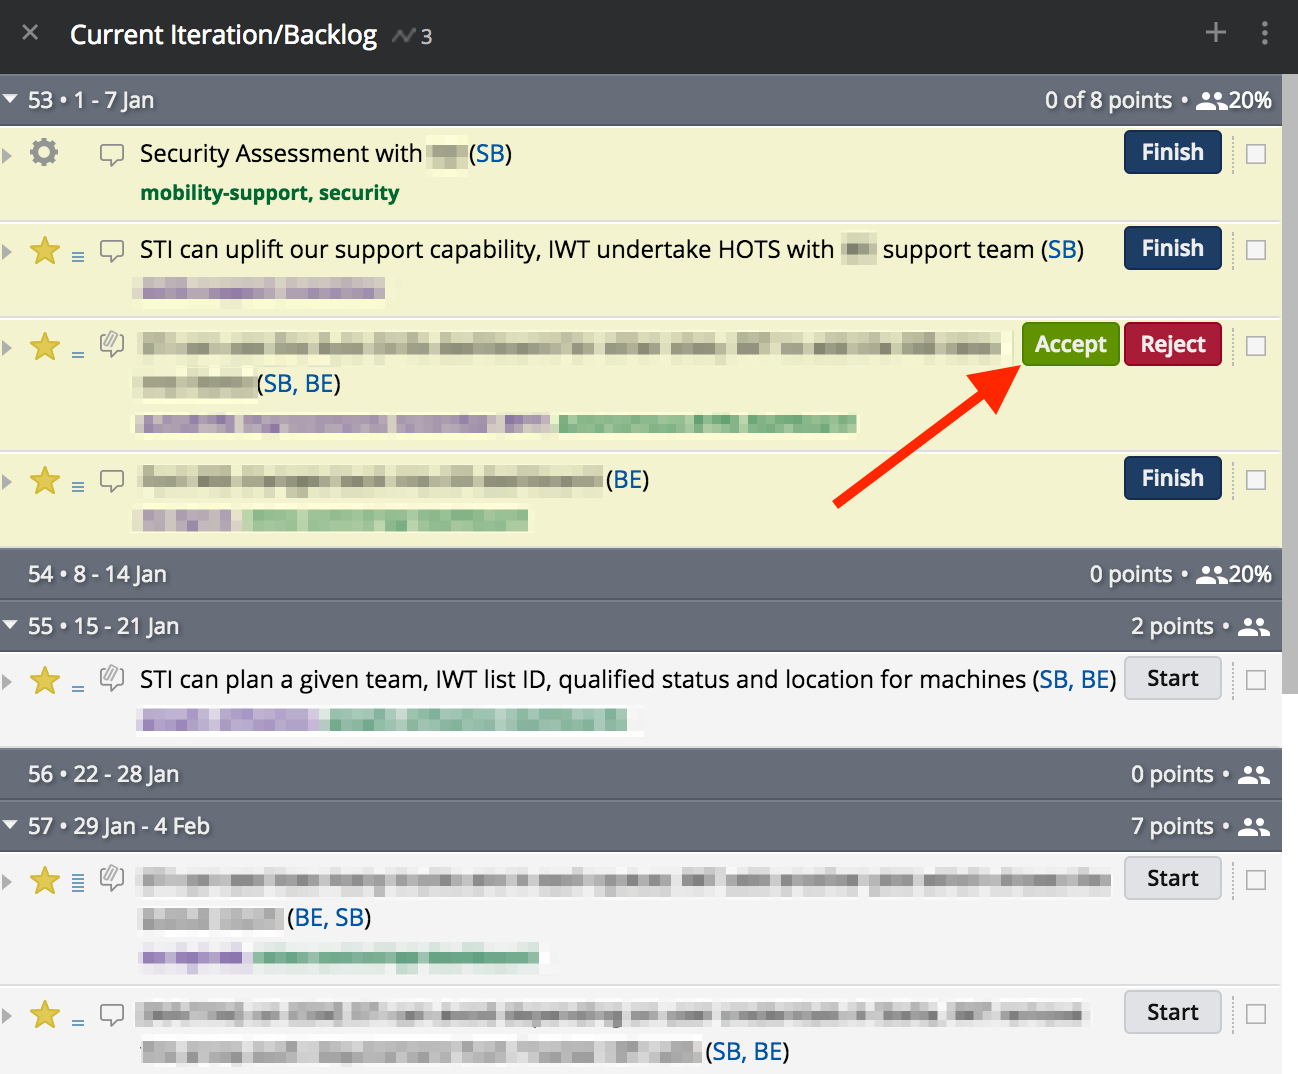
(here Current and Backlog are combined, on top and bottom respectively, rather than in separate columns)
From the above I can see that:
- Sarah has a Chore and a Story she’s not yet finished.
- Barry also has a single story he’s working on.
- There’s a story there which is complete from the Build Team’s point of view - it’s simply waiting on the PO to Accept it.
- The next piece of work to be started is listing various details for machines.
- After that one, there’s a 5 point story that should get started next.
If the current Velocity (rate of delivery) is correct then those week boundaries should be accurate too. So chances are, those un-started stories won’t get started tomorrow. You can already see that I’m now getting even more context than a regular standup meeting and I didn’t have to ask anyone anything or waste valuable time. If I wanted to see what was Accepted yesterday I just open up the Done column.
You might notice that in the screenshot above both Sarah and Barry have assigned the next few stories to themselves in advance. Unless you agree to do this as a team, please try to avoid it. Whether you’re there or not right now, you should want to move to a “cross functional” style of working where every team member can start any piece of work. This way you ensure maximum parallelisation of work and minimise specialisation and SPOFs.
Can you see now why it’s so crucial to maintain the context in Tracker as up-to-date as possible? Tracker works best when each member of the team is adding comments to stories, updating the status of stories and regularly reading comments from others on a daily basis. Free everyone to work how they prefer and where they prefer by using the collaboration features of Tracker to their fullest potential.
Another thing I try to suggest when a story is stretching out over multiple days (which some do and that’s fine), is inviting the owner of the story to add a quick progress note to the comment thread of the story before leaving for home. If those working on the story are already leaving comments throughout the day (communicating with the PO, other team members or simply logging context because they’re particularly verbose) then obviously skip this. But it’s hard for a lead, PO or manager to know whether work has stalled or someone needs extra support if a story has sit in the Started state for 3 consecutive days. Use the tool and reap the rewards.
Building
Now I’m going to talk a bit more about software development patterns. I’m going to insist on a few things in this section and for some of you this might be scary. Maybe you do these already, and if so, power to you! It will make this whole agile thing much easier. But for the others, you may have only heard of these things, and have wanted to do them for years. Yet still others will start to freak out as I unroll this picnic blanket of surprises.
These are not “Matts rules” these are the building blocks of high-performing software and product teams and many if not all of these patterns and practices enable the #agileforteams process. I’m going to explain what the tool or pattern is, why you should use it and how it supports our process.
“But I can’t change all the things Matt! My team is old school..” or “doesn’t like change..” or “too invested in it’s current way of doing things..” or some other excuse. Look, nothing good came easy okay. I already know you want to; that’s why you’re here right? You’ve already launched a major piece of change: The Retro. You did that right? Like I said to (if not, go back to Part 1). That’s the beginning and already forming trust and a greater degree of rapport and respect with your team. Take each step small and you’ll get there. Like my old workout buddy used to say with a cheeky smile “Eh Matty, that pain you feelin now cuz, that’s your body getting stronger!”
The key here is having the ability to push code and partially completed work to your PO after the Started event and before the Finished event of the story. My team frequently starts a story, gets something that’s not quite right but mostly working, deploys it hidden behind a Feature Toggle, and then sends the PO a link in STAGING or PROD inviting their feedback. “Hey Bruce, how’s this form look?” or “Mary, I’ve got this drag and drop behaviour mostly working, should the touch area be bigger on your mobile device?” Then the work is refined and completed with a high degree of confidence in acceptance after formal delivery. Sounds lovely right? It is. But it takes many of the below strategic decisions to make it possible.
Mainline Development
I’m going to define clearly what I mean here because this term, “trunk-based development” and Github Flow share many elements but there are some small differences which will be incompatible with our process.
So the rules:
- Everything in
mastercan and will go into PRODUCTION. This means that if it’s inmaster, then it’s ready for PROD. - Use simple Feature Toggles or Feature Flags (like DevCookie) to enable CI and partially-completed stories to be integrated all the way to PROD.
- Use branches only for Features and story-related dev work. We don’t create “release branches”; we don’t create “dev branches”.
- Use Pull Requests for said feature branches if it’s a significant change. 95% of them are significant. The small 1 or 2 line changes, or very well understood larger changes can committed directly to
master. This is fine. - Other than developer workstations, use only TWO/
2/II deployment environments: STAGING and PRODUCTION. You simply don’t need more. - Use a CI/CD pipeline to automatically integrate everything from
masterinto the STAGING environment. Then have a “single click” deployment step to promote what’s in STAGING, into PRODUCTION.
So why?
- Because merging sux and integrating everything into
masterwith small commits andgit rebaseensures you don’t suffer scary merge pain. I’ve done the hour long merge many times and that was usingrebase! Some merges are so bad you copy and paste the changes in from scratch - I’ve done those too. - Because having everything integrated in PROD is awesome, is the ultimate test of “readiness” and just saves time messing around with other silly ideas like TEST, QA, SIT, STAND, CROUCH and whatever else weird environment names we use today.
- Pull Requests are great, even if only for drawing a logical container around multiple commits - something that comes in handy when making smaller, and therefore many more commits. They’re also a great code review tool and one I highly recommend over automated code quality tools like SonarQube, etc.
And this enables #agileforteams how?
- The
Buildingstep of our story wants feedback as soon as possible from the PO, ideally with the work in PROD (but STAGING will do now and then). So we need a way to push partially complete work (WIP) intomasterwithout preventing other work from passing by it; like an emergency bug fix. Feature Flags and mainline dev work well for this but require a little more discipline. - It’s simpler, so it makes automation many factors less complex and therefore easier to scale.
MyCI to STAGINGconfig in TeamCity generally has Build, Run Tests, and Deploy to STAGING steps. The only other thing in there is the deploy to PROD which I can do in Octopus Deploy with a single click. Just to be clever, I sometimes duplicate that click in TeamCity with a second configPromote STAGING to PRODwhich just calls the Octopus API for the above click anyway.
 (This is seriously as complex as my TeamCity/Octo setup gets most of the time. Config as code becomes hard to justify when it’s that simple.. but still do it if you can)
Automated Testing
Testing in the generic sense affords your product two things: confidence that you’re building the right thing; and confidence that you’re breaking something. The path to this confidence, I will break into two categories:
- Proactive Automated Testing
- Continuous Testing in Production.
Proactive Automated Testing is familiar to many simply termed Unit Testing. I take issue to the term Unit Testing because it’s actually only a very specific category in the wider corpus of automated testing. A heathy application should be employing some browser automation and js testing (more js tests if your app is SPA/interaction heavy), some unit testing, but most of the tests should be heavily-integrated tests, probably Subcutaneous tests (Sub-C tests). I’m aware this inverts the Testing Pyramid and I’m fine with that. The Testing Pyramid is wrong. You want “value-delivering tests” and this means each test should be “tested” with the How-To: To add or not to add steps above. Every test needs to justify itself and have a good Net Return.
Some tests are low cost and low value (unit tests). Some tests and high cost and high value (like browser-automation/UI tests). Then still, there are some tests which are low cost and high value (Sub-C tests) - you should have more of these, because they’re the best value for money. To be clear, “cost” here is the up front writing cost and the maintenance of the test over time. Unit Tests suffer in particular when it comes to ongoing costs as they are often heavily coupled to production code which then causes constant refactoring. I’ve seen teams with 1000s of Unit Tests, get so bogged down by test maintenance for each iteration, that they almost give up on testing altogether (yes, turning huge swaths of them off). Automated testing is another discipline. It takes work to get value from it.
Your software should have as many valuable tests (of varying types), as is necessary for your team to feel confident that the application is performing as expected, and that given changes over time, you’re not going to break the most crucial elements of that application.
I’m very passionate about testing, testable code, TDD, and using testing to drive clarity, simplicity and delivery. Sometimes I think I could write a ebook on that by itself. So instead, please read the articles in the links above.
Continuous Monitoring in Production
Active production monitoring, application telemetry and profiling tools are best practice and have been around for a while. Continuous Monitoring in Production builds on that by asserting that a system where many of the integration risks can’t be exercised fully (or even understood) until PRODUCTION, requires automating testing in the live production environment all the time.
With the above definition, this knowledge is fairly new. All I’ll say is that you can’t catch everything before you deploy and many current best practices try to teach us that we can. These include coding standards, code review processes, automated testing, manual testing/QA, acceptance testing, etc, etc. These often result in way more process, tooling and automation which eventually becomes bloat and cost, leading to diminishing returns. There is a happy place, and you and your team should be constantly tuning your process and tooling, trying to find it. Err on the side of simplicity at all times, and remember we are Agile, so if something goofy goes into PROD, it can be unwound easily. Especially if you have..
Fast Deployments
In my simple feature/bug example above, once the code is done and tests are written and passing, the waiting is now on the automated pipeline. In simple terms, the total time from my ENTER key to said change being live in PROD in front of end users is a product of:
- Pulling dependencies
- Building
- Running automated tests
- Deploying
- Network latencies and other tooling limitations (polling windows, concurrent agents, queuing, CPU/IO performance, etc)
In a recent project, excluding the human step to check the STAGING environment before pushing the Promote STAGING to PROD button, the total time was about 2-2.5 minutes. You want to optimise your automation to ensure that build and deploy cycles, are as fast as possible. Unlike many other software efforts, these automation activities are very linear in terms of costs but have huge scaling value. You can generally afford to spend many hours on (learning) automation knowing that over time you will get that back many times over. But please, use your pragmatic decision making skills - don’t do too much too early.
Some things that might offend the Software Police, but get your team more automation agility include:
-
Storing your packages in source control.
I know it’s not ideal for many reasons but stop saying “what if?” and start small. You may never encounter those issues because many of them require scale which you simply don’t have now. This is not so bad that you can’t change it later if your team decides you need to. npm is particularly slow these days and can add anywhere from a couple of minutes to double-digit minutes to a build step. Think about what you stand to gain by relaxing this constraint. - Adding more hardware is a perfectly acceptable, and often very inexpensive way to cut seconds and sometimes single-digit minutes from a pipeline. A hyped up Xenon, with RAID0 SSDs under your desk will often be faster and cheaper than many of the cloud alternatives. Consider the whole “value”: sure there are wiked-fast VMs but they are expensive. Even reserved instances running build agents incur warm-up costs so try to put everything in perspective.
- Hack your build tooling like Stackoverflow did to get more parallelism than the tools provided natively. This option takes a dependency on the one above - you need more cores and fast IO. But as you can read in the article linked above: it worked!
- Run your tests in parallel. This is especially important as you move to more heavily-integrated tests like Sub-C and browser tests. But it does work and you can still have 24 months of test portfolio complete in 3-4 minutes. Compounding this with more hardware is a relatively easy fix.
-
Get creative and challenge the status quo
Do your tests have to complete and pass before you deploy to PROD?
Can you roll PROD back/forward if tests break, after it’s deployed already?
Can you automate this conditional “unwinding”?
I don’t know about you, but my team’s tests don’t break very often and when they do it’s usually new work, and when that happens it’s only a small part of the new work thanks to #smallbatches. The point is - you can do some very clever and seemingly scary things to get stuff shipped faster while still managing risk. Go think about it.
Simple Architecture
Simple is like Small. They’re somewhat interchangeable. Simple is low risk, low ongoing effort but not necessarily low cost, especially to set up. Why? Because saying “no” is hard.
If you can avoid an extra package or dependency, then over time, as versions change and you would have used that dependency more (because it’s there), you’re saving hours and hours of work and potential pain.
If you can get away with a MPA or MVC UI for now instead of the latest React/Angular/SPA/#moarJS chaos, then you’re winning in my book. There are absolutely genuine reasons to use SPA frameworks and adding another js package, but most of us don’t make said dependencies justify their membership to our day to day lives. Go back to the How-To: To add or not to add steps above.
Have less deployment environments. Integrating in a pre-PROD or STAGING environment is step one - you need to see all the things working together before you do it in front of end users. The only other remaining step is then giving it to users. Remember that designing both STAGING and PRODUCTION to mirror each other as much as possible serves to further reduce risk. Use CCA tools and Blue/Green techniques to deploy consistently and with confidence. If you’re working in the cloud, often the only thing you might have different between STAGING and PROD are the auto-scaling settings: STAGING might start with two nodes and PROD with 10 for example. This keeps costs low but ensures that an integration or environment-related issue can likely be discovered before PROD.
Become the “wall” that team mates must hurdle before new “shiny” things get added to the mass of your product. Use pragmatic decision making skills and encourage team discussions to use these principles all the time.
Your agility as a team and product is disproportional to the mass of your product and process. If you value agility and adapting quickly then you’ll ruthlessly oppose unnecessary mass. Keeping things simple ensures less mass.
So what do you get in return?
Of our three agile cycles, the most time and effort is spent in this Building step, from within the story, inside the current iteration. It’s important then that we optimise for building the real value rather then extraneous tasks that could be dropped or automated. If you can pull some or all of these things off, you stand to gain:
- Fast feedback, mid-story
- Minimise wasted dev effort by keeping “on track” with PO
- Low risk of story Rejection
- Less communication waste
- Quick and granular identification of issues
- Thanks to low risk integration
- Because it happens frequently, quickly and in small, easy to manage pieces
- Shipped value, very fast and very frequently
- Highly engaged and excited POs, who are actively involved with daily progress and input
- Reliable automation: it’s exercised many times a day
- Responsive remediation flexibility
- Lots of options: roll forward, back, toggle code on/off
- Generally a pleasant development experience
- Generally an awesome PO experience
- Oh, and very few scary merges (
git pull --rebaseFTW!).
Finishing
Clicking the Finish button signals the completion of the dev/code work most of the time. But you can adapt this state to represent whatever you need to in your context.
In some teams we had the internal tester takes ownership after Finish. They would conduct their exploratory and manual testing steps and then if happy Deliver it to the PO.
More commonly however, the action Finish or the state Finished in Tracker, simply denotes that the developer(s) working on that story can now work on something else. A story will often remain Finished but not yet Delivered because a pull request (PR) still needs to be merged by another team member, which is best practice.
Sometimes a story becomes blocked in a way that releases the developer to pick up a new story but the old can’t be Finished. We usually just add [BLOCKED] or [WAITING] to the beginning of the story title and add and comment with more details (example in Done column, see Estimating a Story). We don’t set the state to Finished, and then back to Started again. Kanban encourages the minimisation of Work In Progress (WIP), and so do we. Just keep in mind that Tracker should surface all of this context too. If I can see 4 stories assigned to one person in progress without some kind of [BLOCKED] or [WAITING] prefix, then most likely that person needs support in engaging with Tracker - she’s not keeping it up to date. If Tracker is up to date, there could be a WIP problem.
Delivering
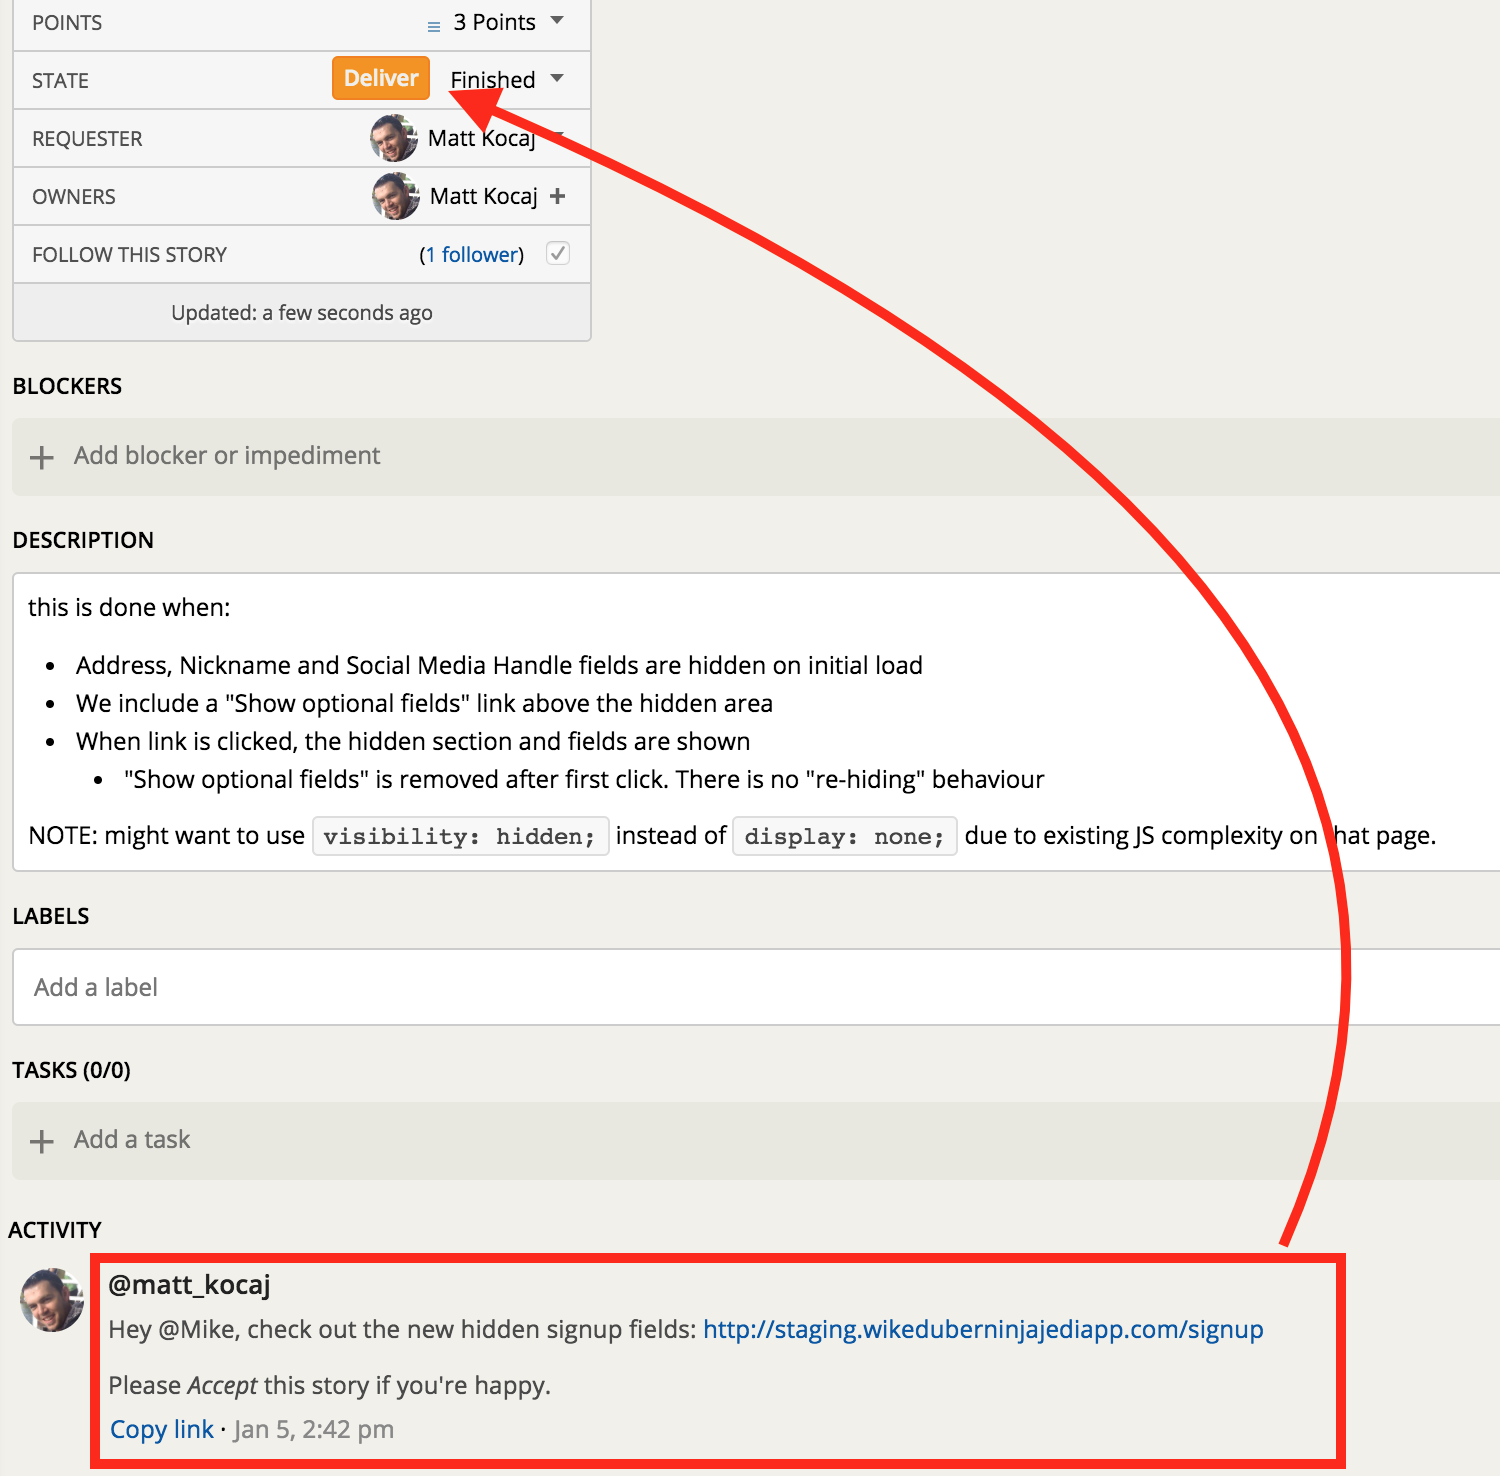
Sometimes it doesn’t make sense to hide something behind a Feature Toggle - if it’s unnecessary work, don’t do it. In the case above I know my PO is responsive and he will see this comment in the next couple of hours. I’m also 95% sure he’ll Accept the work because he was at my desk earlier when I showed him most of it and he was pretty happy (mid-story feedback doesn’t always have to use the Tracker comments). So I’m delivering this into the staging. environment knowing that if a bug needs to go through this will end up in PROD, because my PR is merged into master. More than likely, the PO will see this before the next PROD deployment, Accept the story and then I’ll make the next PROD deploy to set it live. If he Rejected the work because I did something really bad then it’s not a big deal to wrap up the changes in the Feature Toggle (conditionally hide it) after the fact and re-deploy. Optimise for the happy paths and be prepared for the others - this minimises waste.
After I click the orange Deliver button, I’m signalling that all the work is complete, merged into master, built, passing tests and deployed to either to STAGING or PROD. The PO is now welcome to exercise the story according to the this is done when and then either Accept or Reject the story.
Generally we don’t Deliver a story without adding a comment for the PO using the @tagging syntax (this sends them a notification). In a highly engaged team you might not need this as the PO is eager to test and hit green Accept buttons all day long! After all, this is their magic product forming around them.
Lastly, a tip on “hand holding”. You want the PO to click that green Accept button as much as they do: you get to score points, and they get their awesome product. So try to word your final Deliver comment or conversation in a way where you are leading them to their next action - clicking the Accept:
- Try to forecast questions they might have and answer them in advance.
- Gently remind them that this isn’t the whole block of work, just one valuable part. Point them back to the AC/this is done when so they can see what they need to validate.
- If in exercising the AC they discover that they want to change their mind, then encourage them to create a new story - additional effort needs to be tracked and this work is clearly defined. If what she has will get her 80% of the way there, then encourage her to Accept it according to the agreed AC and create a variation by way of a new story. The odds of it being “completely off” are slim given our mid-story feedback.
Acceptance (sign off) and Rejections
Once a story is Delivered, the PO has the opportunity to test the delivered behaviour in PROD/STAGING against the this is done when criteria. Of course the PO can Reject the work, but we’ve already shown how this is unlikely thanks to the highly collaborative Build Cycle. If we do receive a rejection, then a comment should be added by the PO and the story can be restarted.
The ideal and most often outcome is Acceptance. This moves the story into the Done column. Tracker will also show Accepted stories above the Current Iteration section as shown in the below image:
 You will also notice that Tracker is now recording those 3 points as done and counting towards the total for the Current Iteration (circled in red). Tracker will try and forecast how much work, in points, will get completed each iteration. The 8 points circled above is the forecast for the Current Iteration, based on the current Velocity/capacity. Your team may complete more or less than this predicted quantity.
We have now completed a full story cycle. This is a great feeling the whole team can share. The smaller you can make stories, the more frequently the team can experience this forward momentum. Remember, this is not a vanity metric. Those 3 points are real value, validated by the PO/customer, shipped to PRODUCTION as working, completely integrated code. Boom!
Rinse and Repeat
Endeavour to Start stories from the top of the Backlog. As always, there are cases where someone might start something that’s not absolutely the top item, but try to avoid this as much as possible. The team is responsible to give the PO everything they can so that the PO can make informed prioritisation decisions and maintain the order of the Backlog continually. Encourage your PO to check the next week or two of Backlog items and verify they’re in the right order. If you have these estimated, then the PO can usually make a good decision, and drag+drop something to a different position if needed.
Try to keep enough stories estimates to “feed the team”. This is obviously more work if your team is bigger. I generally suggest that 2-3 weeks of estimated work is enough. It’s this JIT approach which assumes that the near future is fairly well known and supports the PO with re-ordering activities. It also prevents waste estimation for the odd story which gets moved out of the Backlog to the Ice Box (like a backlog “later list” of things we may do, but aren’t planning to do) or deleted.
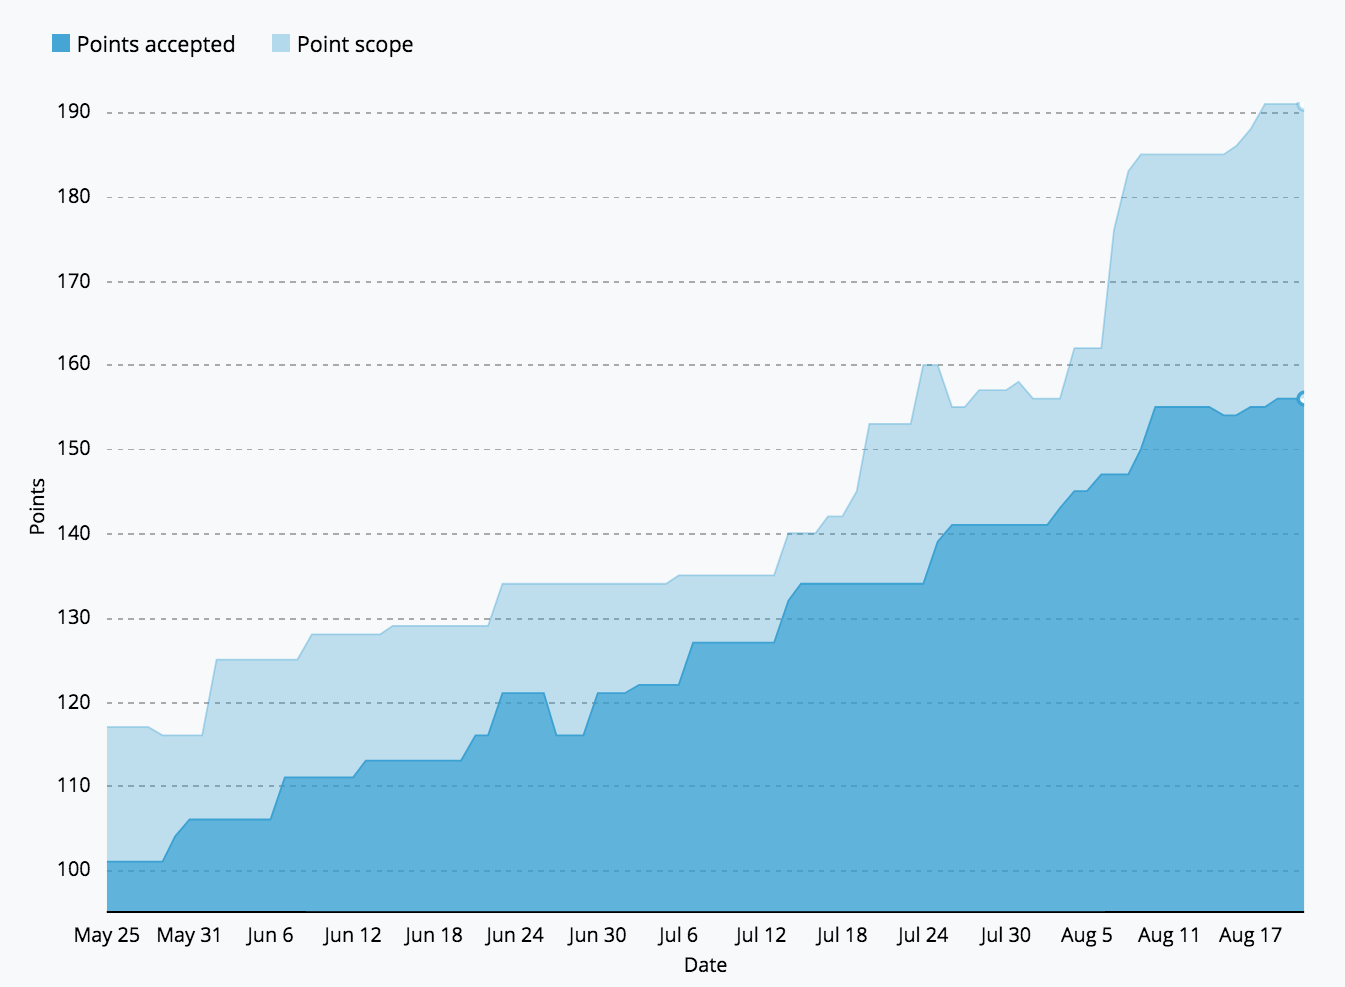 The above image shows a Burn Up chart which compares the total points scope over time, to the points that have been Accepted. The light-blue delta is how much estimated head-room we maintain. Our Velocity over this period was about 7 points a week so you can see we were averaging about 2 weeks of work ready to go (the headroom). If you do find your team with someone who wants to start something new and there’s nothing estimated, then just grab a colleague or two and estimate it on the spot.
Does it matter if Story A with the highest position in the Backlog is Started, then Story B which comes next, is Started and then Accepted first? No. Stories are supposed to be no bigger than an 8 point estimate which should be <= one Iteration’s duration. Worst case, the PO takes delivery of Story A one iteration later than expected. These are, after all, still just estimates. It’s a good practice as a self-organising team member, that when I see my team mate on a particularly large story taking it across many days, asking if I can help out. Maybe by pairing up the two of us can get that big 8 pointer done quicker.
Hopefully you can now see that by:
- Small stories with few dependencies
- Parallelisation of story delivery
- Asynchronous ordering/prioritisation by PO
- Asynchronous build/deliver/acceptance
We can get to a place where we enjoy:
- A highly scalable/efficient team with little capacity waste and Single Points Of Failure.
- Very accurate delivery forecasting (based on real work) with dates as far as many months away within +/- 1 week of actuals.
- Stakeholders/customers in full control of what they take delivery of and when.
- Very (did I mention very?) happy customers/end users.
Questions and Actions
- Run an experiment for yourself: try to say no to everything and everyone for a week (for things that don’t get you immediately fired). You’ll have more time, get more work done and hopefully have avoided some unnecessary complexity. Train yourself to value “simple” and reinforce that value by saying “no”.
- You should now have enough context on the cycles and the details of Tracker to begin entering stories and introducing it to your team. If you’d like the signup discount shown below, please request it by sending me a DM on twitter.
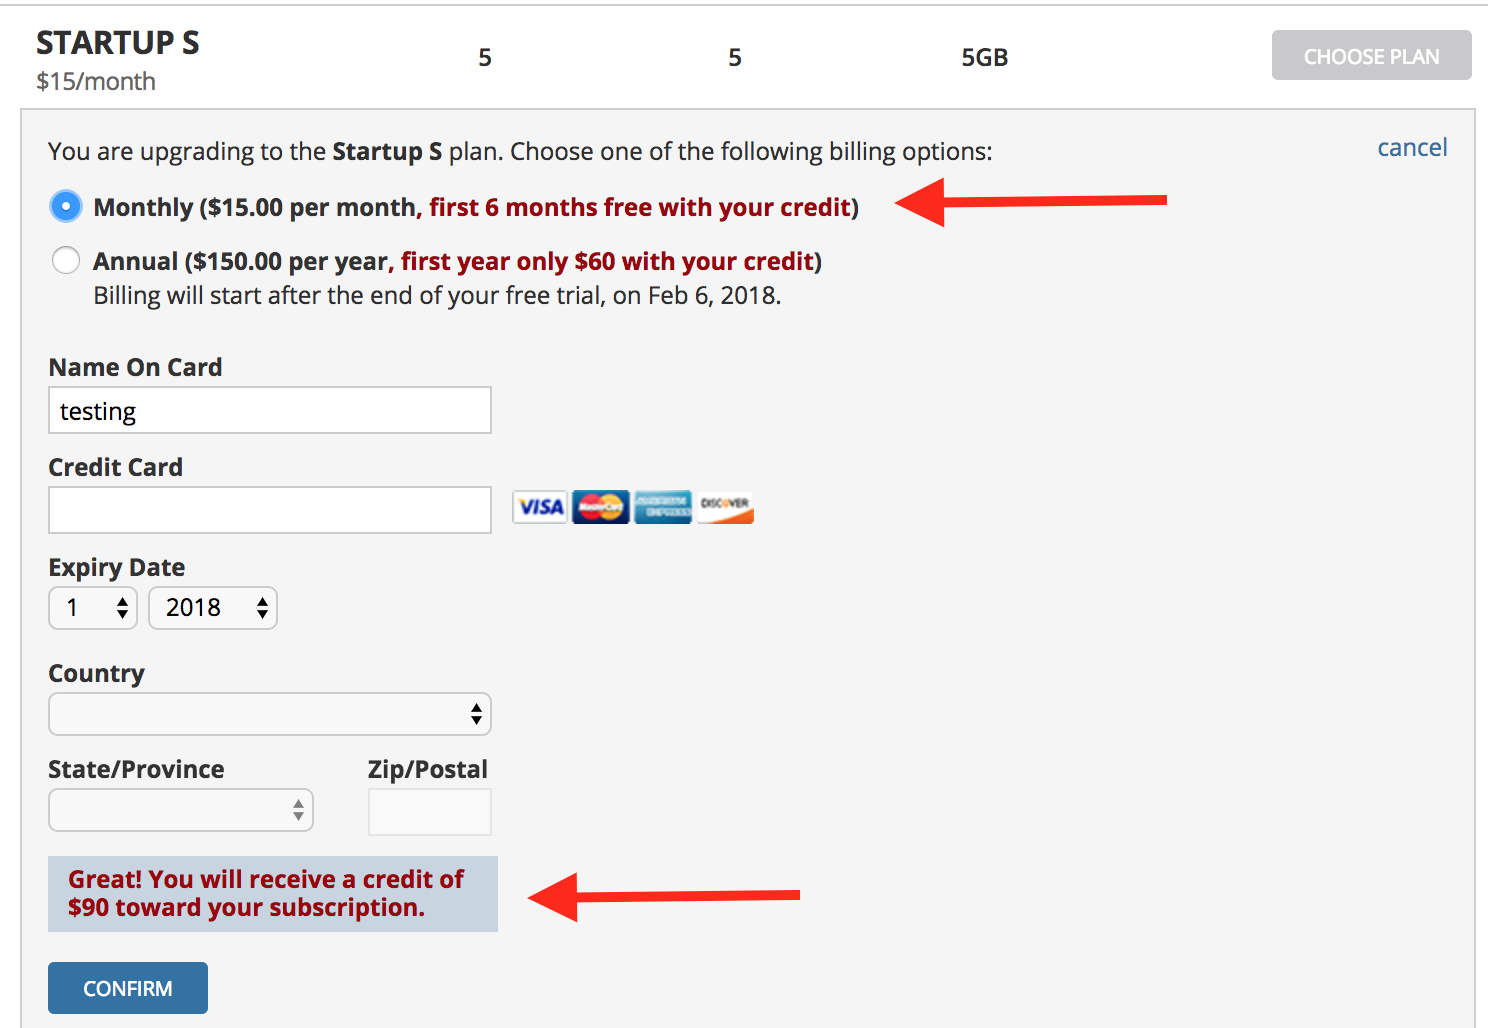 Full disclosure: I don’t receive affiliate credits or anything in return by Tracker offering you these discount codes except for anonymous analytics data and happy readers. Please thank Tracker on twitter using the hastag #agilforteams.
Start thinking about what area of your project or product could be small enough and complete enough, as to make a good launchpad for this new process and tooling.
Full disclosure: I don’t receive affiliate credits or anything in return by Tracker offering you these discount codes except for anonymous analytics data and happy readers. Please thank Tracker on twitter using the hastag #agilforteams.
Start thinking about what area of your project or product could be small enough and complete enough, as to make a good launchpad for this new process and tooling.