Introduction to LM Studio’s Local Inference API
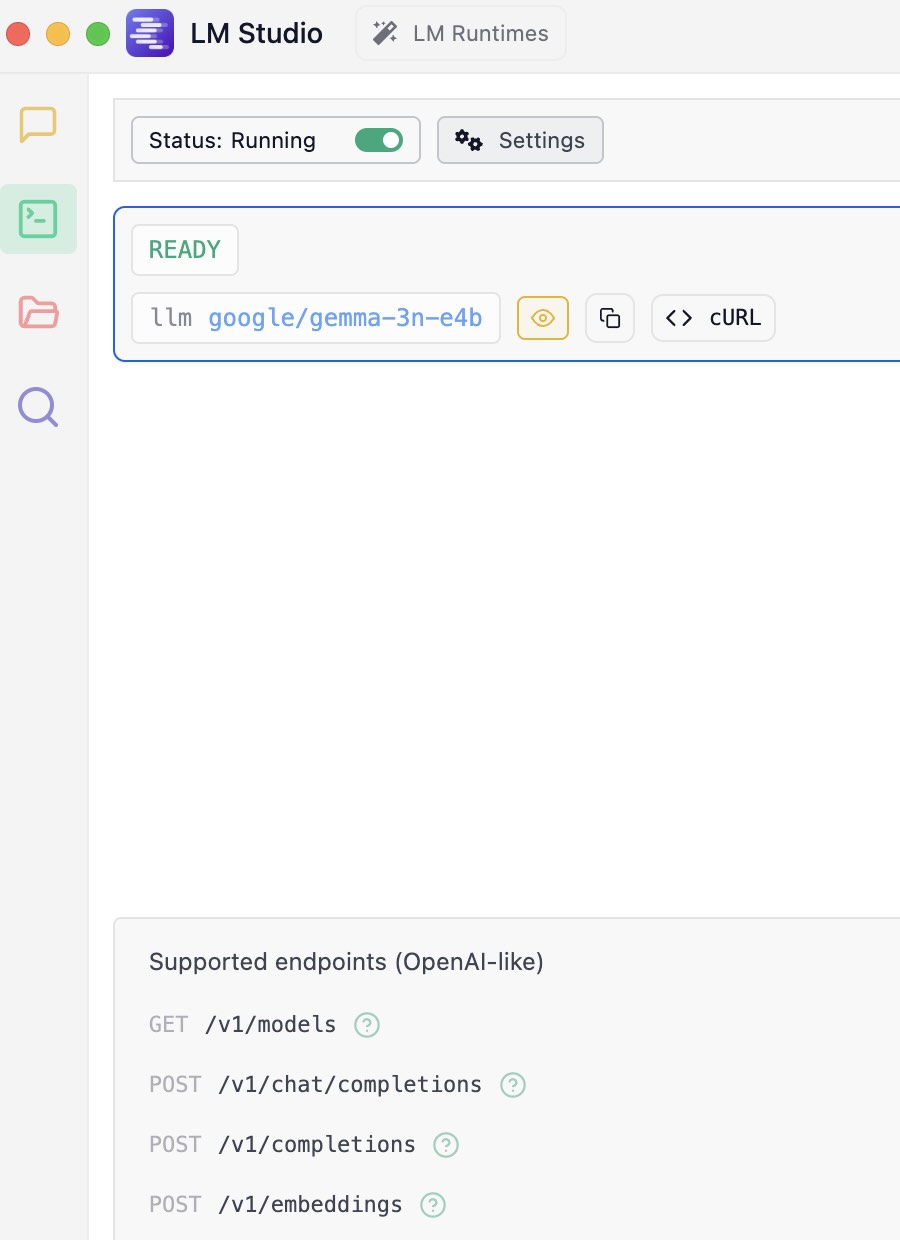
Dear reader, we will start with two simple examples, one using the OpenAI AI compatibility features of LM Studio and the other using the Python lmstudio package. First, make sure you hit the green icon on the left menu area:
When you installed LM Studio you were asked if you wanted “developer mode” enabled. That prompt during installation can be a bit misleading. You haven’t been locked out of any features.
“Developer Mode” in LM Studio is simply a UI setting that you can toggle at any time. It’s not a permanent choice made during installation.
Here’s how to enable it:
Look at the very bottom of the LM Studio window. You will see three buttons: User, Power User, and Developer.
Just click on Developer to switch to that mode. This will expose all the advanced configuration options and developer-focused features throughout the application, including more detailed settings in the Local Server tab.
When using the LM Studio inference APIs using Python scripts, you can’t set the model, or even load a model. Instead, you must use the LM Studio application UI to choose and manually load a model. For Python applications I work on that require switching between different models, I don’t use LM Studio, rather I then use Ollama (read my Ollama book online).
For the examples in this chapter I manually selected and loaded the small but very capable model google/gemma-3n-e4b.
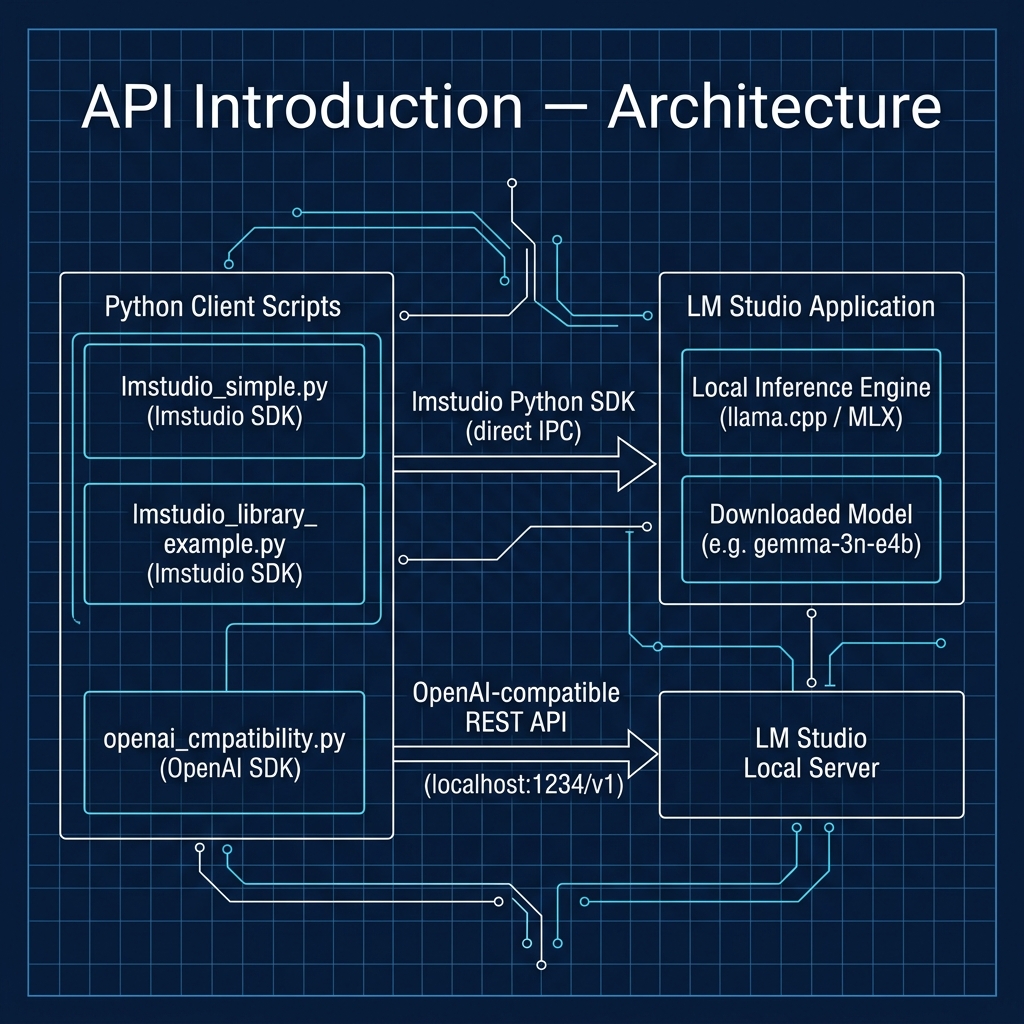
Using the Python OpenAI Compatibility APIs
You can find the Python script examples for this book in the GitHub repository https://github.com/mark-watson/LM_Studio_BOOK in the src directory. The example we now use is in the file src/api_introduction/openai_cmpatibility.py:
 1 from openai import OpenAI
 2
 3 # --- Configuration ---
 4 # Point the client to your local LM Studio server
 5 # The default base_url is "http://localhost:1234/v1"
 6 # You can leave the api_key as a placeholder; it's not required for local servers.
 7 client = OpenAI(base_url="http://localhost:1234/v1", api_key="lm-studio")
 8
 9 # --- Main Execution ---
10 def get_local_llm_response():
11     """
12     Sends a request to the local LLM and prints the response.
13     """
14     # Before running this, make sure you have:
15     # 1. Downloaded and installed LM Studio.
16     # 2. Downloaded a model from the LM Studio hub.
17     # 3. In the "Local Server" tab (the '<->' icon), selected your model
18     #    at the top and clicked "Start Server".
19
20     # The "model" parameter should be a placeholder, as the model is
21     # selected and loaded in the LM Studio UI. The server will use
22     # whichever model is currently loaded.
23     try:
24         completion = client.chat.completions.create(
25             model="local-model",  # This field is ignored by LM Studio
26                                   #but is required by the API.
27             messages=[
28                 {"role": "system", "content": "You are a helpful AI assistant."},
29                 {"role": "user", "content": "What is the capital of France?"}
30             ],
31             temperature=0.7,
32         )
33
34         # Extracting and printing the response content
35         response_message = completion.choices[0].message.content
36         print("\nResponse from local model:")
37         print(response_message)
38
39     except Exception as e:
40         print(f"\nAn error occurred:")
41         print(f"It's likely the LM Studio server is not running or the model is not loaded.")
42         print(f"Please ensure the server is active and a model is selected.")
43         print(f"Error details: {e}")
44
45
46 if __name__ == "__main__":
47     print("--- Local LLM Interaction via OpenAI Compatibility ---")
48     get_local_llm_response()
This Python script uses the official openai library to connect to a local AI model running in LM Studio, not OpenAI’s servers.
It sends the question “What is the capital of France?” to your local model and prints its response to the console. The key is the base_url=“http://localhost:1234/v1” line, which redirects the API request to the LM Studio server.
In the next chapter we will cover “tool use” which also referred to as “function calling” (i.e., we write Python functions, configure API calls to inform a model the names and required arguments for tools/functions).
If you don’t enable LM Server’s inference API, you will see an error like:
1 $ uv run openai_cmpatibility.py
2 --- Local LLM Interaction via OpenAI Compatibility ---
3
4 An error occurred:
5 It's likely the LM Studio server is not running or the model is not loaded.
6 Please ensure the server is active and a model is selected.
7 Error details: Connection error.
Note that I use uv as a Python package manager and to run scripts. The examples also have standard Python requirements.txt files that you can alternatively use with pip and python3.
When you have the server inference running on LM Studio you should see output like this:
1 $ uv run openai_cmpatibility.py
2 --- Local LLM Interaction via OpenAI Compatibility ---
3
4 Response from local model:
5 The capital of France is **Paris**.
Using the Python lmstudio Package
Here is a simple example that assumes the server is running and a model is loaded:
1 import lmstudio as lms
2 model = lms.llm()
3 print(model.respond("Sally is 77, Bill is 32, and Alex is 44 years old. Pairwise, what are their age differences? Print results in JSON format. Be concise and only provide a correct answer, no need to think about different correct answers."))
Here is sample output:
 1 $ uv run lmstudio_simple.py
 2 <think>
 3 To determine the age differences between Sally, Bill, and Alex, I will list their ages first. Sally is 77 years old, Bill is 32 years old, and Alex is 44 years old.
 4
 5 Next, I'll calculate the age difference between each pair:
 6
 7 1. **Sally and Bill**: Subtract Bill's age from Sally's age.
 8    - 77 (Sally) - 32 (Bill) = 45 years.
 9
10 2. **Sally and Alex**: Subtract Alex's age from Sally's age.
11    - 77 (Sally) - 44 (Alex) = 33 years.
12
13 3. **Bill and Alex**: Subtract Bill's age from Alex's age.
14    - 44 (Alex) - 32 (Bill) = 12 years.
15
16 Finally, I'll format the results in JSON as specified: a key for each pair of names with their respective age difference.
17 </think>
18
19 ``json
20 {
21   "Sally and Bill": 45,
22   "Sally and Alex": 33,
23   "Bill and Alex": 12
24 }
25 ``
Here is a more complex example that demonstrates how to pass multiple messages and a custom system prompt:
 1 import lmstudio as lms
 2
 3 # --- Main Execution ---
 4 def get_llm_response_with_sdk(prompt):
 5     """
 6     Loads a model and gets a response using the lmstudio-python SDK.
 7     """
 8     # Before running this, make sure you have:
 9     # 1. Downloaded and installed LM Studio.
10     # 2. Started the LM Studio application. The SDK communicates directly
11     #    with the running application; you don't need to manually start the server.
12
13     try:
14         # Load a model by its repository ID from the Hugging Face Hub.
15         # The SDK will communicate with LM Studio to use the model.
16         # If the model isn't downloaded, LM Studio might handle that,
17         # but it's best to have it downloaded first.
18         #
19         # Replace this with the identifier of a model you have downloaded.
20         # e.g., "gemma-2-9b-it-gguf"
21         print("Loading model...")
22         model = lms.llm("google/gemma-3n-e4b")
23
24         # Send a prompt to the loaded model.
25         print("Sending prompt to the model...")
26         response = model.respond(
27           {"messages":
28             [
29                 {"role": "system", "content": "You are a helpful AI assistant."},
30                 {"role": "user", "content": prompt},
31             ]
32           }
33         )
34
35         # The 'response' object contains the full API response.
36         # The text content is in response.text
37         return response
38
39     except Exception as e:
40         print(f"\nAn error occurred:")
41         print("Please ensure the LM Studio application is running and the model identifier is correct.")
42         print(f"Error details: {e}")
43
44
45 if __name__ == "__main__":
46     print("--- Local LLM Interaction via lmstudio-python SDK ---")
47     print("\n--- Model Response ---")
48     print(get_llm_response_with_sdk("Explain the significance of the Rosetta Stone in one paragraph."))
Sample output may look like this:
1 $ uv run lmstudio_library_example.py
2 --- Local LLM Interaction via lmstudio-python SDK ---
3
4 --- Model Response ---
5 Loading model...
6 Sending prompt to the model...
7 The Rosetta Stone is a fragment of a larger stele inscribed with the same text in three scripts: hieroglyphic, demotic, and ancient Greek. Its discovery in 1799 was a pivotal moment in Egyptology because it provided the key to deciphering hieroglyphics, a writing system that had been lost for centuries. By comparing the known Greek text to the unknown Egyptian scripts, scholars like Jean-François Champollion were able to unlock the meaning of hieroglyphics, opening up a vast treasure trove of information about ancient Egyptian history, culture, and religion.  Essentially, the Rosetta Stone provided the crucial bridge for understanding a civilization's written language and allowed us to finally "read" ancient Egypt.