2. The Serverless Framework
2.1 Introduction
The Serverless framework (henceforth serverless) is a Node.js command-line interface (CLI) that lets you develop and deploy serverless functions, along with any infrastructure resources they require.
The serverless framework lets you write functions, add event triggers, and deploy to the FaaS provider of your choice.
Functions are automatically deployed and events are compiled into the syntax your FaaS provider understands.
serverless is provider and runtime agnostic, so you are free to use any supported FaaS providers and languages. As of January 2018, the framework supports the following FaaS providers:
- Amazon Web Services (AWS Lambda)
- Google Cloud Platform (Google Cloud Functions)
- Microsoft Azure (Azure Functions)
- IBM OpenWhisk
- Kubeless
- Spotinst
- Webtasks
Out of the box, the Serverless framework gives you:
- Structure: The framework’s unit of deployment is a ‘service’, a group of related functions.
- Best practices: Support for multiple staging environments, regions, environment variables, configs, and more.
- Automation: A handful of useful options and commands for packaging, deploying, invoking, and monitoring your functions.
- Plugins: Access to an active open-source ecosystem of plugins that extend the framework’s behaviour.
2.2 Installation
To install serverless, you must first install Node.js on our machine.
The best way to manage Node.js versions on your machine is to use the Node Version Manager (nvm), so we’ll install that first.
Follow the step-by-step instructions below.
2.2.1 Install Node Version Manager
First, we’ll install nvm, which lets you manage multiple Node.js versions on your machine and switch between them.
To install or update nvm, you can use the install script using cURL:
1 > curl -o- https://raw.githubusercontent.com/creationix/nvm/v0.33.2/install.sh | \
2 bash
or Wget:
1 > wget -qO- https://raw.githubusercontent.com/creationix/nvm/v0.33.2/install.sh |\
2  bash
To verify that nvm has been installed, do:
1 > command -v nvm
2 nvm
Next, let’s install Node.js.
2.2.2 Install Node.js
To install the latest Node.js version that AWS Lambda supports, do:
1 > nvm install v6.10.3
To set a default Node.js version to be used in any new shell, use the nvm alias ‘default’:
1 > nvm alias default v6.10.3
To verify that the correct Node.js version has been installed, do:
1 > node -v
2 v6.10.3
The Node Package Manager (npm) should also have been installed:
1 > npm -v
2 3.10.10
For more nvm installation and usage instructions, check out the official nvm repo.
2.2.3 Install the Serverless Framework
Install the serverless node module with npm. In your terminal, do:
1 > npm install serverless -g
Let’s check that serverless has been installed:
1 > serverless --version
2 1.13.2
Type serverless help to see all available commands:
 1 > serverless help
 2
 3 Commands
 4 * Serverless documentation: http://docs.serverless.com
 5 * You can run commands with "serverless" or the shortcut "sls"
 6 * Pass "--help" after any <command> for contextual help
 7
 8 config ........................ Configure Serverless
 9 config credentials ............ Configures a new provider profile for the Serverl\
10 ess Framework
11 create ........................ Create new Serverless service
12 install ....................... Install a Serverless service from GitHub
13 package ....................... Packages a Serverless service
14 package function .............. undefined
15 deploy ........................ Deploy a Serverless service
16 deploy function ............... Deploy a single function from the service
17 deploy list ................... List deployed version of your Serverless Service
18 invoke ........................ Invoke a deployed function
19 invoke local .................. Invoke function locally
20 info .......................... Display information about the service
21 logs .......................... Output the logs of a deployed function
22 metrics ....................... Show metrics for a specific function
23 remove ........................ Remove Serverless service and all resources
24 rollback ...................... Rollback the Serverless service to a specific dep\
25 loyment
26 slstats ....................... Enable or disable stats
In Chapter 3, we will go through some of these commands in more detail.
For a full reference of serverless CLI commands, read the official docs.
2.3 Getting Started
2.3.1 Development Workflow
Here is a typical workflow when building applications using the serverless CLI:
-
serverless createto bootstrap a Serverless project. - Implement your functions.
-
serverless deployto deploy the current state of the project. -
serverless invokeor manually invoke to test the live function. -
serverless logsto stream your function’s logs. - Implement and run unit tests for your functions locally with mocks.
2.3.2 Project structure
Here is a typical serverless Go project structure:
1 .
2 +-- src/
3 |   +-- handlers/
4 |   |   +-- addTodo.go
5 |   |   +-- listTodos.go
6 |   +-- lib/
7 +-- serverless.yml
8 +-- .gitignore
Tests go into the /test directory. Here is where the unit tests for our functions and supporting code lives. Test inputs are stored in /test/fixtures.
The serverless.yml config file is in our service’s root directory.
2.3.3 serverless.yml
The serverless.yml file describes your application’s functions, HTTP endpoints, and supporting resources.
It uses a DSL that abstracts away platform-specific nuances.
Have a look at an example serverless.yml below:
 1 service: test-service
 2
 3 provider:
 4   name: aws
 5   runtime: go1.x
 6   stage: dev
 7   region: us-east-1
 8
 9 # you can define service wide environment variables here
10 #  environment:
11 #    variable1: value1
12
13 # you can add packaging information here
14 # package:
15 #  include:
16 #    - include-me.js
17 #    - include-me-dir/**
18 #  exclude:
19 #    - exclude-me.js
20 #    - exclude-me-dir/**
21
22 functions:
23   hello:
24     handler: handler.hello
25
26 #    The following are a few example events you can configure
27 #    events:
28 #      - http:
29 #          path: users/create
30 #          method: get
31 #      - s3: ${env:BUCKET}
32 #      - schedule: rate(10 minutes)
33 #      - sns: greeter-topic
34 #      - stream: arn:aws:dynamodb:region:XXXXXX:table/foo/stream/1970-01-01T00:00\
35 :00.000
36 #      - alexaSkill
37 #      - iot:
38 #          sql: "SELECT * FROM 'some_topic'"
39 #      - cloudwatchEvent:
40 #          event:
41 #            source:
42 #              - "aws.ec2"
43 #            detail-type:
44 #              - "EC2 Instance State-change Notification"
45 #            detail:
46 #              state:
47 #                - pending
48 #      - cloudwatchLog: '/aws/lambda/hello'
49
50 #    Define function environment variables here
51 #    environment:
52 #      variable2: value2
53
54 # you can add statements to the Lambda function's IAM Role here
55 #  iamRoleStatements:
56 #    - Effect: "Allow"
57 #      Action:
58 #        - "s3:ListBucket"
59 #      Resource: { "Fn::Join" : ["", ["arn:aws:s3:::", { "Ref" : "ServerlessDeplo\
60 ymentBucket" } ] ]  }
61 #    - Effect: "Allow"
62 #      Action:
63 #        - "s3:PutObject"
64 #      Resource:
65 #        Fn::Join:
66 #          - ""
67 #          - - "arn:aws:s3:::"
68 #            - "Ref" : "ServerlessDeploymentBucket"
69 #            - "/*"
70
71 # you can add CloudFormation resource templates here
72 #resources:
73 #  Resources:
74 #    NewResource:
75 #      Type: AWS::S3::Bucket
76 #      Properties:
77 #        BucketName: my-new-bucket
78 #  Outputs:
79 #     NewOutput:
80 #       Description: "Description for the output"
81 #       Value: "Some output value"
In the serverless.yml, you define your Functions, the Events that trigger them, and the Resources your Functions use.
The serverless CLI reads and translates this file into a provider specific language such as AWS CloudFormation so that everything is set up in your FaaS provider.
2.3.3.1 Events
If you are using AWS as your provider, all events in the service are anything in AWS that can trigger an AWS Lambda function, like an S3 bucket upload, an SNS topic, and HTTP endpoints created via API Gateway.
You can define what events can trigger your functions in serverless.yml:
 1 # serverless.yml
 2
 3 functions:
 4   createUser: # Function name
 5     handler: bin/handlers/createUser
 6     events:
 7       - http:
 8           path: users/create
 9           method: get
10       - s3: ${env:BUCKET}
11       - schedule: rate(10 minutes)
12       - sns: greeter-topic
2.3.3.2 Custom Variables
The Serverless framework provides a powerful variable system which allows you to add dynamic data into your serverless.yml.
You can define custom variables such as imagesBucketName in serverless.yml that you can re-use throughout the project.
In the serverless.yml, we define a custom block with variables such as imagesBucketName that we can re-use throughout the file.
1 # serverless.yml
2
3 custom:
4   imagesBucketName: snapnext-images
5
6 provider:
7   ...
8   environment:
9     IMAGES_BUCKET_NAME: ${self:custom.imagesBucketName}
2.3.3.3 Environment Variables
You can also define Environment variables such as process.env.IMAGES_BUCKET_NAME in the provider.environment block. You can use the environment variables you define within your functions:
In the serverless.yml, we expose the bucket’s name custom.imagesBucketName as an environment variable IMAGES_BUCKET_NAME.
We can then read the environment variable from a function as process.env.IMAGES_BUCKET_NAME:
1 # serverless.yml
2
3 custom:
4   imagesBucketName: snapnext-images
5
6 provider:
7   ...
8   environment:
9     IMAGES_BUCKET_NAME: ${self:custom.imagesBucketName}
2.3.3.4 Resources
Defining AWS Resources such as S3 buckets and DynamoDB requires some familiarity with AWS CloudFormation syntax. CloudFormation is an AWS-specific language used to define your AWS Infrastructure as code:
1 # serverless.yml
2
3 resources:
4   Resources:
5     ImagesBucket:
6       Type: AWS::S3::Bucket
7       Properties:
8         BucketName: ${self:custom.imagesBucketName}
9         AccessControl: PublicRead
2.3.3.5 IAM Role Statements
By default, Functions lack access to AWS resources such as S3 buckets and DynamoDB tables. AWS Lambda executes your Lambda function on your behalf by assuming the role you provided at the time of creating the Lambda function. Therefore, you need to grant the role the necessary permissions that your Lambda function needs, such as permissions for Amazon S3 actions to read an object.
You can give these Functions access to resources by writing Identity and Access Management (IAM) role statements for your Function’s role. For example:
 1 # serverless.yml
 2
 3 custom:
 4   imagesBucketName: snapnext-images
 5
 6 provider:
 7   iamRoleStatements:
 8   - Effect: Allow
 9     Action:
10       - S3:GetObject
11     Resource:
12     - Fn::Join:
13       - ""
14       - - "arn:aws:s3:::"
15         - "${self:custom.imagesBucketName}/*"
The above role statement allows our Functions to retrieve objects from an S3 bucket.
Each IAM role statement has three attributes: Effect, Action, and Resource. Effect
can be either Allow or Deny. Action refers to specific AWS operations such as S3:GetObject.
Resource points to the arn of the specific AWS resources to grant access to.
Always remember to specify the minimum set of permissions your lambda functions require. For a list of available IAM Actions, refer to the official AWS IAM reference.
Keep in mind that provider.iamRoleStatements applies to a single IAM role that is created by the Serverless framework and is shared across your Functions.
Alternatively, you can create one role per function by creating an AWS::IAM::Role Cloudformation resource and specifying what role is used for the Function:
1 # serverless.yml
2
3 functions:
4   usersCreate:
5     ...
6     role: arn:aws:iam::XXXXXX:role/role # IAM role which will be used for this fu\
7 nction
2.3.4 Serverless Plugins
Plugins lets you extend beyond the framework’s core features. With plugins, you can:
- Add support for other FaaS providers such as Google Cloud Functions, Azure Functions, and Kubeless.
- Get more information about your stack.
- Keep your functions warm.
- Coordinate multi-step workflows with AWS Step Functions.
- Use the latest JS version with Babel via Webpack.
- And more!
2.3.4.1 Installing Plugins
serverless plugins are packaged as Node.js modules that you can install with NPM:
1 > cd my-app
2 > npm install --save custom-serverless-plugin
Plugins are added on a per service basis and are not applied globally. Make sure you are in your service’s root directory when you install a plugin!
2.3.4.2 Using Plugins
Including and configuring your plugin is done within your project’s serverless.yml.
The custom block in the serverless.yml file is the place where you can add necessary configurations for your plugins, for example:
1 plugins:
2   - custom-serverless-plugin
3
4 custom:
5   customkey: customvalue
In the above the custom-serverless-plugin is configured with a custom.customkey attribute.
Each plugin should have documentation on what configuration options are available.
2.4 Additional Setup
Before we can continue to the hands-on section, there are a few more things you need to set up.
2.4.1 Amazon Web Services (AWS) Setup
2.4.1.1 AWS Account Registration
For the rest of this book, you’ll be using AWS as your FaaS provider. If you haven’t already, sign up for an AWS account!
Once you’ve signed up, you’ll need to create an AWS user which has administrative access to your account. This user will allow the Serverless Framework configure the services in your AWS account.
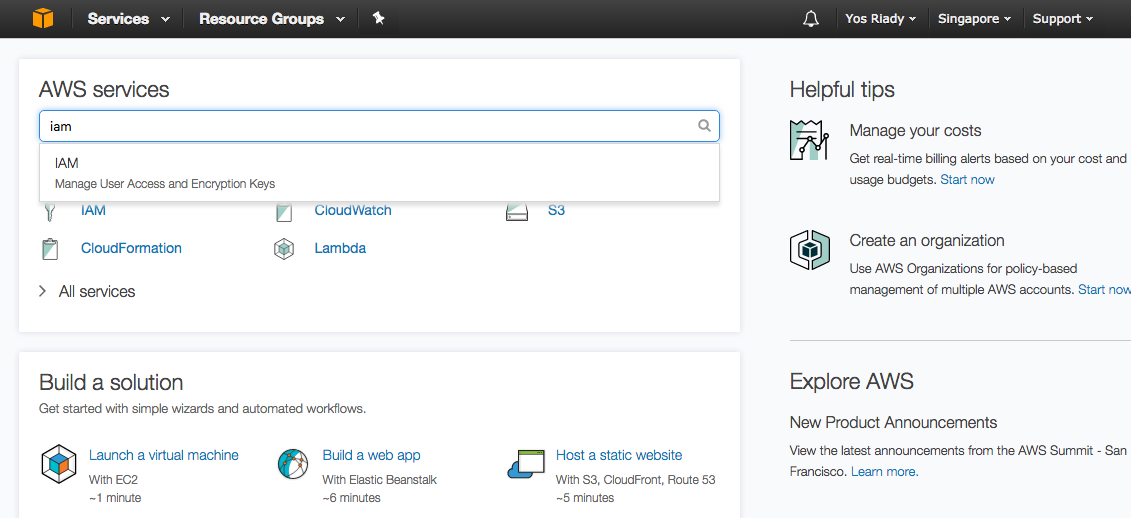
First, Login to your AWS account. Go to the Identity & Access Management (IAM) page.
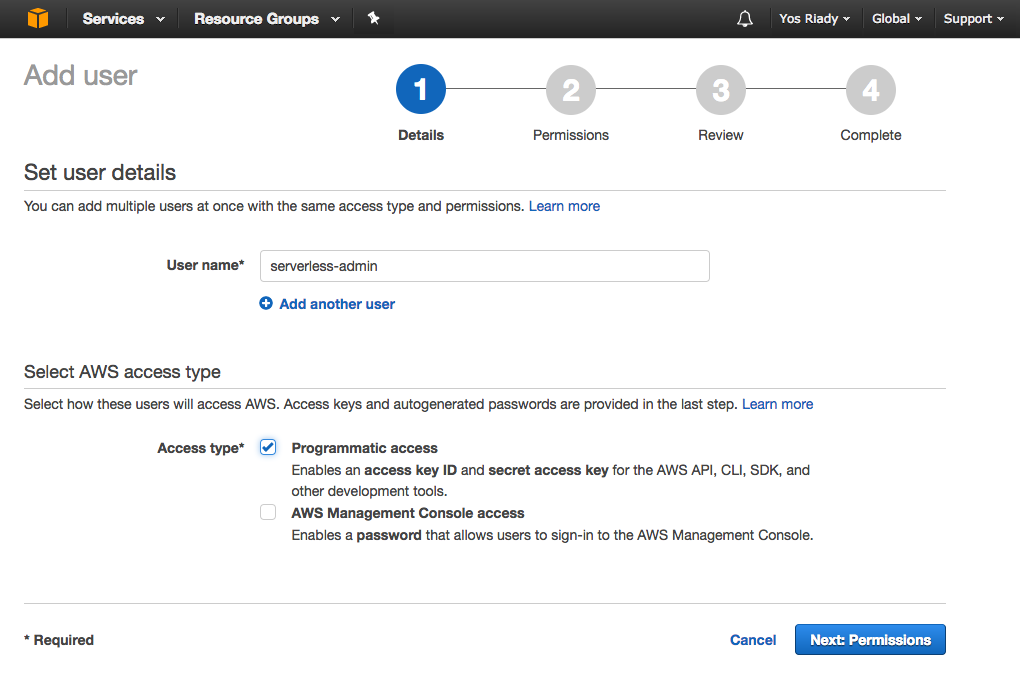
Click on the Users sidebar link.
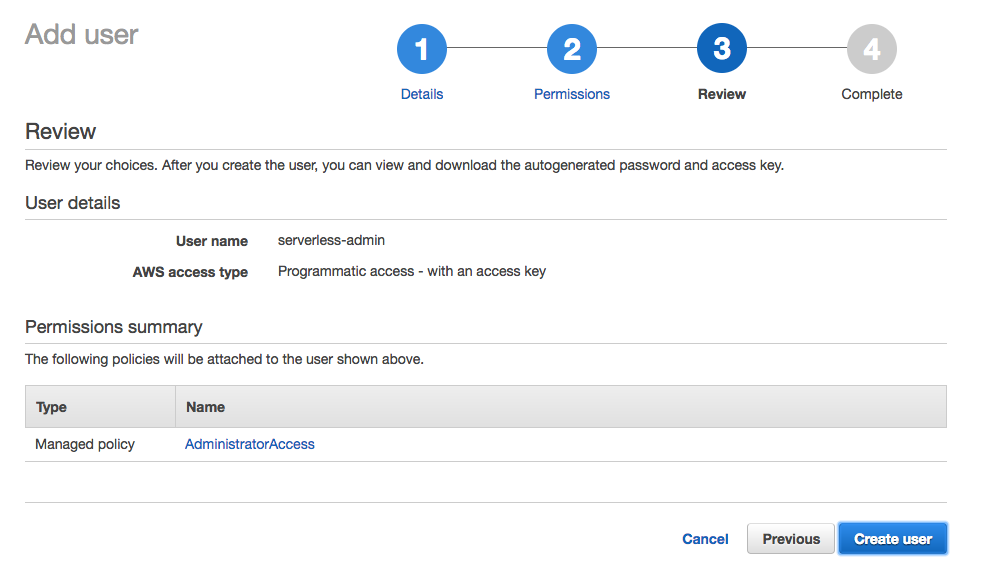
Click on the Add user button. Enter serverless-admin, tick the Programmatic access Access type checkbox, and select Next: Permissions.
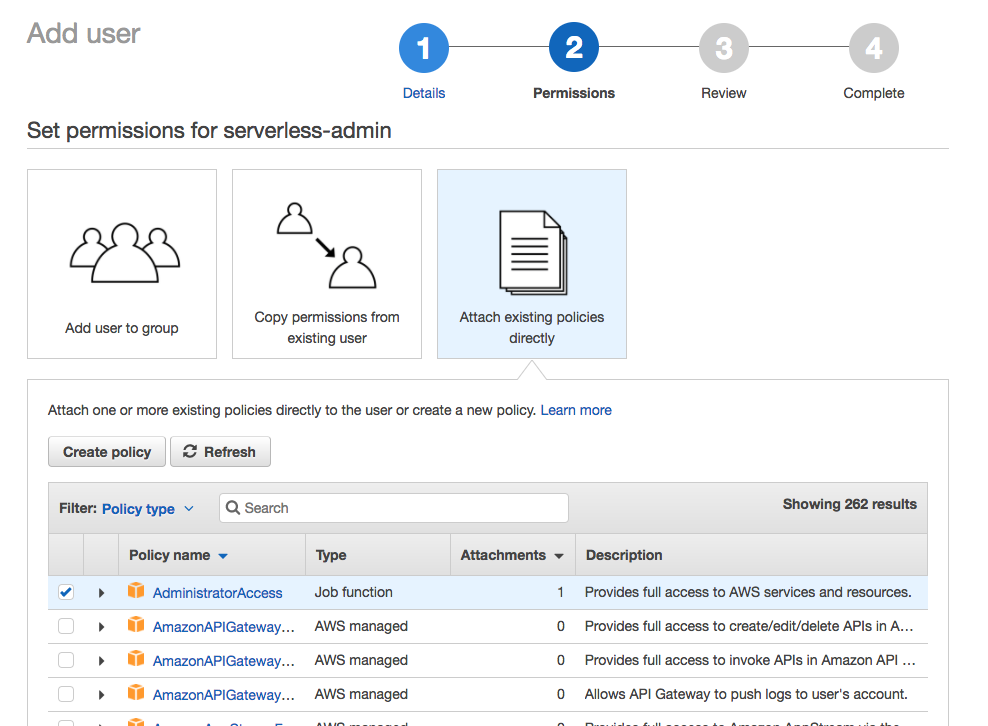
Click Attach existing policies directly, tick Administrator Access, and select Next: Review.
Review your choices, then select Create user.
Save the Access key ID and Secret access key of the newly created user.

Done! We’ve now created a user which can perform actions in our AWS account on our behalf (thanks to the Administrator Access policy).
2.4.1.2 Set Up Credentials
Next, we’ll pass the user’s API Key & Secret to serverless.
With the serverless framework installed on your machine, do:
1 serverless config credentials --provider aws --key <your_aws_key> --secret <your_\
2 aws_secret>
Take a look at the config CLI reference for more information.
2.5 Chapter Summary
In this chapter, you learned about the Serverless framework and set up your development environment.
In the next chapter, you will build a simple application with the Serverless framework.