2. Getting setup
Whilst this book doesn’t go into too many details about setting up git on your system, for completeness some instructions are provided to get you up and running.
If you’re already a git user these will already have been covered. However, the following sections are important and may differ from your previous practice:
If you have issues with any of these instructions, there are many resources available online.
2.1 Signing up to Github
If you have an existing Github account you can skip this step. Otherwise signup for a Github account.
Note: Someone in the organization will have to add each engineer to the company’s group and give access to the specific repositories they’ll be working on.
2.2 Installing git
If you haven’t already, you first need to install git. The easiest way is just to download it from git-scm.com, but you may prefer to install it using your preferred package manager.
Confirm it’s working properly by running git at the command line/prompt:
$ git --version
git version 2.2.1
Note: It’s important to update git when a new version is released, these updates will often include security patches.
2.3 Configuring git
git needs to know your name and the email address. This is added globally (to your .gitconfig file) using:
$ git config --global user.name "Your Name"
$ git config --global user.email "your.email@example.com"
Note: You must use the same email address you used to sign up to Github.
There’s much more you can do to configure git as your experience with git grows. There’s an entire chapter about git tips.
2.4 Forking the upstream repository
Visit the repository’s Github homepage, e.g. www.github.com/your_organization/project, if you are logged in to Github you should see a “Fork” button on the upper right-hand side. Associate this with your own account (this clones this repository within Github).
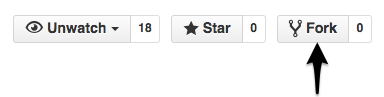
Push the fork button
Your fork will be available at www.github.com/your_username/project.
2.5 Cloning your fork
To download the source code onto your own machine, you need to clone your fork. Visit your fork’s Github page, e.g. www.github.com/your_username/project.
On the right-hand side you should see the following (with a different url):
HTTPS clone URL
https://github.com/your_username/project.git
Copy this url. From the directory you wish the project to reside type:
$ git clone https://github.com/your_username/project.git
This will download the repository from your fork into this directory.
From now on git commands will assume you are in the project directory. If you run a git command and you see the following error:
fatal: Not a git repository (or any of the parent directories): .git
This means that your current working directory is not in a git repository, and you need to change to the project directory.
2.6 Setting up remotes
You need to be able to fetch the latest changes from upstream and push changes to your fork (origin).
$ git remote --verbose
origin   https://github.com/your_username/project.git (fetch)
origin   https://github.com/your_username/project.git (push)
Add the “upstream” remote, which will refer to organizations main repository:
$ git remote add upstream https://github.com/your_organization/project.git
Note: in some versions of git, the upstream remote already exists (but the url is not set), in which case the above will throw an error. Instead you need to set the upstream url:
$ git remote set-url upstream https://github.com/your_organization/project.git
Now when you inspect the list of remotes you can see:
$ git remote --verbose
origin   https://github.com/your_username/project.git (fetch)
origin   https://github.com/your_username/project.git (push)
upstream         https://github.com/your_organization/project.git (fetch)
upstream         https://github.com/your_organization/project.git (push)
It can be useful to set up the upstream remote so that you cannot push:
$ git remote set-url upstream blank --push
This ensures you won’t accidentally push upstream directly.
2.7 The fast-forward alias
Updating your local master branch is done using a “fast-forward”. Add the fast-forward alias to your .gitconfig using the command:
$ git config --global alias.fast-forward merge --ff-only
Note: This is a safety measure allowing developers to catch when the history of master has been broken - and is discussed further in the troubleshooting section.
The reason to add this as an alias, rather than simply typing git merge --ff-only, is two-fold:
- It’s safer - make it less likely developers will
git mergeaccidentally. - It’s easier to remember.