1. Introduction
git is a flexible and powerful version control system, but because of its great flexibility it requires discipline to ensure a sane development experience.
With great power comes great responsibility
If you’re not careful it’s easy to have git history that:
- is complicated to reason about,
- hides work done (or work removed),
- contains erroneous commits, or worse, loses commits.
There are plenty of horror stories from git users, unfortunately this is the case of any version control system. Lost work, time and hair. We’ll discuss some case studies in War stories chapter.
The solution: keep it simple
This book describes a strategy using only a few git commands which is both safe and easy to follow, such that:
- history is transparent and easy to reason about,
- all collaborators catch errors early.
That’s not to say there won’t be some “accidents”, mistakes do happen, however these should be caught early. Diagnosis and resolution shouldn’t require thought/hair pulling.
The main ways this is achieved are:
- Keep your master up-to-date with fast-forward.
- Commit to small feature/bug-fix branches from master.
- Include work into upstream via pull-requests.
- Update your branches with rebase.
- Inspect the network graph regularly.
Note: the latter is a worthwhile even for non-technical team members.
These are described in more detail in the workflow and the network graph chapters.
A small overview of the benefits are given here:
Why: Fork
For each project each developer creates their own Github “fork”. All work for that developer is pushed to their own remote. This means that:
- Developers push to their own fork, rather than directly upstream.
- Developers have their own namespace (for branch names) and therefore “ownership” is transparent.
- The organization can control the access permissions more finely.
- Developers, and others in the team, can see the development landscape at a glance (e.g. via Github network graph).
The latter allows mistakes to be caught early - hopefully before they enter production.
Why: Small branches from master
Work should be organized into independent branches. When starting work on an enhancement or bug fix, a branch is created (from master). Only work for this particular enhancement or bug fix is appended to the branch. This has the following benefits:
- Bug fixes can be applied independently of new features e.g. as hot-fixes to releases.
- Features or bug fixes can be reverted independently (without reverting something you want to keep).
- Keeps work focussed.
Why: Pull request
Once work on the feature or bug fix is complete, a “pull request” is opened. This:
- sends an email to the team, which includes a link to the pull request and the commit messages and proposed diff.
- Team members can review and comment on the diff (including on specific lines).
- The pull request URL can be used as a reference to this work and discussion of the work (e.g. on your bug-tracking tool).
- The build/tests are run, and the result shown, before code ends up in master.
The pull request can be merged by anyone with commit-access to the project (the organization can control access permissions). Generally the amount of code-review per pull request and who can merge will depend on the team dynamic.
Why: Update via rebase
There will always be merge-conflicts when working collaboratively. Although these are made easier by ensuring work is done in small branches (see above).
git allows two methods of updating: merge and rebase. Exclusively using rebase ensures a cleaner and a transparent code history. Some of the merits of rebasing are as follows:
- Work isn’t “hidden” in merge commits.
- The diff shown in the pull request/commit will always be correct.
- The topology of the network graph is much easier to reason about.
Why: Review the network graph
Everyone in the team, even non-technical members, should be able to interpret the network graph.
Not only does this help catch mistakes early, it makes what work has been included in master, or the release branches, as transparent as possible for the entire team.
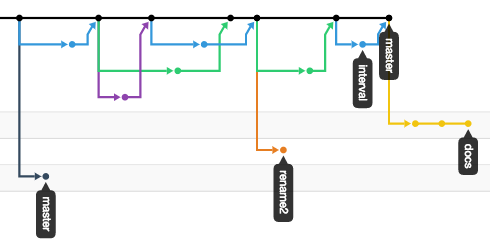
Example network graph
At a glance you can gauge the current state of development:
- Previously included work.
- Who is working on what and when they started.
- Whether there is a (git) problem.
This is discussed in more detail in network graphs section.
Why: Sane release management
Release management is discussed in the Sane Release Strategies chapter. In all cases the idea is to make releases:
- Easy to reason about.
- As non-invasive as possible.
Most team members won’t have to worry about this aspect (their work will be into master).
In this book
The majority of this book will discuss the “how” to keep a sane git experience and give tips to keep you on the straight and narrow.
Once you’re set-up will talk about the workflow in more detail (there’s also a useful cheatsheet for the oft-used commands). The chapter on the network graph discusses what to look for to catch mistakes in development, and the troubleshooting chapter will discuss correcting any such mistakes.
This workflow limits the opportunity for misadventure, so mistakes are almost always easy to rectify.
The war stories chapter discuss real-life git examples, where the situation would have been averted from the sane workflow.