Setup React Webpack
You will learn in this chapter how to setup React development environment starting from scratch. By the end of this chapter we will have a starter boilerplate to develop React apps.
We will cover following topics in this chapter.
- How to install Node.js and use Node Version Manager
- Setup package.json to manage your NPM dependencies
- Quick access companion code for this book using Github
- Install starter dependencies for React, Webpack, and Babel
- Create Webpack configuration for development pipeline automation
- Write a simple React app to run your Webpack setup
Code Along. You can clone the source for this entire book, change to app directory, checkout just the code for this chapter, install and start the app to launch the local version in your default browser.
Preview complete demo website hosted on Firebase, as you code this app by the end of this book.
View current chapter demo of the app we build in this chapter.
Installing Node.js
You will need Node.js to get started with React. Your Mac OS comes with Node pre-installed. However you may want to use the latest stable release.
Check you node release using node -v command.
We recommend installing or upgrading Node using Node Version Manager (NVM). Their Github repo documents install and usage.
To install NVM:
Now you can install a Node release by choosing one from Node releases page.
The command nvm install 5.10.1 installs a stable release for us.
One of the advantages of using NVM is you can switch between multiple node releases you may have on your system.
Here’s what our terminal looks like when using nvm ls to list installed node releases.
Using nvm use x.y.z command we can switch to x.y.z installed node release.
Setting up package.json
You will require package.json to manage your NPM dependencies and scripts.
Create a new one using npm init command, selecting defaults where uncertain.
This is what our package.json looks like as we start off. Note that we added
the private flag to avoid accidental publishing of the project to NPM repo,
and also to stop any warnings for missing flags like project repo.
{
  "name": "react-speed-book",
  "version": "1.0.0",
  "description": "Companion code for React Speed Coding book",
  "main": "index.js",
  "private": true,
  "scripts": {
    "test": "echo \"Error: no test specified\" && exit 1"
  },
  "repository": {
    "type": "git",
    "url": "git+https://github.com/manavsehgal/react-speed-book.git"
  },
  "author": "Manav Sehgal",
  "license": "MIT",
  "bugs": {
    "url": "https://github.com/manavsehgal/react-speed-book/issues"
  },
  "homepage": "https://github.com/manavsehgal/react-speed-book#readme"
}
The dependencies section will start showing up as we add npm dependencies.
Installing starter dependencies
Before we start writing our React app we need to install starter dependencies for our development environment. React uses JSX as the XML-like syntax extension over JavaScript to specify component tree structure, data flow, and event handlers. JSX is processed by Webpack module bundler using specific loaders or convertors.
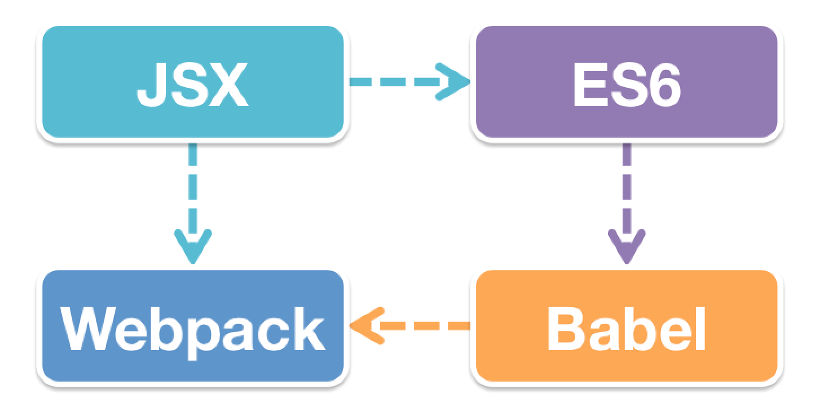
React recommends JavaScript ES6 for latest features and best practices. ES6 needs Babel for compiling to ES5 and maintain browser compatibility. Babel integrates with Webpack to stitch it all together for our app.
React and React DOM
React is available via NPM and this is the recommended way of using React in a project.
React core is available in the react package. The react-dom package targets
browser DOM for rendering React. React enables several targets including iOS, Android
for rendering React apps.
Webpack
Webpack is used for module packaging, development, and production pipeline automation.
We will use webpack-dev-server during development and webpack to create production
builds.
HTML generation
You can add functionality to Webpack using plugins. We will use automatic HTML
generation plugins for creating index.html for our app.
The html-webpack-plugin webpack plugin will refer to template configured
within webpack configuration to generate our index.html file.
Loaders
Webpack requires loaders to process specific file types. CSS loader
resolves @import interpreting these as require() statements.
Style loader turns CSS into JS modules that inject <style> tags. JSON
loader enables us to import local JSON files when using data fixtures
during prototyping our app.
PostCSS and Normalize CSS
PostCSS loader adds CSS post-processing capabilities to our app. This includes
Sass like capabilities including CSS variables and mixins using precss and
automatic vendor prefixes using the autoprefixer plugin for PostCSS.
Normalize CSS offers sensible resets for most use cases. Most CSS frameworks include it.
The postcss-easy-import plugin enables processing @import statements
with rules defined in webpack configuration.
Babel
Babel compiles React JSX and ES6 to ES5 JavaScript. We need babel-loader
as Webpack Babel loader for JSX file types.
Hot loading using babel-preset-react-hmre makes
your browser update automatically when there are changes to code,
without losing current state of your app.
ES6 support requires babel-preset-es2015 Babel preset.
Configure Babel .babelrc
Babel configuration is specified in .babelrc file. React Hot Loading is
required only during development.
{
  "presets": ["react", "es2015"],
  "env": {
    "development": {
      "presets": ["react-hmre"]
    }
  }
}
Dependencies in package.json
The dependencies within package.json now lists all the installed dependencies for our app so far.
"dependencies": {
  "react": "^15.3.0",
  "react-dom": "^15.3.0"
},
"devDependencies": {
  "autoprefixer": "^6.4.0",
  "babel-core": "^6.13.2",
  "babel-loader": "^6.2.4",
  "babel-preset-es2015": "^6.13.2",
  "babel-preset-react": "^6.11.1",
  "babel-preset-react-hmre": "^1.1.1",
  "copy-webpack-plugin": "^3.0.1",
  "css-loader": "^0.23.1",
  "html-webpack-plugin": "^2.22.0",
  "json-loader": "^0.5.4",
  "normalize.css": "^4.2.0",
  "postcss-easy-import": "^1.0.1",
  "postcss-loader": "^0.9.1",
  "precss": "^1.4.0",
  "style-loader": "^0.13.1",
  "webpack": "^1.13.1",
  "webpack-dev-server": "^1.14.1"
}
Configure Webpack in webpack.config.js
Webpack configuration drives your development pipeline, so this is a really important file to understand. We will split various sections of the config file to aid step-by-step learning.
Initialization
To start off, you need to initialize the config file with dependencies. These include webpack itself, an HTML generation plugin, a webpack plugin to copy folders from development to build target, and Node path library for initializing default paths.
Next we initialize the default paths. We also configure defaults for our HOST and PORT configuration.
// Initialization
const webpack = require('webpack');

// File ops
const HtmlWebpackPlugin = require('html-webpack-plugin');

// Folder ops
const CopyWebpackPlugin = require('copy-webpack-plugin');
const path = require('path');

// PostCSS support
const postcssImport = require('postcss-easy-import');
const precss = require('precss');
const autoprefixer = require('autoprefixer');

// Constants
const APP = path.join(__dirname, 'app');
const BUILD = path.join(__dirname, 'build');
const STYLE = path.join(__dirname, 'app/style.css');
const PUBLIC = path.join(__dirname, 'app/public');
const TEMPLATE = path.join(__dirname, 'app/templates/index.html');
const NODE_MODULES = path.join(__dirname, 'node_modules');
const HOST = process.env.HOST || 'localhost';
const PORT = process.env.PORT || 8080;
- APP path is used to specify the app entry point, location of the root component
- BUILD path specifies the target folder where production compiled app files will be pushed
- STYLES path indicates the root CSS file that imports other styles
- PUBLIC path is a folder in development that is copied as-is to root of BUILD, used for storing web server root files like robots.txt and favicon.ico, among others
- TEMPLATE specifies the template used by html-webpack-plugin to generate the index.html file
- NODE_MODULES path is required when including assets directly from installed NPM packages
Entry points and extensions
Next section defines your app entry, build output, and the extensions which will resolve automatically.
module.exports = {
  // Paths and extensions
  entry: {
    app: APP,
    style: STYLE
  },
  output: {
    path: BUILD,
    filename: '[name].js'
  },
  resolve: {
    extensions: ['', '.js', '.jsx', '.css']
  },
Loaders
We follow this by defining the loaders for processing various file types used within our app.
React components will use .jsx extension. The React
JSX and ES6 is compiled by Babel to ES5 using the babel webpack loader.
We use the cacheDirectory parameter to improve repeat development compilation time.
The include key-value pair indicates where webpack will look for these files.
CSS processing is piped among style for injecting CSS style tag, css for
processing import paths, and postcss for using various plugins on the CSS itself.
We need JSON processing much later in the book to enable loading of local JSON files storing data fixtures (sample data) for our app.
module: {
  loaders: [
    {
      test: /\.jsx?$/,
      loaders: ['babel?cacheDirectory'],
      include: APP
    },
    {
      test: /\.css$/,
      loaders: ['style', 'css', 'postcss'],
      include: [APP, NODE_MODULES]
    },
    {
      test: /\.json$/,
      loader: 'json',
      include: [APP, NODE_MODULES]
    }
  ]
},
PostCSS plugins configuration
PostCSS requires further configuration to handle how PostCSS plugins behave.
Now we add postcssImport which enables Webpack build to process @import
even from node_modules directory directly.
Sequence matters as this is the order of execution for the PostCSS plugins. Process imports > compile Sass like features to CSS > add vendor prefixes.
// Configure PostCSS plugins
postcss: function processPostcss(webpack) {  // eslint-disable-line no\
-shadow
  return [
    postcssImport({
      addDependencyTo: webpack
    }),
    precss,
    autoprefixer({ browsers: ['last 2 versions'] })
  ];
},
Configure webpack-dev-server
Now that we have loaders configured, let us add settings for our development server.
Source maps are used for debugging information.
The devServer settings are picked up by webpack-dev-server as it runs.
The historyApiFallback enables local browser to be able to handle direct access
to route URLs in single page apps.
The hot flag enables hot reloading. Using the inline flag a small
webpack-dev-server client entry is added to the bundle which refresh the page on change.
The progress and stats flags indicate how webpack reports compilation progress
and errors.
// Source maps used for debugging information
devtool: 'eval-source-map',
// webpack-dev-server configuration
devServer: {
  historyApiFallback: true,
  hot: true,
  progress: true,

  stats: 'errors-only',

  host: HOST,
  port: PORT,

  // CopyWebpackPlugin: This is required for webpack-dev-server.
  // The path should be an absolute path to your build destination.
  outputPath: BUILD
},
Plugins
We now wrap up by adding plugins needed during our development.
This section specifies the compilation workflow. First we use the DefinePlugin to
define the NODE_ENV variable.
We then activate the Hot Reloading plugin to refresh browser with any app changes.
Then we generate any HTML as configured in the HtmlWebpackPlugin plugin.
plugins: [
  // Required to inject NODE_ENV within React app.
  new webpack.DefinePlugin({
    'process.env': {
      'NODE_ENV': JSON.stringify('development') // eslint-disable-line\
 quote-props
    }
  }),
  new webpack.HotModuleReplacementPlugin(),
  new CopyWebpackPlugin([
    { from: PUBLIC, to: BUILD }
  ],
    {
      ignore: [
        // Doesn't copy Mac storage system files
        '.DS_Store'
      ]
    }
  ),
  new HtmlWebpackPlugin({
    template: TEMPLATE,
    // JS placed at the bottom of the body element
    inject: 'body'
  })
]};
HTML webpack template for index.html
We can now add a custom template to generate index.html using the HtmlWebpackPlugin plugin.
This enables us to add viewport tag to support mobile responsive scaling of our app.
We also add icons for mobile devices. Following best practices from HTML5 Boilerplate,
we add html5shiv to handle IE9 and upgrade warning for IE8 users.
<!DOCTYPE html>
<html class="no-js" lang="">
  <head>
    <meta charset="utf-8">
    <meta http-equiv="X-UA-Compatible" content="IE=edge,chrome=1">
    <title>React Speed Coding</title>
    <meta name="description" content="">
    <meta name="viewport" content="width=device-width, initial-scale=1\
">

    <link rel="icon" href="/favicon.ico" />

    <!--[if lt IE 9]>
        <script src="//html5shiv.googlecode.com/svn/trunk/html5.js"></\
script>
        <script>window.html5 || document.write('<script src="js/html5s\
hiv.js"><\/script>')</script>
    <![endif]-->
  </head>
  <body>
    <!--[if lt IE 8]>
        <p class="browserupgrade">You are using an <strong>outdated</s\
trong> browser. Please <a href="http://browsehappy.com/">upgrade your \
browser</a> to improve your experience.</p>
    <![endif]-->

    <div id="app"></div>
    <!-- Google Analytics: change UA-XXXXX-X to be your site's ID. -->
  </body>
</html>
Configuring startup scripts in package.json
We can configure startup scripts in package.json to speed up our development even further.
Before we do that, let us create a copy of webpack.config.js as webpack.prod.config.js intended
for production build version of our webpack configuration. We will only make one change in the
production configuration. Changing NODE_ENV in plugins section from development to production value.
Now npm start will run webpack-dev-server using inline mode which works well with hot reloading
browser when app changes without manually refreshing the browser.
Running npm run build will use webpack to create our production compiled build.
"scripts": {
  "start": "NODE_ENV=development webpack-dev-server --inline",
  "build": "NODE_ENV=production webpack --config webpack.prod.config.j\
s"
},
The webpack-dev-server will pick up the webpack.config.js file configuration by default.
Run webpack setup
index.js
Add index.js in the root of our development folder.
import React from 'react';
import ReactDOM from 'react-dom';

ReactDOM.render(
  <h1>App running in {process.env.NODE_ENV} mode</h1>,
  document.getElementById('app')
);
We will learn each aspect of a React component in the next chapter. For right now we are writing a minimal React app to test our Webpack configuration.
style.css
We also import the Normalize CSS library in our main style entry file.
@import 'normalize.css';
public/ folder
To test how are public folder is copied over to build, let us add favicon.ico file
to public folder in root of our development folder.
Running webpack
We can now run the development server using npm start command in the Terminal.
Now open your browser to localhost URL that your webpack dev server
suggests.
The browser app displays message that you are running in development mode. Try changing the message text and hit save. Your browser will refresh automatically.
You can also build your app to serve it using any web server.
First add a file server like so.
Now build and serve.
As you open your localhost URL with port suggested by the file server, you will note that the message now displays that you are running in production mode.
The build folder lists following files created in our webpack build.
Congratulations… You just built one of the most modern development environments on the planet!