ES6 React Guide
This chapter guides you through important React concepts and ES6 features for speeding up your React learning and development journey.
You will learn following concepts in this chapter.
- How to define a React component using ES6 syntax
- What are modules and how to import and export React components
- Why we need constructors
- How components talk to each other and the UI using events, props, and state
- Importance of stateless components
- Using React Chrome Extension to inspect your component hierarchy at runtime
For Speed Coding in React, ES6 is essential. Not only does it reduce the amount of code you end up writing, ES6 also introduces language patterns for making your app better designed, more stable, and performant.
Let us create a Hello World app to understand the React and ES6 features together. Subsequent chapters introduce more React and ES6 features based on the context of samples written for the chapter. This spreads your learning journey as you apply these concepts.
Code Along. You can clone the source for this entire book, change to app directory, checkout just the code for this chapter, install and start the app to launch the local version in your default browser.
Preview complete demo website hosted on Firebase, as you code this app by the end of this book.
View current chapter demo of the app we build in this chapter.
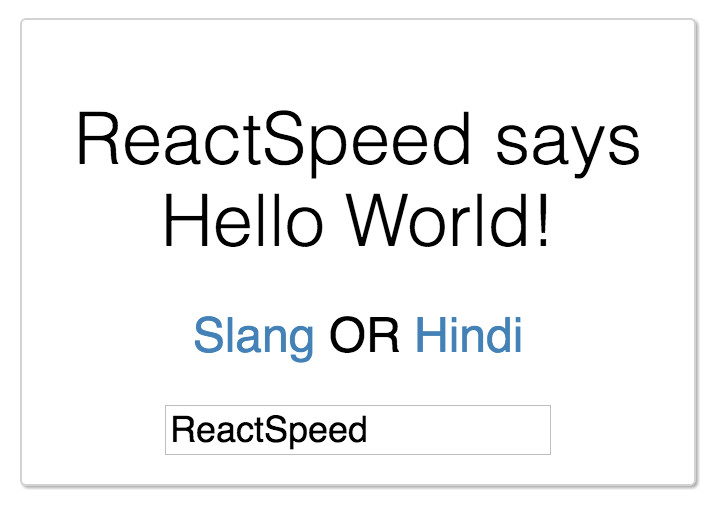
Hello World React
We will write a Hello World app with three custom components. A component to contain our app, a Hello component to render the greeting message, and a World component to handle user events like changing greeting or adding a name.
Component composition and naming
React apps follow component based development. So understanding how components are composed, how they relate to each other, simplifies several aspects of your React learning path. This includes understanding how React app folders and files are organized.
Component Hierarchy. React has owner components which render or set properties on other components. This ownership continues across all components building a tree-like hierarchy.
Root Component. In case of our Hello World ap, index.jsx represents
the root component (one that does not have an owner).
The root component owns and renders World component.
The World component is owner of Hello component.
Component File Naming. Root component inside a folder is named index.jsx and
the component name takes on the name of the folder, app in this case.
Components other than root are named same as the component class names, including PascalCase.
Refer naming conventions in Airbnb style guide.
Files and folder structure
This is the files and folder hierarchy you will create by the end of this chapter.
Root component index.jsx
We start by writing the entry point to our HelloWorld React app.
We replace the index.js created in the last chapter with a new one we
start from scratch.
Module import
In React each component is typically defined in a single file, also known as a module.
Any dependencies are imported using import statement.
The statement specifies name of the exported
component, constant, or function from the dependencies.
Dependencies are then used within a component. Dependencies are also used as rendered components
within an owner component. Like in our case World component is imported
by app root component before it is rendered.
import React from 'react';
import ReactDOM from 'react-dom';
import World from './components/World.jsx';

ReactDOM.render(
  <World />,
  document.getElementById('app')
);
Thinking in modules is central to how Webpack bundles your code and traces dependencies while creating chunks. However, Webpack 1.x does not natively support ES6 modules, though this is on their 2.x roadmap. This is where Babel steps in. Read more about Webpack ES6 support on the Webpack official docs.
The ReactDOM.render method uses React library targeting DOM output to identify
a DOM element id as target for rendering our entire app component hierarchy,
starting with the World component.
World.jsx component
Now we write the World component which renders the Hello component
with a message and handles user inputs.
Class definition
We start by importing Hello component which we will render in World component.
A module exports a component using export default keywords. There can only
be one such export. While importing such components we do not need to use
the { } braces.
All React components extend React.Component. This enables our components to have access to React lifecycle methods and other features.
import React from 'react';
import Hello from './Hello.jsx';

export default class World extends React.Component {
Constructor
The constructor of our World component highlights three most important
features of how components talk to each other and the user.
State. Changing UI or internal state of a component is maintained using this.state
object. When state changes, rendered markup is updated by re-invoking the render() method.
Props. Properties are the mechanism to pass data from owner to rendered components.
Events. Methods or event handlers are bound to UI events (like onClick) to perform actions when the event takes place.
Constructor is called when component is created, so it is the right place for the following three objectives.
- Using
super(props)keyword to make thepropsobject available to React.Component methods. - Setting initial component state. Using
this.stateobject. One can set state to default values or properties passed from owner component accessingpropsobject. - Binding event handlers to
thiscontext of the component class. Usingbind(this)method.
constructor(props) {
  super(props);
  this.state = {
    currentGreeting: props.greet,
    value: 'ReactSpeed'
  };
  this.slangGreet = this.slangGreet.bind(this);
  this.hindiGreet = this.hindiGreet.bind(this);
  this.handleNameChange = this.handleNameChange.bind(this);
}
Event Handlers and setState
Components can exist with no events defined. In our HelloWorld app we define three events.
The slangGreet event handles user click on Slang link to change the greeting message accordingly. Likewise the hindiGreet does so with the Hindi greeting message.
The handleNameChange method handles user input in the input text box to change
the name of greeting sender in the message. The value state is available
to React controlled components as explained few sections later in this chapter.
We use setState method to change state within React components. This in turn
re-renders the component UI calling the render method.
slangGreet() {
  this.setState({ currentGreeting: 'Yo!' });
}

hindiGreet() {
  this.setState({ currentGreeting: 'Namaste' });
}

handleNameChange(event) {
  this.setState({ value: event.target.value });
}
JSX and the render method
Let us now write the render method for World component. React component is
rendered using JSX syntax. JSX is HTML-like syntax where the nodes are
actually native React components providing same functionality as the
HTML DOM equivalents. So <div>, <h2>, <a>, and others used in the JSX
code are all native React components.
render() {
const renderGreeting = this.state.value
  ? `${this.state.value} says ${this.state.currentGreeting}`
  : this.state.currentGreeting;
return (
<div className="World-card">
<Hello greet={renderGreeting} message="World!" />
<h2>
<a onClick={this.slangGreet}>Slang</a>
OR
<a onClick={this.hindiGreet}>Hindi</a>
</h2>
<input
  type="text" value={this.state.value}
  placeholder="Enter a name"
  onChange={this.handleNameChange}
/>
</div>
);
}}
In the next four sections we will break down the render method JSX to understand more ES6 React concepts.
Template literals and ternary conditionals
We are using ES6 template literals as strings with back-ticks. Template
literals allow embedded expressions using the ${expression} syntax.
We are also using the JavaScript ternary conditional expression to set
the JSX value of renderGreeting based on value state.
const renderGreeting = this.state.value
? `${this.state.value} says ${this.state.currentGreeting}`
: this.state.currentGreeting;
Properties
Properties are used for passing input data from Root/Owner component to Child. Owner defines a property=value which is used within rendered component. The “Owner-ownee” relationship can exist without property passing, as in owner simply rendering a component.
<Hello greet={renderGreeting} message="World!" />
Event UI binding
Event UI binding is done by passing a prop named after the event onClick in
this case and the bound event handler method.
<a onClick={this.slangGreet}>Slang</a>
OR
<a onClick={this.hindiGreet}>Hindi</a>
Controlled components
Current UI state changes as user clicks
on greeting language links. We are also processing input data
using this.state.value provided by React. The input control used in this
example does not maintain its own state. It is known as Controlled Component as opposed to
Uncontrolled Component if the value property is not used. Uncontrolled components
manage their own state. Read more about handling forms at Facebook React documentation.
<input
type="text" value={this.state.value}
placeholder="Enter a name"
onChange={this.handleNameChange}
/>
PropTypes and defaultProps
At the end of the class definition we define default properties and property types on the component constructor.
The propTypes are used in property validation during development to throw warnings
in the Browser’s JavaScript console, if your code is not meeting the validation criteria.
Read more on Prop Validation in Facebook post that lists various types,
including custom validations.
World.propTypes = {
  greet: React.PropTypes.string.isRequired
};

World.defaultProps = {
  greet: 'Hello'
};
So if you change the value of greet to any number, the app will run, however you will see following warning in your browser console.
ES7 Property Initializers
Property initializers are an ES7 Stage 1 proposed feature.
In the prior section we were using class properties by
defining the World.propTypes and World.defaultProps outside
of the class definition on the component constructor.
Now using babel-plugin-transform-class-properties we can bring these
within the class definition.
Install the Babel plugin supporting this ES7 transform.
Update .babelrc with this new plugin.
{
  "presets": ["react", "es2015"],
  "env": {
    "development": {
      "presets": ["react-hmre"]
    }
  },
  "plugins": ["transform-class-properties"]
}
Next we update our class definition like so.
export default class World extends React.Component {
  static propTypes = {
    greet: React.PropTypes.string.isRequired
  }

  static defaultProps = {
    greet: 'Hello'
  }

  constructor(props) {
Note the use of static statement before initializing propTypes
and defaultProps in our class definition.
Complete World.jsx listing
We can further reduce few lines of code from our World component by
importing PropTypes and Component from React core.
Here is the complete World component listing.
import React, { PropTypes, Component} from 'react';
import Hello from './Hello.jsx';
export default class World extends Component {
static propTypes = {
greet: PropTypes.string.isRequired
}
static defaultProps = {
greet: 'Hello'
}
constructor(props) {
super(props);
this.state = {
currentGreeting: props.greet,
value: 'ReactSpeed'
};
this.slangGreet = this.slangGreet.bind(this);
this.hindiGreet = this.hindiGreet.bind(this);
this.handleNameChange = this.handleNameChange.bind(this);
}
slangGreet() {
this.setState({ currentGreeting: 'Yo!' });
}
hindiGreet() {
this.setState({ currentGreeting: 'Namaste' });
}
handleNameChange(event) {
this.setState({ value: event.target.value });
}
render() {
const renderGreeting = this.state.value
? `${this.state.value} says ${this.state.currentGreeting}`
: this.state.currentGreeting;
return (
<div className="World-card">
<Hello greet={renderGreeting} message="World!" />
<h2>
<a onClick={this.slangGreet}>Slang</a>
OR
<a onClick={this.hindiGreet}>Hindi</a>
</h2>
<input
type="text" value={this.state.value}
placeholder="Enter a name"
onChange={this.handleNameChange}
/>
</div>
);
}
}
Hello.jsx stateless component
The Hello component renders Hello World message based on how World
component calls it and current UI state.
Our Hello component is stateless. It does not define or change any state.
We are using arrow functions which are ES6 shorthand for writing functions.
import React from 'react';

const Hello = ({ greet, message }) => (
  <h1>{greet} {message}</h1>
);

Hello.propTypes = {
  greet: React.PropTypes.string.isRequired,
  message: React.PropTypes.string.isRequired
};

export default Hello;
Component styles in world.css
We can add some styles to our app. The /app/styles/components/world.css path
is used to create style for our World component.
.World-card {
  background: white;
  border: 1px solid lightgrey;
  border-radius: 3px;
  box-shadow: 1px 1px 1px 0 darkgrey;
  padding: 0.8em 1em;
  width: 300px;
  margin: 10px;
  text-align: center;
}
Base styles in element.css
We also add some shared styles in /app/styles/base/element.css file.
html {
  height: 100%;
  color: black;
  font-family: 'Open Sans', sans-serif;
  font-size: 18px;
  font-weight: 400;
}

h1 {
  font-weight: 300;
  font-size: 2em;
}

h2 {
  font-size: 1.333em;
  font-weight: 400;
}

a {
  color: steelblue;
  text-decoration: none;
}

a:focus,
a:hover {
  border-bottom: 1px solid steelblue;
  cursor: pointer;
}
Entry CSS using style.css
Finally we include our base and component styles, along with Normalize resets from the NPM module we installed earlier in this chapter.
@import 'normalize.css';
@import 'styles/base/elements';
@import 'styles/components/world';
The CSS entry file is stored at the /app/style.css path.
Run development server
This completes our first React app. Now run the app using the development server.
Once the app runs you should see following message from webpack-dev-server in your terminal window.
Browse to your app on the url mentioned in webpack output. Now try changing some code like the style background or the Hello World message and hit save. Your browser should update the app without refreshing state.
When this hot loading update happens you will see following output in the browser console.
Now we build and serve our HelloWorld app.
You will see a different webpack output on your terminal this time.
As you may have noticed the build is not highly optimized. The app.js file is
a huge ~2MB and css turned into JavaScript! In the chapter Production Optimize Webpack
we will discuss various techniques to optimize for a production environment.
React Chrome Extension
In case you want to inspect how your components pass properties and how they are organized at runtime, you can install React Chrome Extension.
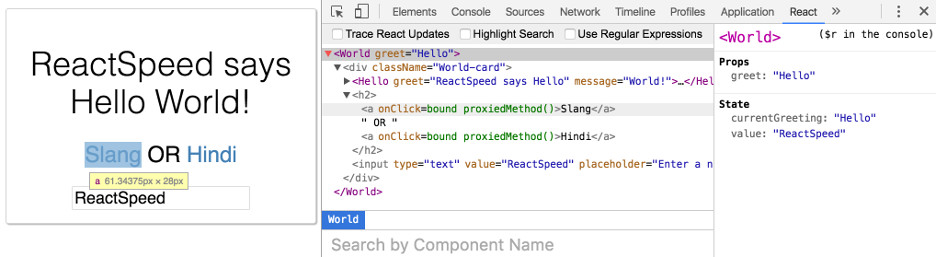
You can then select the code responsible for component UI and see the rendered UI highlighted. The extension will also update properties as they are passed along if you turn on the trace feature.