Why React and d3.js
React is Facebook’s and Instagram’s approach to writing modern JavaScript front-ends. It encourages building an app out of small, re-usable components. Each component is self-contained and only knows how to render a small bit of the interface.
The catch is that many frameworks have attempted this: everything from Angular to Backbone and jQuery plugins. But where jQuery plugins quickly become messy, Angular depends too much on HTML structure, and Backbone needs a lot of boilerplate, React has found a sweet spot.
I have found it a joy to use. Using React was the first time I have ever been able to move a piece of HTML without having to change any JavaScript.
D3.js is Mike Bostock’s infamous data visualization library. It’s used by The New York Times along with many other sites. It is the workhorse of data visualization on the web, and many charting libraries out there are based on it.
But d3.js is a fairly low-level library. You can’t just say “I have data; give me a bar chart”. Well, you can, but it takes a few more lines of code than that. Once you get used to it though, d3.js is a joy to use.
Just like React, d3.js is declarative. You tell it what you want instead of how you want it. It gives you access straight to the SVG so you can manipulate your lines and rectangles at will. The issue is that d3.js isn’t that great if all you want are charts.
This is where React comes in. For instance, once you’ve created a histogram component, you can always get a histogram with <Histogram {...params} />.
Doesn’t that sound like the best? I think it’s pretty amazing.
It gets even better. With React, you can make various graph and chart components build off the same data. This means that when your data changes, the whole visualization reacts.
Your graph changes. The title changes. The description changes. Everything changes. Mind = blown.
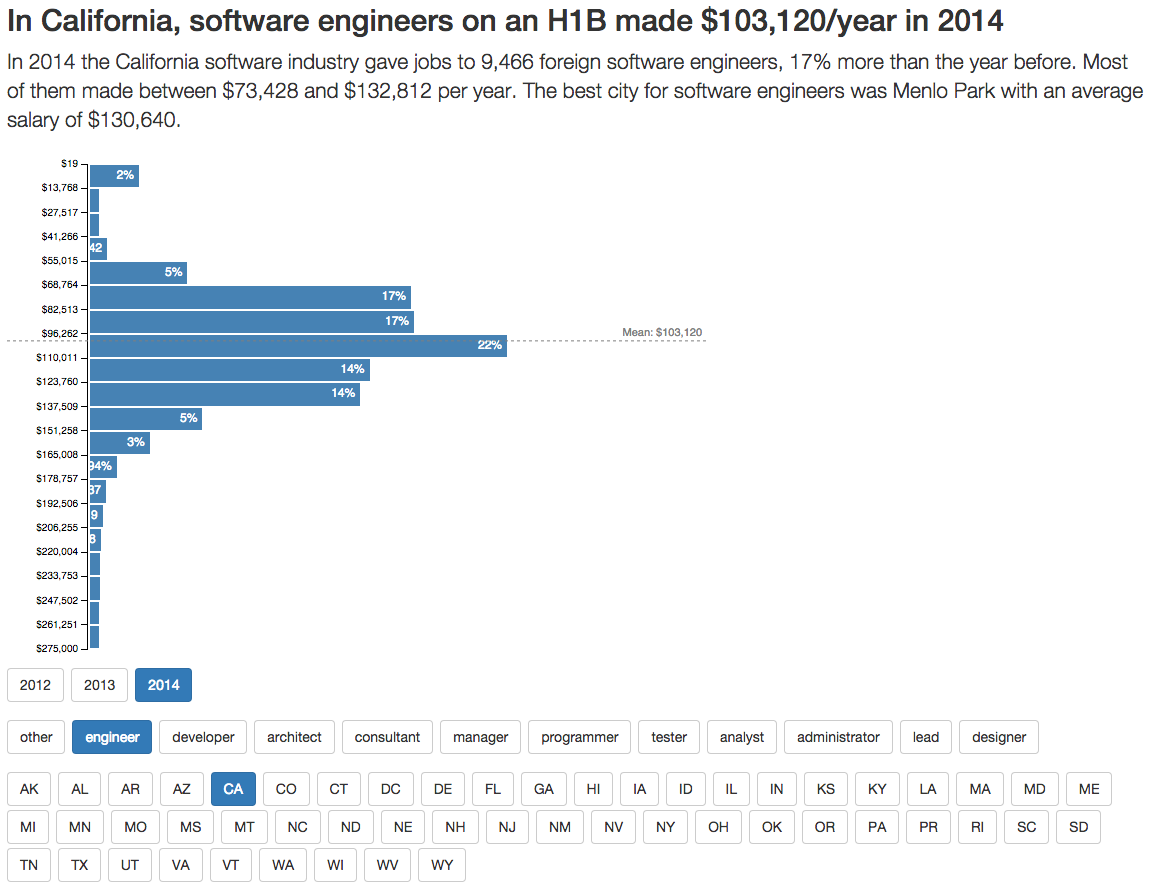
Look how this H1B salary visualization changes when the user picks a subset of the data to look at.

React + d3.js: a powerful combination indeed.
Buzzword soup explained
We’re going to use a lot of buzzwords in this book. Hell, we’ve used some already. Most will get a thorough explanation further on, but let me give you a quick rundown.
- Babel, a JavaScript transpiler that makes your code work on all browsers.
- ECMAScript2016, official name for the part of ES7 we’re getting in 2016
- ES5, any JavaScript features that existed before June 2015
-
ES6/ECMAScript2015, any JavaScript features released as part of the new standard in June 2015 (think
=>and stuff) - ES7, the standard we were promised for 2016, but also a catch-all for future JavaScript features
-
fat arrows, a new way to define functions in ES6 (
=>) - Git, a version control system. It’s pretty popular, you probably know it :)
- H1B, a popular type of work visa in the United States
-
JSX, a language/syntax that lets you use
<a href="/example">as a native part of JavaScript -
Mustache, a popular way to write HTML templates for JavaScript code. Uses
{{ ... }}syntax. - npm, most popular package manager for JavaScript libraries
- props, component properties set when rendering
- state, a local dictionary of values available in most components
- Webpack, a module packager for JavaScript. Makes it more convenient to organize code into multiple files. Provides cool plugins.
JSX
We’re going to write our code in JSX, a JavaScript syntax extension that lets us treat XML-like data as normal code. You can use React without JSX, but I think it makes React’s full power easier to use.
The gist of JSX is that we can use any XML-like string just like it is part of JavaScript. No Mustache or messy string concatenation necessary. Your functions can return straight-up HTML, SVG, or XML.
For instance, the code that renders our whole application is going to look like this:
Which compiles to:
ReactDOM.render(
    React.createElement(H1BGraph, {url: “data/h1bs.csv”}),
    document.querySelectorAll(‘.h1bgraph’)[0]
);
As you can see, HTML code translates to React.createElement calls with attributes translated into a property dictionary. The beauty of this approach is two-pronged: you can use React components as if they were HTML tags and HTML attributes can be anything.
You’ll see that anything from a simple value to a function or an object works equally well.
I’m not sure yet whether this is better than separate template files in Mustache or something similar. There are benefits to both approaches. I mean, would you let a designer write the HTML inside your JavaScript files? I wouldn’t, but it’s definitely better than manually +-ing strings or Angular’s approach of putting everything into HTML. Considerably better.
If you skipped the setup section and don’t have a JSX compilation system set up, you should do that now. You can also use the project stub that came with your book.