Part IV: Handling Data
This section highlights aggregating, visualizing, and acting on incoming data, whether it be logs, events, or environmental information.
Keeping Your Users in the Loop with Toast Notifications
I love toast notifications. They’re a great way of getting information out to people without necessarily demanding their attention in the moment. As you dive into them further, you’ll find that their potential use cases and customizability is limitless.
Need to tell your users to log out at the end of the day? Use a toast!
Need to remind users that there’s an all staff meeting today at 10, and the CEO will be personally upset if they aren’t there? Use a toast!
Waiting on a script and want to know when it’s done without keeping the console open? Use a toast!
My hope is that by the end of this chapter, you’ll love—and use—toast notifications as much as I do.
Toasts
Toast? But this isn’t breakfast!
You may not know them by the name “toast,” but it’s a guarantee that you’ve seen them. Chances are you’ve heard of toast notifications referred to as “pop-up notifications” or “notification bubbles,” but for the remainder of this chapter I’ll be referring to them simply as “toasts.”
These toasts are small graphical elements that pop on your screen to communicate some information to you. One of their defining features is that they’re meant to automatically disappear after a certain amount of time. After disappearing they should then be retrievable from a common location.
All major current Operating Systems support toasts, even those running on your phone. This chapter will only be focusing on their implementation in Microsoft Windows, though you will be left with some breadcrumbs to follow in the final section for Mac and Linux notifications.
You might find yourself asking, “focusing on Windows is fair enough, but why just Windows 10?”
Toasts as a concept were added to Windows in Windows 8. They were the notifications that would pop up towards the top right of your screen every time you inserted some sort of removable media.
These toasts were heavily template based, meaning you’d have to select the best option for your use case from a catalogue.
Windows 10 shook things up by adding adaptive toasts and moving the notifications to the lower right hand corner of your screen. The term adaptive toast sounds a lot more intimidating than it really is. They’re simply a more free form method for creating toasts, using a generic template, giving you much more creative freedom.
As a matter of opinion, the Windows 8 style toasts look much nicer than the new variety. The new flexibly more than makes up for this, but that’s enough history. Time to dive into your first toast notification!
Cooking Your First Toast
Your first toast notification is going to be a whirlwind tour of the basics. It’s going to look a little complicated straight off the blocks, but don’t be put off. The next section in this chapter introduces you to a module that helps with the parts of this that seem arcane.
Before that, hurry up and get your first toast cooking.
The first thing to know is that behind the scenes, a toast notification is XML. When working directly with the XML, it’s preferable to store them in a here-string so that they’re easy to read and understand.
 1 $XmlString = @"
 2 <toast>
 3   <visual>
 4     <binding template="ToastGeneric">
 5       <text>Default Notification</text>
 6     </binding>
 7   </visual>
 8   <audio src="ms-winsoundevent:Notification.Default" />
 9 </toast>
10 "@
There’s a deceptively large amount of information to unpack about this XML schema. If you’re interested in getting a deeper understanding than what this chapter can give you, there’s some good information available from Microsoft Docs.
The main thing to know about this example is the template, “ToastGeneric.” This is where you would have listed the specific template you wanted to use in Windows 8, but now you should just leave it as the generic option. In fact, you have to leave this as the generic option if you want to make use of any of the new adaptive features from Windows 10.
Next is the text wrapped in <text> tags.
You can have more than one of these, and the first one will always be the bold heading of your toast.
It’s beyond the scope of this chapter, but this is also where you can include an image.
Finally, is the audio that plays when the toast is displayed. This example used the default sound, but there is a small library of other operating system provided sounds you can use in its place.
Next you need to pick an “AppUserModelID”, referred to as AppID from this point forward.
This is the string that identifies applications installed on Windows, and it’s use with toasts tells Windows which application generated a given notification.
You can get a list of all valid AppIDs by running Get-StartApps and you’re free to pick any of them.
For this example, you will use Windows PowerShell’s AppID.
1 $AppId =
2  '{1AC14E77-02E7-4E5D-B744-2EB1AE5198B7}\WindowsPowerShell\v1.0\powershell.exe'
Next you need to load some Windows runtimes into your PowerShell session. There’s not much that can be written about this sample code without diving into insane detail. Just know that this has to be run into to display your toast, and it allows you to work with some built-in .NET classes.
 1 $null = @(
 2     'Windows.UI.Notifications.ToastNotificationManager'
 3     'Windows.UI.Notifications'
 4     'ContentType = WindowsRuntime'
 5 ) -join ',' -as [type]
 6
 7 $null = @(
 8     'Windows.Data.Xml.Dom.XmlDocument'
 9     'Windows.Data.Xml.Dom.XmlDocument'
10     'ContentType = WindowsRuntime'
11 ) -join ',' -as [type]
The second to last step is to load the here-string into a “real” XML object and then use that to create a new “ToastNotification” object.
1 $ToastXml = [Windows.Data.Xml.Dom.XmlDocument]::new()
2 $ToastXml.LoadXml($XmlString)
3 $Toast = [Windows.UI.Notifications.ToastNotification]::new($ToastXml)
Finally, pass your toast to the “Toast Notification Manager.” You need to provide the AppID that you defined earlier and the toast object itself.
1 $NotificationManager = [Windows.UI.Notifications.ToastNotificationManager]
2 $NotificationManager::CreateToastNotifier($AppId).Show($Toast)
All going well, you’ll see your toast pop up above everything else on your screen. It’s not much to look at at this stage, but take pride in your very first toast notification!

Troubleshooting Your First Toast
Unfortunately, toasts don’t always go as planned on your first go. Often because a setting has been toggled on your system to limit the display of notification from other application.
Firstly, double check that Focus Assist isn’t enabled. This is a great feature to ensure you’re not being distracted when trying to get work done, however it will also suppress the notifications you’re working on.
Next, open up the Settings app and head to “System” then “Notifications & actions.” Scroll down and you’ll see a list of apps that have, or can, send toasts. Look for the application you chose for your AppID and ensure it’s toggled on. You can also click on the application to change some more granular settings. In this area you could decide that you do want to see toasts from a specific app, but don’t want it to be able to make noises. You can also customize how many past notifications are visible in the Action Center without having to click the “see more” button.
Introduction to BurntToast
Now that you’ve seen how to do toast the hard way, it’s time to leverage an existing module to make the whole process easier. The first thing you’ll need to do is download the BurntToast module from the PowerShell Gallery.
1 Install-Module -Name BurntToast -Scope CurrentUser
With the BurntToast module installed, you can very quickly display a new notification with a single command.
1 New-BurntToastNotification

Now it’s time to iterate quickly so that you can finally make a toast notification that’s 100% your own.
First, decide what text you want displayed on your toast and provide that against the -Text parameter.
Remember that the first string you provide will be the heading and everything thing else will be displayed underneath that.
You’ll also notice that the default BurntToast notification had a larger picture instead of the PowerShell icon that was on your first notification.
This is known as an “App Logo Override” and it can be any image you desire.
To change the logo, provide the path to the desired image to the -AppLogo parameter.
1 $ToastSplat = @{
2     AppLogo = 'C:\Toast\pwsh-hex.png'
3     Text = 'This is a heading', 'This is body text', 'You can fit more too.'
4 }
5
6 New-BurntToastNotification @ToastSplat
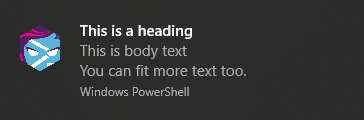
Note that this example included three different string objects, each of which appear on their own line. You can perform any of the string manipulation or variable substitution you’d normally do in PowerShell to make these toasts more dynamic.
You’re now at the point where you can display toast notifications with whatever text you require. Now it’s time to start diving into a few of the more advanced customization options you have at your disposal.
Listening to Your Toast Sing
So far you’ve only customized the appearance of your toasts. Sometimes the best way to get a user’s attention, if that’s the aim of your notification, is to change the sound that accompanies it.
In the “Cooking Your First Toast” section, you saw that there was a small library of built-in sounds you can use.
To access them, use the -Sound parameter.
This parameter gives you tab completion of all the available sounds, so choose from the list and you’re good to go.
If you really do want your user’s attention, it’s best to pick one of the “Call” or “Alarm” sounds. Choosing any of these will loop the sound while the toast is onscreen and all other sounds, such as videos, will be turned down.
1 New-BurntToastNotification -Sound Alarm10
As a bonus, using any of these looping sounds will also result in the toast staying onscreen longer than a standard toast. Use this power sparingly, it can be incredibly annoying if overused and the last thing you want is your users getting annoyed enough to learn how to suppress your notifications.
On the other end of the annoyance spectrum, if you don’t want your toast to make any noise you can use the -Silent switch.
1 New-BurntToastNotification -Silent
Taking Action, or Just Snooze and Dismiss
Now that you know how to make your toast display the information you need it to, and grab your user’s attention with different sounds, it’s time to look at enabling your toast to do more.
The first example in this regard is enabling “Snooze and Dismiss.” This gives the user a series of buttons and a drop down list for dismissing the notification or snoozing it for a selectable number of minutes.
1 New-BurntToastNotification -SnoozeAndDismiss
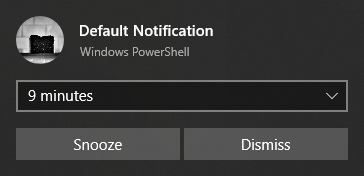
If the user decides to snooze the toast, it will reappear after the amount of minutes shown in the dropdown list.
What if you want to create your own buttons?
You can create “Button” objects with the New-BTButton function, and provide one or more of them to the -Button parameter.
1 $Button1 = New-BTButton -Content 'Google' -Arguments 'https://www.google.com'
2 $Button2 = New-BTButton -Content 'Bing' -Arguments 'https://www.bing.com'
3
4 New-BurntToastNotification -Text 'Open Search Engine' -Button $Button1,$Button2
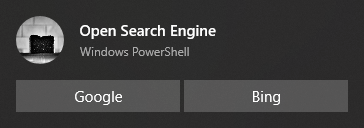
When creating your button objects, the “Content” is the text that displays on the button itself. The “Arguments” is the link to be opened when the button is clicked. If this is a URL, it will open in your default browser, but it doesn’t necessarily need to be a website.
You can instead provide a path to a file. Doing this will open the file in the default program for the file type. For example a .docx will open in Microsoft Word and a .jpeg may open in the Photos app.
But Why? Exploring Scenarios and Use Cases for Toasts
You’ve learned a lot of the “how” regarding toasts, and with any luck your mind is racing with all the places you’ll be able to use them. To tie a pretty bow on your introduction to these notifications, it’s time to spend a little bit of time going through some of the “why.”
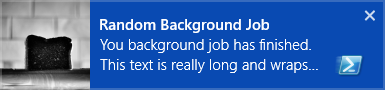
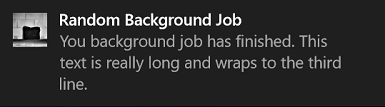
One of the main uses for toasts in PowerShell scripts is to let you know when a long running process is finished. Maybe you have a report that takes 20 minutes or longer to generate and you’d really like to know when it’s done. You don’t, however, want to keep your console open the whole time.
At the end of your report generation script, add the code for a toast notification. You may even want to add a button that points to the .pdf or .csv file that was the end result of the script so that you can open it directly.
If you’ve got a job running in a background job, you could setup an object event to fire a toast when the job completes.
Finally, instead of sending out password expiry warning emails to users, you could use toasts. As the expiry time gets closer, you could make your toasts more annoying attention grabbing by using an alarm sound.
But Don’t Get Too Excited, There’s a Limitation
After all this, you probably have one burning question: “how do you trigger a PowerShell script on a button press?”
The unfortunate answer is that at the time of writing, you can’t.
This is a topic with a lot of depth to it and a deep dive that’s out of scope for this chapter. The very quick explanation is that toasts are part of the “WinRT” APIs in Windows which PowerShell doesn’t completely support. Toasts do fire off events, but PowerShell can’t register actions against them. This means there is a lot of untapped potential still waiting to be unlocked.
Go Forth and Cook Toast
There’s more to learn about toast notification than what could be included in this chapter without making it a book in and of itself.
Do consider rummaging around the BurntToast notification to find out what else is possible.
Some future topics for you to dive into include:
- Progress bars
- Clickable toast
- Images (inline and hero)
- Custom sounds
- Exporting toast XML for portability
It’s time for you to explore toasts at your own leisure and find your own use cases. Have fun!
ReportCardPS - Create Custom HTML Reports with VMware’s Clarity UI Styling
This chapter focuses on how to use the ReportCardPS PowerShell module to create customized HTML reports that leverage VMware’s Clarity UI project. It covers the structure of creating a report manifest and custom functions used by the report manifest file.
PowerShell has been used to create HTML reports for years. System administrators have written hundreds and hundreds of lines of custom code that create visually pleasing reports in an HTML format. Many of those lines exist solely to format data in a pleasing HTML format. Utilizing an external library for HTML styling allows for a much simpler approach to creating these customized reports.
This chapter assumes you are already at a moderate skill level with PowerShell and have a basic knowledge of HTML elements, PowerShell function structure, and JSON objects.
To follow along with the commands in this chapter, Windows PowerShell 5.1 is required.
No other versions of PowerShell were tested with the code referenced in this chapter.
The ReportCardPS PowerShell module version used for this chapter is 0.0.14.
How ReportCardPS Works
The Basics
The purpose of the ReportCardPS module is to turn output from multiple PowerShell functions into a consumable HTML document. Each function should be represented by an area on the page that’s distinct. The HTML document should be able to support multiple screen sizes and a random number of functions or cards.
The New-ReportCard function iterates through the PowerShell functions provided in the report manifest file.
First, a new HTML document is created.
Second, each function is executed and the output of the function is transformed into HTML elements.
As each function is executed the HTML elements are added to the HTML document.
Finally, after all functions have been executed, the HTML document is returned to the PowerShell pipeline.
This function also inserts all the required HTML header information to use the VMware Clarity HTML and Cascading Style Sheets (CSS) elements.
VMware’s Project Clarity
The HTML/CSS framework that supports ReportCardPS is VMware’s Clarity Design System. Clarity is an active open source project and is licensed under the MIT License. This design system provides rich features and an exceptional experience to end users. ReportCardPS consumes the HTML elements of Project Clarity through ClarityPS, a PowerShell module specifically aimed at exposing all Clarity HTML elements. This allows for the ReportCardPS module to focus solely on providing the functionality to generate reports. ReportCardPS also takes advantage of having built-in support for Light and Dark themes.
Understanding HTML Cards
HTML cards are a user interface object that organizes data clearly and concisely. When a HTML document utilizes multiple cards on the same webpage the cards are placed on a balanced grid to allow for auto scaling.
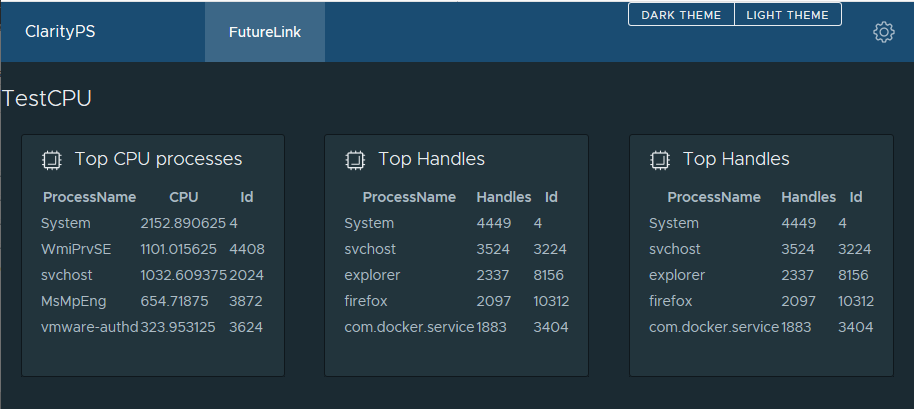
ReportCardPS utilizes a flex-container element which allows for the grid of cards to be generated dynamically based on the card width and the page width.
See the image below where the browser window has been dragged to the left and the result is a card being bumped to a second row.
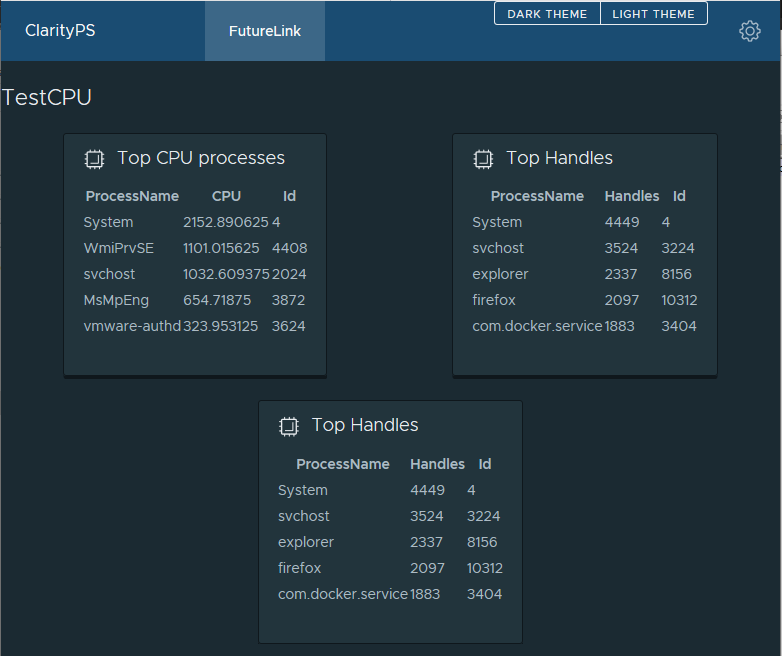
The two images used above were rendered with the same exact HTML—only the browser window’s width was changed.
Getting Started
Configuring Your Environment for This Chapter
Creating a clean environment is important when running any script or application.
1 # Determine the current script execution policy.
2 Get-ExecutionPolicy
Output:
1 Restricted
1 # Execute the following command to change the PowerShell execution policy.
2 Set-ExecutionPolicy -ExecutionPolicy RemoteSigned
1 # Verify the command updated the script execution policy.
2 Get-ExecutionPolicy
Output:
1 RemoteSigned
Install ReportCardPS
First, ensure you can find the module in the PowerShell Gallery. This will require the computer have a connection to the internet.
1 Find-Module -Name ReportCardPS -Repository PSGallery
1 Version    Name                              Repository           Description
2 -------    ----                              ----------           -----------
3 0.0.12     ReportCardPS                      PSGallery            PowerShe...
4 0.0.14     ReportCardPS                      PSGallery            PowerShe...
Next, install the ReportCardPS PowerShell module:
 1 $InstallParams = @{
 2   Name = 'ReportCardPS'
 3   RequiredVersion = '0.0.14'
 4   Repository = 'PSGallery'
 5   Scope = 'AllUsers'
 6   Force = $true
 7 }
 8 Install-Module @InstallParams
 9 # Import the ReportCardPS module
10 Import-Module –Name ReportCardPS
Then, verify the ReportCardPS module is installed by utilizing Get-Module:
1 Get-Module -Name ReportCardPS -ListAvailable
Output:
1     Directory: C:\Program Files\WindowsPowerShell\Modules
2
3 ModuleType Version    Name                              ExportedCommands
4 ---------- -------    ----                              ----------------
5 Script     0.0.14     ReportCardPS                      {Get-ReportCardTemp...
Finally, verify the ClarityPS module is installed by utilizing Get-Module:
1 Get-Module -Name ClarityPS -ListAvailable
Output:
1     Directory: C:\Program Files\WindowsPowerShell\Modules
2
3 ModuleType Version    Name                               ExportedCommands
4 ---------- -------    ----                               ----------------
5 Script     0.3.0     ClarityPS                           {Add-Branding, Add...
Inspect the ReportCardPS Module
You can use the Get-Command function to review the available commands that are provided in the ReportCardPS module.
1 Get-Command -Module ReportCardPS
Output:
1 CommandType     Name                           Version    Source
2 -----------     ----                           -------    ------
3 Function        Get-ReportCardTemplateSet      0.0.14     ReportCardPS
4 Function        New-ReportCard                 0.0.14     ReportCardPS
The ReportCardPS Manifest File
The report manifest file is a JavaScript Object Notation (JSON) document which details the order of and information about the cards that will be in the HTML report document. Each card is described with the following information:
-
CardTitle: Brief description of the card -
CardFunction: PowerShell function to be used to generate the card HTML -
CardArguments: Parameters to be used when executing the PowerShell function -
Order: Order of the cards on the HTML document.
Here is an example of a basic report manifest file:
 1 [
 2   {
 3     "CardTile": "CPU",
 4     "CardFunction": "Get-LocalProcUsage",
 5     "CardArguments": "-Count 5",
 6     "Order": "1"
 7   },
 8   {
 9     "CardTile": "Handles",
10     "CardFunction": "Get-LocalHandleCount",
11     "CardArguments": "-Count 5",
12     "Order": "2"
13   }
14 ]
Locate ReportCardPS Manifest Files
ReportCardPS includes example report manifest files in the module’s lib folder.
You can locate the example files with the included function Get-ReportCardTemplateSet:
1 Get-ReportCardTemplateSet
Output:
1 # Full paths are not displayed.
2 FullName
3 C:\...\Modules\ReportCardPS\0.0.14\lib\Generic\LocalCPUReport.json
4 C:\...\Modules\ReportCardPS\0.0.14\lib\VMware\vCenterHomeReport.json
This chapter will utilize LocalCPUReport.json as the example report manifest file.
Creating a Basic Report
ReportCardPS includes the functions and report Manifest file to create a basic report on CPU usage and performance for your local machine.
To create a report execute the New-ReportCard command with the following parameters:
-
Title: Name of the report that will be displayed on the HTML Document -
JsonFilePath: Full Path to the report manifest file
By default, ReportCardPS returns the HTML document back to the PowerShell pipeline.
In the example below the HTML file is output to a file in the C:\temp directory.
 1 $NewReportParams = @{
 2   Title = 'ExampleReport'
 3   # Full path is not displayed.
 4   # Use the full path returned from Get-ReportCardTemplateSet.
 5   JsonFilePath = 'C:\...\ReportCardPS\0.0.14\lib\Generic\LocalCPUReport.json'
 6 }
 7 $OutputParams = @{
 8   FilePath = 'C:\temp\exampleReport.html'
 9   Encoding = 'ascii'
10 }
11 New-ReportCard @NewReportParams | Out-File @OutputParams
You can open the newly created file C:\temp\exampleReport.html in a web browser.
Creating Custom Functions
The key to ReportCardPS is the custom PowerShell functions.
These functions are used to gather the data and create the HTML used to render the cards.
Each of these custom functions must be imported into the PowerShell session running the New-ReportCard function.
The main steps that each function needs are:
- Accept parameters.
- Gather raw data.
- Convert the raw data to HTML.
- Assemble card HTML.
- Return the html to the pipeline.
Below is a snippet from an example function similar to one found in the ReportCardPS module.
 1 # Gather the raw data.
 2 $rawData = Get-Process | Sort-Object -Property CPU –Descending
 3
 4 # Convert the raw data to HTML
 5 $DataHTML = $rawData | ConvertTo-Html -Fragment
 6
 7 # Build the HTML Card, with a Title and Icon
 8 $Card = New-ClarityCard -Title "Top CPU processes" -Icon cpu -IconSize 24
 9 $CardBody = Add-ClarityCardBody -CardText "$DataHTML"
10 $CardBody += Close-ClarityCardBody
11 $Card += $CardBody
12 $Card += Close-ClarityCard -Title "Close CPU Card"
13
14 # Return the HTML to the pipeline
15 $Card
The example provides the basics for gathering data and creating a simple card. It’s recommended to explore the Clarity Documentation to learn about additional HTML elements you can add to the cards. You may also want to review the latest functions from ClarityPS.
Summary
The ReportCardPS PowerShell module was created to give system administrators another tool to create custom reports utilizing VMware’s Clarity HTML elements. The functions included in ReportCardPS and ClarityPS can be used to create elaborate and customized reports to display a variety of data points. Contributions, bug reports, and suggestions are welcome to both PowerShell modules as they’re open source projects.