Daily operation and administration
Once I have installed Linux and the necessary software on my ALIX computer I have to give some thought to its operation. How do I configure the computer for the network, how do I update the software and how do I tell if there is any updated software and whether I should install it or not.
Configuring the computer for its intended use
In an ideal world I would not have to configure anything at all. Everything would be configured externally, for instance in the network using DHCP, Bonjour, Zero Configuration Networking or IPv6 auto configuration. I can do this for a streaming music client that is configured from the network and whose playlists are on the server. Plug it in, switch it on, it works.
That would be nice but life isn’t always like that. The alternative is to configure the software on the device and - to make the configuration survive the next reboot - write it to a suitable medium. This medium, in the simplest case the root file system, must be writable at least during configuration. To make the root file system writable the scripts remountrw and remountro can be used which do exactly this, remount the root file system read-write ore read-only. Now I can write to the file system and can configure the device.
Because a Linux system contains software of diverse origin, configuration is also heterogeneous. The only common feature that nearly every type of software on Linux and UNIX has, is that text files can be configured using any text editor - traditionally vi. Even this common denominator starts to weaken since programs like Samba can be configured using a binary registry that is accessed using the net command.
Differences already crop up with the syntax of the configuration files.
The key-value-pairs are sometimes separated by equal sign (=)
and sometimes not.
The configuration file may be divided into sections or it may contain complex
block structures with brackets, parenthesis or other constructs.
Some software provides the full range of the scripting language which it is
written in in the configuration file.
Other software uses different syntax in different files - ISC BIND
to mention one.
There are even different ways of commenting on something in the configuration files, making the handbook or other documentation indispensable.
In truth there are projects that unite the configuration of the whole system or at least bring it under a consistent interface, like for instance Webmin, the somewhat out-of-date linuxconf, UCI from OpenWrt or the various server configuration programs. But with these I have to ask myself - particularly with regard to limited resources:
- Can I configure everything that needs to be configured with it?
- Do I have enough disk space and memory for the configuration program?
- Is it reasonably secure?
- Does it work with the read-only root file system?
In particular the last consideration would mean abandoning most of these programs.
So in most cases I have to resort to the traditional method of configuring directly in the text files that are used to configure my software, or software I’ve programmed myself, that acts like UCI, or a configuration management system like cfengine, chef or puppet if I use these in the remaining network as well.
Configuration with UCI from OpenWrT
The Unified Configuration Interface (UCI) from the OpenWrt project is an interesting approach. Because ALIX computers have been able to use OpenWrt since the Kamikaze version, I can test its advantages configuring computers using CompactFlash as a permanent storage medium.
UCI can stand alone and can be adapted to other distributions, but it takes some time to make it work. There is a note regarding this on the OpenWrt web page.
The main configuration of OpenWrt is under /etc/config/. In this directory you will find text files for every part of the system that needs to be configured. These files can be modified with an editor, the command line program uci or with one of the different programming interfaces (Shell, Lua, C). The web interface LuCI is based directly on the programming interface.
The graphical interface LuCI from OpenWrt
One advantage of the web administration interface LuCI is that it makes the administration of the device acceptable for people who would rather avoid the command line. With some knowledge of the programming language Lua, I can enhance this interface to meet my requirements.
For instance, I had the system partition remounted read-only on an ALIX computer with OpenWrt and ext2 file system and added two scripts so that I could switch easily between read-write and read-only. In order to use the same functionality with the web interface I used the extension described in chapter four.
The iptables firewall on OpenWrt
If I want to deploy OpenWrt on my computer and use the packet filter firewall it would be best to understand the context, especially if I want to use the command line tool uci or the web interface LuCI in the configuration.
Indeed it is possible to override all of the settings of the configuration interface in the file /etc/firewall.user, but then I would miss out on all the advantages of structuring using the web interface.
The model
The iptables rules are distributed over the different chains in a defined plan on OpenWrt. Knowledge of this plan helps to understand and be able to analyze the filter rules.
The firewall is basically divided into zones such as wan and lan. For each of these zones there is a set of rule chains which are linked according to the firewall configuration settings. These links for the different firewall tables (filter, mangle, nat and raw) are illustrated in the following model.
The filter table contains all of the rules which allow or deny the passage of data packets. The model for it looks like this:
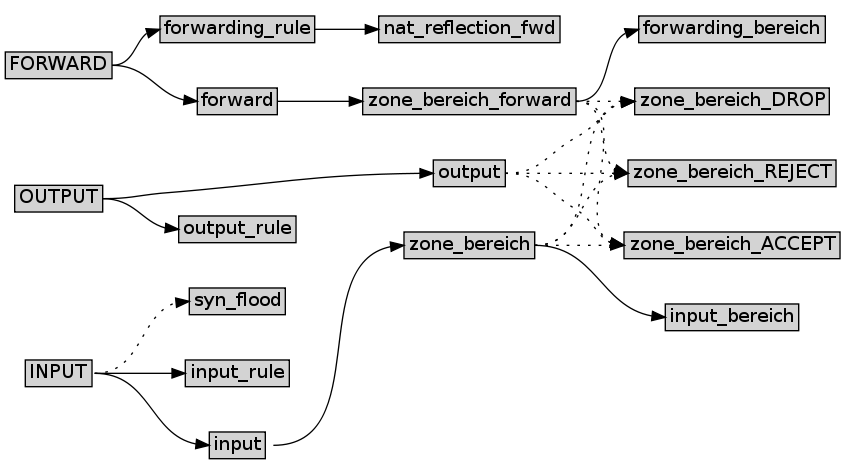
Model of the filter rules
In this diagram the word bereich in the name of a rule chain stands
for one of the zones defined in UCI.
That means if I defined the zones lan and wan, there are rule chains named
zone_lan, zone_wan, zone_lan_ACCEPT, zone_wan_ACCEPT, zone_lan_DROP,
zone_wan_DROP etc.
In the model, solid lines represent fixed jump targets. Dotted lines stand for jump targets which may or may not exist depending on the configuration settings.
A jump from one zone rule chains to another can occur between different
chains depending on the settings.
For example, a jump from rule chain zone_lan_forward to chain
zone_wan_ACCEPT occurs if data transit from zone lan to zone wan is
allowed.
The jump from chain INPUT to chain syn_flood depends on whether the
setting Enable SYN-flood protection is enabled in the configuration settings
or not.
It is important to keep in mind that this model doesn’t reveal the order of the jumps between the chains. To find out this information you would need a more detailed visualization of the firewall rules.
The model for the nat table is more straightforward:
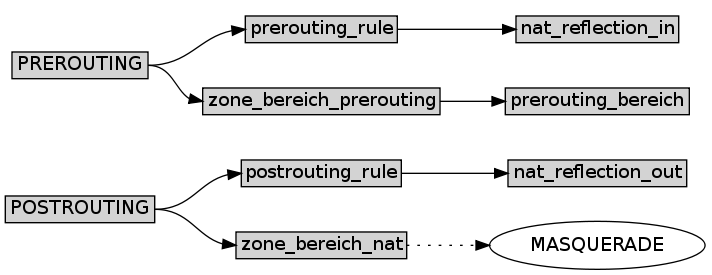
Model of the nat rules
Even easier are the models for the tables mangle

Model of the mangle rules
and raw:

Model of the raw rules
This gives you an idea about the basic relationship between the rule chains. Now I’ll go into detail about configuration.
Common settings
Before I come to the actual firewall settings I will digress briefly and talk
about the network settings.
You’ll find these under Network -> Interfaces with LuCI and in the file
/etc/config/network with UCI.
Or I can use the command uci show network to display them.
Data about the actual state of the network, for instance settings derived
from DHCP, can be found in /var/state/network.
I obtain these in the command line interface with:
# uci -P /var/state show network
With LuCI I can assign every interface to a firewall zone under the interface’s Firewall Settings tab. These settings correspondend with the settings under Network -> Firewall for the zone in question (under Covered Networks).
With UCI the networks are specified in firewall.@zone[x].network
as a space separated list.
I add them in the command line interface with the command uci add_list:
...
# uci add_list firewall.@zone[-1].network=lan1
# uci add_list firewall.@zone[-1].network=lan2
...
Thus the symbolic network names (lan, wan) are used as values and not the names of the physical interfaces.
Common firewall settings
I can find the common firewall settings in the upper area of the page Network->Firewall. Here we have the tabs General Settings and Custom Rules.
The latter enables the file /etc/firewall.user to be customized within the web
interface.
This file is a shell script which is called up after configuration in accordance
with the input given to LuCI or UCI.
Because it is a shell script, all of the firewall rules have to be initiated
with
iptables, the program which sets the rules in the kernel, and they have to
adhere to the syntax understood by this program.
In UCI there is only a reference to the name of this script in the variable
firewall.@include[0].
Now let’s return to the common settings.
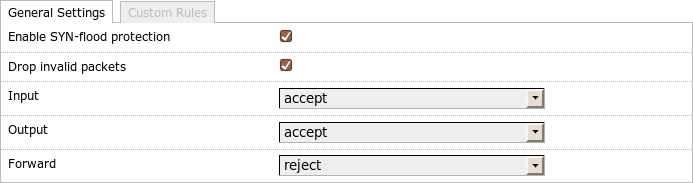
General firewall settings
A check mark after Enable SYN-flood protection corresponds to the entry firewall.@default[0].syn_flood=1 in UCI and creates the rule chain syn_flood in the filter table. There is a jump from the INPUT rule chain to this chain for TCP packets which have set the FIN-, SYN-, RST- or SYN-ACK-bit. The syn_flood chain contains a rule which limits the number of such packets per time unit and otherwise jumps back to the normal rule evaluation.
A check mark after Drop invalid packets in LuCI corresponds to the entry firewall.@default[0].drop_invalid=1 in UCI and creates a rule to discard invalid packets at the beginning of the INPUT chain.
In LuCI I can choose between an ACCEPT, DROP or REJECT policy for the
chains INPUT, OUTPUT and FORWARD.
The information in the LuCI illustration above corresponds to the following entries in UCI:
# uci set firewall.@defaults[0].syn_flood=1
# uci set firewall.@defaults[0].input=ACCEPT
# uci set firewall.@defaults[0].output=ACCEPT
# uci set firewall.@defaults[0].forward=REJECT
# uci set firewall.@defaults[0].drop_invalid=1
Firewall zones
The zone settings in LuCI can be found in the middle area under Network->Firewall. These correspond to the section firewall.@zone[x] in UCI, whereby x is the index of the zone (beginning with 0). A value of -1 for x always denotes the latest zone (i.e. the one just created).
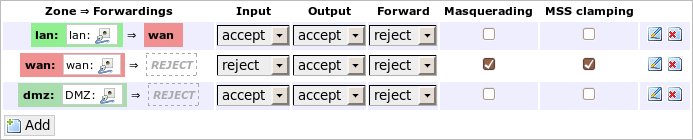
All firewall zones
The lower left button Add enables me to create a new zone in LuCI. Using UCI I would write:
# uci add firewall zone
# uci set firewall.@zone[-1].name=lan
# uci set firewall.@zone[-1].network=lan
# uci set firewall.@zone[-1].input=ACCEPT
# uci set firewall.@zone[-1].output=ACCEPT
# uci set firewall.@zone[-1].forward=REJECT
The name is used to specify some of the iptables rule chains. Therefore it should not contain special characters.
For every zone I can determine distinct policies for input, output and forward.
In practice this means that there will be a jump to the zone_lan_ACCEPT
chain at the end of the zone_lan chain since I have set the input policy for
zone lan to ACCEPT (for more details please see the model of the filter
table above).
Additionally jumps are inserted from output to zone_lan_ACCEPT
and from zone_lan_forward to zone_lan_REJECT.
The reason why these jumps don’t go to the standard targets ACCEPT, DROP
or REJECT, is that this way the policies are restricted to the corresponding
zone.
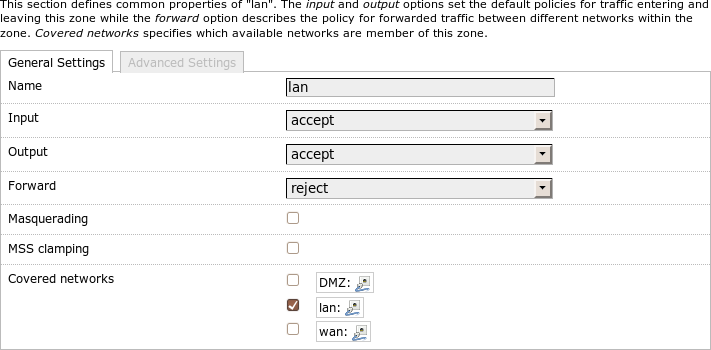
General firewall zone settings
A check mark after Masquerading corresponds to
firewall.@zone[-1].masq=1
and creates a jump to MASQUERADE in the zone_$zone_nat rule chain.
This effectively switches on masquerading for this zone which hides all
addresses behind the address of the router.
A check mark after MSS clamping corresponds to
firewall.@zone[-1].mtu_fix=1
and creates a rule chain which restricts the maximum segment size (MSS) for
tcp and is called zone_$zone_MSSFIX in the mangle table.
This is important, for instance, at the PPPoE interfaces of DSL routers to
ensure
that the path MTU of the TCP connections which run through this interface is
set up correctly.
I can choose which networks should belong to this zone in the area Covered networks. This corresponds to the firewall settings under Network->Interface in LuCI. I add these settings in UCI like this:
# uci add_list firewall.@zone[-1].network=lan
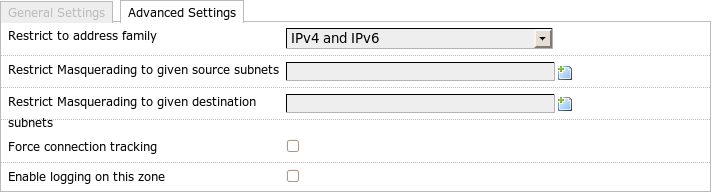
Advanced firewall zone settings
Under Advanced Settings I can restrict the zone to one address family
(IPv4, IPv6) or I can allow both.
In UCI this corresponds to firewall.@zone[-1]=ipv4 for IPv4 and ipv6 for
IPv6.
I omit this line if I want to allow both.
If I have enabled masquerading, I can restrict it here to one or more source networks and/or one or more destination networks. The corresponding settings in UCI are:
# uci add_list firewall.@zone[-1].masq_src=1.2.3.4/24
# uci add_list firewall.@zone[-1].masq_src=1.2.3.4/24
# uci add_list firewall.@zone[-1].masq_dest=5.6.7.8/24
The associated firewall rules appear in the chain zone_$zone_nat in the
nat table.
If I have declared multiple networks, there will be a rule for each pair of
source and destination networks.
Connection tracking is disabled per default in the OpenWrt firewall if no masquerading is activated. For this purpose NOTRACK rules are inserted that incorporate all of the traffic in the zone. This takes pressure of the router but masquerading does not work without connection tracking.
If I do want connection tracking even when no masquerading is in use, I can switch it on with Force connection tracking. Or in UCI:
# uci set firewall.@zone[-1].conntrack=1
I can switch on logging with Enable logging on this zone and then limit the number of log messages per time unit with Limit log messages. In UCI:
# uci set firewall.@zone[-1].log=1
# uci set firewall.@zone[-1].log_limit=20/minute
Forwarding
If I run an NAT router and want to forward incoming traffic to an internal computer (for instance for remote access or some online games), I must select the computer to which the traffic should be forwarded beforehand.
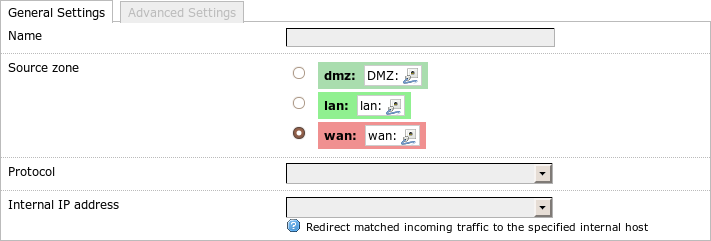
Redirection general settings
I set this up in the area Redirections on the page Network->Firewall. The Add button enables me to create a new redirection. In UCI:
# uci firewall add redirect
# uci set firewall.@redirect[-1]._name=SSH
# uci set firewall.@redirect[-1].src=wan
# uci set firewall.@redirect[-1].proto=tcp
# uci set firewall.@redirect[-1].src_dport=2222
# uci set firewall.@redirect[-1].dest=lan
# uci set firewall.@redirect[-1].dest_ip=1.2.3.4
# uci set firewall.@redirect[-1].dest_port=22
# uci set firewall.@redirect[-1].target=DNAT
Name is only for commenting purposes.
Source zone in LuCI denotes the zone for which the forwarding applies (in
UCI src).
This is usually the wan zone because there you often have masquerading set
to on.
Next I choose the Protocol (UCI: proto) to be forwarded.
LuCI allows me to choose between TCP+UDP, TCP, UDP and custom.
The first three correspond to tcpudp, tcp and udp in UCI. If I select
these in LuCI the page changes and I can choose the port on the
interface (External port) and at the target computer (Internal port).
In UCI I specify src_port and dest_port respectively.
If both ports are the same I can choose the value 0-65535 for Internal port
in LuCI or omit dest_port in UCI.
In LuCI the internal computer is specified with Internal IP address and in UCI
with dest_ip.
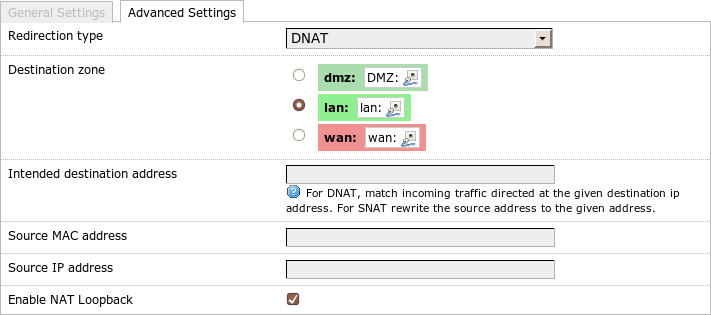
Redirection advanced settings
Under Advanced Settings in LuCI I can choose between the Redirection Type
DNAT and SNAT (in UCI: target).
Destination zone allows me to specify the zone where the target computer is
connected (UCI: dest).
These two settings and a check mark next to Enable NAT Loopback (UCI:
reflection, here 0 means deactivate it) enable me to determine the number
and the
meaning of the rules which are created.
With DNAT three rules are created in the nat table:
- In the
zone_$zone_preroutingrule chain all of the connections are redirected to the target computer in the internal network. - In the
nat_reflectionchain all of the connections from the destination zone that are trying to reach the combination external address/external port are redirected to the internal address/internal port. - In the
nat_reflection_outchain the source address is changed to the address of the router in the target network for all of the connections from the destination zone to the target computer/target port.
The first rule is obvious and applies to all connections from the outside.
The second and third rules are necessary to allow me to reach the target
computer from the internal network with the same combination of address and
port as is used from the outside.
This only works if the router gets the response packets from the target host
too so that it can modify the addresses in all of the data packets.
These last two rules are only generated if I check Enable NAT Loopback in
LuCI or if firewall.@redirect[-1].reflection=0 is omitted in UCI.
With SNAT (in Advanced Settings) LuCI will only create one rule in the
zone_$zone_nat chain from the nat table for the zone of the destination
network.
If a matching packet passes the router, the source address changes.
Intended destination address (UCI: src_dip) has a double meaning according
to the setting in Redirection type:
With DNAT the rule is only followed if the destination address of the packet
matches.
With SNAT the source address is changed to the specified address.
This makes sense if the masquerading interface has more than one IP address.
Source MAC address, Source IP address, Source port (UCI src_mac,
src_ip, src_port) enable me to further restrict the matching data packets.
Rules
I specify the firewall rules in the lower part (Rules) of the page Network->Firewall in LuCI.
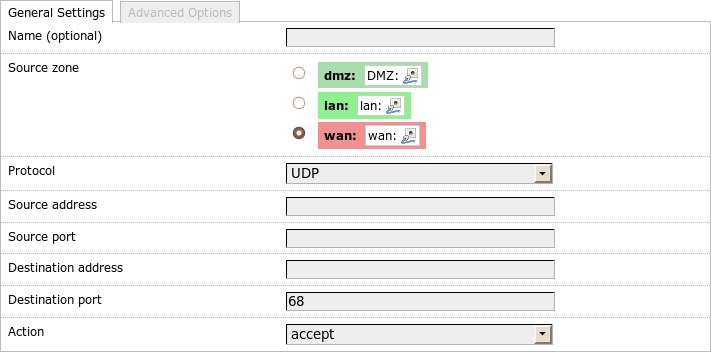
General rule settings
With UCI:
# uci add firewall rule
# uci set firewall.@rule[-1].src=wan
# uci set firewall.@rule[-1].target=ACCEPT
# uci set firewall.@rule[-1].proto=udp
# uci set firewall.@rule[-1].dest_port=68
Name (UCI: _name) is optional and is only for commenting purposes.
Source_zone (UCI: src) determines the rule chain in the filter table
where the rules will be written.
See the model introduced above for
further context.
Protocol, Source address, port, Destination address, port and Action
(UCI: proto, src_ip, src_port, dest_ip, dest_port, target)
determine the parameters of the rule.
In LuCI some parameters are hidden or enabled according to the selected
protocol.
For instance the ports only make sense for TCP and UDP and icmp_type is only
relevant for ICMP.

Advanced rule settings
I can specify the rules even further within the Advanced settings.
Using Destination zone (UCI: dest) I can determine that a rule shall only
apply to packets destined for a certain zone.
In this case the rule does not end with a jump to one of the standard targets
(ACCEPT, DROP, REJECT) but instead goes to zone_$dest_ACCEPT,
zone_$dest_DROP and zone_$dest_REJECT accordingly so that datagrams for
other zones won’t be affected by this rule.
Using Source MAC address (UCI: src_mac) I can define that the rule only be
valid for a certain device, even if it obtains different IP addresses from DHCP.
Finally I can restrict the rule to IPv4 or IPv6 with Restrict to address
family (UCI: family).
This completes our excursion into the configuration of the packet firewall on OpenWrt.
Updates
Updating is relatively easy when I have mounted the root partition read-write. I use the packet manager to do this:
# remountrw
# apt-get update && apt-get dist-upgrade
# remountro
And accordingly with OpenWrt:
# remountrw
# opkg update
# opkg list-upgradable
# opkg upgrade <pkgs>
# remountro
With software I’ve compiled myself I just copy the new version to /usr/local/stow and change the symbolic links to the new version with stow:
$ sudo remountrw
$ ./configure --prefix /usr/local/stow/monotone-1.0
...
$ sudo make install
$ sudo stow -D -d /usr/local/stow monotone-0.99.1
$ sudo stow -d /usr/local/stow monotone-1.0
$ sudo remountro
After I have assured myself that the new version works, I remove the directory of the old version.
Security updates could be a problem.
With Debian I can get these automatically.
But I have to call up apt-get update regularly.
There are software packages like apticron or cron-apt which do this
automatically and according to schedule by cron.
But the files and directories under /var/cache/apt must be writable to do
this.
Furthermore a sendmail (for instance from the package nullmailer) must
be installed and configured because these programs use email to report
available software updates.
Alternatively I can just get the list of the installed software including its installed versions and compare this list on another computer with the current versions of the software.
In any event when I use self-compiled software I must look out myself for newer versions.
Backup and Restore
Because the configuration of the device usually doesn’t change very often after deployment, it seldom has to be backed up. In most cases I just have to backup the configuration as long as I have not installed any new software, have not removed anything and have not updated the software.
After an update or after installing or removing software I like to do a full backup to quickly restore the device to this state. To do this I recommend an approach that should work on all devices regardless which distribution is installed. First I determine the device file of the CF card. Usually this should be /dev/hda or /dev/sda depending on the kernel and kernel module (see the section about the kernel in Chapter 6 for details). Then I can read the whole CF card with the dd program and write it to a file on another computer.
$ ssh root@192.168.1.1 dd if=/dev/sda \
| dd of=router.img
I redirect the output of dd into an image file which I later can write unchanged to another CF card of at least the same size.
On systems with two root partitions of the same size (for example Voyage Linux installed with pxe-initrd) I can write the content of the active and mounted read-only root partition to the other partition using a script. If the root partition has gotten mixed up in an upgrade, I can boot from the second root partition and copy it back to the first root partition. Of course I need access to the serial console for this to work. But then I can repair a not-so-successful update fast. However this does not do away with the fact that I have a defective CF card so I need the full backup mentioned in the previous paragraph anyway.
OpenWrt
OpenWrt provides some simple means for backup using UCI. I can get the current configuration in machine readable form in the command line using:
# uci export
I pick up this configuration with SSH and write it to a file on another machine. Since it is plain text I can use a version control system to track changes. To restore the configuration on a new machine I call up:
# uci import
The passwords, however, are not included in the saved configuration. For these I must additionally save the file /etc/passwd.