The Mobile Application - Rest API Profile
About this chapter content
First, we will install Ionic 2 and all the development tools for Android, iOs and Windows Phone. We will generate our client app using Ionic CLI, and we will describe the anatomy of an Ionic 2 application. We will improve and document our exposed REST API, and we will add security using JWS tokens. We will deploy our app to all the tree known mobile app stores.
Here are the primary resources for this application:
- the source code for the Ionic 2 client is stored in GitHub: https://github.com/colaru/mvp-application/tree/master/app-web/ionic-client
- the REST API documentation: https://app.swaggerhub.com/api/colaru/ItJobsBoard/1.0.0
- mobile app in GooglePlay Store: https://play.google.com/store
- mobile app in Apple AppStore: http://www.apple.com/itunes
- mobile app in Microsoft Store: https://www.microsoft.com/en-us/store/top-free/apps/mobile
Introduction to Ionic 2 and Hybrid Mobile Applications
There are a big number of smartphones and tablets on the market, each having a given operating system and is produced by a given manufacturer. We live in the years when the number of mobile phones overcomes the number of desktop and laptop computers, and the difference is still growing (Google is reporting that there are more searches from mobile now than from desktops).
There are some stores today where you can publish your mobile application based on its operating system. There are some signs that in a number of devices Android is the winner in the market (~70%), followed by iOS (~20%). Windows Phone has just a few percents but they choose to invest in mobile in the last time and your application can be also available to other Windows 10 devices like PC, tablet, Xbox due to UWP (Windows 10 is around 25% from desktop OS market). Here is the list of major mobile operating systems on the market:
| Devices | OS | Store | Language |
|---|---|---|---|
| Android phones and tablets | Google Android | PlayStore | Android(Java) |
| iPhone and iPad | Apple iOs | AppStore | Objective-C or Swift |
| Microsoft phones and tablets | Windows Phone | WindowsStore | C#, Visual Basic |
Google is the owner of Android OS and the devices are manufactured by many others like Samsung, Motorola, etc. There is a reference device Google Pixel series manufactured by Google. Till now it was Nexus, but the manufacturer was not Google. The programming language is Java (Android is derived from Java), and the development tool is Android Studio (based on IntelliJ Idea now, in the past was Eclipse) which can run on Linux, Windows or Mac operation systems.
Apple is the owner of the iOs operating system and is also the manufacturer of the iPhones and iPads. The programming language in Objective C with the addition of a more scripting language named Swift. The development tool is named XCode, and you need a Mac OS system to develop your application.
Microsoft is the owner of Windows Phone operating system and is manufacturing itself some physical devices - based on acquired Nokia company. Starting with version 10, the Windows and Windows Phone are sharing the same store and is possible to publish a mobile app and will be available on mobile and desktop at the same time due to Universal Windows Platform - UWP. You can program in C# or other .Net language. The development tool is Microsoft Visio Studio available on Windows OS.
It is hard to develop applications for all the stores because you have to know a multitude of languages Android(Java) for Java, Objective-C or Swift for iOs, C# or Visual Basic for Windows. A solution for this (write once publish everywhere) is to create hybrid applications using tools like Ionic.
Ionic is a tool for creating hybrid mobile applications combining some other tools: Apache Cordova and AngularJS 2. An Ionic application is a web HTML5 AngularJS application (composed from HTML, JS, CSS) that is running in a browser on the device WebView. It has access to the native platform via JavaScript calls offered by Cordova framework. Ionic 2 is a rewrite of Ionic 1 with AngularJS 2 inside (AngularJS 2 is also using TypeScript instead of JavaScript). We will use this second version of the Ionic framework in this book.
Install Ionic 2
First, we will install Ionic 2 on our machine, and for this, we need NodeJS. Download (LTS - Long Term Support version) and install it on your machine. After installation you can verify:
1 npm version
You will get something similar with this:
 1 { npm: '3.10.10',
 2   ares: '1.10.1-DEV',
 3   http_parser: '2.7.0',
 4   icu: '57.1',
 5   modules: '48',
 6   node: '6.9.5',
 7   openssl: '1.0.2k',
 8   uv: '1.9.1',
 9   v8: '5.1.281.89',
10   zlib: '1.2.8' }
We have NodeJS 6.9.5 and NPM 3.10.10. We need NPM for managing JavaScript libraries (similar with yum or apt package managers in Linux). Next, we install ionic and cordova using NPM:
1 npm install -g ionic cordova
You can
1 ionic -version
2 cordova --version
I get 2.0.0 for Ionic and 6.5.0 for Cordova.
You have to install Android platform and iOS platform on your machine (we hope you have a Mac OS to be able to install both). This because you have to publish your application in store, you need the binary for each platform .apk for Android .ipa for iOS.
For Android, you can follow this Cordova Android Platform Guide. If you already have Java JDK installed you have to install Android Studio (you will be familiar with it if you are already using IntelliJ Idea) which is coming with:
- SDK Manager - will let you install the Android SDK (at a given level)
- ADV Manager - will let you configure the Android emulators
- Android Device Monitor- will let you see your devices logs
For iOS, you can follow this Cordova iOS Platform Guide. You have to install the XCode first which is coming with the SDK, iOs and iPad emulators and all you need to deploy your app in production.
For Windows 10 follow this Cordova Windows Platform Guide. You have to install at least Visual Studio Community Edition 2015/2017 which is free. You will get the Windows phone SDK, the emulator and all you need to deploy your application in production.
You can use a virtualization solution (VirtualBox for example) if you are on Mac or Linux for running the Windows OS - you can get images available for free for one month. If you want a Linux box you have OsBoxes.
Generate client app
Now you are prepared to start your first application using Ionic 2 and its Command-Line-Interface - CLI. We will generate a sidemenu starter application - we will have a side menu. There are two other alternatives blank and tabs. We will locate our client in app-web module near our static HTML client we made.
1 cd ~/MVPS/mvp-application/app-web
2 ionic start --v2 ionic-client sidemenu
We used the –v2 flag to create a Ionic 2 project (otherwise, the old Ionic 1 project is generated). The confirmation:
 1 Creating Ionic app in folder ~/MVPS/mvp-application/app-web/ionic-client based on sidemenu \
 2 project
 3 Downloading: https://github.com/driftyco/ionic2-app-base/archive/master.zip
 4 [=============================]  100%  0.0s
 5 Downloading: https://github.com/driftyco/ionic2-starter-sidemenu/archive/master.zip
 6 [=============================]  100%  0.0s
 7 Installing npm packages...
 8
 9 Adding initial native plugins
10 [=============================]  100%  0.0s
11
12 Adding in iOS application by default
13
14 Saving your Ionic app state of platforms and plugins
15 Saved platform
16 Saved plugins
17 Saved package.json
18
19 ♬ ♫ ♬ ♫  Your Ionic app is ready to go! ♬ ♫ ♬ ♫
20 .......
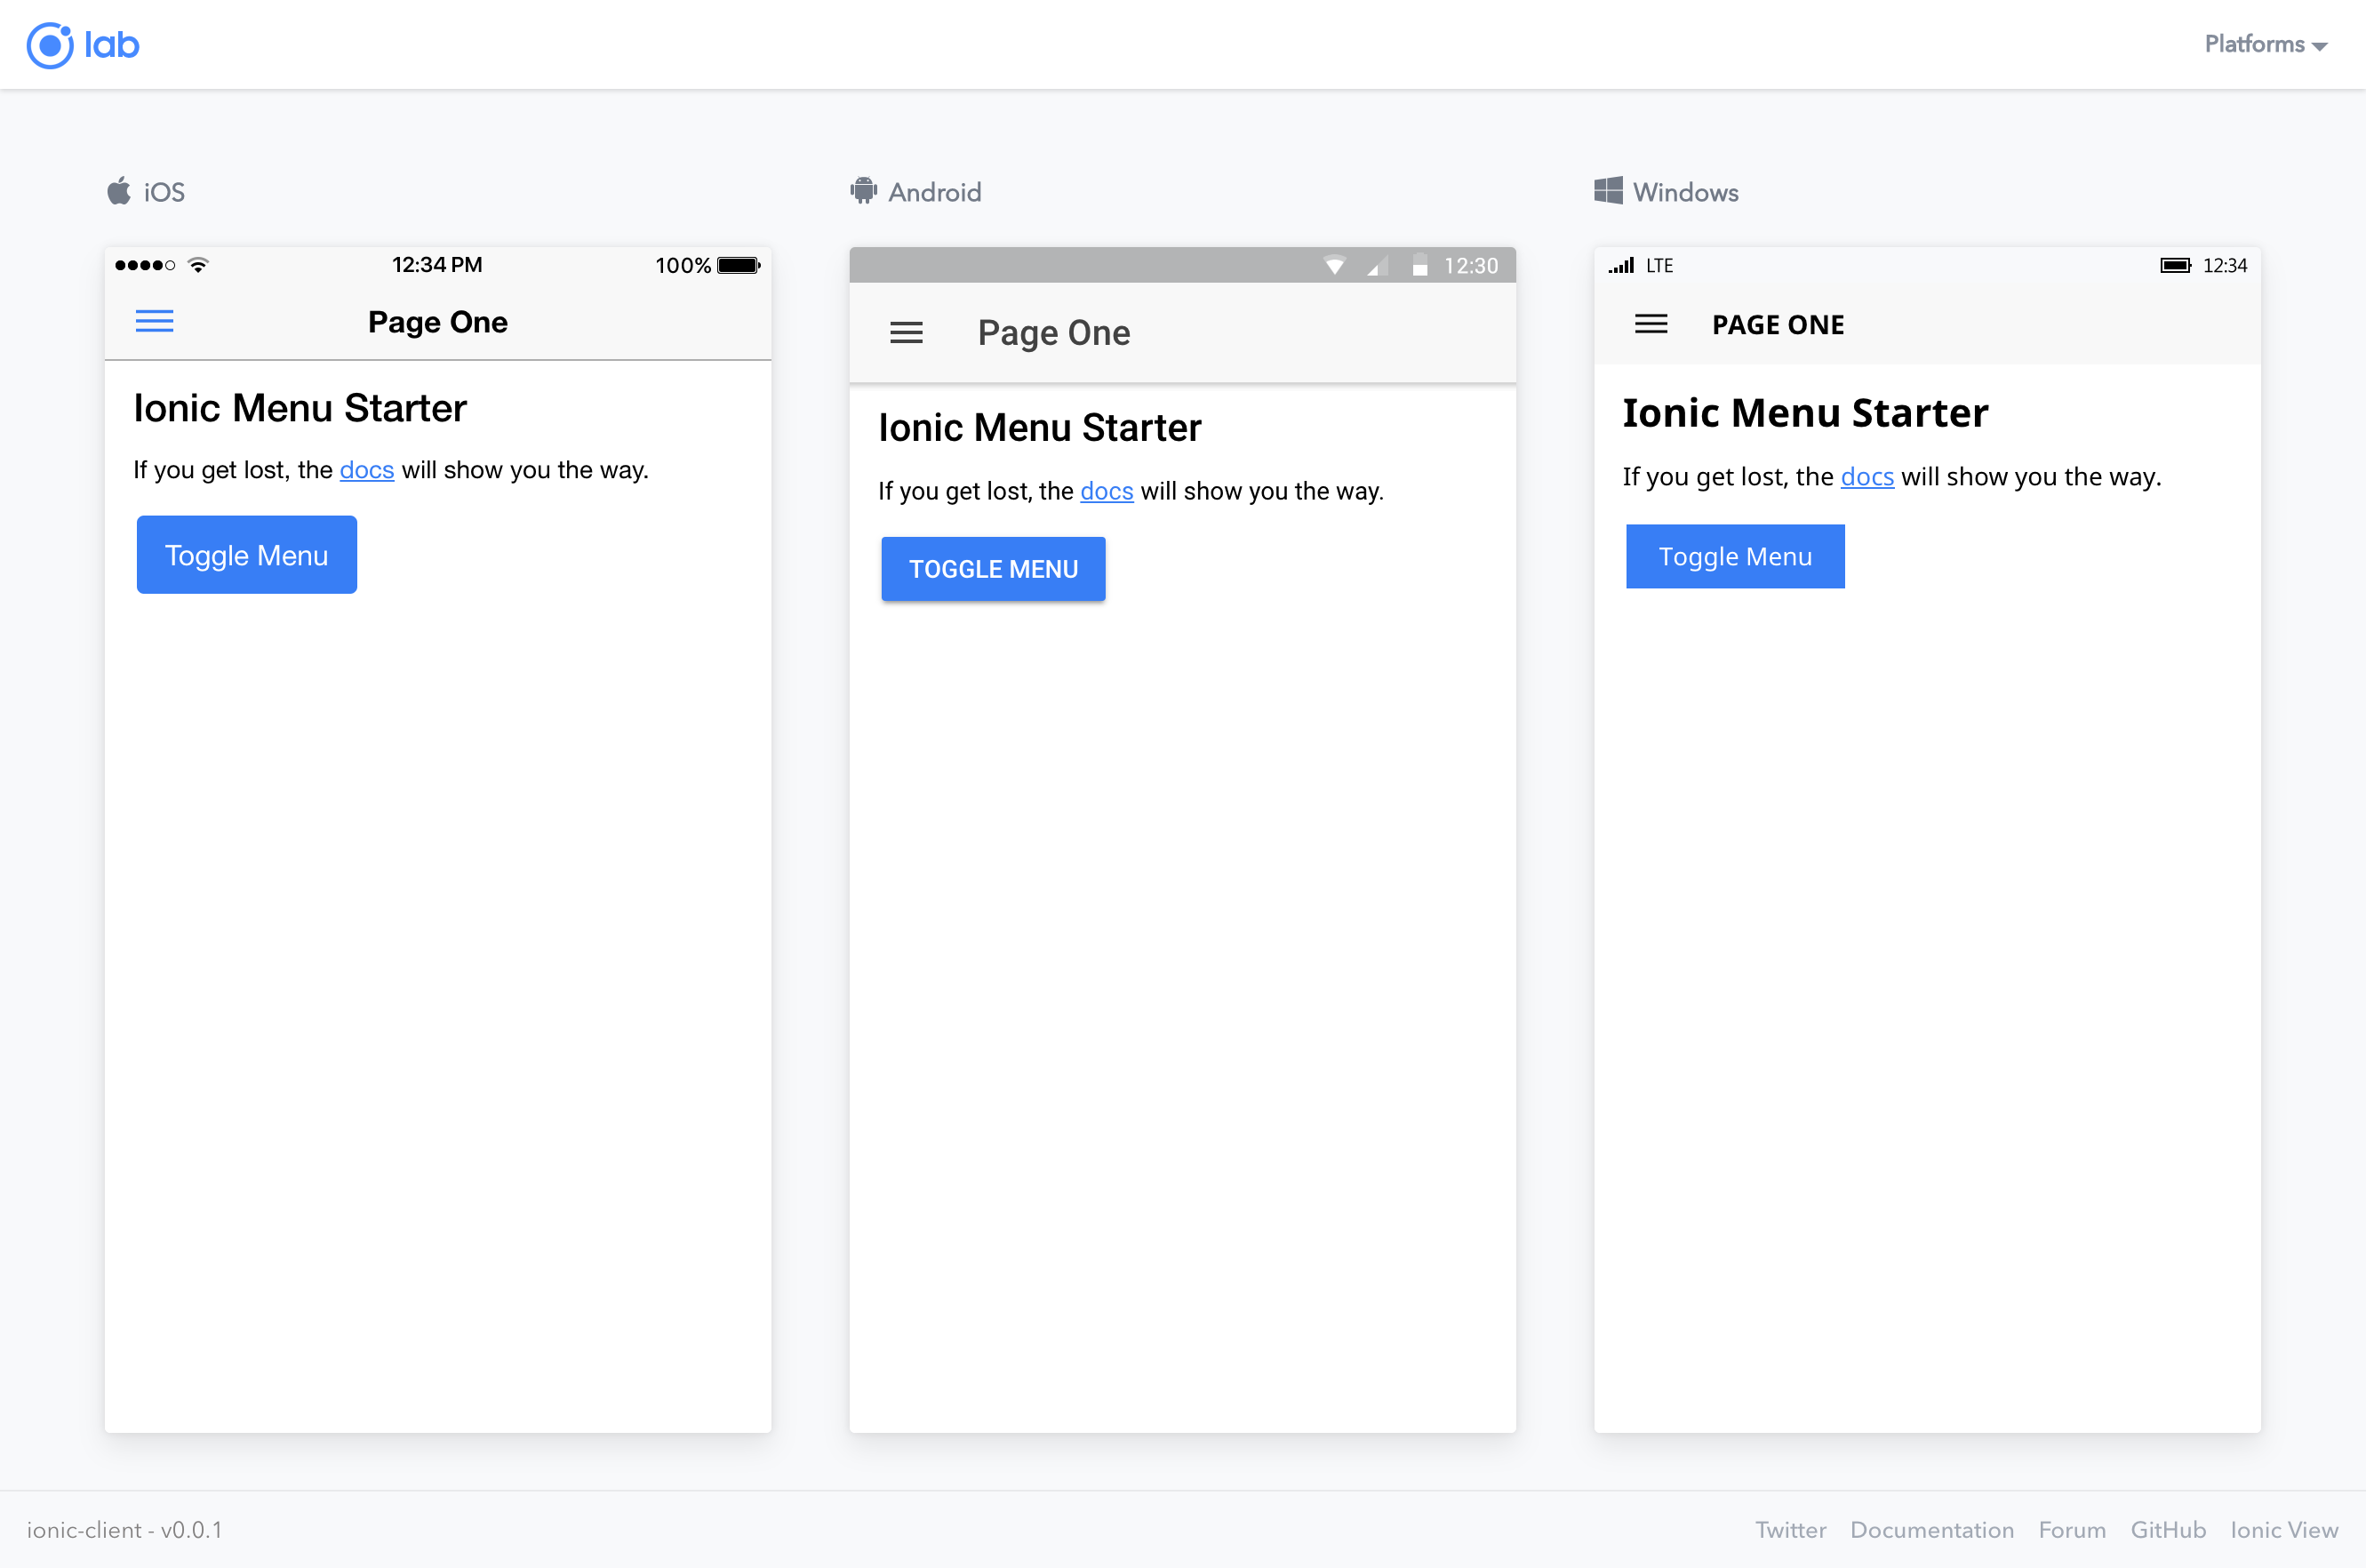
Now build it and run it:
1 ionic build
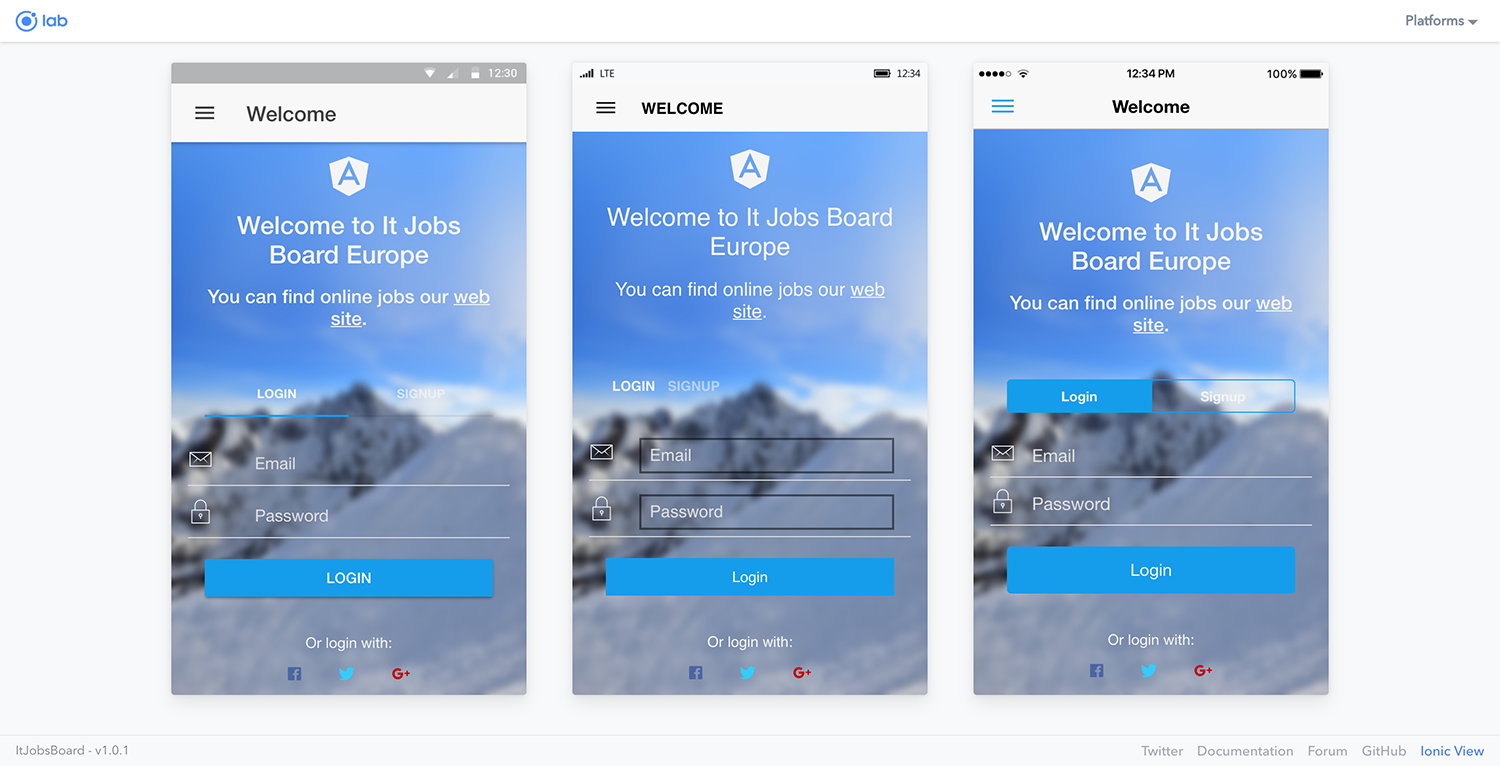
2 ionic serve --lab
We will see the app as it looks on all three platforms:
Now, if we look at the structure of generated app:
1 tree ionic-client -L 2 | pbcopy
We will see this folders structure:
 1 ionic-client
 2 ├── config.xml
 3 ├── hooks
 4 │   └── README.md
 5 ├── ionic.config.json
 6 ├── node_modules
 7 │   ├── @angular
 8 │   ├── @ionic
 9 │   ├── @types
10 ├── package.json
11 ├── platforms
12 │   ├── ios
13 │   └── platforms.json
14 ├── plugins
15 │   ├── cordova-plugin-console
16 │   ├── cordova-plugin-device
17 │   ├── cordova-plugin-splashscreen
18 │   ├── cordova-plugin-statusbar
19 │   ├── cordova-plugin-whitelist
20 │   ├── fetch.json
21 │   ├── ionic-plugin-keyboard
22 │   └── ios.json
23 ├── resources
24 │   ├── android
25 │   ├── icon.png
26 │   ├── ios
27 │   └── splash.png
28 ├── src
29 │   ├── app
30 │   ├── assets
31 │   ├── declarations.d.ts
32 │   ├── index.html
33 │   ├── manifest.json
34 │   ├── pages
35 │   ├── service-worker.js
36 │   └── theme
37 ├── tsconfig.json
38 ├── tslint.json
39 └── www
40     ├── assets
41     ├── build
42     ├── index.html
43     ├── manifest.json
44     └── service-worker.js
This is a classical Ionic 2 application folders structure. We describe here the main folders and files:
- config.xml - is the main configuration file for an Ionic application; you describe your app metadata, required device access rights, preferences and used Cordova plugins.
- /plugins - is the place where all Cordova plugins are located
- /www - here are the application place after build
- /src - is where the Angular 2 application is located
Angular 2
We will investigate the generated Ionic application from the Angular 2 point of view. And we will make some changes - we will prepare the app for our needs. A significant change from previews version of Angular is the use of TypeScript in replacement for JavaScript - you can see the .ts extensions for script files. There are other changes from an Ionic 1, but the main concepts are the same - a migration guide is available.
Let see the structure of the app:
1 tree ~/MVPS/mvp-application/app-web/ionic-client/src
We will see:
 1 ├── app
 2 │   ├── app.component.ts
 3 │   ├── app.html
 4 │   ├── app.module.ts
 5 │   ├── app.scss
 6 │   └── main.ts
 7 ├── assets
 8 │   └── icon
 9 │       └── favicon.ico
10 ├── declarations.d.ts
11 ├── index.html
12 ├── manifest.json
13 ├── pages
14 │   ├── page1
15 │   │   ├── page1.html
16 │   │   ├── page1.scss
17 │   │   └── page1.ts
18 │   └── page2
19 │       ├── page2.html
20 │       ├── page2.scss
21 │       └── page2.ts
22 ├── service-worker.js
23 └── theme
24     └── variables.scss
We see that we have 2 pages. For each page, we have an entry in the pages folder. Let’s create other pages using Ionic CLI.
First, let’s create a new index page:
1 ionic g page index
Then a page for showing the jobs:
1 ionic g page jobs
And we will delete the default created pages (Page1 and Page2):
1 tree ~/MVPS/mvp-application/app-web/ionic-client/src/pages
We will see:
1 ├── index
2 │   ├── index.html
3 │   ├── index.scss
4 │   └── index.ts
5 └── jobs
6     ├── jobs.html
7     ├── jobs.scss
8     └── jobs.ts
Let’s create a service for communicating with the server:
1 ionic g provider jobsData
The service will be created on providers folder and will be named jobs-data.ts:
1 nano ~/MVPS/mvp-application/app-web/ionic-client/src/providers/jobs-data.ts
We will add the code for listing the jobs from REST API:
 1 import {Injectable} from '@angular/core';
 2 import {Http} from '@angular/http';
 3 import 'rxjs/add/operator/map';
 4 import { GlobalVariable } from '../app/global';
 5
 6 @Injectable()
 7 export class JobsData {
 8
 9   data;
10
11   constructor(public http: Http) {
12     console.log('Enter JobsData Provider');
13   }
14
15   listJobs() {
16     return this.http.get(GlobalVariable.BASE_API_URL + "/job").map((res) => res.json())
17   }
18 }
We will inject this service in our page component and we will call the listJobs method:
1 sublime ~/MVPS/mvp-application/app-web/ionic-client/src/pages/jobs/jobs.ts
The code:
 1 import { Component } from '@angular/core';
 2 import { NavController, NavParams } from 'ionic-angular';
 3 import { JobsData } from "../../providers/jobs-data";
 4 import { GlobalVariable } from '../../app/global';
 5
 6 @Component({
 7   selector: 'page-jobs',
 8   templateUrl: 'jobs.html'
 9 })
10 export class JobsPage {
11
12   selectedItem: any;
13   icons: string[];
14   items: any;
15   contextPath: string;
16
17   constructor(public navCtrl: NavController, public navParams: NavParams, public jobsData: \
18 JobsData) {
19     // If we navigated to this page, we will have an item available as a nav param
20     this.selectedItem = navParams.get('item');
21     this.contextPath = GlobalVariable.BASE_API_URL
22
23     jobsData.listJobs().subscribe(data => {
24       this.items = data;
25       console.log("Data: " + JSON.stringify(this.items, null, 2))
26     });
27   }
28
29   itemTapped(event, item) {
30     this.navCtrl.push(JobsPage, {
31       item: item
32     });
33   }
34 }
And we will adapt the page template to show the jobs as cards:
1 nano ~/MVPS/mvp-application/app-web/ionic-client/src/pages/jobs/jobs.html
And here is the code:
 1 <ion-header>
 2   <ion-navbar>
 3     <button ion-button menuToggle>
 4       <ion-icon name="menu"></ion-icon>
 5     </button>
 6     <ion-title>Jobs List</ion-title>
 7   </ion-navbar>
 8 </ion-header>
 9
10 <ion-content padding class="cards-bg social-cards">
11   <ion-card *ngFor="let item of items" (click)="itemTapped($event, item)">
12
13     <button ion-item >
14       <ion-avatar item-left>
15         <img style="width: 50px; length: 50px" src="{{contextPath}}/renderLogo?id={{item.pu\
16 blisher.id}}"
17              alt="{{item.publisher.name}}"
18              class="img-responsive">
19       </ion-avatar>
20       <h2>{{item.title}}</h2>
21       <p>{{item.dateCreated}}</p>
22     </button>
23
24     <ion-card-content>
25       <p>{{item.description}}</p>
26     </ion-card-content>
27   </ion-card>
28
29   <div *ngIf="selectedItem" padding>
30     You navigated here from <b>{{selectedItem.title}}</b>
31   </div>
32 </ion-content>
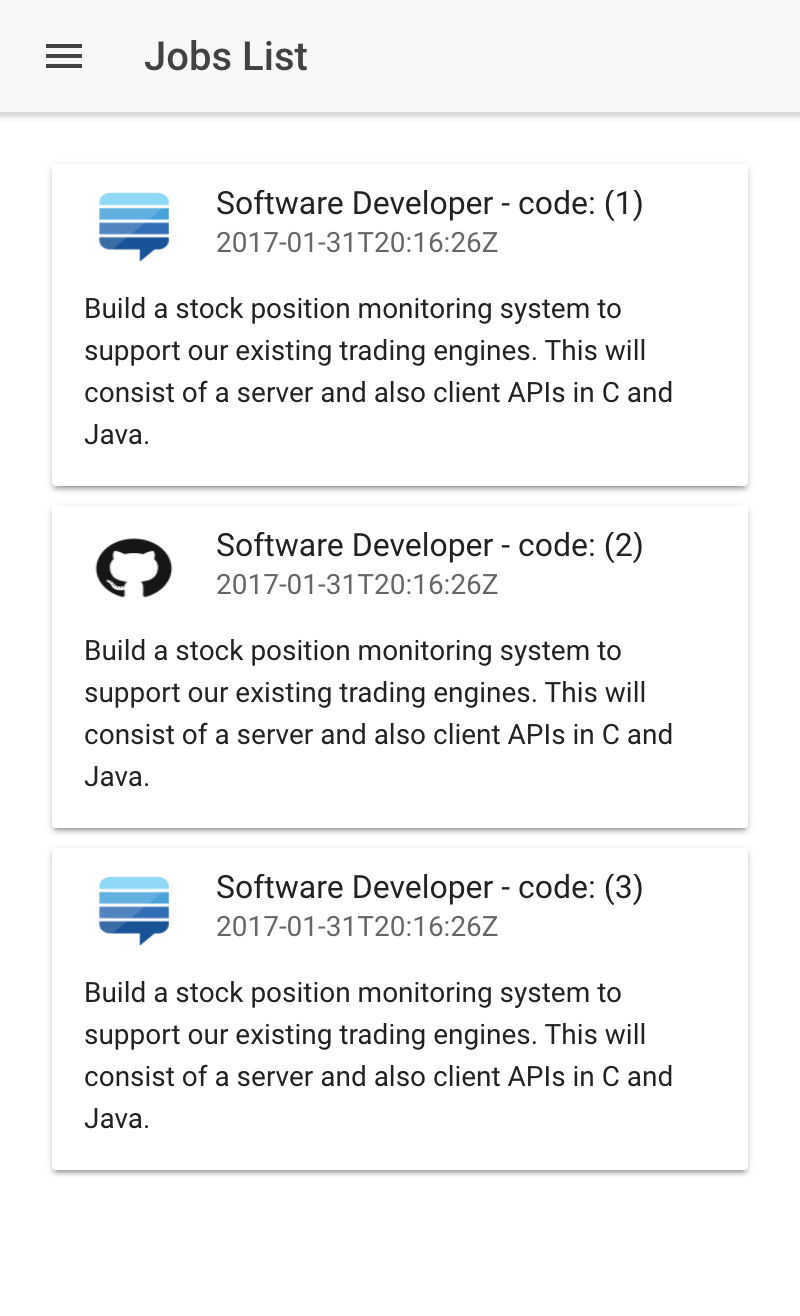
The result is here:
1 ionic serve
The jobs page on our web page:
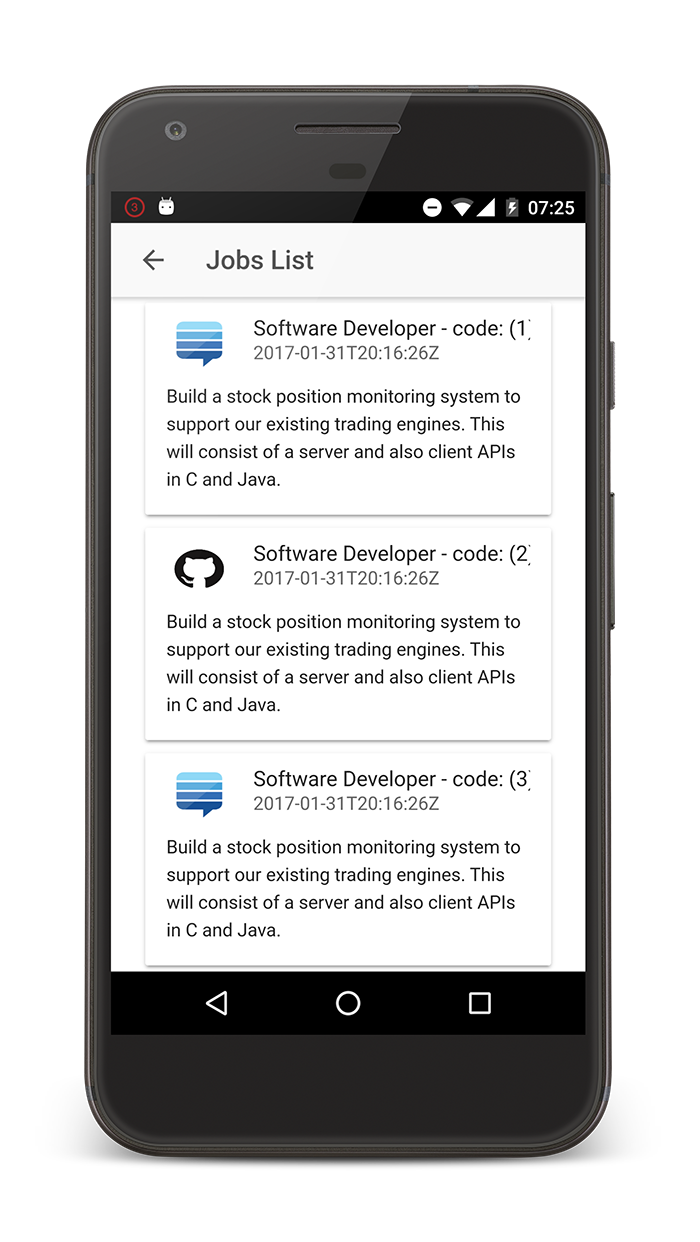
The result is here:
1 ionic run android
The jobs page on our device:
Cordova
Apache Cordova is a part of Ionic Framework and is a JavaScript framework that can be used to make a native call from a browser to the native platform, independent of its type: Android, iOs or Windows Phone. It is exposing a unified API that can be used on all three platforms (or other supported platforms). First, it was named PhoneGap and it was acquired by Adobe, and became Apache project under the name Apache Cordova. Here is a discussion about the distinctions between the two.
First of all, the main configurations for the mobile application are in config.xml file. Lets change the name of the application and other metadata:
 1 <?xml version="1.0" encoding="UTF-8" standalone="yes"?>
 2 <widget id="eu.itjobsboard.mobile" version="0.0.1"
 3 xmlns="http://www.w3.org/ns/widgets"
 4 xmlns:cdv="http://cordova.apache.org/ns/1.0">
 5   <name>ItJobsBoard</name>
 6   <description>It jobs board application</description>
 7   <author email="admin@itjobsboard.eu"
 8   href="http://itjobsboard.eu">It Jobs Board Team
 9   </author>
10 .....
11 </widget>
We will discuss two aspects of Cordova: plugins and platforms.
Cordova, it is a plugin-able system, and there is a list of plugins available on the market (mostly free). You can see the list of plugins already installed on your application:
1 ionic plugin list
You will see:
1 cordova-plugin-console 1.0.5 "Console"
2 cordova-plugin-device 1.1.4 "Device"
3 cordova-plugin-splashscreen 4.0.1 "Splashscreen"
4 cordova-plugin-statusbar 2.2.1 "StatusBar"
5 cordova-plugin-whitelist 1.3.1 "Whitelist"
6 ionic-plugin-keyboard 2.2.1 "Keyboard"
They are located on plugins folder:
1 tree ~/MVPS/mvp-application/app-web/ionic-client/plugins -L 1
You will see:
 1 plugins
 2 ├── android.json
 3 ├── cordova-plugin-console
 4 ├── cordova-plugin-device
 5 ├── cordova-plugin-splashscreen
 6 ├── cordova-plugin-statusbar
 7 ├── cordova-plugin-whitelist
 8 ├── fetch.json
 9 ├── ionic-plugin-keyboard
10 └── ios.json
And are declared on config.xml file:
1 cat ~/MVPS/mvp-application/app-web/ionic-client/config.xml
You will find the list of declared plugins:
1 <plugin name="ionic-plugin-keyboard" spec="~2.2.1"/>
2 <plugin name="cordova-plugin-whitelist" spec="1.3.1"/>
3 <plugin name="cordova-plugin-console" spec="1.0.5"/>
4 <plugin name="cordova-plugin-statusbar" spec="2.2.1"/>
5 <plugin name="cordova-plugin-device" spec="1.1.4"/>
6 <plugin name="cordova-plugin-splashscreen" spec="~4.0.1"/>
Each time you want a plugin you have to declare it here in config.xml.
Cordova let you install platforms - various operating systems where you can publish your application. The ios platform was added the first time I generated the application. We can add Android in this way:
1 ionic platform app android
If you want to see a list of platforms, use this command:
1 ionic platforms list
And the response:
 1 Installed platforms:
 2   android 6.1.2
 3   ios 4.1.1
 4 Available platforms:
 5   amazon-fireos ~3.6.3 (deprecated)
 6   blackberry10 ~3.8.0
 7   browser ~4.1.0
 8   firefoxos ~3.6.3
 9   osx ~4.0.1
10   webos ~3.7.0
The platform content is stored in platforms folder:
1 tree ~/MVPS/mvp-application/app-web/ionic-client/platforms -L 1
You will see the installed platforms:
1 platforms
2 ├── android
3 ├── ios
4 └── platforms.json
Now we can start to work on a given platform. We can use the iOs emulator to play our application:
1 ionic emulate ios

Or we can run our application on an Android device connected by USB to our computer (it has to be set in developer mode):
1 ionic run android
If you want to see the list of available commands, run:
1 ionic --list
Ionic Native
Ionic Native is a collection of the best free Cordova plugins already integrated into Ionic 2 - you still have to declare and install the plugin, but you have the API exposed in Angular 2 style. The Ionic Native script is already installed in any new generated Ionic 2 application. It is a replacement for ngCordova from Ionic 1. We will enumerate just a few plugins (part of Ionic Native) that can be used in your commercial application just for illustrating the possible native features that can be accessed via plugins:
| Plugin name | Description |
|---|---|
| AdMob | Plugin for Google Ads, including AdMob / DFP (double-click for publisher) and mediations to other Ad networks. |
| App Rate | The AppRate plugin makes it easy to prompt the user to rate your app, either now, later, or never. |
| File | This plugin implements a File API allowing read/write access to files residing on the device. |
| Geolocation | This plugin provides information about the device’s location, such as latitude and longitude. |
| Google Analitycs | This plugin connects to Google’s native Universal Analytics SDK |
| InApp Purchase | A lightweight Cordova plugin for in app purchases on iOS/Android. |
| InAppBrowser | Launches in app Browser |
| Splashscreen | This plugin displays and hides a splash screen during application launch. |
| SMS | Send SMS from your application |
You can use all the Cordova plugins even if they are not part of Ionic Native. You can also use commercial plugins - Ionic is offering a marketplace on Ionic Market for this.
We will investigate 2 plugins here. First, we will change the default splash-screen (and the application icon) showing the Splashscreen plugin already used in the generated app. And we will introduce InAppBrowser plugin for displaying our external links in our application (not into a different window in the system browser).
So, the Splashscreen plugin is declared in config.xml file and is used in app.component.ts where the splash-screen is hidden after the application is started:
 1 import { StatusBar, Splashscreen } from 'ionic-native';
 2 .....
 3 initializeApp() {
 4     this.platform.ready().then(() => {
 5       // Okay, so the platform is ready and our plugins are available.
 6       // Here you can do any higher level native things you might need.
 7       StatusBar.styleDefault();
 8       Splashscreen.hide();
 9     });
10 }
All that we will do is to replace the default splash-screen image and icon generated by Ionic. These images are stored in resources folder:
1 tree ~/MVPS/mvp-application/app-web/ionic-client/resources -L 2
The files:
1 ├── android
2 │   ├── icon
3 │   └── splash
4 ├── icon.png
5 ├── ios
6 │   ├── icon
7 │   └── splash
8 └── splash.png
The icon is icon.png and the splash-screen is splash.png. From these 2 files we can generate all the resources files for our platforms (various devices with different screens resolutions) using the resources command (after we modified the images using a tool like Gimp or Photoshop):
1 ionic resources
With the result (also the config.xml will be changed to reflect the newly generated files):
1 Ionic icon and splash screen resources generator
2  uploading icon.png...
3  uploading splash.png...
4 icon.png (1024x1024) upload complete
5 splash.png (2208x2208) upload complete
6 .......
Next we will add the InAppBrowser plugin entering a new line in config.xml:
1 sublime ~/MVPS/mvp-application/app-web/ionic-client/config.xml
Add the plugin declaration in the config file (we installed it and declare it at the same time - see the –save option):
1 ionic plugin add cordova-plugin-inappbrowser --save
The confirmation:
1 Fetching plugin "cordova-plugin-inappbrowser@1.6.1" via npm
2 Installing "cordova-plugin-inappbrowser" for android
3 Installing "cordova-plugin-inappbrowser" for ios
4 Saved plugin info for "cordova-plugin-inappbrowser" to config.xml
We will change the method called when a job posted is tapped in jobs.ts:
1 itemTapped(event, item) {
2     // we use _self instead of _system
3     let browser = new InAppBrowser(item.jobUrl, '_self');
4 }
See this call from jobs.html where the method is called:
1 <ion-card *ngFor="let item of items" (click)="itemTapped($event, item)">
Rest API
In this subchapter, we will improve our REST API. We will first try to clarify what is a RET API; we will document our API using Swagger, we will add token based security for our REST API
From verbs to nouns
The way the applications can communicate in a distributed way is an old subject. First was the idea of RPC - Remote procedure calls - remote calls between programs running on different machines which are exposing procedures/methods using binary data for messages transportation.
Cordoba was such an initiative for communicating between different languages. Java RMI it was an initiative for communicating between JVMs running on different physical machines.
The next evolution step were Web Services using HTTP protocol for communication and XML or JSON (text and not binary data) for messages. SOAP was a first success in the Web Services market was but is still have to be used - is based on XML messages and still has a procedural style of exposing an API. That’s way other types of Web Services emerged like REST.
REST - Representational State Transfer principles were enunciated first time by https://twitter.com/fielding in his 2000 Ph.D. dissertation Architectural Styles and the Design of Network-based Software Architectures
REST is built around HTTP standard: * you expose resources to the world (nouns) * we don’t have other methods to operate on the resources than the HTTP commands (GET, POST, PUT, DELETE, …) (verbs) * the HTTP error codes are used for errors (2XX, 3XX, 4XX, …) * you have a unique intelligible URI to operate with a resource * texts are used for messages (JSON is preferred when we can process it from JavaScript on client side)
Swagger specification
One of the interesting parts of SOAP is the WSDL - Web Services Description Language specification. WSDL specification is a contract describing the exposed API that can be used in many ways. Can be used to generate the client or the server. It can also be itself generated by the server side. It is the central point of a SOAP API.
In the case of REST there were some tries to define such an interface (WADL, RAML) but finally, we have a winner on the market. It is Open API that is a try to standardize a well-known schema model globally from Swagger. Will let you define your API in JSON or YAML. Swagger let you not just to specify your API but also to use this specification for documenting your API - you can easily generate a documentation of your API for your users, and they can test it in real-time.
Let’s document our REST API. There are some Grails 2 plugins for generating the Swager spec via annotations and show the spec in Swagger-UI, but none of them is working in Grails 3. Swaggydoc plugin has an update for Grails 3 but is not working - the project is no longer maintained.
The solution, in this case, is to use the tools that Swagger site is offering. They are offering an online Swagger editor for editing our Swagger specs in JSON or YMAL. We have the chance to generate clients or servers in a multitude of programming languages from Swagger specifications using Swagger Codegen. We also have an option to store a Swagger specification online and to view it on Swagger-UI on Swagger Hub. We created a hosted Swagger specification for the version 1.0.0 of our project:
1 open https://app.swaggerhub.com/api/colaru/ItJobsBoard/1.0.0
Swagger YAML content:
  1 swagger: '2.0'
  2 info:
  3   description: It Jobs Board Europe API
  4   version: "1.0.0"
  5   title: itjobsboard.eu exposed API
  6   contact:
  7     email: admin@itjobsboard.eu
  8   license:
  9     name: Apache 2.0
 10     url: http://www.apache.org/licenses/LICENSE-2.0.html
 11
 12 tags:
 13 - name: admins
 14   description: Secured Admin-only calls
 15 - name: customers
 16   description: Operations available to regular developers
 17 schemes:
 18 - https
 19 paths:
 20   /jobs:
 21     get:
 22       tags:
 23       - customers
 24       summary: list jobs
 25       operationId: list
 26       description: |
 27         List all available jobs in the system.
 28       produces:
 29       - application/json
 30       parameters:
 31       - in: query
 32         name: limit
 33         description: maximum number of records to return
 34         type: integer
 35         format: int32
 36         minimum: 0
 37         maximum: 50
 38       responses:
 39         200:
 40           description: search results matching criteria
 41           schema:
 42             type: array
 43             items:
 44               $ref: '#/definitions/Job'
 45         400:
 46           description: bad input parameter
 47 definitions:
 48   Job:
 49     type: object
 50     required:
 51     - id
 52     - active
 53     - applyInstructions
 54     - contactEmail
 55     - description
 56     - jobUrl
 57     - title
 58     properties:
 59       id:
 60         type: number
 61         example: 1
 62       active:
 63         type: boolean
 64         example: true
 65       applyInstructions:
 66         type: string
 67         example: admin@stackoverflow.com
 68       contactEmail:
 69         type: string
 70         example: admin@stackoverflow.com
 71       dateCreated:
 72         type: string
 73         format: int32
 74         example: 2017-01-31T20:16:26Z
 75       description:
 76         type: string
 77         example: Build a stock position monitoring system to support our existing trading e\
 78 ngines. This will consist of a server and also client APIs in C and Java.
 79       expirationDate:
 80         type: string
 81         format: int32
 82         example: 2017-01-31T20:16:26Z
 83       jobUrl:
 84         type: string
 85         example: https://stackoverflow.com/jobs/132418/software-developer-silver-fern-inves\
 86 tments
 87       lastUpdated:
 88         type: string
 89         format: int32
 90         example: 2017-01-31T20:16:26Z
 91       publisher:
 92         $ref: "#/definitions/Publisher"
 93       remote:
 94         type: boolean
 95         example: true
 96       salaryEstimate:
 97         type: string
 98         example: 1000000 per year
 99       tags:
100         type: array
101         items:
102           $ref: "#/definitions/Type"
103       title:
104         type: string
105         example: Software Developer
106       type:
107         $ref: "#/definitions/Type"
108   Publisher:
109     type: object
110     required:
111     - id
112     properties:
113       id:
114         type: number
115         example: 1
116   Type:
117     type: object
118     required:
119     - id
120     properties:
121       id:
122         type: number
123         example: 1
124   Tag:
125     type: object
126     required:
127     - id
128     properties:
129       id:
130         type: number
131         example: 1
132
133 host: itjobsboard.eu
134 basePath: /api/v1.0/
REST Security on the server side
We will introduce security for our Ionic application based on Spring Security for Grails plugin. In this case, we use JWT cryptographic tokens - JSON Web Tokens instead of classical Java Web session based security used in the admin application. This is a full stateless style of offering security to application specific to B2C applications - the clients are not able to store a secret, and in this case, the token is often expired and it is transported via HTTPS.
The creator of the Rest Security plugin created a workshop to accommodate with REST security Creating applications with Grails, Angular, and Spring Security.
The simple way to implement REST security in our application is to create at the beginning your Angular(2) profile Web application with rest security enabled - –features security. This will generate your client and server already configured for security. In our case, the web-app is already generated without security. We have to do this by hand.
Now it is a good time for versioning our REST API - a good practice because the clients will become dependent of our API and we have to migrate to new versions of API without breaking the clients. For guidelines about how to version an API see the Semantic Versioning specification. We will create a first version 1.0.0 for our API, and we will specify two new URLs for our REST API:
1 nano ~/MVPS/mvp-application/app-web/grails-app/controllers/app/web/UrlMappings.groovy
We will expose two resources - jobs and featured jobs. We want the list of featured jobs to be seen by everybody, but we want the entire list of jobs to be visible just for authenticated users (it is not a really security case here but is enough to illustrate the security concepts):
1 "/api/v1.0/jobs"(controller: "job", action: "listAll")
2 "/api/v1.0/featuredJobs"(controller: "job", action: "listFeatured")
We create two new controllers in JobController:
1 nano ~/MVPS/mvp-application/app-web/grails-app/controllers/app/admin/jobsboard/JobControlle\
2 r.groovy
And the controllers:
 1 @Secured(["ROLE_CUSTOMER"])
 2 def listAll(Integer max) {
 3     params.max = Math.min(max ?: 10, 100)
 4     respond Job.list(params), model:[jobCount: Job.count()]
 5 }
 6
 7 @Secured(["permitAll"])
 8 def listFeatured(Integer max) {
 9     params.max = 1
10     params.order = "desc"
11     params.sort = "title"
12     respond Job.list(params), model:[jobCount: Job.count()]
13 }
Now we will protect these resources accordingly using JWT tokens security. For this, first we have to change the security core plugin with rest security plugin (all the core features are still part of this REST plugin):
1 sublime ~/MVPS/mvp-application/app-web/build.gradle
We will change to:
1 //    compile 'org.grails.plugins:spring-security-core:3.1.1'
2 compile "org.grails.plugins:spring-security-rest:2.0.0.M2"
If we restart the app we will have the confirmation of the installation for this REST plugin (and the core plugin is still there):
1 Configuring Spring Security Core ...
2 ... finished configuring Spring Security Core
3
4
5 Configuring Spring Security REST 2.0.0.M2...
6 ... finished configuring Spring Security REST
Now we have to configure the security filters for the newly added plugin. We have to add the stateless filters for our API path /api/** (we keep state-full filters for this path /*). Also because we will have *permitAll access to some of our API resources we will enable enableAnonymousAccess = true for our version 1.0 of our API and set stateless filters to it:
1 sublime ~/MVPS/mvp-application/app-web/grails-app/conf/application.groovy
Now the security settings for filters chains will look like this:
 1 grails {
 2 	plugin {
 3 		springsecurity {
 4 			filterChain {
 5 				chainMap = [
 6 						//Stateless chain
 7 						[pattern: '/api/v1.0/**',    filters: 'anonymousAuthenticationFilter,restTokenValidat\
 8 ionFilter,restExceptionTranslationFilter,filterInvocationInterceptor'],
 9 						[pattern: '/api/**',         filters: 'JOINED_FILTERS,-anonymousAuthenticationFilter,\
10 -exceptionTranslationFilter,-authenticationProcessingFilter,-securityContextPersistenceFilt\
11 er,-rememberMeAuthenticationFilter'],
12
13 						[pattern: '/assets/**',      filters: 'none'],
14 						[pattern: '/**/js/**',       filters: 'none'],
15 						[pattern: '/**/css/**',      filters: 'none'],
16 						[pattern: '/**/images/**',   filters: 'none'],
17 						[pattern: '/**/fonts/**',    filters: 'none'],
18 						[pattern: '/**/favicon.ico', filters: 'none'],
19
20 						//Stateful chain
21 						[pattern: '/**',             filters: 'JOINED_FILTERS,-restTokenValidationFilter,-res\
22 tExceptionTranslationFilter']				]
23 			}
24
25 			//Other Spring Security settings
26 			//...
27
28 			rest {
29 				token {
30 					validation {
31 						enableAnonymousAccess = true
32 					}
33 				}
34 			}
35 		}
36 	}
37 }
Now when we make a call to /api/login with a valid user and password, we will get a response containing a valid JWT token. We can use this token to access resources under /api/v1.0/jobs path just if we are in the ROLE_CUSTOMER. And /api/v1.0/featuredJobs even if we don’t have an access token.
REST Security on the client side
On the client’s side, we have to introduce a new library named angular2-jwt responsible for JWT token management. First, we have to install it with NPM:
1 cd ~/MVPS/mvp-application/app-web/ionic-client
2 npm install angular2-jwt
We have to change our index page page and added two forms, one for login and another for signup, each submitting the user credentials to the server (ngSubmit)=”login(loginCreds.value)” and (ngSubmit)=”signup(signupCreds.value)”. We show a div containing this two forms in case the user is not authenticated !auth.authenticated() and a div containing welcome info and a logout button in case of authenticated user auth.authenticated():
1 nano ~/MVPS/mvp-application/app-web/ionic-client/src/pages/index/index.html
The new content:
  1 <ion-header>
  2   <ion-navbar>
  3     <button ion-button menuToggle>
  4       <ion-icon name="menu"></ion-icon>
  5     </button>
  6     <ion-title>Welcome</ion-title>
  7   </ion-navbar>
  8 </ion-header>
  9
 10 <ion-content padding class="login auth-page">
 11
 12   <!-- Logo -->
 13   <div text-center padding>
 14     <h1 color="light" >
 15       <i class="ion-social-angular"></i>
 16       <ion-icon name="logo-angular"></ion-icon>
 17     </h1>
 18     <h2 color="light" >Welcome to It Jobs Board Europe</h2>
 19     <h5 color="light" >You can find online jobs our <a href="http://itjobsboard.eu">web sit\
 20 e</a>.</h5>
 21   </div>
 22
 23   <div *ngIf="!auth.authenticated()">
 24     <div padding>
 25       <ion-segment [(ngModel)]="authType">
 26         <ion-segment-button value="login">
 27           <b color="light">Login</b>
 28         </ion-segment-button>
 29         <ion-segment-button value="signup">
 30           <b color="light">Signup</b>
 31         </ion-segment-button>
 32       </ion-segment>
 33     </div>
 34
 35     <div [ngSwitch]="authType">
 36
 37       <!-- Login form -->
 38       <form *ngSwitchCase="'login'" #loginCreds="ngForm" (ngSubmit)="login(loginCreds.value\
 39 )">
 40
 41         <ion-item>
 42           <ion-icon item-left name="ios-mail-outline"></ion-icon>
 43           <ion-input type="text" name="username" placeholder="Email" ngModel></ion-input>
 44         </ion-item>
 45
 46         <ion-item>
 47           <ion-icon item-left name="ios-lock-outline"></ion-icon>
 48           <ion-input type="password" name="password" placeholder="Password" ngModel></ion-i\
 49 nput>
 50         </ion-item>
 51
 52         <div padding>
 53           <button block type="submit" ion-button secondary>Login</button>
 54         </div>
 55
 56         <!-- Social login -->
 57         <div padding text-center>
 58           <span color="light" >Or login with:</span>
 59           <p>
 60             <a padding class="facebook-color">
 61               <ion-icon name="logo-facebook"></ion-icon>
 62             </a>
 63             <a padding class="twitter-color">
 64               <ion-icon name="logo-twitter"></ion-icon>
 65             </a>
 66             <a padding class="googleplus-color">
 67               <ion-icon name="logo-googleplus"></ion-icon>
 68             </a>
 69           </p>
 70         </div>
 71       </form>
 72
 73
 74       <form *ngSwitchCase="'signup'" #signupCreds="ngForm" (ngSubmit)="signup(signupCreds.v\
 75 alue)">
 76         <ion-item>
 77           <ion-icon item-left name="ios-mail-outline"></ion-icon>
 78           <ion-input type="text" name="username" placeholder="Email" ngModel></ion-input>
 79         </ion-item>
 80
 81         <ion-item>
 82           <ion-icon item-left name="ios-lock-outline"></ion-icon>
 83           <ion-input type="password" name="password" placeholder="Password" ngModel></ion-i\
 84 nput>
 85         </ion-item>
 86
 87         <div padding>
 88           <button block type="submit" ion-button secondary>Signup</button>
 89         </div>
 90       </form>
 91     </div>
 92
 93     <div padding style="text-align: center">
 94       <p *ngIf="error" class="error"><ion-badge color="danger" item-right>{{ error }}</ion-\
 95 badge></p>
 96     </div>
 97   </div>
 98
 99   <div *ngIf="auth.authenticated()">
100     <div padding>
101       <h1>Hello {{ user }}</h1>
102       <button ion-button secondary block (click)="logout()">Logout</button>
103     </div>
104   </div>
105 </ion-content>
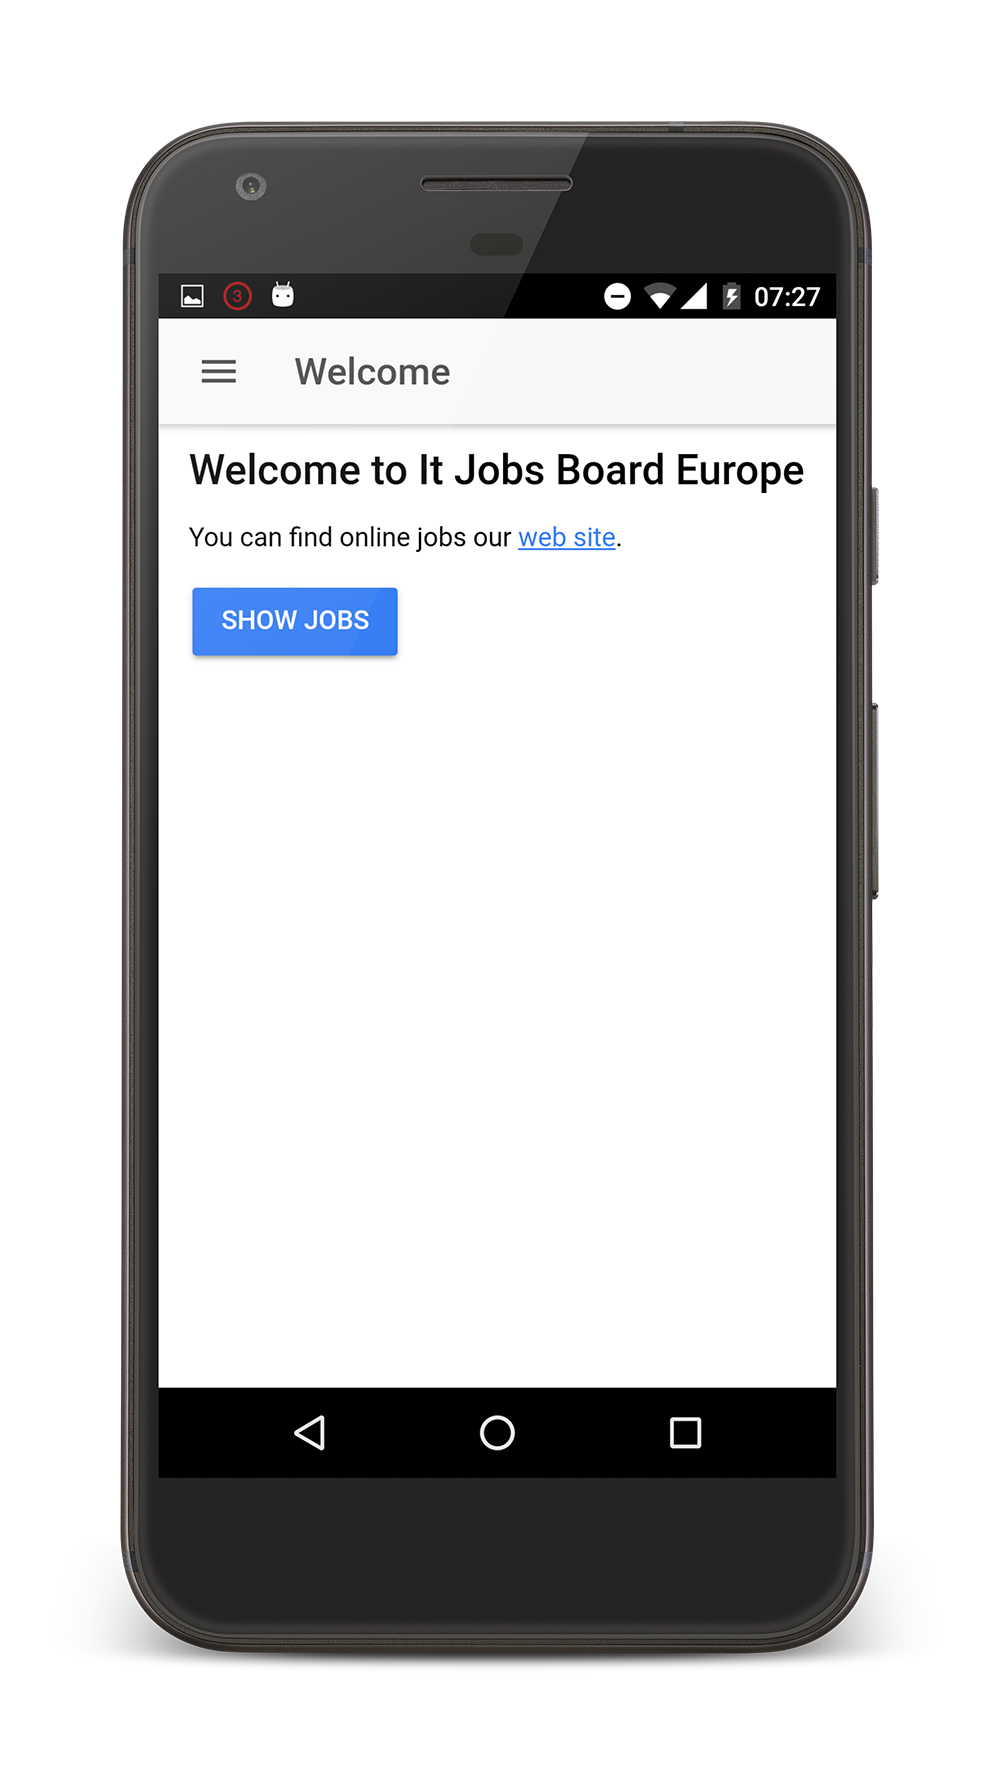
Now the index page with some LAF improuvements will look like this:
And in the controller part we will implement the calls for user login (based on the introduced angular2-jwt plugin):
1 nano ~/MVPS/mvp-application/app-web/ionic-client/src/pages/index/index.ts
New content:
 1 import { Component } from '@angular/core';
 2 import { NavController, NavParams } from 'ionic-angular';
 3 import {AuthService} from "../../providers/auth";
 4 import {Headers, Http} from "@angular/http";
 5 import {JwtHelper} from "angular2-jwt";
 6 import {GlobalVariable} from "../../app/global";
 7
 8 @Component({
 9   selector: 'page-index',
10   templateUrl: 'index.html'
11 })
12 export class IndexPage {
13
14   LOGIN_URL: string = GlobalVariable.BASE_API_URL + "/api/login";
15   SIGNUP_URL: string = GlobalVariable.BASE_API_URL + "/api/signup";
16
17   auth: AuthService;
18   // When the page loads, we want the Login segment to be selected
19   authType: string = "login";
20   // We need to set the content type for the server
21   contentHeader: Headers = new Headers({"Content-Type": "application/json"});
22   error: string;
23   jwtHelper: JwtHelper = new JwtHelper();
24   user: string;
25   loginCreds: any = {}
26
27   constructor(public navCtrl: NavController, public navParams: NavParams, private http: Htt\
28 p) {
29     this.auth = AuthService;
30     let token = localStorage.getItem('id_token');
31     if(token) {
32       this.user = this.jwtHelper.decodeToken(token).sub;
33     }
34   }
35
36   login(credentials) {
37     // alert(JSON.stringify(credentials))
38     // credentials = {username:"admin", password: "Password123!"}
39     if(credentials.username == "" || credentials.password == "") {
40       this.error = "User name and password should be provided!"
41     } else {
42       this.http.post(this.LOGIN_URL, JSON.stringify(credentials), { headers: this.contentHe\
43 ader })
44         .map(res => res.json())
45         .subscribe(
46           data => this.authSuccess(data.access_token),
47           err => {
48             console.log(err)
49             if(err.status == 401) {
50               this.error = "Invalid password and/or username.";
51             }
52             if(err.status == 400) {
53               this.error = "Invalid call to the server.";
54             }
55           }
56       );
57     }
58   }
59
60   signup(credentials) {
61     this.http.post(this.SIGNUP_URL, JSON.stringify(credentials), { headers: this.contentHea\
62 der })
63       .map(res => res.json())
64       .subscribe(
65         data => this.authSuccess(data.access_token),
66         err => {
67           console.log(err)
68           if(err.status == 401) {
69             this.error = "Invalid password and/or username.";
70           }
71           if(err.status == 400) {
72             this.error = "Invalid call to the server.";
73           }
74         }
75       );
76   }
77
78   logout() {
79     localStorage.removeItem('id_token');
80     this.user = null;
81   }
82
83   authSuccess(token) {
84     this.error = null;
85     localStorage.setItem('id_token', token);
86     var tokenData = this.jwtHelper.decodeToken(token);
87     // alert(JSON.stringify(tokenData))
88     this.user = tokenData.sub
89   }
90
91   ionViewDidLoad() {
92     console.log('ionViewDidLoad IndexPage');
93   }
94 }
The LOGIN_URL is the endpoint provided by the Grails Security plugin for exchanging the user and password into a valid token. We define a method named login based on http service which is sending the user and password and parse the response with a authSuccess method to get the token and store it in the browser local storage. In the case of an error, an error message is shown in view page via the error variable. A logout method can be used - it removes the token from local storage.
The class JwtHelper is used to parse the token and get the username. Here is the content of a JWT token:
 1 {
 2    "principal":"H4sIAAAAAAAAAJVSP0/bQBR/ThNRgVSgEkgdYAE25Eh0zMTfqpUbUNMsIIEu9sM9ON+ZuzMkS5W\
 3 JDhlS0SJV7Vfgm7RLPwBqh67MXfvOEBxYUG+y3/38+/d8cQUVo+F5rBkXxk9FFnPpm1RzGRsMM81tx88M6ghtjniRA5\
 4 s0gevjlcALoMQjC0+DA3bMqoLJuLrZOsDQ1toalpSObxj3NUvwROlD/5Y7VBrvCBTU3tcSjGzDJAtDlUlbV3K9nXKN0\
 5 TZMFLNAhYduNBXSDUrLmTDD0BGUrCUwCmCMZfadIlWOxsL4tdnMclFtoK0F8DhlxpC7e0ka1ll3986mpARH8B7K7dSj\
 6 Q90tOKjvePxVJQSl5kqa+aZMVMT3uRMn/u7M2c/+t26zBECdLD78TTF/tgLd77t/Z/OivdDC9JD1AlZrp+RmsmB+q9E\
 7 pX37Z+nR+9WHnESk7xMb/72N++aa5zqpKUqaZVUM7ItqTsnsm8pWHyQdb6PgNnqQC6Y+SFqNbiYKY4pa1EoO+LYy+2Q\
 8 zW95bXXr+su9cKixIuSfVJHtptyw8U7ar35+OP/twvYngFlWMmMqTOJwpQPUtaqE8vzmfGPv/u5QkGf/M/CjCs3REDA\
 9 AA=",
10    "sub":"customer",
11    "roles":[
12       "ROLE_CUSTOMER"
13    ],
14    "exp":1487790029,
15    "iat":1487786429
16 }
After a successful login a response is received containing a valid token and also a refresh token that can be used for accessing pages secured with role ROLE_ADMIN (we shorted the tokens for space reasons):
 1 {
 2    "username":"customer",
 3    "roles":[
 4       "ROLE_CUSTOMER"
 5    ],
 6    "token_type":"Bearer",
 7    "access_token":"...Wok20_KnDmb5C6K3gzjM-0q2zgotwd26Hhbl3_-q-yw",
 8    "expires_in":3600,
 9    "refresh_token":"...GZi-6FOtgsZeXA5GPYs5BG_zkSzduTO8WbnmStQulLg"
10 }
Now we can use two methods in our Jobs page for retrieving the jobs that will be shown. First is listJobs() if the user is authenticated and the second is listFeaturedJobs() if the user is not authenticated - AuthService.authenticated() the call is used for checking this.
 1 import { Component } from '@angular/core';
 2 import { NavController, NavParams } from 'ionic-angular';
 3 import { JobsData } from "../../providers/jobs-data";
 4 import { GlobalVariable } from '../../app/global';
 5
 6 import { InAppBrowser } from 'ionic-native';
 7 import {AuthService} from "../../providers/auth";
 8
 9 @Component({
10   selector: 'page-jobs',
11   templateUrl: 'jobs.html'
12 })
13 export class JobsPage {
14
15   selectedItem: any;
16   icons: string[];
17   items: any;
18   contextPath: string;
19
20   constructor(public navCtrl: NavController, public navParams: NavParams, public jobsData: \
21 JobsData) {
22     // If we navigated to this page, we will have an item available as a nav param
23     this.selectedItem = navParams.get('item');
24     this.contextPath = GlobalVariable.BASE_API_URL
25
26     if(AuthService.authenticated()) {
27       this.listJobs()
28     } else {
29       this.listFeaturedJobs()
30     }
31   }
32
33   listJobs() {
34     this.jobsData.listJobs().subscribe(data => {
35       this.items = data;
36       console.log("Jobs: " + JSON.stringify(this.items, null, 2))
37     });
38   }
39
40   listFeaturedJobs() {
41     this.jobsData.listFeaturedJobs().subscribe(data => {
42         this.items = data;
43         console.log("Featured jobs: " + JSON.stringify(this.items, null, 2))
44       },
45       err => {
46         console.log(err)
47       });
48   }
49
50   itemTapped(event, item) {
51     // we use _self instead of _system
52     new InAppBrowser(item.jobUrl, '_self');
53   }
54 }
Finally, the JobData provider has two different methods. One named listJobs that is using the authHttp provided by angular2-jwt (see the imports) - this call is injecting automatically the header Authorization:Bearer token… for the call taking the token from local storage. The second method listFeaturedJobs() is using the usual http service from Angular.
 1 import {Injectable} from '@angular/core';
 2 import {Http} from '@angular/http';
 3 import 'rxjs/add/operator/map';
 4 import { GlobalVariable } from '../app/global';
 5 import {AuthHttp} from 'angular2-jwt';
 6
 7 @Injectable()
 8 export class JobsData {
 9
10   constructor(public http: Http, public authHttp: AuthHttp) {
11     console.log('Enter JobsData Provider');
12   }
13
14   listJobs() {
15     return this.authHttp.get(GlobalVariable.SECURED_API_URL + "/jobs").map((res) => res.jso\
16 n())
17   }
18
19   listFeaturedJobs() {
20       return this.http.get(GlobalVariable.SECURED_API_URL + "/featuredJobs").map((res) => r\
21 es.json())
22   }
23 }
We can test that the /avi/v1.0/jobs is not accessible without a valid token:
1 open http://localhost:8080/api/v1.0/featuredJobs
We will get:
1 {"message":"401 UNAUTHORIZED. The request has not been applied because it lacks valid authe\
2 ntication credentials for the target resource.","error":401}
To the app store
Publishing to the app store is simple in the case of Google Play store because there are no so many reviews. But will be mode difficult with the Apple AppStore and Windows Store. You have to improve you application usability to be accepted in the store. You can use a professional template from Ionic Market an official Ionic market for starters, plugins, and themes. Now we will describe the steps that should de follow to publish the app in all three stores.
Google Play Store
The Android store is Google Play - your application is easily accepted (in hours) on this store. There are many free applications in this store, and their users are in general not paying for apps. Will cost you $25 per life for publishing in this store and Google takes 30% from revenue. The user receives 70% from revenue.
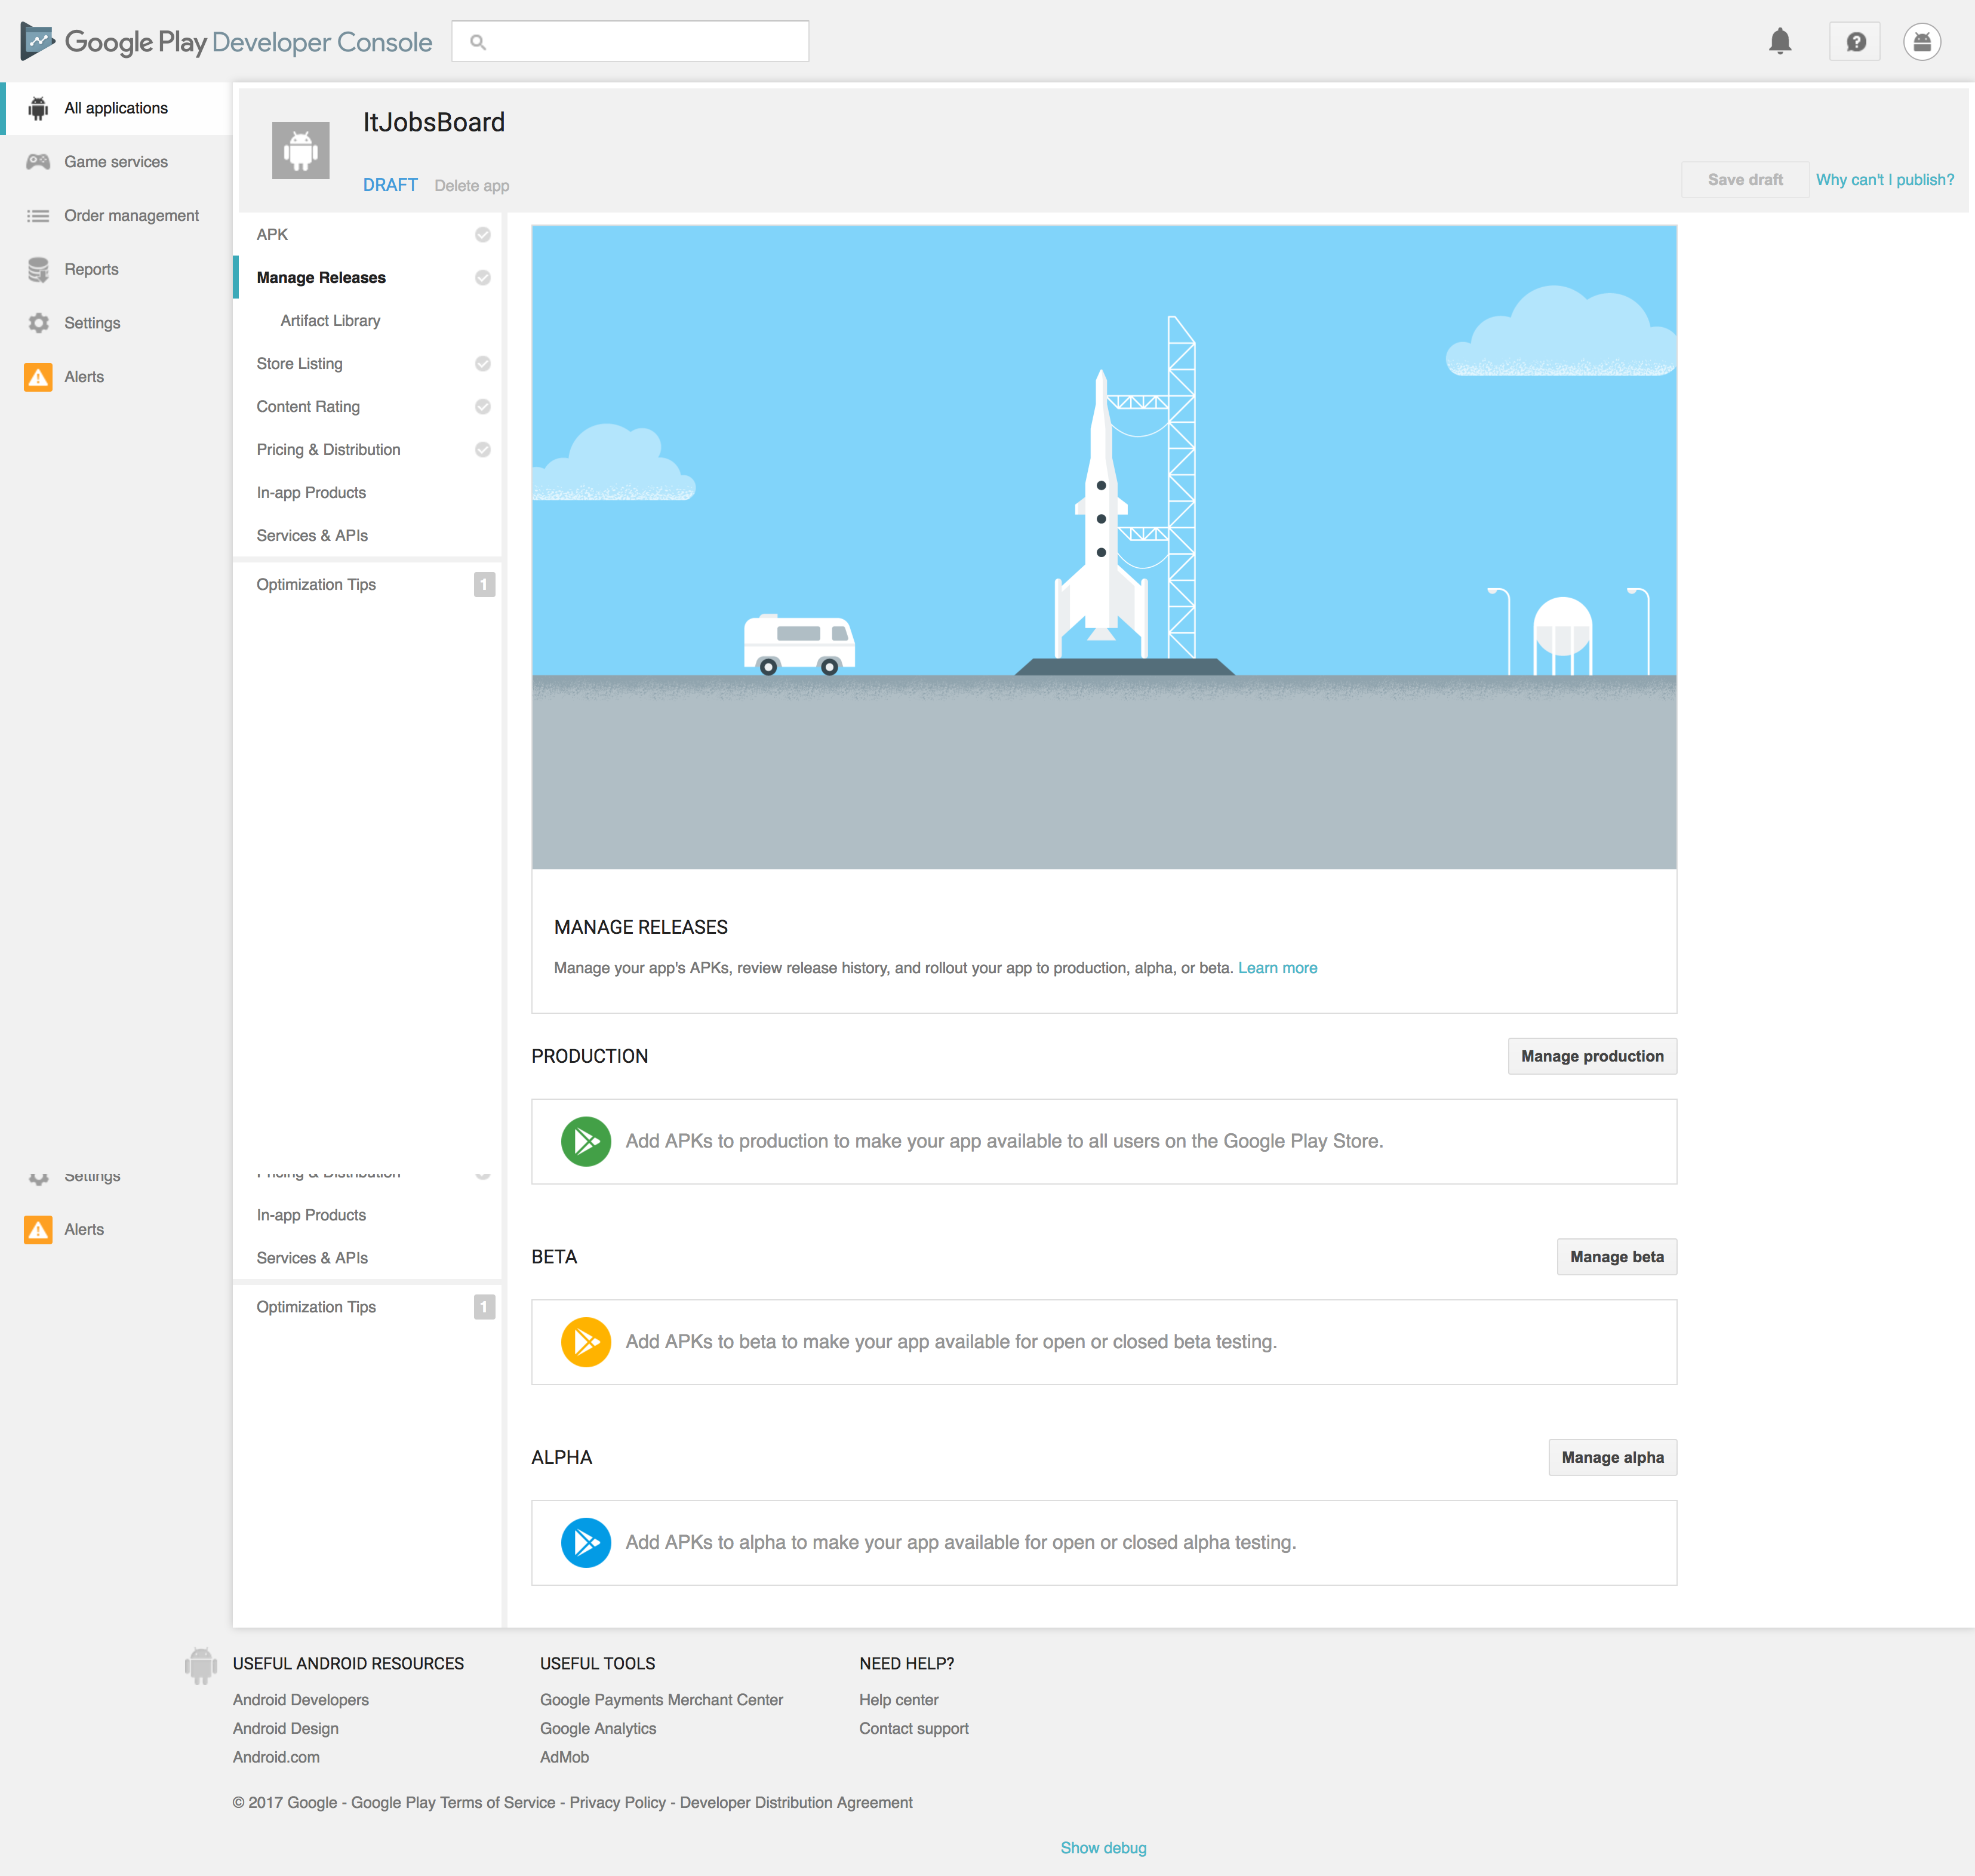
First, you have to create a Play Developer account, and there you have to create an application and edit your Store Listing. Title and Full Description are important for ASO - be aware that around 60% of users are coming from store searches. In Manage Releases you will upload your .apk files.
For creating an APK from your Ionic sources you have to use this script:
1 nano ~/MVPS/mvp-application/app-web/ionic-client/build.sh
The script:
 1 #!/bin/bash
 2
 3 echo "#################################"
 4 project_path=~/MVPS/mvp-application/app-web/ionic-client
 5 android_sdk_path=~/Library/Android/sdk/build-tools/22.0.1
 6 android_adb_path=~/Library/Android/sdk/platform-tools
 7 app_name=ItJobsBoard.apk
 8
 9 echo "#################################"
10 echo $project_path
11 echo "#################################"
12 echo $android_sdk_path
13
14 cd $project_path
15 cordova build --release android
16 cd $project_path
17
18 #apk
19 cp $project_path/platforms/android/build/outputs/apk/android-release-unsigned.apk .
20 jarsigner -verbose -sigalg SHA1withRSA -digestalg SHA1 -keystore jobsboard.keystore android\
21 -release-unsigned.apk jobsboard -storepass Password123!
22 echo $android_sdk_path/zipalign
23 $android_sdk_path/zipalign -vf 4 android-release-unsigned.apk android-$app_name
24
25 $android_adb_path/adb -d install -r $project_path/android-$app_name
As you can see the apk is encrypted. You have to create a keystore using this command (keytool is in bin folder of your JDK installation):
1 keytool -genkey -v -keystore jobsboard.keystore -keyalg RSA -keysize 2048 -validity 10000 -\
2 alias jobsboard
You have to execute it:
1 cd ~/MVPS/mvp-application/app-web/ionic-client/
2 ./build.sh
You will find the APK file in your Ionic app folder: ionic-client/android-ItJobsBoard.apk. You have to upload it and publish the app to the store.
Apple App Store
The store is Apple Store - your application is verified in detail and takes around one week to be published. You can make more money from this store, and in general, there are more payable applications than free. You pay $99 per year for publishing on this store.
Build the iOs project:
1 ionic build ios
First open the project in XCode pointing to the generated .xcodeproj file (from /plathorms/ios folder):
1 ~/MVPS/mvp-application/app-web/ionic-client/platforms/ios/ItJobsBoard.xcodeproj
You can first test the application by running the application in the XCode provided emulator using Product/Run.
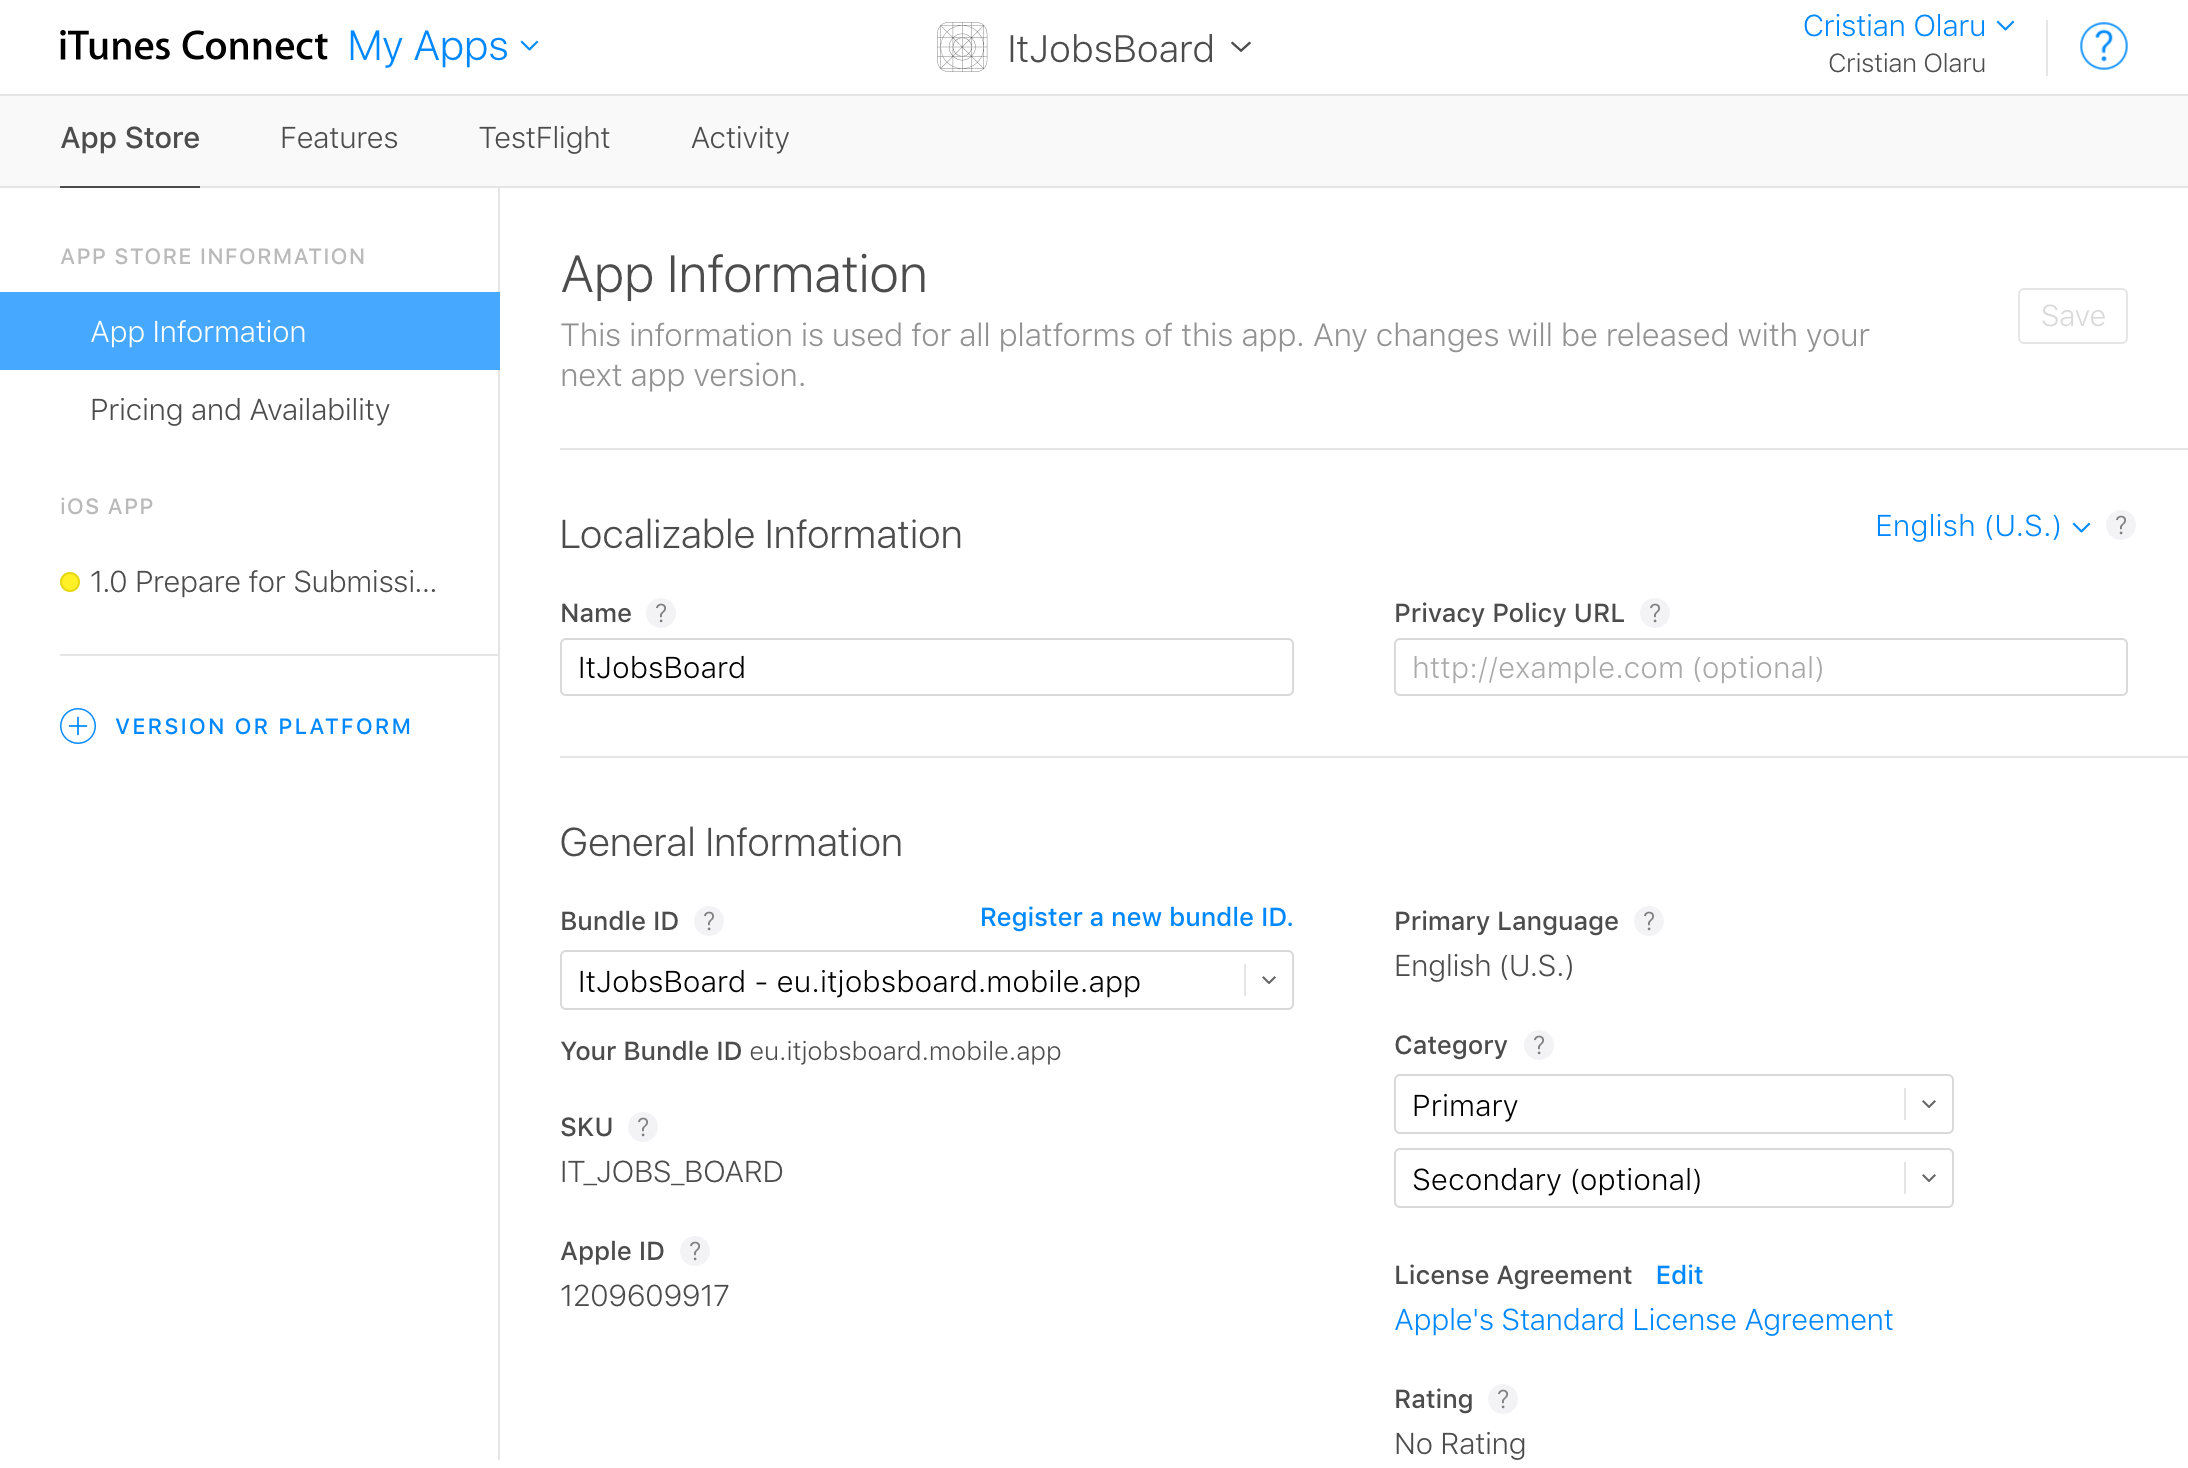
For publishing, you need to have an Apple Id. Then you have to go to your Apple developer account in the area named Certificates, Identifiers & Profiles. There you have to create an application id - in our case eu.itjobsboard.mobile.app associated with an application named ItJobsBoard. Then, you have to go to your iTunes Connect account where you have to request a new application using New App using the application id created in the previews step. There you have to complete App Information and other application data before submitting it for approval.
Also, you have to upload the binary file, and this can be done in two ways. The first option is to use Product/Archive option from XCode. Second is using a distinct application named Application Loader.
Windows App Store
The store for Windows applications is Windows Store and is not so rich in applications like the previous stores. You have to pay $40 for starting publishing in this store. The advantage of this store is that it is a unified store for all Windows 10 applications and you can publish your application to all Windows 10 devices.
For building your application you need a Windows 10 machine with Visual Studio 2015 or 2017 installed (you can get one for free usage for 1 month or you can buy one forever Windows 10 preinstalled with Visual Studio Community Edition). Then you have to get the project from GitHub on your Windows 10 machine (lets say you are doing this in a C:MVPS folder):
1 cd C:\MVPS
2 git clone https://github.com/colaru/mvp-application.git
Now you will be able to build our project:
1 cd C:\MVPS\mvp-application\app-web\ionic-client
2 ionic platform add windows
3 ionic build windows
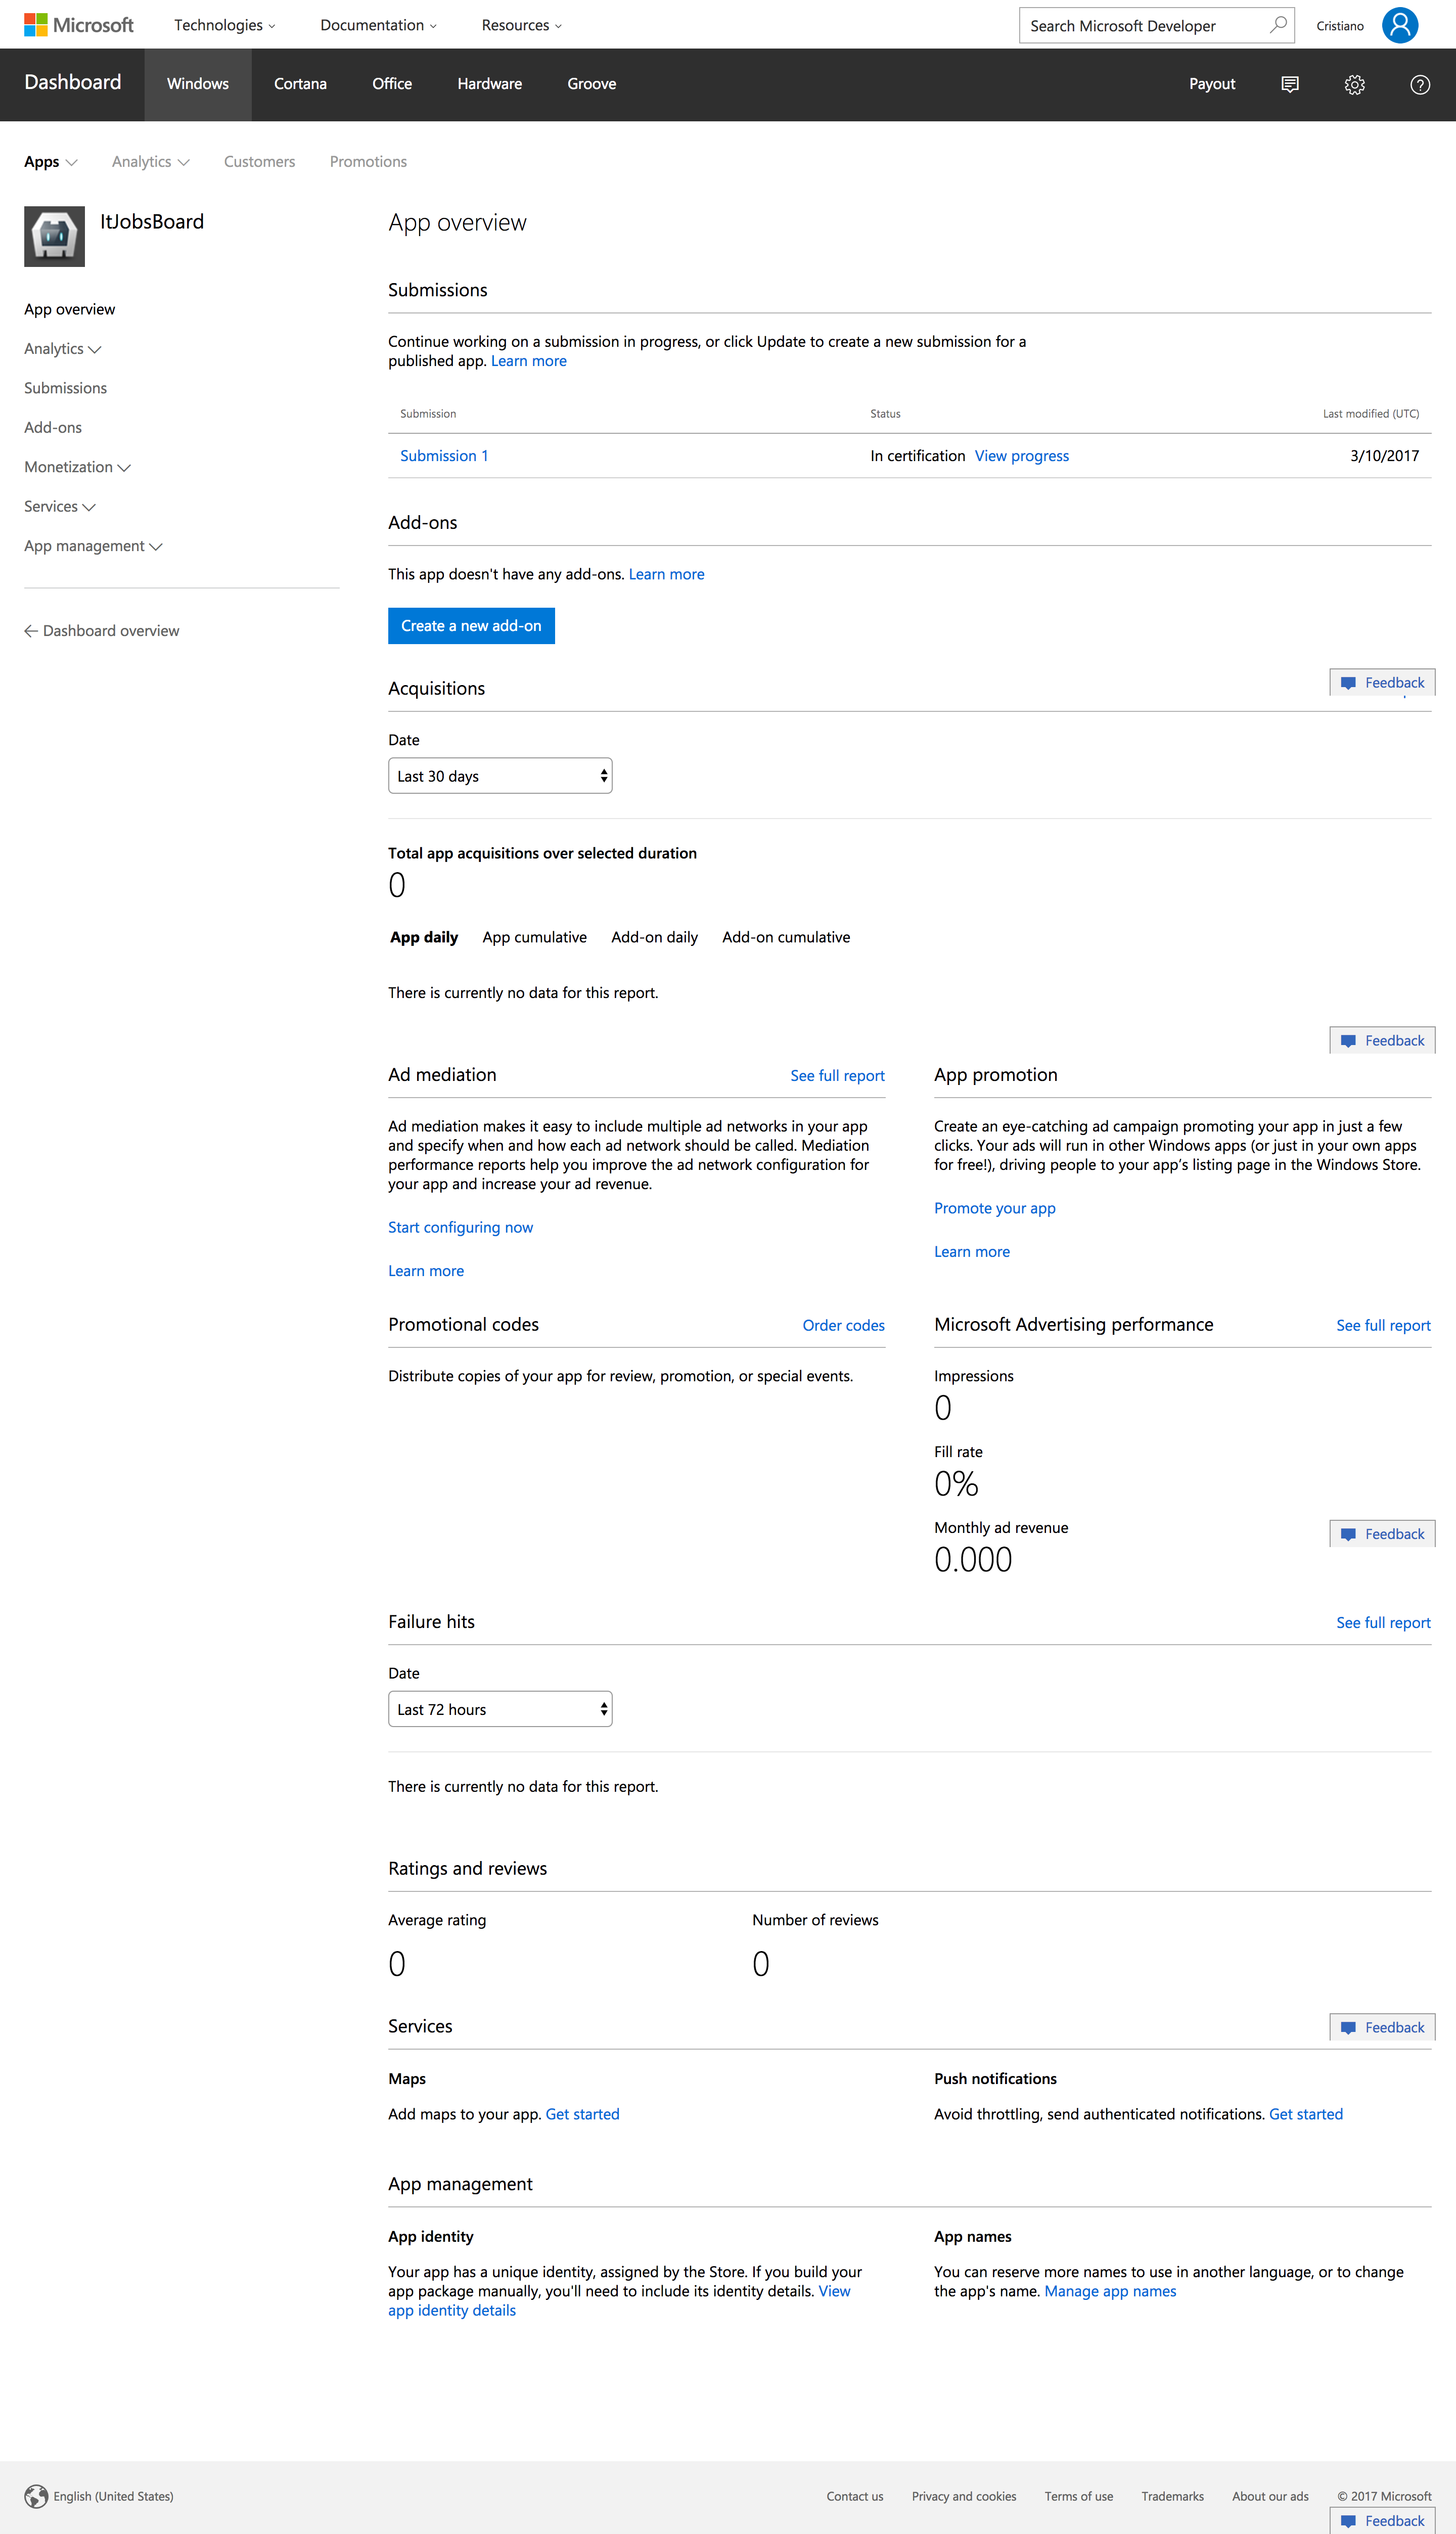
Now you can open in Visual Studio the Windows 10 project located in C:MVPS\mvp-application\app-web\ionic-client\platforms\windows and you can start publishing it to the Windows Store. You can create the deployment artifacts in Project/Store/Create App Packages and there you can choose to link to an existing application definition from your Windows Developer Center account or to create a new one. The package will be signed automatically and you have to upload it manually into the store using Project/Store/Upload App Packages.
You don’t have support in Ionic 2 for generating icons and splash screen resources like in iOs and Android using ionic resources command but you can generate all the icons and splash screens using Properties/Visual Assets option from Visual Studio. Also Windows 10 resources can be generated using this online tool.
To do list
There are a set of things we didn’t manage to implement in the sample application. We will try to implement these features in the near future, but can be a good exercise for the reader to implement them:
- Implement refresh token using angular2-jwt following this Ionic 2 sample
- Implement users signup on client and server side
- Implement a scenario where the customer can save jobs posts after login and the saves are kept on the server side after user logoff