How design can influence testing
How you design your architecture will directly affect how easy your application is to test. If you decouple a system’s components, it makes them easier to test in isolation. This has the additional benefit of creating a more flexible architecture. This chapter describes how a ports and adapters approach can make testing easier and more efficient. We introduce a sample application and show how testing is complicated by a coupled design and how the de-coupled alternative is easier to test. The sample application is available on Github.
Sample application
Lets imagine a system concerned with helping customers manage their stock portfolio. It displays details about stocks owned and allows the customer to buy and sell directly with an exchange. The system is made up of a browser based UI and a RESTful backend server. The backend uses a market data service provided by Yahoo to retrieve stock prices and connects directly to an exchange to execute trades.
One important aspect of the sample application is that the UI is deployed as a separate app from the RESTful server. It’s made up of static HTML and JavaScript and is served by an embedded HTTP server. The RESTful backend is deployed separately with an embedded HTTP server and is called by the UI to perform the business logic. This separation decouples the UI logic from the business logic and allows us to develop the two independently, potentially with differing technologies.
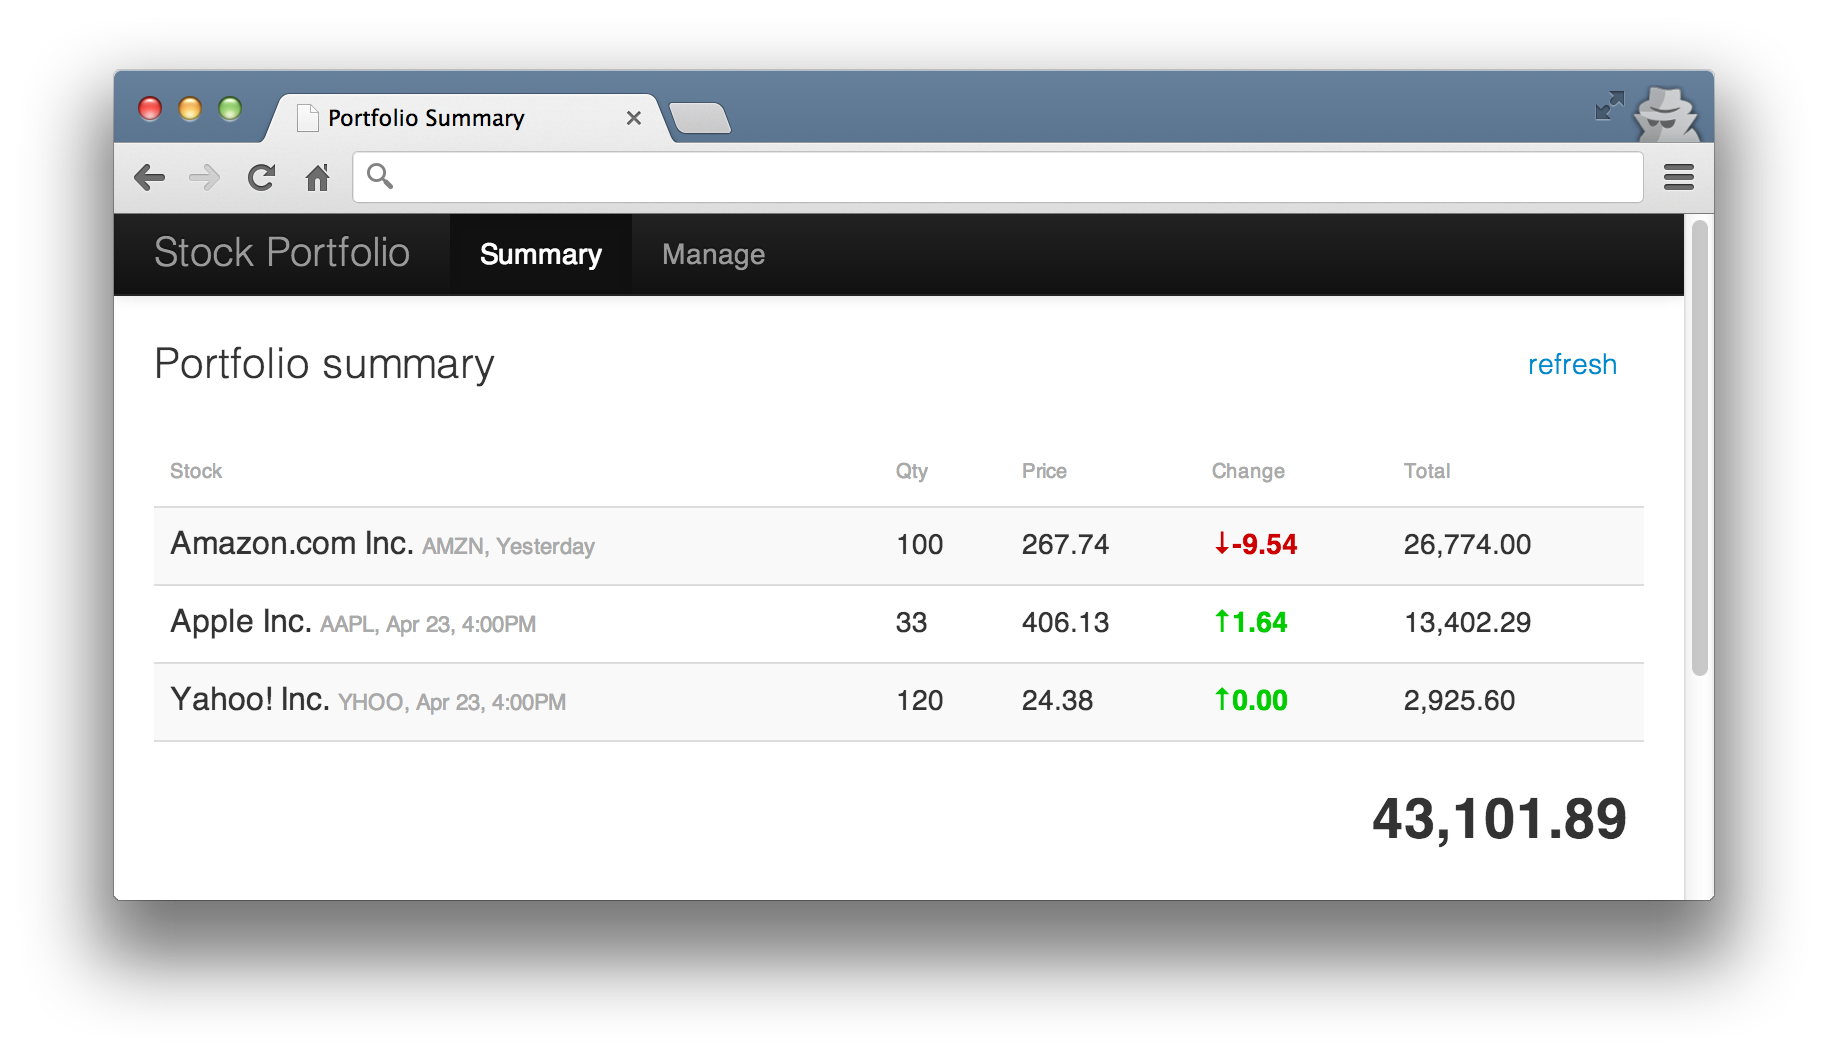
Currently, only basic information is displayed about a customer’s stocks so stakeholders have decided on the next piece of work and have described it as follows.
“As a retail customer, when I ask for my portfolio’s value, current stock prices are retrieved from the market and the total value of my stocks is calculated and displayed.”
In further discussion, the stakeholder clarifies that the calculation is done by multiplying a stock’s current price by the quantity that the user holds. If the user holds 10,000 Google shares, each worth $810 each then their portfolio would be worth $8.1m.
The UI might look something like this.
Coupled architecture
If a system is built with components tightly coupled, the only way to test a scenario is with a coarse grained system test. In our example application, we could test against real Yahoo with something like this.
Listing 1: Coarse grained test starting up the full stack
 1 public class PortfolioSystemTestWithRealYahoo {
 2     private final Server application = Fixture.applicationWithRealYahoo();
 3     private final Browser browser = new Browser();
 4
 5     @Before
 6     public void startServers() {
 7         application.start();
 8     }
 9
10     @Test
11     public void shouldRetrieveValuation() {
12         browser.navigateToSummaryPage().requestValuationForShares(100);
13         waitFor(assertion(portfolioValuationFrom(browser),
14             is("91,203.83")), timeout(seconds(5)));
15     }
16
17     @After
18     public void stopServer() {
19         application.stop();
20         browser.quit();
21     }
22 }
It exercises all of the components but it’s naive as it relies on Yahoo being up and returning the expected result. It starts up the entire application in the @Before which in turn starts up the web container, initialises the UI and market data components. The browser is then fired up and used to simulate the user’s interaction (line 12). The result is scraped directly from the browser (line 13).
The assertion on the result is wrapped in a call to poll the UI periodically (the call to waitFor on line 13) because the request from the browser to the application is asynchronous. Notice the long timeout value of five seconds because Yahoo is a publicly available service with no guarantees of responsiveness. It may take this long or longer to respond. It’s another brittle aspect to this test.
The waitFor is shown inline above for illustrative purposes, a more object-oriented approach would be to push this into the browser object and hide the asynchronousity and timeout details from the client.
Pushing the asynchronous handing into the browser model
    browser.navigateToSummaryPage()
        .requestValuationForShares(100)
        .assertThatPortfolioValue(is("91,203.83"));
We can improve the test slightly by faking out Yahoo and forcing it to return a canned response (a price of 200.10 for each request). Lines 15-17 below set up any HTTP call to the URL /v1/public/yql to respond with a valid HTTP response containing the response string from line 14.
Listing 2: Same test but with a faked out market data service
 1 public class PortfolioSystemTestWithFakeYahoo {
 2     private final Server application = Fixture.applicationWithRealYahoo();
 3     private final FakeYahoo fakeYahoo = new FakeYahoo();
 4     private final Browser browser = new Browser();
 5
 6     @Before
 7     public void startServers() {
 8         application.start();
 9         fakeYahoo.start();
10     }
11
12     @Test
13     public void coarseGrainedTestExercisingPortfolioValuation() {
14         String response = "{\"quote\":{\"Close\":\"200.10\"}}";
15         fakeYahoo.stub(
16               urlStartingWith("/v1/public/yql"),
17               aResponse().withBody(response));
18         browser.navigateToSummaryPage().requestValuationForShares(100);
19         waitFor(assertion(portfolioValuationFrom(browser),
20             is("20,010.00")), timeout(millis(500)));
21     }
22
23     @After
24     public void stopServers() {
25         application.stop();
26         fakeYahoo.stop();
27         browser.quit();
28     }
29 }
Both tests exercise the happy path through the entire system. If we want to check what happens when no price is available from Yahoo or if Yahoo is down, we’d repeat the majority of the test to do so. If we want to test user errors on input, we’d startup the application unnecessarily.
On the surface, we’re testing different behaviours but we’re actually exercising the same code over and over again. It’s something James likens to taking a car out for a test drive.
“Imagine purchasing a new car and taking it out for a test drive. When you return to the showroom, the car has performed flawlessly but just to be sure you take it out again, this time with the windows down. Then again with the glove compartment open. Then again with the seats fully reclined.
You could keep on testing the car in this way but there comes a point when the cost of evaluating the car begins to outweigh the risk of something going wrong. It’s the same with software. The cost of developing and maintaining high level tests should be weighed against the uncertainty and risk of something going wrong.”
Decoupled architecture using ports and adapters
Rather than running several coarse grained tests, let’s decouple the system by defining explicit boundaries between components using interfaces and design a set of tests to exercise the interaction between those boundaries. The tests should compliment each other to provide the same level of confidence as coarse grained tests (for example, tests like Listing 1).
Ports and adapter symbols
| A port (interface) |  |
| A component |  |
| An adapter |  |
| Access adapters only via ports | 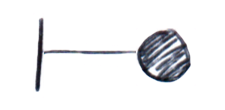 |
| Components only communicate with ports |
The next step is to describe the system architecture in terms of boundary ports (interfaces), their adapters (implementations) and core application logic components. For our application, it might look something like this.
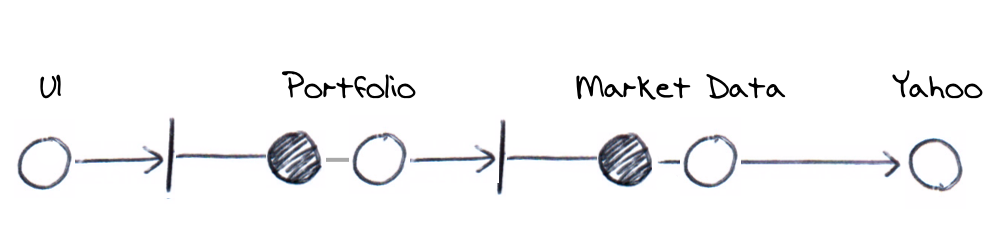
All communication to the domain model is done via a port and adapter pair. The exception, Yahoo, is explained later. We’ve broken down the previous coarse grained architecture into a series of ports, their adapters and domain components.
Using the decoupled ports and adapters approach to create comparable coverage to the earlier coarse grained tests, we’d design tests around the following.
- Testing the UI display and behaviour (Example 1)
- Testing the outgoing messages (Example 2)
- Testing the Portfolio HTTP API (Example 3)
- Testing the Portfolio valuation calculation (Example 4)
- Testing the Market Data API (Example 5)
- Testing real Yahoo! Market Data (Example 6)
- Testing end-to-end (system tests)
Lets have a closer look at each of these next. You can also refer to the source code of the sample application for more details.
Example 1: Testing the UI display and behaviour
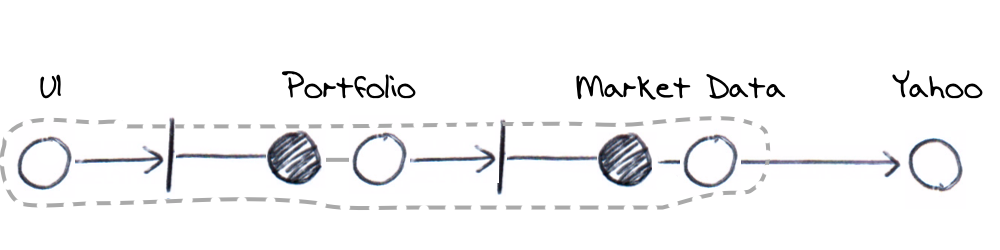
Testing the UI display is about verifying the UI behaviour without exercising backend components. For example, we might want to verify that if the user asks for the current portfolio’s value in the UI that it’s displayed with correct rounding and with commas. You might also be interested if currencies are displayed, negative numbers are shown in red or informational text is displayed in the event that no value is available.
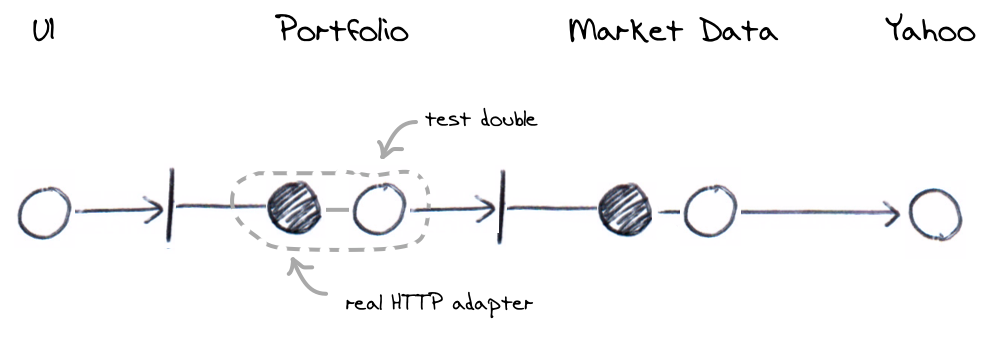
We’d like to be able to make assertions without having to go through the backend so we’ll use a real UI but a fake backend. Taking our system component diagram from earlier, we’ll be faking out the first port below. We’re interested in exercising the components within the dotted line only and as you’ll see as we progress, all the components will eventually be covered in overlapping dotted boundaries.
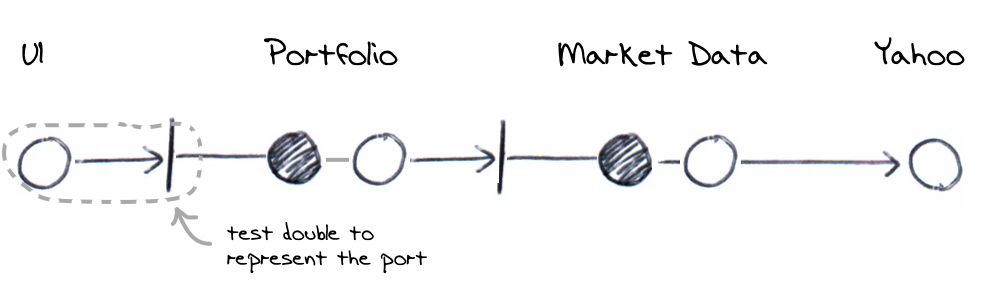
In terms of our sample application, the UI makes a HTTP GET call to the backend. It’s implemented by a ajax call inside a HTML page. In testing however, we’ll replace the Portfolio with a test double and therefore just test that the UI correctly displays whatever the test double returns. Specifically then, we’d
- Start up the UI server (remember this is basically serving static HTML but is started as it’s own app)
- Setup a fake Portfolio server with a canned response against specific HTTP GET calls
- Use the browser in the test to click the refresh valuation control
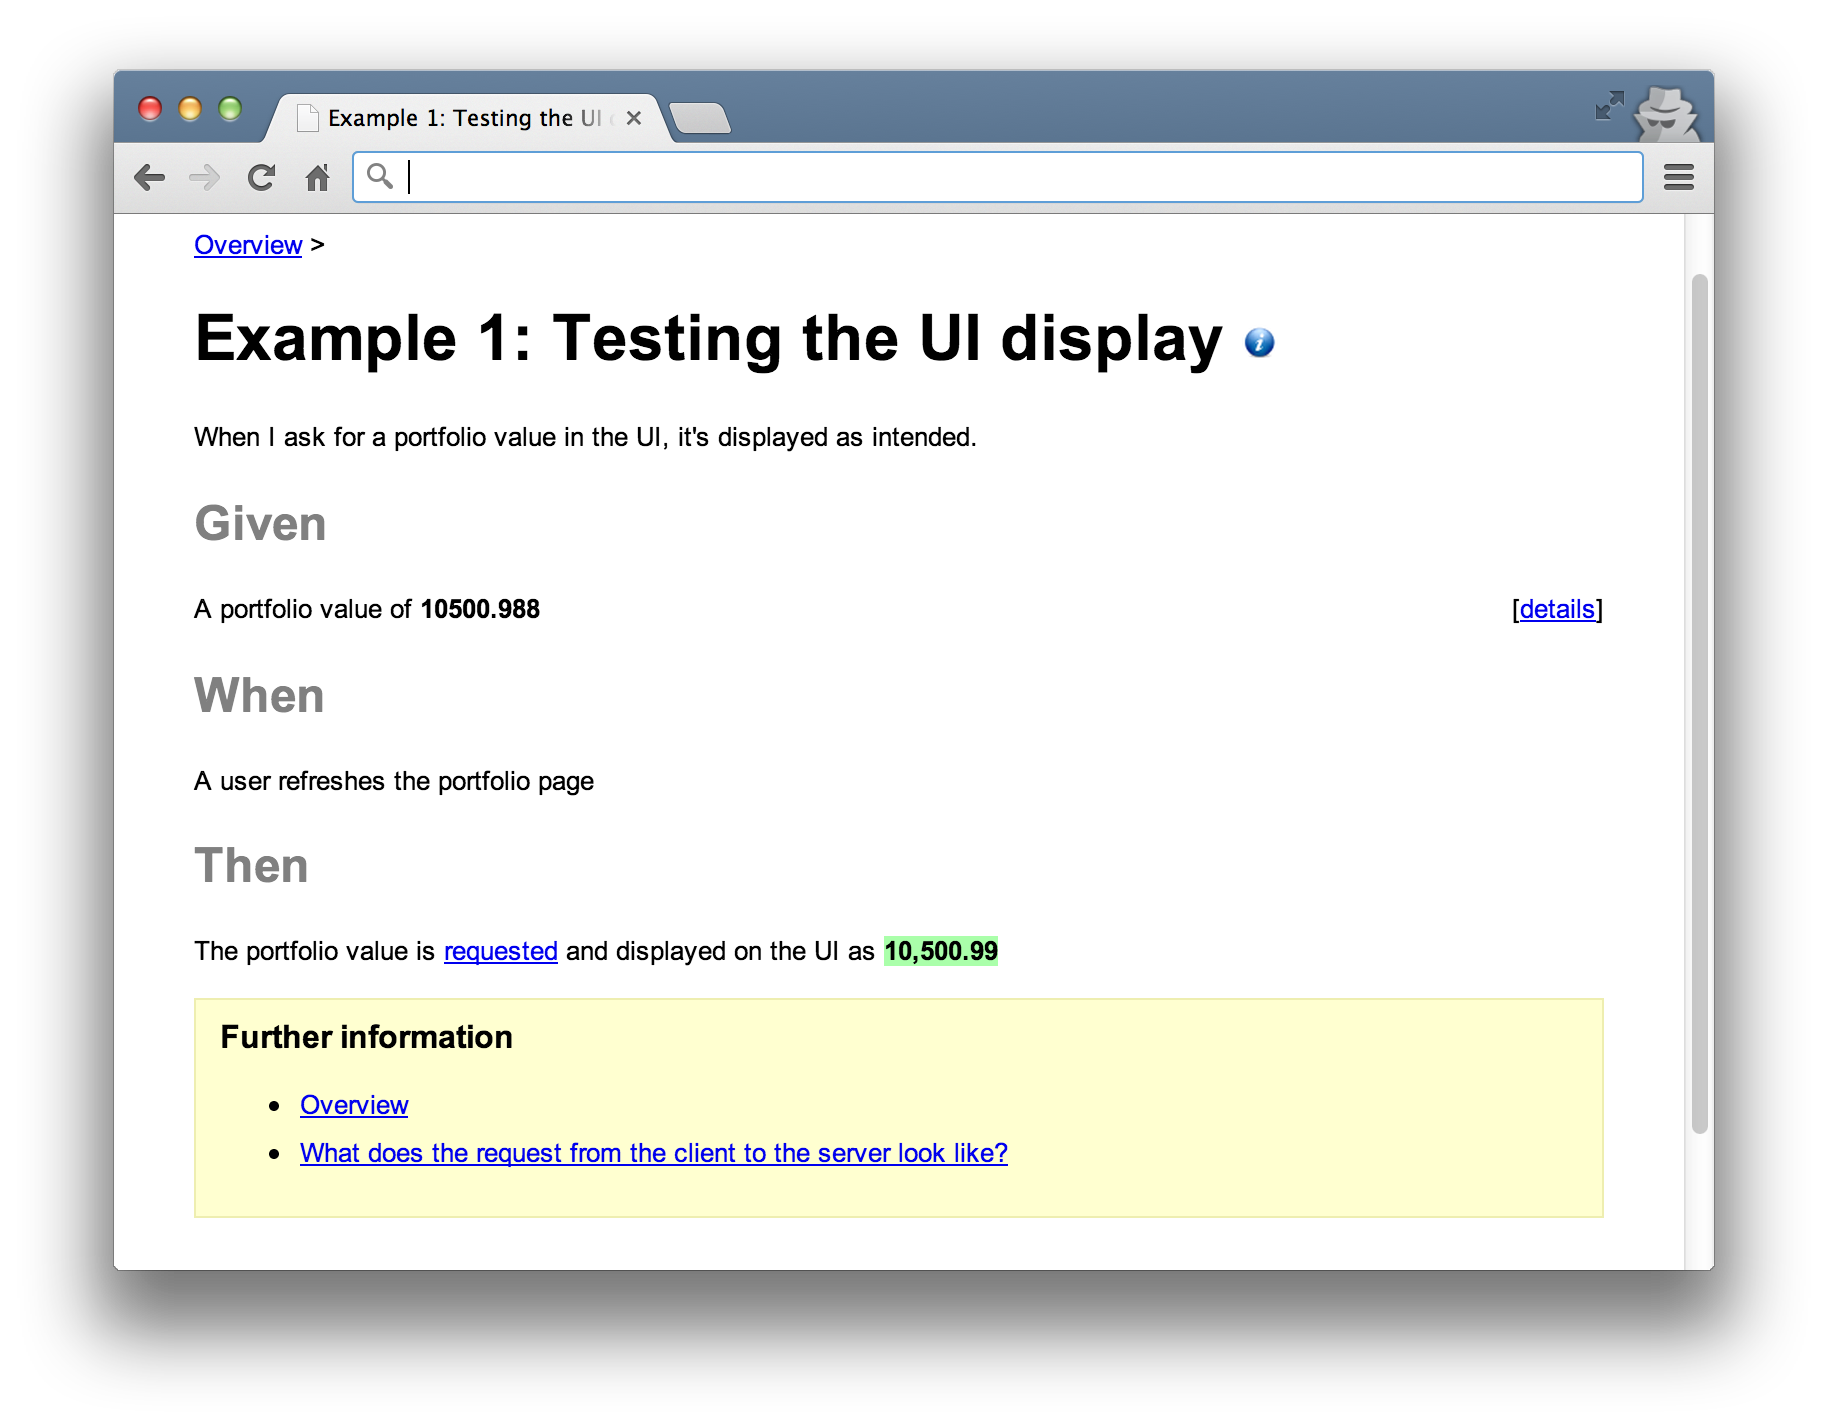
- Verify the canned response is displayed as intended within the UI
For example, we could setup the fake server to respond with a value of 10500.988 for a GET against /portfolio/0001. When the UI is used to make the request, we can verify the response is shown as $10,500.99. This would exercise the UI logic to round the result, introduce commas and add a currency symbol.
Note that we don’t verify how the request actually interacts with the Portfolio. This is a subtle omission but decouples the details of the request from how a response is used leaving us to test more display scenarios without worrying about request details. If we were to verify the request, any changes to the request API would cause changes to this test even though it’s only about display logic.
We’ll fake out the server component and the UI would make a real HTTP request. An alternative approach would be to put the ajax call behind our own JavaScript interface and substitute this during testing. That way, we can exercise the UI without making a real HTTP call. In this case, the test diagram would look like the following.

Lets look at an example to verify monetary values are displayed with thousands separated by commas (1,000,000 and not 1000000). We’ll describe the requirements with the following specification;
We’ll use Concordion as the framework for automating this as a test. We use HTML to document the specification and use Concordion to execute it like a regular JUnit test. You markup the HTML to encode instructions that Concordion interprets at runtime to call application logic and make assertions. After it’s done, it outputs the result as a modified version of the specification. It’s not important that we’re using Concordion. What is important is that we’re producing readable artifacts for the customer.
The HTML specification for our example would look like the following.
Listing 1.1: HTML Specification marked up with Concordion instrumentation
 1 <html xmlns:concordion="http://www.concordion.org/2007/concordion">
 2 <body>
 3 <h1>Portfolio Valuation</h1>
 4
 5 <h2>Given</h2>
 6 <p>
 7     A portfolio value of <b>10500.988</b>
 8 </p>
 9
10 <div class="details hidden">
11     <div class="example">
12         <p>
13             The response from the server contains the body of
14         </p>
15         <pre concordion:set="#body">10500.988</pre>
16     </div>
17 </div>
18
19 <h2>When</h2>
20 <p concordion:execute="requestPortfolioValue(#body)">
21     A user refreshes the portfolio page
22 </p>
23
24 <h2>Then</h2>
25 <p>
26     The portfolio value is requested and displayed on the UI as
27     <b concordion:assertEquals="getPortfolioValue()">10,500.99</b>
28 </p>
29
30 </body>
31 </html>
Concordion uses a test fixture to match the specification to an executable test. In science, a fixture is often physical apparatus used to support a test specimen during an experiment. The experiment or test is distinct from the apparatus that supports it. Unit testing frameworks often muddy this idea because they expect tests to include test support code (the fixture part) as well as the actual test scenarios (the experiment part).
When we use a HTML specification like Listing 1.1, we can create fixtures which are more about supporting the test and the test scenarios themselves are encoded in the specification. We can create differing scenarios in HTML but reuse the same fixture. Our fixture for the above might look like the following.
Listing 1.2: Test fixture for use with scenarios described in HTML specifications
 1 @RunWith(ConcordionRunner.class)
 2 @ExpectedToPass
 3 public class UiPortfolioValueDisplayTest {
 4     private final HttpServer ui = new UiServer();
 5     private final FakeHttpServer application = new FakeHttpServer(8000);
 6     private final Browser browser = new Browser();
 7
 8     @Before
 9     public void start() {
10         ui.start();
11         application.start();
12     }
13
14     public void requestPortfolioValue(String body) {
15         application.stub(
16             urlEndingWith("/portfolio/0001"),
17             aResponse().withBody(body));
18         browser.navigateToSummaryPage().requestValuationForShares(100);
19     }
20
21     public String getPortfolioValue() throws InterruptedException {
22         return browser.navigateToSummaryPage().getPortfolioValue();
23     }
24
25     @After
26     public void stop() {
27         ui.stop();
28         application.stop();
29         browser.quit();
30     }
31 }
By annotating the fixture with @RunWith(ConcordionRunner.class), the class can be run like a regular JUnit test. It will use the Concordion runner to find and parse the HTML specification calling into the fixture as appropriate. Notice that there is no @Test methods, the fixture is run using the JUnit framework but it’s the HTML specification that acts as the test.
The HTML sets up the fake server to respond with 10500.988 by setting a “variable” on line 15 (Listing 1.1) which is passed into the requestPortfolioValue() method of the fixture. As the HTML is interpreted and when it reaches line 20, it’ll call the method on the fixture. At this point, the fixture will control an instance of the browser, refresh the page and cause a GET request to be made.
The GET request causes the canned response to be returned ready for display. It’s JavaScript in the UI that receives this response and introduces the commas. It’s this that we’re really trying to test so we add an assertion in the Concordion markup at line 27 (Listing 1.1). This line will get the actual value from the UI using the fixture’s method and compare it with the HTML element. After running, Concordion updates the specification with a successful result shown in green.
Example 2: Testing the outgoing messages
In the previous example, we made no verifications against the request mechanism so that we could focus solely on display semantics. The next example focuses on the request mechanics. We’re interested in exercising the interaction between the UI and the Portfolio port.
The previous test asks “when I ask for a portfolio value in the UI, how is it displayed?”, this test is concerned with what it actually means to ask for a portfolio’s value?
When the UI asks for a valuation, a specific message is sent over the wire. This example would verify the request and response formats. For example, if the request is sent as JSON, the JSON content could be verified. The response body could also be verified against a specific JSON format and the HTTP response code verified to be 200 (OK). How the response is actually used is left to other tests.
Specifically, we’d
- Start up the UI server
- Setup a fake Portfolio server with an expectation against a specific HTTP request
- Use the browser to refresh the valuation
- Verify the request expectation and return a canned response
- Verify that a response was received but not how it is used in the UI
When the UI asks for the current value, a message is sent to the Portfolio component. Testing the outgoing messages would use a real UI to call a test double (representing the Portfolio’s port) so that we can assert expectations on the message format. If we had multiple UIs (for example a desktop client), we’d need to test how each of them communicate with the port. The port represents the API and the outgoing messages from each UI should be tested against the API specification.
An example specification interested in the Portfolio’s API might look like this.
With a corresponding fixture as follows.
Listing 2.1: Test fixture for working with UI to Portfolio requests
 1 @RunWith(ConcordionRunner.class)
 2 @ExpectedToPass
 3 public class UiPortfolioValueRequestTest {
 4     private final HttpServer ui = new UiServer();
 5     private final FakeHttpServer application = new FakeHttpServer(8000);
 6     private final Browser browser = new Browser();
 7
 8     private final static String expectedUrl = "/portfolio/0001";
 9
10     @Before
11     public void start() {
12         ui.start();
13         application.start();
14     }
15
16     public String requestPortfolioValue() throws MalformedURLException {
17         application.stub(
18             urlEndingWith("/portfolio/0001"),
19             aResponse().withBody("1000"));
20         browser.navigateToSummaryPage().requestValuationForShares(100);
21         return expectedUrl;
22     }
23
24     public String verifyHttpGet() throws InterruptedException {
25         try {
26             application.verify(urlEndingWith(expectedUrl));
27             return "request for the portfolio value is made";
28         } catch (AssertionError e) {
29             return "request for the portfolio value was not made";
30         }
31     }
32
33     public boolean verifyResponseReturned() throws InterruptedException {
34         browser
35             .navigateToSummaryPage()
36             .assertThatPortfolioValue(isRenderedInTheUi());
37         return true;
38     }
39
40     @After
41     public void stop() {
42         ui.stop();
43         application.stop();
44         browser.quit();
45     }
46 }
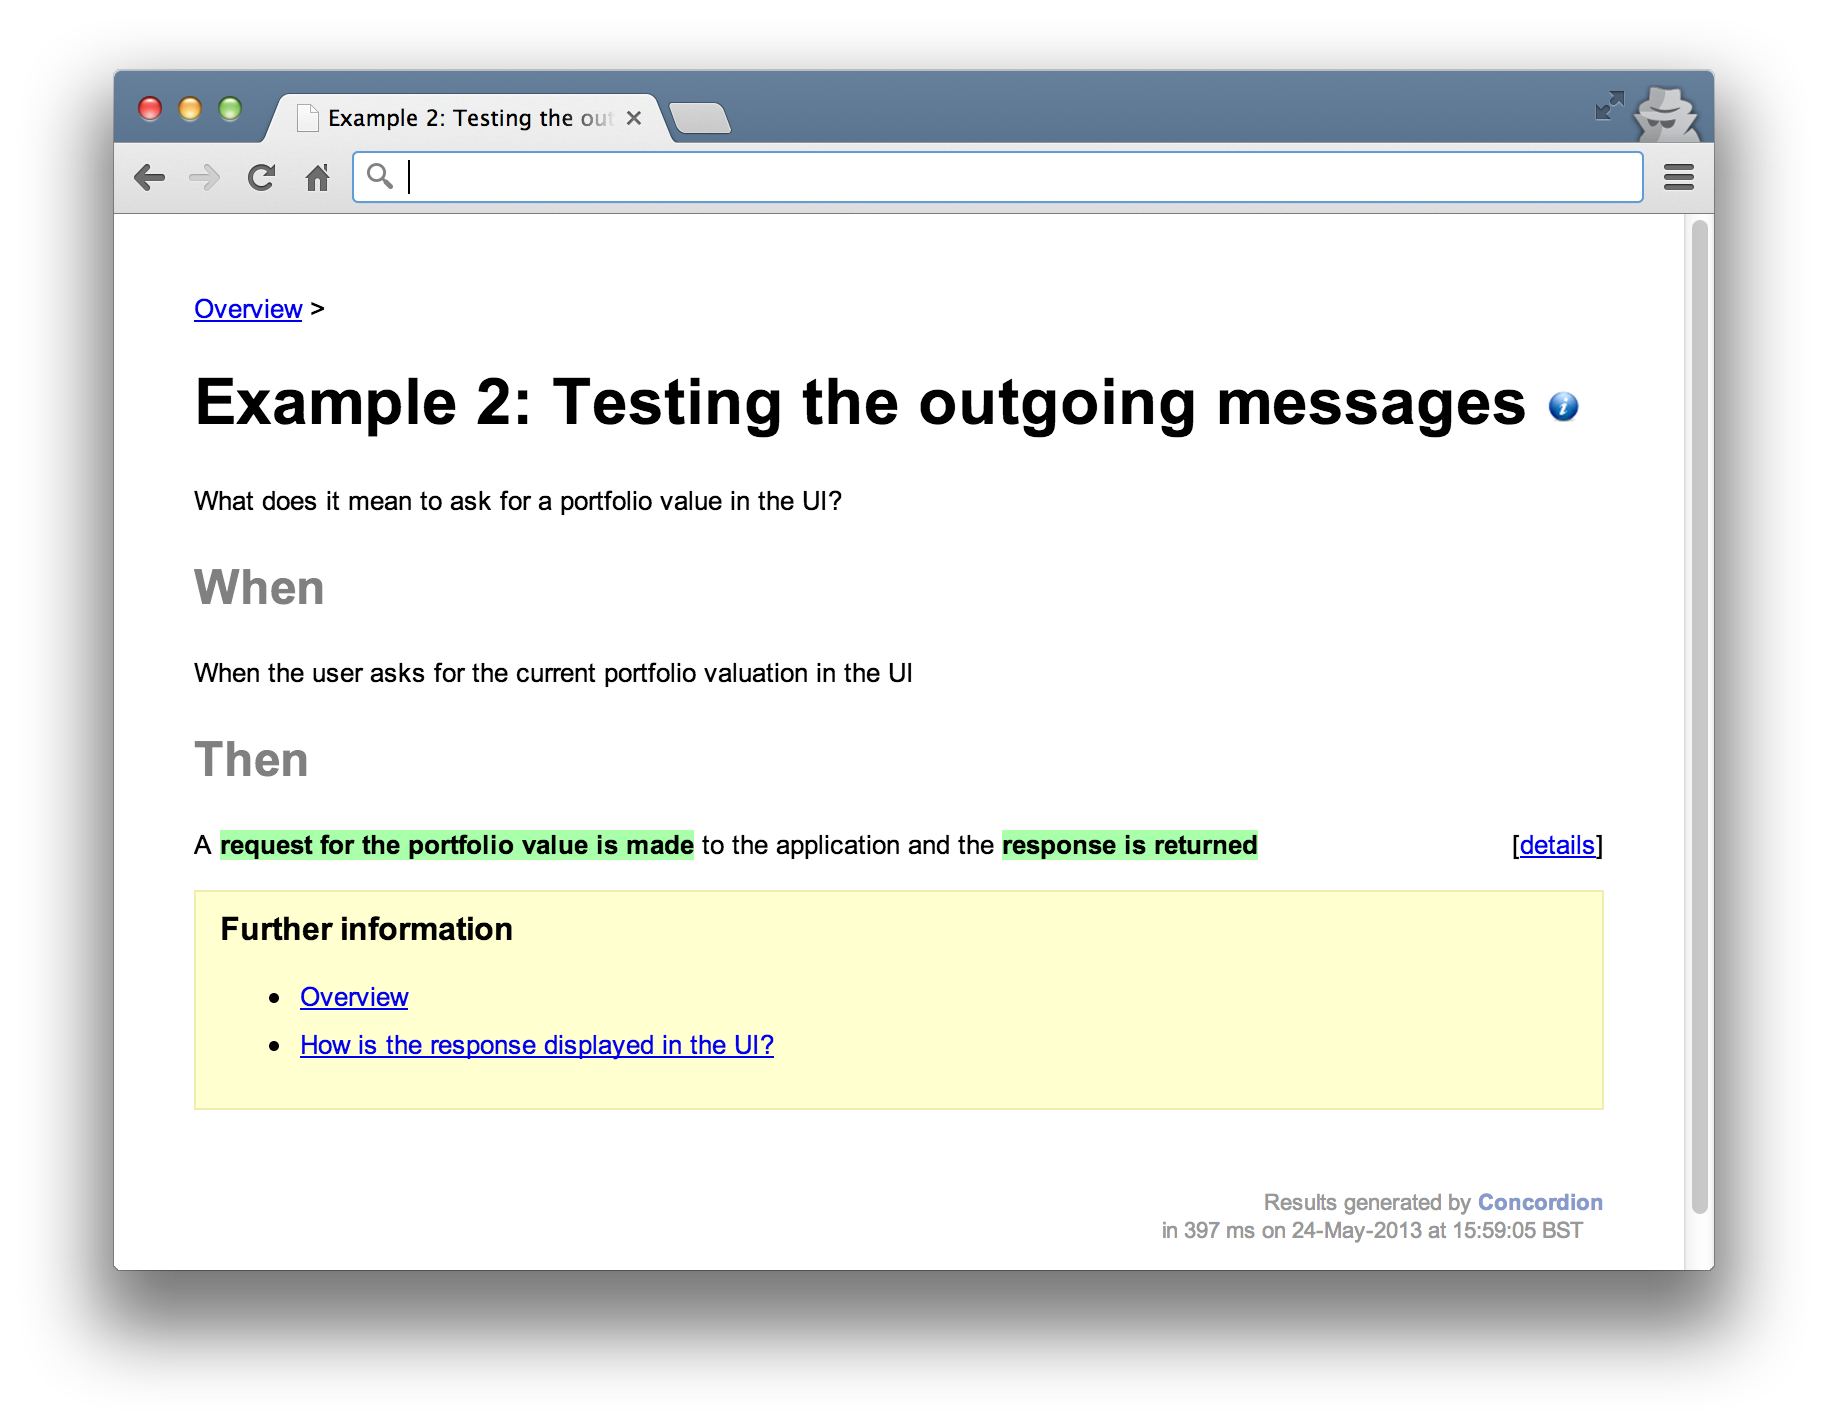
Like the previous example, a canned response is setup (lines 17-19) only this time, the fixture can verify that the UI made the correct type of request (line 26). It asserts that the correct URL was accessed using the HTTP GET method. The test can then go on to verify the response is correct (line 36). In this case, it just verifies that the response makes it’s way onto the UI but doesn’t test anything specific.
In the result below, the specifics of what it means for a request to be valid are omitted. The language in the test talks in abstract terms about the request (“a request for the portfolio value is made and the valuation is returned”). This decouples the language in the test from it’s implementation. That way, this test should be insulated against changes to the response or rendering formats.
Example 3: Testing the Portfolio HTTP API
Once we’re satisfied with the communication between UI and Portfolio, we can look at the behaviour of the Portfolio in detail. This component is responsible for exposing an interface for requesting valuations and processing any valuation requests. The interface is implemented as a HTTP adapter to accept incoming requests. It turns the HTTP call (the external API) into a Java call (the internal API) and a Java result into a HTTP response.
An important point to note is that these tests will assume that the RESTful infrastructure is tested elsewhere. Rather than start up a HTTP server, configure RESTful endpoints and make a real HTTP client request, the tests will work with underlying components directly. This separates the configuration and infrastructure (of the HTTP server) from the behaviour (the business logic classes) tests. We’ll defer the infrastructure tests until later (see Testing end to end). Starting up the full stack and exercising the same path through the system for different business scenarios is wasteful when only a small proportion of the test varies.
In Java terms, you can think of this as starting up a servlet container and testing a servlet along with it’s configuration in the web.xml versus testing the Servlet directly. We don’t really need to test a servlet running within the container, we can safely assume the web container works and that configuration will be tested elsewhere.
An example specification might look like this.
With a corresponding fixture used to verify the HTTP adapter works as intended.
Listing 3.1: Test fixture for the Portfolio’s port HTTP adapter
 1 @RunWith(ConcordionRunner.class)
 2 @ExpectedToPass
 3 public class PortfolioValuationTest {
 4     private final Mockery context = new JUnit4Mockery();
 5
 6     private final Valuation valuation = context.mock(Valuation.class);
 7     private final PortfolioResource portfolio =
 8         new PortfolioResource(valuation);
 9
10     public boolean verifyValuationResponse() {
11         context.checking(new Expectations() {{
12             oneOf(valuation).value(); will(returnValue(new Money("9.99")));
13         }});
14
15         Response response = portfolio.value(null);
16         assertThat(response.entity().toString(), is("9.99"));
17         return true;
18     }
19 }
The PortfolioResource class is accessed when a HTTP request is received. It implements the external API mentioned above or in other words, it plays the role of the Portfolio port. The RESTful framework used to route the GET call here is a JAX-RS (JSR-311) framework called Utterlyidle running in an embedded HTTP server. A common alternative is to use Jersey. Either way, we’re not interested in testing these frameworks or their configuration here. We’re assuming that a HTTP GET is relayed to the PortfolioResource class and the value method is executed. Line 15 above calls the method directly in the test to simulate this.
The PortfolioResource class shown below uses an instance of Valuation as a collaborator to perform the actual calculation and at line 12, sets the result in the HTTP response body. We use JMock in the test to implement a test double for Valuation and simply verify that it’s used and it’s result is bundled in the HTTP response body in Listing 3.1 at line 16.
Listing 3.2: The PortfolioResource class represents the HTTP adapter
 1 public class PortfolioResource {
 2     private final Valuation valuation;
 3
 4     public PortfolioResource(Valuation valuation) {
 5         this.valuation = valuation;
 6     }
 7
 8     @GET
 9     @Path("/portfolio/{id}")
10     public Response value(@PathParam("id") String id) {
11         return response(OK)
12             .entity(valuation.value())
13             .build();
14     }
15 }
This may seem very much like a unit test. That’s because it is. It focuses narrowly on specific questions and can only be called an acceptance test because of the way its used (to give customer’s confidence via the HTML output). There’s nothing in our definition of an acceptance test that precludes it being written as a unit test.
Example 4: Testing the Portfolio valuation calculation
One or more tests will be needed to verify the calculation logic of the domain model. How does the Portfolio actually go about summing the stocks and where does it get their prices? Given the previous example shows that HTTP requests are translated into a Java messages to get a valuation, these tests will go into more detail as to what is involved in valuing the portfolio.
For example, you might include tests to verify the summing of stock prices a customer owns, how the system responds when prices can not be retrieved or if a customer has no stocks to value. Our example is going to look at the simple case of how a single stock is valued, which is done by looking up the price in the Market Data component.
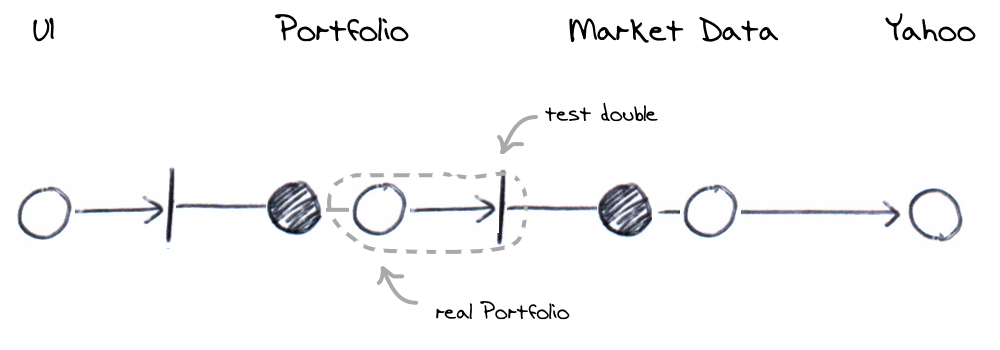
The test must interact with Market Data in order to price the stocks the customer holds so the test will use a real Portfolio component but use a test double for the Market Data interface. We talk about a customers book as a way to record what stock quantities a customer holds. So for example, we might say that a customer has a position of 100 against Google on their book.
An example scenario might look like this.
with a corresponding fixture.
Listing 4.1: Test fixture for the Portfolio’s calculation logic
 1 @RunWith(ConcordionRunner.class)
 2 @ExpectedToPass
 3 public class PortfolioValuationCalculationTest {
 4     private final StubMarketData marketData = new StubMarketData();
 5     private final StubBook book = new StubBook();
 6     private final Valuation portfolio = new Portfolio(book, marketData);
 7
 8     public void setBook(String symbol, Integer quantity) {
 9         book.add(new NumberOfStocks(fromSymbol(symbol), quantity));
10     }
11
12     public void setMarketDataPrice(String symbol, String price) {
13         marketData.add(fromSymbol(symbol), new Money(price));
14     }
15
16     public String getTotalPortfolioValue() {
17         return portfolio.value().toString();
18     }
19
20 }
The previous example mocked out the valuation component (at line 12 in Listing 3.1) whereas this test uses the real class to calculate prices (defined at line 6 and executed at line 17). It works with the MarketData and Book components to get the information it needs. These are stubbed at lines 4 and 5. Given these test doubles, we can setup stocks on a customer book along with corresponding prices in this fixture and verify different scenarios using HTML specifications like the following.
Listing 4.2: HTML Specification marked up with Concordion instrumentation
 1 <html xmlns:concordion="http://www.concordion.org/2007/concordion">
 2 <body>
 3 <h1>Portfolio Valuation</h1>
 4
 5 <h2>Given</h2>
 6 <p>
 7     A customer book <span concordion:execute="setBook(#symbol, #quantity)">
 8     containing <b concordion:set="#quantity">100</b> shares in
 9     <b concordion:set="#symbol">AMZN</b></span> and a stock price in the
10     <span concordion:execute="setMarketDataPrice(#symbol, #price)"> market
11     data system for <b>AMZN</b> of <b concordion:set="#price">261.82</b>
12     </span>
13 </p>
14
15 <h2>When</h2>
16 <p>
17     A request for a valuation is received
18 </p>
19
20 <h2>Then</h2>
21 <p>
22     The total portfolio valuation will be
23     <b concordion:assertEquals="getTotalPortfolioValue()">26182.00</b>
24 </p>
25 </body>
26 </html>
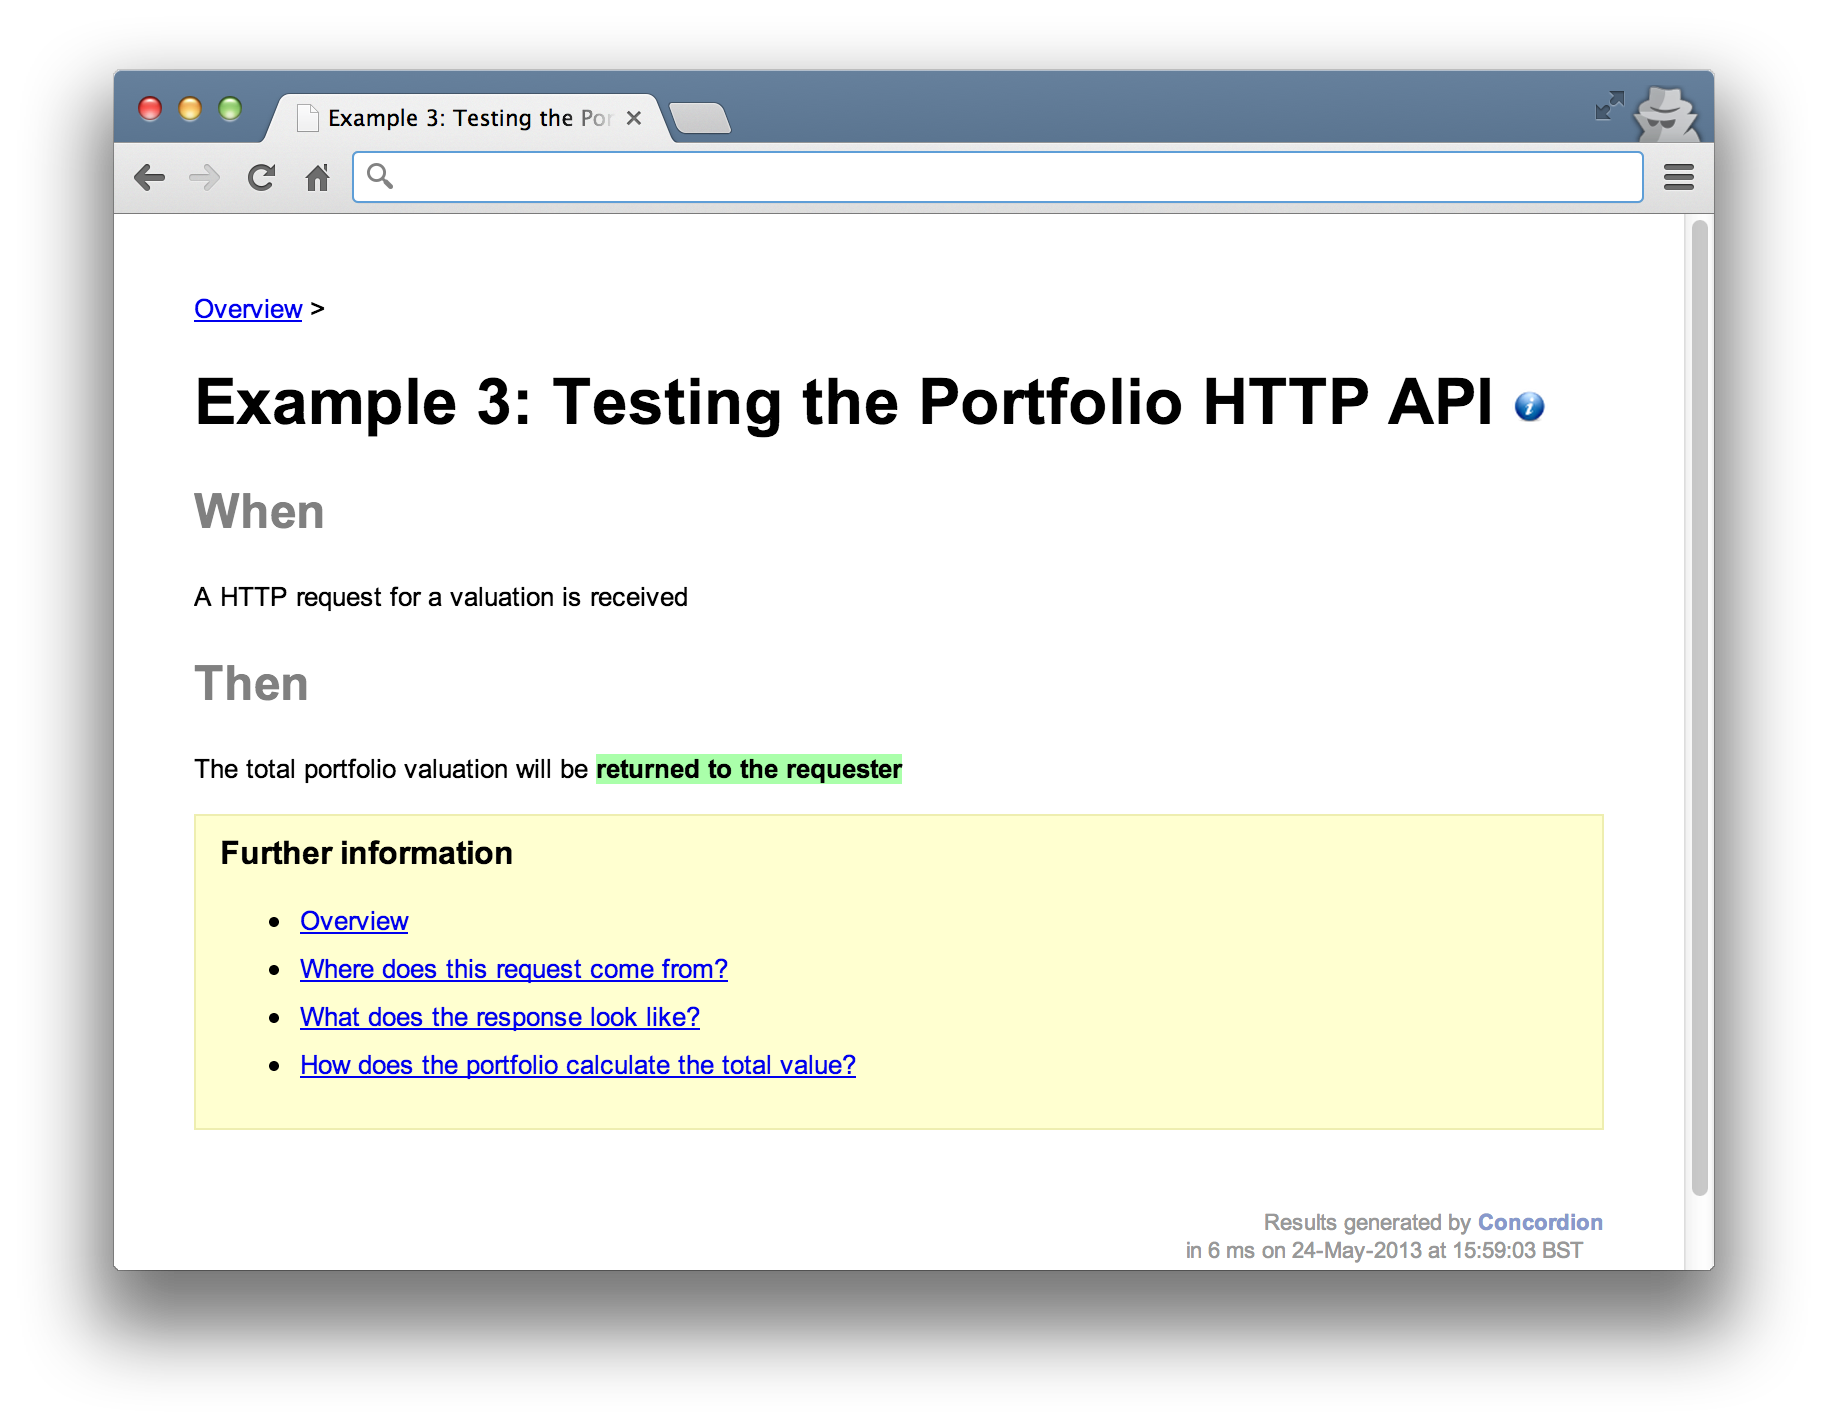
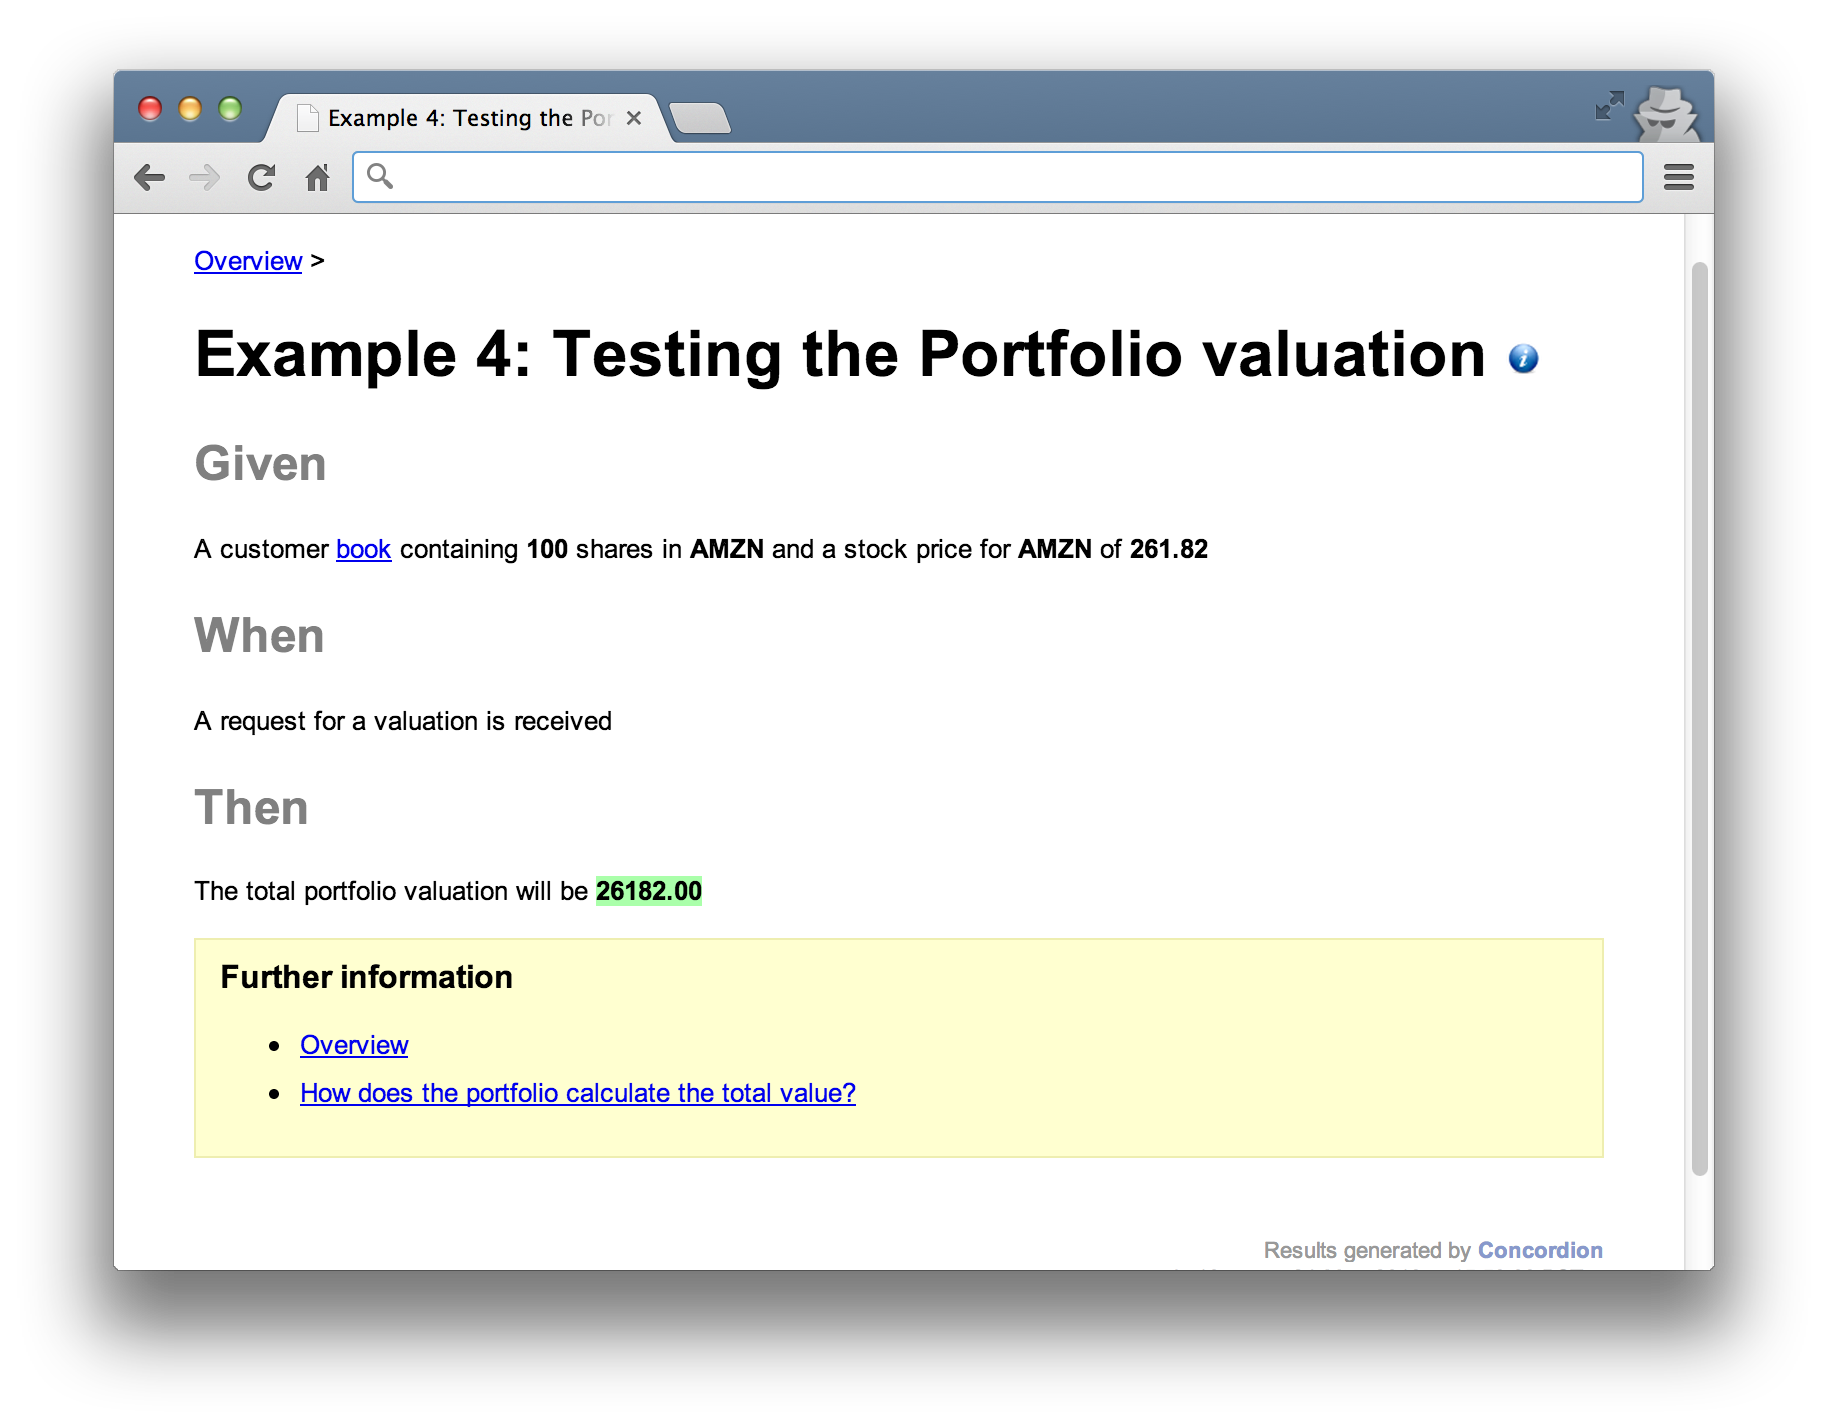
As before, the HTML interacts with the fixture to setup the stubs (lines 7 and 10), execute the function under test and verify the results (line 23). The result would look something like this.
Example 5: Testing the Market Data API
The previous example was concerned with calculation logic once we have stock quantities and prices but we still need to test how stock prices are actually retrieved. Stock prices change frequently and are typically supplied by large institutions like Bloomberg for a fee. In production, we’re using a free data feed supplied by Yahoo!
We have a Market Data API to get the prices, so we focus on testing this here. For example, we might verify what happens when stock prices are happily retrieved or what happens when stock prices are unavailable.
The example specification below outlines what we expect to happen, in terms of interaction with the Market Data component, when a valuation is requested.
With a corresponding fixture Setting expectations against the market data API.
Listing 5.1: Test fixture for the market data API
 1 @RunWith(ConcordionRunner.class)
 2 @ExpectedToPass
 3 public class MarketDataTest {
 4     private final Mockery context = new JUnit4Mockery();
 5
 6     private final MarketData marketData = context.mock(MarketData.class);
 7     private final StubBook book = new StubBook();
 8     private final Portfolio portfolio = new Portfolio(book, marketData);
 9
10     public MultiValueResult verifySymbolCheckedWas(
11             final String firstSymbol, final String secondSymbol) {
12         book.add(fromSymbol(firstSymbol)).add(fromSymbol(secondSymbol));
13         context.checking(new Expectations() {{
14             oneOf(marketData).getPrice(fromSymbol(firstSymbol));
15             oneOf(marketData).getPrice(fromSymbol(secondSymbol));
16         }});
17         portfolio.value();
18         context.assertIsSatisfied();
19         return multiValueResult()
20             .with("firstSymbol", firstSymbol)
21             .with("secondSymbol", secondSymbol);
22     }
23 }
Notice the verification is in the form of expectations. We’re saying here that we expect a certain interaction between the portfolio and the marketData components but not verifying how any return values might be used by the portfolio.
We’re saying that when when prices are queried for Amazon and Google, the market data component is accessed using the getPrice method of the API and that’s all.
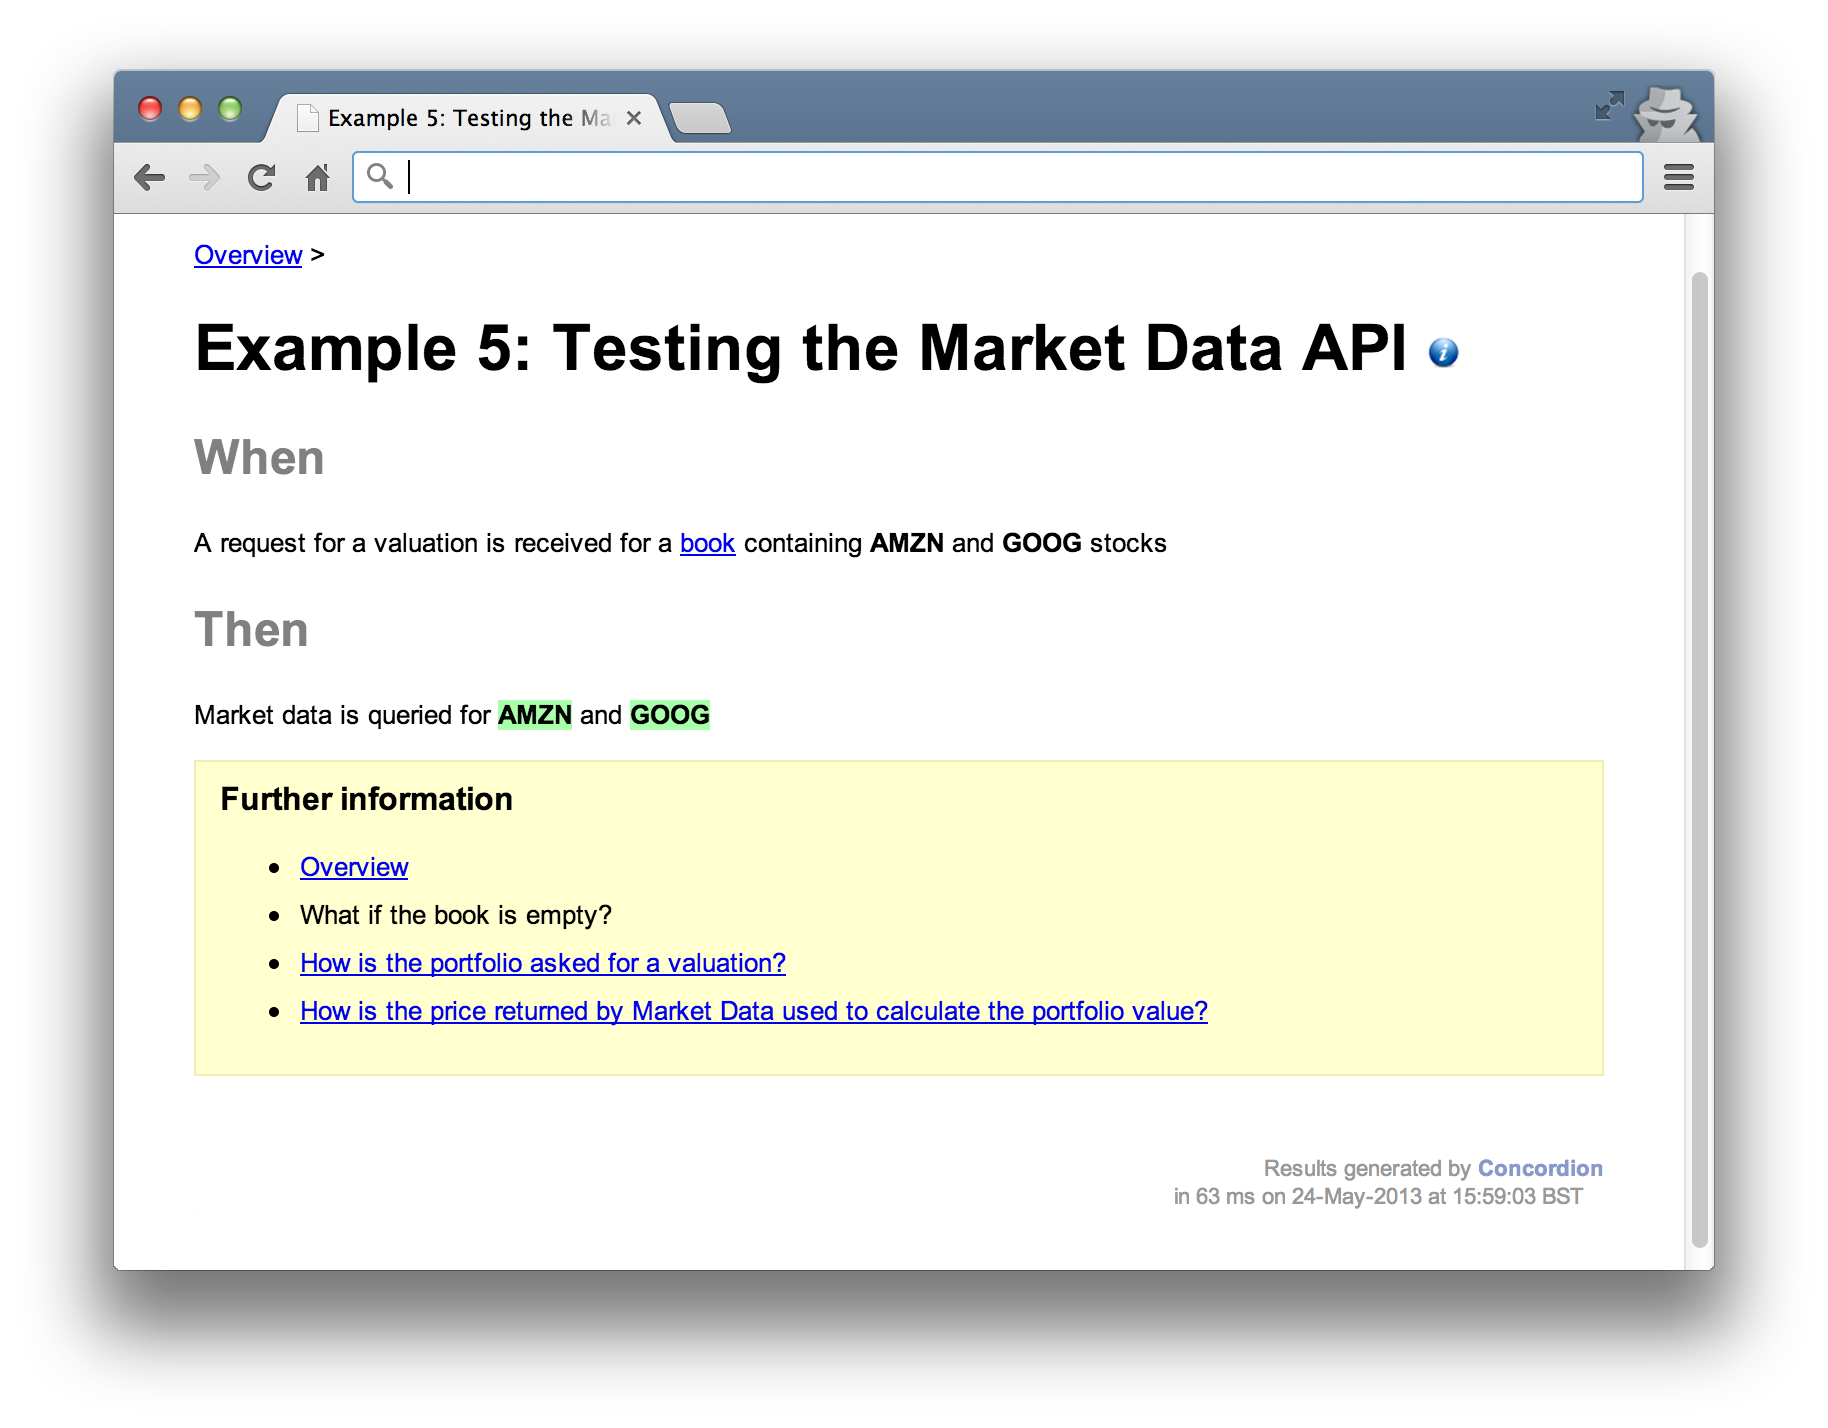
The result would look something like this. Again, notice that no results are explicitly stated, only that the market data “is queried for AMZN and GOOG”.
Example 6: Testing real Yahoo! Market Data
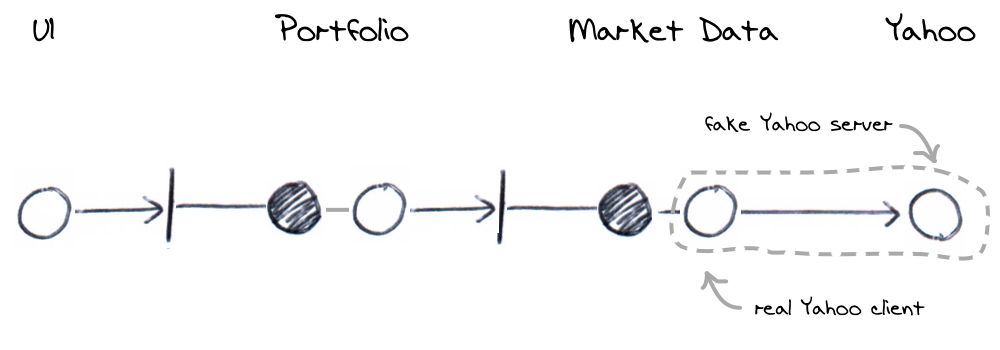
We’d also need tests to ensure that the real Yahoo market data component operates as expected. We’ve already built our market data adapter that we fake out in the previous tests (Example 5.) but now we need to make sure that how we expect fake market data components to behave in tests is actually how they behave with real Yahoo.
We’ve shown that when the market data API is queried for say, Amazon or Google, that a specific API method is called, now we need to show what happens when it’s called.
For example, testing that a specific request should be made to Yahoo when a price is requested might look like this.
With a fixture as below.
Listing 6.1: Test Yahoo’s query endpoint
 1 @RunWith(ConcordionRunner.class)
 2 @ExpectedToPass
 3 public class YahooTest {
 4
 5     private Date date;
 6     private final FakeYahoo yahoo = new FakeYahoo();
 7     private final String host = "http://localhost:" + FakeYahoo.port;
 8     private final Yahoo client = new YqlWebService(anApacheClient(), host);
 9     private final Clock clock = new FrozenClock(date) {
10         @Override
11         public Date now() {
12             return date;
13         }
14     };
15     private MarketData marketData = new YahooMarketData(client, clock);
16
17     @Before
18     public void start() {
19         yahoo.start();
20     }
21
22     public String getPriceFromYahoo(String symbol, String date) {
23         String response = "{\"quote\":{\"Close\":\"200.10\"}}";
24         this.date = new Date(date);
25         yahoo.stub(
26                 urlStartingWith("/v1/public/yql"),
27                 aResponse().withBody(response));
28         marketData.getPrice(fromSymbol(symbol));
29         List<LoggedRequest> requests
30             = yahoo.requestsForHttpGet(urlStartingWith("/v1/public/yql"));
31         return new WiremockLoggedRequest(requests).toString();
32     }
33
34     @After
35     public void stop() {
36         yahoo.stop();
37     }
38 }
There’s a lot of setup in this test. The main thing to note is that a fake Yahoo server is setup (line 6) and the internal component that acts as the client (at line 8) is configured to point to it. The client will make a real HTTP request to the fake server. The fake server allows us to interrogate the messages it received for the purposes of the test (line 29).
The assertion against a specific HTTP message is defined in the HTML specification. The result looks like this.
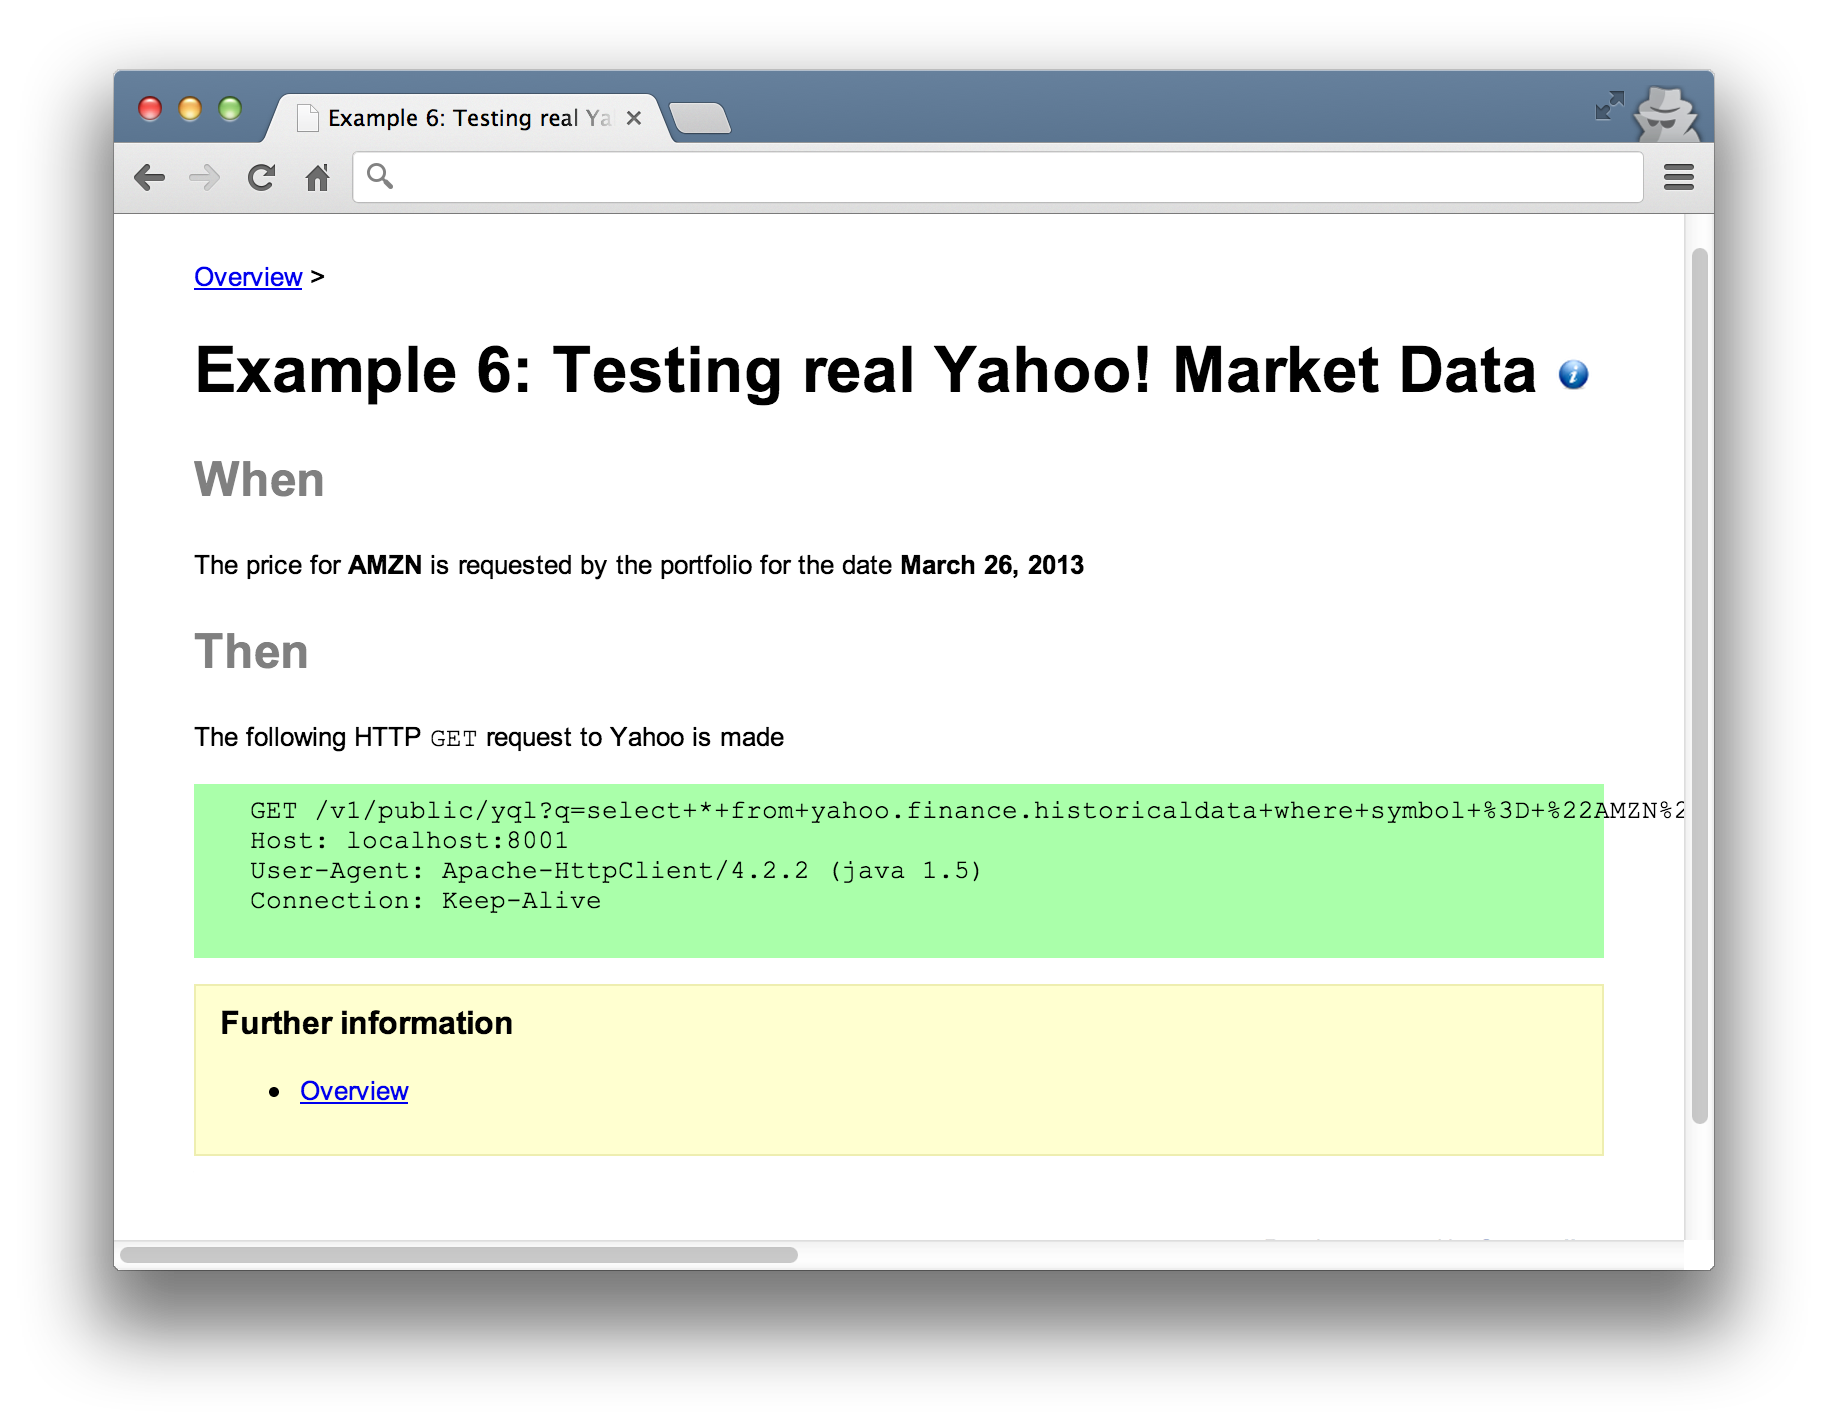
In principle, tests like this should be runnable against a real instance of Yahoo or our locally controlled fake Yahoo.
Testing end-to-end (system tests)
The previous examples focus on specific scenarios, interacting with a limited number of components but they overlap to simulate the broader path through the system. They run within a reduced context (for example, not within a fully started application stack) and avoid duplication. This does however mean that so far, we’ve never run all the components together at the same time.
To address this, we still need to write some additional end-to-end tests. From the introduction of the decoupled architecture above, we still need to address the following points. I’m describing these as end-to-end as it reflects the notion of multiple components working together. It doesn’t mean that we’ll use real external systems though, the tests will be entirely within our own system boundary.
The few end-to-end tests required would startup the full stack and fake out external systems. They’d probably use the UI for input and are really there as litmus tests to ensure the production configuration of components is correct. We’d only run one or two test scenarios as we will have already tested the edge-cases and are just checking that the application is assembled correctly. These tests would be more about infrastructure that functionality.
People often get hung up on this kind of test. They worry that without exercising many scenarios through a fully assembled application, the system may not work in production. You have to have confidence in the previous tests and that they demonstrate the system’s behaviour. You really shouldn’t need many of these heavier, end-to-end tests.
Summary of test coverage
When all the examples are run together they give a sensible amount of coverage without the duplication. The tests are meant to be demonstrative rather than exhaustive; they don’t represent the full suite of tests you’d write in a production system but give you an idea of what component interactions should be tested. You may or may not choose to include addition business scenarios or interactions.
The diagram below visualises the overall coverage offered by the examples.
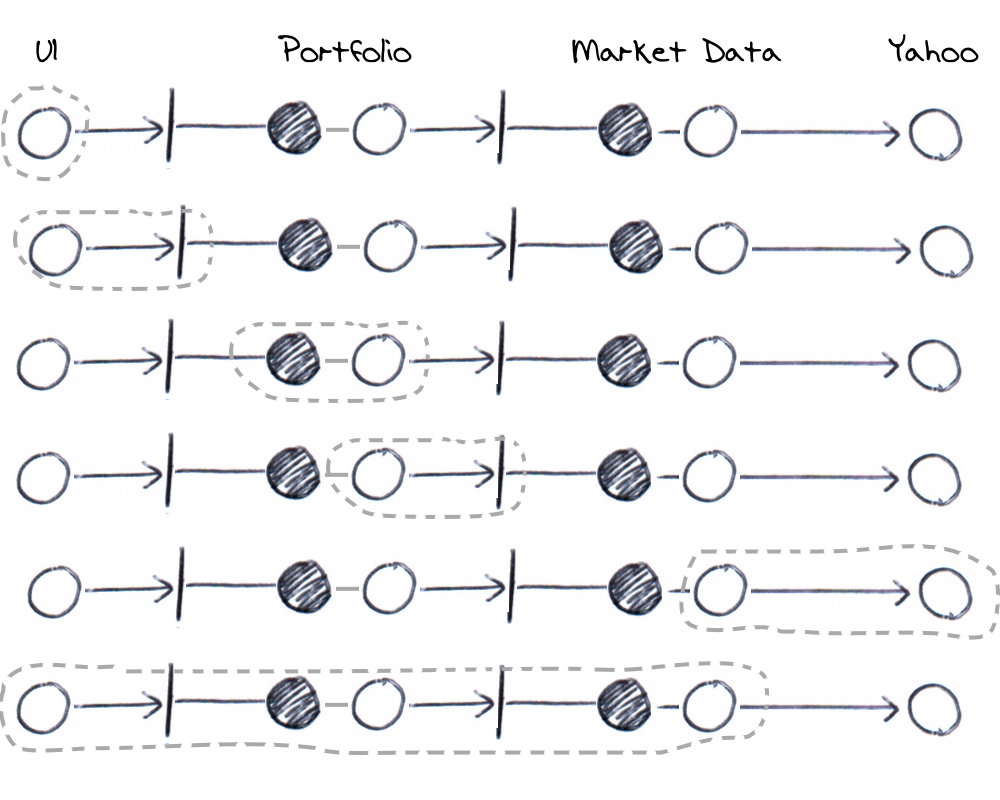
The examples combine for overall coverage
Benefits using ports and adapters
Getting the design of your tests right using ports and adapters means you wont be duplicating effort, you’ll have created a efficient test suite that runs quickly. In a similar way that TDD gives you a flexible design, a ports and adapters design will encourage loosely coupled components with very flexible composability. You’ll have built a very adaptable architecture.
Applying ports and adapters to your test code; creating a composable architecture and abstracting your test language, means that you’ll have created tests narrowly focused on business requirements. A change to a small piece of production code shouldn’t break dozens of acceptance tests. Applying these ideas should get you someway there.
A lot of these ideas are really just about abstraction. If you apply any abstraction correctly, you should see decoupling. Ports and adapters allows you to decouple your architecture, empowering you to test small groups of components in isolation. This frees you up to use abstract language in your specifications, insulating them against implementation changes.
Disadvantages using ports and adapters
Decomposing a system into discrete but overlapping areas is actually quite difficult. It often feels like a protracted process and once done, it’s difficult to keep all the overlapping parts in your head. When you come to write a new set of tests, you’ve got to first understand previous tests and how they interconnect. Reasoning about where new ones might fit in is hard and its difficult to get feedback if you’ve got it wrong. Build times may go up but you probably won’t notice that you’re duplicating effort.
It can also be hard to win over business stakeholders, testers and developers. It’s much more natural for people to accept the system is working a certain way if they see if running in it’s entirety. Despite logical arguments that a decoupled testing approach can yield equivalent coverage, it’s just human nature to accept the empirical over the intellectual argument.
Introducing these ideas late in a project lifecycle is less likely to succeed. If you’ve already got a slow and duplication heavy build, it’s probably not the right technique for a quick fix. It takes sustained effort to get right and is easier to introduce right from the start of a new project. If you’re willing to retrofit to an existing system, be prepared to re-architect large parts of it.