Hands-on
In the following sections we will add models to our application, define the interactions between them, and create an interface to add friends, articles and allow us to keep track of the things we loaned them.
Adding a friend resource
The main model of our application will be called Friend. It represents the people who will borrow articles from us.
Let’s add it with the resource generator.
\
email:string twitter:string
installing model
create app/models/friend.js
installing model-test
create tests/unit/models/friend-test.js
installing route
create app/routes/friends.js
create app/templates/friends.hbs
updating router
add route friends
installing route-test
create tests/unit/routes/friends-test.js
If we open app/models/friend.js or app/routes/friends.js, we will see that they have a similar structure.
import  Foo from 'foo';

export default Foo.extend({
});
What is that? ES6 Modules! As mentioned previously, ember CLI
expects us to write our code using ES6 Modules. import Foo from
'foo' consumes the default export from the package foo and assigns
it to the variable Foo. We use export default Foo.extend... to
define what our module will expose. In this case we will export a
single value, which will be a subclass of Foo.
Now let’s look at the model and route.
// We import the default value from ember-data/model into the variable Model.
//
import Model from 'ember-data/model';
import attr from 'ember-data/attr';

// Define the default export for this model, which will be a subclass
// of ember data model.
//
// After this class has been defined, we can import this subclass doing:
// import Friend from 'borrowers/models/friend'
//
// We can also use relative imports. So if we were in another model, we
// could have written
// import Friend from './friend';

export default Model.extend({

  // attr is the standard way to define attributes with ember data
  firstName: attr('string'),


  // Defines an attribute called lastName of type **string**
  lastName: attr('string'),


  // ember data expects the attribute **email** on the friend's payload
  email: attr('string'),

  twitter: attr('string')
});
// Assigns the default export from **ember** into the variable Ember.
//
// The default export for the ember package is a namespace that
// contains all the classes and functions for Ember that are specified in
// http://emberjs.com/api/

import Ember from 'ember';

// Defines the default export for this module. For now we will not
// add anything extra, but if we want to use a Route **hook** or
// **actions** this would be the place.

export default Ember.Route.extend({
});
In a future version of ember we might be able to be more explicit about the things we want to use from every module. Instead of writing import Ember from ‘ember’, we could have import { Route } from ‘ember/route’ or import { Model } from ‘ember-data/model’. This is currently possible in ES6 using Named Imports and Exports.
What about tests? If we open the test files, we’ll see that they are also written in ES6. We’ll talk about that in a later chapter. Now let’s connect to a backend and display some data.
Connecting with a Backend
We need to consume and store our data from somewhere. In this case, we created a public API (which follows JSON API) http://api.ember-101.com with Ruby on Rails. The following are the API end-points.
| Verb | URI Pattern | |
|---|---|---|
| GET | /friends/:friend_id/relationships/loans(.:format) | |
| POST | /friends/:friend_id/relationships/loans(.:format) | |
| PUT | PATCH | /friends/:friend_id/relationships/loans(.:format) |
| DELETE | /friends/:friend_id/relationships/loans(.:format) | |
| GET | /friends/:friend_id/loans(.:format) | |
| GET | /friends(.:format) | |
| POST | /friends(.:format) | |
| GET | /friends/:id(.:format) | |
| PATCH | /friends/:id(.:format) | |
| PUT | /friends/:id(.:format) | |
| DELETE | /friends/:id(.:format) | |
| GET | /articles/:article_id/relationships/loans(.:format) | |
| POST | /articles/:article_id/relationships/loans(.:format) | |
| PUT | PATCH | /articles/:article_id/relationships/loans(.:format) |
| DELETE | /articles/:article_id/relationships/loans(.:format) | |
| GET | /articles/:article_id/loans(.:format) | |
| GET | /articles(.:format) | |
| POST | /articles(.:format) | |
| GET | /articles/:id(.:format) | |
| PATCH | /articles/:id(.:format) | |
| PUT | /articles/:id(.:format) | |
| DELETE | /articles/:id(.:format) | |
| GET | /loans/:lend_id/relationships/article(.:format) | |
| PUT | PATCH | /loans/:lend_id/relationships/article(.:format) |
| DELETE | /loans/:lend_id/relationships/article(.:format) | |
| GET | /loans/:lend_id/article(.:format) | |
| GET | /loans/:lend_id/relationships/friend(.:format) | |
| PUT | PATCH | /loans/:lend_id/relationships/friend(.:format) |
| DELETE | /loans/:lend_id/relationships/friend(.:format) | |
| GET | /loans/:lend_id/friend(.:format) | |
| GET | /loans(.:format) | |
| POST | /loans(.:format) | |
| GET | /loans/:id(.:format) | |
| PATCH | /loans/:id(.:format) | |
| PUT | /loans/:id(.:format) | |
| DELETE | /loans/:id(.:format) |
If we do a GET request to http://api.ember-101.com/friends, we will get a list of all our friends.
The previous payload follows JSON API and returns a list of resource
objects which will be used to populate ember data store.
A word on Adapters
Ember data has two mechanisms to translate request to the server and transform incoming or outgoing data, such mechanisms are called an adapter and serializer. By default, ember data uses the DS.JSONAPIAdapter10, which expects your API to follow http://jsonapi.org/, a specification for building APIs in JSON. In our example, we’ll be using this adapter since our API is written using JSON API.
Ember data doesn’t force us to use this adapter, we can work with others or create our own. One of those adapters is the active model adapter, built for people using or following API similars to the ones created with active model serializer, which uses a different convention for keys and naming. Everything is in snake_case and objects are linked in different ways.
There are a bunch of different adapters for different projects and frameworks.
Some of them are:
We can find a longer list of adapters if we search GitHub for ember-data adapters.
Playing with the resolver
Before going deep into our app, let’s talk about something which will be very useful while we build Ember applications and that thing is the resolver.
The resolver is the system in charge of returning whatever Ember requires at different stages, so if we need to load a template, route or service it all goes through the resolver. Normally people don’t need to interact with it directly when building applications, but knowing that it is there and being able to idenfity whatever it is trying to do might probably come handy while debugging our applications.
To see it in action, let’s play with the console and examine how ember tries to resolve things.
First we need to go to config/environment.js and uncomment ENV.APP.LOG_RESOLVER. It should look like:
  if (environment === 'development') {
    ENV.APP.LOG_RESOLVER = true;
    ENV.APP.LOG_ACTIVE_GENERATION = true;
    // ENV.APP.LOG_TRANSITIONS = true;
    // ENV.APP.LOG_TRANSITIONS_INTERNAL = true;
    ENV.APP.LOG_VIEW_LOOKUPS = true;
  }
That line will log whatever ember tries to “find” to the browser’s console. If we go to http://localhost:4200 and open the console, we’ll see something like the output below:
That’s the ember resolver trying to find things. We don’t need to worry about understanding all of it right now.
Coming back to the adapter, if we open the ember-inspector and grab the instance of the application route
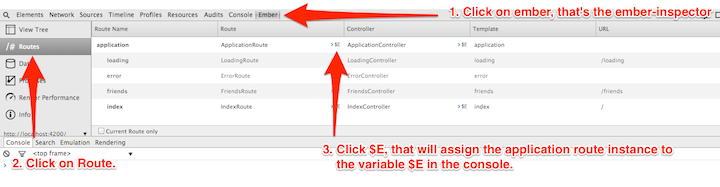
With the application route instance at hand, let’s have some fun.
Let’s examine what happens if we try to find all our friends:
$E.store.findAll('friend')[ ] model:friend .............borrowers/friend/model
[ ] model:friend .............borrowers/models/friend
[✓] model:friend .............borrowers/models/friend
[✓] model:friend .............borrowers/models/friend
[✓] model:friend .............borrowers/models/friend
[ ] adapter:friend .............borrowers/friend/adapter
[ ] adapter:friend .............undefined
[ ] adapter:friend .............borrowers/adapters/friend
[ ] adapter:friend .............undefined
[ ] adapter:application ........borrowers/application/adapter
[ ] adapter:application ........undefined
[ ] adapter:application ........borrowers/adapters/application
[ ] adapter:application ........undefined
First, the resolver tries to find an adapter at the model level:
We can use this if we want to change the default behavior of ember data. For example, changing the way an URL is generated for a resource.
Second, if no adapter is specified for the model, then the resolver checks if we specified an application adapter. As we can see, it returns undefined, which means we didn’t specify one:
Third, if no model or application adapter is found, then ember data falls back to the default adapter, the JSONAPIAdapter. We can check the implementation for this directly in the adapterFor function in ember data.
Once ember data has resolved the adapter it tries to follow the logic to fetch all objects for a given resource. In ours we’ll find an error like the following.
The requests failed because we aren’t connected to any backend.
We need to stop the ember server and start again, but this time let’s specify that we want all our API requests to be proxy to http://api.ember-101.com. To do so we use the option –proxy:
Let’s go back to the console and load all our friends, but this time logging something with the response:
$E.store.findAll('friend').then(function(friends) {
  friends.forEach(function(friend) {
    console.log('Hi from ' + friend.get('firstName'));
  });
});

XHR finished loading: GET "http://localhost:4200/friends".
Hi from Cyril
If we see ‘Hi from’ followed by a name, we have successfully connected to the backend. The output might be different every time we run it since the API’s data is changing.
Listing our friends
Now that we have successfully made a request to our API, let’s display our friends.
By convention, the entering point for rendering a list of any kind of resource in web applications is called the Index. This normally matches to the Root URL of our resource. With our friends example, we do so on the backend through the following end-point http://api.ember-101.com/friends. If we visit that URL, we will see a JSON list with all our friends.
In our ember application, we need to specify somehow that every time we go to URL /friends, then all our users should be loaded and displayed in the browser. To do this we need to specify a Route.
Routes are one of the main parts of ember. They are in charge of everything related to setting up state, bootstrapping objects, specifying which template to render, etc. In our case, we need a Route that will load all our friends from the API and then make them available to be rendered in the browser.
Creating our first Route.
First, if we go to app/router.js, we will notice that the resource generator added this.route(‘friends’);.
// ...

Router.map(function() {
  this.route('friends');
});

// ...
We specify the URLs we want in our application inside the function passed to Router.map. There, we can declare new routes calling this.route.
Let’s check the Routes that we have currently defined. To do so, open the ember-inspector and click on Routes.

By default, ember creates 4 routes:
- ApplicationRoute
- IndexRoute
- LoadingRoute
- ErrorRoute
We also see that the friends route was added with this.route(‘friends’). if we pass a function as second or third argument, ember will create an Index, Loading, and Error Route.
We can modify our route passing an empty function
this.route('friends', function() {
});
And then if we check the inspector, the children routes are automatically generated for the friends route.
Since we just added a friends index route, visiting http://localhost:4200/friends should be enough to list all our friends. But if we actually go there, the only thing we will see is a message with Welcome to Ember.
Let’s go to app/templates/friends.hbs and change it to look like the following:
<h1>Friends Route</h1>
{{outlet}}
For people familiar with Ruby on Rails, {{outlet}} is very similar to the word yield in templates. Basically it allows us to put content into it. If we check the application templates (app/templates/application.hbs), we’ll find the following:
<h2 id='title'>Welcome to Ember</h2>

{{outlet}}
When ember starts, it will render the application template as the main template. Inside {{outlet}}, it will render the template associated with the Route we are visiting. Then, inside those templates, we can have more {{outlet}} to keep rendering content.
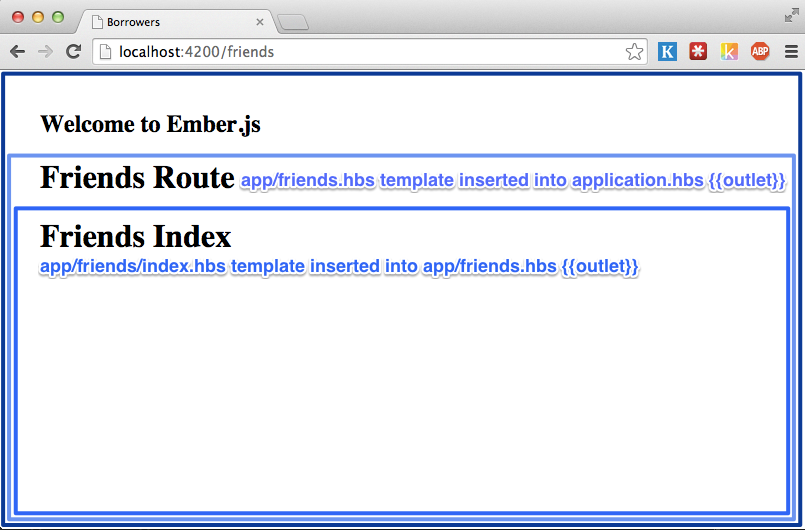
In our friends scenario, app/templates/friends.hbs will get rendered into the application’s template {{outlet}}, and then it will render the friends index template into app/templates/friends.hbs {{outlet}}.
To connect everything, let’s create an index template and list all our friends. Let’s run the route generator ember g route friends/index and put the following content inside app/templates/friends/index.hbs:
<h1>Friends Index</h1>
<ul>
{{#each model as |friend|}} <li>{{friend.firstName}} {{friend.lastName}}</li>
{{/each}}</ul>
Next, we need to specify in the friends index route the data we want to load in this route. The part in charge of loading the data related to a route is called the model hook. Let’s add one to app/routes/friends/index.js as follows:
import Ember from 'ember';

export default Ember.Route.extend({
  //
  // Here we are using ES6 syntax for functions!
  // We can use this out of the box with ember-cli
  // thanks to the addon ember-cli-babel
  //
  // To learn more about ES6, check http://s.abuiles.com/bwWo
  //
  model() {
    return this.store.findAll('friend');
  }
});
If we visit http://localhost:4200/friends we will see something like the following along with a list of our friends:
We played previously with store.findAll to load all our friends from the API and that’s what we are doing in the model hook. ember waits for this call to be completed. When the data is loaded, it automatically creates a friends index controller (or we can define a controller explicitly) and sets the property model with the content returned from the API.
We can also use store.findRecord or store.queryRecord if we want
to load a record by a given id or appending query parameters to the
request URL, such as this.store.findRecord(‘friend’, 1) or
this.store.query(‘friend’, {active: true}), which creates
the following requests to the API /api/friends/1 or
/api/friends?active=true.
When we do {{#each model as |friend|}}, ember takes every element of the collection and set it as friend, the collection which is what the model hook returned is referenced as model.
If we want to display the total number of friends and the id for every friend, then we just need to reference model.length in the template and inside the each use friend.id:
<h1>Friends Index</h1>
{{! The context here is the controller}}<h2>Total friends: {{model.length}}</h2>
<ul>
{{#each model as |friend|}} <li>{{friend.id}} - {{friend.firstName}} {{friend.lastName}}</li>
{{/each}}</ul>
Again, because our model is a collection and it has the property length, we can just reference it in the template as model.length.
Adding a new friend
We are now able to list our friends, but we don’t have a way to add new friends. The next step is to build support for adding a new friend.
To do this we’ll need a friends new route under the route friends, which will handle the URL http://localhost:4200/friends/new.
To add the new route, let’s run the route generator with the parameters friends/new:
If we go to app/router.js we’ll see that the new route was nested under the route friends:
this.route('friends', function(){
  this.route('new');
});
Let’s add the following content on the new template:
<h1>Add a New Friend</h1>
And then navigate to http://localhost:4200/friends/new:
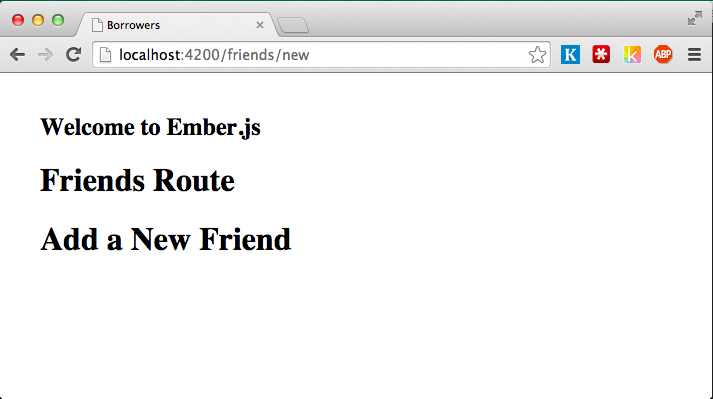
Notice how the friends new route got rendered in the {{outlet}} inside app/templates/friends.hbs.
We got our route and template wired up, but we can’t add friends yet. We need to set a new friend instance as the model of the friends new route, and then create a form that will bind to the friend’s attributes, and save the new friend in our backend.
Following the logic we used in the friends index route, we need to return the model that will be the context of the friends new route.
We need to edit app/routes/friends/new.js and add the following model hook:
import Ember from 'ember';

export default Ember.Route.extend({
  model() {
    return this.store.createRecord('friend');
  }
});
We have been using the this.store without knowing what it is. The Store is an ember data class in charge of managing everything related to our model’s data. It knows about all the records we currently have loaded in our application and it has some functions that will help us to find, create, update, and delete records. During the whole application life cycle there is a unique instance of the Store, and it is injected as a property into every Route, Controller, Serializer, and adapter under the key store. That’s why we have been calling .store in our Routes and Controllers.
The method we are using on the model hook store.createRecord
creates a new record in our application store, but it doesn’t save
it to the backend. What we will do with this record is set it as the
model of our friends new route. Then, once we have filled the
first and last names, we can save it to our backend calling the method
#save() in the model.
Since we will be using the same form for adding a new friend and
editing, let’s create an
Ember component
to contain the form, we can generate the component with the generator,
ember g component friends/edit-form and add the following content:
<form {{action "save" on="submit"}}>
  <p>
    <label>First Name:
      {{input value=model.firstName}}
    </label>
  </p>
  <p>
    <label>Last Name:
      {{input value=model.lastName }}
    </label>
  </p>
  <p>
    <label>Email:
      {{input value=model.email}}
    </label>
  </p>
  <p>
    <label>Twitter:
      {{input value=model.twitter}}
    </label>
  </p>
  <input type="submit" value="Save"/>
  <button {{action "cancel"}}>Cancel</button>
</form>
Then we should modify the template app/templates/friends/new.hbs to include the component:
<h1>Adding New Friend</h1>
{{friends/edit-form}}
Now if we visit http://localhost:4200/friends/new, the form should be displayed.
There are some new concepts in what we just did. Let’s talk about them.
Components
In app/templates/friends/new.hbs we used
{{friends/edit-form model=model}}This is how components are rendered, we’ll have a whole section to talk about components, but for now let’s say that they are isolated “templates”, they don’t know anything about the context surrounding them, so we need to pass down all the necessary data for it to display correctly. In our example, the component required a property called “model” to work, so we are assigning our “current context” model to the component’s model.
The friend form is a perfect candidate for a component since we will be using the same form to create and edit a new friend. The only difference will be how “save” and “cancel” will behave under both scenarios.
{{action}}
The {{action}} helper is one of the most useful features in ember. It allows us to bind an action in the template to an action in the component, controller or route. By default it is bound to the click action, but it can be bound to other actions.
The following button will call the action cancel when we click it.
<button {{action "cancel"}}>Cancel</button>
And <form {{action “save” on=”submit”}}> will call the action save when the onsubmit event is fired; that is, when we click Save.
If we go to the browser http://localhost:4200/friends/new, open the console, and click Save and Cancel, we’ll see two errors. The first says Nothing handled the action ‘save’ and the second Nothing handled the action ‘cancel’.
Ember expects us to define our action handlers inside the property actions in the component, controller or route. When the action is called, ember looks for the definition in the current context, so if we are inside the component, it will look at the component.
Let’s go to the component and add the actions save and cancel.
import Ember from 'ember';

export default Ember.Component.extend({
  actions: {
    save() {
      console.log('+- save action in edit-form component');
    },
    cancel() {
      console.log('+- cancel action in edit-form component');
    }
  }
});
If we go to http://localhost:4200/friends/new and click save, we’ll see in the browser’s console “save action in edit-form component”.
This action is running on the context of the component so if we do
this.get('model') we’ll get the record created on the model’s hook
because we passed it down as an argument when rendering the component.
A component not only receives objects but we can also pass it actions, by default the actions need to be specified in the context where we are calling it, and to do so we use the action helper too.
Let’s edit our friends/new template to add the save
and cancel action, it should look like the following now:
{{friends/edit-form
  model=model
  save=(action "save")
  cancel=(action "cancel")
}}
After adding the actions, we’ll see the following error in the console:
The issue here is that we didn’t specify an action in the
friends/new controller. As mentioned previously controllers will be
replaced eventually but for now if we want to connect a component with
its surrounding context then we need to use controllers too.
We can create a controller using the controller generator like ember
g controller friends/new and then let’s add the save and cancel
actions:
import Ember from 'ember';

export default Ember.Controller.extend({
  actions: {
    save(model) {
      console.log('+--- save action called in friends new controller');
    },
    cancel() {
      console.log('+--- cancel action called in friends new controller');
    }
  }
});
Now the route renders again but we won’t see the actions in the controller being called yet, the reason is that we need to call the passed action from the component’s action. To do so, let’s change our component as follows:
import Ember from 'ember';

export default Ember.Component.extend({
  actions: {
    save() {
      console.log('+- save action in edit-form component');

      //
      // We are calling the save action passed down when rendering the
      // component: action=(action "save")
      //
      this.save(this.get('model'));
    },
    cancel() {
      console.log('+- cancel action in edit-form component');

      //
      // We are calling the cancel action passed down when rendering the
      // component: action=(action "cancel")
      //
      this.cancel();
    }
  }
});
How is this related to creating a new friend in our API? We’ll discover that after we cover the next helper. On the save action in the component, we’ll validate our model, and if it is valid call the action in the controller which will take care of calling .save(), which saves it to the API, and finally transition to a route where we can add new articles.
The input helper
Last we have the input helper. It allows us to automatically bind an html input field to a property in our model. With the following {{input value=firstName}}, changing the value changes the property firstName.
Let’s modify our component’s template to include the following before the form:
<div>
  <h2>Friend details</h2>
  <p>{{model.firstName}}</p>
  <p>{{model.lastName}}</p>
</div>
And then go to the browser, we’ll see that every time we change the first or last name field, this will change the description in Friend details.
We can also use the input helper to render other types of input such as a checkbox. To do so, simply specify type=’checkbox’.
{{input type="checkbox" name=trusted}}If we click the checkbox, the attribute trusted will be true. Otherwise, it will be false.
Save it!
We learned about actions, {{component}}, and {{input}}. Now let’s save our friend to the backend.
To do so, we are going to validate the presence of all the required
fields. If they are present, call the action save which will call .save() on the model.
Otherwise, we’ll see an error message on the form.
First we’ll modify app/templates/components/friends/edit-form.hbs to include a field {{errorMessage}}.
<form {{action "save" on="submit"}}>
  <h2>{{errorMessage}}</h2>
We will see the error every time we try to save a record without first filling in all the fields.
Then we’ll implement a naive validation in app/components/friends/edit-form.js by adding a computed property called isValid:
export default Ember.Component.extend({
  isValid: Ember.computed(
    'model.email',
    'model.firstName',
    'model.lastName',
    'model.twitter',
    {
      get() {
        return !Ember.isEmpty(this.get('model.email')) &&
          !Ember.isEmpty(this.get('model.firstName')) &&
          !Ember.isEmpty(this.get('model.lastName')) &&
          !Ember.isEmpty(this.get('model.twitter'));
      }
    }
  ),
  actions: {
   ....
  }
});
Ember.computed? That’s new! ember allows us to create functions that will be treated as properties. These are called computed properties. In our example, isValid is a computed property that depends on the properties model.email, model.firstName, model.lastName, and model.twitter. When any of those properties changes, the function that we passed-in is called and the value of our property is updated with the returned value.
In our example, we are manually checking that all the fields are not empty by using the isEmpty helper.
With our naive validation in place, we can now modify our save and cancel actions:
actions: {
  save() {
    console.log('+- save action in edit-form component');
    if (this.get('isValid')) {
      this.get('model').save().then((friend) => {
        //
        // This function gets called if the HTTP request succeeds
        //
        //
        // We are calling the save action passed down when rendering
        // the component: action=(action "save")
        //
        return this.save(friend);
      }, (err) => {
        //
        // This gets called if the HTTP request fails.
        //
        this.set('errorMessage', 'there was something wrong saving the model');
      });
    } else {
      this.set('errorMessage', 'You have to fill all the fields');
    }
  },
  cancel() {
    console.log('+- cancel action in edit-form component');

    //
    // We are calling the cancel action passed down when rendering the
    // component: action=(action "cancel")
    //
    this.cancel();
  }
}
When the action save is called, we are first checking if isValid is true, then we get the model and call .save(). The return of save() is a promise, which allows us to write asynchronous code in a sync manner. The function .then receives a function that will be called when the model has been saved successfully to the server. When this happens, it returns an instance of our friend and then we can call the save action specified in the controller, in this function we’ll put the logic to transiton to the route friends show where we can see our friend’s profile.
If we click save and have filled all the required fields, we’ll see
that nothing happens after saving a new friend, but the action save
was called in the controller. Let’s change the controller as follows
to include the transition logic:
import Ember from 'ember';

export default Ember.Controller.extend({
  actions: {
    save(model) {
      console.log('+--- save action called in friends new controller');

      this.transitionToRoute('friends.show', model);
    },
    cancel() {
      console.log('+--- cancel action called in friends new controller');
    }
  }
});
If we save a friend once more, we’ll get an error: The route
friends/show was not found. This is because we haven’t defined a
friends show route. We’ll do that in the next chapter.
Whenever we want to access a property of an ember object, we need to use this.get(‘propertyName’). It’s almost the same as doing object.propertyName, but it adds extra features like handling computed properties. If we want to change the property of an object, we use this.set(‘propertyName’, ‘newvalue’). Again, it’s almost equivalent to doing this.propertyName = ‘newValue’, but it adds support so the observers and computed properties that depend on the property are updated accordingly.
Viewing a friend profile
Let’s start by creating a friends show route
=:friend_id
installing route
create app/routes/friends/show.js
create app/templates/friends/show.hbs
updating router
add route friends/show
installing route-test
create tests/unit/routes/friends/show-test.js
If we open app/router.js, we’ll see the route show nested under friends.
  this.route('friends', function() {
    this.route('new');

    this.route('show', {
      path: ':friend_id'
    });
  });
We have talked previously about path but not about dynamic segments. path: ‘:friend_id’ is specifying a dynamic segment. This means that our route will start with /friends/ followed by an id that will be something like /friends/12 or /friends/ned-stark. Whatever we pass to the URL, it will be available on the model hook under params, so we can reference it like params.friend_id. This will help us to load a specific friend by visiting the URL /friends/:friend_id. A route can have any number of dynamic segments (e.g., path: ‘/friends/:group_id/:friend_id’.)
Now that we have a friends show route, let’s start first by editing the template in app/templates/friends/show.hbs:
<ul>
  <li>First Name: {{model.firstName}}</li>
  <li>Last Name: {{model.lastName}}</li>
  <li>Email: {{model.email}}</li>
  <li>twitter: {{model.twitter}}</li>
</ul>
According to what we have covered, the next logical step would be to add a model hook on the friends show route by calling this.store.findRecord(‘friend’, params.friend_id). However, if we go to http://localhost:4200/friends/new and add a new friend, we’ll be redirected to the friends show route and our friend will be loaded without requiring us to write a model hook.
Why? As we have said previously, ember is based on convention over configuration. The pattern of having dynamic segments like model_name_id is so common that if the dynamic segment ends with _id, then the model hook is generated automatically and it calls this.store(‘model_name’, params.model_name_id).
Visiting a friend profile
We can navigate to http://localhost:4200/friends to see all of our friends, but we don’t have a way to navigate to their profiles!
Fear not, ember has a helper for that as well, and it is called {{link-to}}.
Let’s rewrite the content on app/templates/friends/index.hbs to use the helper:
{{#each model as |friend|}}
  <li>
    {{#link-to 'friends.show' friend}}
      {{friend.firstName}} {{friend.lastName}}
    {{/link-to}}
  </li>
{{/each}}
When we pass our intended route and an instance of a friend to link-to, it maps the property id to the parameter friend_id(we could also pass friend.id). Then, inside the block, we render the content of our link tag, which would be the first and last name of our friend.
One important item to mention is that if we pass an
instance of a friend to link-to, then the model hook in the
friends show route won’t be called. If we want the hook to be
called, instead of doing {{#link-to 'friends.show' friend}}, we’ll
have to do {{#link-to 'friends.show' friend.id}}.
The resulting HTML will look like the following
<a id="ember592" href="/friends/1" class="ember-view">
  Cyril Neveu
</a>
If our friend model had a property called fullName, we could have
written the helper with this other form of link-to which doesn’t
include the block:
{{link-to friend.fullName "friends.show" friend}}We already talked about computed properties, so let’s add one called fullName to app/models/friend.js
import Model from 'ember-data/model';
import attr from 'ember-data/attr';
import { belongsTo } from 'ember-data/relationships';
import Ember from 'ember';

export default Model.extend({
  firstName: attr('string'),
  lastName: attr('string'),
  email: attr('string'),
  twitter: attr('string'),
  fullName: Ember.computed('firstName', 'lastName', {
    get() {
      return this.get('firstName') + ' ' + this.get('lastName');
    }
  })
});
The computed property depends on firstName and lastName. Any time either of those properties changes, so will the value of fullName.
Once we have the computed property, we can rewrite link-to without the block as follows:
{{link-to friend.fullName "friends.show" friend}}Now we’ll be able to visit any of our friends! Next, let’s add support to edit a friend.
Quick Task
- Add a link so we can move back and forth between a friend’s profile and the friends index.
- Add a link so we can move from app/templates/index.hbs to the list of friends (might need to generate the missing template).
Updating a friend profile
By now it should be clear what we need to update a friend:
- Create a route with the ember generator.
- Update the template.
- Add Controller and actions.
To create the friends edit route we should run:
=:friend_id/edit
installing route
create app/routes/friends/edit.js
create app/templates/friends/edit.hbs
updating router
add route friends/edit
installing route-test
create tests/unit/routes/friends/edit-test.js
The nested route edit should looks as follows under the the resource friends:
  this.route('friends', function() {
    this.route('new');

    this.route('show', {
      path: ':friend_id'
    });

    this.route('edit', {
      path: ':friend_id/edit'
    });
  })
Then we should modify the template app/templates/friends/edit.hbs to render the edit friend component:
<h1>Editing {{model.fullName}}</h1>
{{friends/edit-form
  model=model
}}
With that in place, let’s go to a friend’s profile and then append /edit in the browser (e.g., http://localhost:4200/friends/2/edit.)
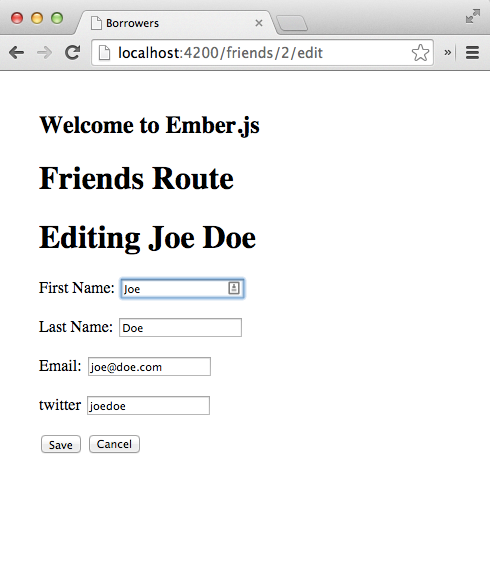
Thanks to the component, we have the same form as in the new
template without writing anything extra. If we open the browser’s
console and click on Save and Cancel, we’ll see error because
we didn’t pass down the save and cancel actions which our
component depends on.
Let’s create a friends.edit controller and implement those
actions. The save action will behave exactly as the one in
new. The action cancel will be different; instead of
redirecting to the friends index route, we’ll redirect back to the
profile page.
We’ll create the controller using ember g controller.
And then we can add the save and cancel actions:
import Ember from 'ember';

export default Ember.Controller.extend({
  actions: {
    save(model) {
      this.transitionToRoute('friends.show', model);
    },
    cancel(model) {
      this.transitionToRoute('friends.show', model);
    }
  }
});
After adding the actions, if we go to the edit template and click
cancel or save we’ll still see an error. The problem is that we didn’t
specify the actions when rendering the component. Let’s change the
edit form to pass the actions save and cancel.
<h1>Editing {{model.fullName}}</h1>
{{friends/edit-form
  model=model
  save=(action "save")
  cancel=(action "cancel")
}}
If we refresh our browser, edit the profile, and click save, we’ll see
our changes applied successfully. But if we click cancel it won’t
work as expected. The reason is that cancel need to receive the
model as parameter.
We can fix it by going to the friends/edit-form component and call
cancel with the model.
import Ember from 'ember';

export default Ember.Component.extend({
  // ...
  actions: {
    // ...
    cancel() {
      this.cancel(this.get('model'));
    }
  }
});
To transition from a controller, we have been using this.transitionToRoute. It’s a helper that behaves similarly to the {{link-to}} helper but from within a controller. If we were in a Route, we could have used this.transitionTo.
Visiting the edit page.
We can edit a friend now, but we need a way to reach the edit screen from the user profile page. To do that, we should add a {{link-to}} in our app/templates/friends/show.hbs.
<ul>
  <li>First Name: {{model.firstName}}</li>
  <li>Last Name: {{model.lastName}}</li>
  <li>Email: {{model.email}}</li>
  <li>twitter: {{model.twitter}}</li>
  <li>{{link-to "Edit info" "friends.edit" model}}</li>
</ul>
If we go to a friend’s profile and click Edit info, we’ll be taken to the edit screen page.
Deleting friends
We have decided not to lend anything to a couple of friends ever again after they took our beloved The Dark Side of the Moon vinyl and returned it with scratches.
It’s time to add support to delete some friends from our application. We want to be able to delete them directly within their profile page or when looking at the index.
By now it should be clear how we will do this. Let’s use actions.
Our destroy actions will call model#destroyRecord() and then this.transitionTo to the friends index route.
Let’s replace our app/templates/friends/index.hbs so it includes the delete action:
<h1>Friends Index</h1>

<h2>Friends: {{model.length}}</h2>

<table>
  <thead>
    <tr>
      <th>Name</th>
      <th></th>
    </tr>
  </thead>
  <tbody>
    {{#each model as |friend|}}
      <tr>
        <td>{{link-to friend.fullName "friends.show" friend}}</td>
        <td><a href="#" {{action "delete" friend}}>Delete</a></td>
      </tr>
    {{/each}}
  </tbody>
</table>
And then add the action *delete to the controller.
import Ember from 'ember';

export default Ember.Controller.extend({
  actions: {
    delete(friend) {
      friend.destroyRecord();
    }
  }
});
To support deletion on friends show route, we just need to add the same link with the action delete and implement the action in the controller.
import Ember from 'ember';

export default Ember.Route.extend({
  actions: {
    delete(friend) {
      friend.destroyRecord().then(() => {
        this.transitionToRoute('friends.index');
      });
    }
  }
});
With that we can now create, update, edit, and delete any of our friends!
Next, let’s add some styling to our project. We don’t want to show this to our friends as it is right now.
Mockups
Before changing our templates, we’ll review a couple of mockups to have an idea of how our pages are going to look.
Friends Index
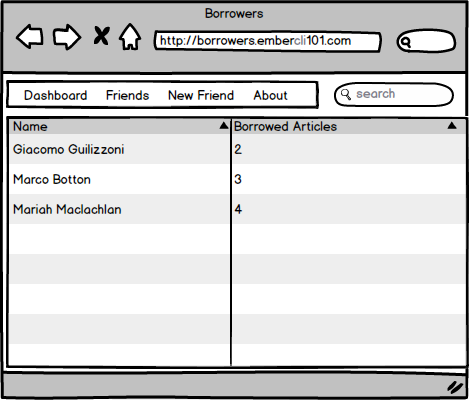
We’ll have a header that will take us to a dashboard, the friends index page, and about page. Additionally, we can insert some content depending on which route we are visiting. In the Friends Index Route we’ll see a search box to filter users.
Then we’ll have a table that can be ordered alphabetically or by number of items.
friend profile
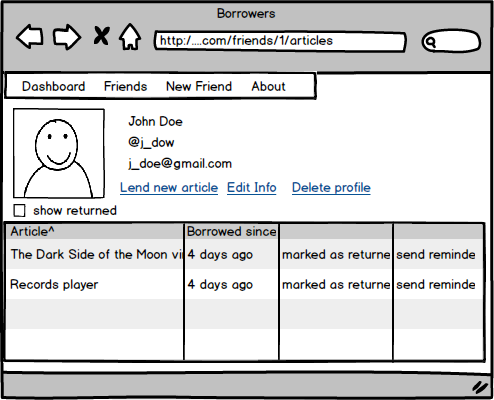
Our friend profile will show us the user’s data with an avatar that we might pull from Gravatar.
We have links to add new articles, edit the user’s info, or delete the user’s profile.
At the bottom we’ll have the list of all the articles the user has borrowed with options to mark them as returned or to send a reminder.
If we are careful, we’ll also notice that the URL looks a little different from what we currently have. After the friend id, we see /articles (..com/friends/1/articlesloans). Whenever we visit the user profile, the nested resource articles will be rendered by default. We haven’t talked about it yet, but basically we are rendering a resource under our friends show route that will defer all responsibility of managing state, handling actions, etc. to a different Controller and Route.
Installing Dependencies
To save time, we’ll be using Basscss as our base CSS and fontello for icons.
Including Basscss
Basscss is distributed through npm or downloading directly from a CDN, but for our example we want to compile it ourselves and put it into our vendor.css. To do, let’s download the source file and put it in the directory vendor.
The fact that a file is in the vendor directory doesn’t mean that
they’ll be included in our assets. We still need to tell ember CLI
that we want to import those assets into our application. To do
so, we need to add the following line to our ember-cli-build.js before
return app.toTree();
/* global require, module */ EmberApp = require('ember-cli/lib/broccoli/ember-app');.exports = function(defaults) { var app = new EmberApp(defaults, { }); app.import('vendor/basscss.min.css'); return app.toTree();};app.import is a helper function that tells ember CLI to append vendor/basscss.min.css into our assets. By default it will put any **CSS file we import into ****/vendor.css** and any JavaScript file into /vendor.js.
If we check app/index.html, we’ll see 2 CSS files included:
<link rel="stylesheet" href="assets/vendor.css">
<link rel="stylesheet" href="assets/borrowers.css">
The first one contains all the imported (vendor) CSS files and the second one contains the CSS files defined under app/styles.
After modifying our ember-cli-build.js we need to stop and start the
server again so the changes are applied. Once we have done that, we
can refresh our browser and go to
http://localhost:4200/assets/vendor.css, we’ll see that the code
for Basscss is there.
Including fontello
Because fontello doesn’t have a custom distribution either, we can’t download it with bower, we’ll download a bundle of icons and fonts that we can manage manually by putting it under vendor/fontello.
We can download a bundle from the following URL https://www.dropbox.com/s/bo2gi770ydxjc9v/fontello.zip?dl=0 and then put the content under vendor/, which will give us the directory vendor/fontello.
In order to tell ember CLI that we want to include fontello’s CSS and fonts, we need to modify our Brocfile as follows:
/* global require, module */
var EmberApp = require('ember-cli/lib/broccoli/ember-app');

module.exports = function(defaults) {
  var app = new EmberApp(defaults, {
  });

  app.import('vendor/fontello/fontello.css');

  app.import('vendor/fontello/font/fontello.ttf', {
    destDir: 'assets/font'
  });
  app.import('vendor/fontello/font/fontello.eot', {
    destDir: 'assets/font'
  });
  app.import('vendor/fontello/font/fontello.svg', {
    destDir: 'assets/font'
  });
  app.import('vendor/fontello/font/fontello.woff', {
    destDir: 'assets/font'
  });
  app.import('vendor/fontello/font/fontello.woff2', {
    destDir: 'assets/font'
  });

  app.import('vendor/basscss.min.css');

  return app.toTree();
};
We are already familiar with the line to import fontello.css, but the following ones are new to us since we have never passed any option to import.
The option destDir tells ember CLI that we want to put those files under a directory called assets/font. If we save and refresh our browser, vendor.css should now include fontello.css.
With that, we know the basics of including vendor files. Now that we have our basic dependencies on hand, let’s improve the appearance of our templates.
The header
We’ll use components to simplify our templates. In this case, our
component contains the code for the navigation bar. Let’s create a component call nav-bar and add the following content:
<header class="h2 border">
  <nav class="flex item-center bg-white">
    {{link-to "Borrowers" "index" class="p2"}}
    {{link-to "Dashboard" "index" class="p2 icon-gauge"}}
    {{link-to "Friends" "friends" class="p2 icon-users-1"}}
    {{link-to "New Friend" "friends.new" class="p2 icon-user-add"}}
  </nav>
</header>
The header should always be visible in our application. In ember, the right receptacle for that content would be the application template since it will contain any other template inside its {{outlet}}.
Modify app/templates/application.hbs as follows:
{{nav-bar}}<main class="clearfix">
{{outlet}}</main>
We will render the header and wrap the outlet in a row using basscss classes.
If we refresh, the header should display nicely.
Friends Index
First, let’s remove the <h1> from app/templates/friends.hbs so it only contains {{outlet}}. Next, clean up app/templates/friends/index.hbs so it adds the class primary to the table:
<table class="mt3 fit">
  <thead class="p1 h2">
    <tr class="white bg-blue">
      <th>Name</th>
      <th></th>
    </tr>
  </thead>
  <tbody class="p1 h3">
    {{#each model as |friend|}}
      <tr>
        <td class="border-bottom">
          {{link-to friend.fullName "friends.show" friend}}
        </td>
        <td class="border-bottom">
          <a href="#" {{action "delete" friend}}>Delete</a>
        </td>
      </tr>
    {{/each}}
  </tbody>
</table>
Now if we visit http://localhost:4200/friends, our friends and navigation bar should look nicer.
New Friend And Friend profile template
Let’s edit app.css with the following:
.borrowers-form .input,
.borrowers-form textarea{
    width: 100%;
    font-size: 1.5em;
    border: 1px solid rgba(196,197,200,.6);
    padding: 30px;
    margin-bottom: 20px;
}
And then edit the friends/edit-form component:
<form {{action "save" on="submit"}} class="col-8 px2 mx-auto borrowers-form">
  {{#if errorMessage}}
    <h2 class="white bg-red p1">{{errorMessage}}</h2>
  {{/if}}
  {{input value=model.firstName placeholder="First Name" class="input fit"}}<br>
  {{input value=model.lastName  placeholder="Last Name" class="input fit"}}<br>
  {{input value=model.email     placeholder="Email" class="input fit"}}<br>
  {{input value=model.twitter   placeholder="Twitter" class="input fit"}}<br>
  <button {{action "cancel"}} class="btn h3 border white bg-gray p2 mr2 col-3">C\
ancel</button>
  <input type="submit" value="Save" class="btn h3 white bg-green border p2 mr2 c\
ol-3">
</form>
And let’s center friends/new with the following:
<div class="center" >
  <h1>Add a New Friend</h1>
  {{friends/edit-form
  model=model
  save=(action "save")
  cancel=(action "cancel")
  }}
</div>
And finally, change app/templates/friends/show.hbs.
<div class="col-8 px2 mx-auto p1 h2 center">
  <p class="">{{model.firstName}}</p>
  <p class="">{{model.lastName}}</p>
  <p class="">{{model.email}}</p>
  <p class="">{{model.twitter}}</p>
  <p class="">{{link-to "Edit info" "friends.edit" model}}</p>
  <p class=""><a href="#" {{action "delete" model}}>delete</a></p>
</div>
The Dashboard
By default, we’ll use the application index route as the dashboard. For now, we are going to create the file app/templates/index.hbs and write a simple title:
**<h2>Dashboard</h2>**.
Let’s move on with more functionality.
Articles Resource
With our Friends CRUD ready, let’s create a similar interface to add articles to our system.
Let’s create an articles resource:
Let’s check the model:
import Model from 'ember-data/model';
import attr from 'ember-data/attr';

export default Model.extend({
  name: attr('string')
});
We have defined our Articles model successfully, but we need to create a full interface so we can add or remove articles to our system. We’ll add two more tabs to our navigation header, one to list all articles and the other one to add new ones.
<header class="h2 border">
  <nav class="flex item-center bg-white">
    {{link-to "Borrowers" "index" class="p2"}}
    {{link-to "Dashboard" "index" class="p2 icon-gauge"}}
    {{link-to "Friends" "friends" class="p2 icon-users-1"}}
    {{link-to "New Friend" "friends.new" class="p2 icon-user-add"}}
    {{#link-to "articles" class="p2 icon-motorcycle"}}
      <span></span>Articles
    {{/link-to}}
    {{link-to "New Article" "articles.new" class="p2"}}
  </nav>
</header>
After adding this, we’ll see an error in the console because we haven’t created yet the route for new articles.
Let’s create the routes for creating, editing and showing articles. They will be very similar to what we did for friends.
=:article_id
$ ember g route articles/edit --path=:article_id/edit
And then we can wire the functionality following a similar pattern to
the one we did for friends. Add a model hook in the index and then
render every article. Create a edit-form component for articles. Use
the edit-form in the new and edit route.
The articles index route should look like the following:
import Ember from 'ember';

export default Ember.Route.extend({
  model() {
    return this.store.findAll('article');
  }
});
And for the template we can reuse the one from friends:
<table class="mt3 fit">
  <thead class="p1 h2">
    <tr class="white bg-blue">
      <th>Name</th>
      <th></th>
    </tr>
  </thead>
  <tbody class="p1 h3">
    {{#each model as |article|}}
      <tr>
        <td class="border-bottom">
          {{link-to article.name "articles.show" article}}
        </td>
        <td class="border-bottom">
          <a href="#" {{action "delete" article}}>Delete</a>
        </td>
      </tr>
    {{/each}}
  </tbody>
</table>
Next we need to create the component for the article form:
And add the following to the component’s template:
<form {{action "save" on="submit"}} class="col-8 px2 mx-auto borrowers-form">
  {{#if errorMessage}}
    <h2 class="white bg-red p1">{{errorMessage}}</h2>
  {{/if}}
  {{input value=model.name placeholder="Article name" class="input fit"}}<br>
  <button {{action "cancel"}} class="btn h3 border white bg-gray p2 mr2 col-3">C\
ancel</button>
  <input type="submit" value="Save" class="btn h3 white bg-green border p2 mr2 c\
ol-3">
</form>
Next, let’s modify the component so it does the validation and saves the model:
import Ember from 'ember';

export default Ember.Component.extend({
  isValid: Ember.computed.notEmpty('model.name'),
  actions: {
    save() {
      if (this.get('isValid')) {
        this.get('model').save().then((friend) => {
          return this.save(friend);
        }, () => {
          this.set('errorMessage', 'there was something wrong saving the model');
        });
      } else {
        this.set('errorMessage', 'You have to fill all the fields');
      }
    },
    cancel() {
      //
      // We are calling the cancel action passed down when rendering the
      // component: action=(action "cancel")
      //
      this.cancel(this.get('model'));
    }
  }
});
Then, we need to change the articles new template to render the component:
<div class="center" >
<h1>New Article</h1>
{{articles/edit-form
model=model
save=(action save)
cancel=(action cancel)
}}</div>
If we go to http://localhost:4200/articles/new we’ll see an error in the conole saying: An action could not be made for save in <borrowers@controller:articles/new.
If we look again at the template above, we’ll notice that the syntax to call the action is slighty different to the one we use in friends new. Instead of passing the name of the action as a string, we are calling it as if it were a property in the controller.
This is another way of using actions, and they are called closure
actions. Introduced in the RFC
0050-improved-actions.md,
these allow us to pass functions directly as actions. This means we
don’t need to define the action in the action object and we can
just bind any function defined in the controller.
To make save and cancel work, let’s create the the articles new
controller running ember g controller articles/new and then add the
following content:
import Ember from 'ember';

export default Ember.Controller.extend({
  save(model) {
    console.log('save action called in articles new');
  },
  cancel() {
    console.log('cancel action called in articles new');
  }
});
Once we have defined the actions in the controller then the template should render. Next, if we try to save a new article, we’ll see that it doesn’t work. The reason is that we didn’t create a model hook on the articles new route. Let’s do that next:
import Ember from 'ember';

export default Ember.Route.extend({
  model() {
    return this.store.createRecord('article');
  }
});
We will leave as a task the rest of the routes, templates and actions. We still need to support edit, delete and show for articles. Also, use closure actions.
Defining relationships.
We’ll be using a join model to keep track of who borrowed what. The name for this join model will be “loan”. A loan belongs to one friend and one article. Friends and articles can have many loans.
In other frameworks this is known as hasMany and belongsTo relationships, and so are they in ember data.
If we want to add a hasMany relationship to our models, we write:
Or we want a belongsTo:
Let’s run the resource generator to create the loan model:
\
longsTo article:belongsTo
If we open the loan model, it will look something like the following:
import Model from 'ember-data/model';
import attr from 'ember-data/attr';

//
// We can export hasMany or belongsTo depending on the type of the
// relationship.
//
import { belongsTo } from 'ember-data/relationships';

export default Model.extend({
  notes: attr('string'),
  returned: attr('boolean'),
  createdAt: attr('date'),
  friend: belongsTo('friend'),
  article: belongsTo('article'),
});
Next, using the relationship types, we can modify our Article model:
import Model from 'ember-data/model';
import attr from 'ember-data/attr';
import { hasMany } from 'ember-data/relationships';

export default Model.extend({
  name: attr('string'),
  loans: hasMany('loan')
});
And our Friend model:
import Model from 'ember-data/model';
import attr from 'ember-data/attr';
import { hasMany } from 'ember-data/relationships';
import Ember from 'ember';

export default Model.extend({
  firstName: attr('string'),
  lastName: attr('string'),
  email: attr('string'),
  twitter: attr('string'),
  loans: hasMany('loan'),
  fullName: Ember.computed('firstName', 'lastName', {
    get() {
      return this.get('firstName') + ' ' + this.get('lastName');
    }
  })
});
With those two lines, we have added a relationship between our models. Now let’s work on the loans resource.
Nested Loans Index
In our friend profile, we specified that we wanted to render the list of articles as a nested route inside the friend profile.
To handle this scenario. We need to make sure that loans is specified as a nested resource inside friends show. Let’s go to our app/router.js and change it to reflect this:
import Ember from 'ember';
import config from './config/environment';

const Router = Ember.Router.extend({
  location: config.locationType
});

Router.map(function() {
  this.route('friends', function() {
    this.route('new');

    // Here we are nesting loans under friends/show.
    this.route('show', {
      path: ':friend_id'
    }, function() {
      this.route('loans', {resetNamespace: true}, function() {
      });
    });

    this.route('edit', {
      path: ':friend_id/edit'
    });
  });
});

export default Router;
Now let’s open the ember-inspector and check our newly defined routes.
We can identify the routes and controllers that ember expects us to define for the new resource.
Next we need to add an {{outlet }} to app/templates/friends/show.hbs, which is where the nested routes will render:
<div class="clearfix flex p3 h2">
  <div class="">
    <img src="http://www.fillmurray.com/200/200">
    <p class="">{{model.fullName}}</p>
    <p class="">{{model.email}}</p>
    <p class="">{{model.twitter}}</p>
    <p class="">{{link-to "Edit info" "friends.edit" model}}</p>
    <p class=""><a href="#" {{action "delete" model}}>Delete</a></p>
  </div>
  <div class="flex-auto ml1 loans-container">
    {{outlet}}
  </div>
</div>
Any nested route will be rendered by default into its parent’s {{outlet}}.
Rendering the index.
Let’s create a new file called app/templates/loans/index.hbs and write the following:
<h2>Loans Index</h2>
If we visit a friend profile, we won’t see anything related with the loans index route. Why? Well, we are not visiting that route, that’s why. To get to the loans index route, we need to modify the link-to in app/templates/friends/index.hbs to reference the route loans instead of friends.show. We’ll still pass the friend as an argument since the route loans is nested under friends.show and it has the dynamic segment :friend_id.
<td>{{link-to friend.fullName "loans" friend}}</td>
Now, with the previous change, if we go to the friends index and visit any profile, we’ll see Loans Index at the bottom.
If we open the ember-inspector and filter by *Current Route
only**, we’ll see loans.index at the last route.
Routes are resolved from top to bottom, so when we navigate to /friends/1/loans it will go first to the application route, then move to friends show route to fetch our friend. Once it is loaded, it will move to loans index route.
Next we need to define the model hook for the loans index route.
Fetching our friend loans.
Let’s add the loans index route to the generator and reply ‘no’ when it asks us if we want to overwrite the template.
[?] Overwrite app/templates/articles/index.hbs? (Yndh) n
[?] Overwrite app/templates/articles/index.hbs? No, skip
create app/routes/articles/index.js
skip app/templates/articles/index.hbs
updating router
add route articles/index
installing route-test
create tests/unit/routes/articles/index-test.js
In app/routes/loans/index.js, load the data using the model hook:
import Ember from 'ember';

export default Ember.Route.extend({
  model() {
    return this.modelFor('friends/show').get('loans');
  }
});
In the model hook, we are using a new function this.modelFor that helps us grab the model for any parent route. In this scenario, parent routes are all the ones appearing on top of articles index route in the ember-inspector.
Once we get the model for friends show route, we simply ask for its loans. And that’s what we are returning.
We need to modify the app/templates/loans/index.hbs so it displays the loans:
<table>
  <thead>
    <tr>
      <th>Description</th>
      <th>Borrowed since</th>
      <th></th>
      <th></th>
    </tr>
  </thead>
  <tbody>
    {{#each model as |loan|}}
      <tr>
        <td>{{loan.article.name}}</td>
        <td>{{loan.notes}}</td>
        <td>{{loan.createdAt}}</td>
        <td></td>
        <td></td>
      </tr>
    {{/each}}
  </tbody>
</table>
If our friend hasn’t borrowed any article yet, we can use the ember-inspector to create a loan manually.
Let’s open the ember-inspector and select the model in the route friends.show.
Once we have the instance of a friend assigned to the variable $E, let’s run the following on the browser’s console:
$E.get('loans').createRecord({notes: 'foo'})$E.get('loans').createRecord({notes: 'bar'})We will see that our loans list updates automatically with the created records.
So far we are only putting records into the store, but they are not being saved to the backend. To do that we’ll need to call save() on every instance. Let’s try to call save:
$E.get('loans').createRecord({notes: 'test'}).save()We will notice that a POST is attempted to our backend, but it gets rejected because the model is not valid:
Error: The backend rejected the commit because it was invalid.
And if we look at the response in the network tab, we’ll see that
there is an error with the message article - can't be blank. Let’s
grab an article and then create a loan including the article.
$E.get('store').findAll('article')article = $E.get('store').peekAll('article').get('firstObject')$E.get('loans').createRecord({notes: 'a loan', article: article}).save()In the previous snippet, we are using two methods from ember data’s
store, the first makes a request to download all the available
articles in the API and puts them in the store, and the second one is
“fetching” all the records from the store (without firing a HTTP
request) and we call firstObject with returns the first record in the
list.
Then, with that record we are creating a new loan.
Let’s add the route loans new and the template so we can lend new articles to our friends.
Lending new articles
Let’s start by adding the route. We’ve done it with the generator up to this point, but now we’ll do it manually.
We need to add the nested route new under the resource loans:
import Ember from 'ember';
import config from './config/environment';

var Router = Ember.Router.extend({
  location: config.locationType
});

Router.map(function() {
  this.route('friends', function() {
    this.route('new');

    this.route('show', {
      path: ':friend_id'
    }, function() {
      this.route(loans, {resetNamespace: true}, function() {
        this.route('new');
      });
    });

    this.route('edit', {
      path: ':friend_id/edit'
    });
  });

  // ...
});

export default Router;
Then let’s create the route app/routes/loans/new.js with the model hook:
import Ember from 'ember';

export default Ember.Route.extend({
  model() {
    return this.store.createRecord('loan', {
      friend: this.modelFor('friends/show')
    });
  }
});
In the model hook we use this.store.createRecord, which creates a new instance of a model in the store. It takes the name of the model we’re creating and its properties.
We pass the property friend, which will make sure that the loan is linked with our friend. For the article we still need to add something like a select where the user can choose an article.
Ember data allows us to specify a defaultValue for our attributes. We can use that to set notes as an empty string. In app/models/loan.js, let’s replace the definition of notes so it looks as follows:
notes: DS.attr('string', {defaultValue: ''})
Next we need to add the new template. Since we might want to reuse the form, let’s add it as a component and then include it in the template.
We can follow a similar pattern to the one used with articles and friends. Let’s create a component called loans/edit-form and then pass the necessary data for it to function properly.
Let’s run the following command: ember g component loans/edit-form and then edit the template with the form.
<form {{action "save" on="submit"}} class="">
  {{#if errorMessage}}
    <h2 class="white bg-red p1">{{errorMessage}}</h2>
  {{/if}}
  <label>Select an article</label>
  <select class="select">
    <option>Article 1</option>
    <option>Article 2</option>
    <option>Article 3</option>
  </select>
  <br>
  {{textarea value=model.notes placeholder="Notes" class="textarea" cols="50" ro\
ws="10"}}
  <br>
  <button {{action "cancel"}} class="btn border white bg-gray">Cancel</button>
  <input type="submit" value="Save" class="btn white bg-green border">
</form>
Then include it in app/templates/loans/new.hbs:
{{loans/edit-form model=model class="ml3"}}We almost have the basics ready. We have set up the route and template, but we still haven’t added a link to navigate to the articles new route. Let’s add link-to to articles.new in app/templates/friends/show.hbs:
<div class="clearfix flex p3 h2">
  <div class="">
    <img src="http://www.fillmurray.com/200/200">
    <p class="">{{model.fullName}}</p>
    <p class="">{{model.email}}</p>
    <p class="">{{model.twitter}}</p>
    <p>{{link-to "Lend article" "loans.new"}}</p>
    <p class="">{{link-to "Edit info" "friends.edit" model}}</p>
    <p class=""><a href="#" {{action "delete" model}}>Delete</a></p>
  </div>
  <div class="flex-auto ml1 loans-container">
    {{outlet}}
  </div>
</div>
We are creating the link with {{link-to "Lend article"
"loans.new"}}. Since we’re already in the context of a
friend, we don’t need to specify the dynamic segment. If we want to add
the same link in the friends index route, we’ll need to
pass the parameter as {{link-to “Lend article” “loans.new”
friend}} where friend is an instance of a friend.
Completing the form
We have the route, template and component for new loans but the select
is not showing the list of articles that we can loan to a
friend. Let’s build that next, and then connect the cancel and
save actions.
Instead of building the select ourselves, we are going to use an addon called ember-power-select which give us a nice select component.
Ember addons offer us an easy way to share code and augment ember-cli, we’ll be building one in a subsequent chapter, but for now, let’s start consuming them.
We can install the addon running the ember install command, we need to stop the ember-cli server and then run the following:
Once our addon has been installed, we can edit the loans/edit-form to use it:
<form {{action "save" on="submit"}} class="borrowers-form">
  {{#if errorMessage}}
    <h2 class="white bg-red p1">{{errorMessage}}</h2>
  {{/if}}
  <label>Select an article</label>
  {{#power-select class="select"
     selected=model.article
     options=articles
     onchange=(action (mut model.article)) as |article|}}
    {{article.name}}
  {{/power-select}}
  <br>
  {{textarea value=model.notes
    placeholder="Notes"
    class="textarea"
  }}
  <br>
  <button {{action "cancel"}} class="btn border white bg-gray">Cancel</button>
  <input type="submit" value="Save" class="btn white bg-green border">
</form>
As we can see, the addon takes as options the current selected option,
which in our example would be model.article. Then it takes the list
of options which will be used to populate the select and also has an
action which gets called every time the selection changes.
In the action we are using the mut helper which give us a special
action to update a property. The following onchange=(action (mut
model.article)) can be read as “On change, change the property
model.article which the selected valued”. We are not seeing the
parameter, but the addon passes it explicitly.
We could have also written a function in the component like the following:
changeArticle(article) {
this.set('model.article', article)
}
And then pass it as the onchange action: onchange=(action changeArticle).
If we start the server and go to the form for new loans, we’ll see that the select is being displayed but the articles are not listed, the reason for that is that we haven’t populated the articles attribute.
To do so, we’ll be creating a computed property in the component and then calling store.findAll, let’s go to loans/edit-form component an add the following:
import Ember from 'ember';
export default Ember.Component.extend({
//
// By default the store is not injected into components, so we use
// the "inject.service" helper to make it available.
//
store: Ember.inject.service(),
articles: Ember.computed({
get() {
//
// Since we are using Ember.inject.service, we need to call the
// store using the get helper
//
return this.get('store').findAll('article');
}
}).readOnly()
});
Now if we refresh again, we’ll see that the list of articles are now in the select.
Next, we need to bind the new and cancel actions.
After successfully making a new loan or clicking cancel, we want to
navigate back to the loans.index for the friend. To do so, let’s
write an action in the controller that we can use in both scenarios.
Let’s create the controller using the generator: ember g controller
loans/new and then add the following content:
import Ember from 'ember';
export default Ember.Controller.extend({
backToIndex(friend) {
this.transitionToRoute('loans.index', friend);
}
});
Then in the loans.new template, pass down the action:
{{loans/edit-form model=model back=(action backToIndex) class="ml3"}}And finally we need to connect the back action in the component and
change the way we call the save and cancel actions:
import Ember from 'ember';
export default Ember.Component.extend({
//
// By default the store is not injected into components, so we use
// the "inject.service" helper to make it available.
//
store: Ember.inject.service(),
articles: Ember.computed({
get() {
//
// Since we are using Ember.inject.service, we need to call the
// store using the get helper
//
return this.get('store').findAll('article');
}
}).readOnly(),
//
// Save and cancel are not declared inside actions key, we'll be
// using it as closure actions.
//
save() {
//
// We probably want to verify here that the model has an article
// before saving
//
this.get('model').save().then((model) => {
this.back(model.get('friend'));
}, () => {
this.set(
'errorMessage',
'there was something wrong saving the loan'
);
});
},
cancel() {
this.back(this.get('model.friend'));
}
});
To finish, we need to change the save and cancel actions so we use
the closure action format instead of “quoted” format.
<form {{action save on="submit"}} class="borrowers-form">
{{#if errorMessage}} <h2 class="white bg-red p1">{{errorMessage}}</h2>
{{/if}} <label>Select an article</label>
{{#power-select class="select"
selected=model.article
options=articles
onchange=(action (mut model.article)) as |article|}} {{article.name}} {{/power-select}} <br>
{{textarea value=model.notes
placeholder="Notes"
class="textarea"
}} <br>
<button {{action cancel}} class="btn border white bg-gray">Cancel</button>
<input type="submit" value="Save" class="btn white bg-green border">
</form>
If we go to a friend profile and click “Lend article”, we’ll be able to create a new loan.
Computed Property Macros
In app/components/friends/edit-form.js, we define the computed property isValid with the following code:
  isValid: Ember.computed(
    'model.email',
    'model.firstName',
    'model.lastName',
    'model.twitter',
    {
      get() {
        return !Ember.isEmpty(this.get('model.email')) &&
          !Ember.isEmpty(this.get('model.firstName')) &&
          !Ember.isEmpty(this.get('model.lastName')) &&
          !Ember.isEmpty(this.get('model.twitter'));
      }
    }
  ),
Although the previous code does what we expect, it is not the most pleasant to read, especially with all those nested &&’s. As it turns out, Ember has a set of helper functions that will allow us to write the previous code in a more idiomatic way using something called computed property macros.
Computed property macros are a set of functions living under Ember.computed. that allow us to create computed properties in an easier, more readable and clean way.
As an example, let’s take two computed property macros and write our isValid on terms of them:
export default Ember.Controller.extend({
  hasEmail:     Ember.computed.notEmpty('model.email'),
  hasFirstName: Ember.computed.notEmpty('model.firstName'),
  hasLastName:  Ember.computed.notEmpty('model.lastName'),
  hasTwitter:   Ember.computed.notEmpty('model.twitter'),
  isValid:      Ember.computed.and(
    'hasEmail',
    'hasFirstName',
    'hasLastName',
    'hasTwitter'
  ),

// actions omitted
This is certainly much cleaner and less error-prone than original implementation.
We can see the full list of computed properties under the Ember.computed namespace.
Using components to mark a loan as returned.
We previously lent our favorite bike to one of our friends and they just returned it. We need to mark the item as returned.
We’ll add a select in the loans index, so we can mark an item as returned or borrowed. Whenever that loan has pending changes, we’ll see a save button.
Using components we’ll encapsulate the behavior per row into its own class, removing responsibility from the model and delegating it to a class. This class will handle how every row should look and additionally when it should fire a save depending on the state of every loan.
We’ll create an loans/loan-row component which will wrap every element. We’ll pass the necessary data to render the list of possible states and also the loan.
Let’s create the loans/loans-row using the components generator.
Let’s modify the component so it looks as follows:
import  Ember from 'ember';

export default Ember.Component.extend({
  tagName: 'tr',
  loan: null // passed-in
});
We are specifying that the html tag for this component is going to be a
tr meaning that whatever content we put in the template, it will be
wrapped in table row using the HTML tag tr, by default it is a
div. Also we defined two properties loan and loanStates
with value null and the comment: “passed-in”. It will help people
consuming the component to identify which data they should pass-in.
We need to add the the markup for the component as follows:
<td>{{loan.article.name}}</td>
<td>{{loan.notes}}</td>
<td>{{loan.createdAt}}</td>
<td>
{{input type="checkbox" checked=loan.returned}}</td>
<td>
{{#if loan.isSaving}} <p>Saving ...</p>
{{else if loan.hasDirtyAttributes}} <button {{action save loan}}>Save</button>
{{/if}}</td>
In the template we are defining the cells for every loan row and
reading the value from the “passed-in” property loan, also we are
calling the action save, which we are passing in.
We are also using the properties loan.isSaving and loan.hasDirtyAttributes, which belong to the loan we passed-in.
The previous properties are part of DS.Model and they help us to know things about a model. In the previous scenario, loan.hasDirtyAttributes becomes true if there is a change to the model and loan.isSaving is true if the model tries to persist any changes to the backend.
Before using our components, let’s create the loans.index controller
and add a function called save which we’ll use to save changes in a
loan.
Let’s add the following content after running ember g controller loans/index:
import Ember from 'ember';

export default Ember.Controller.extend({
  save(loan) {
    return loan.save();
  }
});
Now let’s use our component in the loans index template:
<table>
  <thead>
    <tr>
      <th>Article</th>
      <th>Notes</th>
      <th>Borrowed since</th>
      <th></th>
      <th></th>
    </tr>
  </thead>
  <tbody>
    {{#each model as |loan|}}
      {{loans/loan-row
        loan=loan
        save=(action save)
      }}
    {{/each}}
  </tbody>
</table>
We are iterating over every loan in the model and then rendering an loans-row component for each of them, we are passing as attributes the loan, binding the save action to another action which is also called save.
If we open the ember-inspector, open the view tree and then select components, we will notice that every component is displayed independently.
If we go to the browser and try what we just created, everything should work.
Implementing auto save.
Instead of clicking the save button every time we change the state of the model, we want it to save automatically.
We’ll rewrite our template so the save button is not included and then use the input helper action to call save.
<td>{{loan.article.name}}</td>
<td>{{loan.notes}}</td>
<td>{{loan.createdAt}}</td>
<td>
{{input type="checkbox" checked=loan.returned click=(action save loan)}}</td>
<td>
{{#if loan.isSaving}} <p>Saving ...</p>
{{/if}}</td>
We are doing something new here, we are passing the argument to the
action in the action itself like action save loan, this is one of
the cool things we can do with closure actions.
Now, every time we change the state of the loan, the save
action will be called.
Route hooks
If we go to http://localhost:4200/friends/new and click cancel without entering anything, or we write something and then click cancel, we’ll still see the unsaved record in our friends index. It only goes away if we refresh the app.

The same happens with an article. If we try to create one but we click cancel, it will appear in the index anyway.
The ember data store not only keeps all the data we load from the server, but it also keeps the one we create on the client. We were actually pushing a new record to the store when we did the following on the friends new route:
Such records will live in the store with the state new. We can call save on it, which will persist it to the backend and make it move to a different state, or we can remove it and our backend will never know about it.
We might ask ourselves: but aren’t we doing a store.findAll on the friends index route, which loads our data again from the server? And shouldn’t that remove the unsaved records?
That’s partially true. It is correct that when we do this.store.findAll(‘friend’), a GET request is made to the server. When we load our existing records again, instead of throwing out all the records in the store, ember data merges the results, updating existing records and leaving untouched the ones that the server doesn’t know about. That’s why we see the new but unsaved record in the index.
To mitigate this situation, if we are leaving the friends new route and the model was not saved, we need to remove the record from the store. How do we do that?
Ember.Route has a set of hooks that are called at different times during the route lifetime. For instance, we can use activate to do something when we enter a route, deactivate when we leave it or resetController to reset values on some actions.
Let’s try them in app/routes/friends/new.js:
import Ember from 'ember';
export default Ember.Route.extend({
  model() {
    return this.store.createRecord('friend');
  },
activate() {
console.log('----- activate hook called -----');
},
deactivate() {
console.log('----- deactivate hook called -----');
},
resetController: function (controller, isExiting, transition) {
if (isExiting) {
console.log('----- resetController hook called -----');
}
}
});
And then visit http://localhost:4200/friends/new and click cancel or friends.
We should see something like the following in our browser’s console:

Coming back to our original problem of the unsaved record in the store, we can use the resetController hook to clean up our state.
Let’s rewrite app/routes/friends/new.js so the resetController hook does what we expect:
import Ember from 'ember';

export default Ember.Route.extend({
  model() {
    return this.store.createRecord('friend');
  },
  resetController(controller, isExiting) {
    if (isExiting) {
      // We grab the model from the controller
      //
      var model = controller.get('model');

      // Because we are leaving the Route we verify if the model is in
      // 'isNew' state, which means it wasn't saved to the backend.
      //
      if (model.get('isNew')) {

        // We call DS#destroyRecord() which removes it from the store
        //
        model.destroyRecord();
      }
    }
  }
});
Another scenario where it is common to use the resetController hook
involves the edit routes. For example, if we try to edit a friend
and don’t save the changes but click cancel, the friend profile will
show whatever change we leave unsaved. To solve this problem we’ll use
the resetController hook, but instead of checking if the model
isNew, we’ll call model.rollback(). This will return the
attributes to their initial state if the model hasDirtyAttributes.
import Ember from 'ember';

export default Ember.Route.extend({
  resetController(controller, isExiting) {
    if (isExiting) {
      var model = controller.get('model');
      model.rollback();
    }
  }
});