Bash Shell
Programming is an applied skill. If you want to learn it, you should choose a programming language and solve tasks. This is the only way to get practical skills.
We use the Bash language in this book. This language is convenient for automating computer administration tasks. Here are few examples of what you can do with Bash:
- Create data backups.
- Manipulate directories and files.
- Run programs and transfer data between them.
Bash was developed in the Unix environment. Therefore, it bears the imprint of the Unix philosophy. Despite its roots, you can also use Bash on Windows and macOS.
Development Tools
You need a Bash interpreter and a terminal emulator to run the examples of this chapter. You can install them on all modern operating systems. Let’s take a look at how to do this.
Bash Interpreter
Bash is a script programming language. It has the following features:
- It is interpreted language.
- It operates existing programs or high-level commands.
- You can use it as a shell to access the OS functions.
If you use Linux or macOS, you have the preinstalled Bash interpreter. If your OS is Windows, you need both Bash interpreter and POSIX-compatible environment. Bash needs this environment to work correctly. There are two ways to install it.
The first option is to install the MinGW toolkit. It contains the GNU compiler collection in addition to Bash. If you do not need all MinGW features, you can install Minimal SYStem (MSYS) instead. MSYS is the MinGW component that includes Bash, a terminal emulator and GNU utilities. These three things make up a minimal Unix environment.
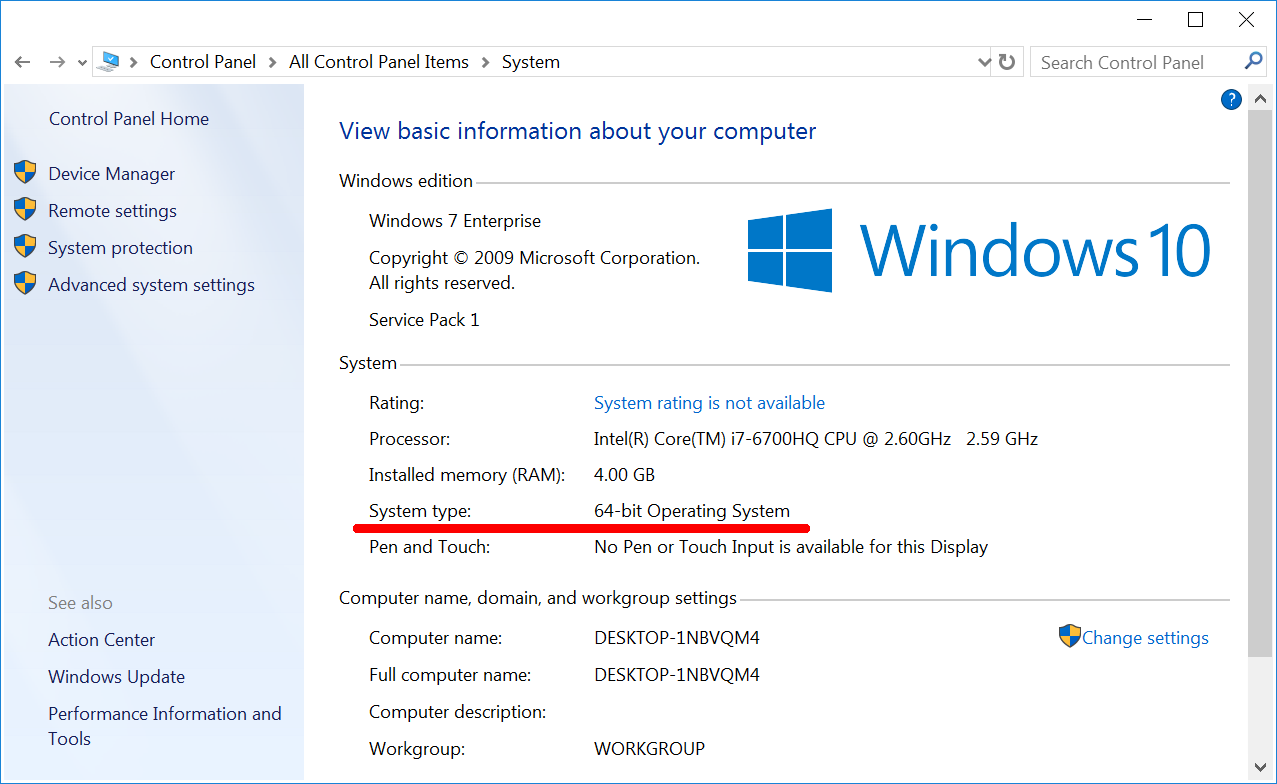
It is always good to clarify the bitness of your Windows before installing any software. Here are steps to read it:
- If you have a “Computer” icon on your desktop, right-click on it and select the “Properties” item.
- If there is no “Computer” icon on your desktop, click the “Start” button. Find the “Computer” item in the menu. Right-click on it and select “Properties”.
- You have opened the “System” window. Locate the “System Type” item there as Figure 2-1 demonstrates. This item shows you the bitness of Windows.
We are going to install the modern MSYS version called MSYS2. Download its installer from the official website. You should choose the installer version that fits the bitness of your Windows.
Now we have everything to install MSYS2. Follow these steps for doing it:
1. Run the installer file. You will see the window as Figure 2-2 shows.
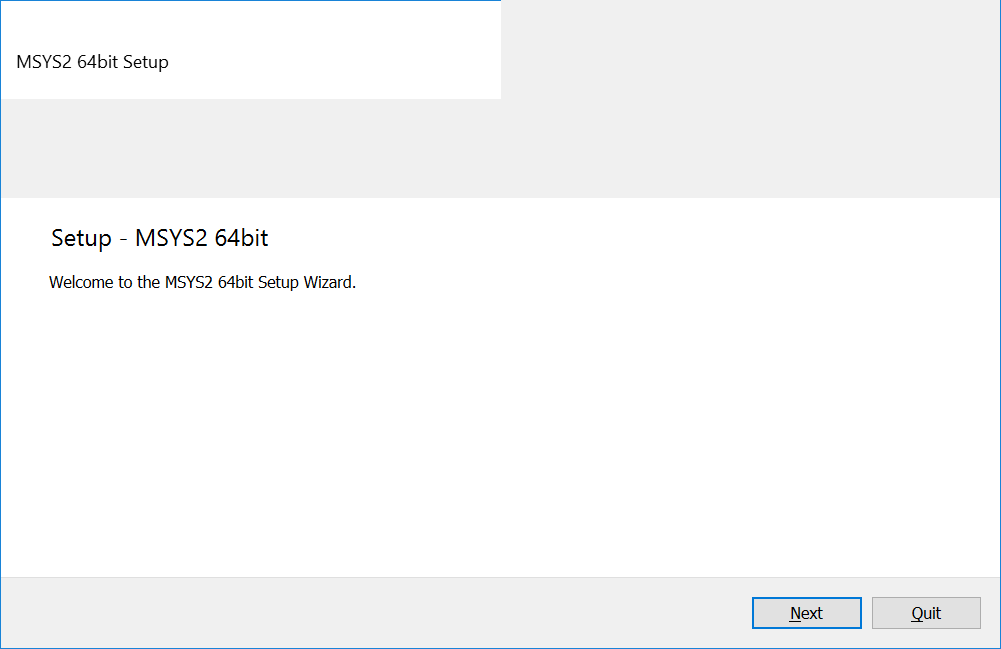
- Click the “Next” button.
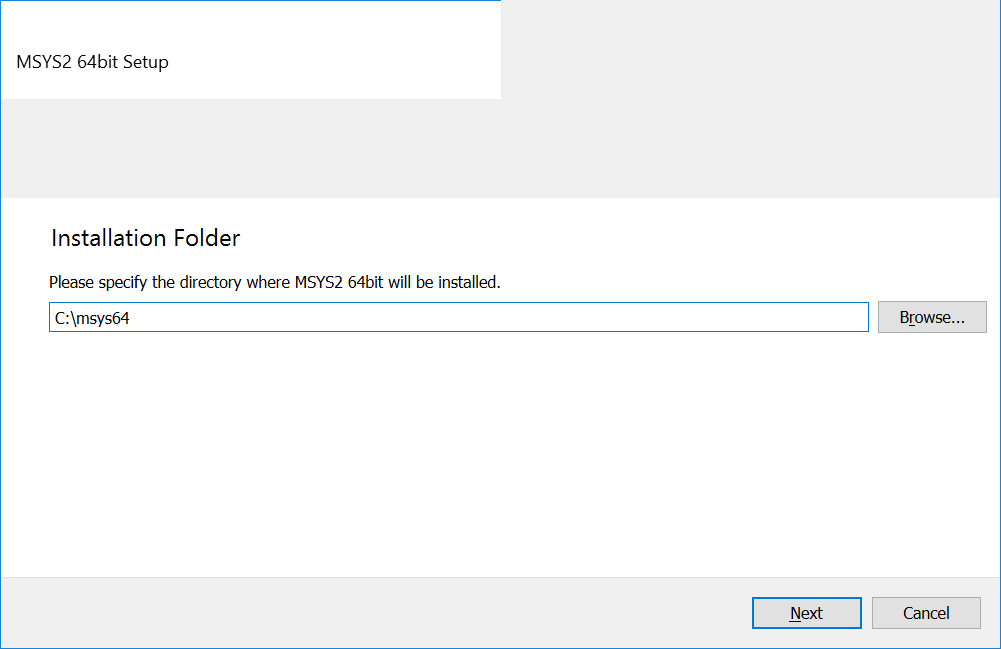
- You see the new window as Figure 2-3 shows. Specify the installation path there and press the “Next” button.
- The next window suggests you to choose the application name for the Windows “Start” menu. Leave it unchanged and click the “Next” button. Then the installation process starts.
- When the installation finishes, click the “Finish” button. It closes the installer window.
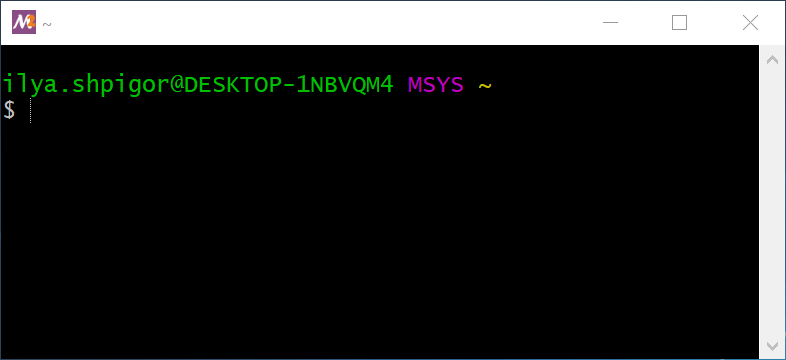
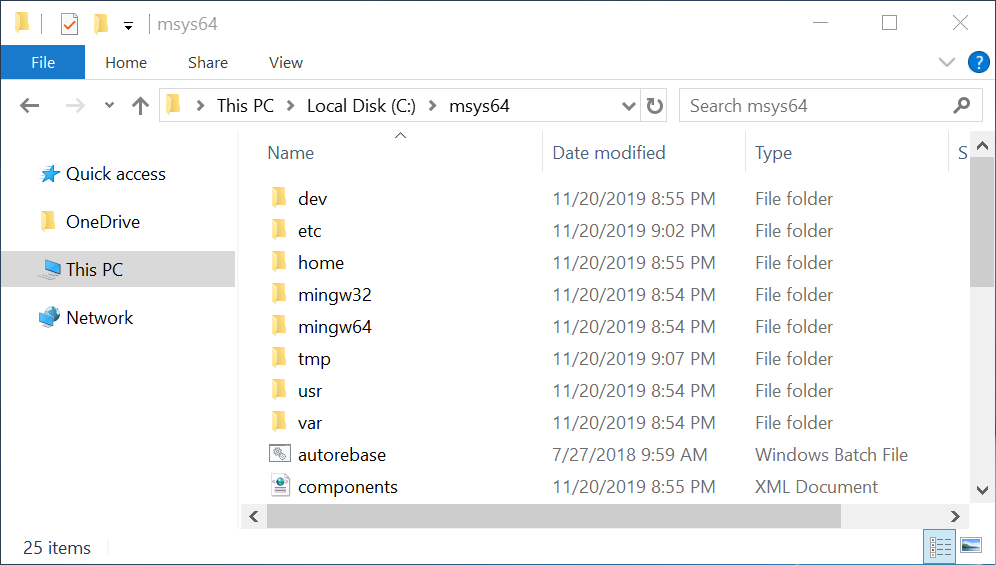
You have installed the MSYS2 Unix environment on your hard drive. You can find its files in the C:\msys64 directory if you did not change the default installation path. Go to this directory and run the msys2.exe file. It opens the window where you can work with the Bash shell. Figure 2-4 shows this window.
The second option is to install a Unix environment from Microsoft. It is called Windows subsystem for Linux (WSL). This environment is available for Windows 10 only. It does not work on Windows 8 and 7. You can find the manual to install WSL on the Microsoft website.
If you use Linux, you do not need to install Bash. You already have it. Just press the shortcut key Ctrl+Alt+T to open a window with the Bash shell.
If you use macOS, you have everything to launch Bash too. Here are the steps for doing that:
- Click the magnifying glass icon in the upper right corner of the screen. It opens the Spotlight search program.
- The dialog box appears. Enter the text “Terminal” there.
- Spotlight shows you a list of applications. Click on the first line in the list with the “Terminal” text.
Terminal emulator
Bash shell is not a regular GUI application. It even does not have its own window. When you run the msys2.exe file, it opens a window of the terminal emulator program.
An emulator is a program that mimics the behavior of another program, OS or device. The emulator solves the compatibility task. For example, you want to run a Windows program on Linux. There are several ways to do that. One option is using the emulator of the Windows environment for Linux. It is called Wine. Wine provides its own version of the Windows system libraries. When you run your program, it uses these libraries and supposes that it works on Windows.
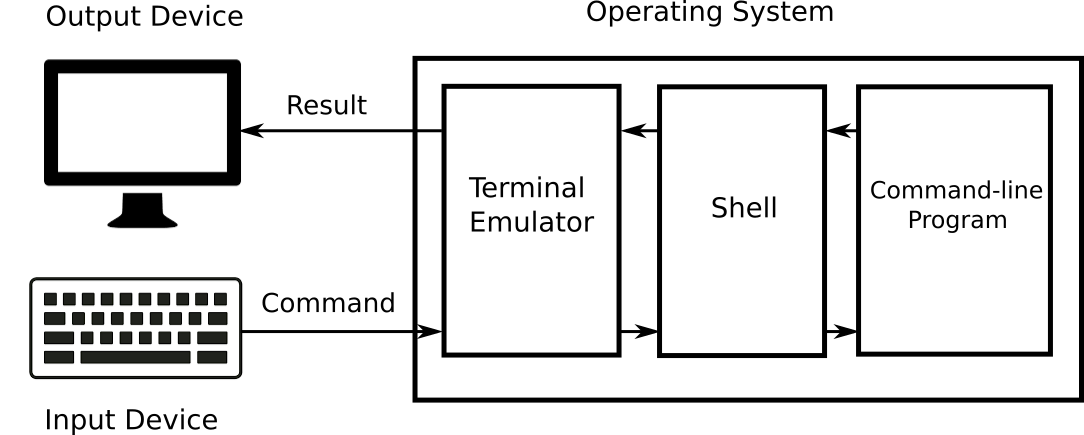
The terminal emulator solves the compatibility task too. Command-line programs are designed to work through a terminal device. Nobody uses such devices today. Cheap personal computers and laptops have replaced them. However, there are still many programs that require a terminal for working. You can run them using the terminal emulator. It uses the shell to pass data to the program. When the program returns some results, the shell passes them to the terminal emulator. Then the emulator displays the results on the screen.
Figure 2-5 explains the interaction between input/output devices, the terminal emulator, the shell and the command-line program.
The terminal emulator window in Figure 2-4 shows the following two lines:
ilya.shpigor@DESKTOP-1NBVQM4 MSYS ~$The first line starts with the username. The username is ilya.shpigor in my case. Then there is the @ symbol and the computer name DESKTOP-1NBVQM4. You can change the computer name via Windows settings. The word MSYS comes next. It means the platform where Bash is running. At the end of the line, there is the symbol ~. It is the path to the current directory.
Command Interpreter
All interpreters have two working modes: non-interactive and interactive. When you choose the non-interactive mode, the interpreter loads the source code file from the disk and executes it. You do not need to type any commands or control the interpreter. It does everything on its own.
When you choose the interactive mode, you type each command to the interpreter manually. If the interpreter is integrated with the OS and works in the interactive mode, it is called a command shell or shell.
A command shell provides access to the settings and functions of the OS. You can perform the following tasks using it:
- Run programs and system services.
- Manage the file system.
- Control peripherals and internal devices.
- Access the kernel features.
Demand of the CLI
Why would somebody learn the command-line interface (CLI) today? It appeared 40 years ago for computers that are thousands of times slower than today. Then the graphical interface supplanted CLI on PCs and laptops. Everybody prefers to use GUI nowadays.
The CLI seems to be outdated technology. However, this statement is wrong. It should be a reason why developers include Bash in all modern macOS and Linux distributions. Windows also has a command shell called Cmd.exe. Microsoft has replaced it with PowerShell in 2006. Just think about this fact. The developer of the most popular desktop OS has created a new command shell in the 2000s. All these points confirm that CLI is still in demand.
What tasks does the shell perform in modern OSes? First of all, it is a tool for system administration. The OS consist of the kernel and software modules. These modules are libraries, services and system utilities. Most of the modules have settings and special modes of operation. You do not need them in your daily work. Therefore, you cannot access these settings via GUI in most cases.
If the OS fails, you need system utilities to recover it. They have a command-line interface because a GUI often is not available after the failure.
Besides the administration tasks, you would need CLI when connecting computers over a network. There are GUI programs for such connection. The examples are TeamViewer and Remote Desktop. They require a stable and fast network connection for working well. If the connection is not reliable, the GUI programs are slow and often fail. The command interface does not have such a limitation. The remote server receives your command even if the link is poor.
You can say that a regular user does not deal with administration tasks and network connections. Even if you do not have such tasks, using command shell speeds up your daily work with the computer. Here are few things that you can do more effective with CLI than with GUI:
- Operations on files and directories.
- Creating data backups.
- Downloading files from the Internet.
- Collecting statistics about your computer’s resource usage.
An example will explain the effectiveness of CLI. Suppose you rename several files on the disk. You add the same suffix to their names. If you have a dozen of files, you can do this task with Windows Explorer in a couple of minutes. Now imagine that you should rename thousands of files this way. You will spend the whole day doing that with the Explorer. If you use the shell, you need to launch a single command and wait for several seconds. It will rename all your files automatically.
The example with renaming files shows the strength of the CLI that is scalability. Scalability means that the same solution handles well both small and large amounts of input data. The solution implies a command when we are talking about the shell. The command renames ten and a thousand files with the same speed.
Experience with the command interface is a great benefit for any programmer. When you develop a complex project, you manage plenty of text files with the source code. You use the GUI editor to change the single file. It works well until you do not need to introduce the same change in many files. For example, it can be the new version of the license information in the file headers. You waste your time when solving such a task with the editor. Command-line utilities make this change much faster.
You need to understand the CLI to deal with compilers and interpreters. These programs usually do not have a graphical interface. You should run them via the command line and pass the names of the source code files. The reason for such workflow is the poor scalability of the GUI. If you have plenty of source code files, you cannot handle them effectively via the GUI.
There are special programs to edit and compile source code. Such programs are called integrated development environments (IDE). You can compile a big project using IDE and its GUI. However, IDE calls the compiler via the command line internally. Therefore, you should deal with the compiler’s CLI if you want to change its options or working mode.
If you are an experienced programmer, knowing the CLI encourages you to develop helper utilities. It happens because writing a program with a command interface is much faster than with a GUI. The speed of development is essential when solving one-off tasks.
Here is an example situation when you would need to write a helper utility. Suppose that you have to make a massive change in the source code of your project. You can do it with IDE by repeating the same action many times.
Another option is to spend time writing a utility that will do this job. You should compare the required time for both ways of solving your task. If you are going to write a GUI helper utility, it takes more time than for a CLI utility. This can lead you to the wrong decision to solve the task manually using the IDE. Automating your job is the best option in most cases. It saves your time and helps to avoid mistakes.
You decide if you need to learn the CLI. I have only given few examples of when it is beneficial. It is hard to switch from using a GUI to a CLI. You have to re-learn many things that you do with Windows Explorer regularly. But once you get the hang of the command shell, your new productivity will surprise you.
Navigating the File System
Let’s start introducing the Unix environment and Bash with a file system. A file system is a software that dictates how to store and read data from disks. It covers the following topics:
- API to access data on the disk that programs can use.
- Universal way for accessing different storage devices.
- Physical operations on the disk storage.
First, we will look at the differences between the directory structure in Unix and Windows. Then we will learn the Bash commands for navigating the file system.
Directory Structure
There is an address bar at the top of the Windows Explorer window. It displays the absolute path to the current directory. An absolute path shows the place of the file system object regardless of the current directory.
Another way to specify the file system object place is using the relative path. It shows you how to reach the object from the current directory.
A directory is a file system cataloging structure. It can contain files and other directories. Windows terminology calls it folder. Both names mean the same kind of file system object.
Figure 2-6 shows an Explorer window. The address bar equals This PC > Local Disk (C:) > msys64 there. It matches the C:\msys64 absolute path. Thus, we see the contents of the msys64 directory on the C drive in the Explorer window.
The letter C in the path denotes the local system disk drive. The local drive means the device that is connected to your computer physically. You can also have a network drive. You access such a device via the network. The system disk means one that has the Windows installation on it.
If you run the MSYS2 terminal emulator, it shows you the current absolute path at the end of the first line. This line behaves like the address bar of Windows Explorer. When you change the current directory, the current path changes too. However, you have to consider that the terminal and Explorer show you different paths for the same current directory. It happens because directory structures of the Unix environment and Windows do not match.
Windows marks each disk drive with a Latin letter. You can open the drive using Explorer as a regular folder. Then you access its content.
For example, let’s open the C system drive. It has a standard set of directories. Windows has created them during the installation process. If you open the C drive in Explorer, you see the following directories there:
WindowsProgram FilesProgram Files (x86)UsersPerfLogs
These directories store OS components, user applications and temporary files.
You can connect extra disk drives to your computer. Another option is to split a single disk into several logical partitions. Windows will assign the Latin letters (D, E, F, etc) to these extra disks and partitions. You are allowed to create any directory structure there. Windows does not restrict you in any way.
The File Allocation Table (FAT) file system dictates how Windows manages disks and provides you access to them. Microsoft developed this file system for the MS-DOS OS. The principles of FAT became the basis of the ECMA-107 standard. The next-generation file system from Microsoft is called NTFS. It replaced the obsolete FAT in modern versions of Windows. However, the basic principles of disks and directory structure are the same in NAT and FAT. The reason for that is the backward compatibility requirement.
The Unix directory structure follows the POSIX standard. This structure gives you less freedom than the Windows one. It has several predefined directories that you cannot move or rename. You are allowed to put your data in the specific paths only.
The POSIX standard says that the file system should have a top-level directory. It is called the root directory. The slash sign / denotes it. All directories and files of all connected disk drives are inside the root directory.
If you want to access the contents of a disk drive, you should mount it. Mounting means embedding the contents of a disk into the root directory. When mounting is done, you can access the disk contents through some path. This path is called a mount point. If you go to the mount point, you enter the file system of the disk.
Let’s compare the Windows and Unix directory structures by example. Suppose that your Windows computer has two local disks C and D. Listing 2-1 shows their directory structure.
Suppose that you have installed the Unix environment on your Windows. Then you run the terminal emulator and get the directory structure from Listing 2-2.
Since you launch the MSYS2 terminal, you enter the Unix environment. Windows paths don’t work there. You should use Unix paths instead. For example, you can access the C:\Windows directory via the /c/Windows path only.
There is another crucial difference between Unix and Windows file systems besides the directory structure. The character case makes strings differ in the Unix environment. It means that two words with the same letters are not the same if their character case differs. For example, the Documents and documents words are not equal. Windows has no case sensitivity. If you type the c:\windows path in the Explorer address bar, it opens the C:\Windows directory. This approach does not work in the Unix environment. You should type all characters in the proper case.
Here is the last point to mention regarding Unix and Windows file systems. Use the slash sign / to separate directories and files in Unix paths. When you work with Windows paths, you use backslash \ for that.
File System Navigation Commands
We are ready to learn our first Bash commands. Here are the steps to execute a shell command:
- Open the terminal window.
- Type the command there.
- Press Enter.
The shell will execute your command.
When the shell is busy, it cannot process your input. You can distinguish the shell’s state by the command prompt. It is a sequence of one or more characters. The default prompt is the dollar sign $. You can see it in Figure 2-4. If the shell prints the prompt, it is ready for executing your command.
Windows Explorer allows you the following actions to navigate the file system:
- Display the current directory.
- Go to a specified disk drive or directory.
- Find a directory or file on the disk.
You can do the same actions with the shell. It provides you a corresponding command for each action. Table 2-1 shows these commands.
| Command | Description | Examples |
|---|---|---|
ls |
Display the contents of the directory. | ls |
| If you call the command without parameters, it shows you the contents of the current directory. | ls /c/Windows |
|
pwd |
Display the path to the current directory. | pwd |
When you add the -W parameter, the command displays the path in the Windows directory structure. |
||
cd |
Go to the directory at the specified | cd tmp |
| relative or absolute path. | cd /c/Windows |
|
cd .. |
||
mount |
Mount the disk to the root file system. If you call the command without parameters, it shows a list of all mounted disks. | mount |
find |
Find a file or directory. The first parameter | find . -name vim |
| specifies the directory to start searching. | find /c/Windows -name *vim* |
|
grep |
Find a file by its contents. | grep "PATH" * |
grep -Rn "PATH" . |
||
grep "PATH" * .* |
Bash can perform pwd and cd commands of Table 2-1 only. They are called built-ins. Special utilities perform all other commands of the table. Bash calls an appropriate utility if it cannot execute your command on its own.
The MSYS2 environment provides a set of GNU utilities. These are auxiliary highly specialized programs. They give you access to the OS features in Linux and macOS. However, their capabilities are limited in Windows. Bash calls GNU utilities to execute the following commands of Table 2-1:
lsmountfindgrep
When you read an article about Bash on the Internet, its author can confuse the “command” and “utility” terms. He names both things “commands”. This is not a big issue. However, I recommend you to distinguish them. Calling a utility takes more time than calling Bash built-in. It causes performance overhead in some cases.
pwd
Let’s consider the commands in Table 2-1. You have just started the terminal. The first thing you do is to find out the current directory. You can get it from the command prompt, but it depends on your Bash configuration. You do not have this feature enabled by default in Linux and macOS.
When you start the terminal, it opens the home directory of the current user. Bash abbreviates this path by the tilde symbol ~. You see this symbol before the command prompt. Use tilde instead of the home directory absolute path. It makes your commands shorter.
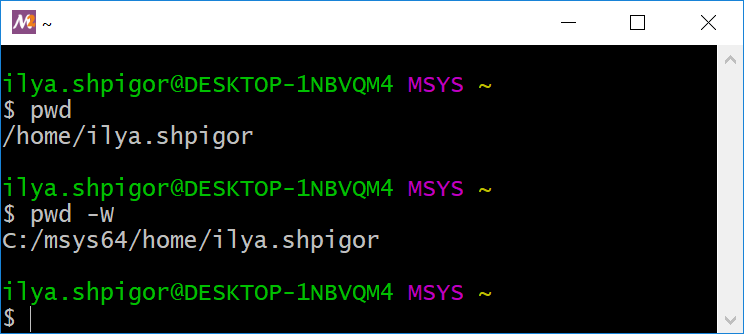
Call the pwd command to get the current directory. Figure 2-7 shows this call and its output. The command prints the absolute path to the user’s home directory. It equals /home/ilya.shpigor in my case.
If you add the -W option to the call, the command prints the path in the Windows directory structure. It is useful when you create a file in the MSYS2 environment and open it in a Windows application afterward. Figure 2-7 shows you the result of applying the -W option.
pwd commandWhat is a command option? When the program has a CLI only, you have very limited ways to interact with it. The program needs some data on input to do its job. The shell provides you a simple way to pass these data. Just type them after the command name. These data are called arguments of the program. Bash terminology distinguishes two kinds of arguments: parameter and option. A parameter is the regular word or character you pass to the program. An option or key is an argument that switches the mode of a program. The standard dictates the option format. It is a word or character that starts with a dash - or a double dash --.
You pass data to the CLI programs and Bash built-ins in the same way. Use parameters and options for doing that.
Typing long commands is inconvenient. Bash provides the autocomplete feature to save your time. Here are the steps for using it:
- Type the first few letters of the command.
- Press the Tab key.
- If Bash finds the command you mean, it completes it.
- If several commands start with the typed letters, autocomplete does not happen. Press Tab again to see the list of these commands.
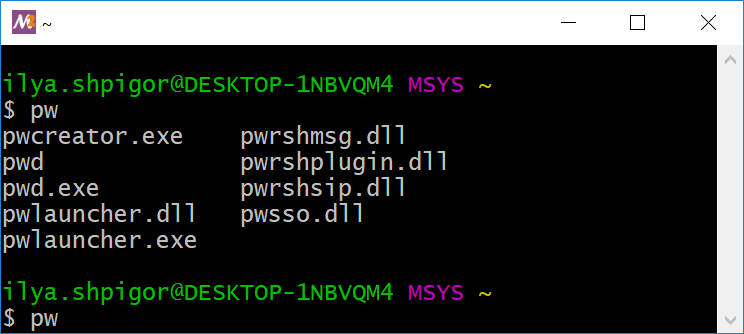
Figure 2-8 demonstrates how the autocomplete feature works. Suppose that you type the “pw” word. Then you press the Tab key twice. Bash shows you the commands that start with “pwd” as Figure 2-8 shows.
ls
We got the current directory using the pwd command. The next step is checking the directory content. The ls utility does this task.
Suppose that you have just installed the MSYS2 environment. Then you launched the terminal first time. You are in the user’s home directory. Call the “ls” command there. Figure 2-9 shows its result. The command output has nothing. It means that the directory is empty or has hidden files and directories only.
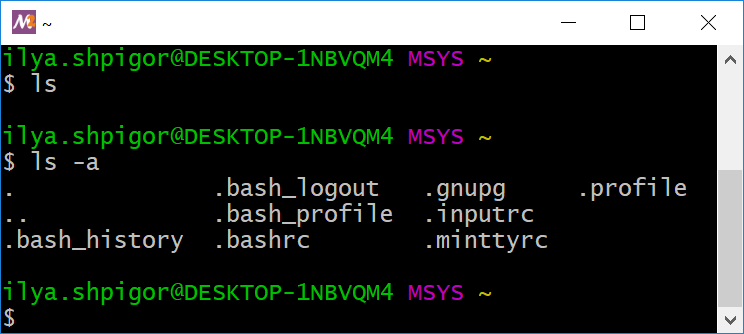
ls utilityWindows has a concept of hidden files and directories. The Unix environment also has it. Applications and OS create hidden files for their own needs. These files store configuration and temporary data.
You can make the file hidden in Windows by changing its attribute. If you want to do the same in Unix, you should add a dot at the beginning of the filename.
When you launch the ls utility without parameters, it does not show you hidden objects. You can add the -a option to see them. Figure 2-9 shows a result of such a call.
The ls utility can show the contents of the specified directory. Pass a directory’s absolute or relative path to the utility. For example, the following command shows the contents of the root directory:
Figure 2-10 shows the output of this command.
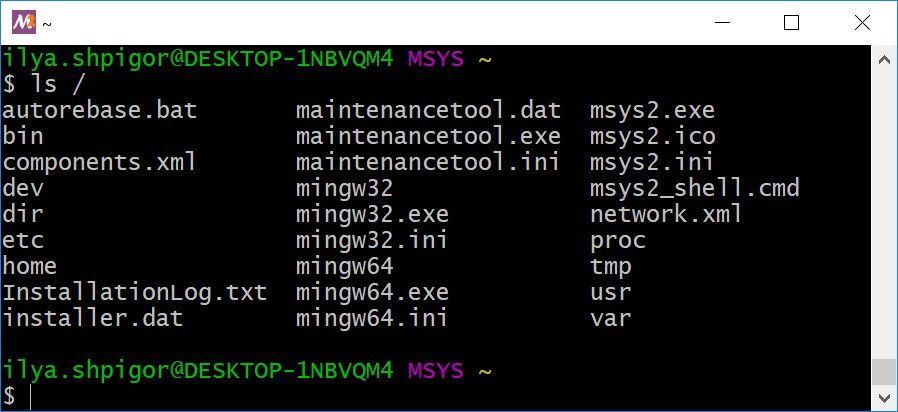
ls utilityThere are no directories /c and /d in Figure 2-10. These are the mount points of C and D disk drives according to Listing 2-2. The mounting points are in the root directory. Why does not the ls utility print them? It happens because the Windows file system does not have a concept of mount points. Therefore, it does not have directories /c and /d. They are present in the Unix environment only. These are not real directories but paths where you can access the disk file systems. The ls utility reads the directory contents in the Windows file system. Thus, it does not show the mount points. The ls utility behaves differently in Linux and macOS. It shows mount points properly there.
mount
If your computer has several disk drives, you can read their mount points. Call the mount utility without parameters for doing that. Figure 2-11 shows its output.
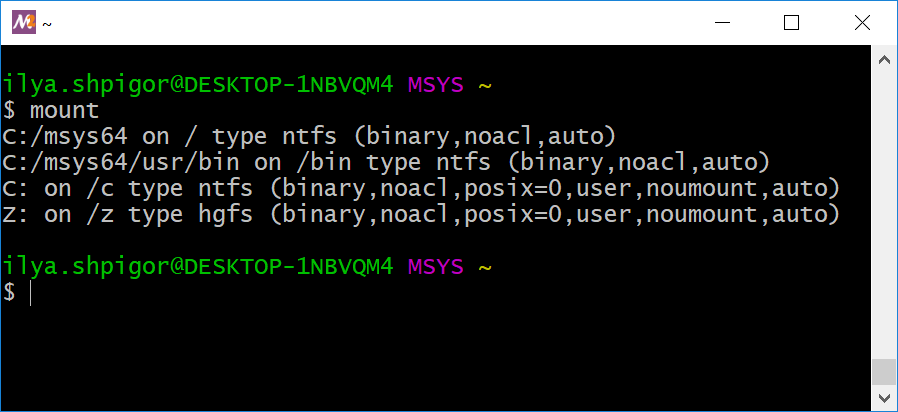
mount utilityConsider this output as a table with four columns. The columns display the following values:
- The disk drive, its partition or directory. It is the object that the OS has mounted to the root directory.
- Mount point. It is the path where you can access the mounted disk drive.
- The file system type of the disk drive.
- Mounting parameters. An example is access permissions to the disk contents.
If we split the mount utility output into these columns, we get Table 2-2.
| Mounted partition | Mount point | FS type | Mounting parameters |
|---|---|---|---|
C:/msys64 |
/ |
ntfs |
binary,noacl,auto |
C:/msys64/usr/bin |
/bin |
ntfs |
binary,noacl,auto |
C: |
/c |
ntfs |
binary,noacl,posix=0,user,noumount,auto |
Z: |
/z |
hgfs |
binary,noacl,posix=0,user,noumount,auto |
Table 2-2 confuses most Windows users. MSYS2 mounts C:/msys64 as the root directory. Then it mounts the C and Z disks into the root. Their mount points are /c and /z. It means that you can access the C drive via the C:/msys64/c Windows path in the Unix environment. However, C:/msys64 is the subdirectory of disk C in the Windows file system. We got a contradiction.
Actually, there is no contradiction. The /c path is the mount point that exists only in the Unix environment. It does not exist in the Windows file system. Therefore, Windows knows nothing about the C:/msys64/c path. It is just invalid if you try to open it via Explorer. You can imagine the mount point /c as the shortcut to drive C that exists in the MSYS2 environment only.
The output of the mount utility took up a lot of screen space. You can clear the terminal window by the Ctrl+L keystroke.
Another useful keystroke is Ctrl+C. It interrupts the currently running command. Use it if the command hangs or you want to stop it.
cd
You have got everything about the current directory. Now you can change it. Suppose that you are looking for the Bash documentation. You can find it in the /usr system directory. Installed applications stores their non-executable files there. Call the cd command to go to the /usr path. Do it this way:
cd /usr
Do not forget about autocompletion. It works for both command and its parameters. Just type “cd /u” and press the Tab key. Bash adds the directory name usr automatically. Figure 2-12 shows the result of the command.
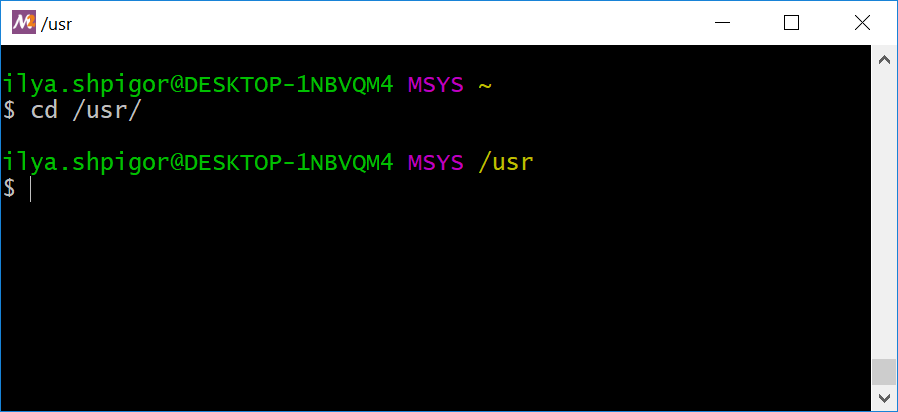
cd commandThe cd command does not output anything if it succeeds. It changes the current directory and that is it. You can read the new path in the line above the command prompt. This line shows the /usr path after our cd call.
The cd command accepts both absolute and relative paths. Relative paths are shorter. Therefore, you type them faster. Prefer them when navigating the file system using a command shell.
There is a simple rule to distinguish the type of path. An absolute path starts with a slash /. An example is /c/Windows/system32. A relative path starts with a directory name. An example is Windows/system32.
Now you are in the /usr directory. You can get a list of its subdirectories and go to one of them. Suppose that you want to go one level higher and reach the root directory. There are two ways for doing that: go to the absolute path / or the special relative path ... The .. path always points to the parent directory of the current one. Use it in the cd call this way:
cd ..
Come back to the /usr directory. Then run the ls utility there. It will show you the share subdirectory. Come to this directory and call ls again. You will find the doc directory there. It contains Bash documentation. Call the cd command this way to reach the documentation:
cd doc/bash
You are in the /usr/share/doc/bash directory now. Call the ls utility there. It will show you several files. One of them is README. It contains a brief description of the Bash interpreter.
You found the documentation file. The next step is to print its contents. The cat utility does that. Here is an example of how to run it:
Figure 2-13 shows the terminal window after the cat call.
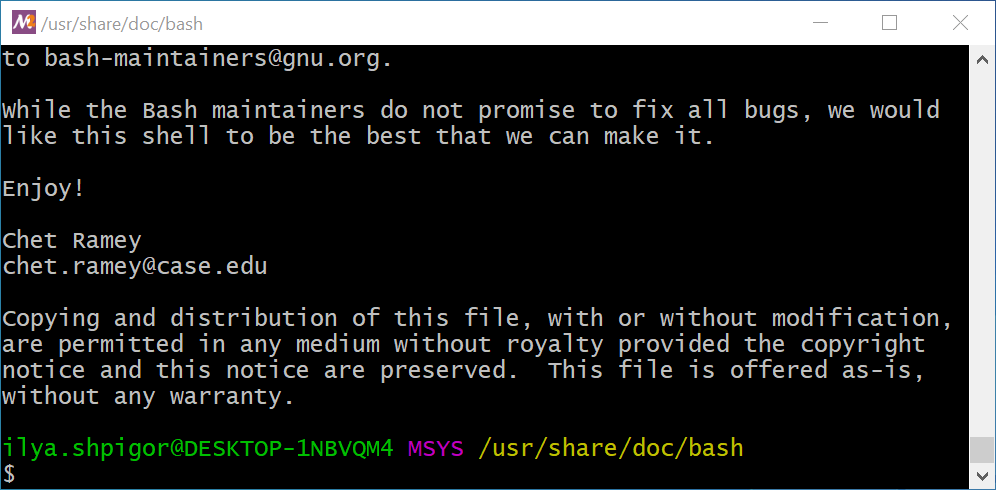
cat utilityecho "$(< README.txt)"
The README file contents do not fit in the terminal window. Therefore, you see the tail of the file in Figure 2-13. Use the scroll bar on the window’s right side to check the head of the file. Also, use the Shift+PageUp and Shift+PageDown hotkeys to scroll pages up and down. The Shift+↑ and Shift+↓ keystrokes scroll the lines.
Command History
Whenever you call a command, Bash saves it in the command history. You can navigate the history by up and down arrow keys. Bash automatically types the corresponding command. You just need to press Enter for launching it. For example, you have called the “cat README” command. Press the up arrow and Enter to repeat it.
The Ctrl+R shortcut brings up a search over all command history. Press Ctrl+R and start typing. Bash will show you the last called command that begins with these characters. Press Enter to execute it.
The history command shows you the whole history. Run it without parameters this way:
history
The history stores the command that you have executed. It does not keep the command that you typed and then erased.
There is a trick to save the command to the history without executing it. Add the hash symbol # before the command and press Enter. Bash stores the typed line, but it does not execute it. This happens because the hash symbol means comment. When the interpreter meets a comment, it ignores this line. However, Bash adds the commented lines in the history because they are legal constructions of the language.
Here is an example of the trick with comment for our cat utility call:
#cat README
You have saved the commented command in the history. Now you can find it there by pressing the up arrow key. Remove the hash symbol at the beginning of the line and press Enter. Bash will execute your command.
You can do the comment trick by the Alt+Shift+3 shortcut. It works in most modern terminal emulators. Here are the steps for using the shortcut:
- Type a command, but do not press Enter.
- Press Alt+Shift+3.
- Bash saves the command in the history without executing it.
Sometimes you need to copy text from the terminal window. It can be a command or its output. Here is an example. Suppose that some document needs a part of the Bash README file. Use the clipboard to copy it. The clipboard is temporary storage for text data. When you select something in the terminal window with a mouse, the clipboard saves it automatically. Then you can paste this data to any other window.
These are the steps to copy text from the terminal window:
- Select the text with the mouse. Hold down the left mouse button and drag the cursor over the required text.
- Press the middle mouse button to paste the text from the clipboard into the same or another terminal window. You insert the text at the current cursor position.
- Right-click and select the “Paste” item to paste the text to the application other than the terminal.
find
It is inconvenient to search for a file or directory with cd and ls commands. The special find utility does it better.
If you run the find utility without parameters, it traverses the contents of the current directory and prints it. The output includes hidden objects. Figure 2-14 shows the result of running find in the home directory.
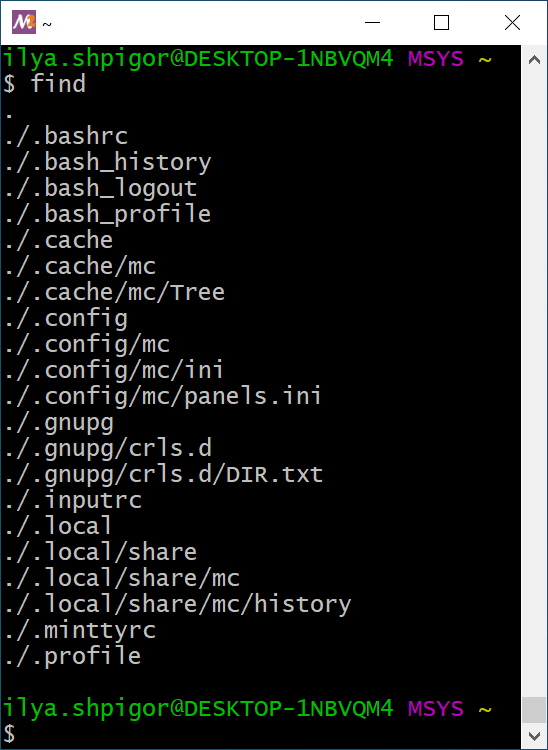
find utilityThe first parameter of find is the directory to search in. The utility accepts relative and absolute paths. For example, the following command shows the contents of the root directory:
You can specify search conditions starting from the second parameter. If the found object does not meet these conditions, find does not print it. The conditions form a single expression. The utility has an embedded interpreter that processes this expression.
An example of the find condition is the specific filename. When you call the utility with such a condition, it prints the found files with this name only.
Table 2-3 shows the format of commonly used conditions for the find utility.
| Condition | Meaning | Example |
|---|---|---|
-type f |
Search files only. | find -type f |
-type d |
Search directories only. | find -type d |
-name <pattern> |
Search for a file or directory with the | find -name README |
| name that matches a glob pattern. The | find -name READ* |
|
| pattern is case-sensitive. | find -name READ?? |
|
-iname <pattern> |
Search for a file or directory with the name that matches a glob pattern. The pattern is case-insensitive. | find -iname readme |
-path <pattern> |
Search for a file or directory with the path that matches a glob pattern. The pattern is case-sensitive. | find -path */doc/bash/* |
-ipath <pattern> |
Search for a file or directory with the path that matches a glob pattern. The pattern is case-insensitive. | find . -ipath */DOC/BASH/* |
-a or -and
|
Combine several conditions using the logical AND. If the found object fits all conditions, the utility prints it. | find -name README -a -path */doc/bash/* |
-o or -or
|
Combine several conditions using the logical OR. If the found object fits at least one condition, the utility prints it. | find -name README -o -path */doc/bash/* |
! or -not
|
The logical negation (NOT) of the | find -not -name README |
| condition. If the found object does not fit the condition, the utility prints it. | find ! -name README |
A glob pattern is a search query that contains wildcard characters. Bash allows three wildcard characters: *, ? and [. The asterisk stands for any number of any characters. A question mark means a single character of any kind.
Here is an example of glob patterns. The string README matches all following patterns:
*MEREADM?*M?R*M?
Square brackets indicate a set of characters at a specific position. For example, the pattern “[cb]at.txt” matches the cat.txt and bat.txt files. You can apply this pattern to the find call this way:
"[cb]at.txt"
Let’s apply glob patterns into practice. Suppose that you do not know the Bash README file location and looking for it. Then you should use the find utility.
Start searching with the utility from the root directory. Now you need a search condition. It is a common practice to store documentation in directories called doc in Unix. Therefore, you can search files in these directories only. This way, you get the following find call:
The command shows you all documentation files on all mounted disks. This is a huge list. You can shorten it with an extra search condition. It should be a separate directory for the Bash documentation. The directory is called bash. Add this path as the second search condition. Then you get the following command:
Figure 2-15 shows the result of this command.
The following find call provides the same result:
Our find calls differ by the -a option between conditions. The option means logical AND. If you do not specify any logical operator between conditions, find inserts AND by default. This is a reason why both calls provide the same result.
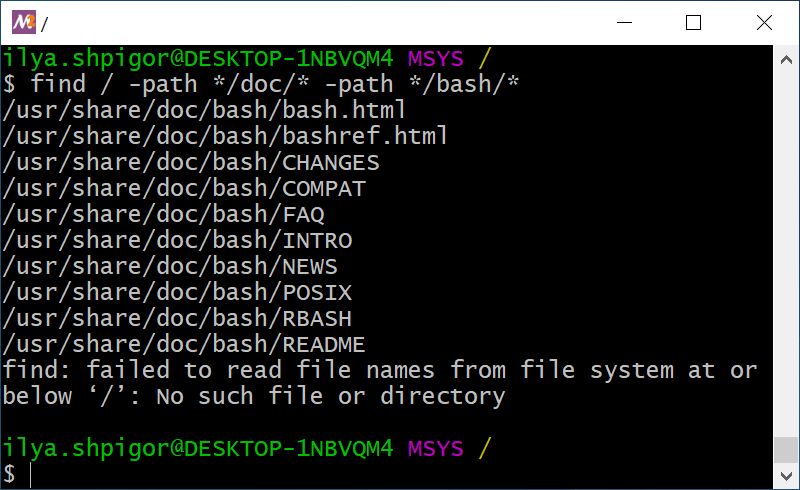
find utilityYou can see that the find utility reports an error in Figure 2-15. The mount points of Windows disk drives cause it. The utility cannot access them when you start searching from the root directory. You can avoid the problem if you start searching from the /c mount point. Do it this way:
There is an alternative solution. You should exclude mount points from the search. The -mount option does this. Apply the option this way:
When you add the second search condition, the find utility shows a short list of documents. You can find the right README file easily there.
There are other ways to search for the documentation file. Suppose that you know its name. Then you can specify it together with an assumed path. You will get the find call like this:
Figure 2-16 shows the result of this command.
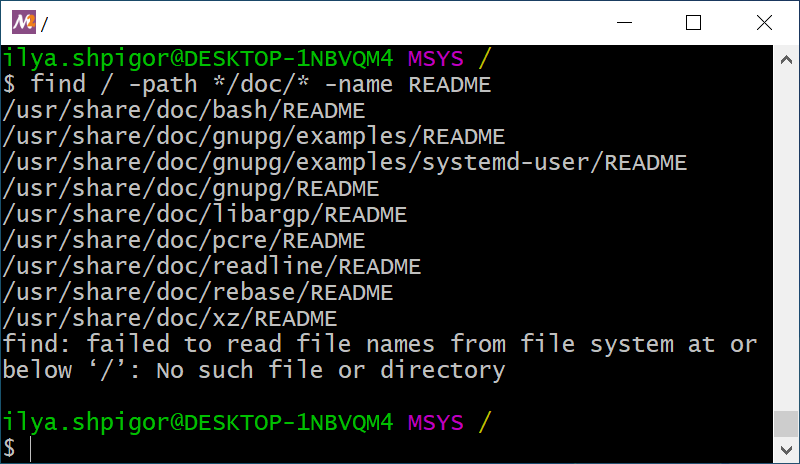
find utilityAgain you got a short list of files. It is easy to locate the right file there.
You can group the conditions of the find utility. Do it using the escaped parentheses. Here is an example of using them. Let’s write the find call that searches README files with path */doc/* or LICENSE files with an arbitrary path. This call looks like this:
\( -path */doc/* -name README \) -o -name LICENSE
Why should you apply backslashes to escape brackets here? The parentheses are part of the Bash syntax. Therefore, Bash treats them like language constructs. When Bash meets parentheses in a command, it performs an expansion. The expansion is the replacement of a part of the command with something else. When you escape parentheses, you force Bash to ignore them. Thus, Bash does not perform the expansion and passes all search conditions to the find utility as it is.
The find utility can process the found objects. You can specify an action to apply as an extra option. The utility will apply this action to each found object.
Table 2-4 shows the find options that specify actions.
| Option | Meaning | Example |
|---|---|---|
-exec command {} \; |
Execute the specified command on each found object. | find -name README -type f -exec cp {} ~ \; |
-exec command {} + |
Execute the specified command once over all found objects. The command receives all these objects on the input. | find -type d -exec cp -t ~ {} + |
-delete |
Delete each of the found files. The utility deletes empty directories only. | find -name README -type f -delete |
Table 2-4 shows that there are two variants of the -exec action. They differ by the last symbol. It can be an escaped semicolon \; or a plus sign +. Use the plus sign only if the called command handles several input parameters. You will make a mistake if the command accepts one parameter only. It will process the first found object and skip the rest.
Let’s apply the -exec action in practice. Suppose that you want to copy files with the Bash documentation into the home directory. You are interested in the HTML files only.
The first step is preparing the correct find call for searching the files. You should apply two conditions here. The first one checks the directory of the Bash documentation. The second condition checks the file extensions. If you combine these conditions, you get the following find call:
"*/doc/bash/*" -name "*.html"
When you pass the glob pattern to the find utility, always enclose it in double quotes. The quotes do the same as the backslash before parentheses. They prevent Bash from expanding the patterns. Instead, Bash passes them to the find utility.
Figure 2-17 shows the result of our find call. You can see that it found HTML files correctly.
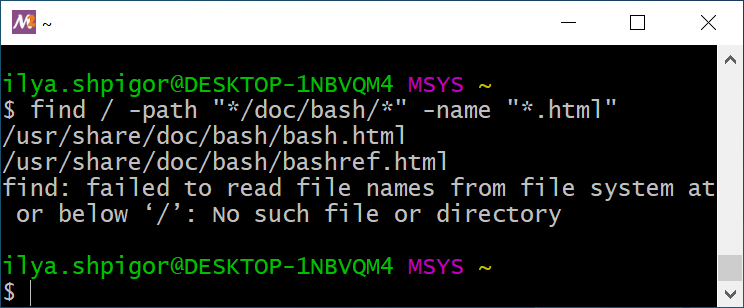
find utilityThe second step for solving your task is adding the -exec action. The action should call the cp utility. This utility copies files and directories to the specified path. It takes two parameters. The first one is the source object to copy. The second parameter is the target path. When you apply the -exec action, you get the following find call:
"*/doc/bash/*" -name "*.html" -exec cp {} ~ \;
Run this command. It prints an error about the mount point. Despite the error, the command did its job. It copied the HTML files into the home directory.
How does the command work in detail? It calls the cp utility for each HTML file it found. When calling the utility, find inserts each found object instead of curly braces {}. Therefore, two cp calls happen here. They look like this:
1 cp ./usr/share/doc/bash/bash.html ~
2 cp ./usr/share/doc/bash/bashref.html ~
Each cp call copies one HTML file to the home directory.
Good job! You just wrote your first program in the language of the find utility. The program works according to the following algorithm:
- Find HTML files starting from the root directory. Their paths match the
*/doc/bash/*pattern. - Copy each found file into the home directory.
The program is quite simple and consists of two steps only. However, it is a scalable solution for finding and copying files. The program processes two or dozens of HTML files with the same speed.
You can combine the -exec actions in the same way as the search conditions. For example, let’s print the contents of each found HTML file and count the number of its lines. You should call the cat utility to print the file contents. The wc utility counts the lines. It takes the filename as an input parameter. If you combine cat and wc calls, you get the following find command:
"*/doc/bash/*" -name "*.html" -exec cat {} \; -exec wc -l {} \;
There is no logical operation between the -exec actions. The find utility inserts logical AND by default. This has a consequence in our case. If the cat utility fails, find does not call the wc utility. It means that find executes the second action only if the first one succeeds. You can apply the logical OR explicitly. Then find always calls wc. Here is the command with logical OR:
"*/doc/bash/*" -name "*.html" -exec cat {} \; -o -exec wc -l {} \;
You can group the -exec actions with escaped parentheses \( and \). It works the same way as grouping search conditions.
find utilityWrite a find call to search for text files in a Unix environment.
Extend the command to print the total number of lines in these files.
Boolean Expressions
The search conditions of the find utility are Boolean expressions. A Boolean expression is a programming language statement. It produces a Boolean value when evaluated. This value equals either “true” or “false”.
The find condition is a statement of the utility’s language. It produces the “true” value if the found object meets its requirement. Otherwise, the condition produces “false”. If there are several conditions in the find call, they make a single compound Boolean expression.
When we have considered the binary numeral system, we already met Boolean algebra. This section of mathematics studies logical operators. They differ from the arithmetic operations: addition, subtraction, multiplication, and division.
You can apply a logical operator to Boolean values or expressions. Using an arithmetic operation does not make sense in this case. Addition or subtraction is trivial for Boolean values. It yields nothing. When you apply a logical operator, you get a condition with strict evaluation rules. This way, you wrote search conditions for the find utility. When you combine several conditions, you get a program with complex behavior.
An operand is an object of a logical operator. Boolean values and expressions can be operands.
Let’s consider Boolean expressions using an example. The example is not related to the find utility or Bash for simplicity. Imagine that you are programming a robot for a warehouse. Its job is to move boxes from point A to point B. You can write the following straightforward algorithm for the robot:
- Move to point A.
- Pick up the box at point A.
- Move to point B.
- Put the box at point B.
This algorithm does not have any conditions. It means that the robot performs each step independently of external events.
Now imagine that an obstacle happens in the robot’s way. For example, another robot stuck there. Executing your algorithm leads to the collision of the robots in this case. You should add a condition in the algorithm to prevent the collision. For example, it can look like this:
- Move to point A.
- Pick up the box at point A.
- If there is no obstacle, move to point B. Otherwise, stop.
- Put the box at point B.
The third step of the algorithm is called conditional statement. All modern programming languages have such a statement.
The conditional statement works according to the following algorithm:
- Evaluate the Boolean expression in the condition.
- If the expression produces “true”, perform the first action.
- If the expression produces “false”, perform the second action.
The robot evaluates the value of the Boolean expression “there is no obstacle” in our example. If there is an obstacle, the expression produces “false” and the robot stops. Otherwise, the robot moves to point B.
When writing the conditional statement, you can combine several Boolean expressions using logical operators. Here is an example. Suppose that the robot tries to pick up a box at point A, but there is no box. Then there is no reason for him to move to point B. You can check this situation in the conditional statement. Add the new Boolean expression there using logical AND (conjunction). Then the robot’s algorithm becomes like this:
- Move to point A.
- Pick up the box at point A.
- If there is a box AND no obstacle, move to point B. Otherwise, stop.
- Put the box at point B.
Logical operators produce Boolean values when evaluated. The result of a logical AND equals “true” when both operands are “true”. In our example, it happens when the robot has a box and there is no obstacle on its way. Otherwise, the result of logical AND equals “false”. It forces the robot to stop.
You have used two more logical operators when learning the find utility. These operators are OR (disjunction) and NOT (negation).
Actually, you have already applied logical NOT in the robot’s algorithm. It stays implicitly in the expression “there is no obstacle”. It equals the following negation: “there is NOT an obstacle”. You can specify the logical NOT in the algorithm explicitly this way:
- Move to point A.
- Pick up the box at point A.
- If there is a box AND there is NOT an obstacle, move to point B. Otherwise, stop.
- Put the box at point B.
You can always replace logical AND by OR with some extra changes. Let’s do it for our example but keep the robot’s behavior the same. You should add the negation to the first Boolean expression and remove it from the second one. Also, you have to change the order of actions in the conditional statement. If the condition produces “true”, the robot stops. If it produces “false”, the robot moves to point B. The new algorithm looks this way:
- Move to point A.
- Pick up the box at point A.
- If there is NOT a box OR there is an obstacle, stop. Otherwise, move to point B.
- Put the box at point B.
Read the new conditional statement carefully. The robot follows the same decisions as before. It stops if it has no box or if there is an obstacle on its way. However, you have exchanged the logical AND to OR. This trick helps you to keep your conditional statements clear. Choose between logical AND and OR depending on your Boolean expressions. Pick one that fits your case better.
You wrote the Boolean expressions as sentences in English in our example. Such a sentence sounds unnatural. You have to read it several times to understand it. This happens because the natural humans’ language is not suitable for writing Boolean expressions. This language is not accurate enough. Boolean algebra uses mathematical notation for that reason.
We have considered logical AND, OR and NOT. You will deal with three more operators in programming often:
- Equivalence
- Non-equivalence
- Exclusive OR
Table 2-5 explains them.
| Operator | Evaluation Rule |
|---|---|
| AND | It produces “true” when both operands are “true”. |
| OR | It produces “true” when any of the operands is “true”. It produces “false” when all operands are “false”. |
| NOT | It produces “true” when the operand is “false” and vice versa. |
| Exclusive OR (XOR) | It produces “true” when the operands have different values (true-false or false-true). It produces “false” when the operands are the same (true-true, false-false). |
| Equivalence | It produces “true” when the operands have the same values. |
| Non-equivalence | It produces “true” when the values of the operands differ. |
Try to memorize this table. It is simple to reach when you use logical operators often.
grep
The GNU utilities have one more searching tool besides find. It is called grep. This utility checks file contents when searching.
How to choose the proper utility for searching? Use find for searching a file or directory by its name, path or metadata. Metadata is extra information about an object. Examples of the file metadata are size, time of creation and last modification, permissions. Use the grep utility to find a file when you know nothing about it except its contents.
Here is an example. It shows you how to choose the right utility for searching. Suppose that you are looking for a documentation file. You know that it contains the phrase “free software”. If you apply the find utility, the searching algorithm looks like this:
- Call
findto list all the files with theREADMEname. - Open each file in a text editor and check if it has the phrase “free software”.
Using a text editor for checking dozens of files takes too much effort and time. You should perform several operations with each file manually: open it, activate the editor’s searching mode, type the “free software” phrase. The grep utility automates this task. For example, the following command finds all lines with the “free software” phrase in the specified README file:
"free software" /usr/share/doc/bash/README
The first parameter of the utility is a string for searching. Always enclose it in double quotes. This way, you prevent Bash expansions and guarantee that the utility receives the string unchanged. Without the quotes, Bash splits the phrase into two separate parameters. This mechanism of splitting strings into words is called word splitting.
The second parameter of grep is a relative or absolute path to the file. If you specify a list of files separated by spaces, the utility processes them all. In the example, we passed the README file path only.
Figure 2-18 shows the result of the grep call.
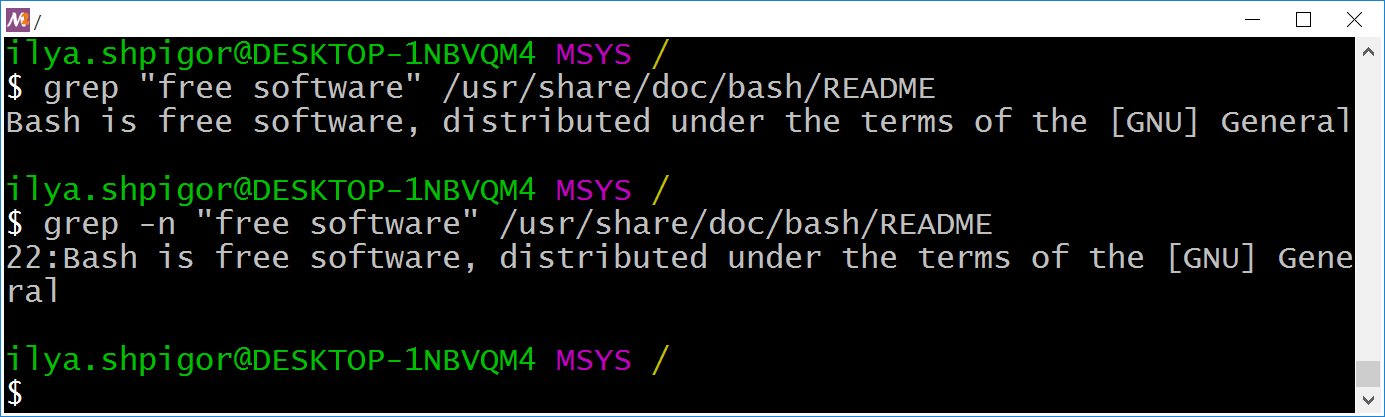
grep utilityYou see all lines of the file where the utility found the specified phrase. The -n option adds the line numbers to the grep output. It can help you to check big text files. Add the option before the first parameter when calling the utility. Figure 2-18 shows the output in this case.
We have learned how to use grep to find a string in the specified files. Now let’s apply the utility to solve our task. You are looking for the documentation files with the phrase “free software”. There are two ways to find them with the grep utility:
- Use Bash glob patterns.
- Use the file search mechanism of the
greputility.
The first method works well when you have all files for checking in the same directory. Suppose that you found two README files: one for Bash and one for the xz utility. You have copied them to the home directory with the names bash.txt and xz.txt. The following two commands find the file that contains the phrase “free software”:
1 cd ~
2 grep "free software" *
The first command changes the current directory to the user’s home. The second command calls the grep utility.
When calling grep, we have specified the asterisk for the target file path. This wildcard means any string. Bash expands all wildcards in the command before launching it. In our example, Bash replaces the asterisk with all files of the home directory. The resulting grep call looks like this:
"free software" bash.txt xz.txt
Launch both versions of the grep call: with the * pattern and with a list of two files. The utility prints the same result for both cases.
You can search for the phrase in a single command. Just exclude the cd call. Then add the home directory to the search pattern. You will get the following grep call:
"free software" ~/*
This command does not handle subdirectories. It means that the grep call does not check the files in the ~/tmp directory, for example.
There is an option to check how the Bash expands a glob pattern. Use the echo command for that. Here are echo calls for checking our patterns:
1 echo *
2 echo ~/*
Run these commands. The first one lists files and subdirectories of the current directory. The second command does the same for the home directory.
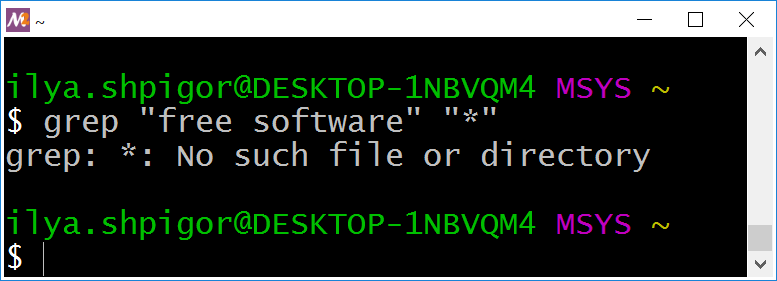
Do not enclose search patterns in double quotes. Here is an example of the wrong command:
"free software" "*"
Quotes prevent the Bash expansion. Therefore, Bash does not insert the filenames to the command but passes the asterisk to the grep utility. The utility cannot handle the glob pattern properly as find does. Thus, you will get an error like Figure 2-19 shows.
grepWhen expanding the * pattern, Bash ignores hidden files and directories. Therefore, the grep utility ignores them too in our example. Add the dot before the asterisk to get the glob pattern for hidden objects. It looks like .*. If you want to check all files at once, specify two patterns separated by the space. Here is an example grep call:
"free software" * .*
The second approach to search files with grep is using its built-in mechanism. It traverses the directories recursively and checks all files there. The -r option enables this mechanism. When using this option, specify the search directory in the second utility’s parameter.
Here is an example of using the -r option:
"free software" .
This command finds the “free software” phrase in the files of the current directory. It processes the hidden objects too.
If you work on Linux or macOS, prefer the -R option instead of -r. It forces grep to follow symbol links when searching. Here is an example:
"free software" .
You can specify the starting directory for searching by a relative or absolute path. Here are the examples for both cases:
1 grep -R "free software" ilya.shpigor/tmp
2 grep -R "free software" /home/ilya.shpigor/tmp
Suppose that you are interested in a list of files that contain a phrase. You do not need all occurrences of the phrase in each file. The -l option switches the grep utility in the mode you need. Here is an example of using it:
"free software" .
Figure 2-20 shows the result of this command.
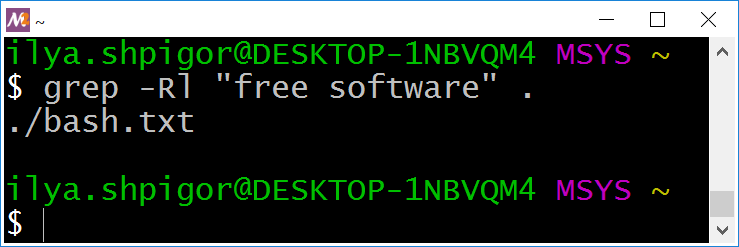
grep outputs filenames onlyYou see a list of files where the phrase “free software” occurs at least once. Suppose that you need the opposite result: a list of files without the phrase. Use the -L option for finding them. Here is an example:
"free software" .
The grep utility processes the text files only. Therefore, it deals well with the source code files. You can use the utility as an add-on to your code editor or IDE.
You may have liked the grep utility. You want to process PDF and MS Office documents with it. Unfortunately, this approach does not work. The contents of these files are not text. It is encoded. You need another utility to process such files. Table 2-6 shows grep alternatives for non-text files.
| Utility | Features |
|---|---|
| pdftotext | It converts a PDF file into text format. |
| pdfgrep | It searches PDF files by their contents. |
| antiword | It converts an MS Office document into text format. |
| catdoc | It converts an MS Office document into text format. |
| xdoc2txt | It converts PDF and MS Office files into text format. |
Some of these utilities are available in the MSYS2 environment. Use the pacman package manager for installing them. The last chapter of the book describes how to use it.
grep utilityWrite a grep call to find system utilities with a free license.
Here are widespread licenses for open-source software:
1. GNU General Public License
2. MIT license
3. Apache license
4. BSD license
Command Information
We got acquainted with commands for navigating the file system. Each command has several options and parameters. We have covered the most common ones only. What if you need a rare feature that is missing in this book? You would need official documentation in this case.
All modern OSes and applications have documentation. However, you rarely need it when using the graphical interface. It happens because graphic elements are self-explanatory in most cases. Therefore, most PC users do not care about documentation.
When working with the CLI, the only way to know about available features of the software is by reading documentation. Besides that, you do not have anything that gives you a quick hint. When using CLI utility, it is crucial to know its basics. The negligence can lead to loss or corruption of your data.
The first versions of Unix had paper documentation. Using it was inconvenient and time-consuming. Soon it became even worse because the documentation volume grew rapidly. It exceeded the size of a single book. The Unix developers introduced the system called man page to solve the issue with documentation. Using this software, you can quickly find the required topic. It contains information about OS features and all installed applications.
The man page system is a centralized place to access documentation. Besides it, every program in Unix provides brief information about itself. For example, the Bash interpreter has its own documentation system. It is called help.
Suppose that you want to get a list of all Bash built-ins. Launch the help command without parameters. Figure 2-21 shows its output.
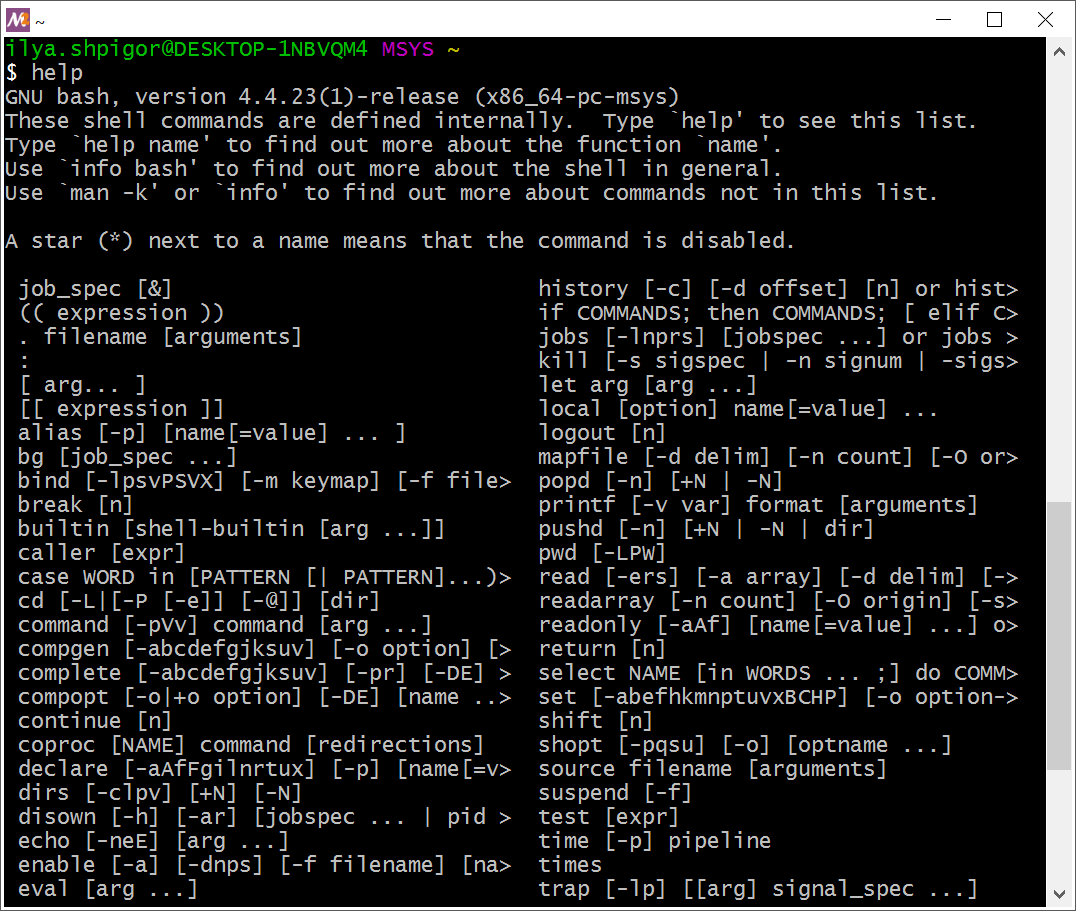
help commandYou see a list of all commands that Bash executes on its own. If some command is missing in this list, Bash calls a GNU utility or another program to execute it.
Here is an example. The cd command presents in the help list. It means that Bash executes it without calling another program. Now suppose you type the find command. It is missing in the help list. Therefore, Bash looks for an executable file with the find name on the disk drive. If it succeeds, Bash launches this file.
Where does Bash look for files that execute your commands? Bash has a list of paths where it searches utilities and programs. The environment variable called PATH stores this list. The variable is a named area of memory. If you write a program in machine code and want to access the memory area, you should specify its address. A variable is a mechanism of a programming language. It allows you to use the variable name instead of the memory address. Therefore, you do not need to remember addresses, which are long numbers.
Bash stores about a hundred environment variables. They hold data that affect the interpreter’s behavior. Most of these data are system settings. We will consider Bash variables in the next chapter.
You can imagine the variable as a value that has a name. For example, you can say: “The time now is 12 hours”. “Time now” is the variable name. Its value equals “12 hours”. The computer stores it in memory at some address. You do not know the address. However, you can ask a computer the value of the “time now” variable. It returns you “12 hours”. This is how the variables work.
The echo command prints strings. It can also show you the value of a variable. For example, the following echo call prints the PATH variable:
echo "$PATH"
Why do we need the dollar sign $ before the variable name? The echo command receives the string on input and outputs it. For example, this echo call prints the text “123”:
echo 123
The dollar sign before a word tells Bash that it is a variable name. The interpreter handles it differently than a regular word. When Bash encounters a variable name in a command, it checks its variable list. If the name presents there, Bash inserts the variable value into the command. Otherwise, the interpreter places an empty string there.
Let’s come back to the echo command that prints the PATH variable. Figure 2-22 shows this output.
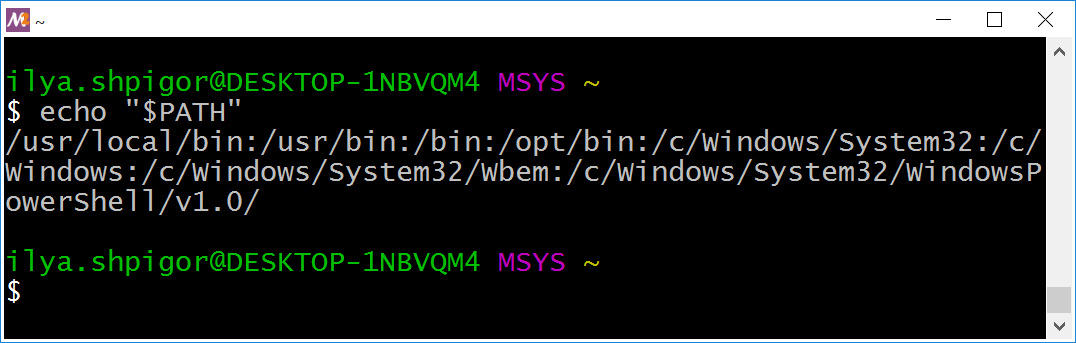
PATH variableWhat does this line mean? It is a list of paths separated by colons. If you write each path on a new line, you get the following list:
The format of the PATH variable raises questions. Why does Bash use colons as delimiters instead of line breaks? Line breaks make it easy to read the list. The reason is the specific behavior of Bash and some utilities when handling line breaks. Colons allow developers to avoid potential problems.
Suppose that you want to locate an executable file of some program on the disk. The PATH variable gives you a hint of where to look. Then you can apply the find utility and locate the file. For example, the following command searches the executable of the find utility:
The command shows you two locations of the find file:
/bin/usr/bin
Both locations present in the PATH variable.
There is a much faster way to locate an executable on the disk. The type Bash built-in does it. Call the command and give it a program name. You will get the absolute path to the program’s executable. Figure 2-23 shows how it works.
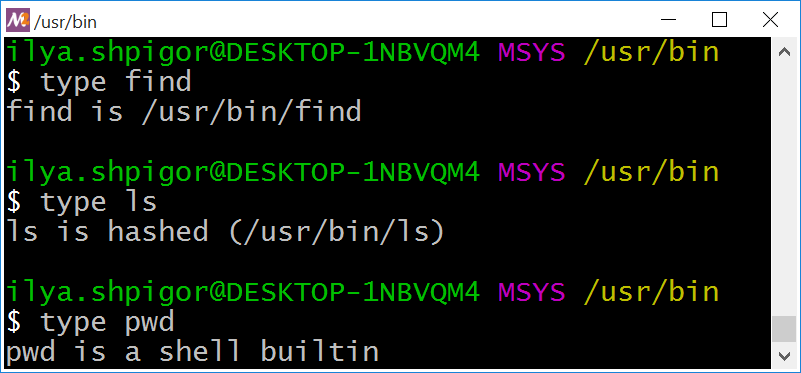
type commandYou see that the /usr/bin directory stores the executables of find and ls utilities. The ls utility is marked as hashed. It means that Bash has remembered its path. When you call ls, the interpreter does not search the executable on the disk. Bash uses the stored path and calls the utility directly. If you move the hashed executable, Bash cannot find it anymore.
You can call the type command and pass a Bash built-in there. Then type tells you that Bash executes this command. Figure 2-23 shows an example of such output for the pwd command.
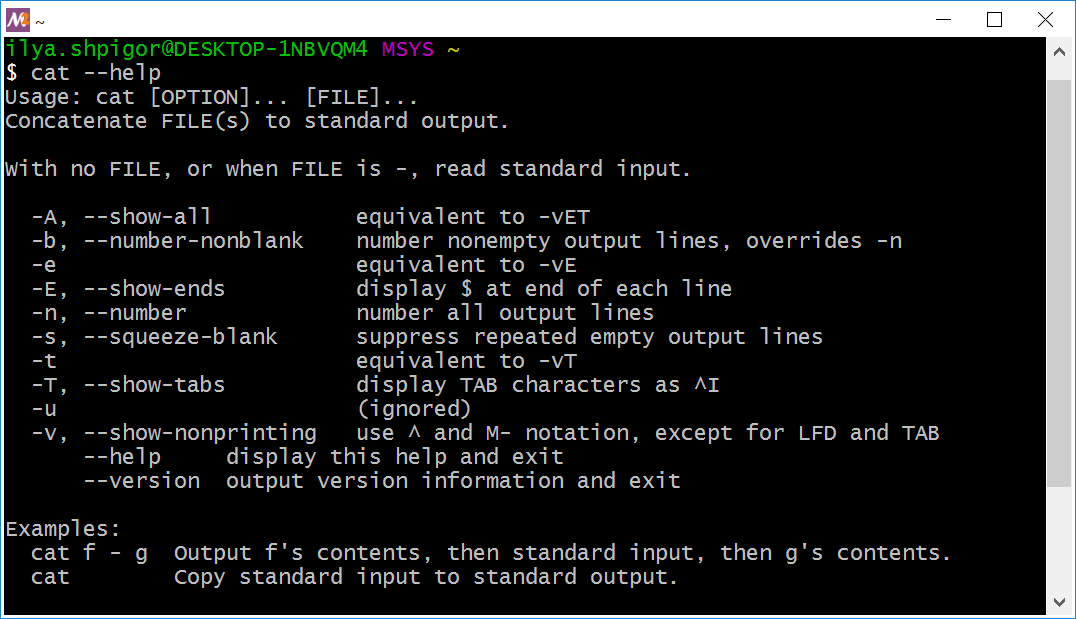
Suppose that you found the executable of the required utility. How do you know the parameters it accepts? Call the utility with the --help option. The option prints a brief help. Figure 2-24 shows this help for the cat utility.
cat utilityIf the brief help is not enough, refer to the documentation system called info. Suppose you need examples of how to use the cat utility. The following command shows them:
Figure 2-25 shows the result of the command.
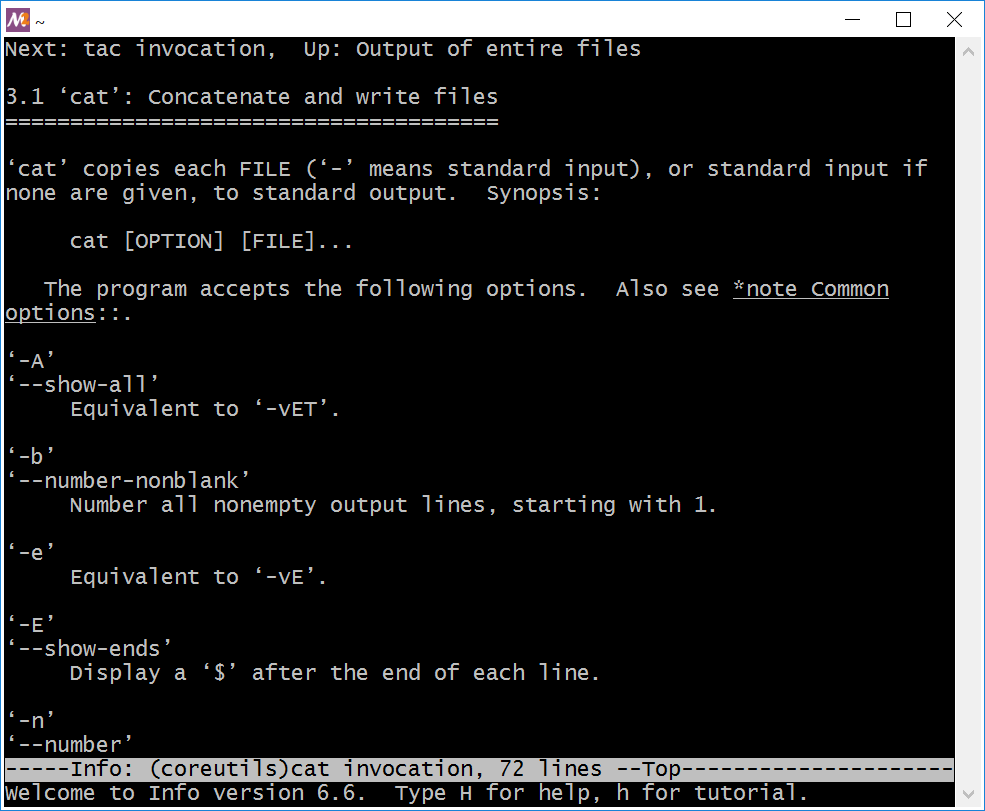
info page for the cat utilityYou see a program for reading text documents. Use the arrow keys, PageUp and PageDown to scroll the text. Press the Q key to end the program.
Developers of GNU utilities have created the info system. Before that, all Unix distributions used the man page system. It is also known as man. The capabilities of info and man are similar. The MSYS2 environment uses the info system, which is more modern.
Your Linux distribution may use man instead of info. Use it in the same way as info. For example, the following man call shows you help for the cat utility:
When you know which utility solves your task, it is easy to get help. What would you do if you don’t know how to solve the task? The best approach is to look for the answer on the Internet. You will find tips there. They are more concise than the manuals for GUI programs. You don’t need screenshots and videos that explain each action. Instead, you will find a couple of lines with command calls that do everything you need.
Actions on Files and Directories
You have learned how to find a file or directory on the disk. Now let’s discuss what you can do with it. If you have an experience with Windows GUI, you know the following actions with file system objects:
- Create
- Delete
- Copy
- Move or rename
Each of these actions has a corresponding GNU utility. Call them to manage the file system objects. Table 2-7 describes these utilities.
| Utility | Feature | Examples |
|---|---|---|
mkdir |
It creates the directory with the specified name and path. | mkdir ~/tmp/docs |
mkdir -p tmp/docs/report |
||
rm |
It deletes the specified file or directory | rm readme.txt |
rm -rf ~/tmp |
||
cp |
It copies a file or directory. The first parameter | cp readme.txt tmp/readme.txt |
| is the current path. The second parameter is the target path. | cp -r /tmp ~/tmp |
|
mv |
It moves or renames the file or directory | mv readme.txt documentation.txt. |
| specified by the first parameter. | mv ~/tmp ~/backup |
Each of these utilities has the --help option. It displays a brief help. Please read it before using the utility the first time. You will find there some modes that this book misses. Refer to the info or man system if you need more details.
It is time to consider the utilities of Table 2-7.
mkdir
The mkdir utility creates a new directory. Specify its target path in the first parameter of the command. Here is an example mkdir call for creating the docs directory:
We specified the absolute path to the docs directory. You can pass the relative path instead. There are two steps to take it:
- Navigate the home directory.
- Call the
mkdirutility there.
Here are the corresponding commands:
1 cd ~
2 mkdir docs
The utility has an option -p. It creates the nested directories. Here is an example of when to use it. Suppose you want to move the documents into the ` ∼/docs/reports/2019 path. However, the docs and reports directories do not exist yet. If you use mkdir in the default mode, you should call it three times to create each of the nested directories. Another option is to call mkdir once with the -p` option like this:
This command succeeds even if the docs and reports directories already exist. It creates only the missing 2019 directory in this case.
rm
The rm utility deletes files and directories. Specify the object to delete by its absolute or relative path. Here are examples of rm calls:
1 rm report.txt
2 rm ~/docs/reports/2019/report.txt
The first call deletes the report.txt file in the current directory. The second one deletes it in the ~/docs/reports/2019 path.
The rm utility can remove several files at once. Specify a list of filenames separated by spaces in this case. Here is an example:
If you want to delete dozens of files, listing them all is inconvenient. Use a Bash glob pattern in this case. For example, you need to delete all text files whose names begin with the word “report”. The following rm call does it:
When removing a write-protected file, the rm utility shows you a warning. You can see how it looks like in Figure 2-26.
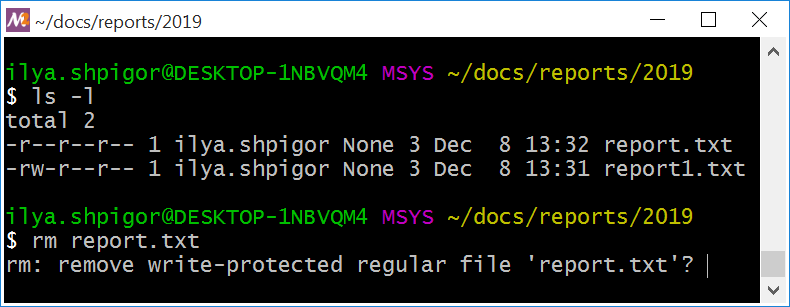
When you see such a warning, there are two options. You can press the Y (short for yes) and Enter. Then the rm utility removes the file. Another option is to press N (no) and Enter. It cancels the operation.
If you want to suppress any rm warnings, use the -f or --force option. The utility removes files without confirmation in this case. Here is an example call:
The rm utility cannot remove a directory unless you pass one of two possible options there. The first option is -d or --dir. Use it for removing an empty directory. Here is an example:
If the directory contains files or subdirectories, use the -r or --recursive option to remove it. Such a call looks like this:
The -r option removes empty directories too. Therefore, you can always use the -r option when calling rm for a directory.
cp and mv
The cp and mv utilities copy and move file system objects. Their interfaces are almost the same. Specify the target file or directory in the first parameter. Pass the new path for the object in the second parameter.
Here is an example. You want to copy the report.txt file. First, you should come to its directory. Second, call the cp utility this way:
This command creates the new file report-2019.txt in the current directory. Both report-2019.txt and report.txt files have the same contents.
Suppose that you do not need the old file report.txt. You can remove it with the rm utility after copying. The second option is to combine copying and removing in a single command. The mv utility does that:
This command does two things. First, it copies the report.txt file with the new name report-2019.txt. Second, it removes the old file report.txt.
Both cp and mv utilities accept relative and absolute paths. For example, let’s copy a file from the home directory to the ~/docs/reports/2019 path. Here is the command for that:
This command copies the report.txt file into the ~/docs/reports/2019 directory. The copy has the same name as the original file.
You can repeat the copying command with relative paths. Come to the home directory and call the cp utility there. The following commands do it:
1 cd ~
2 cp report.txt docs/reports/2019
When copying a file between directories, you can specify the copy name. Here is an example:
This command creates a file copy with the report-2019.txt name.
Moving files works the same way as copying. For example, the following command moves the report.txt file:
The following command moves and renames the file at once:
You can rename a directory using the mv utility too. Here is an example:
This command changes the name of the tmp directory to backup.
The cp utility cannot copy a directory when you call it in the default mode. Here is an example. Suppose you want to copy the directory /tmp with the temporary files to the home directory. You call cp this way:
This command fails.
You must add the -r or --recursive option when copying directories. Then the cp utility can handle them. This is the correct command for our example:
Suppose you copy or move a file. If the target directory already has the file with the same name, the cp and mv utilities ask you to confirm the operation. If you press the Y and Enter keys, utilities overwrite the existing file.
There is an option to suppress the confirmation when copying and moving files. Use the -f or --force option. It forces cp and mv utilities to overwrite the existing files. Here are examples:
1 cp -f ~/report.txt ~/tmp
2 mv -f ~/report.txt ~/tmp
Both commands overwrite the existing report.txt file in the tmp directory. You do not need to confirm these operations.
File System Permissions
Each utility of Table 2-7 checks the file system permissions before acting. These permissions define if you are allowed to operate the target object. Let’s consider this file system mechanism in detail.
The permissions restrict the user actions on the file system. The OS tracks these actions and checks their allowance. Each user can access only his files and directories, thanks to this feature. It also restricts access to the OS components.
The permissions allow several people to share one computer. This workflow was widespread in the 1960s until the advent of PCs. Hardware resources were expensive at that time. Therefore, several users have to operate with one computer.
Today most users have their own PC or laptop. However, the file system permissions are still relevant. They protect your Linux or macOS system from unauthorized access and malware.
Have a look at Figure 2-26 again. There you see the output of the ls utility with the -l option. It is the table. Each row corresponds to a file or directory. The columns have the following meaning:
- Permissions to the object.
- The number of hard links to the file or directory.
- Owner.
- Owner’s group.
- The object’s size in bytes.
- Date and time of the last change.
- File or directory name.
The permissions to the file report.txt equal the “-r–r–r–” string. What does it mean?
Unix stores permissions to a file object as a bitmask. The bitmask is a positive integer. When you store it in computer memory, the integer becomes a sequence of zeros and ones. Each bit of the mask keeps a value that is independent of the other bits. Therefore, you can pack several values into a single bitmask.
What values can you store in a bitmask? This is a set of object’s properties, for example. Each bit of the mask corresponds to one property. If it is present, the corresponding bit equals one. Otherwise, the bit equals zero.
Let’s come back to the file access rights. We can represent these rights as the following three attributes:
- Read permission.
- Write permission.
- Permission to execute.
If you apply a mask of three bits, you can encode these attributes there. Suppose a user has full access to the file. He can read, change, copy, remove or execute it. It means that the user has read, write, and execute permissions to the file. The writing permission allows changing the file and removing it. Therefore, the file permissions mask looks like this:
111
Suppose the user cannot read or execute the file. The first bit of the mask corresponds to the read access. The third bit is execution permission. When you set both these bits to zero, you restrict the file access. Then you get the following mask:
010
You should know the meaning of each bit in the mask if you want to operate it properly. The mask itself does not provide this information.
Our mask with three bits is a simplified example of file permissions. The permissions in Unix follow the same idea. However, bitmasks there have more bits. The ls utility prints these access rights to the report.txt file:
This string is the bitmask. Here dashes correspond to zeroed bits. Latin letters match the set bits. If you follow this notation, you can convert the “-r–r–r–” string to the 0100100100 mask. If all bits of the mask equal ones, the ls prints it like the “drwxrwxrwx” string.
The Unix permissions string has four parts. Table 2-8 explains their meaning.
| d | rwx | rwx | rwx |
|---|---|---|---|
| The directory attribute. | The permissions of the object’s owner. The owner is a user who has created the object. | The permissions of the user group that is attached to the object. By default, it is the group to which the owner belongs. | The permissions of all other users except the owner and the group attached to the object. |
You can imagine the Unix permissions as four separate bitmasks. Each of them corresponds to one part of Table 2-8. All bitmasks have a size of four bits. Using this approach, you can represent the “-r–r–r–” string this way:
0000 0100 0100 0100
The Latin letters in the Unix permissions have special meaning. First of all, they match bits that are set to one. The position of each bit defines the allowed action to the object. You do not need to remember the meaning of each position. The Latin letters give you a hint. For example, “r” means read access. Table 2-9 explains the rest letters.
| Letter | Meaning for a file | Meaning for a directory |
|---|---|---|
| d | If the first character is a dash instead of d, the permissions correspond to a file. |
The permissions correspond to a directory. |
| r | Access for reading. | Access for listing the directory contents. |
| w | Access for writing. | Access for creating, renaming or deleting objects in the directory. |
| x | Access for executing. | Access for navigating to the directory and accessing its nested objects. |
| — | The corresponding action is prohibited. | The corresponding action is prohibited. |
Suppose that all users of the system have full access to the file. Then its permissions look like this:
If all users have full access to a directory, the permissions look this way:
The only difference is the first character. It is d instead of the dash.
Now you know everything to read the permissions of Figure 2-26. It shows two files: report.txt and report1.txt. All users can read the first one. Nobody can modify or execute it. All users can read the report1.txt file. Only the owner can change it. Nobody can execute it.
We have considered commands and utilities for operating the file system. When you call each of them, you specify the target object. You should have appropriate permissions to the object. Otherwise, your command fails. Table 2-10 shows the required permissions.
| Command | Required Bitmask | Required Permissions | Comment |
|---|---|---|---|
ls |
r-- |
Reading | Applied for directories only. |
cd |
--x |
Executing | Applied for directories only. |
mkdir |
-wx |
Writing and executing | Applied for directories only. |
rm |
-w- |
Writing | Specify the -r option for the directories. |
cp |
r-- |
Reading | The target directory should have writing and executing permissions. |
mv |
r-- |
Reading | The target directory should have writing and executing permissions. |
| Execution | r-x |
Reading and executing. | Applied for files only. |
Files Execution
Windows has strict rules for executable files. The file extension defines its type. The Windows loader runs only files with the EXE and COM extensions. These are compiled executable of programs. Besides them, you can run scripts. The script’s extension defines the interpreter that launches it. Windows cannot run the script if there is no installed interpreter for it. The possible extensions of the scripts are BAT, JS, PY, RB, etc.
Unix rules for executing files differ from Windows ones. Here you can run any file if it has permissions for reading and executing. Its extension does not matter, unlike Windows. For example, the file called report.txt can be executable.
There is no convention for extensions of the executable files in Unix. Therefore, you cannot deduce the file type from its name. Use the file utility to get it. The command receives the file path on input and prints its type. Here is an example of calling file:
If you launch the command in the MSYS2 environment, it prints the following information:
(console) x86-64 (stripped to external PDB), for MS Wi\
ndows
The output says that the /usr/bin/ls file has the PE32 type. Files of this type are executable and contain machine code. The Windows loader can run them. The output also shows the bitness of the file “x86-64”. It means that this version of ls utility works on 64-bit Windows only.
If you run the same file command on Linux, it gives another output. For example, it might look like this:
64-bit LSB executable, x86-64, version 1 (SYSV), dynamically linked, in\
terpreter /lib64/ld-linux-x86-64.so.2, for GNU/Linux 2.6.32, BuildID[sha1]=d0bc0fb9b\
3f60f72bbad3c5a1d24c9e2a1fde775, stripped
This is the executable file with machine code. It has the ELF type. Linux loader can run it. The file bitness “x86-64” is the same as in MSYS2.
We have learned to distinguish executable and non-executable files in the Unix environment. Now let’s find out where you can find them.
GNU utilities are part of OS. Therefore, they are available right after installing the system. You do not need to install them separately. Their executable files are located in the /bin and /usr/bin directories. The Bash variable PATH stores these paths. Now the question is, where can you find newly installed applications?
Windows installs new applications in the Program Files and Program Files (x86) directories on the system drive. Each application has its own subdirectory. For example, it can be C:\Program Files (x86)\Notepad++. The installer program copies executables, libraries, configuration and resource files into that subdirectory. The application requires all these files to work properly. You can specify another installation directory than Program Files and Program Files (x86). Then the installer program creates the application subdirectory there.
There are two approaches to install applications to the Unix environment. The first one resembles the Windows way. There is the system directory /opt. The installer program creates an application subdirectory with all its files there.
Here is an example. Suppose that you are installing the TeamViewer application. Its installer creates the /opt/teamviewer subdirectory. You can find the TeamViewer executable there. Developers of proprietary applications prefer this way of installing programs.
Developers of open-source programs follow another approach. An application requires files of various types. Each file type has a separate system directory in Unix. It means that the executable files of all applications occupy the same directory. The documentation for them is in another directory and so on. The POSIX standard dictates the purposes of all system directories.
Table 2-11 explains the purposes of Unix system directories.
| Directory | Purpose |
|---|---|
/bin |
It stores executable files of system utilities. |
/etc |
It stores configuration files of applications and system utilities. |
/lib |
It stores libraries of system utilities. |
/usr/bin |
It stores executable files of user applications. |
/usr/lib |
It stores libraries of user applications. |
/usr/local |
It stores applications that the user compiled on his own. |
/usr/share |
It stores architecture-independent resource files of user applications (e.g. icons). |
/var |
It stores files created by applications and utilities while running (e.g. log files). |
Copying all files of the same type into one directory sounds like a controversial solution. Its disadvantage is the complexity of maintenance. Suppose that the application updates to the next version. It should update all its files in all system directories. If the application misses one of the files, it cannot run anymore.
However, the Unix system directories have an advantage. When you install an application on Windows, it brings all files it needs. There are libraries with subroutines among these files. Some applications require the same libraries to run. When each application has its own copy of the same library, it causes the file system overhead.
The Unix way gets rid of library copies. Suppose that all applications respect the agreement and install their files to the proper system directories. Then applications can locate files of each other. Therefore, they can use the same library if they require it. A single instance of each library is enough for supporting all dependent applications.
Suppose that you have installed a new application (e.g., a browser). Its executable file (for example, firefox) comes to the /usr/bin path according to Table 2-11. How to run this application in Bash? There are several ways for that:
- By the name of the executable file.
- By the absolute path.
- By the relative path.
Let’s consider each way in detail.
You have used the first approach when calling GNU utilities. For example, the following command runs the find utility:
It launches the /usr/bin/find executable file.
Use a similar command to run a newly installed application. Here is an example for the Firefox browser:
Why does this command work? The executable file firefox is located in the /usr/bin system directory. The Bash variable PATH stores this path. When Bash receives the “firefox” command, it searches the executable with that name. The shell takes searching paths from the PATH variable. This way, Bash finds the /usr/bin/firefox file and launches it.
The paths have a specific order in the PATH variable. Bash follows this order when searching for an executable. There is an example. Suppose that both /usr/local/bin and /usr/bin directories contain the firefox executable. If the path /usr/local/bin comes first in the PATH list, Bash always runs the file from there. Otherwise, Bash calls the /usr/bin/firefox executable.
The second way to run an application reminds the first one. Instead of the executable filename, you type its absolute path. For example, the following command runs the Firefox browser:
You would need this approach when launching proprietary applications. They are installed to the /opt system directory. The PATH variable does not contain this path by default. Therefore, Bash cannot find executables there. You can help Bash by specifying an absolute path to the program.
The third approach to run an application is something in between the first and second ways. You use a relative executable path instead of the absolute one. Here is an example for the Firefox browser:
1 cd /usr
2 bin/firefox
The first command navigates to the /usr directory. Then the second command launches the browser by its relative path.
Now let’s change the first command. Suppose that you navigate the /opt/firefox/bin directory. The following try to launch the browser fails:
1 cd /opt/firefox/bin
2 firefox
Bash reports that it cannot find the firefox file. It happens because you are launching the application by the executable filename here. It is the first way to run applications. Bash looks for the firefox executable in the paths of the PATH variable. However, the application is located in the /opt directory, which is not there.
You should specify the relative path to the executable instead of its filename. If the current directory contains the file, mention it in the relative path. The dot symbol indicates the current directory. Thus, the following commands run the browser properly:
1 cd /opt/firefox/bin
2 ./firefox
Now Bash follows your hint and searches the executable in the current directory.
Suppose that you have installed a new application. You are going to use it in your daily work frequently. Add its installation path to the PATH variable in this case. The following steps explain how to do it for the /opt/firefox/bin directory:
1. Navigate the home directory:
cd ~
2. Print its Windows path:
pwd -W
- Open the file
~/.bash_profilein the text editor (for example, Notepad). - Add the following line at the end of the file:
PATH="/opt/firefox/bin:${PATH}"
You have redefined the PATH variable this way. The next chapter considers Bash variables in detail. There you will know how to operate them.
Restart the MSYS2 terminal for applying changes. Now you can run the browser by the name. Bash finds the corresponding executable in the /opt/firefox/bin path correctly.
Extra Bash Features
We have learned the basic Bash built-ins and GNU utilities for operating the file system. Now you know how to run a program or copy a file using the shell. You can do the same things in GUI. When solving such simple tasks, both types of interfaces are effective.
Bash provides several features that a GUI does not have. They give you a significant performance gain when solving some specific tasks. Use these features to automate your work and save time.
These are the Bash features that we are talking about:
- I/O redirection.
- Pipeline.
- Logical operators.
Unix Philosophy
Douglas McIlroy is one of the Unix developers. He wrote several famous command-line utilities: spell, diff, sort, join, graph, speak, and tr. McIlroy summarized the best practices of software development for Unix in the following points:
- Write programs that do one thing and do it well.
- Write programs to work together.
- Write programs to handle text streams, because that is a universal interface.
These principles became a part of the Unix philosophy.
The cornerstone of the Unix philosophy is the plain text format. McIlroy emphasized its significant role and called it a universal interface. Using text format allows you both to develop highly specialized programs and combine them together.
The primary feature of the text format is the simplicity of data exchange between programs. Here is an example. Suppose that two developers wrote two utilities independently of each other. The utilities use the text format for input and output data. This decision allows you to combine these utilities. This way, you apply their feature to solve your task. All you need is to pass the output of the first utility to the input of the second one.
When programs interact easily, there is no need to overload them with extra features. For example, you write a program that copies files. It does the job well. At some moment, you realize that the program needs a search function. This feature will speed up your work because you can find and copy the files at once. You add the searching mechanism and it works well. Then you decide to add the feature of creating new directories. It makes the program more convenient for use and so on. This example shows that the requirements for a self-contained application grow rapidly.
Having a universal interface, you can get a special program for each task. You do not need to add a search function to your program. Just call the find utility and use its results. This utility works better than your code. The reason is many people use it for a long time. Therefore, they find most of its bugs and fixed them.
Always prefer existed utilities when developing software for Unix and Linux.
I/O Redirection
GNU utilities were done by 1987. The idea behind them is to provide open-source software for Unix developers. Most of the original Unix programs were proprietary. It means that you should buy a Unix system and launch them there.
GNU utilities copy all features of their originals. Therefore, they follow the Unix philosophy too. Using them, you get all benefits of the universal text format.
You have several options to transfer text data between the utilities. The simplest way is using the clipboard. Suppose that the data fits one line. Follow these steps to move them from one utility to another one:
- Select the utility’s output with the mouse. Now you got it in the clipboard.
- Type the command to call another utility.
- Paste the clipboard data with the middle mouse button.
- Launch the command.
This approach does not work for copying multiple lines. When you paste them, Bash handles each line break as a command delimiter. It treats the text before the delimiter as a separate command. Thus, the shell loses some copied lines.
Another solution for data transfer is using the file system. Create a temporary file to save the utility’s output. Then pass the filename to another utility. It will read the data there. This approach is more convenient than the clipboard for two reasons:
- There is no limit on the number of text lines to transfer.
- There are no manual operations with the clipboard.
Bash provides you a mechanism that redirects the command’s output to the file. It can also redirect the file contents to the command input. It means that your application does not need a feature for interacting with the file system. Instead, it should support the text data format. Then Bash takes care of redirecting data.
Here is an example of redirecting text data. Suppose that you are looking for the files on the disk. You want to save the searching result into a file. Use the find utility and the redirection operator 1>. Then the utility call looks like this:
1> readme_list.txt
The command creates the readme_list.txt file in the current directory. It writes the find utility’s output there. The file contents look the same as it is printed on the screen without the redirection operator. If the current directory has the readme_list.txt file already, the command overwrites it.
What does the 1> operator mean? It is a redirection of the standard output stream. There are three standard streams in Unix. Table 2-12 explains them.
| Number | Name | Purpose |
|---|---|---|
| 0 | Standard input stream (stdin). | A program receives input data from this stream. By default, it comes from an input device like a keyboard. |
| 1 | Standard output stream (stdout). | A program outputs data there. The terminal window prints this stream by default. |
| 2 | Standard error stream (stderr). | A program outputs the error messages there. The terminal window prints this stream by default. |
Any program operates in the software environment that the OS provides. You can imagine each standard stream as a communication channel between the program and the OS environment.
Early Unix systems have used only physical channels for data input and output. The input channel comes from the keyboard. The same way the output channel goes to the monitor. Then developers introduced the streams as an abstraction for these channels.
The abstraction makes it possible to work with different objects using the same algorithm. It allows replacing a real device input with the file data. Similarly, it replaces printing data to the screen with writing them to the file. The same OS code handles these I/O operations.
The purpose of the input and output streams is clear. However, the error stream causes questions. Why does a program need it? Imagine that you run the find utility to search for files. You do not have access to some directories. When the find utility reads their contents, it is unavailable. The utility reports about these issues in the error messages.
Suppose that the find utility found many files. You can miss error messages in a huge file list. Separating the output and error streams helps you in this case. For example, you can redirect the output stream to the file. Then the utility prints only error messages on the screen.
The 2> operator redirects the standard error stream. Use it in the same way as the 1> operator. Here is an example with the find utility:
2> errors.txt
Each redirection operator has a number before the angle bracket. The number specifies the stream’s number from Table 2-12. For example, the 2> operator redirects the second stream.
If you need to redirect the standard input stream, the operator looks like 0<. You cannot handle this stream with the 0> operator. Here is an example. The following call searches the “Bash” pattern in the README.txt file:
"Bash" 0< README.txt
This command is for demonstration only. It uses the grep utility’s interface that handles the standard input stream. However, the utility can read the contents of a specified file on its own. Use this mechanism and always pass the filename to the utility. Here is an example:
"Bash" README.txt
Let’s take a more complicated example. Some Bash manuals recommend the echo command to print a file’s contents. Using this approach, you can print the README.txt file this way:
echo $( 0< README.txt )
Here echo receives the output of the following command:
0< README.txt
We have used the command substitution Bash mechanism to embed one command into another one. When the shell encounters the $( and ) characters, it executes everything enclosed between them. Then Bash inserts the output of the executed command instead of the $(...) block.
Bash executes our echo call in two steps because of the command substitution. These are the steps:
- Pass the
README.txtfile’s contents to the standard input stream. - Print data from the input stream on the screen.
Please take into account the execution order when invoking the command substitution. Bash executes sub-commands and inserts their results in the order they follow. Only when all substitutions are done, Bash executes the resulting command.
The following find call demonstrates a typical mistake when using the command substitution:
echo $(0< {}) \;
This command should print the contents of all found files. However, it leads to the following Bash error:
{}: No such file or directory
The problem happens because Bash executes the 0< {} command before calling the find utility. When executing this command, the shell redirects the file called {} to the input stream. However, there is no file with such a name. We expect the find utility substitutes the brackets {} by its results. It does not happen because these results are not ready yet.
Replace the echo command with the cat utility. It solves the problem. Then you get the following find call:
{} \;
This command prints the contents of all found files.
Bash users apply the redirection operators frequently. Therefore, the shell developers have added short forms for some of them. Here are these forms:
- The
<operator redirects the input stream. - The
>operator redirects the output stream.
Here is an example of using the > operator:
This command writes a list of all found README files to the readme_list.txt file.
Here is an example of using the < operator:
echo $( < README.txt )
Suppose that you redirect the output stream to a file. Then you found that this file already exists. You decide to keep its content and add new data at the end. Use the >> operator in this case.
Here is an example. You are searching the README files in the /usr and /opt system directories. You want to store the searching results in the readme_list.txt file. Then you should call the find utility twice. The first call uses the > operator. The second call should use the >> operator. These calls look like this:
1 find /usr -path */doc/* -name README > readme_list.txt
2 find /opt -name README >> readme_list.txt
The first find call creates the readme_list.txt file and writes its result there. If the file already exists, the utility overwrites its contents. The second find call appends its output to the end of readme_list.txt. If the file does not exist, the >> operator creates it.
The full form of the >> operator looks like 1>>. You can use this form for both output and error streams. The operator for redirecting the error stream looks like 2>>.
Suppose that you need to redirect both the output and the error streams to the same file. Use the &> and &>> operators in this case. The first operator overwrites an existing file. The second one appends data at the end of the file. Here is an example:
&> result_and_errors.txt
This command works in Bash properly. However, the &> operator may absent in other shells. If you should use the features of the POSIX standard only, apply the 2>&1 operator. Here is an example:
2>&1
The 2>&1 operator is called stream duplication. It redirects both output and error streams to the same target.
Be careful when using stream duplication. It is easy to make a mistake and mix up the operators’ order in a command. If you work in Bash, always prefer the &> and &>> operators.
The following command demonstrates a mistake with using stream duplication:
2>&1 > result_and_errors.txt
This command outputs the error stream data on the screen. However, we expect that these data come to the result_and_errors.txt file. The problem happens because of the wrong order of 2>&1 and > operators.
Here are the details of the problem. The POSIX standard has the concept of the file descriptor. The descriptor is a pointer to a file or communication channel. It serves as an abstraction that makes it easier to handle streams.
When you start a program, both descriptors of output and error streams point to the terminal window. You can associate them with files instead. If you do so, the streams’ descriptors point to that file. The BashGuide article describes this mechanism in detail.
Let’s go back to our find call. Bash processes redirection operators one by one from left to right. Table 2-13 shows how it happens in our example.
| Number | Operation | Result |
|---|---|---|
| 1 | 2>&1 |
Now the error stream points to the same target as the output stream. The target is the terminal window. |
| 2 | > result_and_errors.txt |
Now the output stream points to the file result_and_errors.txt. The error stream is still associated with the terminal window. |
We should change the order of the redirection operators to fix the mistake. The > operator comes first. Then stream duplication takes place. Here is the corrected command:
2>&1
Both output and error streams point to the result_and_errors.txt file here.
Suppose that you want to redirect output and error streams into two different files. Specify redirection operators for each stream one after another in this case. Here is an example:
2> errors.txt
The order of the operators is not important here.
Pipeline
The redirection operators are useful when you save data for manual analysis or processing. When you want to process data with another program, storing them in temporary files is inconvenient. Managing these files takes extra effort. You should keep in mind their paths and remove them after usage.
Unix provides an alternative solution for transferring text data. It is called a pipeline. This mechanism shares data between programs by passing messages. It does not use the file system.
An example will demonstrate how pipelines work. Suppose that you are looking for information about the Bash license. Bash documentation has it. Therefore, you call the grep utility to parse documentation files this way:
"GNU" /usr/share/doc/bash
Another source of the Bash license information is the info help page. You can take this information and transfer it to the grep utility. The pipeline does this job. It takes the output of one program and sends it to the input of another one. The following command does it for info and grep programs:
| grep -n "GNU"
The info utility sends its result to the output stream. This stream is associated with the monitor by default. Therefore, you see the information in the terminal window. You do not get it in our case because of the pipeline.
The vertical bar | means the pipeline operator. When you add it after the info call, the utility’s output comes to the pipeline. You should add another command after the | symbol. This command receives the data from the pipeline. This is the grep call in our example.
The general algorithm of our command looks like this:
- Call the
infoprogram to receive the Bash help. - Send the
infooutput to the pipeline. - Call the
greputility. - Pass the data from the pipeline to
grep.
The grep utility searches the “GNU” word in the input data. If the utility finds the word, it prints the corresponding string of the input data. Check the grep output. If it is not empty, the Bash license is GNU GPL.
We use the -n option when calling grep. It adds the line numbers to the utility’s output. The option helps you find the exact place of the “GNU” word on the help page.
du
Here is a more complex example with pipelines and the du utility. The utility evaluates disk space usage. Run it without parameters in the current directory. The utility passes through all subdirectories recursively. It prints the space occupied by each of them.
Traversing a directory recursively means visiting all its subdirectories. If any of them has subdirectories, we should visit them too, etc. The traversal algorithm looks like this:
- Check the contents of the current directory.
- If there is an unvisited subdirectory, go to it and start from the 1st step of the algorithm.
- If all subdirectories are visited, go to the parent directory and start from the 1st step of the algorithm.
- If it is impossible to go to the parent directory, finish the algorithm.
You should select a starting point for this algorithm. It is a specific file system path. Then the algorithm bypasses all subdirectories starting from this path. The traversing finishes when the algorithm should come to the parent directory of the starting point.
We have considered the universal traversal algorithm. You can add any action to it for processing each subdirectory. The action of the du utility is calculating disk space usage.
The algorithm of the du utility looks like this:
- Check the contents of the current directory.
- If there is an unvisited subdirectory, go to it and start from the 1st step of the algorithm.
- If there are no subdirectories:
3.1 Calculate and print the disk space occupied by the current directory.
3.2 Go to the parent directory.
3.3 Start from the 1st step of the algorithm.
- If it is impossible to go to the parent directory, finish the algorithm.
When calling the du utility, you can specify a path to a file or directory. If you pass the file’s path, the utility prints its size and finishes. In the case of the directory, it executes the traversing algorithm.
Here is an example of the du call for the /usr/share path:
It gives the following output:
 1 261     /usr/share/aclocal
 2 58      /usr/share/awk
 3 3623    /usr/share/bash-completion/completions
 4 5       /usr/share/bash-completion/helpers
 5 3700    /usr/share/bash-completion
 6 2       /usr/share/cmake/bash-completion
 7 2       /usr/share/cmake
 8 8       /usr/share/cygwin
 9 1692    /usr/share/doc/bash
10 85      /usr/share/doc/flex
11 ...
You see a table of two columns. The right column shows the subdirectories. The left column shows the number of bytes they occupy.
You can add the statistics for the files to the du output. Use the -a option for that. Here is an example du call:
The -h option improves the du output. The option converts bytes to kilobytes, megabytes, and gigabytes.
Suppose that you want to evaluate the size of all HTML files in the /usr/share path. The following command does it:
| grep "\.html"
Here the pipeline redirects the du output to the grep input. The grep utility filters it and prints the lines that match the “.html” pattern.
The backslash \ escapes the dot in the “.html” pattern. The dot means a single occurrence of any character. If you specify the “.html” pattern, the grep output includes non-HTML files (like pod2html.1perl.gz) and subdirectories (like /usr/share/doc/pcre/html). When you escape the dot, the grep utility treats it as a dot character.
The pipeline combines calls of du and grep utilities in our example. However, you can combine more than two commands. Suppose that you need to sort the found HTML files. Call the sort utility for doing this job. Then you get the following pipeline :
| grep "\.html" | sort -h -r
The sort utility sorts the strings in ascending lexicographic order when called without options. The following example explains the lexicographic order. Suppose that you have a file. It has this contents:
1 abc
2 aaaa
3 aaa
4 dca
5 bcd
6 dec
You call the sort utility for this file. It gives you the following output:
1 aaa
2 aaaa
3 abc
4 bcd
5 dca
6 dec
The -r option of the utility reverts the sorting order. You get this output when applying the option:
1 dec
2 dca
3 bcd
4 abc
5 aaaa
6 aaa
The du utility prints it results in the table. The first column contains sizes of files and directories. The sort utility process its input data line by line from left to right. Suppose that you transfer the du output to the sort input. Then the sort utility deals with numbers which are sizes of objects. The lexicographic sorting does not work well in this case. An example will explain the issue to you.
There is a file with three integers:
1 3
2 100
3 2
If you call the sort utility for this file, it gives you this result:
1 100
2 2
3 3
The utility deduces that 100 is less than 2 and 3. It happens because sort compares strings but not digits. It converts each character of two lines to the corresponding ASCII code. Then the utility compares these codes one by one from left to right. When the first difference happens, the utility chooses the smaller string and puts it first. This string has the character with the smaller code.
The -n option forces sort to compare digits instead of strings. If you add this option, the utility converts all string into the numbers and compare them. Using this option, you get the correct sorting order like this:
1 2
2 3
3 100
Let’s come back to our command:
| grep "\.html" | sort -h -r
It works well because of the -h option of the sort utility. This option forces the utility to convert the object sizes to integers. For example, it converts “2K” to “2048” integer. If sort meets the “2048” string, the utility treats it as an integer. This way, sort can process the du output.
You can combine pipelines with stream redirection. Suppose that you want to save the filtered and sorted du output to the file. The following command does it:
| grep "\.html" | sort -h -r > result.txt
The result.txt file gets the sort output here.
There is an option to split data streams when you combine pipelines and the redirection operator. For example, you want to write the output stream into the file and pass it to another utility at once. Bash does not have a mechanism for this task. However, you can call the tee utility for doing that. Here is an example:
| tee result.txt
The command prints the du output on the screen. It writes this output into the result.txt file at the same time. The tee utility duplicates its input stream to the specified file and the output stream. The utility overwrites the contents of result.txt if it exists. Use the -a option if you want to append data to the existing file.
Sometimes you need to check the data flow between commands in a pipeline. The tee utility helps you in this case. Just call the utility between the commands in the pipeline. Here is an example:
| tee du.txt | grep "\.html" | tee grep.txt | sort -h -r > resul\
t.txt
Each tee call stores the output of the previous pipeline command to the corresponding file. This intermediate output helps you to debug possible mistakes. The result.txt file contains the final result of the whole pipeline.
xargs
The find utility has the -exec parameter. It calls the specified command for each found object. This behavior resembles a pipeline: find passes its result to another program. These two mechanisms look similar, but their internals differs. Choose an appropriate one depending on your task.
Let’s look at how the find utility performs the -exec action. The utility has a built-in interpreter. When it receives the -exec action on input, it calls the specified program there. The interpreter passes to the program whatever the find utility has found. Note that Bash is not involved in the -exec call. Therefore, you cannot use the following Bash features there:
- built-in Bash commands
- functions
- pipelines
- stream redirection
- conditional statements
- loops
Try to run the following command:
echo {} \;
The find utility calls the echo Bash built-in here. It works correctly. Why? Actually, find calls the echo utility. It has the same name as the Bash command. Unix environment provides several utilities that duplicate the Bash built-ins. You can find them in the /bin system directory. For example, there is the /bin/echo executable there.
Sometimes you need a Bash feature in the -exec action. There is a trick to get it. Run the shell explicitly and pass a command to it. Here is an example:
'echo {}' \;
The previous command calls the echo utility. This command calls the echo Bash built-in. They do the same and print the find results on the screen.
Another option to process the find results is applying pipeline. Here is an example:
| grep "bash"
The command’s output looks like this:
1 /home/ilya.shpigor/.bashrc
2 /home/ilya.shpigor/.bash_history
3 /home/ilya.shpigor/.bash_logout
4 /home/ilya.shpigor/.bash_profile
The pipeline receives text data from the find utility. Then it transfers these data to the grep utility. Finally, grep prints the filenames where the pattern “bash” occurs.
The -exec action behaves in another way. No text data is transferred in this case. The find interpreter constructs a program call using the find results. It passes the paths of found files and directories to the program. These paths are not plain text.
You can use a pipeline and get the -exec action behavior. Apply the xargs utility for that.
Here is an example. Suppose that you want to find the pattern in the contents of the found files. The grep utility should receive file paths but not the plain text in this case. You can apply pipeline and xarg to solve this task. The solution looks like this:
| xargs grep "bash"
Here is the command’s output:
 1 /home/ilya.shpigor/.bashrc:# ~/.bashrc: executed by bash(1) for interactive shells.
 2 /home/ilya.shpigor/.bashrc:# The copy in your home directory (~/.bashrc) is yours, p\
 3 lease
 4 /home/ilya.shpigor/.bashrc:# User dependent .bashrc file
 5 /home/ilya.shpigor/.bashrc:# See man bash for more options...
 6 /home/ilya.shpigor/.bashrc:# Make bash append rather than overwrite the history on d\
 7 isk
 8 /home/ilya.shpigor/.bashrc:# When changing directory small typos can be ignored by b\
 9 ash
10 ...
The xargs utility constructs a command. The utility takes two things on the input: parameters and text data from the input stream. The parameters come in the first place in the constructed command. Then all data from the input stream follows.
Let’s come back to our example. Suppose that the find utility found the ~/.bashrc file. The pipeline passes the file path to the following xargs call:
"bash"
The xargs utility receives two parameters in this call: “grep” and “bash”. Therefore, it constructs the command that starts with these two words. Here is the result:
"bash"
Then xargs do the second step. It takes text data from the input stream and converts them to the parameters for the constructed command. The pipeline passes the ~/.bashrc path to xargs. The utility uses it for making this command:
"bash" ~/.bashrc
The xargs utility does not invoke Bash for executing the constructed command. It means that the command has the same restrictions as the -exec action of the find utility. No Bash built-ins and features are allowed there.
The xargs utility places the parameters made from the input stream at the end of the constructed command. In some cases, you want to change their position. For example, you want to place the parameters in the middle of the command. The -I option of xargs does that.
Here is an example. Suppose that you want to copy the found HTML files to the home directory. The cp utility does it. The only task is placing its parameters in the proper order when constructing the cp call. Use the -I option of xargs this way to get it:
"*.html" | xargs -I % cp % ~
When you apply the -I option, you specify the place to insert parameters by the percent sign %. You can replace the percent sign with any string. Here is an example:
"*.html" | xargs -I FILE cp FILE ~
The xargs utility receives several lines via the pipeline. It constructs the cp call per each received line. The utility creates the following two commands in our example:
1 cp /usr/share/doc/bash/bash.html /home/ilya.shpigor
2 cp /usr/share/doc/bash/bashref.html /home/ilya.shpigor
The -t option of xargs displays the constructed commands before executing them. Use it for checking the utility’s results and debugging. Here is an example of applying the option:
"*.html" | xargs -t -I % cp % ~
We have considered several cases of using find with a pipeline. These examples are for educational purposes only. Do not apply them in practice! Use the -exec action of the find utility instead of pipelines. This way, you avoid issues when processing filenames with spaces and line breaks.
There are very few cases when combining find and a pipeline makes sense. One of these cases is the parallel processing of found files.
Here is an example. When you call the cp utility in the -exec action, it copies files one by one. It is inefficient if your CPU has several cores and the hard disk has a high access speed. You can speed up the operation by running it in several parallel processes. The -P parameter of the xargs utility does that. Specify the number of the processes in this parameter. They will execute the constructed command in parallel.
Suppose your computer’s processor has four cores. Then you can copy files in four parallel processes. The following command does it:
"*.html" | xargs -P 4 -I % cp % ~
This command copies four files at once. As soon as one of the parallel processes finishes, it handles the next file. This approach speeds up the processing of time-consuming tasks considerably. The performance gain depends on the configuration of your hardware.
Many GNU utilities can handle text data from the input stream. They work well in pipelines. Table 2-14 shows the most commonly used of these utilities.
| Utility | Description | Examples |
|---|---|---|
xargs |
It constructs a command from parameters and the input stream data. | find . -type f -print0 | xargs -0 cp -t ~ |
grep |
It searches for text that matches | grep -A 3 -B 3 "GNU" file.txt |
| the specified pattern. | du /usr/share -a | grep "\.html" |
|
tee |
It redirects the input stream to the output stream and file at the same time. | grep "GNU" file.txt | tee result.txt |
sort |
It sorts strings from the input stream | sort file.txt |
in forward or reverse order (-r). |
du /usr/share | sort -n -r |
|
wc |
It counts the number of lines (-l), words (-w), |
wc -l file.txt |
letters (-m) and bytes (-c) in the specified file or input stream. |
info find | wc -m |
|
head |
It outputs the first bytes (-c) or lines (-n) |
head -n 10 file.txt |
| of a file or text from the input stream. | du /usr/share | sort -n -r | head -10 |
|
tail |
It outputs the last bytes (-c) or lines (-n) |
tail -n 10 file.txt |
| of a file or text from the input stream. | du /usr/share | sort -n -r | tail -10 |
|
less |
It is the utility for navigating | less /usr/share/doc/bash/README |
| text from the input stream. Press the Q key to exit. | du | less |
Pipeline Pitfalls
The pipeline is a convenient Bash feature. You will apply it often when working with the shell. Unfortunately, you can easily make a mistake using the pipeline. Let’s consider its pitfalls by examples.
You can expect that the same result from the following two commands:
1 find /usr/share/doc/bash -name "*.html"
2 ls /usr/share/doc/bash | grep "\.html"
These commands provide different results in some cases. The problem happens when you pass the filenames through the pipeline.
The root cause of the problem came from the POSIX standard. The standard allows all printable characters in the file and directory names. It means that spaces and line breaks are allowed. The only forbidden character is the null character (NULL). This rule can lead to unexpected consequences.
Here is an example. Create a file in the home directory. The filename should contain the line break. This is a control character that matches the \n escape sequence in the ASCII encoding. Call the touch utility to create the empty file this way:
$'test\nfile.txt'
The touch utility updates the modification time of the file. It is a primary task of the utility. If the file does not exist, touch creates it. Such a secondary feature of a program is called the side effect.
You need to create two extra files for our test. Call them test1.txt and file1.txt. The following command does that:
Now call the ls utility for the home directory. Pass its output to grep using the pipeline. Here are the example commands:
1 ls ~ | grep test
2 ls ~ | grep file
Figure 2-27 shows the output of these commands.
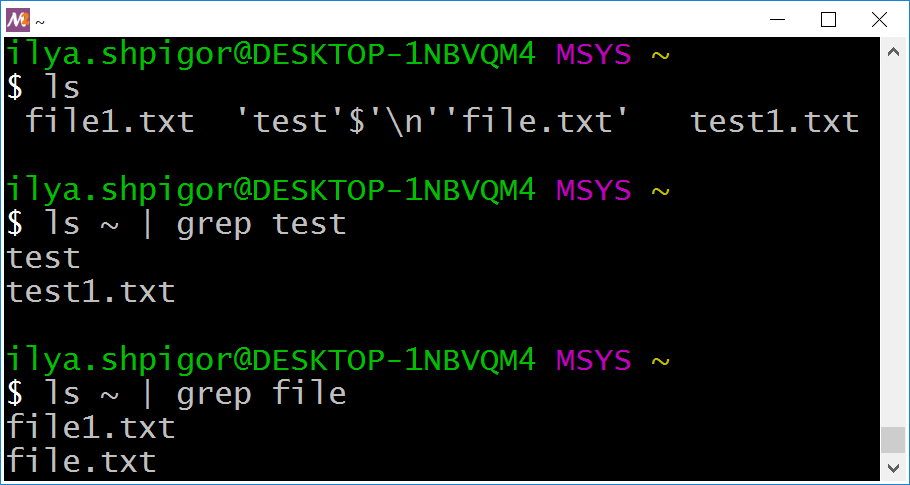
ls and grep utilitiesBoth commands truncate the test\nfile.txt filename.
Try to call ls without the pipeline. You will see that the utility prints the ‘test’$’\n’‘file.txt’ filename properly. When you pass it via the pipeline, the escaping sequence \n is replaced by the line break. It leads to splitting the filename into two parts. Then grep handles these parts separately.
There is another potential problem. Suppose you search and copy the file. Its name has a space (for example, “test file.txt”). Then the following command fails:
| xargs cp -t ~/tmp
Here xargs constructs the following call of the cp utility:
test file.txt
The command copies the test and file.txt files to the ~/tmp path. However, none of these files exists. The reason for the error is the word splitting mechanism. Bash splits lines in words by the spaces. You can disable the mechanism using double quotes. Here is an example for our command:
| xargs -I % cp -t ~/tmp "%"
It copies the “test file.txt” file properly.
Double quotes do not help if the filename has a line break. The only solution here is not to use ls. The find utility with the -exec action does this job right. Here is an example:
"*.txt" -exec cp -t tmp {} \;
It would be great not to use pipelines with file and directory names at all. However, you need it for solving some tasks. Combine the find and xargs utilities in this case. This approach works well if you call find with the -print0 option. Here is an example:
| xargs -0 -I % bsdtar -cf %.tar %
The -print0 option changes the find output format. The default format is a list of the found objects. The separator between the objects is a line break. The -print0 option changes the separator to the null character.
You have changed the find output format. Now you should change the xargs call accordingly. The xarg utility separates the input stream data by line breaks. The -0 option changes the separator to the null character. This way, you reconcile the output and input formats of two utilities.
The -Z option changes the grep output format in the same manner. It replaces the line breaks with the null characters. Using the option, you can pass the grep output via the pipeline without errors. Here is an example:
"GNU" . | xargs -0 -I % bsdtar -cf %.tar %
This command searches files that contain the “GNU” pattern. Then the pipeline passes the found filenames to the xargs utility. The utility constructs the bsdtar call for archiving these files.
Here are the general hints for using pipelines:
- Be aware of spaces and line breaks when passing file and directory names via the pipeline.
- Never process the
lsoutput. Use thefindutility with the-execaction instead. - Always use
-0option when processing the object names byxargs. Pass only null character separated names to the utility.
Logical Operators
The pipeline allows you to combine several commands. These commands together make an algorithm with a linear sequence. The computer executes actions of such an algorithm one by one without any conditions.
Suppose that you need a more complex algorithm. There, the result of the first command determines the next step. The computer does one action if the command succeeds. Otherwise, it does another action. Such a dependency is known as a conditional algorithm. The pipeline does not fit in this case.
Here is an example of the conditional algorithm. You want to write a command to copy the directory. If this operation succeeds, the command writes the “OK” line in the log file. Otherwise, it writes the “Error” line there.
You can write the following command using the pipeline:
| echo "OK" > result.log
This command does not work properly. It writes the “OK” line to the result.log file regardless of the copying result. Even if the docs directory does not exist, you get the “OK” line. The log file reports that the operation succeeded, but it has failed in fact.
The cp utility result should define the echo output. You can get this behavior using the && operator. Then the command becomes like this:
&& echo "OK" > result.log
Now echo prints the “OK” line when the cp utility succeeds. Otherwise, there is no output to the log file.
The && operator performs the logical conjunction (AND). Its operands are Bash commands, which are actions. It differs from a regular AND that operates the Boolean expressions. These expressions are conditions.
Let’s have a look at how the logical conjunction deals with the Bash commands. The POSIX standard requires each program to return an exit code (or exit status) when it is done. The zero code means that the program finished successfully. Otherwise, the code takes a value from 1 to 255. Each Bash built-in returns the exit code too.
When you apply logical conjunction to the commands, the operator handles their exit codes. Bash executes the commands. Then the shell converts their exit codes into Boolean values. These values are the allowed operands of the logical operator.
Let’s go back to our example command:
&& echo "OK" > result.log
Suppose the cp utility completes successfully. It returns the zero code in this case. The zero code matches the “true” Boolean value. Therefore, the left-hand side (LHS) operand of the && operator equals “true”. This information is not enough to deduce the result of the whole expression. It can be “true” or “false” depending on the right-hand side (RHS) operand. Then the && operator has to execute the echo command. This command always succeeds and returns the zero code. Thus, the result of the && operator equals “true”.
It is not clear how do we use the result of the && operator in our example. The answer is we do not use it at all. Logical operators are needed to calculate Boolean expressions. However, they are often used in Bash for their side effect. This side effect is a strict order of operands evaluation.
Let’s consider the case when the cp utility fails in our example. It returns a non-zero exit code. This code is equivalent to the “false” value for Bash. In this case, the && operator can deduce the value of the whole Boolean expression. It does not need to calculate the RHS operand. If at least one operand of the logical AND is “false”, the operator’s result equals “false”. Thus, the exit code of the echo command is not required. Then the && operator does not execute it. This way, the “OK” line does not come to the log file.
We have considered the behavior of logical operators that is called the short-circuit evaluation. It means calculation only those operands that are sufficient to deduce the value of the whole Boolean expression.
echo $?
We have done only the first part of our task. Now the command prints the “OK” line in the log file when copying succeeds. We need to handle the case of a failure too. If copying fails, the log file should get the “Error” line. You can add this behavior with the || operator, which does logical OR.
When adding the OR operator, our command looks like this:
&& echo "OK" > result.log || echo "Error" > result.log
This command implements the conditional algorithm that we need. If the cp utility finishes successfully, the log file gets the “OK” line. Otherwise, it gets the “Error” line. Let’s consider how it works in detail.
First, we would make our command simpler for reading. Let’s denote all operands by Latin letters. The “A” letter matches the cp call. The “B” letter marks the first echo call with the “OK” line. The “C” letter is the second echo call. Then we can rewrite our command this way:
The && and || operators have the same priorities. Bash calculates Boolean expressions from the left to the right side. The operators are called left-associative in this case. Given this, we can rewrite our expression this way:
Adding parentheses does not change the calculation order. First, Bash evaluates the expression (A && B). Then, it calculates the “C” operand if it is necessary.
If “A” equals “true”, the && operator calculates its RHS operand “B”. This is the echo command that prints the “OK” line to the log file. Next, Bash processes the || operator. Its LHS operand (A && B) equals “true”. When calculating the OR operator, it is enough to get the “true” value for at least one operand. Then you can conclude that the operator’s result equals “true”. Therefore, Bash skips the RHS operand “C” in our case. It leads that the “Error” line does not come to the log file.
If the “A” value is “false”, the expression (A && B) equals “false” too. In this case, Bash skips the operand “B”. It is enough to have one operand equals “false” to deduce the “false” result of the AND operator. Then the “OK” line does not come to the log file. Next, Bash handles the || operator. The shell already knows that its LHS operand equals “false”. Thus, it should evaluate the RHS operand “C” for deducing the whole expression. It leads to executing the second echo command. Then the “Error” line comes to the log file.
The principle of short-circuits evaluation is not obvious. You would need some time to figure it out. Please do your best for that. Every modern programming language supports Boolean expressions. Therefore, understanding the rules of their evaluation is essential.
Combining Commands
We already know how to combine Bash commands with pipelines and logical operators. There is a third way to do that. You can put a semicolon as a delimiter between the commands. In this case, Bash executes them one by one from left to right without any conditions. You get the linear sequence algorithm in this case.
Here is an example. Suppose that you want to copy two directories to different target paths. A single cp call cannot do it. But you can combine two calls into one command like this:
; cp -R ~/photo ~/photo-backup
This command calls the cp utility twice. The second call does not depend on the result of copying the docs directory. Even if it fails, Bash copies the photo directory anyway.
You can do the same with the pipeline this way:
| cp -R ~/photo ~/photo-backup
Here Bash executes both cp calls one by one too. It means that the linear sequence algorithm is the same for our two commands: with the semicolon and pipeline.
However, a semicolon and pipeline behave differently in general. When you use the semicolon, two commands do not depend on each other completely. When you use the pipeline, there is dependency. The output stream data of the first command comes to the input stream of the second command. In some cases, it changes the behavior of your algorithm.
Compare the following two commands:
1 ls /usr/share/doc/bash | grep "README" * -
2 ls /usr/share/doc/bash ; grep "README" * -
The - option of grep appends data from the input stream to the utility’s parameters.
Figure 2-28 shows the results of both commands.
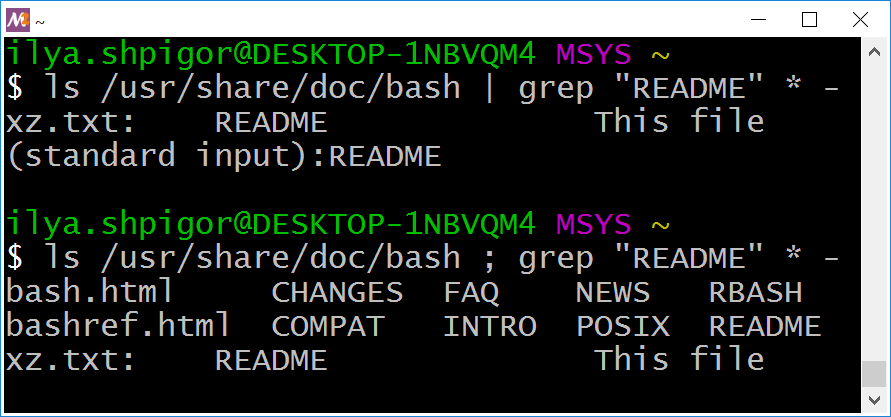
Even the behavior of the ls utility differs in these two commands. When using the pipeline, ls prints nothing on the screen. Instead, it redirects its output to the grep input.
Let’s consider the output of the commands. The second parameter of grep is the “*” pattern. It forces the utility to process all files in the current directory first. grep founds the “README” word in the xz.txt file. Then it prints this line on the screen:
When file processing is done, grep handles the input stream data from the ls utility. This data also contains the “README” word. Then grep prints the following line:
(standard input):README
This way, the grep utility processes two things at once:
- Files of the current directory.
- Data from the input stream.
When using the semicolon, the ls utility prints its result on the screen. Then Bash calls the grep utility. It processes all files of the current directory. Next, grep checks its input stream. There is no data there. This way, grep finds the “README” word in the xz.txt file only.