Bash Scripts
We have learned the basics of how to operate the file system using the shell. It is time to apply our knowledge and come from the standalone commands to programs. These programs written in Bash are called scripts. We will learn how to write them.
Development Tools
You have used the interactive mode of Bash in the previous chapter. The workflow of this mode looks like this:
- You type a command in the terminal window.
- The Bash process loads your command in RAM.
- The interpreter executes the command.
- Bash removes your command from RAM.
If you want to write a program, RAM is not the appropriate place to store it. This is a temporary memory. Whenever you shut down the computer, RAM is cleared.
When you write a program, you should store it on the disk drive. The disk drive is long-term information storage. Then you need a special program to create and edit source code files. This program is called a source code editor.
Let’s consider source code editors that work well with Bash.
Source Code Editor
Potentially, you can write Bash scripts in any text editor. Even the standard Windows application called Notepad can work this way. However, text editors are inconvenient for writing the source code. Notepad does not have any features for doing that. Meanwhile, these features increase your productivity significantly.
Today you can find plenty of free and proprietary source code editors. Some of them are more widespread than others. The popularity of the editor does not mean that it fits you perfectly. You should try several programs and choose one that you like.
Here there is a list of three popular source code editors. You can start with them. If no one fits you, please look for alternatives on the Internet.
Notepad++ is a fast and minimalistic source code editor. It is available for free. You can use it on Windows only. If your OS is macOS or Linux, please consider other editors. The latest Notepad++ version is available on the official website.
Sublime Text is a proprietary cross-platform source code editor. Cross-platform means that the program runs on several OSes and hardware configurations. Sublime Text works well on Windows, Linux and macOS. You can use it for free without buying a license. Download the editor on the official website.
Visual Studio Code is a free cross-platform source code editor from Microsoft. It works on Windows, Linux and macOS. You do not need to buy a license for using the editor. Download it on the official website.
All three editors have the following features for working with source code:
- Syntax highlighting.
- Autocomplete.
- Support of commonly used character encodings.
It is possible to edit the source code without these features. However, they make it easier to read and edit the program. They also help you to get used to the Bash syntax.
Launching the Editor
There are several ways to run the source code editor. The first option is using the GUI of your OS. Launch the editor via the Start menu or the desktop icon. It is the same way you run any other program.
The second option is using the command-line interface. This approach is more convenient in some cases. Here is an example of when you would need it. You call the find utility for searching several files. You can pass the find output to the source code editor input and open all found files. It is possible because most modern editors support CLI.
There are three ways to run an application in Bash:
- By the name of the executable.
- By the absolute path.
- By the relative path.
The first approach is the most convenient. You need to add the installation path of the application to the PATH variable. Then Bash can find the program’s executable when you call it.
Let’s consider how to run the Notepad++ editor by the executable name. The program has the following installation path by default:
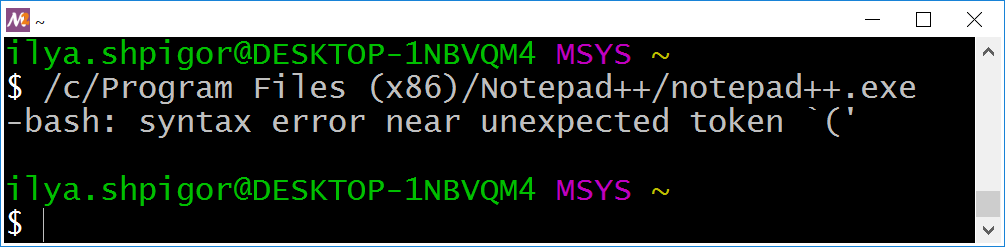
When you work in the MSYS2 environment, the Notepad++ installation path looks like this:
Try to run the editor using this absolute path. Figure 3-1 shows that it does not work. Bash reports about the syntax error in this case.
This command has several problems. We will investigate them one by one. The cd Bash built-in can give you the first hint about what is going wrong. Call cd this way:
cd /c/Program Files
Figure 3-2 shows the result.
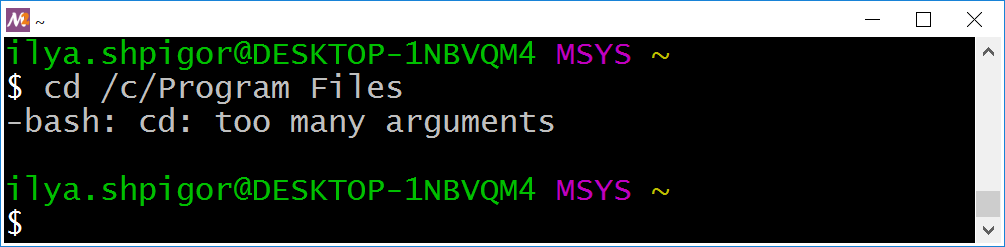
cd commandBash complains that you have passed too many parameters to cd. This command expects only one parameter, which is a path. It looks like you provided two paths instead of one here. This mistake happens because of the word splitting mechanism. Bash separated the path by the space into two parts: “/c/Program” and “Files”.
You have two option to suppress the word splitting mechanism:
1. Enclose the path in double quotes:
cd "/c/Program Files"
2. Escape all spaces using the backslash:
cd /c/Program\ Files
When you suppress word splitting, Bash executes the cd command properly.
Now try to navigate the /c/Program Files (x86) path. The following command does not work:
cd /c/Program Files (x86)
We found out that the issue happens because of word splitting. You can suppress it by escaping the spaces this way:
cd /c/Program\ Files\ (x86)
Figure 3-3 shows that this command still fails.
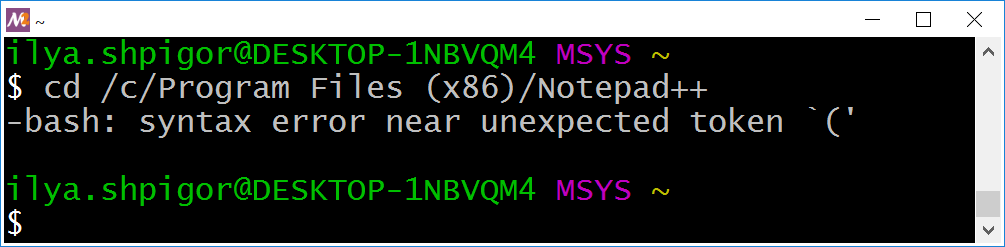
cd commandThis is the same error message as Bash has printed when launching Notepad++ in Figure 3-1. This problem happens because of the parentheses. They are part of the Bash syntax. It means that the shell treats them as a language construct. We met this problem when grouping conditions of the find utility. Escaping or double quotes solves this issue too. Here are possible solutions for our case:
1 cd /c/Program\ Files\ \(x86\)
2 cd "/c/Program Files (x86)"
Using double quotes is simpler than escaping. Apply them to launch the Notepad++ this way:
"/c/Program Files (x86)/Notepad++/notepad++.exe"
Now Bash launches the editor properly.
Launching Notepad++ by the absolute path is inconvenient. You should type a long command in this case. Launching the editor by the name of the executable is much better. Let’s change the PATH Bash variable for making that work.
Add the following line at the end of the ~/.bash_profile file:
PATH="/c/Program Files (x86)/Notepad++:${PATH}"
Restart the MSYS2 terminal. Now the following command launches Notepad++:
There is one more option to launch the editor from the shell. Instead of changing the PATH variable, you can declare an alias. The alias is a Bash mechanism. It replaces the command you typed with another one. This way, you can abbreviate long lines.
We have the following command for launching Notepad++:
"/c/Program Files (x86)/Notepad++/notepad++.exe"
Let’s declare the alias for this command. The alias Bash built-in does this job. Call it this way for our example:
alias notepad++="/c/Program\ Files\ \(x86\)/Notepad++/notepad++.exe"
This command declares the alias with the “notepad++” name. Now Bash replaces the “notepad++” command by the absolute path to the Notepad++ executable.
Using the alias has one problem. You should declare it whenever launching the terminal window. There is a way to automate this declaration. Just add our alias command at the end of the ~/.bashrc file. Bash executes this file at every terminal startup. Then you get declared alias in each new terminal window.
Now you can open the source code files in Notepad++ using the shell. Here is an example to open the test.txt file:
If the test.txt file does not exist, Notepad++ shows you the dialog to create it.
Background Mode
Suppose that you run a GUI application in the terminal window. Then you cannot use this window for typing the Bash commands. The GUI program controls it and prints the diagnostic messages there. The terminal window becomes available again when the application finishes.
You can run the GUI application in the background mode. Then the terminal window stays available, and you can use it normally.
Add the ampersand & at the end of a Bash command to launch it in the background mode. Here is an example:
&
After this command, you can type text in the terminal window. The only problem is the error messages from Notepad++. The editor still prints them here. They make it inconvenient to use this terminal window.
You can detach the running GUI application from the terminal window completely. Do it with the disown Bash built-in. Call disown with the -a option this way:
1 notepad++ test.txt &
2 disown -a
Now Notepad++ does not print any messages in the terminal. The disown call has one more effect. It allows you to close the terminal window and keep the editor working. Without the disown call, Notepad++ finishes when you close the terminal.
You can combine Notepad++ and disown calls into one command. It looks like this:
& disown -a
The -a option of the disown command detaches all programs that work in the background. If you skip this option, you should specify the process identifier (PID) of the program to detach. PID is a unique number that OS assigns to each new process.
Suppose that you want to call disown for the specific program. You should know its PID. Bash prints the PID of the background process when you launch it. Here is an example:
&
[1] 600
The second line has two numbers. The second number 600 is PID. The first number “[1]” is the job ID. You can use it to switch the background process to the foreground mode. The fg command does it this way:
fg %1
If you want to detach the Notepad++ process from our example, call disown this way:
disown 600
If you want to list all programs that work in the background, use the jobs Bash built-in. When you call it with the -l option, it prints both job IDs and PIDs. Use it this way:
jobs -l
This command lists all background processes that you have launched in the current terminal window.
You can call Notepad++ and detach it from the terminal in a single command. In this case, you should use the special Bash variable called $!. It stores the PID of the last launched command. Pass this PID to the disown call, and you are done. Here is an example of how to apply this approach:
& disown $!
Why Do We Need Scripts?
We learned how to write complex Bash commands using pipelines and logical operators. The pipeline combines several commands into one. You get a linear sequence algorithm this way. If you add logical operators there, you get the conditional algorithm. These operators allow you to handle special cases and choose a proper reaction for them.
The shell command that implements the conditional algorithm can be as complicated as a real program. What is the difference between them? Why do we need scripts that are Bash programs? Let’s figure out answers to these questions.
Backup Command
We need an example to consider Bash scripts features. Let’s write the command that creates a backup of your photos on the external hard drive. The command consists of two actions: archiving and copying.
Suppose that you store all your photos in the ~/photo directory. The mount point of the external drive is /d. Then the following command creates an archive of the photos on the external drive:
&& cp -f ~/photo.tar.bz2 /d
Here the logical AND connects the archiving and copying commands. Therefore, the cp call happens only when the bsdtar utility succeeds. This utility creates an archive called photo.tar.bz2. It contains all files of the ~/photo directory.
Suppose that you run the backup command automatically. For example, it launches every day by schedule. If some error happens, you do not have a chance to read its message. You need a log file to get this possibility. Here is an example of the bsdtar call that writes its status to the file:
1 bsdtar -cjf ~/photo.tar.bz2 ~/photo &&
2 echo "bsdtar - OK" > results.txt ||
3 echo "bsdtar - FAILS" > results.txt
You can split a Bash command into multiple lines. There are two ways for doing that:
- Add the line break right after the logical operator (&& or ||).
- Add the line break after the backslash .
We applied the first option in the last bsdtar call. The second option looks like this:
1 bsdtar -cjf ~/photo.tar.bz2 ~/photo \
2 && echo "bsdtar - OK" > results.txt \
3 || echo "bsdtar - FAILS" > results.txt
You would need the status of the cp call as well. Therefore, we should write it to the log file. Here is the command for that:
1 cp -f ~/photo.tar.bz2 /d &&
2 echo "cp - OK" >> results.txt ||
3 echo "cp - FAILS" >> results.txt
Now we can combine the bsdtar and cp calls into a single command. The logical AND should connect these calls. The straightforward solution looks like this:
&&
echo "bsdtar - OK" > results.txt ||
echo "bsdtar - FAILS" > results.txt &&
cp -f ~/photo.tar.bz2 /d &&
echo "cp - OK" >> results.txt ||
echo "cp - FAILS" >> results.txt
Let’s check if this command works correctly. We can replace each command call with a Latin letter. Then we get a convenient form of the Boolean expression. The expression looks like this:
&& O1 || F1 && C && O2 || F2
The “B” and “C” letters represent the bsdtar and cp calls. “O1” is the echo call that prints “bsdtar - OK” line in the log file. “F1” is the echo call for printing “bsdtar - FAIL” line. Similarly, “O2” and “F2” are the commands for logging the cp result.
If the bsdtar call succeeds, the “B” operand of our expression equals “true”. Then Bash performs the sequence of the following steps:
- B
- O1
- C
- O2 or F2
If the bsdtar fails, the “B” operand equals false. Then Bash does the following steps:
- B
- F1
- C
- O2 or F2
It means that the shell calls the cp utility even when the archiving fails. It does not make sense.
Unfortunately, the bsdtar utility makes things even more confusing. It creates an empty archive if it cannot access the target directory or files. Then the cp utility copies the empty archive successfully. These operations lead to the following output in the log file:
1 bsdtar - FAILS
2 cp - OK
Such output confuses you. It does not clarify what went wrong.
Here is our expression again:
&& O1 || F1 && C && O2 || F2
Why does Bash call the cp utility when bsdtar fails? It happens because the echo command always succeeds. It returns zero code, which means “true”. Thus, the “O1”, “F1”, “O2” and “F2” operands of our expression are always “true”.
Let’s fix the issue caused by the echo call exit code. We should focus on the bsdtar call and corresponding echo commands. They match the following Boolean expression:
&& O1 || F1
We can enclose the “B” and “O1” operands in brackets this way:
(B && O1) || F1
It does not change the expression’s result.
We got a logical OR between the “(B && O1)” and “F1” operands. The “F1” operand always equals “true”. Therefore, the whole expression is always “true”. The value of “(B && O1)” does not matter. We want to get another behavior. If the “(B && O1)” operand equals “false”, the entire expression should be “false”.
One possible solution is inverting the “F1” operand. The logical NOT operator does that. We get the following expression this way:
Let’s check the behavior that we got. If the “B” command fails, Bash evaluates “F1”. It always equals “false” because of negation. Then Bash skips the “C” and “O2” commands. It happens because there is a logical AND between them and “F1”. Finally, Bash comes to the “F2” operand. The shell needs its value. Bash knows that the LHS operand of the logical OR equals “false”. Therefore, it needs to evaluate the RHS operand to deduce the result of the whole expression.
We can make the expression clearer with the following parentheses:
Now it is evident that Bash executes the “F2” action when the parenthesized expression equals “false”. Otherwise, it cannot deduce the final result.
The last command writes this output into the log file:
1 bsdtar - FAILS
2 cp - FAILS
This output looks better than the previous one. Now the cp utility does not copy an empty archive.
The current result still has room for improvement. Imagine that you extended the backup command. Then it contains 100 actions. If an error occurs at the 50th action, all the remaining operations print their failed results into the log file. Such output makes it complicated to find the problem. The better solution here is to terminate the command right after the first error occurred. Parentheses can help us to reach this behavior. Here is a possible grouping of the expression’s operands:
Let’s check what happens if the “B” operand is false. Then Bash executes the “F1” command. The negation inverts the “F1” result. Therefore, the entire LHS expression equals “false”. Here is the LHS expression:
Then the short-circuit evaluation happens. It prevents calculating the RHS operand of the logical AND. Then Bash skips all commands of the RHS expression. Here is the RHS expression:
We got the proper behavior of the backup command.
We can add one last improvement. The “F2” operand should be inverted. Then the whole expression equals “false” if the “C” command fails. Then the entire backup command fails if bsdtar or cp call fails. Inverting “F2” operand provides the proper non-zero exit status in the error case.
Here is the final version of our expression with all improvements:
Let’s come back to the real Bash code. The corrected backup command looks like this:
1 (bsdtar -cjf ~/photo.tar.bz2 ~/photo &&
2   echo "bsdtar - OK" > results.txt ||
3   ! echo "bsdtar - FAILS" > results.txt) &&
4 (cp -f ~/photo.tar.bz2 /d &&
5   echo "cp - OK" >> results.txt ||
6   ! echo "cp - FAILS" >> results.txt)
We spent some time writing this command. However, another person would need much more time to read it and understand it correctly. It happens in programming often. This situation is a severe problem for big projects. Therefore, please train yourself to make your code clean and evident from the beginning. Code cleanliness is more important than a high speed of writing it.
Poor Technical Solution
Our backup command became long and complex after applying all improvements. Therefore, you should store it somewhere. Otherwise, you have to type the command in the terminal window each time. Typing is a bad idea because you can make a mistake or forget something.
Bash has an option to store frequently used commands. The history file saves everything you executed in the terminal. The file is unique for each user and has the ~ / .bash_history path. When you press the Ctrl+R keystroke in the terminal window, Bash calls the quick search over the history. You can quickly find the required command there.
Can you store the backup command permanently in the history file? This solution seems to be reliable and convenient. Please do not jump to conclusions. Let’s take a look at its possible problems.
First, the history file has a limited size. It saves 500 most recently executed commands by default. When this number exceeds, each new command overwrites the oldest one in the file. Therefore, you can lose the backup command accidentally.
You can think about increasing the capacity of the history file. Then the question arises. Which size would be enough? Whatever size you choose, there is a risk of exceeding it. This problem leads to the idea of making the history file unlimited. Then it saves all commands without overwriting anything.
It seems you find a way to store the backup command effectively. The history file with unlimited size does it. Could this decision lead to any problems?
Suppose you use Bash for a couple of years. All commands you executed during this time came to the .bash_history file. If you run the same command twice, it appears twice in the file. Therefore, the history size will reach hundreds of megabytes in two years. You do not need most of these commands. Only a small portion of them are significant for regular usage. It leads to inefficient use of your disk drive space.
You might argue that storing two hundred megabytes of the history file is not a problem for modern computers. Yes, it is true. However, there is another overhead that you missed. When you press Ctrl+R, Bash searches the command in the entire .bash_history file. The larger it is, the longer the search takes. Over time, you will wait several seconds, even using a powerful computer.
When the history file grows, the searching time increases. There are two reasons for that. First, Bash should process more lines in the history to find your request. Second, the file has many commands that have the same first letters. It leads you to type more letters after pressing Ctrl+R to find the right command. At some point, the history file search becomes inconvenient. That is the second problem with our solution.
What else could go wrong? Suppose that you got new photos. You placed them in the ~/Documents/summer_photo directory. Our backup command can handle the ~/photo path only. It cannot archive files from ~/Documents/summer_photo. Thus, you should write a new command for doing that. The complexity of extending features is the third problem of our solution.
You may have several backup commands for various purposes. The first one archives your photos. The second one archives your documents. It would be hard to combine them. You have to write the third command that includes all required actions.
We can conclude that a history file is a bad option for the long-term storage of commands. There is the same reason for all our problems. We misuse the history file mechanism. It was not intended for storing information permanently. As a result, we came up with a poor technical solution.
Everybody can come up with a poor technical solution. Professionals with extensive experience did such a mistake often. It happens for various reasons. The lack of knowledge played a role in our case. We got how Bash works in the shell mode. Then we applied this experience to the new task. The problem happened because we did not take into account all the requirements.
Here is the complete list of the requirements for our task:
- The backup command should have a long-term storage.
- It should be a way to call the command quickly.
- It should be a possibility to extend the command by new features.
- The command should be able to combine with other commands.
First, let’s evaluate our knowledge of Bash. They are not enough to meet all these requirements. All the mechanisms we know do not fit here. Can a Bash script help us? I propose to explore its features. Then we can check if it is suitable for our task.
Bash Script
Let’s create a Bash script that does our backup command. Here are the steps for doing that:
1. Open the source code editor and create a new file. If you have integrated Notepad++ into Bash, run the following command:
2. Copy the backup command into the file:
1 (bsdtar -cjf ~/photo.tar.bz2 ~/photo &&
2   echo "bsdtar - OK" > results.txt ||
3   ! echo "bsdtar - FAILS" > results.txt) &&
4 (cp -f ~/photo.tar.bz2 /d &&
5   echo "cp - OK" >> results.txt ||
6   ! echo "cp - FAILS" >> results.txt)
- Save the file in the home directory with the
photo-backup.shname. - Close the editor.
Now you have the Bash script file. Call the Bash interpreter and pass the script name there in the first parameter. Here is an example of this command:
You have run your first script. Any script is a sequence of Bash commands. The file on the disk drive stores them. When Bash runs a script, it reads and executes the file commands one by one. Conditional and loop statements can change this order of execution.
It is inconvenient to call Bash interpreter explicitly when running the script. Instead, you can specify its relative or absolute path. This approach works if you do the following steps to prepare the script:
1. Allow any user to execute the script by the following command:
- Open the script in an editor.
- Add the following line at the beginning of the file:
#!/bin/bash
- Save the modified file.
- Close the editor.
Now you can run the script by its relative or absolute path. Do it in one of the following ways:
1 ./photo-backup.sh
2 ~/photo-backup.sh
Let’s consider our preparation steps for launching the script. The first thing that prevents it from running is permissions. When you create a new file, it gets the following permissions by default:
This line means that the owner and his group can read and modify the file. Everyone else can only read it. No one can execute the file.
The chmod utility changes the permissions of the specified file. If you call it with the +x option, the utility allows everyone to execute the file. It gets the following permissions in this case:
When you run the script, your shell tries to interpret its lines. You may switch your shell from Bash to another one. It can be the Csh for example. In this case, you cannot execute our script. It happens because Bash and Csh have different syntax. They use different language constructions for the same things. We wrote the script in the Bash language. Therefore, the Bash interpreter should execute it.
There is an option to specify the interpreter that should execute the script. To do that, add the shebang at the beginning of the script file. Shebang is a combination of the number sign and exclamation mark. It looks like this:
Add the absolute path to the interpreter after the shebang. It looks like this in our case:
#!/bin/bash
Now the Bash interpreter always executes the script. It happens even if you use another shell for typing commands.
The file utility prints the type of the specified file. If the script does not have the shebang, the utility defines it as a regular text file. Here is an example output:
If you add the shebang, the utility defines this file as the Bash script:
The Bash interpreter has the same path /bin/bash for most Linux systems. However, this path differs for some Unix systems (for example, FreeBSD). It can be a reason why your script does not work there. The following shebang solves this problem:
#!/usr/bin/env bash
Here we call the env utility. It searches the path of the Bash executable in the list of the PATH variable.
Commands Sequence
Listing 3-1 demonstrates the current version of our script.
1 #!/bin/bash
2 (bsdtar -cjf ~/photo.tar.bz2 ~/photo &&
3   echo "bsdtar - OK" > results.txt ||
4   ! echo "bsdtar - FAILS" > results.txt) &&
5 (cp -f ~/photo.tar.bz2 /d &&
6   echo "cp - OK" >> results.txt ||
7   ! echo "cp - FAILS" >> results.txt)
The script contains one command, which is too long. This makes it hard to read and modify. You can split the command into two parts. Listing 3-2 shows how it looks like.
1 #!/bin/bash
2
3 bsdtar -cjf ~/photo.tar.bz2 ~/photo &&
4   echo "bsdtar - OK" > results.txt ||
5   ! echo "bsdtar - FAILS" > results.txt
6
7 cp -f ~/photo.tar.bz2 /d &&
8   echo "cp - OK" >> results.txt ||
9   ! echo "cp - FAILS" >> results.txt
Unfortunately, the behavior of the script has changed. Now the logical AND does not take place between the bsdtar and cp commands. Therefore, Bash always tries to copy files even if archiving has failed. This is wrong.
The script should stop if the bsdtar call fails. We can reach this behavior with the exit Bash built-in. It terminates the script when called. The command receives the exit code as the parameter. The script returns this code on termination.
Listing 3-3 shows the script with the exit call.
exit call1 #!/bin/bash
2
3 bsdtar -cjf ~/photo.tar.bz2 ~/photo &&
4 echo "bsdtar - OK" > results.txt ||
5 (echo "bsdtar - FAILS" > results.txt ; exit 1)
6
7 cp -f ~/photo.tar.bz2 /d &&
8 echo "cp - OK" >> results.txt ||
9 ! echo "cp - FAILS" >> results.txt
We changed the command that calls the bsdtar utility. It looked like this before:
It became like this after adding the exit call:
The “E” letter means the exit command here.
If bsdtar returns an error, Bash evaluates the RHS operand of the logical OR. It is equal to “(F1; E)”. We removed the negation of the echo command because its result is not necessary anymore. Bash calls exit after echo. We expect that this call terminates the script.
Unfortunately, the exit call does not terminate the script. It happens because parentheses create a child process. The child Bash process is called subshell. It executes the commands specified in parentheses. When they are done, Bash continues executing the parent process. The parent process is the one that spawned the subshell.
The exit call finishes the subshell in Listing 3-3. Bash calls the cp utility after that. To solve this problem, you should replace the parentheses with braces. Bash executes the commands in braces in the current process. The subshell is not spawned in this case.
Listing 3-4 shows the corrected version of the script.
exit call1 #!/bin/bash
2
3 bsdtar -cjf ~/photo.tar.bz2 ~/photo &&
4 echo "bsdtar - OK" > results.txt ||
5 { echo "bsdtar - FAILS" > results.txt ; exit 1 ; }
6
7 cp -f ~/photo.tar.bz2 /d &&
8 echo "cp - OK" >> results.txt ||
9 ! echo "cp - FAILS" >> results.txt
Notice the semicolon before the closing brace. It is mandatory here. Also, spaces after the opening brace and before the closing one are required.
Our problem has another solution. It is more elegant than calling the exit command. Suppose you want to terminate the script after the first failed command. The set Bash built-in can do that. It changes the parameters of the interpreter. Call the command with the -e option like this:
set -e
You can specify the same option when starting the Bash. Do it this way:
The -e option has several pitfalls. For example, it changes the behavior of the current Bash process only. The subshells it spawns work as usual.
Bash executes each command of a pipeline or logical operator in a separate subshell. Therefore, the -e option does not affect these commands. It means that the set command does not work well in our case.
Changing Parameters
Suppose you have moved your photos from the ~/photo directory to ~/Documents/Photo. If you want to support the new path in the backup script, you should change its code. Listing 3-5 shows how the new script looks like.
1 #!/bin/bash
2
3 bsdtar -cjf ~/photo.tar.bz2 ~/Documents/Photo &&
4   echo "bsdtar - OK" > results.txt ||
5   { echo "bsdtar - FAILS" > results.txt ; exit 1 ; }
6
7 cp -f ~/photo.tar.bz2 /d &&
8   echo "cp - OK" >> results.txt ||
9   ! echo "cp - FAILS" >> results.txt
Every time you move the photos from one directory to another, you have to change the script. It is inconvenient. A better solution would be to make a universal script that can handle any directory. Such a script should receive the path to photos as an input parameter.
When you run a Bash script, you can pass command-line parameters there. It works the same way as for any GNU utility. Specify the parameters separated by a space after the script name. Bash will pass them to the script. Here is an example:
This command runs our script with the ~/Documents/Photo input parameter. You can read it via the $1 variable in the script. If the script receives more parameters, read them via the variables $2, $3, $4, etc. These names match the numbers of the parameters. Variables of this type are called positional parameters.
There is a special positional parameter $0. It stores the path to the launched script. It equals ./photo-backup.sh in our example.
Let’s handle the input parameter in our script. Listing 3-6 shows how it looks like after the change.
1 #!/bin/bash
2
3 bsdtar -cjf ~/photo.tar.bz2 "$1" &&
4   echo "bsdtar - OK" > results.txt ||
5   { echo "bsdtar - FAILS" > results.txt ; exit 1 ; }
6
7 cp -f ~/photo.tar.bz2 /d &&
8   echo "cp - OK" >> results.txt ||
9   ! echo "cp - FAILS" >> results.txt
The $1 variable stores the path to the photos. We use it in the bsdtar call. There are double quotes around the variable name. They prevent the word splitting mechanism.
Suppose you want to archive photos from the ~/photo album path. Then you call the script this way:
"~/photo album"
Suppose that you skip quotes around the variable name when calling in the script. Then the bsdtar call looks like this:
&&
echo "bsdtar - OK" > results.txt ||
{ echo "bsdtar - FAILS" > results.txt ; exit 1 ; }
In this case, the bsdtar utility receives the ~/photo album string in parts. It gets two parameters instead of one: ~/photo and album. These directories do not exist. Therefore, the script fails.
It is not enough to put parameters in quotes when calling a script. You should quote all occurrences of the corresponding variable name in the script. It happens because of the way how the Bash runs a program.
Suppose that you call a script from the shell. Then Bash spawns a child process to execute it. The child process does not receive quotes from the command line because Bash removes them. Therefore, you should add quotes again inside the script.
Now our backup script can handle the input parameter. What are the benefits of this solution? It provides you a universal script for making backups. The script can process any paths and types of input files: documents, photos, videos, source code, etc.
Adding the parameter processing to our script leads to one problem. Suppose you call it twice for making backups of photos and documents this way:
1 ./photo-backup.sh ~/photo
2 ./photo-backup.sh ~/Documents
The first command creates the ~/photo.tar.bz2 archive and copies it to the D disk. Then the second command does the same and overwrites the existing /d/photo.tar.bz2 file. This way, you lose the result of the first command.
To solve this problem, you should pick different names for the created archive. This way, you avoid filename conflicts. The simplest approach is to name the archive the same way as the target directory with the files to backup. Listing 3-7 shows how this solution looks like.
1 #!/bin/bash
2
3 bsdtar -cjf "$1".tar.bz2 "$1" &&
4   echo "bsdtar - OK" > results.txt ||
5   { echo "bsdtar - FAILS" > results.txt ; exit 1 ; }
6
7 cp -f "$1".tar.bz2 /d &&
8   echo "cp - OK" >> results.txt ||
9   ! echo "cp - FAILS" >> results.txt
Now the script picks a unique name for the archive. Call it this way, for example:
This command creates the ~/Documents.tar.bz2 archive and copies it to the D disk. In this case, the filename does not conflict with the photo archive called /d/photo.tar.bz2.
You can make one more improvement to the script. Call the mv utility instead of cp. It deletes the temporary archive in the home directory. Listing 3-8 shows the final version of the script.
1 #!/bin/bash
2
3 bsdtar -cjf "$1".tar.bz2 "$1" &&
4   echo "bsdtar - OK" > results.txt ||
5   { echo "bsdtar - FAILS" > results.txt ; exit 1 ; }
6
7 mv -f "$1".tar.bz2 /d &&
8   echo "cp - OK" >> results.txt ||
9   ! echo "cp - FAILS" >> results.txt
Now we get the universal backup script. Its old name photo-backup.sh does not fit anymore. The new version can copy any data. Let’s rename it to make-backup.sh.
Combination with Other Commands
At the moment, you can run our backup script by its absolute or relative path. If you integrate it into Bash, you can call it by the name. This is a convenient option when you use the script in pipelines or logical operators.
These are three ways to integrate some script into Bash:
- Add the script’s path to the
PATHvariable. Edit the~/.bash_profilefile for that. - Define the alias with an absolute path to the script. Do that in the
~/.bashrcfile. - Copy the script to the
/usr/local/bindirectory. ThePATHvariable contains this path by default. If there is no such directory in your MSYS2 environment, create it.
We have learned the first two ways when preparing your source code editor. The third way is very straightforward. You can do it on your own.
unalias make-backup.sh
Suppose that you have integrated the backup script with Bash in one of three ways. Then you can launch it by name like this:
You can combine the script with other commands using pipelines and logical operators. It works the same way as for any Bash built-in or GNU utility.
Here is an example. Suppose you need to backup all PDF documents of the ~/Documents directory. You can find them by the following find call:
"*.pdf"
Then you can apply our script to archive and copy each found file. Here is the command for that:
"*.pdf" -exec make-backup.sh {} \;
This command works well. It creates an archive of each PDF file and copies it to the D disk. However, this approach is inconvenient. It would be better to collect all PDF files into one archive. Let’s try the following command for that:
{} +
The command should pass all found files into the single make-backup.sh call. Unfortunately, it does not work as expected. It produces an archive with the first found PDF file only. Where are the rest of the documents? Let’s take a look at the bsdtar call inside the script. It looks like this:
"$1".tar.bz2 "$1"
The problem happens because we process the first positional parameter only. The $1 variables stores it. The bsdtar call ignores other parameters in variables $2, $3, etc. They contain the rest results of the find utility. This way, we cut off all results except the first one.
If you replace the $1 variable with $@, you solve the problem. Bash stores all script parameters in $@. The corrected bsdtar call looks like this:
"$1".tar.bz2 "$@"
The bsdtar utility now processes all script parameters. Note that the archive name still matches the first $1 parameter. It should be one word. Otherwise, bsdtar fails.
Listing 3-9 shows the corrected version of the backup script. It handles an arbitrary number of input parameters.
1 #!/bin/bash
2
3 bsdtar -cjf "$1".tar.bz2 "$@" &&
4   echo "bsdtar - OK" > results.txt ||
5   { echo "bsdtar - FAILS" > results.txt ; exit 1 ; }
6
7 mv -f "$1".tar.bz2 /d &&
8   echo "cp - OK" >> results.txt ||
9   ! echo "cp - FAILS" >> results.txt
Bash has an alternative variable for $@. It is called $*. If you put it in double quotes, Bash interprets its value as a single word. It interprets the $@ variable as a set of words in the same case.
Here is an example to explain the difference between the $@ and $* variables. Suppose you call the backup script this way:
"one two three"
In the script, Bash replaces the “$*” construct with the following word:
"one two three"
Here is the replacement for the “$@” construct:
"one" "two" "three"
Scripts Features
While solving the backup task, we considered the basic features of the Bash scripts. Let’s make a summary for them.
Here are the requirements for the backup task:
- The backup command should have a long-term storage.
- It should be a way to call the command quickly.
- It should be a possibility to extend the command by new features.
- The command should be able to combine with other commands.
The final version of the make-backup.sh script meets all these requirements. Here are the solutions for them:
- The hard disk stores the script file. It is long-term memory.
- The script is easy to integrate with Bash. Then you can call it quickly.
- The script is a sequence of commands. Each one starts on a new line. You can read and edit it easily. Thanks to parameterization, you can generalize the script for solving tasks of the same type.
- Due to integration with Bash, you can combine the script with other commands.
If your task requires any of these features, write a Bash script for that.
Variables and Parameters
We already met Bash variables several times in this book. You have learned the list of system paths in the PATH variable. Then you have used positional parameters in the backup script. It is time to get a good grasp on the topic.
Let’s start with the meaning of the “variable” term in programming. The variable is an area of memory where some value is stored. In most cases, this is short-term memory (RAM, CPU cache and registers).
The first generation of programming languages (for example, assembler) has minimal support of variables. When using such a language, you should refer to a variable by its address. If you want to read or write its value, you have to specify its memory address.
When working with memory addresses, you might get into trouble. Suppose you work on a computer with 32-bit processors. Then any memory address has a length of 4 bytes. It is the number from 0 to 4294967295. This number is twice larger for 64-bit processors. It is inconvenient to remember and operate with such big numbers. That is why modern programming languages allow you to replace a variable address with its name. A compiler or interpreter translates this name into a memory address automatically. These programs “remember” large numbers instead of you this way.
When should you apply variables? Our experience with PATH and positional parameters has shown that variables store some data. It is needed for one of the following purposes:
- Transfer information from one part of a program or system to another.
- Store the intermediate result of a calculation for later use.
- Save the current state of the program or system. This state may determine its future behavior.
- Set a constant value to be used repeatedly later.
A typical programming language has a special type of variable for each of these purposes. The Bash language follows this rule too.
Classification of variables
The Bash interpreter has two operation modes: interactive (shell) and non-interactive (scripting). Variables solve similar tasks in each mode. However, the contexts of these tasks are different. Therefore, there are more features to classify variables in Bash than in other languages.
Let’s simplify the terminology for convenience. It is not entirely correct, but it helps to avoid confusion. When we talk about scripts, we use the “variable” term. When we talk about shell and command-line arguments, we use the “parameter” term. These terms are often used synonymously.
There are four attributes for classifying variables in Bash. Table 3-1 explains them.
| Classification Attribute | Variable Types | Definition | Examples |
|---|---|---|---|
| Declaration mechanism | User-defined variables | The user sets them. | filename="README.txt" ; echo "$filename" |
| Internal variables | The interpreter sets them. It needs them to work correctly. | echo "$PATH" |
|
| Special parameters | The interpreter sets them for the user. The user can read them but not write. | echo "$?" |
|
| Scope | Environment or global variables | They are available in any instance of the interpreter. The env utility lists them. |
echo "$PATH" |
| Local variables | They are available in a particular instance of the interpreter only. | filename="README.txt" ; echo "$filename" |
|
| Content type | String | It stores a string. | filename="README.txt" |
| Integer | It stores an integer. | declare -i number=10/2 ; echo "$number" |
|
| Indexed array | It stores a numbered list of lines. | cities=("London" "New York" "Berlin") ; echo "${cities[1]}" |
|
cities[0]="London" ; cities[1]="New York" ; cities[2]="Berlin" ; echo "${cities[1]}" |
|||
| Associative array | It is a data structure with elements that are key-value pairs. Each key and value are strings. | declare -A cities=( ["Alice"]="London" ["Bob"]="New York" ["Eve"]="Berlin" ) ; echo "${cities[Bob]}" |
|
| Changeability | Constants | The user cannot delete them. They store values that cannot be changed. | readonly CONSTANT="ABC" ; echo "$CONSTANT" |
declare -r CONSTANT="ABC" ; echo "$CONSTANT" |
|||
| Variables | The user can delete them. They store values that can be changed. | filename="README.txt" |
We will consider each type of variable in this section.
Declaration Mechanism
User-Defined Variables
The purpose of user-defined variables is obvious from their name. You declare them for your own purposes. Such variables usually store intermediate results of the script, its state and frequently used constants.
To declare the user-defined variable, specify its name, put an equal sign, and type its value.
Here is an example. Suppose that you want to declare a variable called filename. It stores the README.txt filename. The variable declaration looks like this:
filename="README.txt".
Spaces before and after the equal sign are not allowed. It works in other programming languages but not in Bash. For example, the following declaration causes an error:
filename = "README.txt"
Bash misinterprets this line. It assumes that you call the command with the filename name. Then you pass there two parameters: = and “README.txt”.
When declaring a variable, you can apply Latin letters, numbers and the underscore in its name. The name must not start with a number. Letter case is important. It means that filename and FILENAME are two different variables.
Suppose you have declared a variable filename. Then Bash allocates the memory area for that. It writes the README.txt string there. You can read this value back using the variable name. When you do that, Bash should understand your intention. If you put a dollar sign before the variable name, it would be a hint for Bash. Then it treats the word filename as the variable name.
When you reference the variable in a command or script, it looks like this:
$filename
Bash handles words with a dollar sign in a special way. When it encounters such a word, it runs the parameter expansion mechanism. The mechanism replaces all occurrences of a variable name by its value. Here is the example command:
$filename ~
The command looks like this after the parameter expansion:
Bash performs nine kinds of expansions before executing each command. They are done in a strict order. Please try to remember this order. If you miss it, you can get an error.
Here is an example of a mistake that happens because of expansions order. Suppose that you manipulate the “my file.txt” file in the script. For the sake of convenience, you put the filename into a variable. Its declaration looks like this:
filename="my file.txt"
Then you use the variable in the cp call. Here is the copying command:
$filename ~
Bash does word splitting after the parameter expansion. They are two different expansion mechanisms. When both of them are done, the cp call looks like this:
This command leads to the error. Bash passes two parameters to the cp utility: “my” and “file.txt”. These files do not exist.
Another error happens if the variable’s value contains a special character. For example, you declare and use the filename variable this way:
1 filename="*file.txt"
2 rm $filename
The rm utility deletes all files ending in file.txt. The globbing mechanism causes such behavior. It happens because Bash does globbing after the parameter expansion. Then it substitutes files of the current directory whose names match the “*file.txt” pattern. It leads to unexpected results. Here is an example of the rm call that you can get this way:
When referencing a variable, always apply double quotes. They prevent unwanted Bash expansions. The quotes solve problems of both our examples:
1 filename1="my file.txt"
2 cp "$filename1" ~
3
4 filename2="*file.txt"
5 rm "$filename2"
Thanks to the quotes, Bash inserts the variables’ values as they are:
1 cp "my file.txt" ~
2 rm "*file.txt"
We already know several Bash expansions. Table 3-2 gives the full picture. It shows the complete list of expansions and their order of execution.
| Order of Execution | Expansion | Description | Example |
|---|---|---|---|
| 1 | Brace Expansion | It generates a set of strings by the specified pattern with braces. | echo a{d,c,b}e |
| 2 | Tilde Expansion | Bash replaces the tilde by the value of the HOME variable. |
cd ~ |
| 3 | Parameter Expansion | Bash replaces parameters and variables by their values. | echo "$PATH" |
| 4 | Arithmetic Expansion | Bash replaces arithmetic expressions by their results. | echo $((4+3)) |
| 5 | Command Substitution | Bash replaces commands with their output. | echo $(< README.txt) |
| 6 | Process Substitution | Bash replaces commands with their output. Unlike Command Substitution, it is done asynchronously. The command’s input and output are bound to a temporary file. | diff <(sort file1.txt) <(sort file2.txt) |
| 7 | Word Splitting | Bash splits command-line arguments into words and passes them as separate parameters. | cp file1.txt file2.txt ~ |
| 8 | Filename Expansion (globbing) | Bash replaces patterns with filenames. | rm ~/delete/* |
| 9 | Quote Removal | Bash removes all unshielded characters , ' " that were not derived from one of the expansions. |
cp "my file.txt" ~ |
Let’s come back to the parameter expansion. When you put the dollar sign before a variable name, you use the short form of the expansion. Its full form looks this way:
${filename}
Use this form to avoid ambiguity. Ambiguity can happen when the text follows the variable name. Here is an example of such a case:
1 prefix="my"
2 name="file.txt"
3 cp "$prefix_$name" ~
Here Bash tries to find and insert the variable called “prefix_”. It happens because the interpreter appends the underscore to the variable name. You can solve this kind of problem if you apply the full form of the parameter expansion. Do it this way:
"${prefix}_${name}" ~
If you prefer to use the short form of the expansion, you have another option. Enclose each variable name in double quotes. Then Bash will not confuse them and nearby text. Here is an example:
"$prefix"_"$name" ~
The full form of the parameter expansion has several features. They help you to handle cases when a variable is undefined. For example, you can insert the specified value in this case. Here is an example:
"${directory:-~}"
Here Bash checks if the directory variable is defined and has a non-empty value. If it is, Bash performs a regular parameter expansion. Otherwise, it inserts the value that follows the minus character. It is the home directory path in our example.
Table 3-3 shows all variations of the parameter expansion.
| Variation | Description |
|---|---|
${parameter:-word} |
If the “parameter” variable is not declared or has an empty value, Bash inserts the specified “word” value instead. Otherwise, it inserts the variable’s value. |
${parameter:=word} |
If a variable is not declared or has an empty value, Bash assigns it the specified “word” value. Then it inserts this value. Otherwise, Bash inserts the variable’s value. You cannot override positional and special parameters this way. |
${parameter:?word} |
If the variable is not declared or has an empty value, Bash prints the specified “word” value in the error stream. Then, it terminates the script with a non-zero exit status. Otherwise, Bash inserts the variable’s value. |
${parameter:+word} |
If the variable is not declared or has an empty value, Bash skips the expansion. Otherwise, it inserts the specified “word” value. |
Internal Variables
You can declare variables for your own purposes. Bash also can do that. These variables are called internal or shell variables. You can change values for some of them.
Internal variables solve two tasks:
- They pass information from the shell to the applications it runs.
- They store the current state of the interpreter.
There are two groups of internal variables:
- Bourne Shell variables.
- Bash variables.
The first group came from Bourne Shell. Bash needs it for compatibility with the POSIX standard. Table 3-4 shows the frequently used variables of this group.
| Name | Value |
|---|---|
HOME |
The home directory of the current user. Bash uses this variable for tilde expansion and processing the cd call without parameters. |
IFS |
It contains a list of delimiter characters. The word splitting mechanism uses them to split the strings into words. The default delimiters are space, tab and a line break. |
PATH |
It contains the list of paths where Bash looks for utilities and programs. Colons separate the paths in the list. |
PS1 |
It is a command prompt. The prompt can include control characters. Bash replaces them with specific values (for example, the current user’s name). |
SHELLOPTS |
The list of shell options. They change the operating mode of the interpreter. Colons separate the options in the list. |
The second group of internal variables is Bash specific. Table 3-5 shows them. This list is incomplete. There are some more variables, but they are rarely used.
| Name | Value |
|---|---|
BASH |
The full path to the Bash executable file. This file corresponds to the current Bash process. |
BASHOPTS |
The list of Bash specific shell options. They change the operating mode of Bash. Colons separate the options in the list. |
BASH_VERSION |
The version of the running Bash interpreter. |
GROUPS |
The list of groups to which the current user belongs. |
HISTCMD |
The index of the current command in history. It shows you how many items are there. |
HISTFILE |
The path to the file that stores the command history. The default path is ~/.bash_history. |
HISTFILESIZE |
The maximum number of lines allowed in the command history. The default value is 500. |
HISTSIZE |
The maximum number of entries allowed in the command history. The default value is 500. |
HOSTNAME |
The computer name as a node of the network. Other hosts can reach your computer by this name. |
HOSTTYPE |
The string describing the hardware platform where Bash is running. |
LANG |
Locale settings for the user interface. They define the user’s language, region and special characters. Some settings are overridden by variables LC_ALL, LC_COLLATE, LC_CTYPE, LC_MESSAGES, LC_NUMERIC, LC_TYPE. |
MACHTYPE |
The string describing the system where Bash is running. It includes information from the HOSTTYPE and OSTYPE variables. |
OLDPWD |
The previous directory that the cd command has set. |
OSTYPE |
The string describing of the OS where Bash is running. |
POSIXLY_CORRECT |
If this variable is defined, Bash runs in the POSIX compatible mode. |
PWD |
The current directory that the cd command has set. |
RANDOM |
Each time you read this variable, Bash returns a random number between 0 and 32767. When you write the variable there, Bash assigns a new initializing number (seed) to the pseudorandom number generator. |
SECONDS |
The number of seconds elapsed since the current Bash process started. |
SHELL |
The path to the shell executable for the current user. Each user can use his own shell program. |
SHLVL |
The nesting level of the current Bash instance. This variable is incremented by one each time you start Bash from the shell or script. |
UID |
The ID number of the current user. |
The internal variables are divided into three groups depending on the allowed actions with them. These are the groups:
- Bash assigns a value to a variable at startup. It remains unchanged throughout the session. You can read it, but changing is prohibited. Examples:
BASHOPTS,GROUPS,SHELLOPTS,UID. - Bash assigns a default value to a variable at startup. Your actions or other events change this value. You can re-assign some values explicitly, but this can disrupt the interpreter. Examples:
HISTCMD,OLDPWD,PWD,SECONDS,SHLVL. - Bash assigns a default value to the variable at startup. You can change it. Examples:
HISTFILESIZE,HISTSIZE.
Special Parameters
Bash declares special parameters and assigns values to them. It handles them the same way as shell variables.
Special parameters pass information from the shell to the launched application and vice versa. A positional parameter is an example of this kind of Bash variable.
Table 3-6 shows frequently used special parameters.
| Name | Value |
|---|---|
$* |
The string with all positional parameters passed to the script. Parameters start with the $1 variable but not with $0. If you skip the double quotes ($*), Bash inserts each positional parameter as a separate word. With double quotes (“$*”), Bash handles it as one quoted string. The string contains all the parameters separated by the first character of the internal variable IFS. |
$@ |
The list of strings that contains all positional parameters passed to the script. Parameters start with the $1 variable. If you skip double quotes ($@), Bash handles each array’s element as an unquoted string. Word splitting happens in this case. With double quotes (“$@”), Bash handles each element as a quoted string without word splitting. |
$# |
The number of positional parameters passed to the script. |
$1, $2… |
They contain the value of the corresponding positional parameter. $1 matches the first parameter. $2 matches the second one, etc. These numbers are given in the decimal system. |
$? |
The exit status of the last executed command in the foreground mode. If you have executed a pipeline, the parameter stores the exit status of the last command in this pipeline. |
$- |
It contains options for the current interpreter instance. |
$$ |
The process ID of the current interpreter instance. If you read it in the subshell, Bash returns the PID of the parent process. |
$! |
The process ID of the last command launched in the background mode. |
$0 |
The name of the shell or script that is currently running. |
You cannot change special Bash parameters directly. For example, the following redeclaration of $1 does not work:
1="new value"
If you want to change positional parameters, use the set command. It redeclares all parameters at once. There is no option to change a single positional parameter only. Here is the general form of the set call:
set -- NEW_VALUE_OF_$1 NEW_VALUE_OF_$2 NEW_VALUE_OF_$3...
What to do if you need to change a single positional parameter? Here is an example. Suppose you call the script with four parameters like this:
You want to replace the third parameter arg3 with the new_arg3 value. The following set call does that:
set -- "${@:1:2}" "new_arg3" "${@:4}"
Let’s consider this command in detail. Bash replaces the first argument “$” with the first two elements of the $@ array. It leads that $1 and $2 parameters get their previous values. Then there is the new value for the parameter $3. Now it equals “new_arg3”. The “$” value comes at the end. Here Bash inserts all elements of the $@ array starting from $4. It means that all these parameters get their previous values.
All special parameters from Table 3-6 are available in the POSIX-compatible mode of Bash.
Scope
Environment Variables
Any software system has scopes that group variables. A scope is a part of a program or system where the variable name remains associated with its value. There you can convert the variable name into its address. Outside the scope, the same name can point to another variable.
A scope is called global if it spreads to the whole system. Here is an example. Suppose that the variable called filename is in the global scope. Then you can access it by its name from any part of the system.
Bash keeps all its internal variables in the global scope. They are called environment variables. It means that all internal variables are environment variables. You can declare your variable in the global scope too. Then it becomes a new environment variable.
Why does Bash store variables in the global scope? It happens because Unix has a special set of settings. They affect the behavior of the applications that you run. An example is locale settings. They dictate how each application should adapt its interface. Applications receive Unix settings through environment variables.
Suppose one process spawns a child process. The child process inherits all environment variables of the parent. This way, all utilities and applications launched from the shell inherit its environment variables. This mechanism allows all programs to receive global Unix settings.
The child process can change its environment variables. When it spawns another process, it inherits the changed variables. However, when the child changes its environment variables, it does not affect the corresponding variables of the parent process.
The export built-in command declares an environment variable. Here is an example of doing that:
export BROWSER_PATH="/opt/firefox/bin"
You can declare the variable and then add it to the global scope. Call the export command this way:
1 BROWSER_PATH="/opt/firefox/bin"
2 export BROWSER_PATH
Sometimes you need to declare the environment variables for the specific application only. List the variables and their values before the application call in this case. Here is an example:
MOZ_WEBRENDER=1 LANG="en_US.UTF-8" /opt/firefox/bin/firefox
This command launches the Firefox browser and passes it the MOZ_WEBRENDER and LANG variables. They can differ from the global Unix settings.
The last example works well in Bash. If you use another shell, you need another approach. Suppose that you use Bourne Shell. Then you can pass variables to the application using the env utility. Here is an example of doing that:
MOZ_WEBRENDER=1 LANG="en_US.UTF-8" /opt/firefox/bin/firefox
If you call the env utility without parameters, it prints all declared environment variables for the current interpreter process. Call it in your terminal this way:
The export Bash built-in and the env utility print the same thing when called without parameters. Use export instead of env. There are two reasons for that. First, the export sorts its output. Second, it adds double quotes to the values of all variables. They prevent you from making a mistake if some values have line breaks.
All names of environment variables contain uppercase letters only. Therefore, it is a good practice to name local variables in lower case. It prevents you from accidentally using one variable instead of another.
Local Variables
We have considered the user-defined variables. You can declare them in several ways. Depending on your choice, the new variable comes to the local scope or global scope (environment).
There are two ways to declare the global scope variable:
- Add the
exportcommand to the variable declaration. - Pass the variable to the program when launching it. You can do it with the
envutility when using a shell other than Bash.
If you do not apply any of these ways, your variable comes to the local scope. A variable of this kind is called a local variable. It is available in the current instance of the interpreter. A child process (except a subshell) does not inherit it.
Here is an example. Suppose that you declare the filename variable in the terminal window this way:
filename="README.txt"
Now you can print its value in the same terminal window. The following echo command does that:
echo "$filename"
The same echo command works well in a subshell. You can try it. Spawn the subshell by adding the parentheses around the Bash command. It looks like this:
(echo "$filename")
The child process does not get the local filename variable. Let’s check it. Start a child process by calling the Bash interpreter explicitly. Do it this way:
'echo "$filename"'
The -c parameter passes a command that the Bash child process executes. A similar Bash call occurs implicitly when you run a script from the shell.
We enclose the echo call in the single quotes when passing it to the bash command. The quotes disable all Bash expansions for the string inside. This behavior differs from the double quotes. They disable all expansions except the command substitution and parameter expansion. If we apply double quotes in our bash call, the parameter expansion happens. Then Bash inserts the variable’s value in the call. This way, we will get the following command:
"echo README.txt"
We are not interested in this command. Instead, we want to check how the child process reads the local variable. Therefore, the parent process should not insert its value into the bash call.
If you change a local variable in the subshell, its value stays the same in the parent process. The following commands confirm this rule:
1 filename="README.txt"
2 (filename="CHANGELOG.txt")
3 echo "$filename"
If you execute them, you get the “README.txt” output. It means that changing the local variable in the subshell does not affect the parent process.
When you declare a local variable, it comes to the shell’s variables list. The list includes all local and environment variables that are available in the current interpreter process. The set command prints this list when called without parameters. Here is an example of how to find the filename variable there:
set | grep filename=
The grep utility prints the following string with the filename value:
filename=README.txt
It means that the filename variable is in the list of shell variables.
Variable Content Type
Variable Types
It is common practice to use the static type system in compiled programming languages (such as C). When using this system, you decide how to store the variable in memory. You should specify the variable type when declaring it. Then the compiler allocates memory and picks one of the predefined formats to store this type of variable.
Here is an example of how the static type system works. Suppose you want to declare a variable called number. You should specify its type in the declaration. You choose the unsigned integer type, which has a size of two bytes. Then the compiler allocates exactly two bytes of memory for this variable.
When the application starts, you assign the 203 value to the variable. It is equal to 0xCB in hexadecimal. Then the variable looks this way in the memory:
00 CB
One byte is enough to store the 203 value. However, you forced the compiler to reserve two bytes for that. The unused byte stays zeroed. No one can use it in the scope of the number variable. If the variable has a global scope, the byte is reserved and unused while the application works.
Suppose that you have assigned the 14037 value to the variable. It is equal to 0x36D5 in hexadecimal. Then it looks like this in the memory:
36 D5
Now you want to store the 107981 (0x1A5CD) value in the variable. This number does not fit into two bytes. The variable’s size is defined in the declaration. The compiler cannot extend it automatically afterward. Therefore, it writes only part of the 107981 value into the variable. It looks like this in the memory:
The compiler discarded the first digit of the number. If you read the variable, you get 42445 (0xA5CD). It means that you lose the original 107981 value. You cannot recover it anymore. This problem is called integer overflow.
Here is another example of the static type system. Suppose you want to store the username in a variable called username. You declare this variable and assign it the string type. When doing that, you should specify the maximum length of the string. It can be ten characters, for example.
After declaring the variable, you write the “Alice” name there. If you use the C compiler, the string looks this way in memory:
41 6C 69 63 65 00 00 00 00 00
Six bytes are enough to store the string “Alice”. The first five bytes store characters. The last sixth byte stores the null character (00). It marks the end of the string. However, the compiler has reserved ten bytes for the variable. It fills the unused memory with zeros or random values.
Dynamic type system is an alternative to the static system. It uses another approach to choose how to store a variable in memory. This choice happens whenever you assign the new value to the variable. Together with the value, the variable gets new metadata. The metadata defines the variable type. They can change during the application work. Thus, the variable’s representation in memory changes too. Most interpreted programming languages use the dynamic type system (for example, Python).
Strictly speaking, Bash does not have the type system at all. It is not a language with a static or dynamic type system. Bash stores all scalar variables in memory as strings.
The scalar variable stores data of a primitive type. These data are the minimal building blocks to construct more complex composite types. The scalar variable is just a name for the memory address where its value is stored.
Here is an example of how Bash represents scalar variables in memory. Suppose you made the following variable declaration:
declare -i number=42
Bash stores the number variable in memory as the following string:
34 32 00
Any language with the type system needs one byte to store this integer. But Bash needs three bytes. The first two bytes store each character of the integer. The characters are 4 and 2. The third byte stores the null character.
The Bourne Shell language has the scalar variables only. Bash introduces two new composite types: indexed array and associative array.
The indexed array is a numbered set of strings. There each string corresponds to the sequence number. Bash stores such an array as a linked list in memory. A linked list is a data structure that consists of nodes. Each node contains data and the memory address of the next node. Node data are strings in this case.
The associative array is a more complicated thing. It is a set of elements. Each element consists of two strings. The first one is called “key”. The second is called “value”. When you want to access the array’s element, you should specify its key. It works the same as for the indexed array, where you specify the element’s index. The keys are unique. It means that the array cannot have two elements with the same keys. Bash stores associative array as a hash-table in memory.
Why are Bash “arrays” called arrays? Actually, they are linked lists and hash tables. A real array is the data structure whose elements are stored in memory one after another. Each element has a sequential number called an index or identifier. Bash “arrays” do not store their elements sequentially in memory. Thus, they are not arrays according to the definition.
Here is an example of how a real array stores its elements in memory. Suppose you have an array with numbers from five to nine. Each element takes one byte. Then the size of the array is five bytes. It looks this way in memory:
05 06 07 08 09
The indexing of arrays’ elements starts with zero. It means that the index of the first element equals 0. The second index equals 1 and so on. In our example, the first element with the 0 index equals integer 5. The second element equals 6. Elements follow each other in memory. Their indexes match the memory offset from the beginning of the array. Thus, the element with the third index has three bytes offset. Its value equals integer 8.
Let’s come back to the question about naming the Bash “arrays”. Only the authors of the language can answer it. However, we can guess. The name “array” gives you a hint of how to work with such a variable. When you have experience with another language, you know how to operate with a regular array. This way, you can start using Bash “arrays” immediately. You do not need to know how Bash stores these “arrays” internally.
Attributes
The Bash language does not have a type system. It stores all scalar variables in memory as strings. At the same time, Bash has arrays. They are composite types because an array is a combination of strings.
When you declare a variable in Bash, you should choose if it is scalar or composite. You make this choice by specifying metadata for the variable. Such metadata is called attributes. The attributes also define the constancy and scope of a variable.
The declare Bash built-in specifies the variable attributes. When you call it without parameters, declare prints all local and environment variables. The set command prints the same output.
The declare command has the -p option. The option adds variables attributes to the output data.
If you need information on a particular variable, pass its name to the declare command. Here is an example of the PATH variable:
declare -p PATH
The declare command also prints information about declared subroutines. They are called functions in Bash. A function is a program fragment or an independent block of code that performs a certain task.
Suppose you are interested in function declarations but not in variables. Then apply the -f option of the declare command. It filters out variables from the output. Here is the declare call in this case:
declare -f
You can specify the function name right after the -f option. Then the declare command prints information about it. Here is an example of the function quote:
declare -f quote
This command displays the declaration of the quote function. The function takes a string on the input and encloses it in single quotes. If the string already contains the single quotes, the function escapes them. You can call quote in the same way as any Bash built-in. Here is an example:
"this is a 'test' string"
The declare call without the -p option does not print a function declaration. It means that the following command outputs nothing:
declare quote
We have learned how to get information about already declared variables and functions using declare. Now let’s find out how this command sets attributes for new variables.
Table 3-7 shows the frequently used options of the declare command.
| Option | Definition |
|---|---|
-a |
The declared variable is an indexed array. |
-A |
The declared variable is an associative array. |
-g |
It declares a variable in the global scope of the script. The variable does not come to the environment. |
-i |
It declares an integer variable. When you assign it a value, Bash treats it as an arithmetic expression. |
-r |
It declares a constant. The constant cannot change its value after declaration. |
-x |
It declares an environment variable. |
Here are several examples of how to declare variables with attributes. First, let’s compare integer and string variables. Execute the following two commands in the terminal window:
1 declare -i sum=11+2
2 text=11+2
We declared two variables named sum and text. The sum variable has the integer attribute. Therefore, its value equals 13 that is the sum of 11 and 2. The text variable is equal to the “11+2” string.
Bash stores both variables as strings in memory. The -i option does not specify the variable’s type. Instead, it limits the allowed values of the variable.
Try to assign a string to the sum variable. You can do it in one of the following ways:
1 declare -i sum="test"
2 sum="test"
Each of these commands sets the sum value to zero. It happens because the variable has the integer attribute. Therefore, it cannot be equal to some string.
Suppose you have declared an integer variable. Then you do not need any Bash expansion for arithmetic operations on it. The following commands do correct calculations:
1 sum=sum+1       # 13 + 1 = 14
2 sum+=1          # 14 + 1 = 15
3 sum+=sum+1      # 15 + 15 + 1 = 31
Here the calculation results come after the hash symbol. Bash ignores everything after this symbol. Such lines are called comments.
Now execute the same commands with the string variable. You will get the following results:
1 text=text+1     # "text+1"
2 text+=1         # "text+1" + "1" = "text+11"
3 text+=text+1    # "text+11" + "text" + "1" = "text+11text+1"
Here Bash concatenates strings instead of doing arithmetic calculations. If you want to operate on integers instead, you should use the arithmetic expansion. Here is an example of this expansion:
1 text=11
2 text=$(($text + 2)) # 11 + 2 = 13
When you apply the -r option of the declare built-in, you get a constant. Such a call looks this way:
declare -r filename="README.txt"
Whenever you change or delete the value of the filename constant, Bash prints an error message. Therefore, both following commands fail:
1 filename="123.txt"
2 unset filename
The -x option of the declare command declares an environment variable. It provides the same result as if you apply the export built-in in the variable declaration. Thus, the following two commands are equivalent:
1 export BROWSER_PATH="/opt/firefox/bin"
2 declare -x BROWSER_PATH="/opt/firefox/bin"
A good practice is to use the export command instead of declare with the -x option. This improves the code readability. You do not need to remember what the -x option means. For the same reason, you should prefer the readonly command instead of declare with the -r option. Both built-ins declare a constant, but readonly is easier to remember.
The readonly command declares a variable in the global scope of a script. The declare built-in with the -r option has another result. If you call it in a function body, you declare a local variable. It is not available outside the function. Use the -g option to get the same behavior as readonly. Here is an example:
declare -gr filename="README.txt"
Indexed Arrays
Bourne Shell has scalar variables only. The interpreter stores them as strings in memory. Working with such variables is inconvenient in some cases. Therefore, developers have added arrays to the Bash language. When do you need an array?
Strings have a serious limitation. When you write a value to the scalar variable, it is a single unit. For example, you save a list of filenames in the variable called files. You separate them by spaces. As a result, the files variable stores a single string from the Bash point of view. It can lead to errors.
The root cause of the problem came from the POSIX standard. It allows any characters in filenames except the null character (NULL). NULL means the end of a filename. The same character means the end of a string in Bash. Therefore, a string variable can contain NULL at the end only. It turns out that you have no reliable way to separate filenames in a string. You cannot use NULL, but any other delimiter character can occur in the names.
You cannot process results of the ls utility reliable because of the delimiter problem. The utility cannot use NULL as a separator for names of files and directories in its output. It leads to a recommendation to avoid parsing of the ls output. Another advice is to not use ls in variable declarations this way:
files=$(ls Documents/*.txt)
This declaration writes all TXT files of the Documents directory to the files variable. If there are spaces or line breaks in the filenames, you cannot separate them properly anymore.
Bash arrays solve the delimiter problem. An array stores a list of separate units. You can always read them in their original form. Therefore, use an array to store filenames instead of a string. Here is a better declaration of the files variable:
declare -a files=(Documents/*.txt)
This command declares and initializes the array named files. Initializing means assigning values to the array’s elements. You can do that in the declaration or after it.
When you declare a variable, Bash can deduce if it is an array. This mechanism works when you skip the declare built-in. Bash adds the appropriate attribute automatically. Here is an example:
files=(Documents/*.txt)
This command declares the indexed array files.
Suppose that you know all array elements in advance. In this case, you can assign them explicitly in the declaration. It looks like this:
files=("/usr/share/doc/bash/README" "/usr/share/doc/flex/README.md" "/usr/share/doc/\
xz/README")
When assigning array elements, you can read them from other variables. Here is an example:
1 bash_doc="/usr/share/doc/bash/README"
2 flex_doc="/usr/share/doc/flex/README.md"
3 xz_doc="/usr/share/doc/xz/README"
4 files=("$bash_doc" "$flex_doc" "$xz_doc")
This command writes values of variables bash_doc, flex_doc and xz_doc to the files array. If you change these variables after this declaration, it does not affect the array.
When declaring an array, you can specify an index for each element explicitly. Do it this way:
1 bash_doc="/usr/share/doc/bash/README"
2 flex_doc="/usr/share/doc/flex/README.md"
3 xz_doc="/usr/share/doc/xz/README"
4 files=([0]="$bash_doc" [1]="$flex_doc" [5]="/usr/share/doc/xz/README")
Here there are no spaces before and after each equal sign. Remember this rule: when you declare any variable in Bash, you do not put spaces near the equal sign.
Instead of initializing the entire array at once, you can assign its elements separately. Here is an example:
1 files[0]="$bash_doc"
2 files[1]="$flex_doc"
3 files[5]="/usr/share/doc/xz/README
There are gaps in the array indexes in the last two examples. It is not a mistake. Bash allows arrays with such gaps. They are called sparse arrays.
Suppose that you have declared an array. Now there is a question of how to read its elements. The following parameter expansion prints all of them:
echo "${files[@]}"
/usr/share/doc/bash/README /usr/share/doc/flex/README.md /usr/share/doc/xz/README
You see the echo command at the first line. Its output comes on the next line.
It can be useful to print indexes of elements instead of their values. For doing that, add an exclamation mark in front of the array name in the parameter expansion. Here is an example:
1 $ echo "${!files[@]}"
2 0 1 5
You can calculate an element index using some formula. Specify the formula in square brackets when accessing the array. The following commands read and write the fifth element:
1 echo "${files[4+1]}"
2 files[4+1]="/usr/share/doc/xz/README
You can use variables in the formula. Bash accepts both integer and string variables there. Here is another way to access the fifth element of the array:
1 i=4
2 echo "${files[i+1]}"
3 files[i+1]="/usr/share/doc/xz/README
You can insert the sequential array elements at once. Specify the starting index, colon and the number of elements in the parameter expansion. Here is an example:
1 $ echo "${files[@]:1:2}"
2 /usr/share/doc/flex/README.md /usr/share/doc/xz/README
This echo call prints two elements, starting from the first. The elements’ indexes are not important in this case. You get the filenames with indexes 1 and 5.
Starting with version 4, Bash provides the readarray built-in. It is also known as mapfile. The command reads the contents of a text file into an indexed array. Let’s see how to use it.
Suppose you have the file named names.txt. It contains names of several persons:
1 Alice
2 Bob
3 Eve
4 Mallory
You want to create an array with strings of this file. The following command does that:
The command writes all lines of the names.txt file to the names_array array.
We have learned how to declare and initialize indexed arrays. Here are some more examples of using them. Suppose the files array contains a list of filenames. You want to copy the first file in the list. The following cp call does that:
"${files[0]}" ~/Documents
When reading an array element, you always apply the full form of the parameter expansion with curly brackets. Put the index of the element in square brackets after the variable name.
When you put the @ symbol instead of the element’s index, Bash inserts all array elements. Here is an example:
"${files[@]}" ~/Documents
You need to get an array size in some cases. Put the # character in front of its name. Then specify the @ symbol as the element index. For example, the following parameter expansion gives you the size of the files array:
echo "${#files[@]}"
When reading array elements, always apply double quotes. They prevent errors caused by word splitting.
Call the unset Bash built-in if you need to remove an array element. Here is an example of removing the fourth element:
unset 'files[3]'
You can suppose that this command has the wrong element index. The command is correct. Remember about numbering array elements from zero. Also, single quotes are mandatory here. They turn off all Bash expansions.
The unset command can clear the whole array if you call it this way:
unset files
Associative Arrays
We have considered indexed arrays. Their elements are strings. Each element has an index that is a positive integer. The indexed array gives you a string by its index.
The developers introduced associative arrays in the 4th version of Bash. These arrays use strings as element indexes instead of integers. This kind of string-index is called key. The associative array gives you a string-value by its string-index. When do you need this feature?
Here is an example. Suppose you need a script that stores the list of contacts. The script adds a person’s name, email or phone number to the list. Let’s omit the person’s last name for simplicity. When you need these data back, the script prints them on the screen.
You can solve the task using the indexed array. This solution would be inefficient for searching for the required contact. The script should traverse over all array elements. It compares each element with the person’s name that you are looking for. When the script finds the right person, it prints his contacts on the screen.
An associative array makes searching for contacts faster. The script should not pass through all array elements in this case. Instead, it gives the key to the array and gets the corresponding value back.
Here is an example of declaring and initializing the associative array with contacts:
declare -A contacts=(["Alice"]="alice@gmail.com" ["Bob"]="(697) 955-5984" ["Eve"]="(\
245) 317-0117" ["Mallory"]="mallory@hotmail.com")
There is only one way to declare an associative array. For doing that, you should use the declare command with the -A option. Bash cannot deduce the array type without it, even if you specify string-indexes. Therefore, the following command declares the indexed array:
contacts=(["Alice"]="alice@gmail.com" ["Bob"]="(697) 955-5984" ["Eve"]="(245) 317-01\
17" ["Mallory"]="mallory@hotmail.com")
Let’s check of how this indexed array looks like. The following declare call prints it:
1 $ declare -p contacts
2 declare -a contacts='([0]="mallory@hotmail.com")'
You see the indexed array with one element. This result happened because Bash converts all string-indexes to zero value. Then every next contact in the initialization list overwrites the previous one. This way, the zero-index element contains contacts of the last person in the initialization list.
You can specify elements of an associative array separately. Here is an example:
1 declare -A contacts
2 contacts["Alice"]="alice@gmail.com"
3 contacts["Bob"]="(697) 955-5984"
4 contacts["Eve"]="(245) 317-0117"
5 contact["Mallory"]="mallory@hotmail.com"
Suppose that you have declared an associative array. Now you can access its elements by their keys. The key is the name of a person in our example. The following command reads the contacts by the person’s name:
1 $ echo "${contacts["Bob"]}"
2 (697) 955-5984
If you put the @ symbol as the key, you get all elements of the array:
1 $ echo "${contacts[@]}"
2 (697) 955-5984 mallory@hotmail.com alice@gmail.com (245) 317-0117
If you add the exclamation mark before the array name, you get the list of all keys. It is the list of persons in our example:
1 $ echo "${!contacts[@]}"
2 Bob Mallory Alice Eve
Add the # character before the array name to get its size:
1 $ echo "${#contacts[@]}"
2 4
Let’s apply the associative array to the contacts script. The script receives a person’s name via the command-line parameter. Then it prints an email or phone number of that person.
Listing 3-10 shows the script for managing the contacts.
1 #!/bin/bash
2
3 declare -A contacts=(
4   ["Alice"]="alice@gmail.com"
5   ["Bob"]="(697) 955-5984"
6   ["Eve"]="(245) 317-0117"
7   ["Mallory"]="mallory@hotmail.com")
8
9 echo "${contacts["$1"]}"
If you need to edit some person’s data, you should open the script in a code editor and change the array initialization.
The unset Bash built-in deletes an associative array or its element. It works this way:
1 unset contacts
2 unset 'contacts[Bob]'
Bash can insert several elements of an associative array in the same way as it does for an indexed array. Here is an example:
1 $ echo "${contacts[@]:0:2}"
2 mallory@hotmail.com (245) 317-0117
Here you get the first two elements of the array.
There is one problem with inserting several elements of an associative array. Their order in memory does not match their initialization order. The hash function calculates a numerical index in the memory of each element. The function takes a string-key on input and returns a unique integer on output. Because of this feature, inserting several elements of the associative array is a bad practice.
Conditional Statements
We met the conditional statements the first time when learning the find utility. Then we found out that Bash has its own logical operators AND (&&) and OR (||). This language has other options to make branches.
We will consider the if and case operators in this section of the book. You will use them frequently when writing Bash scripts. These operators provide similar behavior. However, each of them fits better for some specific tasks.
If Statement
Imagine that you are writing a one-line command. Such a command is called one-liner. You are trying to make it as compact as possible because a short command is faster to type. Also, compactness gives you less chance to make a mistake when typing.
Now imagine that you are writing a script. The hard drive stores it. You call the script regularly and change it rarely. The code compactness is not important in this case. Instead, you try to make the code simple for reading and changing.
The && and || operators fit well for one-liners. When you are writing scripts, Bash gives you better options. Actually, it depends on the particular case. Sometimes you can use logical operators in the script and keep its code clean. However, they lead to hard-to-read code in most cases. Therefore, it is better to replace them with the if and case statements.
Here is an example. Have a look at Listing 3-9 again. It shows the backup script. You can see this bsdtar call there:
1 bsdtar -cjf "$1".tar.bz2 "$@" &&
2   echo "bsdtar - OK" > results.txt ||
3   { echo "bsdtar - FAILS" > results.txt ; exit 1 ; }
When writing this script, we have tried to make it better for reading. This motivation forced us to split calls of the bsdtar and mv utilities. This solution is still not enough. The bsdtar call is too long and complicated for reading. Therefore, it is easy to make a mistake when modifying it. Such error-prone code is called fragile. You get it whenever making a poor technical solution.
Let’s improve the bsdtar call. The first step for improving the code is writing its algorithm in a clean way. Here is the algorithm for our case:
- Read a list of files and directories from the
$@variable. - Archive and compress the files and directories.
- If the archiving succeeds, write the “bsdtar - OK” line into the log file.
- If an error occurred, write the line “bsdtar - FAILS” into the log file and terminate the script.
The last step is the most confusing one. When bsdtar succeeds, the script does one action only. When an error happens, there are two actions. These actions are combined into the single command block by curly brackets. This code block looks too complicated.
The if statement executes command blocks on specific conditions. The statement looks this way in the general form:
1 if CONDITION
2 then
3   ACTION
4 fi
You can write the if statement in one line. For doing that, add semicolons before then and fi like this:
if CONDITION; then ACTION; fi
The CONDITION and ACTION here mean a single command or a block of commands. If the exit status of the CONDITION equals zero, Bash executes the ACTION.
Here is an example of the if statement:
1 if cmp file1.txt file2.txt &> /dev/null
2 then
3   echo "Files file1.txt and file2.txt are identical"
4 fi
The cmp utility call works as the CONDITION here. The utility compares the contents of two files. If they differ, cmp prints the position of the first distinct character. The exit status is non-zero in this case. If the files are the same, the utility returns the zero status.
When you call a utility or command in the if condition, its exit status matters only. Therefore, we redirect the cmp output to the /dev/null file. It is a special system file. OS deletes all data that you write there. This operation always succeeds.
If the contents of the file1.txt and file2.txt files match, the cmp utility returns the zero status. Then the if condition equals “true”. The echo command prints the message in this case.
We have considered a simple if statement with a single CONDITION and ACTION. When the condition is met, if performs the ACTION. There are cases when you want to choose one of two possible ACTIONS using the CONDITION. The if-else statement solves this task. Here is the statement in the general form:
1 if CONDITION
2 then
3   ACTION_1
4 else
5   ACTION_2
6 fi
If you write the if-else statement in one line, it looks this way:
if CONDITION; then ACTION_1; else ACTION_2; fi
Bash executes ACTION_2 if the CONDITION returns the non-zero exit status. The condition is “false” in this case. Otherwise, Bash executes the ACTION_1.
You can extend the if-else statement by the elif blocks. Such a block adds an extra CONDITION and the corresponding ACTION. Bash executes the ACTION if the CONDITION equals “true”.
Here is an example of the if-else statement. Suppose you want to choose one of three actions depending on the value of a variable. The following if statement does that:
1 If CONDITION_1
2 then
3   ACTION_1
4 elif CONDITION_2
5 then
6   ACTION_2
7 else
8   ACTION_3
9 fi
There is no limitation on the number of elif blocks in the statement. You can add as many blocks as you need.
Let’s improve our example of file comparison. You need to print the message in both cases: when the files match and when they do not. The following if-else statement does that:
1 if cmp file1.txt file2.txt &> /dev/null
2 then
3   echo "Files file1.txt and file2.txt are the same."
4 else
5   echo "Files file1.txt and file2.txt differ."
6 fi
It is time to come back to our backup script. There the echo call combined with exit makes a block of commands. Bash executes it depending on the result of the bsdtar utility. Whenever you meet a code block and condition, it is a hint to apply the if statement.
If you apply the if-else statement to check the bsdtar result, you get the following code:
1 if bsdtar -cjf "$1".tar.bz2 "$@"
2 then
3   echo "bsdtar - OK" > results.txt
4 else
5   echo "bsdtar - FAILS" > results.txt
6   exit 1
7 fi
Do you agree that it is easier to read the code now? You can simplify it even more. The early return pattern will help you with that. Replace the if-else statement with if this way:
1 if ! bsdtar -cjf "$1".tar.bz2 "$@"
2 then
3   echo "bsdtar - FAILS" > results.txt
4   exit 1
5 fi
6
7 echo "bsdtar - OK" > results.txt
This code behaves the same as one with the if-else statement. You can see that the bsdtar result was inverted. If the utility fails, the if condition equals “true”. Then Bash prints the “bsdtar - FAILS” message to the log file and terminates the script. Otherwise, Bash skips the whole command block of the if statement. Then the further echo call prints the “bsdtar - OK” message to the log file.
The early return pattern is a useful technique that makes your code cleaner and easier to read. The idea behind it is to terminate the program as early as possible when an error appears. This solution allows you to avoid the nested if statements.
An example will demonstrate the benefits of the early return pattern. Imagine the algorithm that does five actions. Each action depends on the result of the previous one. If any action fails, the algorithm stops. You can implement this algorithm with the nested if statements like this:
 1 if ACTION_1
 2 then
 3   if ACTION_2
 4   then
 5     if ACTION_3
 6     then
 7       if ACTION_4
 8       then
 9         ACTION_5
10       fi
11     fi
12   fi
13 fi
These nested statements look confusing. Suppose that you need to handle the errors. It means that you should add the else block for each if statement. It will make this code even harder to read.
The nested if statements make code bulky and incomprehensible. It is a serious problem. The early return pattern solves it. If you apply the pattern to our example algorithm, you get the following code:
 1 if ! ACTION_1
 2 then
 3   # error handling
 4 fi
 5
 6 if ! ACTION_2
 7 then
 8   # error handling
 9 fi
10
11 if ! ACTION_3
12 then
13   # error handling
14 fi
15
16 if ! ACTION_4
17 then
18   # error handling
19 fi
20
21 ACTION_5
This is the same algorithm. Its behavior did not change. Bash performs the same five actions one by one. If any of them fails, the algorithm stops. However, the code looks different. The early return pattern made it simpler and clearer.
Suppose that each action of the algorithm corresponds to one short command. The exit command handles all errors. Also, you do not need an output to the log file. You can replace the if statement with the || operator in this case. Then your code remains simple and clear. It will look this way:
1 ACTION_1 || exit 1
2 ACTION_2 || exit 1
3 ACTION_3 || exit 1
4 ACTION_4 || exit 1
5 ACTION_5
There is only one case when the && and || operators are more expressive than the if statement. It happens when you operate short commands for doing actions and error handling.
Let’s rewrite the backup script using the if statement. Listing 3-11 shows the result.
 1 #!/bin/bash
 2
 3 if ! bsdtar -cjf "$1".tar.bz2 "$@"
 4 then
 5   echo "bsdtar - FAILS" > results.txt
 6   exit 1
 7 fi
 8
 9 echo "bsdtar - OK" > results.txt
10
11 mv -f "$1".tar.bz2 /d &&
12   echo "cp - OK" >> results.txt ||
13   ! echo "cp - FAILS" >> results.txt
We have replaced the && and || operators in the bsdtar call with the if statement. It did not change the behavior of the script.
Logical operators and the if statement are not equivalent in general. An example will show you the difference between them. Suppose there is an expression of three commands A, B and C:
You can suppose that the following if-else statement gives the same behavior:
if A
then
  B
else
  C
fi
It looks like Bash does the same in both cases. If A is “true”, then Bash executes B. Otherwise, it executes C. This assumption is wrong. When you apply the logical operator, you get another behavior. If A is “true”, then Bash executes B. Then the B result defines if C execution happens. If B is “true”, Bash skips C. If B is “false”, it executes C. Thus, execution of C depends on both A and B. There is no such dependence in the if-else statement.
if statementOperator [[
We got acquainted with the if statement. It calls a Bash built-in or utility in the condition.
Let’s consider the options that you have for making an if condition. Suppose that you want to check if a text file contains some phrase. When the phrase presents, you should print a message in the log file.
You can combine the if statement and the grep utility to solve the task. Put the grep call in the if condition. If the utility succeeds, it returns zero exit status. In this case, the if condition equals “true” and Bash prints the message.
The grep utility prints its result to the output stream. You do not need it when calling grep in the if condition. You can get rid of the utility’s output using the -q option. Then you get the following if statement:
1 if grep -q -R "General Public License" /usr/share/doc/bash
2 then
3   echo "Bash has the GPL license"
4 fi
The grep utility works well when you deal with files. But what should you do when you want to compare two strings or numbers? Bash has the [[ operator for that. The double square brackets are the reserved word of the interpreter. Bash handles them on its own without calling a utility.
Let’s start with a simple example of using the [[ operator. You need to compare two strings. The following if condition does that:
1 if [[ "abc" = "abc" ]]
2 then
3   echo "The strings are equal"
4 fi
Write a script with this code and run it. It will show you the message that the strings are equal. This kind of check is not useful. Usually, you want to compare some variable with a string. The [[ operator compares them this way:
1 if [[ "$var" = "abc" ]]
2 then
3   echo "The variable equals the \"abc\" string"
4 fi
Double quotes are optional in this condition. Bash skips globbing and word splitting when it substitutes a variable in the [[ operator. The quotes prevent problems if the variable value or string contains spaces. Here is an example of such a case:
1 if [[ "$var" = abc def ]]
2 then
3   echo "The variable equals the \"abc def\" string"
4 fi
This if condition causes the error because of word splitting. Always apply quotes when working with strings. This helps you to avoid such problems. Here is the corrected if condition for our example:
1 if [[ "$var" = "abc def" ]]
2 then
3   echo "The variable equals the \"abc def\" string"
4 fi
The [[ operator can compare two variables with each other. The following if condition does that:
1 if [[ "$var" = "$filename" ]]
2 then
3   echo "The variables are equal"
4 fi
Table 3-8 shows all kinds of string comparisons that the [[ operator performs.
| Operation | Description | Example |
|---|---|---|
| > | The string on the left side is larger than the string on the right side in the lexicographic order. | [[ “bb” > “aa” ]] && echo “The "bb" string is larger than "aa"” |
| < | The string on the left side is smaller than the string on the right side in the lexicographic order. | [[ “ab” < “ac” ]] && echo “The "ab" string is smaller than "ac"” |
| = or == | The strings are equal. | [[ “abc” = “abc” ]] && echo “The strings are equal” |
| != | The strings are not equal. | [[ “abc” != “ab” ]] && echo “The strings are not equal” |
| -z | The string is empty. | [[ -z “$var” ]] && echo “The string is empty” |
| -n | The string is not empty. | [[ -n “$var” ]] && echo “The string is not empty” |
| -v | The variable is set to any value. | [[ -v var ]] && echo “The string is set” |
| = or == | Search a pattern on the right side in a string on the left side. You should not enclose the pattern in quotes here. | [[ “$filename” = READ* ]] && echo “The filename starts with "READ"” |
| != | Check that a pattern on the right side does not occur in a string on the left side. You should not enclose the pattern in quotes here. | [[ “$filename” != READ* ]] && echo “The filename does not start with "READ"” |
| =~ | Search a regular expression on the right side in a string on the left side. | [[ “$filename” =~ ^READ.* ]] && echo “The filename starts with "READ"” |
You can use logical operations AND, OR and NOT in the [[ operator. They combine several Boolean expressions into a single condition. Table 3-9 explains how they work.
| Operation | Description | Example |
|---|---|---|
| && | Logical AND. | [[ -n “$var” && “$var” < “abc” ]] && echo “The string is not empty and it is smaller than "abc"” |
| || | Logical OR. | [[ “abc” < “$var” || -z “$var” ]] && echo “The string is larger than "abc" or it is empty” |
| ! | Logical NOT. | [[ ! “abc” < “$var” ]] && echo “The string is not larger than "abc"” |
You can group Boolean expressions using parentheses in the [[ operator. Here is an example:
[[ (-n "$var" && "$var" < "abc") || -z "$var" ]] && echo "The string is not empty an\
d less than \"abc\" or the string is empty"
Comparing strings is one feature of the [[ operator. Besides that, it can check files and directories for various conditions. Table 3-10 shows operations for doing that.
| Operation | Description | Example |
|---|---|---|
| -e | The file exists. | [[ -e “$filename” ]] && echo “The $filename file exists” |
| -f | The specified object is a regular file. It is not a directory or device file. | [[ -f “~/README.txt” ]] && echo “The README.txt is a regular file” |
| -d | The specified object is a directory. | [[ -f “/usr/bin” ]] && echo “The /usr/bin is a directory” |
| -s | The file is not empty. | [[ -s “$filename” ]] && echo “The $filename file is not empty” |
| -r | The specified file exists, and you can read it. | [[ -r “$filename” ]] && echo “The $filename file exists. You can read it” |
| -w | The specified file exists, and you can write it. | [[ -w “$filename” ]] && echo “The $filename file exists. You can write into it” |
| -x | The specified file exists, and you can execute it. | [[ -x “$filename” ]] && echo “The $filename file exists. You can execute it” |
| -N | The file exists. It was modified since you read it last time. | [[ -N “$filename” ]] && echo “The $filename file exists. It was modified” |
| -nt | The file on the left side is newer than the file on the right side. Either the file on the left side exists and the file on the right side does not. | [[ “$file1” -nt “$file2” ]] && echo “The $file1 file is newer than $file2” |
| -ot | The file on the left side is older than the file on the right side. Either the file on the right side exists and the file on the left side does not. | [[ “$file1” -ot “$file2” ]] && echo “The $file1 file is older than $file2” |
| -ef | There are paths or hard links to the same file on the left and right sides. You cannot compare hard links if your file system does not support them. | [[ “$file1” -ef “$file2” ]] && echo “The $file1 and $file2 files match” |
The [[ operator can compare integers. Table 3-11 shows operations for doing that.
| Operation | Description | Example |
|---|---|---|
| -eq | The number on the left side equals the number on the right side. | [[ “$var” -eq 5 ]] && echo “The variable equals 5” |
| -ne | The numbers are not equal. | [[ “$var” -ne 5 ]] && echo “The variable is not equal to 5” |
| -gt | Greater (>). | [[ “$var” -gt 5 ]] && echo “The variable is greater than 5” |
| -ge | Greater or equal. | [[ “$var” -ge 5 ]] && echo “The variable is greater than or equal to 5” |
| -lt | Less (<). | [[ “$var” -lt 5 ]] && echo “The variable is less than 5” |
| -le | Less or equal. | [[ “$var” -le 5 ]] && echo “The variable is less than or equal to 5” |
Table 3-11 raises questions. Two letters mark each comparison operation. It is harder to remember them than usual comparison signs: <, >, and =. Why doesn’t the [[ operator use the comparison signs? We should have a look at the operator’s history to answer this question.
The [[ operator came to Bash to replace the obsolete test built-in. The first version of Bourne shell in 1979 did not have test. However, programmers needed the feature to compare strings, files and integers. Therefore, Unix developers have added the test utility for that purpose. This utility became built-in since the System III shell version in 1981. This change did not affect the test syntax. The reason for that is backward compatibility. Programmers have written a lot of code by 1981. This code has used the old test syntax. Therefore, the new System III shell version had to support it.
Let’s take a look at the test syntax. When it was a utility, the format of its input parameters had to follow Bourne shell rules. For example, here is a typical test call to compare the var variable with the number five:
test "$var" -eq 5
This command does not raise any questions. We pass the following three parameters to the test utility:
- The value of the
varvariable. - The
-eqoption. - The number 5.
We can use the test call in the if condition this way:
1 if test "$var" -eq 5
2 then
3   echo "The variable equals 5"
4 fi
The Bourne shell introduces the [ operator as a synonym for the test built-in. The only difference between them is the mandatory closing parenthesis ]. The test operator does not need it, but the operator does.
Using the [ operator, we can rewrite the previous if condition this way:
1 if [ "$var" -eq 5 ]
2 then
3   echo "The variable equals 5"
4 fi
The [ operator improves the code readability. Thanks to the operator, the if statement in the Bourne shell looks like in other programming languages. Problems happen because the [ and test are equivalent. It is easy to lose sight of this fact. Mostly it happens when you have experience in using other languages. This mismatch between expected and real behavior leads to errors.
One of the most common mistakes of using the [ operator is the missing space between the bracket and the following character. Then the if condition becomes like this:
1 if ["$var" -eq 5]
2 then
3   echo "The variable equals 5"
4 fi
If you replace the [ bracket with the test call, the error becomes obvious:
1 if test"$var" -eq 5
2 then
3   echo "The variable equals 5"
4 fi
The space between a command name and its parameters is mandatory in both Bash and Bourne shells.
Let’s come back to the question about comparison signs in the [[ operator. Imagine the following test call:
test "$var" > 5
The > symbol is a short form of the redirect operator 1>. Therefore, the test call does the following steps:
- It calls the
testbuilt-in and passes thevarvariable there. - It redirects the
testoutput to the file named5in the current directory.
We expect another behavior, right? The > symbol should be a comparison sign. Such errors are easy to make and hard to detect. Shell developers want to prevent them. Therefore, they introduced two-letter comparison operations. The [[ Bash operator inherited these operations. It was done for backward compatibility with the Bourne shell.
Suppose that the [[ operator replaces two-letter operations with comparison signs. You have the legacy code written in Bourne shell. You want to port it to Bash. The legacy code has the following if statement:
1 if [ "$var1" -gt 5 -o 4 -lt "$var2" ]
2 then
3   echo "The var1 variable is greater than 5 or var2 is less than 4"
4 fi
Here you should replace the -gt operation to > and -lt to <. It is easy to make a mistake while doing that. It is much simpler to add an extra parenthesis at the beginning and end of the Boolean expression. This idea answers our question.
You can use comparison signs for strings when working with the [[ operator. Why is there no backward compatibility issue in this case? The first version of the test utility did not support the lexicographic comparison of strings. Therefore, the utility did not have comparison signs < and >. They appeared in the extension of POSIX standard later. The standard allows comparison signs for strings only. It was too late to add them for numbers because of the legacy code amount. According to the standard, you should escape comparison signs like this: /< and />. Then these signs came to the [[ operator in Bash. You do not need to apply escape symbols for them there.
Case Statement
A program that follows a conditional algorithm chooses its actions depending on the values of variables. If some variable has one value, the program does one thing. Otherwise, it does something else. The condition statements of programming language provide such a behavior.
We have considered the if statement. There is another conditional statement in Bash called case. It is more convenient than if in some cases.
An example will help us to compare if and case statements. Suppose that you are writing a script for archiving documents. The script has three operating modes:
- Archiving without compression.
- Archiving with compression.
- Unarchiving.
You can choose the mode by passing a command-line option to the script. Table 3-12 shows the possible options.
| Option | Operating mode |
|---|---|
-a |
Archiving without compression |
-c |
Archiving with compression |
-x |
Unarchiving |
You can check the script option using the if statement. Listing 3-12 shows how this solution looks like.
 1 #!/bin/bash
 2
 3 operation="$1"
 4
 5 if [[ "$operation" == "-a" ]]
 6 then
 7   bsdtar -c -f documents.tar ~/Documents
 8 elif [[ "$operation" == "-c" ]]
 9 then
10   bsdtar -c -j -f documents.tar.bz2 ~/Documents
11 elif [[ "$operation" == "-x" ]]
12 then
13   bsdtar -x -f documents.tar*
14 else
15   echo "Invalid option"
16   exit 1
17 fi
The $1 position parameter keeps the script option. It is always better to store it in a well-named variable. It is the operation variable in our example. Depending on its value, the if statement chooses parameters for the bsdtar call.
Now let’s replace the if statement with the case one. Listing 3-13 shows the result.
 1 #!/bin/bash
 2
 3 operation="$1"
 4
 5 case "$operation" in
 6   "-a")
 7     bsdtar -c -f documents.tar ~/Documents
 8     ;;
 9
10   "-c")
11     bsdtar -c -j -f documents.tar.bz2 ~/Documents
12     ;;
13
14   "-x")
15     bsdtar -x -f documents.tar*
16     ;;
17
18   *)
19     echo "Invalid option"
20     exit 1
21     ;;
22 esac
Suppose that you saved the script in the archiving-case.sh file. Now you can call it in one of the following ways:
1 ./archiving-case.sh -a
2 ./archiving-case.sh -c
3 ./archiving-case.sh -x
If you pass any other parameter to the script, it prints the error message and terminates. The same happens if you skip the parameter.
The case statement compares a string with a list of patterns. Each pattern has a corresponding code block. Bash executes this block when its pattern and the string match each other.
Each case block consists of the following elements:
- A pattern or a list of patterns separated by vertical bars.
- Right parenthesis.
- A code block.
- Two semicolons. They mark the end of the code block.
Bash checks patterns of the case blocks one by one. If the string matches the first pattern, Bash executes its code block. Then it skips other patterns and executes the command that follows the case statement.
The * pattern without quotes matches any string. It is usually placed at the end of the case statement. The corresponding code block handles cases when none of the patterns match the string. It usually indicates an error.
At first sight, it may seem that the if and case statements are equivalent. They are different but allow you to achieve the same behavior in some cases.
Let’s compare the if and case statements of Listings 3-12 and 3-13. First, we will write them in a general form. Here is the result for the if statement:
 1 if CONDITION_1
 2 then
 3   ACTION_1
 4 elif CONDITION_2
 5 then
 6   ACTION_2
 7 elif CONDITION_3
 8 then
 9   ACTION_3
10 else
11   ACTION_4
12 fi
The case statement looks this way:
 1 case STRING in
 2   PATTERN_1)
 3     ACTION_1
 4     ;;
 5
 6   PATTERN_2)
 7     ACTION_2
 8     ;;
 9
10   PATTERN_3)
11     ACTION_3
12     ;;
13
14   PATTERN_4)
15     ACTION_4
16     ;;
17 esac
The differences between the constructs are evident now. First, the if condition checks the results of a Boolean expression. The case statement compares a string with several patterns. Therefore, it makes no sense to pass a Boolean expression to the case condition. Doing that, you handle two cases only: when the expression is “true” and “false”. The if statement is more convenient for such checking.
The second difference between if and case is the number of conditions. Each branch of the if statement evaluates an individual Boolean expression. They are independent of each other in general. The expressions check the same variable in our example, but this is a particular case. The case statement checks one string that you pass to it.
The if and case statements are fundamentally different. You cannot exchange one for another in your code. Use an appropriate statement depending on the nature of your checking. The following questions will help you to make the right choice:
- How many conditions should you check? Use
iffor checking several conditions. - Would it be enough to check one string only? Use
casewhen the answer is yes. - Do you need compound Boolean expressions? Use
ifwhen the answer is yes.
When you use the case statement, you can apply one of two possible delimiters between the code blocks:
- Two semicolons
;;. - Semicolons and ampersand
;&.
The ampersand delimiter is allowed in Bash, but it is not part of the POSIX standard. When Bash meets this delimiter, it executes the following code block without checking its pattern. It can be useful when you want to start executing an algorithm from a specific step. Also, the ampersand delimiter allows you to avoid code duplication in some cases.
Here is an example of a code duplication problem. Suppose that you have the script that archives PDF documents and copies the resulting file. An input parameter of the script chooses an action to do. For example, the -a option means archiving and -c means copying. The script should always copy the archiving result. You get a code duplication in this case.
Listing 3-14 shows the archiving script. The case statement there has two cp calls that are the same.
 1 #!/bin/bash
 2
 3 operation="$1"
 4
 5 case "$operation" in
 6   "-a")
 7     find Documents -name "*.pdf" -type f -print0 | xargs -0 bsdtar -c -j -f document\
 8 s.tar.bz2
 9     cp documents.tar.bz2 ~/backup
10     ;;
11
12   "-c")
13     cp documents.tar.bz2 ~/backup
14     ;;
15
16   *)
17     echo "Invalid option"
18     exit 1
19     ;;
20 esac
You can avoid code duplication by adding the ;& separator between the -a and -c code blocks. Listing 3-15 shows the changed script.
 1 #!/bin/bash
 2
 3 operation="$1"
 4
 5 case "$operation" in
 6   "-a")
 7     find Documents -name "*.pdf" -type f -print0 | xargs -0 bsdtar -c -j -f document\
 8 s.tar.bz2
 9     ;&
10
11   "-c")
12     cp documents.tar.bz2 ~/backup
13     ;;
14
15   *)
16     echo "Invalid option"
17     exit 1
18     ;;
19 esac
The ;& delimiter can help you in some cases. However, use it carefully. You can easily confuse the delimiters when reading the code. This way, you may misread ;; instead of ;& and misunderstand the case statement.
Alternative to the Case Statement
The case statement and the associative array solve a similar task. The array makes the relationship between data (key-value). The case statement does the same between data and commands (value-action).
Usually, it is more convenient to handle data than code. Data are easier for modifying and checking for correctness. Therefore, it is worth to replace the case statement with an associative array in some cases. Converting data into code is easy to do in Bash comparing with other programming languages.
Here is an example of replacing case with an array. Suppose that you want to write a wrapper script for the archiving utilities. It receives several command-line parameters. The first one defines if the script calls the bsdtar or tar utility.
Listing 3-16 shows the script. It handles the command-line parameters in the case statement.
 1 #!/bin/bash
 2
 3 utility="$1"
 4
 5 case "$utility" in
 6   "-b"|"--bsdtar")
 7     bsdtar "${@:2}"
 8     ;;
 9
10   "-t"|"--tar")
11     tar "${@:2}"
12     ;;
13
14   *)
15     echo "Invalid option"
16     exit 1
17     ;;
18 esac
Here you see three code blocks in the case statement. The script executes the first block when the utility variable matches the string -b or --bsdtar. The script executes the second block when the variable matches -t or --tar. The third block handles an invalid input parameter.
Here is an example of how you can launch the script:
This call forces the script to choose the tar utility for archiving the Documents directory. If you want to use the bsdtar utility instead, replace the --tar option with -b or --bsdtar this way:
The script handles the first positional parameter on its own. It passes all the following parameters to the archiving utility. We use the $@ parameter for doing that. It is not an array, but it supports the array-like syntax for accessing several elements. The archiving utility receives all elements of the $@ parameter starting from the second one.
Now let’s rewrite our wrapper script using the associative array. First, we should consider the Bash mechanisms for converting data into commands. If you want to apply such a mechanism, you should store the command and its parameters into the variable. Then Bash expands the variable somewhere in the script and executes the command.
Here is an example of how to convert data into a command. For the first time, we will do it in the shell but not in the script. The first step is declaring the variable like this:
ls_command="ls"
Now the ls_command variable stores the command to call the ls utility. You can use the variable this way:
$ls_command
This command calls the ls utility without parameters. How does it work? Bash inserts the value of the ls_command variable. Then the command becomes like this:
Bash executes the resulting ls command after the parameter expansion.
Why don’t we use double quotes when expanding the ls_command variable? One small change would help us to answer this question. Let’s add an option to the ls utility call. Here is the ls_command variable declaration for this case:
ls_command="ls -l"
The parameter expansion with double quotes leads to the error now:
1 $ "$ls_command"
2 ls -l: command not found
Double quotes cause the problem because they prevent word splitting. Therefore, the command looks this way after the parameter expansion:
"ls -l"
Bash should call the utility named “ls -l” for processing this command. As you remember, the POSIX standard allows spaces in filenames. Therefore, “ls -l” is the correct name for an executable. Removing the quotes solves this problem. We meet one of the rare cases when you do not need double quotes for the parameter expansion.
It can happen that you still need double quotes when reading the command from the variable. This issue has a solution. Use the eval built-in in this case. It constructs the command from its input parameters. Then Bash does word splitting for the resulting command regardless of double quotes.
Here is the eval call for processing our ls_command variable:
eval "$ls_command"
Now we can rewrite our wrapper script using an associative array. Listing 3-17 shows the result.
 1 #!/bin/bash
 2
 3 option="$1"
 4
 5 declare -A utils=(
 6   ["-b"]="bsdtar"
 7   ["--bsdtar"]="bsdtar"
 8   ["-t"]="tar"
 9   ["--tar"]="tar")
10
11 if [[ -z "$option" || ! -v utils["$option"] ]]
12 then
13   echo "Invalid option"
14   exit 1
15 fi
16
17 ${utils["$option"]} "${@:2}"
Here, the utils array stores matching between the script’s options and utility names. Using the array, we construct a call of the right utility. The following command does that:
${utils["$option"]} "${@:2}"
Bash reads the utility name from the utils array. The option variable provides the element’s key. If you pass the wrong option to the script, the corresponding key does not present in utils. Then Bash inserts an empty string after the parameter expansion. It leads to an error. The if statement checks the option variable and prevents this error.
The if statement checks two Boolean expressions:
- The
optionvariable is not empty. - The
utilsarray has a key that equals theoptionvariable.
The second expression uses the -v option of the [[ operator. It checks if the variable has been declared. This option has one pitfall. If you have declared the variable and assigned an empty string, the expression result equals true. Please remember about this behavior.
Our example with the wrapper script shows that replacing the case statement with the associative array makes your code cleaner. Always consider if this option fits your case when writing scripts.
case statementArithmetic Expressions
Bash allows you to do calculations on integers. You can apply the following operations there: addition, subtraction, multiplication and division. Besides that, Bash provides bitwise and logical operators. You will use them often when programming.
Bash does not support floating-point arithmetic. If you need this arithmetic in your scripts, please use the bc or dc calculator.
Integer Representation
The first question we should consider is integers’ representation in the computer’s memory. This knowledge helps you to get mathematical operations in Bash.
You already know integers from mathematic. They do not have a fractional component and can be positive or negative. Programming languages with the static type system provide an integer type of variables. You should use this type whenever you need to operate integers.
You can be very precise in programming and specify if the integer variable is positive only. The integer of this kind is called unsigned. If it can become positive and negative, the variable is called signed.
There are three common ways of representing integers in computer memory:
Sign-Magnitude Representation
All numbers in the computer’s memory are represented in binary form. It means that the computer stores them as a sequence of zeros and ones. A number representation defines how to interpret this sequence.
First, we consider the simplest numbers representation that is the sign-magnitude representation or SMR. There are two options to use it:
- To store positive integers (unsigned).
- To store both positive and negative integers (signed).
The computer allocates a fixed block of memory for any number. When you choose the first option of SMR, all allocated memory bits are used in the same way. They store the value of the number. Table 3-13 shows several examples of how it looks like.
| Decimal | Hexadecimal | SMR |
|---|---|---|
| 0 | 0 | 0000 0000 |
| 5 | 5 | 0000 0101 |
| 60 | 3C | 0011 1100 |
| 110 | 6E | 0110 1110 |
| 255 | FF | 1111 1111 |
Suppose that the computer allocates one byte of memory for a number. Then you can store unsigned integers from 0 to 255 there using SMR.
The second option of SMR allows you to store signed integers. In this case, the highest bit keeps the integer’s sign. Therefore, there are fewer bits left for the value of the number.
Here is an example. Suppose that a computer allocates one byte to store the signed integer. One bit is reserved to indicate the positive or negative sign. Then you have seven bits only to store the number itself.
Table 3-14 shows the sign-magnitude representation of several signed integers.
| Decimal | Hexadecimal | SMR |
|---|---|---|
| -127 | FF | 1111 1111 |
| -110 | EE | 1110 1110 |
| -60 | BC | 1011 1100 |
| -5 | 85 | 1000 0101 |
| -0 | 80 | 1000 0000 |
| 0 | 0 | 0000 0000 |
| 5 | 5 | 0000 0101 |
| 60 | 3C | 0011 1100 |
| 110 | 6E | 0110 1110 |
| 127 | 7F | 0111 1111 |
The highest (leftmost) bit of all negative numbers equals one. It equals zero for positive numbers. Because of the sign, it is impossible to store numbers greater than 127 in one byte. The minimum allowed negative number is -127 for the same reason.
There are two reasons why SMR is not widespread nowadays:
- Arithmetic operations on negative numbers complicate the processor architecture. A processor module for adding positive numbers is not suitable for negative numbers.
- There are two representations of zero: positive (0000 0000) and negative (1000 0000). It complicates the comparison operation because these values are not equal in memory.
Take your time and try to get well how the SMR works. Without getting it, you won’t understand the other two ways of representing integers.
Ones’ Complement
SMR has two disadvantages. They led to technical issues when computer engineers had used this representation in practice. Therefore, the engineers started looking for an alternative approach to store numbers in memory. This way, they came to ones’ complement representation.
The first problem of SMR is related to operations on negative numbers. The ones’ complement solves it. Let’s consider this problem in detail.
The example will explain to you what exactly happens when you operate negative numbers in SMR. Suppose that you want to add integers 10 and -5. First, you should write them in SMR. Assume that each integer occupies one byte in computer memory. Then you represent them this way:
10 = 0000 1010
-5 = 1000 0101
Now the question arises. How does the processor add these two numbers? Any modern processor has a standard module called adder. It adds two numbers in a bitwise manner. If you apply it for our task, you get the following result:
10 + (-5) = 0000 1010 + 1000 0101 = 1000 1111 = -15
This result is wrong. It means that the adder cannot add numbers in SMR. The calculation mistake happens because the adder handles the highest bit of the number wrongly. This bit stores the integer’s sign.
There are two ways for solving the problem:
- Add a special module to the processor. It should process operations on negative integers.
- Change the integer representation in memory. The representation should fit the adder logic when it operates negative integers.
The development of computer technology followed the second way. It is cheaper than complicating the processor architecture.
The ones’ complement reminds SMR. The sign of the integer occupies the highest bit. The remaining bits store the number. The difference with SMR is all bits of a negative number are inverted. It means zeros become ones, and ones become zeros. Bits of positive numbers are not inverted.
Table 3-15 shows the ones’ complement representation of some numbers.
| Decimal | Hexadecimal | Ones’ Complement |
|---|---|---|
| -127 | 80 | 1000 0000 |
| -110 | 91 | 1001 0001 |
| -60 | C3 | 1100 0011 |
| -5 | FA | 1111 1010 |
| -0 | FF | 1111 1111 |
| 0 | 0 | 0000 0000 |
| 5 | 5 | 0000 0101 |
| 60 | 3C | 0011 1100 |
| 110 | 6E | 0110 1110 |
| 127 | 7F | 0111 1111 |
The memory capacity is the same when you switch from SMR to the ones’ complement. One byte can store numbers from -127 to 127 in both cases.
How did inverting the bits of negative numbers solve the adder problem? Let’s come back to our example with adding 10 and -5. First, you should represent them in the ones’ complement this way:
10 = 0000 1010
-5 = 1111 1010
When you apply the standard adder, you get the following result:
10 + (-5) = 0000 1010 + 1111 1010 = 1 0000 0100
The addition led to the overflow because the highest one does not fit into one byte. It is discarded in this case. Then the result becomes like this:
0000 0100
The discarded highest one affects the final result. You need a second calculation step to take it into account. There you add the discarded value to the result this way:
0000 0100 + 0000 0001 = 0000 0101 = 5
You got the correct result of adding numbers 10 and -5.
If the addition results in a negative number, the second calculation step is unnecessary. Here is an example of adding numbers -7 and 2. First, write them in the ones’ complement representation:
Then add the numbers:
The highest bit equals one. It means that you got a negative number. Therefore, you should skip the second calculation step.
Let’s check if the result is correct. You can convert it from ones’ complement to SMR for convenience. Invert bits of the number for doing that. The highest bit should stay unchanged. Here is the result:
1111 1010 -> 1000 0101 = -5
This is the correct result of adding -7 and 2 and.
The ones’ complement solves the first of two SMR’s problems. Now the CPU adder can operate any signed integers. This solution has one disadvantage. Addition requires two steps when you get a positive number in the result. This drawback slows down computations.
SMR has another problem with zeros. It represents zero in two ways. The ones’ complement does not solve it.
Two’s Complement
The two’s complement solves both problems of SMR. First, it allows the CPU adder to operate negative numbers in one step. You need two steps for that when using the ones’ complement. Second, the two’s complement has only one way to represent zero.
Positive integers in the two’s complement and SMR look the same. The highest bit equals zero there. The remaining bits store the number.
Negative integers in the two’s complement have the highest bit equal to one. The rest bits are inverted the same way as in the ones’ complement. The only difference is you need to add one to the negative number after inverting its bits.
Table 3-16 shows the two’s complement representation of some numbers.
| Decimal | Hexadecimal | Two’s Complement |
|---|---|---|
| -128 | 80 | 1000 0000 |
| -127 | 81 | 1000 0001 |
| -110 | 92 | 1001 0010 |
| -60 | C4 | 1100 0100 |
| -5 | FB | 1111 1011 |
| 0 | 0 | 0000 0000 |
| 5 | 5 | 0000 0101 |
| 60 | 3C | 0011 1100 |
| 110 | 6E | 0110 1110 |
| 127 | 7F | 0111 1111 |
The memory capacity increases by one unit when you switch from SMR to the two’s complement. It happens because there is only one way to represent zero. Therefore, one byte can store the numbers from -128 to 127.
Here is an example of adding numbers 14 and -8. First, you should write them in the two’s complement this way:
14 = 0000 1110
-8 = 1111 1000
Now you can add the numbers:
14 + (-8) = 0000 1110 + 1111 1000 = 1 0000 0110
The addition leads to the overflow. The highest one does not fit into a single byte. The rest bits make a positive number. It means that you should discard the highest one. This way, you get the following result:
0000 0110 = 6
When addition gives a negative result, you should not discard the highest bit. Here is an example. You want to add numbers -25 and 10. They look this way in the two’s complement:
This is the result of the addition:
Now you should convert the result to decimal. First, covert it from two’s complement to the ones’ complement. Second, convert the result to SMR. You get the following sequence of conversions:
1111 0001 - 1 = 1111 0000 -> 1000 1111 = -15
When converting from the ones’ complement to SMR, you invert all bits except the highest one. This way, you get the correct result of adding -25 and 10.
The two’s complement allows the CPU adder to operate negative numbers. Moreover, such calculations require a single step only. Therefore, there is no performance loss, unlike the ones’ complement case.
The two’s complement solves the problem of zero representation. It has only one way to represent it. Zero is the number with all bits zeroed. Therefore, you do not have issues with comparing numbers anymore.
All modern computers use the two’s complement representation to store numbers in memory.
Converting Numbers
You have learned how a computer represents numbers in memory. Would you need this knowledge in practice?
Modern programming languages take care of converting numbers to the correct format. For example, you declare a signed integer variable in decimal notation. You do not need to worry about how the computer stores it in memory. It stores all numbers in two’s complement representation automatically.
There are cases when you want to treat a variable as a set of bits. You declare it as a positive integer in this case. You should operate it in hexadecimal. Please do not convert this variable to decimal. This way, you avoid the problems of converting numbers.
The issue arises when you want to read data from some device. Such a task often occurs in the system software development. Specialists of this domain deal with device drivers, OS kernels and their modules, system libraries and network protocol stack.
An example will demonstrate you a problem. Suppose that you are writing a driver for a peripheral device. It measures air temperature cyclically and sends the results to the CPU. Your task is to interpret these data correctly. Unfortunately, the computer cannot do it for you. It happens because the computer and device represent the numbers differently. Therefore, you should write a code that does the conversion. You need to know numbers representation for doing that.
There is another task that requires you to know the two’s complement. I am talking about debugging your program. Suppose that the program gives you an unexpectedly large number in the result. If you know the two’s complement, you can guess that an integer overflow happens. This helps you find the root cause of the problem.
Operator ((
Bash performs integer arithmetic in math context.
Suppose that you want to store a result of adding two numbers in a variable. You need to declare it using the -i attribute and assign a value in the declaration. Here is an example:
declare -i var=12+7
When processing this declaration, the variable gets value 19 instead of the “12+7” string. It happens because the -i attribute forces Bash to apply the mathematical context when handling the variable.
There is an option to apply the mathematical context besides the variable declaration. Call the let built-in for doing that.
Suppose that you declared the variable without the -i attribute. Then the let built-in allows you to calculate an arithmetic expression and assign its result to the variable. Here is an example:
let text=5*7
The text variable gets integer 35 after executing this command.
When declaring a variable using the -i attribute, you do not need the let command. You can calculate the arithmetic expression without it this way:
declare -i var
var=5*7
Now the var variable equals 35.
Declaring a variable using the -i attribute creates the mathematical context implicitly. The let built-in does it explicitly. Avoid implicit mathematical contexts whenever it is possible. They can lead to errors. The -i attribute does not affect the way of how Bash stores the variable in memory. Instead, it forces Bash to convert strings into numbers every time you operate the variable.
The let command allows you to treat a string variable as an integer variable. This way, you can do the following assignments:
1 let var=12+7
2 let var="12 + 7"
3 let "var = 12 + 7"
4 let 'var = 12 + 7'
All four commands give you the same result. They assign number 19 to the var variable.
The let built-in takes parameters on input. Each of them should be a valid arithmetic expression. If there are spaces, Bash splits the expression into parts because of word splitting. In this case, let computes each part separately. It can lead to errors.
The following command demonstrates the issue:
let var=12 + 7
Here Bash applies word splitting. It produces three expressions that the let built-in receives on input. These are the expressions:
- var=12
- +
- 7
When calculating the second expression, let reports the error. The plus sign means the arithmetic addition. The addition requires two operands. There are no operands at all in our case.
If you pass several correct expressions to the let built-in, it evaluates them one by one. Here are the examples:
1 let a=1+1 b=5+1
2 let "a = 1 + 1" "b = 5 + 1"
3 let 'a = 1 + 1' 'b = 5 + 1'
The results of all three commands are the same. The a variable gets number 2. The b variable gets number 6.
If you need to prevent word splitting of the let parameters, apply single or double quotes.
The let built-in has a synonym that is the (( operator. Bash skips word splitting when handling everything inside the parentheses. Therefore, you do not need quotes there. Always use the (( operator instead of the let built-in. This way, you will avoid mistakes.
The (( operator has two forms. The first one is called the arithmetic evaluation. It is a synonym for the let built-in. The arithmetic evaluation looks like this:
((var = 12 + 7))
Here the double opening parentheses replace the let keyword. When using the arithmetic evaluation, you need double closing parentheses at the end. When the evaluation succeeds, it returns zero exit status. It returns exit status equals one when it fails. After calculating the arithmetic evaluation, Bash replaces it with its exit status.
The second form of the (( operator is called the arithmetic expansion. It looks like this:
var=$((12 + 7))
Here you put a dollar sign before the (( operator. In this case, Bash calculates the arithmetic expression and replaces it by its value.
You can skip the dollar sign before variable names inside the (( operator. Bash evaluates them correctly in this case. For example, the following two expressions are equivalent:
1 a=5 b=10
2 result=$(($a + $b))
3 result=$((a + b))
Both expressions assign number 15 to the result variable.
Do not use the dollar sign inside the (( operator. It makes your code clearer.
Table 3-17 shows the operations that you can perform in the arithmetic expression.
| Operation | Description | Example |
|---|---|---|
| Calculations | ||
* |
Multiplication | echo "$((2 * 9)) = 18" |
/ |
Division | echo "$((25 / 5)) = 5" |
% |
The remainder of division | echo "$((8 % 3)) = 2" |
+ |
Addition | echo "$((7 + 3)) = 10" |
- |
Subtraction | echo "$((8 - 5)) = 3" |
** |
Exponentiation | echo "$((4**3)) = 64" |
| Bitwise operations | ||
~ |
Bitwise NOT | echo "$((~5)) = -6" |
<< |
Bitwise left shift | echo "$((5 << 1)) = 10" |
>> |
Bitwise right shift | echo "$((5 >> 1)) = 2" |
& |
Bitwise AND | echo "$((5 & 4)) = 4" |
| |
Bitwise OR | echo "$((5 | 2)) = 7" |
^ |
Bitwise XOR | echo "$((5 ^ 4)) = 1" |
| Assignments | ||
= |
Ordinary assignment | echo "$((num = 5)) = 5" |
*= |
Multiply and assign the result | echo "$((num *= 2)) = 10" |
/= |
Divide and assign the result | echo "$((num /= 2)) = 5" |
%= |
Get the remainder of the division and assign it | echo "$((num %= 2)) = 1" |
+= |
Add and assign the result | echo "$((num += 7)) = 8" |
-= |
Subtract and assign the result | echo "$((num -= 3)) = 5" |
<<= |
Do bitwise left shift and assign the result | echo "$((num <<= 1)) = 10 |
>>= |
Do bitwise right shift and assign the result | echo "$((num >>= 2)) = 2" |
&= |
Do bitwise AND and assign the result | echo "$((num &= 3)) = 2" |
^= |
Do bitwise XOR and assign the result | echo "$((num^=7)) = 5" |
|= |
Do bitwise OR and assign the result | echo "$((num |= 7)) = 7" |
| Comparisons | ||
< |
Less than | ((num < 5)) && echo "The \"num\" variable is less than 5" |
> |
Greater than | ((num > 5)) && echo "The \"num\" variable is greater than 3" |
<= |
Less than or equal | ((num <= 20)) && echo "The \"num\" variable is less or equal 20" |
>= |
Greater than or equal | ((num >= 15)) && echo "The \"num\" variable is greater or equal 15" |
== |
Equal | ((num == 3)) && echo "The \"num\" variable is equal to 3" |
!= |
Not equal | ((num != 3)) && echo "The \"num\" variable is not equal to 3" |
| Logical operations | ||
! |
Logical NOT | (( ! num )) && echo "The \"num\" variable is FALSE" |
&& |
Logical AND | (( 3 < num && num < 5 )) && echo "The \"num\" variable is greater than 3 but less than 5" |
|| |
Logical OR | (( num < 3 || 5 < num )) && echo "The \"num\" variable is less than 3 or greater than 5" |
| Other operations | ||
num++ |
Postfix increment | echo "$((num++))" |
num-- |
Postfix decrement | echo "$((num--))" |
++num |
Prefix increment | echo "$((++num))" |
--num |
Prefix decrement | echo "$((--num))" |
+num |
Unary plus or multiplication of a number by 1 | a=$((+num))" |
-num |
Unary minus or multiplication of a number by -1 | a=$((-num))" |
CONDITION ? ACTION_1 : ACTION_2 |
Ternary operator | a=$(( b < c ? b : c )) |
ACTION_1, ACTION_2 |
The list of expressions | ((a = 4 + 5, b = 16 - 7)) |
( ACTION_1 ) |
Grouping of expressions (subexpression) | a=$(( (4 + 5) * 2 )) |
Bash performs all operations of the arithmetic expression in order of their priorities. The operations with a higher priority come first.
Table 3-18 shows the priority of operations.
| Priority | Operation | Description |
|---|---|---|
| 1 | ( ACTION_1 ) |
Grouping of expressions |
| 2 | num++, num-- |
Postfix increment and decrement |
| 3 | ++num, --num |
Prefix increment and decrement |
| 4 | +num, -num |
Unary plus and minus |
| 5 | ~, ! |
Bitwise and logical NOT |
| 6 | ** |
Exponentiation |
| 7 | *, /, % |
Multiplication, division and the remainder of division |
| 8 | +, - |
Addition and subtraction |
| 9 | <<, >> |
Bitwise shifts |
| 10 | <, <=, >, >= |
Comparisons |
| 11 | ==, != |
Equal and not equal |
| 12 | & |
Bitwise AND |
| 13 | ^ |
Bitwise XOR |
| 14 | | |
Bitwise OR |
| 15 | && |
Logical AND |
| 16 | || |
Logical OR |
| 17 | CONDITION ? ACTION_1 : ACTION_2 |
Ternary operator |
| 18 | =, *=, /=, %=, +=, -=, <<=, >>=, &=, ^=, |= |
Assignments |
| 19 | ACTION_1, ACTION_2 |
The list of expressions |
You can change the order of operations execution using parentheses “( )”. Their contents are called subexpression. It has the highest priority for Bash. If there are several subexpressions, Bash calculates them in the left-to-right order.
Suppose your code uses a numeric constant. You can specify its value in any numeral system. Use a prefix for choosing the system. Table 3-19 shows the list of allowable prefixes.
| Prefix | Numeral System | Example] |
|---|---|---|
0 |
Octal | echo "$((071)) = 57" |
0x |
Hexadecimal | echo "$((0xFF)) = 255" |
0X |
Hexadecimal | echo "$((0XFF)) = 255" |
<base># |
The numeral system with a base from 2 to 64 | echo "$((16#FF)) = 255" |
echo "$((2#101)) = 5" |
When printing a number, Bash always converts it to decimal. The printf built-in changes the format of the number on output. You can use it this way:
printf "%x\n" 250
This command prints number 250 in hexadecimal.
The printf built-in handles variables in the same way:
printf "%x\n" $var
Arithmetic Operations
Let’s start with the arithmetic operations because they are the simplest. Programming languages use regular symbols to denote them:
-
+addition -
-subtraction -
/division -
*multiplication
There are two more operations that are often used in programming. These are exponentiation and division with remainder.
Suppose that you want to raise the a number to the power of b. You can write it on paper this way: ab. Here a is the base and b is the exponent. If you want to raise two to the power of seven, you write 27. The same operation in Bash looks like this:
2**7
Calculating the remainder of a division is a complex but essential operation in programming. Therefore, we should consider it in detail.
Suppose that you have divided one integer by another. You get a fractional number in the result. The division operation produced a remainder in this case.
Here is an example. Suppose that you want to divide the number 10 (the dividend) by 3 (the divisor). If you round the result, you will get 3.33333 (the quotient). The remainder of the division equals 1 in this case. To find it, you should multiply the divisor 3 by the integer part of the quotient 3 (the incomplete quotient). Then subtract the result from the dividend 10. It gives you the remainder, which equals 1.
Let’s write our calculations in formulas. We can introduce the following notation for that:
-
ais a dividend -
bis a divisor -
qis an incomplete quotient -
ris a remainder
Using the notation, you get this formula for calculating the dividend:
Move the “b * q” multiplication to the left side of the equal sign. Then you get the following formula for finding the remainder:
The right choice of an incomplete quotient q raises questions. Sometimes several numbers fit this role. There is a restriction that helps you to choose the right one. The q quotient should have the value that makes the r remainder’s absolute value less than the b divisor. In other words, it should fulfill the following inequality:
The percent sign denotes the operation of finding the remainder in Bash. Some languages use the same symbol for the modulo operation. These two operations are not the same. They give the same results only when the signs of the dividend and the divisor match.
Here is an example of calculating the division remainder and modulo when dividing 19 by 12 and -19 by -12. You will get these results:
19 % 12 = 19 - 12 * 1 = 7
19 modulo 12 = 19 - 12 * 1 = 7

-19 % -12 = -19 - (-12) * 1 = -7
-19 modulo -12 = -19 - (-12) * 1 = -7
Let’s change the signs of the dividend and divisor. Then you get the following pairs of numbers: 19, -12 and -19, 12. If you calculate the division remainder and modulo for them, you get these results:
19 % -12 = 19 - (-12) * (-1) = 7
19 modulo -12 = 19 - (-12) * (-2) = -5

-19 % 12 = -19 - 12 * (-1) = -7
-19 modulo 12 = -19 - 12 * (-2) = 5
You see that the remainder and the modulo differ for the same pairs of numbers. It looks strange because you use the same formula for calculating them. The trick happens when you choose the q incomplete quotient. You calculate it this way when finding the division remainder:
You should round the result to the lowest absolute number. It means discarding all decimal places.
Calculating the incomplete quotient for finding the modulo depends on the signs of a and b. If the signs are the same, the formula for the quotient stays the same:
If the signs differ, you should use another formula:
You should round the result to the lowest absolute number in both cases.
When somebody talks about the division remainder r, he usually assumes that both the dividend a and divisor b are positive. That is why programming books often mention the following condition for r:
0 ≤ r < |b|
However, you can get a negative remainder when dividing numbers with different signs. Remember a simple rule: the r remainder always has the same sign as the a dividend. If the signs of r and a differ, you have found the modulo but not the division remainder.
Always keep in mind the difference between the division remainder and modulo. Some programming languages provide the % operator that calculates the remainder. Other languages have the same operator, but it calculates the modulo. It leads to confusion.
If you are unsure of your calculations, check them. The % operator of Bash always computes the division remainder. For example, you want to find the remainder of dividing 32 by -7. This command does it:
echo $((32 % -7))
This command prints the division remainder that equals four.
Now let’s find the modulo for the same pair of numbers. You can use the online calculator for that. First, enter the dividend 32 in the “Expression” field. Then enter the divisor 7 in the “Modulus” field. Finally, click the “CALCULATE” button. You will get two results:
- The “Result” field shows 4.
- The “Symmetric representation” field shows -3.
The first number 4 is the division remainder. The second number -3 is the modulo that you are looking for.
When do you need the division remainder in programming? It is often used for checking an integer for parity. For example, there is a widespread approach that controls the integrity of transmitted data in computer networks. It is called the parity bit check. You need to calculate the division remainder there.
Another task that requires calculating the division remainder is converting the time units. For example, you want to convert 128 seconds into minutes.
First, you count the number of minutes in 128 seconds. Divide 128 by 60 to do that. The result equals 2, which is the incomplete quotient. It means that 128 seconds contains 2 minutes.
The second step is calculating the remainder of dividing 128 by 60. This way, you will find the remaining seconds to add. Here is the result:
The remainder equals 8. It means that 128 seconds equals two minutes and eight seconds.
Calculating the remainder is useful when working with loops. Suppose that you want to act on every 10th iteration of the loop. Then you need to check the remainder of dividing the loop counter by 10. If the remainder is zero, then the current iteration is a multiple of 10. Thus, you should act on this iteration.
The modulo operation is widely used in cryptography.
Bitwise operations
Bitwise operations handle each bit of a number individually. You will use them often when programming. Let’s consider how they work in detail.
Bitwise negation
First, we will consider the simplest bitwise operation that is the negation. It is also called bitwise NOT. The tilde symbol indicates this operation in Bash.
When doing bitwise negation, you swap the value of each bit of an integer. It means that you replace each 1 to 0 and vice versa.
Here is an example of doing bitwise NOT for number 5:
5 = 101
~5 = 010
The bitwise NOT is a simple operation when we are talking about mathematics. However, there are pitfalls when using it in programming. You should keep in mind two things:
- How many bytes does the number occupy?
- What is the number’s representation in memory?
Suppose that the two-byte variable stores the number 5. Then it looks like this in memory:
00000000 00000101
When you apply the bitwise NOT for this variable, you get the following result:
11111111 11111010
What do these bits mean? If you store them to the variable of the unsigned integer type, you get the number 65530. If the variable is a signed integer, it equals -6. You can check it by converting the two’s complement representation to decimal.
Various Bash built-ins and operators represent integers in different ways. For example, echo always outputs numbers as signed integers. The printf command allows you to choose between a signed and unsigned integers.
There are no types in the Bash language. Bash stores all scalar variables as strings. It converts strings to integers right before inserting them into arithmetic expressions. The number interpretation (signed or unsigned) depends on the context.
Bash allocates 64 bits of memory space for each integer, regardless of its sign. Table 3-20 shows maximum and minimum allowed integers in Bash.
| Integer | Hexadecimal | Decimal |
|---|---|---|
| Maximum positive signed | 7FFFFFFFFFFFFFFF | 9223372036854775807 |
| Minimum negative signed | 8000000000000000 | -9223372036854775808 |
| Maximum unsigned | FFFFFFFFFFFFFFFF | 18446744073709551615 |
The following examples show you how Bash interprets integers in the (( operator, echo and printf built-ins:
 1 $ echo $((16#FFFFFFFFFFFFFFFF))
 2 -1
 3
 4 $ printf "%llu\n" $((16#FFFFFFFFFFFFFFFF))
 5 18446744073709551615
 6
 7 $ if ((18446744073709551615 == 16#FFFFFFFFFFFFFFFF)); then echo "ok"; fi
 8 ok
 9
10 $ if ((-1 == 16#FFFFFFFFFFFFFFFF)); then echo "ok"; fi
11 ok
12
13 $ if ((18446744073709551615 == -1)); then echo "ok"; fi
14 ok
The last example of comparing the numbers 18446744073709551615 and -1 confirms that Bash stores signed and unsigned integers the same way in memory. However, it interprets them depending on the context.
Let’s come back to the bitwise negation of the number 5. Bash gives you the result 0xFFFFFFFFFFFFFFFFFA in hexadecimal. You can print it as a positive or negative integer this way:
1 $ echo $((~5))
2 -6
3
4 $ printf "%llu\n" $((~5))
5 18446744073709551610
The numbers 18446744073709551610 and -6 are equal for Bash. It happens because all their bits in memory are the same.
Bitwise AND, OR and XOR
The bitwise AND operation resembles the logical AND. The result of the logical AND is “true” when both operands are “true”. Any other operands lead to the “false” result.
The bitwise AND operate the numbers instead of Boolean expressions. These are steps to perform the bitwise AND manually:
- Represent the numbers in the two’s complement.
- If one number has fewer bits than another, add zeros to its left side.
- Take the bits of the numbers in the same position and apply the logical AND for them.
Here is an example. You want to calculate the bitwise AND for numbers 5 and 3. First, you should represent their absolute values in binary like this:
5 = 101
3 = 11
The number 3 has fewer bits than 5. Therefore, you have to add an extra zero on its left side. This way, you get the following representation of the number 3:
3 = 011
You should convert a number in the two’s complement if it is negative.
Now you should apply the logical AND for each pair of bits of the numbers. You can write the numbers in columns for convenience:
101
011
---
001
The result equals 001. You can translate it in decimal this way:
001 = 1
It means that the bitwise AND for numbers 5 and 3 produces 1.
The ampersand sign denotes the bitwise AND operation in Bash. For example, the following command performs our calculations and prints the result:
echo $((5 & 3))
The bitwise OR operation works similarly as bitwise AND. The only difference is it applies logical OR instead of AND for each pair of bits.
Here is an example. Suppose that you need to calculate the bitwise OR for the numbers 10 and 6. First, you should write them in binary this way:
10 = 1010
6 = 110
The number 6 is one bit shorter than 10. Then you should extend it by zero like this:
6 = 0110
Now you perform the logical OR on each pair of bits of the numbers:
1010
0110
----
1110
The last step is converting the result to decimal:
1110 = 14
The number 14 is the result of the bitwise OR.
The vertical bar denotes the bitwise OR in Bash. Here is the command to check our calculations:
echo $((10 | 6))
The bitwise exclusive OR (XOR) operation is similar to the bitwise OR. You should replace the logical OR with the exclusive OR when handling the bits of the numbers there. The exclusive OR returns “false” only when both operands have the same values. Otherwise, it returns “true”.
Let’s calculate the exclusive OR for the numbers 12 and 5. First, represent them in binary:
12 = 1100
5 = 101
Then supplement the number 5 to four bits:
5 = 0101
Perform the exclusive OR for each pair of bits:
1100
0101
----
1001
Finally, convert the result to decimal:
1001 = 9
The caret symbol denotes the exclusive OR in Bash. For example, the following command checks our calculations:
echo $((12 ^ 5))
Bit Shifts
A bit shift changes the positions of the bits in a number.
There are three types of bit shifts:
- Logical
- Arithmetic
- Circular
The simplest shift type is the logical one. Let’s consider it first.
Any bit shift operation takes two operands. The first one is some integer, which bits you want to shift. The second operand is the number of bits to move.
Here is an algorithm for doing the logical bit shift:
- Represent the integer in binary.
- Discard the required amount of bits on the RHS for the right shift and the LHS for the left shift.
- Append zeroes on the opposite side of the number. This is LHS for the right shift and RHS for the left shift. The amount of zeroes matches the number of shifted bits.
Here is an example. You need to do a logical right shift of the unsigned integer 58 by three bits. The integer occupies one byte of memory.
First, you represent the number in binary:
58 = 0011 1010
The second step is discarding three bits on the right side of the number this way:
0011 1010 >> 3 = 0011 1
Finally, you add zeros to the left side of the result:
0011 1 = 0000 0111 = 7
The number 7 is the result of the shift.
Now let’s do the left bit shift of the number 58 by three bits. You will get the following result:
0011 1010 << 3 = 1 1010 = 1101 0000 = 208
Here you follow the same algorithm as for the right shift. First, discard three leftmost bits. Then add zeros to the right side of the result.
Now let’s consider the second type of bit shift that is the arithmetic shift. When you do it to the left side, you follow the logical shift algorithm. The steps are entirely the same.
The arithmetic shift to the right side differs from the logical shift. The first two steps are the same. You should convert the source integer in the two’s complement and discard the bits on its right side. Then you append the same amount of bits on the left side. Their value matches the leftmost bit of the integer. If it equals one, you add ones. Otherwise, add zeros. This way, you keep the sign of the integer unchanged after the shifting.
Here is an example. Suppose that you need to do an arithmetic shift of the signed integer -105 to the right by two bits. The integer occupies one byte of memory.
First, you represent the number in the two’s complement like this:
Then you shift it to the right by two bits this way:
1001 0111 >> 2 -> 1001 01 -> 1110 0101
The leftmost bit of the integer equals one in this case. Therefore, you complement the result with ones on the left side.
This way, you get a negative number in the two’s complement representation. You can convert it to decimal this way:
1110 0101 = 1001 1011 = -27
The number -27 is the result of the bit shift operation.
Bash has operators << and >>. They do arithmetic bit shifts. The following commands check your calculations:
1 $ echo $((58 >> 3))
2 7
3
4 $ echo $((58 << 3))
5 464
6
7 $ echo $((-105 >> 2))
8 -27
Bash provides another result for shifting 58 to the left by three bits. It equals 208. It happens because Bash always operates eight-byte integers.
The third type of bit shift is a circular shift. It is used in programming rarely. Therefore, most programming languages do not have built-in operators for circular shifts.
When doing the cyclic bit shift, you should append the discarded bits from one side of the number to another side.
Here is an example of the circular bit shift of the number 58 to the right by three bits:
0011 1010 >> 3 = 010 0011 1 = 0100 0111 = 71
You should discard bits 010 on the right side of the number. Then add them on the left side.
Using Bitwise Operations
Bitwise operations are widely used in system programming. The specialists of this domain deal with computer networks, device drivers and OS kernels. Translating data from one format to another often happens there.
Here is an example. Suppose you are writing a driver for some peripheral device. The byte order on the device is big-endian. Your computer uses another order, which is little-endian.
The device sends an unsigned integer to the computer. It equals 0xAABB in hexadecimal. Because of the different byte orders, your computer cannot handle the integer as it is. You should convert it to 0xBBAA. Then the computer reads it correctly.
Here are the steps for converting the 0xAABB integer to the computer’s byte order:
- Read the lowest (rightmost) byte of the integer and shift it to the left by eight bits, i.e. one byte. The following Bash command does that:
little=$(((0xAABB & 0x00FF) << 8))
- Read the highest (leftmost) byte of the number and shift it to the right by eight bits. Here is the corresponding command:
big=$(((0xAABB & 0xFF00) >> 8))
3. Combine the highest and lowest bytes with the bitwise OR this way:
result=$((little | big))
Bash wrote the conversion result to the result variable. It is equal to 0xBBAA.
You can replace all three steps by the single Bash command:
value=0xAABB
result=$(( ((value & 0x00FF) << 8) | ((value & 0xFF00) >> 8) ))
Here is another example of using bitwise operations. You need them for computing bitmasks. You already know file permission masks in the Unix environment. Suppose that a file has the permissions “-rw-r–r–”. It looks like this in binary:
0000 0110 0100 0100
Suppose that you want to check if the file owner can execute it. You can do that by calculating the bitwise AND for the permission mask and the 0000 0001 0000 0000 0000 number. Here is the calculation:
0000 0110 0100 0100 & 0000 0001 0000 0000 = 0000 0000 0000 0000 = 0
The result equals zero. It means that the owner cannot execute the file.
Using the bitwise OR, you can set bits of the bitmask. For example, you can allow the owner to execute the file this way:
0000 0110 0100 0100 | 0000 0001 0000 0000 = 0000 0111 0100 0100 = -rwxr--r--
We performed the bitwise OR for the permission mask and the 0000 0001 0000 0000 number. The eighth bit of the number equals one. It changes the eighth bit of the permission mask. The corresponding bit in the mask can have any value. It does not matter because the bitwise OR sets it to one regardless of its current value. If you do not want to change some bits in the permission mask, set the corresponding bits of the number to zero.
The bitwise AND clears bits of the bitmask. For example, let’s remove the file owner’s permission to write. Here is the calculation:
0000 0111 0100 0100 & 1111 1101 1111 1111 = 0000 0101 0100 0100 = -r-xr--r--
We set the ninth bit of the permission mask to zero. To do that, you should calculate the bitwise AND for the permission mask and the 1111 1101 1111 1111 number. The ninth bit of the number equals zero and all other bits are ones. Therefore, the bitwise AND changes the ninth bit of the permission mask only.
The OS operates masks whenever you access a file. This way, it checks your access rights.
Here is the last example of using bitwise operations. Until recently, software developers used bit shifts as an alternative to multiplication and division by a power of two. For example, the bit shift to the left by two bits corresponds to multiplication by 22 (i.e. four). You can check it with the following Bash command:
1 $ echo $((3 << 2))
2 12
The bit shift gives the same result as multiplication because “3 * 4” equals 12.
This trick reduces the number of processor clock cycles to perform multiplication and division. These optimizations are now unnecessary due to the development of compilers and processors. Compilers automatically select the fastest assembly instructions when generating code. Processors execute these instructions in parallel with several threads. Today, software developers tend to write code that is easier to read and understand. They do not care about optimizations as they do it before. Multiplication and division operations are better for reading the code than bit shifts.
Cryptography and computer graphics algorithms use bit operations a lot.
Logical Operations
The [[ operator is inconvenient for comparing integers in the if statement. This operator uses two-letter abbreviations for expressing the relations between numbers. For example, the -gt abbreviation means greater. When you apply the (( operator instead, you can use the usual comparison symbols there. These symbols are: >, < and =.
Here is an example. Suppose that you want to compare some variable with the number 5. The following if construction does that:
1 if ((var < 5))
2 then
3   echo "The variable is less than 5"
4 fi
The construction uses the (( operator in the arithmetic evaluation form. You can replace it with the let built-in. Then it provides the same result:
1 if let "var < 5"
2 then
3   echo "The variable is less than 5"
4 fi
However, you should always prefer to use the (( operator.
There is an important difference between arithmetic evaluation and expansion. According to the POSIX standard, any program or command returns the zero exit status when it succeeds. It returns the status between 1 and 255 when it fails. The shell interprets the exit status like this: zero means “true” and nonzero means “false”. If you apply this rule, the logical result of the arithmetic expansion is inverted. There is no such inversion for the arithmetic evaluation result.
Arithmetic evaluation is synonymous with the let built-in. Therefore, it follows the POSIX standard just like any other command. The shell executes the arithmetic expansion in the context of another command. Thus, its result depends on the interpreter’s implementation.
Suppose that you use the (( operator in the arithmetic expansion form. Then Bash interprets its result this way: if the condition in the (( operator equals “true”, it returns one. Otherwise, the operator returns zero. The C language deduces Boolean expressions in the same way.
An example will demonstrate the difference between the arithmetic expansion and evaluation. The following Bash command compares the var variable with the number 5:
((var < 5)) && echo "The variable is less than 5"
This command contains the arithmetic evaluation. Therefore, if the var variable is less than 5, the (( operator succeeds. It returns the zero exit status according to the POSIX standard. Then echo prints the message.
When you use the operator (( in the form of the arithmetic expansion, it gives you another result. The following command makes the same comparison:
echo "$((var < 5))"
When this condition is true, the echo command prints the number one. If you are familiar with the C language, you expect the same result.
You can use logical operations in the arithmetic evaluation form of the (( operator. They work in the same way as the Bash logical operators.
Here is an example of how to apply a logical operation. The following if condition compares the var variable with the numbers 1 and 5:
1 if ((1 < var && var < 5))
2 then
3   echo "The variable is less than 5 but greater than 1"
4 fi
This condition is true when both expressions are true.
The logical OR works similarly:
1 if ((var < 1 || 5 < var))
2 then
3   echo "The variable is less than 1 or greater than 5"
4 fi
The condition is true if at least one of two expressions is true.
It rarely happens when you apply the logical NOT to some number. Instead, you use it to negate the value of some variable or expression. If you apply the logical NOT to a number, its output corresponds to the POSIX standard. In other words, zero means “true” and nonzero means “false”. Here is an example:
1 if ((! var))
2 then
3   echo "The variable equals true or zero"
4 fi
This condition is true if the var variable equals zero.
Increment and Decrement
The increment and decrement operations first appeared in the programming language B. Ken Thompson and Dennis Ritchie developed it in 1969 while working at Bell Labs. Dennis Ritchie moved these operations later to his new language called C. Bash copied them from C.
First, let’s consider the assignment operations. It helps you to get how increment and decrement work. A regular assignment in arithmetic evaluation looks like this:
((var = 5))
This command assigns the number 5 to the var variable.
Bash allows you to combine an assignment with arithmetic or bitwise operation. The following command does addition and assignment at the same time:
((var += 5))
The command performs two actions:
- It adds the number 5 to the current value of the
varvariable. - It writes the result back to the
varvariable.
All other assignment operations work the same way. First, they do a mathematical or bitwise operation. Second, they assign the result to the variable. Using assignments makes your code shorter and clearer.
Now we will consider the increment and decrement operations. They have two forms: postfix and prefix. You should write them in different ways. The ++ and – signs come after the variable name in the postfix form. They come before the variable name in the prefix form.
Here is an example of the prefix increment:
((++var))
This command provides the same result as the following assignment operation:
((var+=1))
The increment operation increases the variable’s value by one. Decrement decreases it by one.
Why does it make sense to introduce special operations for adding and subtracting one? The Bash language has assignments += and -= that you can use instead.
The most probable reason for introducing the increment and decrement is managing a loop counter. This counter keeps the number of loop iterations. When you want to interrupt the loop, you check its counter in a condition. The result defines if you should interrupt the loop or not.
Increment and decrement make it easier to serve the loop counter. Besides that, modern processors perform these operations on the hardware level. Therefore, they work faster than addition and subtraction combined with the assignment.
What is the difference between prefix and postfix forms of increment? If the expression consists only of an increment operation, you get the same result for both forms.
For example, the following two commands increase the variable’s value by one:
1 ((++var))
2 ((var++))
The difference between the increment forms appears when you assign the result to some variable. Here is an example:
1 var=1
2 ((result = ++var))
After executing these two commands, both variables result and var store the number 2. It happens because the prefix increment first adds one and then returns the result.
If you break the prefix increment into steps, you get the following commands:
1 var=1
2 ((var = var + 1))
3 ((result = var))
The postfix increment behaves differently. Let’s change the increment’s form in our example:
1 var=1
2 ((result = var++))
These commands write the number 1 to the result variable and the number 2 to the var variable. It happens because the postfix increment returns the current value of the variable first. Then it adds one to this value and writes the result back to the variable.
If you break the postfix increment into steps, you get the following commands:
1 var=1
2 ((tmp = var))
3 ((var = var + 1))
4 ((result = tmp))
Note the order of steps in the postfix increment. First, it increments the var variable by one. Then it returns the previous value of var. Therefore, the increment needs the temporary variable tmp to store this previous value.
The postfix and prefix forms of decrement work similarly to increment. They decrease the variable by one.
Always use the prefix increment and decrement instead of the postfix form. First, the CPU performs them faster. The reason is it does not need to save the previous value of the variable in the registers. Second, it is easier to make an error using the postfix form. It happens because of the non-obvious order of assignments.
Ternary Operator
The ternary operator is also known as the conditional operator and ternary if. The first time, it appeared in the programming language ALGOL. The operator turned out to be convenient and many programmers liked it. The languages of the next generation (BCPL and C) inherited the ternary if. This way, it comes to almost all modern languages: C++, C#, Java, Python, PHP, etc.
The ternary operator is a compact form of the if statement.
Here is an example. Suppose that your script has the following if statement:
1 if ((var < 10))
2 then
3   ((result = 0))
4 else
5   ((result = var))
6 fi
Here the result variable gets the zero value if var is less than 10. Otherwise, result gets the value of var.
You can get the same behavior using the ternary operator. It looks like this:
((result = var < 10 ? 0 : var))
The ternary operator replaced six lines of the if statement with one line. This way, you got simpler and clearer code.
The ternary operator consists of a conditional expression and two actions. Its general form looks like this:
If the CONDITION is true, Bash executes the ACTION_1. Otherwise, it executes the ACTION_2. This behavior matches the following if statement:
1 if CONDITION
2 then
3   ACTION_1
4 else
5   ACTION_2
6 fi
Unfortunately, Bash allows the ternary operator in arithmetic evaluation and expansion only. It means that the operator accepts arithmetic expressions as actions. You cannot call commands and utilities there, as you do it in the code blocks of the if statement. There is no such restriction in other programming languages.
Use the ternary operator as often as possible. It is considered a good practice. The operator makes your code compact and easy to read. The less code has less room for potential errors.
Loop Constructs
You have learned the conditional statements. They manage the control flow of a program. The control flow is the execution order of the program’s commands.
The conditional statement chooses a branch of execution depending on the result of a Boolean expression. However, this statement is not enough in some cases. You need extra features to manage the control flow. The loop construct helps you to handle these cases.
The loop construct repeats the same block of commands multiple times. The single execution of this block is called the loop iteration. The loop checks its condition after each iteration. The check result defines if the next iteration should be executed.
Repetition of Commands
Why does somebody need to repeat the same block of commands in his program? Several examples will help us to answer this question.
You are already familiar with the find utility. It looks for files and directories on the disk drive. If you add the -exec option to the find call, you can specify some action. The utility performs this action for each found object.
For example, the following command deletes all PDF documents in the ~/Documents directory:
"*.pdf" -exec rm {} \;
Here find calls the rm utility several times. It passes the next found file on each call. It means that the find utility executes the loop implicitly. The loop ends when find finishes the processing of all found files.
The du utility is another example of the repetition of commands. The utility estimates the amount of occupied disk space. It has one optional parameter. The parameter sets the path to start the estimation.
Here is an example of the du call:
Here the utility traverses all ~/Documents subdirectories recursively. It adds the size of each found file to the final result. This way, incrementing the result repeats several times.
The du utility performs a loop implicitly. The loop traverses over all files and subdirectories. It does the same actions on each iteration. The only difference between iterations is a file system object to check.
You can meet the repetition of operations in regular mathematical calculations. A canonical example here is the calculation of factorial. The factorial of the number N is a multiplication of natural numbers from 1 to N inclusive.
Here is an example of calculating the factorial of number 4:
4! = 1 * 2 * 3 * 4 = 24
You can calculate the factorial easily when using the loop. The loop should pass through the integers from 1 to N in sequence. You should multiply the final result by each passed integer. This way, you repeat the multiplication operation several times.
Here is the last example of action repetition in a computer system. Repetition is an effective approach to manage some events.
Suppose that you write a program. It downloads files to your computer from the Internet. First, the program establishes a connection to a server. If the server doesn’t respond, the program has two options to do. The first one is to terminate with a non-zero exit status. The second option is to wait for the server response. This behavior of the program is preferable. There are many reasons why the packets from the server can delay. It can be an overload of the network, for example. Waiting for a couple of seconds is enough to get the packet. Then your program can continue to work.
Now the question arises: how can you wait for the event to occur in the program? The easiest way to get it is using a loop operator. The operator’s condition should check if the event occurs. When it happens, the operator stops.
Let’s come back to our example. The loop should stop when the program receives a response from the server. While it does not happen, the loop continues. You do not need any actions on each iteration. Instead, you leave the loop body empty. This technique is called busy waiting.
Busy waiting does nothing but can consume a lot of CPU time. This is a reason why you should optimize it when possible. Add the command, which stops the program for a short time, to the loop body. It gives OS a chance to execute another task while your program is waiting.
We have considered examples when the program repeats the same action several times. Let’s write down the tasks that such repetition solves:
- Process multiple entities monotonously. The
findutility processes the search results this way. - Accumulate intermediate data for calculating the final result. The
duutility does it for collecting statistics. - Mathematical calculations. You can calculate factorial using the loop.
- Wait for some event to happen. You can wait for the server response in the busy waiting loop.
This list is far from being complete. It demonstrates just the most common programming tasks that require the loop operator.
While Statement
Bash provides two loop operators: while and for. We will start with the while statement because it is more straightforward than for.
The while syntax resembles the if statement. If you write while in the general form, it looks this way:
1 while CONDITION
2 do
3   ACTION
4 done
You can write the while statement in one line:
while CONDITION; do ACTION; done
Both CONDITION and ACTION can be a single command or block of commands. The ACTION is called the loop body.
When Bash executes the while loop, it checks the CONDITION first. If a command of the CONDITION returns the zero exit status, it means “true”. Bash executes the ACTION in the loop body in this case. Then it rechecks the CONDITION. If it still equals “true”, the ACTION is performed again. The loop execution stops when the CONDITION becomes “false”.
Use the while loop when you do not know the number of iterations beforehand. A good example of this case is busy waiting for some event.
Suppose that you write a script that checks if some web server is available. The simplest check looks this way:
- Send a request to the server.
- Receive the response.
- If there is no response, the server is unavailable.
When the script receives the response from the server, it should print a message and stop.
You can call the ping utility to send a request to the server. The utility uses the ICMP protocol.
The protocol is an agreement for the format of messages between the computers of the network. The ICMP protocol describes the error messages and packets with operational information. For example, you need them to check if some computer is available.
When calling the ping utility, you should specify an IP address or URL of the target host. A host is a computer or device connected to the network.
Here is an example of the ping call:
We have specified the Google server as the target host. The utility sends ICMP messages there. The server replies to them. The utility output looks like this:
1 PING google.com (172.217.21.238) 56(84) bytes of data.
2 64 bytes from fra16s13-in-f14.1e100.net (172.217.21.238): icmp_seq=1 ttl=51 time=17.\
3 8 ms
4 64 bytes from fra16s13-in-f14.1e100.net (172.217.21.238): icmp_seq=2 ttl=51 time=18.\
5 5 ms
You see information about each sent and received ICMP message. The “time” field means the delay between sending the request and receiving the server response.
The utility runs in the infinite loop by default. You can stop it by pressing Ctrl+C.
You do not need to send several requests to check if some server is available. It is sufficient to send a single ICMP message instead. The -c option of the ping utility specifies the number of messages to send. Here is an example of how to use it:
1 google.com
If the google.com server is available, the utility returns the zero exit status. Otherwise, it returns a non-zero value.
The ping utility expects the server response until you do not interrupt it. The -W option limits this waiting time. You can specify one second to wait this way:
1 -W 1 google.com
Now you have the condition for the while statement. There is time to write this statement:
1 while ! ping -c 1 -W 1 google.com &> /dev/null
2 do
3   sleep 1
4 done
The output of the ping utility does not matter in our case. Therefore, you can redirect it to the /dev/null file.
The exit status of the ping utility is inverted in our while condition. Therefore, Bash executes the loop body as long as the utility returns a non-zero exit status. It means that the loop continues as long as the server stays unavailable.
The loop body contains the sleep utility call only. It stops the script execution for the specified number of seconds. The stop lasts for one second in our case.
Listing 3-18 shows the complete script for checking server availability.
1 #!/bin/bash
2
3 while ! ping -c 1 -W 1 google.com &> /dev/null
4 do
5   sleep 1
6 done
7
8 echo "The google.com server is available"
The while statement has an alternative form called until. It executes the ACTION until the CONDITION stays “false”. It means that the loop continues as long as the CONDITION returns a non-zero exit status. Use the until statement when you need to invert the condition of the while loop.
The general form of the until statement looks this way:
1 until CONDITION
2 do
3   ACTION
4 done
You can write it in one line, the same way as you do it for while:
until CONDITION; do ACTION; done
Let’s replace the while statement with until in Listing 3-18. You should remove the negation of the ping result for that. Listing 3-19 shows the changed script.
1 #!/bin/bash
2
3 until ping -c 1 -W 1 google.com &> /dev/null
4 do
5   sleep 1
6 done
7
8 echo "The google.com server is available"
The scripts in Listing 3-18 and Listing 3-19 behave the same.
Choose the while or until statement, depending on the loop condition. Your goal is to avoid negations there. Negations make the code harder to read.
Infinite Loop
The while statement fits well when you need to implement an infinite loop. This kind of loop continues as long as the program is running.
You can meet infinite loops in system software. They run the whole time while a computer stays powered on. An example is the microcontroller firmware that checks some sensors cyclically. It happens in the infinite loop. Also, such loops are used in computer games, antiviruses, monitors of computer resources, etc.
The while loop becomes infinite if its condition always stays true. The easiest way to make such a condition is to call the true Bash built-in. Here is an example for doing that:
1 while true
2 do
3   sleep 1
4 done
The true built-in always returns the “true” value. It means that it returns zero exit status. There is the symmetric command called false. It always returns exit status one that matches the “false” value.
You can replace the true built-in in the while condition with a colon. Then you will get the following statement:
1 while :
2 do
3   sleep 1
4 done
The colon is synonymous with the true command. This synonymous solves the compatibility task with the Bourne shell. This shell does not have true and false built-ins. Bourne shell scripts use a colon instead, and Bash should support it.
The POSIX standard includes all three keywords: colon, true, and false. However, you should avoid using a colon in your scripts. It is a deprecated syntax that makes your code harder to understand.
Here is an example of an infinite loop. Suppose that you need a script that displays statistics of disk space usage. The df utility can help you in this case. It provides the following output when called without parameters:
1 $ df
2 Filesystem     1K-blocks      Used Available Use% Mounted on
3 C:/msys64       41940988  24666880  17274108  59% /
4 Z:             195059116 110151748  84907368  57% /z
The utility shows “Used” and “Available” disk space in bytes. You can improve this output by adding the -h option to the utility call. Then df shows kilobytes, megabytes, gigabytes and terabytes instead of bytes. Another option that you can apply is -T. It shows the file system type for each disk. You will get the following output after all improvements:
1 $ df -hT
2 Filesystem     Type  Size  Used Avail Use% Mounted on
3 C:/msys64      ntfs   40G   24G   17G  59% /
4 Z:             hgfs  187G  106G   81G  57% /z
If you need to get information about all mount points, add the -a option.
Now you should write the infinite loop. It calls the df utility on each iteration. This way, you will get a simple script to monitor the file system. Listing 3-20 shows how it looks like.
1 #!/bin/bash
2
3 while true
4 do
5   clear
6   df -hT
7   sleep 2
8 done
The first action of the loop body is the clear utility call. It removes all text in the terminal window. Thanks to this step, the terminal shows the output of your script only.
When working with Bash, you often face the task of executing a command in a cycle. The watch utility does it. The utility is a part of the procps package. If you need it, the following command installs it to the MSYS2 environment:
Now you can replace the script from Listing 3-20 with a single command this way:
2 "df -hT"
The -n option of the watch utility specifies the interval between command calls. The command to execute follows all options of watch.
The -d utility option highlights the difference of the command output at the current and past iterations. This way, it is easier to keep track of occurred changes.
Reading a Standard Input Stream
The while loop fits well for handling an input stream. Here is an example of such a task. Suppose that you need a script that reads a text file. It should make an associative array from the file content.
Listing 3-10 shows the script for managing the list of contacts. The script stores contacts in the format of the Bash array declaration. It makes adding a new person to the list inconvenient. The user must know the Bash syntax. Otherwise, he can make a mistake when initializing an array element. It will break the script.
There is a solution to the problem of editing the contacts list. You can move the list into a separate text file. Then, the script would read it at startup. This way, you separate data and code. It is a well-known good practice in software development.
Listing 3-21 shows a possible format of the file with contacts.
contacts.txt1 Alice=alice@gmail.com
2 Bob=(697) 955-5984
3 Eve=(245) 317-0117
4 Mallory=mallory@hotmail.com
Let’s write the script that reads this file. It is convenient to read the list of contacts directly into the associative array. This way, you will keep the searching mechanism over the list as effective as before.
When reading the file, you should handle its lines in the same manner. It means that you will repeat the same action several times. Therefore, you need a loop statement.
At the beginning of the loop, you don’t know the file size. Thus, you do not know the number of iterations to do. The while statement fits this case perfectly.
Why is the number of iterations unknown in advance? It happens because the script reads the file line by line. It cannot count the lines before it reads them all. There is an option to make two loops. Then the first one counts the lines. The second loop processes them. However, this solution works slower and is less efficient.
You can call the read Bash built-in for reading lines of the file. The command receives a string from the standard input stream. Then it writes the string into the specified variable. You can pass the variable name as the parameter. Here is an example of calling read:
read var
Run this command. Then type the string and press Enter. The read command writes your string into the var variable. You can call read without parameters. It writes the string into the reserved variable REPLY in this case.
When read receives the string, it removes backslashes \ there. They escape special characters. Therefore, the read command considers the backslashes unnecessary. The -r option disables this feature. Use it always to prevent losing characters of the input string.
You can pass several variable names to the read command. Then it divides the input text into parts. The command uses the delimiters from the reserved variable IFS in this case. Default delimiters are spaces, tabs and line breaks.
Here is an example of how the read built-in deals with several variables. Suppose that you want to store the input string into two variables. They are called path and file. The following command reads them:
read -r path file
Suppose that you have typed the following string for this command:
Then the read command writes the ~/Documents path into the path variable. The filename report.txt comes into the file variable.
If the path or filename contains spaces, the error occurs. For example, you can type the following string:
Then the read built-in writes the ~/My string into the path variable. The file variable gets the rest part of the input: Documents report.txt. This is the wrong result. Keep in mind this behavior when using the read command.
There is a solution to the problem of splitting the input string. You can solve it by redefining the IFS variable. For example, the following declaration specifies a comma as the only possible delimiter:
This declaration uses the Bash-specific type of quotes $'...'. Bash does not perform any expansions inside them. At the same time, you can place the following control sequences there: \n (new line), \\\ (escaped backslash), \t (tabulation) and \xnn (bytes in hexadecimal).
The IFS redeclaration allows you to process the following input string properly:
1 ~/My Documents,report.txt
Here the comma separates the path and filename. Therefore, the read command writes the ~/My Documents string into the path variable. The report.txt string comes into the file variable.
The read built-in receives data from the standard input stream. It means that you can redirect the file contents there.
Here is an example to read the first line of the contacts.txt file from Listing 3-21. The following command does it:
read -r contact < contacts.txt
This command writes the “Alice=alice@gmail.com” string to the contact variable.
You can write the name and contact information to two different variables. You need to define the equal sign as a delimiter to do that. Then you will get the following read call:
IFS=$'=' read -r name contact < contacts.txt
Now the name variable gets the “Alice” name. The e-mail address comes to the contact variable.
Let’s try the following while loop for reading the entire contacts.txt file:
1 while IFS=$'=' read -r name contact < "contacts.txt"
2 do
3   echo "$name = $contact"
4 done
Unfortunately, this approach does not work. You get the infinite loop accidentally. It happens because the read command always reads only the first line of the file. Then it returns the zero exit status. The zero status leads to another execution of the loop body. It happens over and over again.
You should force the while loop to pass through all lines of the file. The following form of the loop does it:
1 while CONDITION
2 do
3   ACTION
4 done < FILE
This form of the loop can handle keyboard input too. You need to specify the /dev/tty input file for doing that. Then the loop will read keystrokes until you press Ctrl+D.
Here is the corrected while loop that reads the entire contacts.txt file:
1 while IFS=$'=' read -r name contact
2 do
3   echo "$name = $contact"
4 done < "contacts.txt"
This loop prints all lines of the contacts file.
There is the last step left to finish your script. You should write the name and contact variables to the associative array on each iteration. The name variable is the key and contact is the value.
Listing 3-22 shows the final version of the script for reading the contacts from the file.
 1 #!/bin/bash
 2
 3 declare -A array
 4
 5 while IFS=$'=' read -r name contact
 6 do
 7   array[$name]=$contact
 8 done < "contacts.txt"
 9
10 echo "${array["$1"]}"
This script behaves the same way as the one in Listing 3-10.
For Statement
There is another loop statement in Bash called for. You should use it when you know the number of iterations in advance.
The for statement has two forms. The first one processes words in a string sequentially. The second form applies an arithmetic expression in the loop condition.
The First Form of For
Let’s start with the first form of the for statement. It looks this way in the general form:
1 for VARIABLE in STRING
2 do
3   ACTION
4 done
You can write the same construction in a single line like this:
for VARIABLE in STRING; do ACTION; done
The ACTION of the for statement is a single command or a block of commands. It is the same thing as the one in the while statement.
Bash performs all expansions in the for condition before starting the first iteration of the loop. What does it mean? Suppose you specified the command instead of the STRING. Then Bash executes this command and replaces it with its output. Also, you can specify a pattern instead of the STRING. Then Bash expands it before starting the loop.
Bash splits the STRING into words when there are no commands or patterns left in the for condition. It takes the separators for splitting from the IFS variable.
Then Bash executes the first iteration of the loop. The first word of the STRING is available via the VARIABLE inside the loop body on the first iteration. Then Bash writes the second word of the STRING to the VARIABLE and starts the second iteration. It happens again and again until you handle all words of the STRING.
Here is an example of the for loop. Suppose that you need a script that prints words of a string one by one. The script receives the string via the first parameter. Listing 3-23 shows how its code looks like.
1 #!/bin/bash
2
3 for word in $1
4 do
5   echo "$word"
6 done
Here you should not enclose the position parameter $1 in quotes. Quotes prevent word splitting. Without word splitting, Bash passes the whole string to the first iteration of the for loop. Then the loop finishes. You do not want this behavior. The script should process each word of the string separately.
When you call the script, you should enclose the input string in the double quotes. Then the whole string comes into the $1 parameter. Here is an example of calling the script:
"this is a string"
There is a way to get rid of the double quotes when calling the script. Replace the $1 parameter in the for condition with $@. Then the loop statement becomes like this:
1 for word in $@
2 do
3   echo "$word"
4 done
Now both following script calls work properly:
1 ./for-string.sh this is a string
2 ./for-string.sh "this is a string"
The for loop condition has a short form. Use it when you need to handle all input parameters of the script. This short form looks this way:
1 for word
2 do
3   echo "$word"
4 done
It does the same as our previous script for processing an unquoted string. The only difference is dropping the “in $@” part in the for condition. It did not change the loop behavior.
Let’s make the task a bit more complicated. Suppose the script receives a list of paths in input parameters. They are separated by commas. The paths may contain spaces. Then you should redefine the IFS variable to process such input correctly.
Listing 3-24 shows the for loop that prints the list of paths.
1 #!/bin/bash
2
3 IFS=$','
4 for path in $1
5 do
6   echo "$path"
7 done
You have specified only one allowable delimiter in the IFS variable. This delimiter is the comma. Therefore, the for loop ignores spaces when splitting the input string.
You can call the script this way:
"~/My Documents/file1.pdf,~/My Documents/report2.txt"
There are the mandatory double quotes for the input string here. You cannot replace the $1 parameter with $@ in the for condition and omit quotes. This will lead to an error. The error happens because Bash does word splitting when calling the script. This word splitting applies spaces as delimiters. It occurs before the redeclaration of the IFS variable. Thus, Bash ignores your change of the variable in this case.
If some path contains a comma, it leads to an error.
The for loop can pass through the elements of an indexed array. It works the same way as processing words in a string. Listing 3-25 shows an example of doing that.
1 #!/bin/bash
2
3 array=(Alice Bob Eve Mallory)
4
5 for element in "${array[@]}"
6 do
7   echo "$element"
8 done
Suppose that you need the first three elements of an array. In this case, you should expand only the elements you need in the loop condition. Listing 3-26 shows how to do that.
1 #!/bin/bash
2
3 array=(Alice Bob Eve Mallory)
4
5 for element in "${array[@]:0:2}"
6 do
7   echo "$element"
8 done
There is another option to handle the array. You can iterate over the indexes instead of the elements. These are the steps for doing that:
- Write the string with indexes of the elements you need. They should be separated by spaces.
- Put the string into the
forcondition. - The loop gives you an index on each iteration.
Here is an example of the loop condition:
1 array=(Alice Bob Eve Mallory)
2
3 for i in 0 1 2
4 do
5   echo "${array[i]}"
6 done
This loop passes only through elements with indexes 0, 1 and 2.
You can apply the brace expansion to specify the indexes list. Here is an example:
1 array=(Alice Bob Eve Mallory)
2
3 for i in {0..2}
4 do
5   echo "${array[i]}"
6 done
This loop prints the first three elements of the array too.
Do not iterate over the element indexes when processing arrays with gaps. You should expand the array elements in the loop condition instead. Listing 3-25 and Listing 3-26 show how to do that.
Files Processing
The for loop works well when you need to process a list of files. The only point here is to compose the loop condition correctly. There are several common mistakes when writing this condition. Let’s consider them by examples.
The first example is a script that reads the current directory and prints the types of all files there. You can call the file utility to get this information for each file.
When composing the for loop condition, the most common mistake is the neglect of patterns (globbing). Users often call the ls or find utility to get the STRING. It happens this way:
1 for filename in $(ls)
2 for filename in $(find . -type f)
Both these for conditions are wrong. They lead to the following problems:
- Word splitting breaks the names of files and directories with spaces.
- If the filename contains an asterisk, Bash performs globbing before starting the loop. Then it writes the globbing result to the
filenamevariable. This way, you lose the actual filename. - The output of the
lsutility depends on the regional settings. Therefore, you can get question marks instead of the national alphabet characters in filenames. Then theforloop cannot process these files.
Always use patterns in the for condition when you need to enumerate filenames. It is the only correct solution for this task.
You should write the following for loop condition for our script:
for filename in *
Listing 3-27 shows the complete script.
1 #!/bin/bash
2
3 for filename in *
4 do
5   file "$filename"
6 done
Do not forget to use the double quotes when accessing the filename variable. They prevent word splitting of filenames with spaces.
You can use a pattern in the for loop condition if you want to process files from a specific directory. Here is an example for doing that:
for filename in /usr/share/doc/bash/*
A pattern can filter out files with a specific extension or name. It looks this way:
for filename in ~/Documents/*.pdf
There is a new feature of patterns in Bash version 4. You can pass through directories recursively. Here is an example:
1 shopt -s globstar
2
3 for filename in **
This feature is disabled by default. You can activate it by enabling the globstar Bash option with the shopt command.
When Bash meets the ** pattern, it inserts a list of all subdirectories and their files starting from the current directory. You can combine this mechanism with a regular pattern.
For example, you want to process all files with the PDF extension from the home directory. The following for loop condition does that:
1 shopt -s globstar
2
3 for filename in ~/**/*.pdf
There is another common mistake when using the for loop. Sometimes you just do not need it. For example, you can replace the script in Listing 3-27 with the following find call:
1 -exec file {} \;
This command is more efficient than the for loop. It is compact and works faster because of fewer operations to do.
When should you use the for loop instead of the find utility? Use find when one short command is enough to process found files. If you need a conditional statement or block of commands for that, use the for loop.
There are cases when patterns are not enough for the for loop condition. For example, you need a complex search with checking file types. Use the while loop in this case.
Let’s replace the for loop with while in Listing 3-27. Then you can replace the pattern with the find call. When doing that, you should apply the -print0 option of find. This way, you avoid issues caused by word splitting. Listing 3-28 shows how to combine the find utility with the while loop properly.
1 #!/bin/bash
2
3 while IFS= read -r -d '' filename
4 do
5   file "$filename"
6 done < <(find . -maxdepth 1 -print0)
There are several tricky solutions in this script. Let’s take a closer look at them. The first question is, why does the IFS variable get an empty value? If you keep it unchanged, Bash splits the find output by default delimiters (spaces, tabs and line breaks). It can break filenames with these characters.
The second solution is to apply the -d option of the read command. This option defines a delimiter character for splitting the input text. When using it, the filename variable gets the part of the string that comes before the next delimiter.
The -d option specifies the empty delimiter in our case. It means the NULL character. You can also specify it explicitly this way:
while IFS= read -r -d $'\0' filename
Thanks to the -d option, the read command handles the find output correctly. There is the -print0 option in the utility call. It means that find separates found files by a NULL character. This way, you reconcile the read input format and the find output.
Note that you cannot specify the NULL character as a delimiter using the IFS variable. In other words, the following solution does not work:
while IFS=$'\0' read -r filename
The problem comes from the peculiarity when interpreting the IFS variable. If the variable is empty, Bash does not do word splitting at all. When you assign the NULL character to the variable, it means an empty value for Bash.
There is the last tricky solution in Listing 3-28. The process substitution helps us to pass the find output to the while loop. Why did we not use the command substitution instead? It can look this way:
1 while IFS= read -r -d '' filename
2 do
3   file "$filename"
4 done < $(find . -maxdepth 1 -print0)
Unfortunately, this redirection does not work. The < operator couples the input stream and the specified file descriptor. When you apply the command substitution, there is no file descriptor. In this case, Bash calls the find utility and inserts its output to the command instead of $(...). When you use the process substitution, Bash writes the find output to a temporary file. This file has a descriptor. Therefore, the stream redirection works fine.
The process substitution has only one issue. It is not part of the POSIX standard. If you should follow the standard, use a pipeline instead. Listing 3-29 demonstrates how to do that.
1 #!/bin/bash
2
3 find . -maxdepth 1 -print0 |
4 while IFS= read -r -d '' filename
5 do
6   file "$filename"
7 done
Combine the while loop and find utility only when you meet both following cases:
- You need a conditional statement or code block to process files.
- You need a complex condition for searching files.
When combining while and find, always use the NULL character as a delimiter. This way, you avoid the word splitting problems.
The Second Form of For
The second form of the for statement allows you to apply an arithmetic expression as a condition. Let’s consider cases when you need it.
Suppose that you write a script for calculating a factorial. The solution for this task depends on the way you enter the data. The first option is you have a predefined integer. Then you can apply the first form of the for loop. Listing 3-30 shows this solution.
 1 #!/bin/bash
 2
 3 result=1
 4
 5 for i in {1..5}
 6 do
 7   ((result *= $i))
 8 done
 9
10 echo "The factorial of 5 is $result"
The second option is the script gets an integer via the parameter. You can try to keep the first form of for and handle the $1 parameter this way:
for i in {1..$1}
You can expect that Bash does brace expansion here. However, it does not happen.
According to Table 3-2, the brace expansion happens before the parameter expansion. Thus, the loop condition gets the "{1...$1}" string instead of “1 2 3 4 5”. Bash does not recognize the brace expansion here because the upper bound of the range is not an integer. Then Bash writes the "{1...$1}" string to the i variable. Therefore, the (( operator in the loop body fails.
The seq utility can solve our problem. It generates a sequence of integers or fractions.
Table 3-21 shows options to call the seq utility.
| Number of parameters | Description | Example | Result |
|---|---|---|---|
| 1 | The parameter defines the last number in the generated sequence. The sequence starts with one. | seq 5 |
1 2 3 4 5 |
| 2 | The parameters are the first and last numbers of the generated sequence. | seq -3 3 |
-2 -1 0 1 2 |
| 3 | The parameters are the first number, step and last numbers of the generated sequence. | seq 1 2 5 |
1 3 5 |
The seq utility splits the generated integers by line breaks. You can specify another delimiter using the -s option. If you skip this option, you can process the seq output anyway. It happens because the IFS variable contains a line break by default. Therefore, Bash performs word splitting for the seq output properly.
The “Result” column of Table 3-21 should have line breaks instead of spaces between generated integers. The spaces are used there for convenience.
Let’s apply the seq utility and adapt the script for calculating a factorial for any integer. Listing 3-31 shows the result.
 1 #!/bin/bash
 2
 3 result=1
 4
 5 for i in $(seq $1)
 6 do
 7   ((result *= $i))
 8 done
 9
10 echo "The factorial of $1 is $result"
This solution works properly. However, it is ineffective. The performance overhead comes because of calling the seq utility. It costs the same time as launching an application (for example, Windows Calculator). The OS kernel performs several complicated operations whenever Bash creates a new process. They take significant time from the processor’s point of view. Therefore, you should apply Bash built-ins whenever possible.
You need the second form of the for loop to calculate a factorial effectively. This form looks like this in general:
1 for (( EXPRESSION_1; EXPRESSION_2; EXPRESSION_3 ))
2 do
3   ACTION
4 done
You can write this loop in one line this way:
for (( EXPRESSION_1; EXPRESSION_2; EXPRESSION_3 )); do ACTION; done
Here is an algorithm that Bash follows when executing the for loop with an arithmetic condition:
- Calculate the EXPRESSION_1 once before the first loop iteration.
- Execute the loop body while the EXPRESSION_2 remains true. When it becomes false, the loop stops.
- Calculate the EXPRESSION_3 at the end of each iteration.
Let’s change the for condition of Listing 3-31 with the arithmetic expression. Listing 3-32 shows the result.
 1 #!/bin/bash
 2
 3 result=1
 4
 5 for (( i = 1; i <= $1; ++i ))
 6 do
 7   ((result *= i))
 8 done
 9
10 echo "The factorial of $1 is $result"
The new script works faster. It uses Bash built-ins only. There is no need to create new processes anymore.
The for statement in the new script follows this algorithm:
- Declare the
ivariable and assign it the number 1 before the first iteration of the loop. This variable is a loop counter. - Compare the loop counter with the input parameter
$1. - If the counter is smaller than the
$1parameter, do the loop iteration. - If the counter is greater than the parameter, stop the loop.
- Calculate the arithmetic expression “result *= i” in the loop body. It multiplies the
resultvariable byi. - When the loop iteration is done, calculate the “++i” expression of the
forcondition. It increments theivariable by one. - Go to the 2nd step of the algorithm.
We use the prefix increment form in the loop. The reason is it works faster than the postfix form.
Use the second form of the for whenever you should calculate the loop counter. There are no other effective solutions in this case.
Controlling the Loop Execution
The loop condition dictates when it should run and stop. Two Bash built-ins can change this behavior. Using them, you can interrupt the loop or skip its iteration. Let’s consider these built-ins in detail.
break
The break built-in stops the loop immediately. It is useful for handling an error and finishing an infinite loop.
Here is an example of using break. Suppose you write the script that searches the specific array element by its value. You apply the loop to traverse the array. When you find the element, there is no reason to continue the loop. You can finish it immediately with the break command. Listing 3-33 shows how to do it.
 1 #!/bin/bash
 2
 3 array=(Alice Bob Eve Mallory)
 4 is_found="0"
 5
 6 for element in "${array[@]}"
 7 do
 8   if [[ "$element" == "$1" ]]
 9   then
10     is_found="1"
11     break
12   fi
13 done
14
15 if [[ "$is_found" -ne "0" ]]
16 then
17   echo "The array contains the $1 element"
18 else
19   echo "The array does not contain the $1 element"
20 fi
The script receives one parameter on input. It contains the element’s value that you are looking for.
The is_found variable stores the search result. The if statement in the loop body checks the array elements. If some element matches the $1 parameter, the is_found variable gets the value 1. Then the break command interrupts the loop.
There is the if statement after the loop. It checks the is_found variable. Then the echo command prints the message with the search result.
Using the break built-in, you can extract some commands from the loop body and place them after it. This is a good practice to keep the loop body as short as possible. It makes your code easier to read and understand.
Please have a look at Listing 3-33 again. You can print the search result right in the loop body. Then you do not need the is_found variable at all. On the other hand, the processing of the found element can be complex. If it happens, it is better to take the code out of the loop body.
Sometimes it does not make sense to continue the script when interrupting the loop. Call the exit Bash built-in instead of break in this case.
For example, your script detects an error when processing the input data in the loop body. Then printing a message and calling the exit command is a good decision to handle this case.
The exit command makes your code cleaner when you handle the loop result in its body. Just call exit when you are done.
Let’s replace the break command with exit in the code of Listing 3-33. Listing 3-34 shows the result.
 1 #!/bin/bash
 2
 3 array=(Alice Bob Eve Mallory)
 4
 5 for element in "${array[@]}"
 6 do
 7   if [[ "$element" == "$1" ]]
 8   then
 9     echo "The array contains the $1 element"
10     exit 0
11   fi
12 done
13
14 echo "The array does not contain the $1 element"
Using the exit command, you handle the search result in the loop body. This solution made the code shorter and simpler. However, you can get the opposite effect if the result processing requires a block of commands.
The scripts of Listing 3-33 and Listing 3-34 give the same result.
continue
The continue Bash built-in skips the current loop iteration. The loop does not stop in this case. It starts the next iteration instead.
Here is an example of using continue. Suppose you calculate the sum of positive integers of some array. You should distinguish the signs of the integers for doing that. The if statement can solve this task. If the sign is positive, you add the integer to the result. Listing 3-35 shows the script that does it.
 1 #!/bin/bash
 2
 3 array=(1 25 -5 4 -9 3)
 4 sum=0
 5
 6 for element in "${array[@]}"
 7 do
 8   if (( 0 < element ))
 9   then
10     ((sum += element))
11   fi
12 done
13
14 echo "The sum of the positive numbers is $sum"
If the element variable is greater than zero, you add it to the result sum.
Let’s apply the continue command to get the same behavior. Listing 3-36 shows the new version of the script.
 1 #!/bin/bash
 2
 3 array=(1 25 -5 4 -9 3)
 4 sum=0
 5
 6 for element in "${array[@]}"
 7 do
 8   if (( element < 0))
 9   then
10     continue
11   fi
12
13   ((sum += element))
14 done
15
16 echo "The sum of the positive numbers is $sum"
You need to invert the condition of the if statement. Now it is “true” for negative numbers. Bash calls the continue command in this case. The command interrupts the current loop iteration. It means that all further operations of the loop body are ignored. Then the next iteration starts and handles the next array element.
Using the continue built-in, you apply the early return pattern in the context of the loop.
The continue command is convenient for handling errors. It is also helpful for cases when it does not make sense to execute the loop body to the end. Skipping a part of the loop body, you can avoid the nested if statements. It will make your code cleaner.
Functions
Bash is the procedural programming language. Procedural languages allow you to divide a program into logical parts called subroutines. A subroutine is an independent block of code that solves a specific task. A program calls subroutines when it is necessary.
A subroutine is a deprecated term. It is called function in modern programming languages. We have already met functions when considering the declare Bash built-in. Now it is time to study them in detail.
Programming Paradigms
We should start with the terminology. It will explain to you why functions were introduced and which tasks they solve.
What is procedural programming? It is one of the paradigms of software development. A paradigm is a set of ideas, methods and principles that define how to write programs.
There are two dominant paradigms today. Most modern programming languages follow them. That paradigms are the following:
- Imperative programming. The developer explicitly specifies to the computer how to change the state of the program. In other words, he writes a complete algorithm for calculating the result.
- Declarative programming. The developer specifies the properties of the desired result, but not the algorithm to calculate it.
Bash follows the first paradigm. It is an imperative language.
The imperative and declarative paradigms define general principles for writing programs. There are different methodologies (i.e. approaches) within the same paradigm. Each methodology offers specific programming techniques.
The imperative paradigm has two dominant methodologies:
- Procedural programming.
- Object-oriented programming.
Each of these methodologies suggests a specific way for structuring the source code of programs. Bash follows the first methodology.
Let’s take a closer look at procedural programming. This methodology suggests features for combining the program instructions into independent code blocks. These blocks are called subroutines or functions.
You can call a function from any place of a program. The function can receive input parameters. This mechanism works similarly to passing command-line parameters to a script. This is a reason why a function is called “a program inside a program” sometimes.
The main task of the functions is to manage the complexity of the source code. The larger size it has, the harder it is to maintain. Repeating code fragments make things worse. They are scattered throughout the program and may contain errors. After fixing a mistake in one fragment, you have to find and fix all the rest. If you put the fragment into a function, it is enough to fix the error only there.
Here is an example of a repeating code fragment. Suppose that you are writing a large program. Whenever some error happens, the program prints the corresponding text message to the error stream. This approach leads to duplicating echo calls in the source code. The typical call looks this way:
&2 echo "The N error has happened"
At some point, you decide that it is better to write all errors to the log file. It will help you to debug possible issues. Users of your program may redirect the error stream to the log file themselves. This is a good idea, but some users do not know how to use redirection. Thus, your program must write messages into the log file by itself.
You decided to change the way how the program prints error messages. It means that you need to check every place where it happens. You should change the echo calls there this way:
echo "The N error has happened" >> debug.log
If you miss one echo call accidentally, its output does not come to the log file. This specific output can be critical for debugging. Without it, you would not understand why the program fails on the user side.
We have considered one of several problems of maintaining programs. The maintenance forces you to change the existing source code. If you have violated the don’t repeat yourself or DRY development principle, you get a lot of troubles. Remember a simple rule: do not copy the same code block of your program.
Functions solve the problem of code duplication. They resemble loops in some sense. The difference is, a loop executes a code block in one place of the program cyclically. In contrast to a loop, a function executes the code block at different program places.
Using functions improves the readability of the source code. A function combines a set of commands into a single block. If you give a speaking name to this block, its purpose becomes obvious. Then you can use this name to call the function. It makes your program easier to read. You replace a dozen lines of the function body with its name wherever you call it.
Using Functions in Shell
The functions are available in both Bash modes: shell and script execution. First, let’s consider how they work in the shell.
Here is the general form of the function declaration:
1 FUNCTION_NAME()
2 {
3   ACTION
4 }
You can also declare the function in one line this way:
() { ACTION ; }
The semicolon before the closing curly bracket is mandatory here.
The ACTION is a single command or block of commands. It is called the function body.
Function names follow the same restrictions as variable names in Bash. You are allowed to use Latin letters, numbers and the underscore character there. The name must not begin with a number.
Let’s have a look at how to declare and use functions in the shell. Suppose you need statistics about memory usage. These statistics are available via the special file system proc or procfs. This file system provides the following information:
- The list of running processes.
- The state of the OS.
- The state of the computer hardware.
The default mount point of the procfs is the /proc path. You can find special files there. They provide you an interface to the kernel data.
You can read the RAM usage statistics in the /proc/meminfo file. The cat utility prints the file contents to the screen:
The output of this command depends on your OS. The /proc/meminfo file provides less information for the MSYS2 environment and more for the Linux system.
Here is an example of the meminfo file contents for the MSYS2 environment:
1 MemTotal:        6811124 kB
2 MemFree:         3550692 kB
3 HighTotal:             0 kB
4 HighFree:              0 kB
5 LowTotal:        6811124 kB
6 LowFree:         3550692 kB
7 SwapTotal:       1769472 kB
8 SwapFree:        1636168 kB
Table 3-22 explains the meaning of these abbreviations.
| Field | Description |
|---|---|
| MemTotal | The total amount of usable RAM in the system. |
| MemFree | The amount of unused RAM at the moment. It is equal to sum of fields LowFree + HighFree. |
| HighTotal | The total amount of usable RAM in the high region (above 860 MB). |
| HighFree | The amount of unused RAM in the high region (above 860 MB). |
| LowTotal | The total amount of usable RAM in the non-high region. |
| LowFree | The amount of unused RAM in the non-high region. |
| SwapTotal | The total amount of physical swap memory. |
| SwapFree | The amount of unused swap memory. |
This article provides more details about fields of the meminfo file.
You can always call the cat utility and get the meminfo file contents. However, typing this call takes time. You can shorten it by declaring the function this way:
() { cat /proc/meminfo; }
This is the one-line declaration of the mem function. Now you can call it the same way as any regular Bash built-in. Do it like this:
This command calls the mem function that prints statistics on memory usage.
The unset Bash built-in removes the declared function. For example, the following call removes our mem function:
unset mem
Suppose that you have declared a variable and function with the same names. Call unset with the -f option to remove the function and keep the variable. Here is an example:
unset -f mem
You can add the function declaration to the ~/.bashrc file. Then the function will be available whenever you start the shell.
We have declared the mem function in the single-line format. It is convenient when you type it in the shell. However, clarity is more important when you declare the function in the ~/.bashrc file. Therefore, it is better to apply the following format there:
1 mem()
2 {
3   cat /proc/meminfo
4 }
Difference Between Functions and Aliases
We have declared the mem function. It prints statistics on memory usage. The following alias does the same thing:
alias mem="cat /proc/meminfo"
It looks like functions and aliases work the same way. What should you choose then?
Functions and aliases have one similar aspect only. They are built-in Bash mechanisms. From the user’s point of view, they shorten long commands. However, these mechanisms work in completely different ways.
An alias replaces one text with another in a typed command. In other words, Bash finds a part of the command that matches the alias name. Then the shell replaces it with the alias value. Finally, Bash executes the resulting command.
Here is an example of an alias. Suppose you have declared the alias for the cat utility. It adds the -n option to the utility call. This option adds line numbers to the cat output. The alias declaration looks this way:
alias cat="cat -n"
Whenever you type a command that starts with the word “cat”, Bash replaces it with the “cat -n”. For example, you type this command:
Bash inserts the alias value here, and the command becomes like this:
Bash has replaced the word “cat” with “cat -n”. It did not change the parameter, i.e. the ~/.bashrc path.
Now let’s have a look at how functions work. Suppose that Bash meets the function name in the typed command. The shell does not replace the function name with its body, as it does for the alias. Instead, Bash executes the function body.
An example will explain to you how it works. Suppose that you want to write the function that behaves the same way as the cat alias. If Bash functions work as aliases, the following declaration should solve your task:
() { cat -n; }
You expect that Bash will add the -n option to the following command:
However, it does not happen. Bash does not insert the function body into the command. The shell executes the body and inserts the result into the command.
In our example, Bash calls the cat function. The function calls the cat utility with the -n option, but it ignores the ~/.bashrc parameter. You do not want such behavior.
You can solve the problem of ignoring the ~/.bashrc parameter. Pass this path to the function as a parameter. This mechanism works similarly to passing a parameter to some command or script. You can call the function and specify its parameters, separated by spaces.
Calling a function and passing parameters to it looks this way in the general form:
`
You can read parameters in the function body via their names $1, $2, $3, etc. The $@ array stores all these parameters.
Let’s correct the declaration of the cat function. You should pass all parameters of the function to the input of the cat utility. Then the declaration becomes like this:
() { cat -n $@; }
This function does not work either. The problem happens because of unintentional recursion. When some function calls itself, it is called recursion.
Why did we get the recursion? Bash checks the list of declared functions before executing the command “cat -n $@”. There is the cat function in the list. Bash executes it at the moment, but it does not change anything. Thus, the shell calls the cat function again instead of calling the cat utility. This call repeats over and over again. It leads to the infinite recursion, which is similar to an infinite loop.
Recursion is not a mistake of Bash behavior. It is a powerful mechanism that simplifies complex algorithms. An example of such algorithms is the traversing of a graph or tree.
The mistake occurred in our declaration of the cat function. The recursive call happens by accident and leads to a loop. There are two ways to solve this problem:
- Use the
commandBash built-in. - Give another name to the function that does not conflict with the utility name.
Let’s try the first solution. The command built-in receives some command on input. If there are aliases or function names there, Bash ignores them. It does not insert the alias value instead of its name. It does not call a function. Instead, Bash executes the command as it is.
If you add the command built-in to the cat function, you get the following result:
() { command cat -n "$@"; }
Now Bash calls the cat utility instead of the cat function here.
Another solution is renaming the function. For example, this declaration works well:
() { cat -n "$@"; }
Always be aware of the problem of unintentional recursion. Give unique names to your functions. They should not match the names of Bash built-ins and GNU utilities.
Here is a summary of our comparison of functions and aliases. If you want to shorten a long command, use an alias.
When using the shell, you need a function in two cases only:
- You need a conditional statement, loop, or code block to perform your command.
- The input parameters are not at the end of the command.
The second case needs an example. Let’s shorten the find utility call. It should search for files in the specified directory. When you search them in the home directory, the find call looks this way:
You cannot declare an alias that takes the target path as a parameter. In other words, the following solution does not work:
alias="find -type f"
The target path should come before the -type option. This requirement is a serious problem for the alias.
However, you can declare the function in this case. The function allows you to specify the position to insert the parameter to the find call. The declaration looks like this:
() { find $1 -type f; }
Now you can call the function that searches files in the home directory this way:
Using Functions in Scripts
You can declare a function in a script the same way as you do it in the shell. Bash allows both full or one-line form there.
For example, let’s come back to the task of handling errors in the large program. You can declare the following function for printing error messages:
1 print_error()
2 {
3   >&2 echo "The error has happened: $@"
4 }
This function expects input parameters. They should explain to a user the root cause of the error. Suppose that your program reads a file on the disk. The file becomes unavailable for some reason. Then the following print_error call reports this problem:
"the readme.txt file was not found"
Suppose that the requirements for the program have changed. Now the program should print error messages to a log file. It is enough to change only the declaration of the print_error function to meet the new requirement. The function body looks this way after the change:
1 print_error()
2 {
3   echo "The error has happened: $@" >> debug.log
4 }
This function prints all error messages to the debug.log file. There is no need to change anything at the points where the function is called.
Sometimes you want to call one function from another. This technique is named a nested function call. Bash allows it. In general, you can call a function from any point of the program.
Here is an example of a nested function call. Suppose you want to translate the program interface to another language. This task is called localization. It is better to print error messages in a language the user understands, right? You need to duplicate all messages in all languages supported by your program to reach this requirement.
The straightforward solution for localization is to assign a unique code to each error. Using such codes is a common practice in system programming. Let’s apply this approach to your program. Then the print_error function will receive an error code via the input parameter.
You can write error codes to the log file as it is. However, it will be inconvenient for a user to interpret these codes. He would need a table to map them into error messages. Therefore, the better solution is to print the text messages to the log file. It means that it is your responsibility to convert error codes to text in a specific language. You would need a separate function for doing this conversion. Here is an example of such a function:
 1 code_to_error()
 2 {
 3   case $1 in
 4     1)
 5       echo "File not found:"
 6       ;;
 7     2)
 8       echo "Permission to read the file denied:"
 9       ;;
10   esac
11 }
Now you can apply the code_to_error function when printing an error in the print_error body. You will get the following result:
1 print_error()
2 {
3   echo "$(code_to_error $1) $2" >> debug.log
4 }
Here is an example of the print_error function call from some point of your program:
1 "readme.txt"
It prints the following message to the log file:
The first parameter of the print_error function is the error code. The second parameter is the name of the file that caused the error.
Using functions made the error handling in your program easier to maintain. Changing the requirements demonstrates it. Suppose that your customer asked you to support the German language. You can introduce this feature by declaring two extra functions:
-
code_to_error_enfor messages in English. -
code_to_error_defor messages in German.
How can you choose the proper function to convert error codes? The LANGUAGE Bash variable helps you in this case. It stores the language that the user has chosen for his system. You should check this variable in the print_error function and convert all error codes accordingly.
Our functions for handling the error codes are just an example for demonstration. Never apply them in your real project. Bash has a special mechanism to localize scripts. It uses PO files with texts in different languages. Read more about this mechanism in the BashFAQ article.
Returning a Function Result
Most procedural languages have a reserved word for returning the function result. It is called return. Bash also has a built-in with the same name. However, it has another purpose. The return command of Bash does not return a value. Instead, it provides a function exit status to the caller. This status is an integer between 0 and 255.
The complete algorithm of calling and executing the function looks this way:
- Bash meets the function name in the command.
- The interpreter goes to the function body and executes it starting from the first command.
- If Bash meets the
returncommand in the function body, it stops executing it. The interpreter jumps to the place where the function was called. The special parameter$?keeps an exit status of the function. - If there is no
returncommand in the function body, Bash executes it until the last command. Then, the interpreter jumps to the place where the function was called.
In a typical procedural language, the return command returns a variable of any type from a function. It can be a number, string or array. You need other mechanisms for doing that in Bash. There are three options:
- The command substitution.
- A global variable.
- The caller specifies a global variable.
Let’s consider these approaches with examples.
We wrote the code_to_error and print_error functions to print error messages. Here are their declarations:
 1 code_to_error()
 2 {
 3   case $1 in
 4     1)
 5       echo "File not found:"
 6       ;;
 7     2)
 8       echo "Permission to read the file denied:"
 9       ;;
10   esac
11 }
12
13 print_error()
14 {
15   echo "$(code_to_error $1) $2" >> debug.log
16 }
Here we have used the first approach for returning the function result. We call the code_to_error function using the command substitution. Thus, Bash inserts whatever the function prints to the console instead of its call.
The code_to_error function prints the error message using the echo command. Then Bash inserts this output to the print_error function body. There is only one echo call there. It consists of two parts:
- Output of the
code_to_errorfunction. It contains an error message. - The input parameter
$2of theprint_errorfunction. This is the name of the file that caused the error.
The echo command of the print_error function accumulates all data and prints the final error message to the log file.
The second way to return a value from a function is to write it to some global variable. This kind of variable is available anywhere in the script. Thus, you can access it in the function body and the place where it is called.
Let’s apply the global variable approach to our case. You should rewrite the code_to_error and print_error functions for doing that. The first function will write its result to a global variable. Then print_error reads it. The resulting code looks this way:
 1 code_to_error()
 2 {
 3   case $1 in
 4     1)
 5       error_text="File not found:"
 6       ;;
 7     2)
 8       error_text="Permission to read the file denied:"
 9       ;;
10   esac
11 }
12
13 print_error()
14 {
15   code_to_error $1
16   echo "$error_text $2" >> debug.log
17 }
The code_to_error function writes its result to the error_text global variable. Then the print_error function combines this variable with the $2 parameter to make the final error message and print it to the log file.
Returning a function result via a global variable is the error-prone solution. It may cause a naming conflict. Here is an example of such an error. Suppose that there is another variable called error_text in your script. It has nothing to do with the output to the log file. Then any code_to_error call will overwrite the value of that variable. This will cause errors in all places where error_text is used outside the code_to_error and print_error functions.
Variable naming convention can solve the problem of naming conflict. The convention is an agreement on how to name the variables in all parts of the project. This agreement is one of the clauses of the code style guide. Any large program project must have such a guide.
Here is an example of a variable naming convention:
All global variables, which functions use to return their results, should have an underscore sign prefix in their names.
Let’s follow this convention in our example. Then you should rename the error_text variable to _error_text. This way, you solve one specific problem. However, there are cases when a naming conflict can happen. Suppose one function calls another, i.e. there is a nested call. What happens if both functions use the same variable to return their results? You will get the naming conflict again.
The third way to return a function result solves the name conflict problem. The idea is to let the caller the possibility to specify the global variable name. Then the called function writes its result to that variable.
How to pass a variable name to the called function? You can do it using an input parameter. Then the function calls the eval built-in. This command converts the specified text into a Bash command. You need this conversion because you passed the variable name as text. Bash does not allow you to refer to the variable using text. So, eval resolves this obstacle.
Let’s adapt the code_to_error function for receiving a global variable name. The function should accept two input parameters:
- The error code in the
$1parameter. - The name of the global variable to store the result. Use the
$2parameter for that.
This way, you will get the following code:
 1 code_to_error()
 2 {
 3   local _result_variable=$2
 4
 5   case $1 in
 6     1)
 7       eval $_result_variable="'File not found:'"
 8       ;;
 9     2)
10       eval $_result_variable="'Permission to read the file denied:'"
11       ;;
12   esac
13 }
14
15 print_error()
16 {
17   code_to_error $1 "error_text"
18   echo "$error_text $2" >> debug.log
19 }
At first glance, the code looks almost the same as it was before. However, it behaves more flexibly now. The print_error function chooses the global variable to get the code_to_error result. The caller explicitly specifies the variable name. Therefore, it is easier to find and resolve naming conflicts.
Variable Scope
Naming conflict is a serious problem. It occurs when functions declare their variables in the global scope. As a result, the names of two or more variables can match. If functions access these variables at different moments, they overwrite data of each other.
Procedural languages provide the feature that resolves naming conflicts. The idea of this mechanism is to restrict the scope of declared variables.
Bash provides the local keyword. Suppose that you declare the variable in some function using this keyword. Then you can access this variable in the function body only. It means that the function body limits the variable scope.
Here is the latest version of the code_to_error function:
 1 code_to_error()
 2 {
 3   local _result_variable=$2
 4
 5   case $1 in
 6     1)
 7       eval $_result_variable="'File not found:'"
 8       ;;
 9     2)
10       eval $_result_variable="'Permission to read the file denied:'"
11       ;;
12   esac
13 }
We have declared the _result_variable variable using the local keyword. Therefore, it becomes the local variable. You can read and write its value inside code_to_error and any other function that it calls.
Bash limits a local variable scope by the execution time of the function where it is declared. Such a scope is called dynamic. Modern languages tend to use lexical scope. There the variable is available in the function body only. If you have nested calls, the variable is not available in the called functions.
A local variable does not come to the global scope. It guarantees that no function will overwrite it by accident.
 1 #!/bin/bash
 2
 3 bar()
 4 {
 5   echo "bar1: var = $var"
 6   var="bar_value"
 7   echo "bar2: var = $var"
 8 }
 9
10 foo()
11 {
12   local var="foo_value"
13
14   echo "foo1: var = $var"
15   bar
16   echo "foo2: var = $var"
17 }
18
19 echo "main1: var = $var"
20 foo
21 echo "main2: var = $var"
Careless handling of local variables leads to errors. They happen because a local variable hides a global variable with the same name.
An example will demonstrate the problem. Suppose that you write a function for processing a file. It calls the grep utility to look for a pattern in the file contents. The function looks this way:
1 check_license()
2 {
3   local filename="$1"
4   grep "General Public License" "$filename"
5 }
Now suppose that you have declared the global variable named filename at the beginning of the script. Here is its declaration:
1 #!/bin/bash
2
3 filename="$1"
Will the check_license function work correctly? Yes. It happens thanks to hiding a global variable. This mechanism works in the following way. When Bash meets the filename variable in the function body, it accesses the local variable instead of the global one. It happens because the local variable is declared later than the global one. When Bash translates the variable name to the memory address, it takes the latest variable declaration. The hiding mechanism has a side effect. It does not allow you to access the filename global variable inside the check_license function.
When you hide global variables accidentally, you get troubles. The best solution is to avoid any possibility of getting such a situation. Add a prefix or postfix for local variable names for doing that. For example, it can be an underscore at the end of each name.
A global variable becomes unavailable in the function body only after declaring the local variable with the same name there.
Let’s consider the following variant of the check_license function:
1 #!/bin/bash
2
3 filename="$1"
4
5 check_license()
6 {
7   local filename="$filename"
8   grep "General Public License" "$filename"
9 }
Here we initialize the local variable filename by the value of the global variable with the same name. This assignment works as expected. It happens because Bash does parameter expansion before executing the assignment.
Suppose that you pass the README filename to the script. Then you will get this assignment after the parameter expansion:
local filename="README"
Bash developers changed the default scope of arrays in the 4.2 shell version. If you declare an indexed or associative array in a function body, it comes to the local scope. You should use the -g option of the declare command to make the array global.
For example, here is the declaration of the files local array:
1 check_license()
2 {
3   declare files=(Documents/*.txt)
4   grep "General Public License" "$files"
5 }
You should change this declaration if you need the global array. It becomes like this:
1 check_license()
2 {
3   declare -g files=(Documents/*.txt)
4   grep "General Public License" "$files"
5 }
We have considered the functions in Bash. Here are general recommendations on how to use them:
- Choose names for your functions carefully. They should explain the purpose of the functions.
- Declare only local variables inside functions. Use some naming convention for them. This solves potential conflicts of local and global variable names.
- Do not use global variables in functions. Instead, pass their values to the functions using input parameters.
- Do not use the
functionkeyword when declaring a function. It presents in Bash, but the POSIX standard does not have it.
Let’s take a closer look at the last tip. Do not declare functions this way:
1 function check_license()
2 {
3   declare files=(Documents/*.txt)
4   grep "General Public License" "$files"
5 }
There is only one case when the function keyword is useful. It resolves the conflict between the names of some function and alias.
For example, the following function declaration does not work without the function keyword:
1 alias check_license="grep 'General Public License'"
2
3 function check_license()
4 {
5   declare files=(Documents/*.txt)
6   grep "General Public License" "$files"
7 }
If you have such a declaration, you can call the function by adding a slash before its name. Here is an example of this call:
\check_license
If you skip the slash, Bush inserts the alias value instead of calling the function. It means that the following command runs the alias:
There is a low probability that you get the conflict of function and alias names in the script. Each script runs in a separate Bash process. This process does not load aliases from the .bashrc file. Therefore, name conflicts can happen by mistake in the shell mode only.