Testing
A critical part of any production-ready system is a complete test suite. If you have not written tests before, and wonder why they are important, this introduction is for you. If you already understand the importance of proper testing, you can skip to the particulars of writing tests in Go, in writing tests.
Why do we need tests?
A line of reasoning we sometimes hear, is that “my code clearly works, why do I need to write tests for it?” This is a natural enough question, but make no mistake, a modern production-ready system absolutely must have automated tests. Let’s use an analogy from the business world to understand why this is so: double entry bookkeeping.
Double entry is the idea that every financial transaction has equal and opposite effects in at least two different accounts. For example, if you spend $10 on groceries, your bank account goes down by $10, and your groceries account goes up by $10. This trick allows you to see, at a glance, simultaneously how much money is in your bank account, and how much you spent on groceries. It also allows you to spot mistakes. Suppose a smudge in your books made the $10 entry look like $18. The total balance of your assets would no longer match your liabilities plus equity - there would be an $8 difference. We can compare entries in the bank account with entries in the groceries account to discover which amount is incorrect. Before double-entry bookkeeping, it was much harder to prove mistakes, and impossible to see different account balances at a glance. The idea revolutionized bookkeeping, and underpins accounting to this day.
Back to tests. For every piece of functionality we write, we also write a test. The test should prove that the code works in all reasonable scenarios. Like double-entry bookkeeping, tests are our way to ensure our system is correct, and remains correct. Your system might work now - you might even prove it to yourself by trying out some cases manually. But systems, especially production systems, require changes over time. Requirements change, environments change, bugs emerge, new features become needed, inefficiencies are discovered. All these things will require changes to be made to the code. After making these changes, will you still be sure that the system is correct? Will you run through manual test cases after every change? What if someone else is maintaining the code? Will they know how to test changes? How much time will it take you to manually perform these test cases?
Automated tests cost up-front investment, but they uncover bugs early, improve maintainability, and save time in the long run. Tests are the checks and balances to your production system.
Many books and blog posts have been written about good testing practice. There are even movements that promote writing tests first, before writing the code. We don’t think it’s necessary to be quite that extreme, but if it helps you write good tests, then more power to you. No production system is complete without a test suite that makes sensible assertions on the code to prove it correct.
Now that we have discussed the importance of testing in general, let’s see how tests are written in Go. As we’ll see, testing was designed with simplicity in mind.
Writing Tests
Test files in Go are located in the same package as the code being tested, and end with the suffix _test.go. Usually, this means having one _test.go to match each code file in the package. Below is the layout of a simple package for testing prime numbers.
- prime
- prime.go
- prime_test.go
- sieve.go
- sieve_test.go
This is a very typical Go package layout. Go packages contain all files in the same directory, including the tests. Now, let’s look at what the test code might look like in prime_test.go.
prime_test.go that tests a function called IsPrime 1 package main
2
3 import "testing"
4
5 // TestIsPrime tests that the IsPrime function
6 // returns true when the input is prime, and false
7 // otherwise.
8 func TestIsPrime(t *testing.T) {
9 // check a prime number
10 got := IsPrime(19)
11 if got != true {
12 t.Errorf("IsPrime(%d) = %t, want %t", 19, got, true)
13 }
14
15 // check a non-prime number
16 got = IsPrime(21)
17 if got != false {
18 t.Errorf("IsPrime(%d) = %t, want %t", 21, got, false)
19 }
20 }
We start by importing the testing package. Then, on line 8, we define a test as a normal Go function taking a single argument: t *testing.T. All tests must start with the word Test and have a single argument, a pointer to testing.T. In the function body, we call the function under test, IsPrime. First we pass in the integer 19, which we expect should return true, because 19 is prime. We check this assertion with a simple if statement on line 11, if got != true. If the statement evaluates to false, t.Errorf is called. Errorf formats its arguments in a way analogous to Printf, and records the text in the error log. We repeat a similar check for the number 21, this time asserting that the IsPrime function returns true, because 21 is not prime.
We can run the tests in this package using go test. Let’s see what happens:
It passed! But did it actually run our TestIsPrime function? Let’s check by adding the -v (verbose) flag to the command:
Our test is indeed being executed. The -v flag is a useful trick to remember, and we recommend running tests with it turned on most of the time.
All tests in Go follow essentially the same format as the TestIsPrime. The Go authors made a conscious decision not to add specific assertion functions, advising instead to use the existing control flow tools that come with the language. The result is that tests look very similar to normal Go code, and the learning curve is minimal.
Table-driven tests
Our initial TestIsPrime test is a good start, but it only tests two numbers. The code is also repetitive. We can do better by using what is called a table-driven test. The idea is to define all the inputs and expected outputs first, and then loop through each case with a for loop.
prime_test.go that tests a function called IsPrime 1 package main
2
3 import "testing"
4
5 // TestIsPrime tests that the IsPrime function
6 // returns true when the input is prime, and false
7 // otherwise.
8 func TestIsPrimeTD(t *testing.T) {
9 cases := []struct {
10 give int
11 want bool
12 }{
13 {19, true},
14 {21, false},
15 {10007, true},
16 {1, false},
17 {0, false},
18 {-1, false},
19 }
20
21 for _, c := range cases {
22 got := IsPrime(c.give)
23 if got != c.want {
24 t.Errorf("IsPrime(%d) = %t, want %t", c.give, got, c.want)
25 }
26 }
27 }
In the refactored test, we use a slice of an anomymous struct to define all the inputs we want to test. We then loop over each test case, and check that the output matches what we want. This is much cleaner than before, and it only took a few keystrokes to add more test cases into the mix. We now also check some edge cases: inputs of 0, 1, 10007, and negative inputs. Let’s run the test again and check that it still passes:
It looks like the IsPrime function works as advertised! To be sure, let’s add a test case that we expect to fail:
    ...
        {-1, false},

        // 17 is prime, so this test should fail:
        {17, false},
    }
    ...
We run go test -v again to see the results:
This time go test reports that the test failed, and we see the error message we provided to t.Errorf.
Writing error messages
In the tests above, we had the following code:
if got != c.want {
    t.Errorf("IsPrime(%d) = %t, want %t", c.give, got, c.want)
}
The ordering of the if statement is not accidental: by convention, it should be actual != expected, and the error message uses that order too. This is the recommended way to format test failure messages in Go 8. In the error message, first state the function called and the parameters it was called with, then the actual result, and finally, the result that was expected. We saw before that this results in a message like
prime_test.go:25: IsPrime(17) = true, want false
This makes it clear to the reader of the error message what function was called, what happened, and what should have happened. The onus is on you, the test author, to leave a helpful message for the person debugging the code in the future. It is a good idea to assume that the person debugging your failing test is not you, and is not your team. Make both the name of the test and the error message relevant.
Testing HTTP Handlers
Let’s look at an example of testing that comes up often when developing web applications: testing an HTTP handler. First, let’s define a comically simple HTTP handler that writes a friendly response:
 1 package main
 2
 3 import (
 4 	"fmt"
 5 	"net/http"
 6 )
 7
 8 // helloHandler writes a friendly "Hello, friend :)" response.
 9 func helloHandler(w http.ResponseWriter, r *http.Request) {
10 	fmt.Fprintln(w, "Hello, friend :)")
11 }
12
13 func main() {
14 	http.HandleFunc("/hello", helloHandler)
15 	http.ListenAndServe(":8080", nil)
16 }
The httptest package provides us with the tools we need to test this handler as if it were running in a real web server. The TestHTTPHandler function in the following example illustrates how to use httptest.NewRecorder() to send a real request to our friendly helloHandler, and read the resulting response.
 1 package main
 2
 3 import (
 4 	"net/http"
 5 	"net/http/httptest"
 6 	"testing"
 7 )
 8
 9 func TestHTTPHandler(t *testing.T) {
10 	// Create a request to pass to our handler.
11 	req, err := http.NewRequest("GET", "/hello", nil)
12 	if err != nil {
13 		t.Fatal(err)
14 	}
15
16 	// We create a ResponseRecorder, which satisfies
17 	// the http.ResponseWriter interface, to record
18 	// the response.
19 	r := httptest.NewRecorder()
20 	handler := http.HandlerFunc(helloHandler)
21
22 	// Our handler satisfies http.Handler, so we can call
23 	// the ServeHTTP method directly and pass in our
24 	// Request and ResponseRecorder.
25 	handler.ServeHTTP(r, req)
26
27 	// Check that the status code is what we expect.
28 	if r.Code != http.StatusOK {
29 		t.Errorf("helloHandler returned status code %v, want %v",
30 			r.Code, http.StatusOK)
31 	}
32
33 	// Check that the response body is what we expect.
34 	want := "Hello, friend :)\n"
35 	got := r.Body.String()
36 	if got != want {
37 		t.Errorf("helloHandler returned body %q want %q",
38 			got, want)
39 	}
40 }
In this example we see the t.Fatal method used for the first time. This method is similar to t.Error, but unlike t.Error, if t.Fatal is called, the test will not execute any further. This is useful when a condition happens that will cause the rest of the test to be unnecessary. In our case, if our call to create a request on line 11 were to fail for some reason, the call to t.Fatal ensures that we log the error and abandon execution immediately. Anagolous to t.Errorf, there is also a t.Fatalf method, which takes arguments the same way as fmt.Printf.
On line 19 we create a new httptest.Recorder with which to record the response. We also create handler, which is helloHandler, but now of type http.HandlerFunc. We can do this, because helloHandler uses the appropriate signature defined by http.HandlerFunc:
type HandlerFunc func(ResponseWriter, *Request)
http.HandlerFunc is an adapter to allow the use of ordinary functions as HTTP handlers. As the final step of the setup, we pass the recorder and the request we created earlier in to handler.ServeHTTP(r, req). Now we can use the fields provided by httptest.Recorder, like Code and Body, to make assertions against our HTTP handler, as shown in the final lines of the test function.
Mocking
Imagine you need to test code that uses a third party library. Perhaps this library is a client library to an external API, or perhaps it performs database operations. In your unit tests, it is best to assume that the library does its job, and only test your functions and their interactions. This allows your test case failures to accurately reflect where the problem is, rather than leave the question of whether it’s your function, or the library, that’s at fault. There is a place for tests that include third party libraries, and that place is in integration tests, not unit tests.
Interfaces
How do we go about testing our functions, but not the libraries they use? The answer: interfaces. Interfaces are an incredibly powerful tool in Go.
In Java, interfaces need to be explicitly implemented. You rely on your third party vendor to provide an interface that you can use to stub methods for tests. In Go, we don’t need to rely on the third party author; we can define our own interface. As long as our interface defines a subset of the methods implemented by the library, the library will automatically implement our interface.
The next example illustrates one particular case where mocking is very useful: testing code that relies on random number generation.
 1 package eightball
 2
 3 import (
 4 	"math/rand"
 5 	"time"
 6 )
 7
 8 // randIntGenerator is an interface that includes Intn, a
 9 // method in the built-in math/rand package. This allows us
10 // to mock out the math/rand package in the tests.
11 type randIntGenerator interface {
12 	Intn(int) int
13 }
14
15 // EightBall simulates a very simple magic 8-ball,
16 // a magical object that predicts the future by
17 // answering yes/no questions.
18 type EightBall struct {
19 	rand randIntGenerator
20 }
21
22 // NewEightBall returns a new EightBall.
23 func New() *EightBall {
24 	return &EightBall{
25 		rand: rand.New(rand.NewSource(time.Now().UnixNano())),
26 	}
27 }
28
29 // Answer returns a magic eightball answer
30 // based on a random result provided by
31 // randomGenerator. It supports only four
32 // possible answers.
33 func (e EightBall) Answer(s string) string {
34 	n := e.rand.Intn(3)
35 	switch n {
36 	case 0:
37 		return "Definitely not"
38 	case 1:
39 		return "Maybe"
40 	case 2:
41 		return "Yes"
42 	default:
43 		return "Absolutely"
44 	}
45 }
We define a simple eightball package that implements a simple Magic 8-Ball. We ask it a yes/no question, and it will return its prediction of the future. As you might expect, it completely ignores the question, and just makes use of a random number generator. But random numbers are hard to test, because they change all the time. One option would be to set the random seed in our code, or in our tests. This is indeed an option, but it doesn’t allow us to specifically test the different outcomes without some trial and error. Instead, we create an randIntGenerator interface, which has only one method, Intn(int) int. This method signature is the same as the Intn method implemented by Go’s built-in math/rand package. Instead of using the math/rand package directly in Answer, we decouple our code by referencing the Intn method on the EightBall’s rand interface. Since EightBall.rand is not exported, users of this package will not be aware of this interface at all. To create the struct, they will need to call the New method, which assigns the built-in struct from math/rand struct to satisfy our interface. So to package users the code looks the same, but under the hood, we can now mock out the call to Intn in our tests:
 1 package eightball
 2
 3 import (
 4 	"testing"
 5 )
 6
 7 type fixedRandIntGenerator struct {
 8 	// the number that should be "randomly" generated
 9 	randomNum int
10
11 	// record the paramater that Intn gets called with
12 	calledWithN int
13 }
14
15 func (g *fixedRandIntGenerator) Intn(n int) int {
16 	g.calledWithN = n
17 	return g.randomNum
18 }
19
20 func TestEightBall(t *testing.T) {
21 	cases := []struct {
22 		randomNum int
23 		want      string
24 	}{
25 		{0, "Definitely not"},
26 		{1, "Maybe"},
27 		{2, "Yes"},
28 		{3, "Absolutely"},
29 		{-1, "Absolutely"}, // default case
30 	}
31
32 	for _, tt := range cases {
33 		g := &fixedRandIntGenerator{randomNum: tt.randomNum}
34 		eb := EightBall{
35 			rand: g,
36 		}
37
38 		got := eb.Answer("Does this really work?")
39 		if got != tt.want {
40 			t.Errorf("EightBall.Answer() is %q for num %d, want %q",
41 				got, tt.randomNum, tt.want)
42 		}
43
44 		if g.calledWithN != 3 {
45 			t.Errorf("EightBall.Answer() did not call Intn(3) as expected")
46 		}
47 	}
48 }
Sometimes, when the existing code uses a specific library implementation, it takes refactoring to use interfaces to mock out impementation details. However, the resulting code is more decoupled. The tests run faster (e.g. when mocking out external network calls) and are more reliable. Don’t be afraid to make liberal use of interfaces. This makes for more decoupled code and more focused tests.
GoMock
Another way to generate mocks for tests is GoMock. WIP
Generating Coverage Reports
To generate test coverage percentages for your code, run the go test -cover command. Let’s make a quick example and a test to go with it.
We’re going to write a simple username validation function. We want our usernames to only contain letters, numbers, and the special characters “-“, “_”, and “.”. Usernames also cannot be empty, and they must be less than 30 characters long. Here’s our username validation function:
 1 package validate
 2
 3 import (
 4 	"fmt"
 5 	"regexp"
 6 )
 7
 8 // Username validates a username. We only allow
 9 // usernames to contain letters, numbers,
10 // and special chars "_", "-", and "."
11 func Username(u string) (bool, error) {
12 	if len(u) == 0 {
13 		return false, fmt.Errorf("username must be > 0 chars")
14 	}
15 	if len(u) > 30 {
16 		return false, fmt.Errorf("username too long (must be < 30 chars)")
17 	}
18 	validChars := regexp.MustCompile(`^[a-zA-Z1-9-_.]+$`)
19 	if !validChars.MatchString(u) {
20 		return false, fmt.Errorf("username contains invalid character")
21 	}
22
23 	return true, nil
24 }
Now let’s write a test for it:
 1 package validate
 2
 3 import "testing"
 4
 5 var usernameTests = []struct {
 6 	in        string
 7 	wantValid bool
 8 }{
 9 	{"gopher", true},
10 }
11
12 func TestUsername(t *testing.T) {
13 	for _, tt := range usernameTests {
14 		valid, err := Username(tt.in)
15 		if err != nil && tt.wantValid {
16 			t.Fatal(err)
17 		}
18
19 		if valid != tt.wantValid {
20 			t.Errorf("Username(%q) = %t, want %t", tt.in, valid, tt.wantValid)
21 		}
22 	}
23 }
As you can see, we’re not covering very many cases. Let’s see what exactly our test coverage is for this function:
62.5% is a bit too low. This function is simple enough that we can get close to 100% coverage. We’d like to know exactly what parts of the function are not being covered. This is where the coverage profile and HTML report come in.
To generate a test coverage profile, we run go test -coverprofile=coverage.out:
We can now get a breakdown of coverage percentages per function, although we only have one function so it’s not very interesting:
What we really want to see is a line-by-line breakdown. We can get this with the HTML report, which we’ll cover in the next section.
HTML Coverage Reports
We can generate an HTML coverage report using the same coverage.out file from before, by running the following command:
This should open up a browser and show us an HTML page like the following:
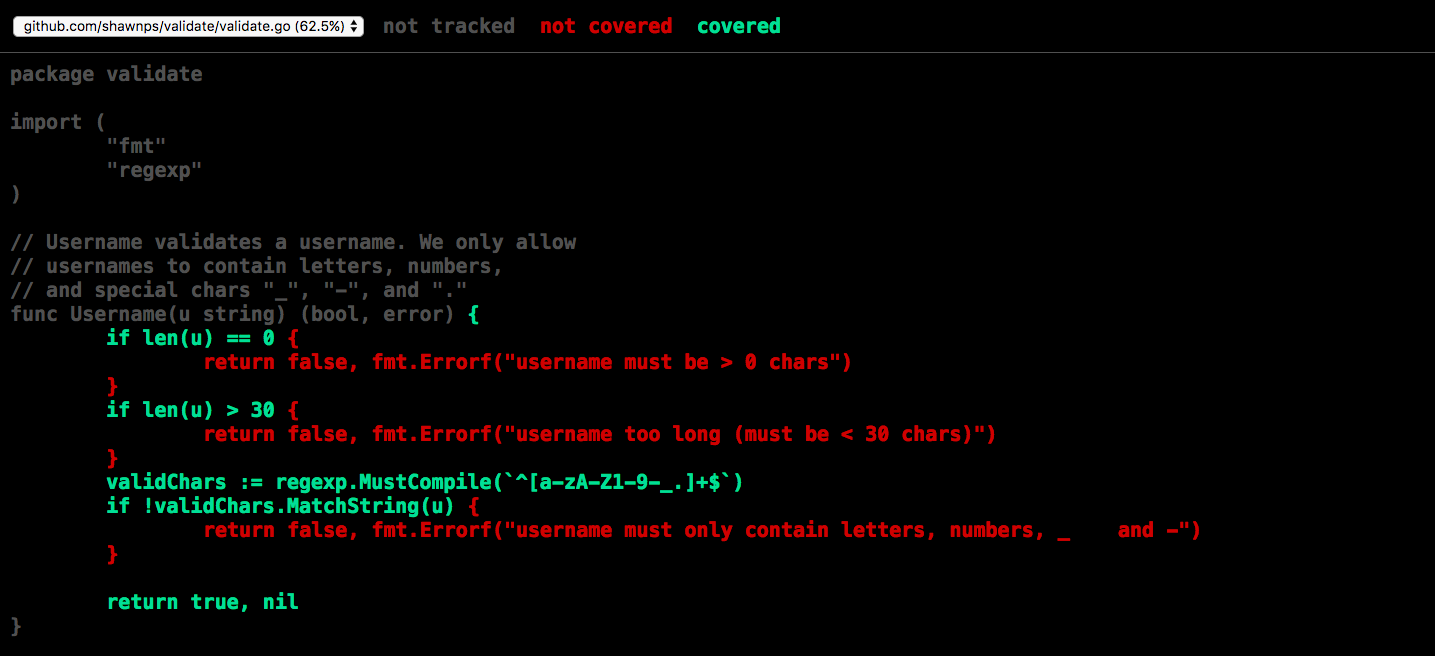
Now we can see exactly where we need to improve our coverage. We need to cover the cases where the username length is either 0 or > 30, as well as the case where the username contains an invalid character. Let’s update our test for those cases:
 1 package validate
 2
 3 import "testing"
 4
 5 var usernameTests = []struct {
 6 	in        string
 7 	wantValid bool
 8 }{
 9 	{"", false},
10 	{"gopher", true},
11 	{"gopher$", false},
12 	{"abcdefghijklmnopqrstuvwxyzabcde", false},
13 }
14
15 func TestUsername(t *testing.T) {
16 	for _, tt := range usernameTests {
17 		valid, err := Username(tt.in)
18 		if err != nil && tt.wantValid {
19 			t.Fatal(err)
20 		}
21
22 		if valid != tt.wantValid {
23 			t.Errorf("Username(%q) = %t, want %t", tt.in, valid, tt.wantValid)
24 		}
25 	}
26 }
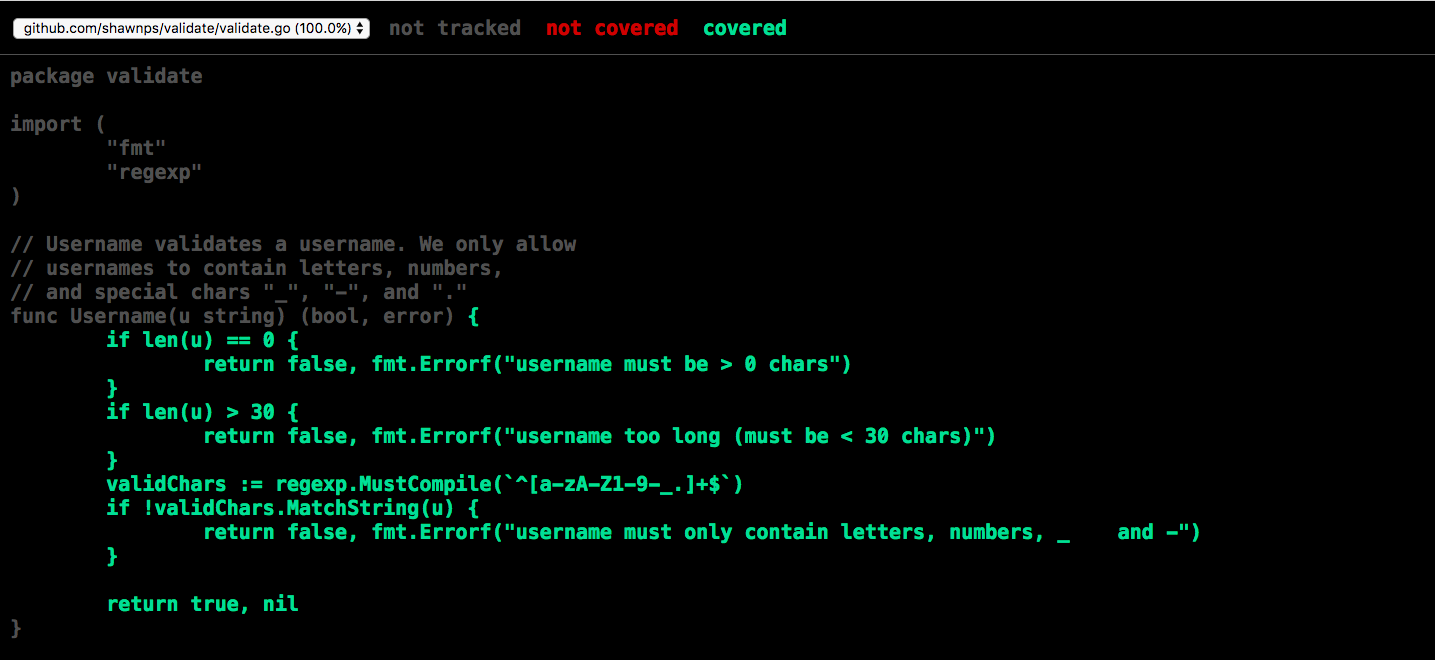
Now if we re-run go test -coverprofile=coverage.out to get a new coverage profile, and then go tool cover -html=coverage.out to view the HTML report again, we should see all green:
Writing Examples
We can also write example code and the go test tool will run our examples and verify the output. godoc renders examples underneath the function’s documentation.
Let’s write an example for our username validation function:
 1 package validate
 2
 3 import (
 4 	"fmt"
 5 	"log"
 6 )
 7
 8 func ExampleUsername() {
 9 	usernames := []struct {
10 		in    string
11 		valid bool
12 	}{
13 		{"", false},
14 		{"gopher", true},
15 		{"gopher$", false},
16 		{"abcdefghijklmnopqrstuvwxyzabcde", false},
17 	}
18 	for _, tt := range usernames {
19 		valid, err := Username(tt.in)
20 		if err != nil && tt.valid {
21 			log.Fatal(err)
22 		}
23
24 		fmt.Printf("%q: %t\n", tt.in, valid)
25 	}
26 	// Output:
27 	// "": false
28 	// "gopher": true
29 	// "gopher$": false
30 	// "abcdefghijklmnopqrstuvwxyzabcde": false
31 }
Note the Output: at the bottom. That’s a special construct that tells go test what the standard output of our example test should be. go test is actually going to validate that output when it runs the tests.
If we run a local godoc server with godoc -http:6060, and navigate to our validate package, we can also see that godoc renders the example, as expected:
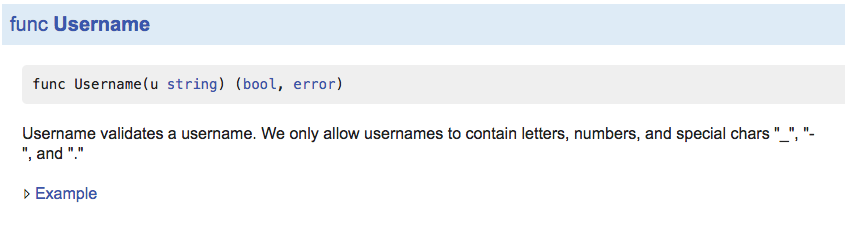
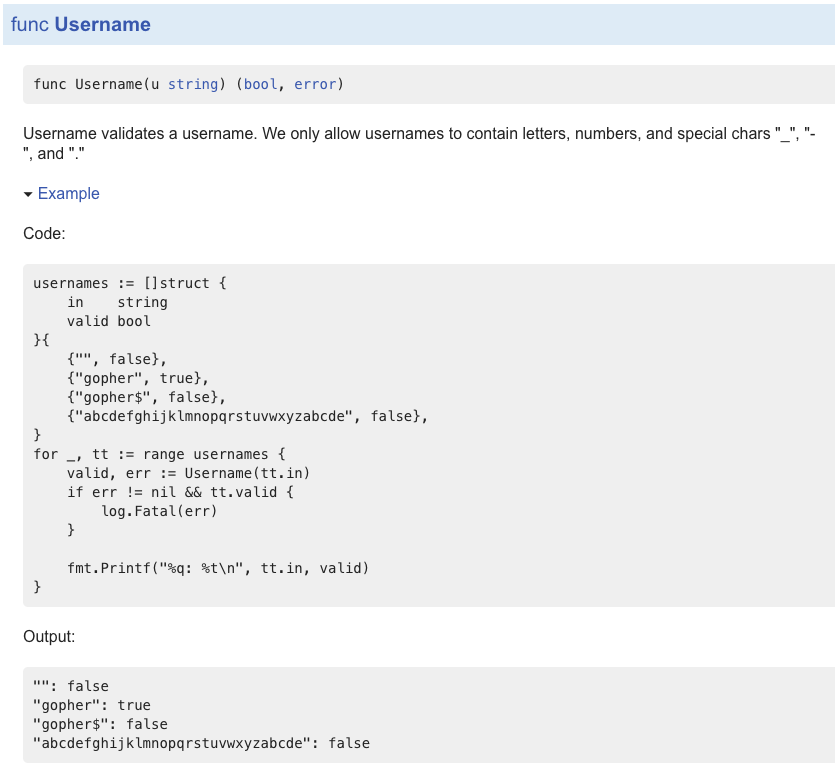
If we click “Example” we’ll see our example code:
Another note about examples is that they have a specific naming convention. We named our example above ExampleUsername because we wrote an example for the Username function. But what if we want to write an example for a method on a type? Let’s say we had a type User with a method ValidateName:
1 type User struct {
2     Name string
3 }
4
5 func (u *User) ValidateName() (bool, error) {
6 	...
7 }
Then our example code would look like this:
1 func ExampleUser_ValidateName() {
2     ...
3 }
where the convention for writing examples for methods on types is ExampleT_M().
If we need multiple examples for a single function, we append an underscore and a lowercase letter. For example with our Validate function, we could have ExampleValidate, ExampleValidate_second, ExampleValidate_third, and so on.
In the next chapter, we will discuss one last important use of the Go testing package: benchmarking.