CFEngine Basics
In this chapter we will take a more detailed look at the basic concepts behind CFEngine, including its theoretical foundation, the syntax and constructs of its policy language, and some unique aspects of its behavior. I will also point you to some of the many online resources available for learning and improving your CFEngine skills.
Basic Principles
One of CFEngine’s unique characteristics is that it is built upon predefined, solid theoretical and behavioral principles. These principles guide the design and implementation of all the CFEngine components and of its policy language, and ensure that the behavior of those components remains consistent. These principles are: desired-state configuration, a minimum base set of native operations, promise theory, and convergent configuration. Let us look at them in more detail.
Desired-State Configuration
CFEngine is different from many other automation mechanisms in that you do not need to tell it what to do. Instead, you specify the state in which you wish the system to be, and CFEngine will automatically decide the actions to take to reach the desired state, or as close to it as possible. In programming language terms, we say that the CFEngine policy language is declarative, as opposed to imperative.
These are some examples of the things that you can express to CFEngine as desired states:
- “Make sure file
/etc/ssh/sshd_configcontains the lineUseDNS no” - “Make sure user
mysqlexists/does not exist” - “Make sure process
httpdis (not) running”
At a higher level of abstraction, you can encapsulate CFEngine operations and express high-level desired states:
- “Make sure all web servers have Apache installed”
- “Make sure all
rootaccounts have the same, centrally-designated password” - “Make sure parameters
UseDNSandPermitRootLoginare disabled on allsshdservers, except on dbsrv01 and dbsrv02, wherePermitRootLoginshould be enabled”
And at an even higher level, you can express top-level desired states like these:
- “Configure host dbsrv01 as a database server”
- “Create a new cluster of VMs to use as web servers”
- “Give me a new datacenter in EC2 region ap-northeast-1”
Of course, at some point, CFEngine needs to know what specific changes to make to the system, and how to make them. To this effect, CFEngine knows how to perform a number of native operations on the system.
Basic CFEngine Operations
These are some of the basic operations that CFEngine natively knows how to perform:
- Extract information from the system itself about its current state and configuration.
- Inspect and modify the contents of text, XML or JSON files.
- Check for and manipulate file permissions and ownerships.
- Check for existence of processes running in the system.
- Check for existence of users in the system.
- Run programs and check their exit status.
- Check and manipulate packages installed on the system.
- Check and manipulate services on Unix systems.
- Query and manipulate databases and their contents (as of this writing, MySQL, PostgreSQL and SQLite are supported).
- Examine and manipulate POSIX Access Control Lists (ACLs).
 |
This is by necessity an incomplete list—-it reflects only the major features implemented by major promise types in CFEngine. There are many other operations implemented by functions or by CFEngine’s monitoring components that allow both querying and modifying the system. Plus CFEngine is constantly evolving, so by the time you read this, new features may have appeared. |
The commercial version of CFEngine has some additional capabilities, including the following:
- Check and manipulate the Windows registry, event logs, and services.
- Query and manipulate LDAP (and, by extension, Active Directory) databases.
- Examine and manipulate Windows Access Control Lists (ACLs).
These operations are sufficient to perform most configuration tasks on a system. At the lowest possible level, CFEngine contains functional specifications of how to make changes to the system. At the highest level, however, you declare what you want as shown in Desired-State Configuration, and leave the details to CFEngine.
CFEngine ships with some built-in libraries that perform more advanced operations using these basic capabilities, and you can also build your own or use existing libraries to perform custom checks and activities.
Promise Theory
CFEngine 3 works on top of a theoretical model called Promise Theory. This theory models the behavior of autonomous agents in an environment without central authority, based only on promises of behavior made by each agent, and shows that even without central control, the system can converge to a stable state.
Promise Theory underlays one of the basic tenets of CFEngine: voluntary cooperation. In CFEngine, each system participates voluntarily, makes promises only about its own behavior (if you think about it, it makes no sense for a system to make promises about someone else’s behavior), and cannot be forced to accept commands or information from any external entities. This gives CFEngine very strong security properties, since it means that CFEngine running on a host cannot be coerced into modifying its behavior according to some external influence. It may choose to do so (for example, by getting policies from a central server), but unlike many other configuration management systems, CFEngine does not require you to open a command channel through which each host can be given instructions (all you can do is “ping” clients so that they run their policies before their scheduled time, or to query them for information, but never to perform arbitrary actions or commands).
It’s worth mentioning that CFEngine’s principle of voluntary cooperation is more than a theoretical nicety in terms of security: in its entire 25-year history (spanning versions 1 through 3), CFEngine has had only seven published vulnerabilities, only three of which were remotely exploitable. The last one of those was published in 2005, still in CFEngine 2. CFEngine 3 has the impressive record of zero published vulnerabilities since its release in 2009. |
A promise is simply a declaration of intent, a model of the desired state of the promiser. A promise does not imply that the desired state will be reached in the next iteration (or ever), but implies a capability for verifying whether the promise has been satisfied. Through this seemingly simple characteristic, promise theory allows CFEngine to deal with a crucial aspect of systems management: operational uncertainty. Systems are under constant change, both intentional (changing requirements, changing software, changing user behavior, security attacks) and accidental (disconnected network links, disappearing resources, software crashes) and have to react to it, often with incomplete information. Promise theory allows CFEngine to deal with these conditions in a resilient fashion.
Promise Theory was developed initially as the foundation for CFEngine’s behavior (in fact, the policy language in CFEngine 3 was redesigned to reflect this theory), but it has found more general applications in Computer Science and in other disciplines such as Economics and Organization.
According to Promise Theory, everything in CFEngine 3 is a promise, with specifications of what to do if the promise is already satisfied, if the promise was not satisfied but could be fixed, if the promise was not satisfied and could not be fixed, etc. The following table shows some examples of promises you could find in a CFEngine policy, and of the possible actions CFEngine could take automatically if the promise is not kept.
| Promiser | Promises to… | If not currently kept, CFEngine will… |
|---|---|---|
| A variable | …hold a certain value of a certain type. | …store the appropriate value in the variable. |
| A file | …have certain characteristics (permissions, ownership, ACLs, etc.). | …set the desired properties on the file. |
| A file | …exist and to have certain content. | …create the file if needed, modify its content (add, remove or edit lines) to match the desired state. |
| A user account | …exist and have certain characteristics (home directory, group, etc.) | …create the user account with the desired characteristics. |
| A process | …be running on the system. | …run the appropriate command to create the process. |
| A shell command | …have been executed. | …execute the command and collect its output and exit status. |
| A directory on the policy hub | …provide access to its content to certain clients. | …reconfigure its access rules to permit or block the access as desired. |
| An output message | …be generated when certain conditions arise, with a certain frequency and in a certain format. | …produce the appropriate message. |
When a promise is not already satisfied (e.g., a file does not exist as it should), CFEngine will take the necessary actions to fix it, according to both its built-in rules and any additional promises declared in the policy.
Depending on the current state of the system with respect to a given promise, on the actions that CFEngine took when evaluating a promise, and on the result of those actions, CFEngine defines the following promise states:
- Promise kept
-
The state of the system was already as described by the promise, so no action had to be taken.
- Promise repaired
-
The state of the system was not as required by the promise, so CFEngine took the appropriate actions, and repaired the system state to match the requirements of the promise.
- Repair failed
-
Repair actions were attempted by CFEngine, but they failed for some reason (for example, lack of permissions to edit a file). Depending on why the repair action failed, one of the following states may also be set:
Repair denied: Repair actions were attempted by CFEngine, but they failed due to lack of access to some resource.
Repair timeout: Repair actions were attempted by CFEngine but took too long to execute, and CFEngine cancelled the operation.
A CFEngine policy is constructed out of individual promises that get executed in certain order, and that can interact with other promises. After a promise is evaluated (executed), you can determine its state and act based on it, triggering further actions such as reporting, command execution, or evaluation of other promises.
Convergent Configuration
One of CFEngine’s basic principles is that of convergent configuration. This means that you don’t have to leave the system in the desired state on the first pass. Instead, you make changes incrementally, getting closer to the objective every time, independently of the starting state of the system. A CFEngine policy may not leave the system completely configured on the first pass, but at least it will make some changes. On subsequent passes, it will continue to make changes, eventually bringing it as close as possible to the desired state.
One advantage of convergent configuration, and of the declarative nature of CFEngine, is that you do not need to know the current state of the system in order to correct it. If the system is already in the desired state, a correctly written CFEngine policy will do nothing. If it’s not, CFEngine will iteratively make discrete changes to bring it closer to the ideal, taking only the necessary actions to correct the existing deviations.
In order to carry out convergent configuration, CFEngine performs three passes over its policy. During each pass, all the promises in the policy are evaluated. There may be some promises that cannot be evaluated until the second or third pass due to dependencies between different components of the policy, so the multiple passes help CFEngine bring things to a convergent state as soon as possible.
CFEngine Components
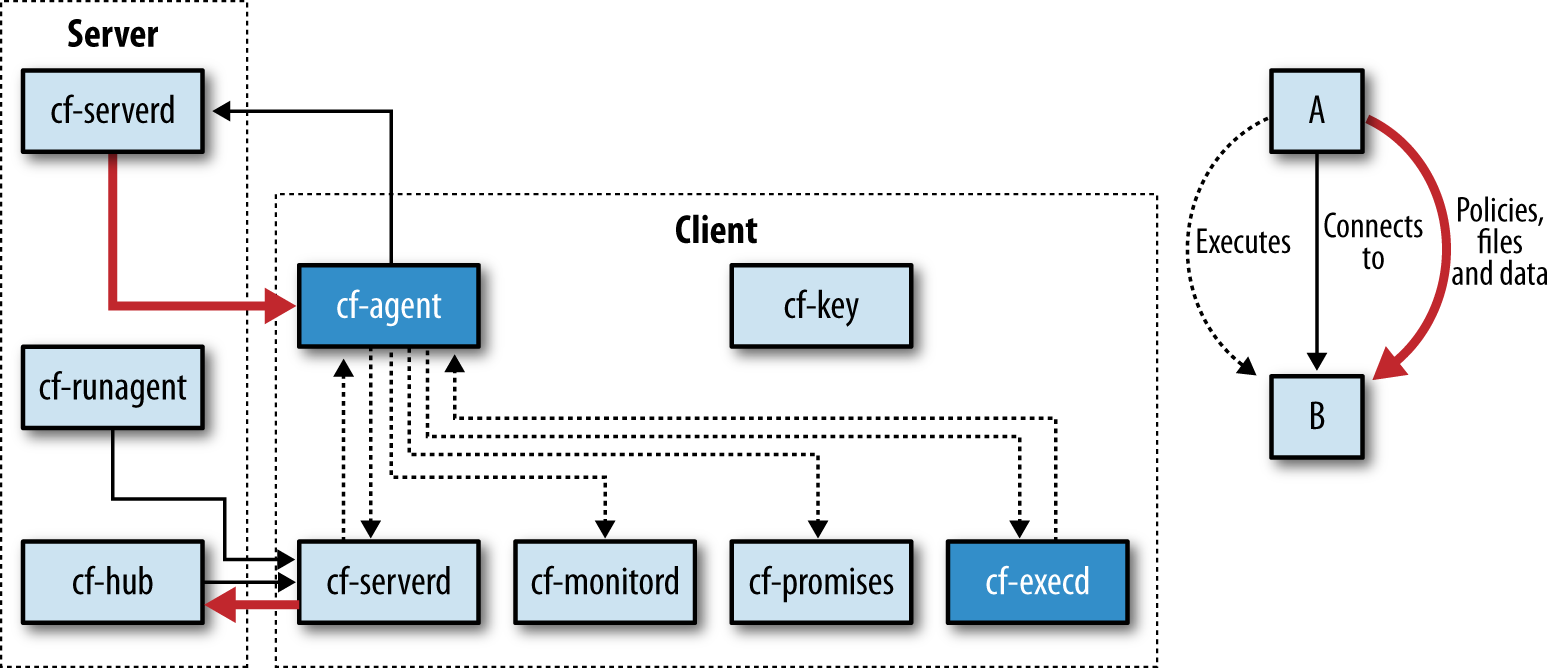
A CFEngine installation contains multiple components that perform different, specific functions, as shown in the following figure. Dotted lines represent components that execute others, solid lines represent communication among components, and bold lines indicate data flow.
Let’s look in more detail at the functionality and role of each one of these components.
cf-agent-
This process is the “instigator of change,” the program that evaluates policies and acts on them, making any necessary changes to the system.
cf-agentis normally started directly by the user (for example, we have been running it manually from the command line to test the policies in this book), or by one ofcf-execd(as a mechanism for starting it at regular intervals) orcf-serverd(in response to thecf-runagentcommand executed from a different host). Note that depending on its policies,cf-agentcan in turn be responsible for restartingcf-execd,cf-serverdorcf-monitordif they have stopped for any reason (in addition,cf-promisesis used bycf-agentto validate its policies before attempting to run them).
By default, cf-agent will attempt to run /var/cfengine/inputs/promises.cf (more precisely, the file found by expanding the string $(sys.workdir)/inputs/promises.cf) when invoked, unless a different file is specified using the -f command-line option. If the filename executed produces an error, cf-agent will try to run /var/cfengine/inputs/failsafe.cf. The idea is for failsafe.cf to be a barebones policy that does little more than try to restore the CFEngine policies to a working state. Normally failsafe.cf will attempt to update the local policies from the policy hub, and it may also try to start cf-execd and cf-monitord to have at least a minimal CFEngine infrastructure running. If the failsafe.cf file is not found, cf-agent will generate it from a built-in template.
cf-execd-
This process executes
cf-agentin a periodic basis, collecting its output, and potentially emailing it somewhere. By default,cf-execdrunscf-agentevery five minutes, but you can modify its behavior using anexecutor controlbody. For example:body executor control { any:: splaytime => "10"; mailto => "cfengine@example.org"; mailfrom => "cfengine@$(sys.host).example.org"; smtpserver => "mail.example.org"; schedule => { "Min00_05", "Min30_35" }; }
In this case, the schedule attribute tells cf-execd to only run cf-agent every 30 minutes (more precisely, whenever either the Min00_05 or Min30_35 classes are enabled, which would be the case between 00-05 and 30-35 minutes of every hour). The splaytime parameter tells cf-execd that the execution could be delayed up to 10 minutes (this is useful in large installations to prevent all the clients from connecting to the server at once). The mailto, mailfrom and smtpserver attributes determine how email reports will be sent.
It is common for cf-execd to be the one process started by the operating system (for example, through a cron job or an init script) when the system starts. cf-execd then runs cf-agent, which makes sure through the appropriate policies that cf-execd, cf-monitord, and cf-serverd are running in the background, if needed.
cf-serverd-
This component implements server functionality in CFEngine—-the ability to listen for connections from clients and serve files to them.
cf-serverdalso has the ability to listen for connections from thecf-runagentprocess in other hosts, and according to its configuration, respond by executingcf-agentlocally (this is the one reason why you may want to runcf-serverdon CFEngine clients: if you want the policy hub to be able to remotely instruct clients to runcf-agent). We will look in more detail at thecf-serverdconfiguration in Clients and Servers.cf-serverdlistens on port TCP/5308, and this is the only port that needs to be open for the clients to be able to communicate with the server.
cf-runagent-
Invokes
cf-agenton remote hosts so that they evaluate their policies. This is the only form of control a remote machine may exercise over another in CFEngine. We will talk more about this in CFEngine Remote Execution Using cf-runagent.
cf-key-
This is one of the first commands you run when installing CFEngine on a new host. It creates a cryptographic key pair for the current host, which is used for authentication when communicating with the policy hub or any other CFEngine server.
cf-monitord-
This process is intended to run continuously in the background. It collects statistical information about different aspects of the system and makes it available to
cf-agentthrough the specialmonvariable context. Some examples of the information collected bycf-monitordare the numbers of users with active processes in the system (mon.value_users), free space in the root disk partition (mon.value_diskfree), and kernel load average (mon.value_loadavg). For most valuescf-monitordalso keeps a running average and the standard deviation (for example,mon.av_loadvgandmon.dev_loadavg).
cf-hub-
This process exists only in CFEngine Enterprise, and is responsible for collecting from all the clients information about their current status, reports and monitoring information, for analysis and reporting purposes.
cf-hubperiodically connects to thecf-serverdprocess on all the clients it knows about (this is, all the clients that have bootstrapped to it) to collect this information. If it cannot connect to a client, this information is also reported in the Enterprise console.
A First Example
Let’s consider the simple case of modifying the configuration of an ssh server. At the top level, we need to make sure the sshd service is up and running. With CFEngine, we can simply write the following:
services:
  "sshd";
This will by default enable and make sure the service is running, on any operating system. If we wanted to make sure the service is not running, we would simply need to write:
services:
  "sshd" service_policy => "stop";
Now, let’s go down a level and change the configuration of the ssh daemon. Traditionally, we would do this sort of task with a shell script. The following snippet from a shell script is intended to add a line to /etc/ssh/sshd_config to prevent root logins:
echo "PermitRootLogin no" >> /etc/ssh/sshd_config
However, this code will add a new line to the file every time it runs. It assumes that the file does not contain the line already. Of course, you can add checks for this, but the code quickly becomes unreadable:
(grep -iq 'PermitRootLogin' /etc/ssh/sshd_config ||
 echo "PermitRootLogin no" >> /etc/ssh/sshd_config) &&
 sed -i 's/^.*PermitRootLogin.*$/PermitRootLogin no/;' /etc/ssh/sshd_config
This snippet uses the grep command to determine if the file alredady contains the PermitRootLogin string, and based on the result either adds the corresponding line or uses the sed command to edit the existing line.
Compare this with the equivalent CFEngine declaration:
files:
  "/etc/ssh/sshd_config"
    comment => "Disallow direct root login",
    edit_line => replace_or_add(".*PermitRootLogin.*", "PermitRootLogin no");
The CFEngine policy will add the line only if it is not there already. Additionally, you can see that CFEngine rules allow comments as rule attributes. These comments can be made available as the policy executes, allowing administrators to better understand and debug the actions taken by CFEngine.
Rules in CFEngine can be as detailed or as high-level as you wish. For example, you could generalize the SSH configuration file mechanism and express it like this (and we will look into the details of how to do this in Editing /etc/sshd_config):
bundle agent main {
  vars:
      # SSHD configuration to set
      "config" data => '{
        "Protocol": "2",
        "X11Forwarding": "yes",
        "UseDNS": "no",
        "PermitRootLogin": "no"
         }';

  files:
      "/etc/ssh/sshd_config"
        edit_line => set_config_values( "$(this.bundle).config" ),
        classes   => results("bundle", "sshd_config");

  services:
    sshd_config_repaired::
      "ssh"
        service_policy => "restart";
}
This CFEngine policy allows you to define arbitrary configuration parameters in the config data container defined at the top (in the vars: section), which will be applied by the files: section by modifying or adding only those parameters that need to be fixed. Finally, sshd will be restarted only if any changes were made. In other words, the promise of having the right parameters in the file could be satisfied just by checking that they’re set properly already (the “Promise kept” state described earlier), so the restart will take place only in the “Promise repaired” state.
Let’s go back to our description of promises, to start figuring out what is happening in this policy. The vars: section is simply variable declarations—-in this case, a data container indexed by configuration parameter names, and containing the values of each parameter. In the files: section, the /etc/ssh/sshd_config file promises to have its content edited according to the specifications contained in the set_config_values() bundle (a named collection of CFEngine promises), and to set the sshd_config_repaired class if the file needed to be repaired (i.e. modified to satisfy the promise). Finally, in the services: section, the sshd service promises to be restarted only if the restart_sshd class is set (if this class is set, it means that the file was modified, so the daemon needs to be restarted for the changes to take effect).
Not shown in this example are the set_config_values() edit_line bundle and the results() classes body. They are part of the CFEngine Standard Library (described in CFEngine Standard Library). The edit_line bundle takes care of the actual editing of the file to set the desired parameters, using the built-in file-editing primitives in CFEngine. We will examine this bundle in detail in Editing /etc/sshd_config. The results() classes body is used to define a class for signaling so that the services promise can know when it is appropriate to restart the service.
You can try running this policy, and you should see something like this:
# cf-agent -K -f ./src/ssh_config1.cf
  notice: Q: "...in/service ssh ": Restarting OpenBSD Secure Shell server: sshd.
 |
The standard library in the Masterfiles Policy Framework contains many useful |
CFEngine allows you to express configuration policies at the level of abstraction you wish, leaving lower-level details out of sight but available when you need them. Now, let’s take a more detailed look at the syntax of a CFEngine policy.
The CFEngine Policy Language
The syntax of the CFEngine 3 configuration files is very uniform, since everything is a promise. In general, every element in a CFEngine policy has the following structure:
promise_type:
  class_expression::
    "promiser" -> { "promisee1", "promiseeX" }
        attribute1 => value1,
        attributeX => valueX;
        ...
The values that promise_type can have depend on the type of container in which the promise is stored (and we will look at them in detail in Bundles, Bodies, and Namespaces). The value of promise_type determines how the "promiser" is interpreted, which attributes are valid and how their corresponding values are used. The attribute values can be either constant values, variables of the types described in Data Types and Variables in CFEngine, or container names as described in Bundles, Bodies, and Namespaces. The type of allowed values is fixed for each attribute.
The promisees are optional and, if specified, contain references to other promises that depend on the current one, and are used for documentation. In this way, we can specify which promises affect others or who might care about a particular promise. CFEngine has the ability to produce reports that include this information. Note that specifying promisees has no effect on the execution order of the policy, they are merely for informational purposes. Promisees can be arbitrary strings.
The class_expression, if specified, allows the promise to be conditionally executed depending on the value of the expression. If omitted it defaults to any, which is always defined (you can also use the class expression line any:: to make this explicit). We will look at them in detail in Classes and Decision Making.
Depending on the type of promise, almost all elements of this syntax, except for the promise_type and the "promiser", are optional. For example, to unconditionally execute a command, we would simply state it like this:
commands:
  "/bin/ls /";
In this case commands: is the promise type, and specifies that the promisers in the following section are to be interpreted as commands to execute. The promiser, "/bin/ls /" indicates the command to run. Since no attributes are specified, the command will always be executed and its output reported by CFEngine.
|
You can find some guidance on the style and form of policy writing in the CFEngine Policy Style Guide. |
Data Types and Variables in CFEngine
CFEngine supports different data types:
Scalars can be strings, integers or floating-point numbers;
Lists contain an ordered set of scalars
Arrays contain sets of key/value pairs.
Data containers can hold arbitrary data structures, including lists and associative arrays.
|
Please note that “native” CFEngine arrays are being deprecated in favor of data containers, which are much more flexible and robust. You should use them whenever possible. Most functions which take the native types are also able to handle data containers. |
Variable declarations
Variables in CFEngine are declared in the vars: section (they are promises of type vars:) of a bundle. vars: is one of the common promise types (along with classes: and reports:) that can be included in any type of bundle. vars: promises adhere to the common structure described in The CFEngine Policy Language, which in this case is interpreted as follows:
vars:
    "variable"
      type => value;
The promiser is the name of the variable in quotes. The type of the variable is given as an attribute, and its value indicates the value to store in the variable. For short values, we normally write the whole declaration in a single line for brevity:
vars:
  "name"   string => "Diego";
  "year"   int    => "2011";
  "colors_rgb" slist  => { "red", "green", "blue" };
  "colors_cmyk" data => '[ "cyan", "magenta", "yellow", "black" ]';
  "user" data => '{
    "name": "Diego Zamboni",
    "username": "zzamboni",
    "id": 501
  }';
Let us now look at the details of the different data types available in CFEngine.
Strings
Strings in CFEngine are declared using the string type. String values must always be enclosed by single or double quotes (there is no difference in their behavior). If you need to include a double quote in a double-quoted string, you need to precede it with a backslash (and similarly for single quotes inside single-quoted strings). You can create multiline strings simply by splitting them across multiple lines. To reference a string variable (and any scalar variable), you need to enclose the variable name in parentheses or curly braces, and precede them with a dollar sign.
You can interpolate variables into a string simply by referencing them inside the string. The following example shows some examples of strings:
bundle agent main
{
 vars:
   "s1" string => "one";
   "s2" string => 'this
is a
multine string';
   "s3" string => 'with "quotes"';

 reports:
  cfengine::
   "s1 = \"$(s1)\"";
   "s2 = $(s2)";
   "s3 = $(s3)";
}
If you save this short policy into a file and run it, you will get the following output:
# cf-agent -K -f ./src/strings.cf
R: s1 = "one"
R: s2 = this
is a
multine string
R: s3 = with "quotes"
Note that the strings in the reports: section adhere to the same rules, and contain the interpolated values of the declared variables.
Numbers
CFEngine supports both integers and floating-point numbers, denoted by the int and real types. Note that numeric values are also given as strings in CFEngine, but they are checked for validity before they are stored in the variable. For integers, CFEngine supports the suffixes k, m, and g to represent powers of 10 (that is, 1000, etc.), and the suffixes K, M, and G to represent powers of 2 (that is, 1024, etc.). Real numbers can be specified in decimal or exponential notation. For example:
bundle agent main
{
  vars:
      "i1" int => "25";
      "i2" int => "10k";
      "i3" int => "10K";
      "r1" real => "1.2";
      "r2" real => "10e-5";

  reports:
    cfengine::
      "i1 = $(i1)";
      "i2 = $(i2)";
      "i3 = $(i3)";
      "r1 = $(r1)";
      "r2 = $(r2)";
}
Produces the following output:
# cf-agent -K -f ./src/numbers.cf
R: i1 = 25
R: i2 = 10000
R: i3 = 10240
R: r1 = 1.200000
R: r2 = 0.000100
Lists
CFEngine supports ordered lists of any of the scalar types: lists of strings (slist), lists of integers (ilist) and lists of reals (rlist). In all cases, the values have to be specified as strings, but they are interpreted and validated according to the declared type. You can assign and store lists across variables of different types, as long as the values can be converted. This means you can always assign an ilist or an rlist into an slist, but you can assign an slist into an ilist or rlist only if it contains valid values according to the type of the destination variable.
You can refer to list variables by using an at-sign (@) before the variable name. By doing this you can pass the whole list to a function that expects a list argument. You can also specify a list as part of another list value, and it will be expanded in place. The following example illustrates these points:
bundle agent main
{
  vars:
      "l1" ilist => { "1", "2", "3" };
      "l2" rlist => { "1.0", "2.0", "3.0" };
      "l3" slist => { "one", "two", "three", @(l1), @(l2) };

  reports:
    cfengine::
      "l3 = $(l3)";
}
When you run it you get the following output:
# cf-agent -K -f ./src/lists.cf
R: l3 = one
R: l3 = two
R: l3 = three
R: l3 = 1
R: l3 = 2
R: l3 = 3
R: l3 = 1.0
R: l3 = 2.0
R: l3 = 3.0
Both @(l1) and @(l2) are being expanded inside @(l3), so that its final value is this:
{ "one", "two", "three", "1", "2", "3", "1.0", "2.0", "3.0" }
In this example we are also using CFEngine implicit looping by referring to the @(l3) array as a scalar $(l3). See Looping in CFEngine for a full explanation of how this works.
Data Containers
Object of type data can contain arbitrary data structures, including lists or hashes (associative arrays). Such objects can commonly be represented in JSON or YAML formats. CFEngine provides functions to read both of those formats, either from files or from strings.
The basic functions that return data container objects are parsejson() and parseyaml() (for parsing strings), readjson() and readyaml() (for parsing files). For declaring fixed values, CFEngine allows specifying the data structure as a string which can contain either JSON or YAML.
bundle agent main
{
  vars:
      # Parse JSON explicitly
      "animals_json" data => parsejson('{ "animals": [ "dog", "cat", "crow" ] }');
      # Parse YAML explicitly - no header needed
      "animals_yaml" data => parseyaml("animals:
        - dog
        - cat
        - crow");
      # Parsed as JSON
      "colors_json" data => '[ "red", "green", "blue" ]';
      # Parsed as YAML thanks to the "---" header
      "colors_yaml" data => '---
        - red
        - green
        - blue';

      # Serialize the objects to their string representation
      "a1" string => format("%S", "animals_json");
      "a2" string => format("%S", "animals_yaml");
      "c1" string => format("%S", "colors_json");
      "c2" string => format("%S", "colors_yaml");

  reports:
      # Each of these loops over the corresponding element
      "animals_json = $(animals_json[animals])";
      "animals_yaml = $(animals_yaml[animals])";
      "colors_json = $(colors_json)";
      "colors_yaml = $(colors_yaml)";
      # These show the serialization of each object
      "a1 = '$(a1)'";
      "a2 = '$(a2)'";
      "c1 = '$(c1)'";
      "c2 = '$(c2)'";
}
Running this code produces the output you might expect. Note that regardless of the original format, the JSON and YAML specifications parse to identical objects.
# cf-agent -K -f ./src/containers.cf
R: animals_json = dog
R: animals_json = cat
R: animals_json = crow
R: animals_yaml = dog
R: animals_yaml = cat
R: animals_yaml = crow
R: colors_json = red
R: colors_json = green
R: colors_json = blue
R: colors_yaml = red
R: colors_yaml = green
R: colors_yaml = blue
R: a1 = '{"animals":["dog","cat","crow"]}'
R: a2 = '{"animals":["dog","cat","crow"]}'
R: c1 = '["red","green","blue"]'
R: c2 = '["red","green","blue"]'
A couple of notes about data containers:
They are immutable once created. However, you can combine them into new objects using the
mergedata()function.In many respects,
dataobjects behave in the same way as “traditional” CFEngine lists and arrays, but they are not subject to many of their limitations in size and behavior.Data containers are returned by several different functions, including the JSON or YAML parsing functions mentioned above, but also
data_regextract(),data_readstringarray(),data_expand()and others.In my experience, parsing of YAML strings works better when the string is specified in multiple lines as shown above instead of using embedded newline characters (
\n) as shown in the documentation.
Data containers are undoubtedly the most powerful data type in CFEngine, and you will see them used extensively through this book.
Arrays
Arrays are sets of values indexed by a string (they are commonly called hashes in other programming languages). Array elements can contain scalars, lists or other arrays, even within the same array.
 |
The Array data type in CFEngine is in the process of being fully replaced by Data Containers, which are much more powerful and flexible. Whenever possible you should use containers instead of arrays. We describe them here since you will still find them in many CFEngine policies. |
In CFEngine, arrays are declared element by element, as if they were regular variables, except their name contains the index surrounded by brackets. There is no shortcut for declaring the whole array in a single step. There are certain functions that operate on arrays, such as getindices() and getvalues(), and they receive as argument the name of the array as a string. For example, we could use an array to store user account information:
bundle agent main
{
  vars:
      "user[name]"              string => "zamboni";
      "user[fullname][first]"   string => "Diego";
      "user[fullname][last]"    string => "Zamboni";
      "user[dirs]"              slist => { "/home/zamboni",
                                           "/tmp/zamboni",
                                           "/export/home/zamboni" };

      "fields"     slist => getindices("user");
      "userfields" slist => getindices("user[fullname]");

  reports:
      "user fields = $(fields)";
      "account name = $(user[name])";
      "$(userfields) name = $(user[fullname][$(userfields)])";
      "user dir = $(user[dirs])";
}
This example is intentionally contrived to show how you can store different data types in an array. Note how @(fields) is being automatically populated by getindices() based on the indices declared for the user array. In other words, the statement:
"fields" slist => getindices("user");
creates a variable named fields that refers to a list of three strings taken from the indices: name, fullname, and dirs. The list can then be used to loop through the user array, like before. Additionally, @(userfields) is being populated with the indices of the array stored in user[fullname]:
"userfields" slist => getindices("user[fullname]");
Finally, observe that user[dirs] contains a list of strings, and we are looping over that list as we would over a regular list variable (such as @(fields) or @(userfields) in this example) by referencing it as a scalar:
"user dir = $(user[dirs])";
Here is its output:
# cf-agent -K -f ./src/arrays.cf
R: user fields = dirs
R: user fields = fullname
R: user fields = name
R: account name = zamboni
R: first name = Diego
R: last name = Zamboni
R: user dir = /home/zamboni
R: user dir = /tmp/zamboni
R: user dir = /export/home/zamboni
Classes and Decision Making
Classes are the key to controlling flow and making decisions in a CFEngine policy. In CFEngine, classes are named boolean values that can be either true (the class is defined) or false (the class is undefined). Classes can represent any characteristic of the system, information that is known (true) or unknown (false), or any condition that you want to indicate in the policy. They can be volatile (they stop existing as soon as the current CFEngine run is over) or persistent for a period of time you define. While many important classes are predefined by CFEngine (hard classes), you can define others for your particular needs (soft classes).
Hard classes
These are defined automatically by CFEngine when it runs, and represent mainly information about the system or the current environment that is discovered by CFEngine. Examples of hard classes include:
- Host information (e.g., class
doomsdaywould be defined if the hostname of the machine wherecf-agentis running is “doomsday” and classipv4_192_168_1_2would be defined if the host’s IP address is 192.168.1.2). - Time information (e.g., class
Hr5would be set if CFEngine is running between 5 and 6 AM, classMin15_20is defined if it is currently between minutes 15 and 20 of the hour, and classMonwould be set if it’s Monday). - Operating system information (e.g.,
linuxwould be set on any Linux system, andsuse_9would be set if the Linux distribution is SuSE 9).
To see the full list of hard classes defined on a particular system, run the following command (partial example output from a macOS machine at 15:31 GMT on a Tuesday):
# cf-promises --show-classes | grep hardclass
  127_0_0_1       inventory,attribute_name=none,source=agent,hardclass
  192_168_1_107   inventory,attribute_name=none,source=agent,hardclass
  64_bit          source=agent,hardclass
  8_cpus          source=agent,derived-from=sys.cpus,hardclass
  Afternoon       time_based,...,source=agent,hardclass
  Day2            time_based,...,source=agent,hardclass
  GMT_Afternoon   time_based,...,source=agent,hardclass
  GMT_Day2        time_based,...,source=agent,hardclass
  GMT_Hr15        time_based,...,source=agent,hardclass
  GMT_January     time_based,...,source=agent,hardclass
  GMT_Lcycle_2    time_based,...,source=agent,hardclass
  GMT_Min30_35    time_based,...,source=agent,hardclass
  GMT_Min31       time_based,...,source=agent,hardclass
  GMT_Tuesday     time_based,...,source=agent,hardclass
  GMT_Yr2018      time_based,...,source=agent,hardclass
  Hr16            time_based,...,source=agent,hardclass
  January         time_based,...,source=agent,hardclass
  Lcycle_2        time_based,...,source=agent,hardclass
  Min30_35        time_based,...,source=agent,hardclass
  Min31           time_based,...,source=agent,hardclass
  Q3              time_based,...,source=agent,hardclass
  Tuesday         time_based,...,source=agent,hardclass
  Yr2018          time_based,...,source=agent,hardclass
  any             source=agent,hardclass
  cfengine        inventory,attribute_name=none,source=agent,hardclass
  cfengine_3      inventory,attribute_name=none,source=agent,hardclass
  ...
Soft classes
These are defined by the policy during its execution. For example, a class could be defined in the following cases:
-
Depending on whether a certain file exists. In this example, we set the
devel_hostclass if the/var/sitedata/devel_host.flagfile exists, using the built-infileexists()function to perform the check:classes: "devel_host" expression => fileexists("/var/sitedata/devel_host.flag");
Setting a class like this might be useful, for example, to establish whether certain executable programs or other capabilities are present on a system before invoking them, or to apply different configurations to the system.
-
As a Boolean expression of other classes. In this example,
test_hostwill be defined if any oftesthost1,testhost2, ortesthost3classes is defined. These might be the hostnames of the machines in which you want thetest_hostclass to be defined:classes: "test_host" or => { "testhost1", "testhost2", "testhost3"};
Setting a class like this might be useful to run certain operations on certain systems—-tests in this case.
-
As an indication of the status of a particular promise. In this example, if any changes are made to the
/etc/ssh/sshd_configfile by theedit_lineattribute, CFEngine would consider the promise as repaired, in which case therestart_sshdclass will be defined:files: "/etc/ssh/sshd_config" edit_line => set_config_values("sshd"), classes => if_repaired("restart_sshd");
Setting a class like this might be useful to keep track of the state of the system, and make sure that CFEngine follows up on an operation during its next pass.
Note that classes can be explicitly defined in a classes: section, but as you can see in the third example, they can also be defined by the common classes attribute, which you can use in all promises to set or unset classes based on the result of the promise. Several classes bodies are predefined in the CFEngine standard library, including if_repaired, if_ok, if_notkept, if_else, always and classes_generic.
|
The classes => classes_generic("foo");
Then, depending on the state of the promise, you will get one of |
You may see “classes” described sometimes as “contexts”. This term expresses the idea of a particular context (be it time or date, operating system, architecture, etc.) in which a host is at the moment. The CFEngine team has decided to keep using class in all official documentation to avoid confusion, but context might still be used in some explanations when it makes things clearer.
Apart from defining classes, you need a way to act on them. This is what the class_expression shown in The CFEngine Policy Language is for. A class expression in CFEngine is a boolean expression constructed with class names and the boolean operators AND (& or .), OR (|) and NOT (!). Parenthesis can be used to group parts of the expression. When a line ends with a double colon, it is evaluated as a class expression. Only if the class expression is true are the lines that follow evaluated. The following are examples of valid class expressions:
# True if the linux class is defined
linux::
# True if both reboot_needed and linux are defined
reboot_needed.linux::
# True if reboot_needed is defined and neither linux nor windows are defined
reboot_needed.!(linux|windows)::
# The any class is always defined, so whatever follows will always be evaluated
any::
Additionally, you can use the if attribute in most promise types to condition the evaluation of one promise to the result of the included class expression. For example, the following two promises are equivalent:
commands:
  # First command is conditioned by the if attribute
  "/usr/sbin/shutdown -r now"
    if => "linux";

  # Second command is conditioned by the class expression before it
  linux::
    "/usr/sbin/shutdown -r now";
The if attribute allows you to place a condition around a single promise. It has the advantage of specifying the class expression as a string, which means you can use variables in the class expression, and they will be expanded before evaluating the expression. You can also use some other operators like not to construct expressions. This allows a lot of flexibility in the types of conditions that you can use. For example, you can construct class names on the fly using variables:
bundle agent main
{
 vars:
   "words" slist => { "chair", "darwin", "table", "linux" };
 reports:
  cfengine::
   "Class $(words) is defined"
     if => $(words);
   "Class $(words) is not defined"
     if => not($(words));
}
|
|
In this example, the reports: section is looping through all the strings in the @(words) list (see Looping in CFEngine), and the corresponding message is printed depending on whether the class named after the current value is defined. Note how the class expression for the second report (“not defined”) uses the not function to negate the expression. Here is its output on a Linux machine (on a Mac, the darwin class would be defined):
# cf-agent -K -f ./src/if-test.cf
R: Class linux is defined
R: Class chair is not defined
R: Class darwin is not defined
R: Class table is not defined
Class expressions can also be used to define other classes using the expression attribute in a classes: promise. For example, the test_host class shown above could also be defined like this:
classes:
  "test_host" expression => "testhost1|testhost2|testhost3";
Finally, classes can be made persistent, even across invocations of cf-agent, by using the persistence attribute in the class declaration. Its value should be the length of time, in minutes, for which the class should retain its value after being evaluated. This can be useful if the class value is the result of a time-consuming or otherwise expensive operation, to avoid recomputation every time cf-agent runs.
Note that setting a class as persistent does not mean it will not be reevaluated every time cf-agent runs, only that its previous value will be available during the persistence period. To avoid unnecessary reevaluation, the usual practice is to use a “flag class” with the same persistence period. For example:
bundle agent test
{
 classes:
  !cache_is_active::
   "line_exists" expression => regline(".*foo.*", "/tmp/test_data.txt"),
     persistence => "1";
   "cache_is_active" expression => "any",
     persistence => "1";
 reports:
  line_exists::
   "Line exists in file";
  !line_exists::
   "Line does not exist in file";
}
In this case, we are using cache_is_active as the “flag class” to indicate whether we should recompute the value of line_exists, which would arguably be a very costly class to compute. In this case we are using regline() to look for a line containing “foo” in the file /tmp/test_data.txt). In the classes: section, we evaluate the classes only when cache_is_active is not defined. In this case, we set cache_is_active unconditionally (using the special expression "any"), and set line_exists depending on the result of the function, both with the same persistence period. This means that within one minute, no matter how many times cf-agent executes, the classes will not be reevaluated and their cached values will be reported. You can test this behavior in the previous example by running it, then editing the file, and observing that the changes are not detected until a minute has passed since the last execution. In deployment, this can be extremely useful to limit reevaluation of complex or costly class expressions whose values change slowly or infrequently.
Bundles, Bodies, and Namespaces
CFEngine policies can grow quite complex, so it would not be very scalable simply to list promises back to back. For this reason, and to promote reusability, CFEngine groups its syntax elements into two types of structures: bundles and bodies, and they in turn can be grouped into namespaces.
Bundles
Bundles are the most general and powerful grouping mechanism. They are the only elements that can contain promises. A bundle can contain many promises, possibly separated into sections. The structure described at the beginning of The CFEngine Policy Language can be contained only inside a bundle. Bundles are defined as follows:
bundle type name(arguments)
{
  promise_type:
    class_expression::
      promise
      ...
}
The name of the bundle is an arbitrary string that you can use to identify it. The type of the bundle has to be one of the CFEngine-recognized types, and it defines the semantics of the bundle (that is, how are the promises in it interpreted), as well as the promise type sections it can contain. All bundles can receive an arbitrary number of arguments. If no arguments are needed, the parenthesis are optional.
The bundle types defined by CFEngine are:
agent-
Bundles of type
agentare “executable” bundles that can be called from the mainbundlesequencedeclaration, or as method calls in themethods:section of another agent bundle. In this respect they could be compared to subroutines in other programming languages. They are the most extensive and powerful type of bundle, and the ones that actually implement any changes that we want to make in the system. These bundles can contain the following promise types:
commands:to specify commands to be executed
files:to edit and manipulate files
methods:to call other agent bundles
packages:to query and manipulate software packages in the system
processes:to query and manipulate running processes
storage:to query and configure file systems
services:to configure system services in Unix-like systems (CFEngine Enterprise also supports Windows system services)
databases:to manipulate and configure databases
guest_environments:to manipulate and configure virtual environments
common-
Bundles of this type are just like
agentbundles, but are special in two ways:The variables and classes defined in them are automatically available to every other bundle in your policy.
They are evaluated by all the CFEngine components (
cf-agent,cf-serverd,cf-monitord, etc.)
For these reasons, they are a good place to define globally useful variables and classes. For example:bundle common g { vars: "localdir" string => "/usr/local"; "confdir" string => "/etc"; classes: "testhost" or => { "testhost1", "testhost2" }; }
This example defines two variables with strings that will be useful in other parts of the policy, and which we can reference as $(g.localdir) and $(g.confdir) (in general, any variable can be accessed from anywhere else by prefixing it with the name of the bundle where it was defined). Also defined is a class based on whether either of the classes testhost1 or testhost2 is defined (this would be the case if the current host has any of those names, and is a common way of defining a class for a certain group of hosts—-more on this in Defining Classes for Groups of Hosts). This class is automatically made global, which means it can be used in any other bundle.
All variables in CFEngine are local to the bundle in which they are defined. However, they can be accessed from any other bundle by prefixing them with the bundle name in which they are defined, separated by a dot, as in $(g.localdir).
Most classes in CFEngine are local to the bundle in which they are defined, and they cannot be accessed from anywhere else (there is no mechanism for specifying the bundle of a class). The exceptions are:
- Classes defined in a
commonbundle are automatically global.
- Classes defined by the
classesattribute in a promise (as a result of its status) are automatically global. This is useful because these classes are commonly used as a signaling mechanism across promises and bundles.
|
Note that |
edit_line-
Bundles of type
edit_linecan be used to change a file, one of the most common and most complex operations performed by CFEngine. These bundles must be specified as the value of theedit_lineattribute in a file-editing promise (this is, a promise of typefiles:).edit_linebundles themselves can be quite complex and contain their own set of allowable promise types, which include:
insert_lines:to add lines to a file
delete_lines:to remove lines from a file
field_edits:to make field-oriented changes in a file
replace_patterns:to make regular expression substitutions in a file
server-
Bundles of type
servercontrol the behavior of thecf-serverdprocess, which has the task of serving files to other CFEngine machines that request them (cf-serverdnormally runs on the CFEngine policy hub). This type of bundle can contain two promise types:
access:to define access permissions to different resources on the server.
roles:to define which users can indicate classes (and which classes they can define) in the server process, to alter the behavior of thecf-serverddaemon. One of CFEngine’s strong security features is that remote machines can never execute arbitrary commands. Instead, they can execute certain bundles. Some users, as defined byroles:promises, may have the ability to set custom classes when invoking those remote promises, thus allowing them to modify the promises’ behavior, but only as allowed by the remote bundle and its handling of the defined classes.
monitor-
Bundles of this type are supported in CFEngine community as of 3.10.0. They define custom parameters that CFEngine can monitor automatically, and specify how to react to changes in their values. CFEngine natively knows how to monitor a some system values, such as CPU and memory utilization. This type of bundle supports only one section called
measurements:, which contains promises defining what and how to monitor it, and how to react to changes.
Certain generic promise types are allowed in all bundle types:
vars:to define variables
classes:to define classes
reports:to define produced output
meta:to define metadata about a bundle.
Bodies
Bodies are collections of attributes and values that can be used as values to other attributes. Bodies cannot contain promises nor sections, although they can receive arguments, and can contain class expressions to specify different values for some of the attributes. Bodies, just like bundles, have a type, which indicates the attribute to which they can be passed, as well as the attributes they can contain. The generic structure of a body is:
body type name(arguments)
{
  attribute1 => value1;
  attribute2 => value2;
  ...
[class_expression::]
  attributeN => valueN;
}
Some common bodies you will use include:
-
controlbodies are special structures that are not referenced in any promises, but that control the behavior of different aspects of CFEngine itself. There are different types of control bodies, depending on the component whose behavior they control. The one you are bound to use is thecommon controlbody. Among other things, it is in this body that you specify which bundles will be executed in your policy and in which order, using thebundlesequenceattribute, and which additional files to read, using theinputsattribute:body common control { inputs => { "tests.cf" }; bundlesequence => { "test" }; }
This block tells CFEngine to load the file
tests.cfand to execute thetestbundle. Every CFEngine policy needs to have abundlesequencedefinition, and this is most commonly done through a [common control](https://docs.cfengine.com/docs/3.12/search.html?ie=UTF-8&q=common control) body. (You can also specify it with the-boption tocf-agent, but I normally do this only when testing policy components.)As you might imagine, [
common control](https://docs.cfengine.com/docs/3.12/search.html?ie=UTF-8&q=common control) supports many other attributes that specify global CFEngine behavior. There are alsocontrolbodies for specific CFEngine components, including the following:
agent controlbodies to specify promise-evaluation behavior such as minimum time between consecutive evaluations of the same promise (ifelapsed), classes that tell CFEngine to abort (abortclasses), and many others.
server controlbodies to specify server behavior, such as addresses and users from which connections will be allowed (allowconnects,allowusers) and the interface to which thecf-serverdprocess should bind (bindtointerface).Others such as [
monitor control](https://docs.cfengine.com/docs/3.12/search.html?ie=UTF-8&q=monitor control),runagent control, [executor control](https://docs.cfengine.com/docs/3.12/search.html?ie=UTF-8&q=executor control),hub controland [file control](https://docs.cfengine.com/docs/3.12/search.html?ie=UTF-8&q=file control).
-
classesbodies specify which classes will be defined depending on the outcome of a promise. These bodies are valid attributes for all promise types. For example, consider the following file promise:"/var/run/somefile" create => "true", classes => passfail;
- In this case,
passfailis the name of a body, of type
classes, that needs to be defined somewhere else. For example:body classes passfail { promise_kept => { "fileexisted" }; promise_repaired => { "filecreated" }; repair_failed => { "fileerror" }; }
- There are several things you should notice here. First, the type of the body part is
classes, which means it can be used only as the value of aclassesattribute in a promise. The namepassfailis an arbitrary identifier. The documentation for the classes body type lists the attributes it can contain. In this case, if/var/run/somefilealready existed (the promise was kept), thefileexistedclass will be defined after the promise runs. If/var/run/somefiledid not exist and CFEngine was able to create it (the promise was repaired),filecreatedwill be defined. And if the file cannot be created for some reason (the repair failed), thefileerrorclass will be defined. These classes can be used later on to control other promises. And more importantly, thepassfailbody can be used in many different promises, allowing for encapsulation and code reutilization.
An important thing to notice is that body parts can also have parameters, which allows even further customization of their behavior. For example, suppose we want the repaired/kept/failed classes to contain an arbitrary identifier to help us differentiate among multiple file checks. We could define passfail as follows:
body classes passfail(id)
{
  promise_kept     => { "$(id)_existed" };
  promise_repaired => { "$(id)_created" };
  repair_failed    => { "$(id)_error" };
}
We would then have to modify the files promises to something like this:
"/var/run/somefile"
  create => "true",
  classes => passfail("somefile");
Now "somefile" is being passed as an argument to the passfail body part, and used as part of the class names to define. This means that depending on the result of the promise, the classes somefile_existed, somefile_created or somefile_error will be defined, instead of the generic names we had used before.
The |
-
actionis another attribute that can be used in any promise, and defines how the promise should be evaluated and fixed. Using it we can define that promises should only be checked but not fixed, whether the actions related to the promise should occur in the background, how often promises should be checked, logging behavior for the promise, and other attributes. For example, the following promise will warn if a certain line does not exist in/etc/motdbut will not fix it, and will issue the warning only every hour, even if CFEngine checks more frequently:bundle agent test { files: "/etc/motd" edit_lines => insert_lines("Unauthorized access will be prosecuted."), action => warn_hourly; } body action warn_hourly { # Produce warning only, don't fix anything action_policy => "warn"; ifelapsed => "60"; }
-
copy_fromis an attribute that can be used only infiles:promises, and indicates from where and how a file will be copied. It is an extremely flexible attribute, since it allows us to request local or remote file copies, how the files will be compared, whether the file will be encrypted in transit, and many other parameters. For example, the following two bodies are from CFEngine’s standard library:body copy_from secure_cp(from,server) { source => "$(from)"; servers => { "$(server)" }; compare => "digest"; encrypt => "true"; verify => "true"; } body copy_from remote_cp(from,server) { servers => { "$(server)" }; source => "$(from)"; compare => "mtime"; }
Both handle copying files from a remote server, and take both a server address and a source file as arguments. The first one specifies that the connection will be encrypted (using an internal CFEngine mechanism), that the files will be verified after copying them, and that files will be compared by computing a cryptographic hash of their contents. The second one is simpler, indicating no need for encryption or verification, and the comparison will be made using simply the time of last modification (
mtime) of both files. The former, more expensive verification mechanism allows us to reliably detect changes in the files in cases when their modification date might not be a reliable indicator. In both cases, the comparison mechanism allows CFEngine to skip the expensive copy operation if the files already match.
-
depth_searchis another attribute offiles:promises that allows us to control recursive operations. It specifies how deep to traverse, which directories to skip, and other parameters. For example:body depth_search recurse_ignore(d,list) { depth => "$(d)"; exclude_dirs => { @(list) }; }
This definition specifies that only directories up to
$(d)levels deep will be traversed (the special string"inf"can be used to specify infinite recursion), and allows the caller to specify a list of directories to exclude.
Putting copy_from and depth_search together, we can already create a working file-copy promise:
bundle agent update_inputs
{
 vars:
   "server"  string => "10.1.1.1";
   "inputs" string => "/var/cfengine/masterfiles/inputs";
 files:
   "$(sys.workdir)/inputs"
     copy_from => remote_cp("$(server)", "$(inputs)"),
     depth_search => recurse_ignore("inf", { "_.*" });
}
Here we will be copying all files from the directory /var/cfengine/masterfiles/inputs on server 10.1.1.1 onto the local /var/cfengine/inputs directory ($(sys.workdir) is an internal variable that CFEngine defines to be its working directory, normally /var/cfengine). A recursive copy of infinite depth will be done, but all directories starting with an underscore (_) will be ignored (the patterns provided have to be regular expressions and not shell metacharacter expressions, hence the _.* instead of just _*). Note that it is not possible to use depth_search in conjunction with edit_line. For editing files, the precise file to be edited needs to be specified.
-
edit_defaultsis an attribute offiles:promises that controls parameters of the file-editing process. You can specify whether backups should be made of the original file, the maximum size of a reasonable file for editing, and whether the file should be emptied and recreated every time. In the following example, timestamped copies of the file will be kept every time the file is changed:bundle agent editexample { files: "/etc/motd" create => "true", edit_line => insert_lines("Unauthorized use will be prosecuted"), edit_defaults => backup_timestamp; } body edit_defaults backup_timestamp { empty_file_before_editing => "false"; edit_backup => "timestamp"; max_file_size => "300000"; }
-
edit_fieldis an attribute offield_edits:promises that performs field-based editing in a file (it must be specified as an attribute in a promise of typefield_edits:, which in turn is allowable only insideedit_linebundles). It specifies what characters to use as delimiters and which actions will be taken on which fields. For example, the following definition from the Standard Library performs generic field-editing operations using user-provided information:body edit_field col(split,col,newval,method) { field_separator => "$(split)"; select_field => "$(col)"; value_separator => ","; field_value => "$(newval)"; field_operation => "$(method)"; extend_fields => "true"; allow_blank_fields => "true"; }
The split argument specifies a regular expression to use as separator (thus it gets assigned to the field_separator attribute), col indicates the column on which to operate and gets assigned to select_field (by default CFEngine starts counting from one, although this behavior can be changed using the start_fields_from_zero attribute in the edit_field body), newval indicates the value to insert or delete from that field (it gets used for field_value, each field can contain multiple values separated by value_separator, a comma in this case), and method indicates which operation to perform (set, delete, append, prepend, etc.).
The col() body definition can be used to edit colon-separated files, such as /etc/passwd in Unix systems. This set_user_field() bundle is also defined in the Standard Library:
bundle edit_line set_user_field(user,field,val)
{
 field_edits:
   "$(user):.*"
     comment => "Edit a user attribute in the password file",
     edit_field => col(":","$(field)","$(val)","set");
}
This bundle takes three arguments: the user to edit (user), the field number to edit (field), and the value to set in that field (val). In field_edits: promises, the promiser is interpreted as a regular expression that is matched against all the lines in the file, to select which lines to edit. In this case, the value of the $(user) parameter is used to select the line that starts with that string, followed by a colon and any other text ("$(user):.*" —-the pattern is automatically anchored by CFEngine to the beginning and end of the line, so there is no need for the ^ character to specify that the pattern must start at the beginning of the line). Once a line is selected, the edit_field attribute uses col() to perform the actual field-change operation, The separator is specified as a colon, the field number and the new value are passed directly from the arguments $(field) and $(val), and the operation to perform is "set", which tells CFEngine to replace the old value of the field with the new one.
To put this in context, note that set_user_field() is an edit_line bundle, which means it has to be used as the argument to the edit_line attribute of a files: promise. For example:
files:
    # Set the 7th field (shell) of user "nobody" to "/bin/false"
    "/etc/passwd"
      edit_line => set_user_field("nobody", "7", "/bin/false");
Many other body attributes are allowed in CFEngine for different promise types. I have shown here some of the most common ones, but you can find the full listing and details in the CFEngine Reference documentation.
The distinction between bundles and bodies can be confusing at first. Remembering these points may help:
Bodies are named groups of attributes, whereas bundles are collections of promises. Promises are the units that actually do something in CFEngine (for example, run a command or add a line to a file), whereas attributes specify characteristics of how things are done (for example, whether to run the command in a shell, or where in the file to add the line).
The value of an attribute can be a basic data type (string, integer, list, container, etc.), it can be the name of a body, or it can be the name of a bundle.
The type of an attribute’s value is fixed, and determined by the attribute itself (for example, the value of the
depth_searchattribute in afiles:promise is always a body, and the value of anedit_lineattribute is always a bundle).Bodies can inherit attributes from other bodies by using the
inherit_fromattribute. In this way you can modularize and better structure your body definitions.
For bodies and bundles, their type is always the name of the attribute to which they correspond. For example, bodies to be used with the
depth_searchattribute are always declared asbody depth_search xyz, wherexyzis an arbitrary name of your choosing. The same goes for bundles: bundles to be used with theedit_lineattribute are always declared asbundle edit_line xyz.
Namespaces
By default, all bodies, bundles, and classes in CFEngine exist in a common namespace. This makes it easy to call bundles and bodies from anywhere in the policy. However, as a policy grows in size to handle a large or complex infrastructure, and particularly if multiple people are in charge of writing policies, the possibility for naming conflicts increases—-for example, it becomes entirely possible that a bundle named restart_service will be defined in two different files that correspond to different services.
To avoid this problem, files can be assigned to /namespaces/. Bundles, bodies, and global classes with the same name can coexist, as long as they are in separate namespaces. To declare a namespace for the current file, you use a [body file control](https://docs.cfengine.com/docs/3.12/search.html?ie=UTF-8&q=body file control) declaration, like this:
body file control
{
        namespace => "name1";
}
If no namespace declaration is found, the default namespace is used. Note that the namespace declaration is placement-sensitive: it affects everything on the file after its appearance, and it can appear multiple times in a single file. This means that you can in principle declare bundles and bodies belonging to different namespaces in the same file. I strongly advise against this practice to avoid confusion, and recommend limiting each file to a single namespace, if any, by placing the body file control declaration at the top.
When you call a bundle or a body, CFEngine will look for it only in the current namespace (whether it’s default or a declared one). To access things in a different namespace, you need to prepend their names with the namespace, separated by a colon. For example:
methods:
  "any" usebundle => namespace:bundle("arg");

files:
  "/tmp/file"
    create => true,
    perms => namespace:myperms;
Note that namespacing also affects global classes: they will be global only within the namespace in which they are declared. Global classes from other namespaces can also be used by prefixing them with the namespace, separated by a colon.
|
Bundles and bodies in the CFEngine Standard Library are declared in the default namespace. To call them from a namespaced file, you need to explicitly prefix them with |
We will not use namespaces in the examples in this book, to keep things simple. However, namespacing is a powerful mechanism that will help you grow your policies with a minimum of naming conflicts, so I encourage you to use them whenever appropriate.
Normal Ordering
CFEngine does not have any flow control statements, at least not in the sense with which you may be familiar from imperative programming languages (the concept of implicit flow control may be familiar to you if you have done any declarative programming before, for example in Prolog). A lot of the behavior of CFEngine is hard-coded, and this includes the order in which things are evaluated. This is called normal ordering, and is determined based on what makes sense for different types of bundles and promises. For example, it makes no sense to first create a file and then delete it, while it makes sense to first delete it and then create it again. Normal ordering can, if needed, be overriden by defining classes after an operation completes, and then defining other operations based on that class (for details, see Controlling Promise Execution Order).
Bundles of type common are a good place to define variables and classes that will be accessible to all other bundles in the policy. Variables defined in common bundles are accessible from other bundles (just like all variables) by prefixing them with the bundle name, as in $(bundle.variable). For classes, the rules slightly more complicated, but easy to understand:
In
commonbundles, classes defined byclassespromises are by defaultnamespacescoped (i.e. they can be used from any bundle in the current namespace). They can bebundlescoped (made accessible only from the current bundle) by using thescopeattribute.In
agentbundles classes defined byclassespromises are by defaultbundlescoped. They can benamespacescoped by using thescopeattribute.In all bundles, classes defined as the result of a promise via a
classesbody are by defaultnamespacescoped. They can bebundlescoped by using thescopeattribute.
|
CFEngine has mechanisms to detect variable/class dependencies and a best-effort algorithm to make sure all necessary values are available before an expression or promise is evaluated. You can help it ensure consistency and convergence by including bundles of type |
CFEngine executes agent bundles three times in an attempt to achieve a convergent state. In each iteration, the sections in the bundle will be executed in the following order:
Within edit_line bundles, the following order will be kept:
Within each section, promises will be executed in the order in which they appear in the policy. Multiple executions of each bundle mean that you can, for example, define a variable, then define a class based on that variable, and then define other variables depending on that class.
Within server bundles, the normal ordering is as follows:
|
Within monitor bundles, the normal ordering is as follows (sections marked with * are only available in CFEngine Enterprise):
Normal ordering provides a fairly rigid structure to the execution of CFEngine policies. It is common when you first start writing CFEngine policies, particularly if you are familiar with imperative programming, to try to “fight” the normal ordering to fit what you want to do. When you encounter a case in which you are positive that normal ordering needs to be changed, I encourage you to back up and rethink at a higher level the task you want to accomplish. Most of the time, you will find that structuring the task in some other way will make the need to reorder operations go away, and will in fact make more sense with the way CFEngine “thinks.”
Looping in CFEngine
One of the most evident examples of “thinking in CFEngine” is the concept of implicit looping. It is one of the most basic behaviors, one of the most confusing to a CFEngine beginner, and one of the most powerful once you harness it.
First, let us define it: in CFEngine 3, if you refer to a list variable (normally called @(var)) as a scalar ($(var)), CFEngine interprets it to mean “iterate over all the values in the list.”
Let’s try it. Type in the following policy:
bundle agent main
{
 vars:
   "colors" slist => { "red", "green", "blue" };
 reports:
  cfengine::
   "$(colors)";
}
Now run it:
# cf-agent -K -f ./src/looping1.cf
R: red
R: green
R: blue
The lines that start with "R: " indicate messages produced by the reports: promises in the policy. You can see that the single promise in the reports: section has been repeated for every value in the list, therefore printing all the values.
You can also try nested looping:
bundle agent main
{
 vars:
   "colors" slist => { "red", "green", "blue" };
   "tone"   slist => { "dark", "light" };
 reports:
  cfengine_3::
   "$(tone) $(colors)";
}
This returns the following:
# cf-agent -K -f ./src/looping2.cf
R: dark red
R: dark green
R: dark blue
R: light red
R: light green
R: light blue
Simple enough, isn’t it? In this explicit example, the behavior is clear. The real power of implicit looping comes when you realize that it can be used in any type of promise, and that it means the whole promise will be executed as many times as there are items in the list. Also, the looping variable can be used anywhere—-in defining variables or classes, in executing commands, or in making decisions with classes.
Let’s look at a real example in which implicit looping saved the day (this was, incidentally, the time when this really “clicked” in my head as I was starting with CFEngine 3). I needed to determine which network interface in a system was configured in a certain network segment, to apply some configuration commands.
CFEngine has a built-in array variable called sys.ipv4 that contains the IP addresses of all the network interfaces in the system, indexed by interface name. My first thought was that I needed a function that gave me all the values stored in this array, so I could compare them against my desired IP address range and find the one I needed.
To my surprise, I realized that CFEngine has a getindices() function, but no equivalent getvalues() function (actually this function was added as of version 3.1.5, but wasn’t available when I came up with this solution, and in any case this is much more elegant). After turning the problem over a lot in my head, I came to the realization that the getvalues() function is not needed in this case. Here is the code I came up with:
bundle agent find_netif
{
 vars:
   "nics" slist => getindices("sys.ipv4");
   # Regex we want to match on the IP address
   "ipregex" string => "172\.17\.0\..*";

 classes:
   "ismatch_$(nics)" expression => regcmp("$(ipregex)",
                                          "$(sys.ipv4[$(nics)])");

 reports:
  cfengine::
   "NICs found: $(nics) ($(sys.ipv4[$(nics)]))";

   "Matched NIC: $(nics) ($(sys.ipv4[$(nics)]))"
     if => "ismatch_$(nics)";
}
If you run this, you will see something like this (the “Matched” lines would depend, of course, on the actual IP addresses in your machine):
# cf-agent -b find_netif -K -f ./src/find_netif.cf
R: NICs found: lo (127.0.0.1)
R: NICs found: eth0 (172.17.0.2)
R: Matched NIC: eth0 (172.17.0.2)
Let us look at this in detail.
First, we get a list (using
getindices()of all the network interfaces in the system, and store it in the nics variable. We also assign into ipregex the regular expression for the IP address range I want to match (in this case, 192.168.1.*).Then we use this list, referenced as a scalar, in the
classes:promise, to define a number of classes named after each of the interfaces, by using$(nics)in the class name itself. The definition of the class depends on whether the IP address of that network interface ($(nics)is used again in the call to theregcmp()method) matches the regular expression of the IP address I want to find. The result is that, for each NIC on the system, the corresponding class is defined if its IP address matches, and undefined if it does not.
- Finally, we print all the interfaces by using
$(nics)in a report message, and we also print only the matching ones by conditioning the second message using theif => "ismatch_$(nics)"attribute. The reference to$(nics)in theifattribute is also expanded to each value in turn, so the second message is printed only for those NICs whose corresponding class is defined.
So you see, we do not need the getvalues() function after all. In this example I used the defined classes to print messages, but in my real example I used them to append the appropriate configuration statements to a file—-but only for those interfaces that matched the IP range I wanted.
I encourage you to look at that example again, and make sure you understand it. There are no looping constructs anywhere—-in fact, they do not exist in the CFEngine syntax at all. It may take a while getting used to this. Whenever you are constructing a policy and you think “I definitely need a while loop to do this,” take a step back and see whether you can recast the problem using implicit looping. The definition of classes based on a condition using implicit looping is a powerful technique, and you will see it used in many of the examples in this book.
|
Prior to CFEngine 3.3.0, looping was allowed only for local lists (those declared in the current bundle). Starting with 3.3.0 this limitation was removed, and you can now loop over lists from any bundle, provided that you properly qualifiy its name with the bundle name where it is declared ( |
Thinking in CFEngine
As we have seen, CFEngine imposes a rigid structure on many aspects of its operation. Two prime examples are normal ordering and implicit looping, which help get rid of the need for explicit control flow statements. For the most part, you do not tell CFEngine how to do things. Rather, you tell it what you want to achieve and write out the low-level building blocks of how to achieve certain promises, and CFEngine will put them together for you to bring the system to the desired state.
If you are like me, you have been programming for some time before you encountered CFEngine, and your brain is wired to think about problems and tasks in a certain way. This will almost inevitably cause a clash when you have to “let go” of the control and lend it over to CFEngine.
I have personally found that what works for me is to step back from the details of the task at hand, and think at a higher level: “what am I trying to achieve?” Often this gives a different perspective on why you are doing certain things, and how you are trying to achieve them. My main advice is to keep practicing, and to use the community resources available to study examples and to get feedback on your promises from more experienced users.
Clients and Servers
One of CFEngine’s key strengths is autonomy. A machine in which CFEngine is installed and configured does not need a network connection to operate, and as long as its policies are well defined, it will continue to obey those policies and maintain the system as configured. For instance, a laptop that is sometimes connected to the company network, but is also often away, will continue to benefit from CFEngine running on it.
However, the true power of CFEngine lies in its ability to manage thousands of machines with very little effort, and for this you need to distribute the corresponding policies to all those hosts. Fortunately, CFEngine makes it very easy to set up a client-server environment in which one or more hosts act as policy hubs, distributing policies and data to others. As we saw in Finishing the Installation and Bootstrapping, all it requires is a single command to configure CFEngine and tell it which machine to use as its policy hub:
# cf-agent --bootstrap x.y.z.w
|
Prior to CFEngine 3.5.0 the bootstrapping options were different. This is the command you have to run for older versions: # cf-agent --bootstrap --policy-server x.y.z.w
|
This command works on both the policy hub itself and its clients. In the hub, cf-agent will recognize its own IP address and configure the host as a policy hub.
In its simplest form, and one perfectly suitable for all but the largest of organizations, you can have a single policy hub with multiple clients fetching policies and files from it, as shown in the following figure.
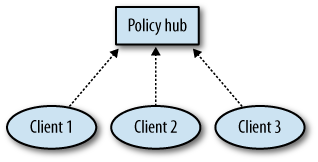
In larger and more complex environments, you can have a more complex structure. A CFEngine policy hub can itself be a client for some other hub, thus creating a hierarchy of CFEngine policy distribution points, as shown next.
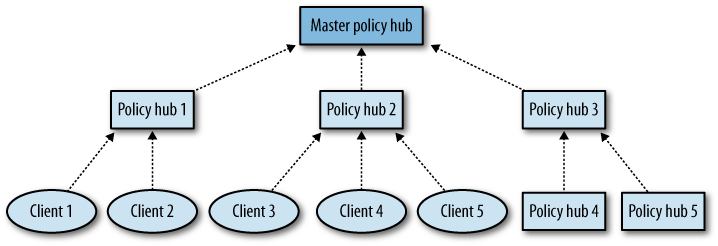
The need for a hierarchical structure could be dictated by technical requirements (e.g., geographically disperse sites, low-bandwidth links between them, traffic blocking) or administrative needs (e.g., different teams in charge of different locations, needing to make their own customizations to the top-level inherited policies). CFEngine is flexible enough to accomodate any of them. Ideally, all the policy files should propagate from the top-level, where they are maintained in a master repository, but you could also have several disjoint trees in your organization.
CFEngine follows a strict pull-only philosophy: only the client can make requests to the server, asking for the information and files it needs. The server cannot push anything onto the clients. This convention makes it very simple to configure the network to allow communication between CFEngine clients and servers. Only one port—-TCP/5308—-is necessary for the client to connect to the server. All communication, including file transfers, takes place through this port.
The |
The decision to only allow the clients to pull from the server (and not the server to push things onto the clients) is also rooted in promise theory. An entity cannot make promises about anyone other than itself. Because of this, the operation of a distributed system cannot depend on one entity forcing others to do something. Entities may request information from others, but they may make promises only about their own behavior. Voluntary cooperation is one of CFEngine’s core principles.
On the other hand, CFEngine is designed with resilience and graceful degradation in mind. If a client becomes disconnected from the network, CFEngine continues managing it using the latest locally-stored version of the policies until it restores connectivity. This allows clients to continue working during network outages, network congestion, security incidents, or other circumstances that may prevent connectivity to the master policy hub.
CFEngine Server Configuration
The CFEngine server functionality is provided by the cf-serverd process. It is configured using a [server control](https://docs.cfengine.com/docs/3.12/search.html?ie=UTF-8&q=server control) body block like in the following example, taken from the default configuration provided with CFEngine (this is part of the /var/cfengine/inputs/controls/cf_serverd.cf file generated when you bootstrap CFEngine):
body server control
{
     denybadclocks         => "false";
     allowconnects         => { "127.0.0.1" , "::1", @(def.acl) };
     allowallconnects      => { "127.0.0.1" , "::1", @(def.acl) };
     trustkeysfrom         => { "127.0.0.1" , "::1", @(def.acl) };
     skipverify            => { ".*$(def.domain)", "127.0.0.1" , "::1",
                                @(def.acl) };
     allowusers            => { "root" };
     maxconnections        => "100";

   # Uncomment the line below to allow remote users to run
   # cf-agent through cf-runagent

   # cfruncommand          => "$(sys.cf_agent)";
}
|
The default policy files produced by CFEngine when you bootstrap a client are an excellent starting point and provide a lot of basic functionality. I advise you to go over them and try to get at least a general understanding of what they do. Most of the parts you may need to customize are in |
This body defines the set of machines from which connections will be allowed allowconnects), those that will be allowed to connect multiple times simultaneously allowallconnects),1 those whose public keys will be trusted if they have not been seen before trustkeysfrom) and those whose DNS record will not be checked for consistency skipverify). Also specified are the maximum number of simultaneous connections maxconnections), the users that will be allowed to connect allowusers), and whether machines with out-of-sync clocks will be blocked denybadclocks).
Additionally, per-directory and per-file ACLs can be defined in the access_rules() bundle, whose default version contains the following:
bundle server access_rules()
{
 access:
  any::
   "$(def.dir_masterfiles)"
     handle => "server_access_rule_grant_access_policy",
     comment => "Grant access to the policy updates",
     admit => { ".*\.$(def.domain)", @(def.acl) };
 roles:
}
This bundle contains promises of type access:, which define the ACLs to apply. In this case, directory $(def.dir_masterfiles) (which expands by default to /var/cfengine/masterfiles) will be accessible by all machines in the $(def.domain) domain, plus those defined explicitely in the @(def.acl) list.
Note that most of these parameters include the @(def.acl) and $(def.domain) variables. These are references to the acl and domain variables defined in the def() bundle, which is defined in /var/cfengine/inputs/def.cf:
bundle common def
{
 vars:
   "domain"  string => "example.com",
     comment => "Define a global domain for all hosts",
     handle => "common_def_vars_domain";
   "acl" slist => { "$(sys.policy_hub)/16" },
     comment => "Define an acl for the machines to be granted accesses",
     handle => "common_def_vars_acl";
   "dir_masterfiles" string => translatepath("$(sys.workdir)/masterfiles"),
     comment => "Define masterfiles path",
     handle => "common_def_vars_dir_masterfiles";
}
You are expected to edit the def() bundle before putting CFEngine into production, in particular two values:
- The $(domain) variable must contain the domain name of your current environment. This is used in the code shown earlier to limit access to machines from this domain. It is also used in some other contexts in the default
promises.cffile.
- The @(acl) variable is a list containing all the IP addresses that should have access to the server. This promise uses the value of
$(sys.policy_hub)(an automatically-set variable that contains the IP address of the hub from which the host was bootstrapped) and determines its local class-B network (/16). The assumption is that the policy hub will in most cases be in the same network as the client. Of course, this range may well be too broad or too narrow according to your needs, so you must edit it accordingly.
You can also define these parameters using the def.json file, formally known as augments. Instead of modifying def.cf, you can create /var/cfengine/masterfiles/def.json in your server with the corresponding values, like this:
{
    "vars": {
        "domain": "example.com",
        "acl": [ "$(sys.policy_hub)/16" ],
        "dir_masterfiles": "$(sys.workdir)/masterfiles"
    }
}
Updating Client Files from the Server
One of the main tasks of the policy hub is to distribute policy files, and any other necessary files, to its clients. This is a crucial operation, since it makes it possible to update files on the hub and have them propagate automatically to all the clients. To this effect, CFEngine provides ample capabilities for efficient and secure file transfer.
The default policy installed with CFEngine contains a bundle called cfe_internal_update() which is executed on the clients (remember that the CFEngine policy hub cannot instruct the clients to do anything). It takes care of all these tasks automatically, but you may want to modify it according to your needs. It is contained in the file /var/cfengine/inputs/update.cf, and in a nutshell these are the tasks it performs:
Check whether the host key files exist (under
/var/cfengine/ppkeys/), and runcf-keyto create them if they are not present.Start the
cf-serverd,cf-monitordandcf-execdprocesses if they are not running.Copy updated files from
/var/cfengine/masterfiles/on the policy hub to/var/cfengine/inputs/on all machines (both the clients and the policy hub) to put them in production.Symlink CFEngine binaries from
/var/cfengine/bin/to/usr/local/sbin/for easier access.Ensure all critical directories and files have the correct permissions.
For now we will look only at the file-copying operations, but I encourage you to read through the whole bundle to get an idea of what it does. These are the crucial parts:
bundle agent cfe_internal_update
{
 vars:
   "inputs_dir"
     string => translatepath("$(sys.workdir)/inputs"),
     comment => "Directory containing Cfengine policies",
     handle => "update_vars_inputs_dir";
   "master_location"
     string => "/var/cfengine/masterfiles",
     comment => "The master cfengine policy directory on the policy host",
     handle => "update_vars_master_location";
 files:
   "$(inputs_dir)"
     comment => "Copy policy updates from master source on policy server",
     handle => "update_files_inputs_dir",
     copy_from => u_rcp("$(master_location)","$(sys.policy_hub)"),
     depth_search => u_recurse("inf"),
     file_select  => u_input_files,
     classes => u_if_repaired("update_report");
}
The
$(inputs_dir)variable contains the directory where the local CFEngine installation expects to find its policy files. On Unix/Linux hosts this is normally/var/cfengine/inputs, but the location can vary in different platforms. For this reason, we are using the$(sys.workdir)variable, which is automatically defined to be the base directory of the local CFEngine installation. We are also using the translatepath() function to translate the Unix-style path into the local style (for example, using backslashes instead of forward slashes on Windows).The
$(master_location)variable contains the directory on the policy hub where the “master files” are located, and from where they will be copied to the local host. The policy hub has to be a Unix-style host, so in this case we don’t need to perform any path translation.
- The
files:promise is the one that does the actual work. The promiser is the destination directory$(inputs_dir), to which the files will be copied according to the parameters specified by the promise attributes that follow.
-
The
copy_fromattribute indicates the source of the files. The value of this attribute is a body, defined in the sameupdate.cffile as follows:body copy_from u_rcp(from,server) { source => "$(from)"; compare => "digest"; trustkey => "true"; !am_policy_hub:: servers => { "$(server)" }; }
This body receives as arguments the directory and the host from where the files should be copied. $(master_location) is the variable defined before, and $(sys.policy_hub) is a special CFEngine variable that is set when the client is bootstrapped, as described in #bootstrapping-cfengine. Additionally, it indicates that the files should be compared using a cryptographic digest (compare => "digest"), and that the client should trust the cryptographic keys presented by the server (trustkey => "true"). The servers attribute is set only when the am_policy_hub class is not set, and am_policy_hub is a hard class set only on the policy hub, so the effect is that on the policy hub, the file copy operation will be done locally, from /var/cfengine/masterfiles/ to /var/cfengine/inputs/.
-
The
depth_searchattribute is used to indicate a recursive file copy operation of infinite depth. Its value is another body:body depth_search u_recurse(d) { depth => "$(d)"; exclude_dirs => { "\.svn", "\.git" }; }
The depth attribute is set to the passed argument (which can be a number, or the special value "inf" for infinite recursion). The exclude_dirs attribute is also used to skip version-control directories that may be present in the server (assuming that version control is done using Subversion or Git).
-
The
file_selectattribute is used to control which types of files are copied. This is another body:body file_select u_input_files { leaf_name => { ".*.cf",".*.dat",".*.txt" }; file_result => "leaf_name"; }
In this case we are asking CFEngine to copy only files whose names end with .cf, .dat and .txt. There are many criteria that can be specified in a file_select body, and for this reason we need the file_result attribute to tell CFEngine on which criteria we want to match (in this case it is the only one available).
-
The
classesattribute indicates that if any files are copied (which flags the promise as “repaired”), then theupdate_reportclass should be set. This class can be used in other parts of the policy to execute any actions necessary (for example, produce a report) when the files are updated. This is yet another body that sets the appropriate class: pass:body classes u_if_repaired(x) { promise_repaired => { "$(x)" }; }
File-copy promises are extremely flexible and powerful. Policy and binary updates are automatically handled by the built-in CFEngine policies, but I encourage you to read the documentation for files: promises to get a good idea of the wide range of tasks they can perform.
Why is this bundle in the |
CFEngine Remote Execution Using cf-runagent
One of the basic premises of CFEngine is that clients operate autonomously. If there is a central coordination point, like the policy hub, it is up to the clients to connect to it and fetch policies or files. However, in practice, the server (or some other machine) sometimes needs to “ping” the clients and ask them to do something. This is where cf-runagent comes in. It does not allow arbitrary actions to be executed, but simply asks the remote machine to run cf-agent and evaluate its policies. The remote host (in most cases it would be a CFEngine client) needs to have cf-serverd running and configured to listen for connections from cf-runagent.
Allow me to emphasize this point: cf-runagent does not allow the execution of arbitrary commands or arbitrary actions on a remote host. It simply instructs the host to run cf-agent and start evaluating its policies. This is useful when you don’t want to wait until the next regular execution of cf-agent (for example, critical policy or operating system updates).
The behavior of the cf-runagent command can be configured as part of the CFEngine policy in a [runagent control](https://docs.cfengine.com/docs/3.12/search.html?ie=UTF-8&q=runagent control) body, which allows you to specify, among other things, a list of hosts that will be contacted by default when running the command. On the client side (the one to which the cf-runagent command will connect), the server control body specifies whether cf-runagent connections will be allowed, and what they will be allowed to do. It can also specify a list of remote users that will be allowed to set custom classes when running cf-runagent. This allows more fine-grained control of the policy behavior.
cf-runagent connections are handled by cf-serverd, so if you need this functionality you will also need to open port TCP/5308 traffic from the server to the clients.
Because of its potential security implications, the cf-runagent functionality comes disabled in the CFEngine default policy. To enable it, you need to uncomment the cfruncommand attribute in the server control body, shown in CFEngine Server Configuration:
cfruncommand => "$(sys.cf_agent)";
This instructs cf-serverd to listen for connections from cf-runagent, and to execute cf-agent in response to them (remember that this is all that cf-runagent allows you to do: wake up cf-agent). We still need to instruct cf-serverd to allow access to the cf-agent binary (its path is stored in the special variable $(sys.cf_agent), normally /var/cfengine/bin/cf-agent) from the policy hub. We need to do this in the access_rules() bundle, stored in /var/cfengine/inputs/controls/cf_serverd.cf:
bundle server access_rules()
{
 access:
  any::
...
  "$(sys.cf_agent)"
    handle => "grant_access_policy_agent",
    comment => "Grant access to the agent (for cf-runagent)",
    admit => { "$(sys.policy_hub)" };
}
In this case, we are telling cf-serverd to allow access to the cf-agent binary only to the policy hub, as defined by the special variable $(sys.policy_hub).
Finally, we need to tell the policy hub which hosts to contact by default when cf-runagent is executed. We need to do this explicitly in the runagent control body:
body runagent control
{
    # A list of hosts to contact when using cf-runagent
  any::
    hosts => { "127.0.0.1" };
    # , "myhost.example.com:5308", ...
}
Note that defining this list is not strictly necessary, as the list of hosts can be specified in the command line when running cf-runagent, using the --hail option.
CFEngine Information Resources
CFEngine has been around for a long time, and it has developed a solid body of documentation and information. In addition to community support, the company that was formed to provide commercial support for CFEngine, CFEngine AS, provides extensive documentation and information, most of it free of charge.
One word of caution: Some of the information you find online may still be geared towards CFEngine 2. While you can apply many of the basic ideas, be aware that the syntax of CFEngine 3 is completely different and incompatible with the previous version.
Let’s look at some of the information resources available for CFEngine
Manuals and Official Guides
Most of the documentation made available by CFEngine AS can be found at the CFEngine Documentation web page. The core documentation includes the following:
CFEngine Reference: the most complete and authoritative reference for CFEngine concepts, installation, syntax, and examples.
CFEngine Guide: documents that describe different aspects of CFEngine, including its design, architecture and components, basic language concepts and more.
Apart from the core documents, you will find a growing collection of Special Topics Guides, a series of shorter documents that focus on specific advanced aspects of working with CFEngine. You can find documentation about best practices for different topics, such as team collaboration, integrating CFEngine into change management practices or specific frameworks such as the ITIL standard, reporting capabilities, knowledge management, etc.
CFEngine Standard Library
The CFEngine Standard Library contains implementations of a large number of commonly-used promise bundles and bodies. It includes bundles for tasks such as editing files in common formats, interfacing with common package and service managers, editing text files, and copying files. The standard library allows you to focus on the task at hand without having to worry about the details, and also serves as a fantastic source of examples, based on which you can extend or define your own bundles and bodies for CFEngine configuration. This library is constantly evolving, and users are encouraged to submit changes and additions to it. The CFEngine standard library is hosted in the cfengine/masterfiles repository on GitHub, but is included with the CFEngine distribution, so if you have installed CFEgine from the official packages, the Standard Library is already installed on your macines.
|
The CFEngine Standard Library used to be known as the Community Open Promise Body Library (COPBL). This name is no longer being used, but you may still see some references to it. |
The Standard Library is split into multiple files by promise type. For example, all bodies and bundles related to files: promises are stored in $(sys.libdir)/files.cf (the special $sys.libdir variable defaults to /var/cfengine/inputs/lib, but it may change depending on your installation or the user under which you are running CFEngine). You need to load the parts that you are going to use in your policy, for example:
body common control
{
  inputs => { "$(sys.libdir)/common.cf",
              "$(sys.libdir)/files.cf",
              "$(sys.libdir)/commands.cf" };
}
If you want to load the whole standard library, you can also just load the included stdlib.cf file, which in turn loads the others:
body common control
{
   inputs => { "$(sys.libdir)/stdlib.cf" };
}
The default |
The standard library provides you with most of the basic building blocks for implementing different tasks using CFEngine.
Community Forum and IRC channel
The official CFEngine help forum can be found in Google Groups, at https://groups.google.com/forum/?fromgroups#!forum/help-cfengine, and is a fantastic resource of information and help. Both CFEngine developers and advanced users participate actively in the forum, providing a friendly and fertile ground for newcomers to ask questions and learn about CFEngine, and for experienced users to exchange information, discuss advanced aspects, and provide feedback to the developers.
The official IRC channel is called #cfengine and hosted on http://freenode.net/ (use your favorite IRC client to connect to it). It is a good place to ask questions and have informal discussions with CFEngine users, engineers and developers. I would advise you to post complex questions to the forum, and use IRC only for quick questions or conversations.
CFEngine Bug Tracker
The official mechanism for reporting bugs or feature requests is the CFEngine issue tracker.
Other Community Resources
CFEngine users have also developed and made available an incredible amount of useful resources. Here is the list of some of the most useful ones.
- Neil H. Watson’s CFEngine 3 Tutorial was one of the first tutorials available specifically for CFEngine 3, and provides a very useful, hands-on guide to CFEngine installation and setting up an initial scheme for experimenting.
- Jessica Greer’s Yale University’s CFEngine 3 library shows many real-world examples of bodies and bundles used to maintain Yale’s computers with CFEngine.
- Aleksey Tsalolikhin’s Guide to CFEngine 3 Body of Knowledge is a great collection of links to a lot of the information available about CFEngine 3, including many of the resources already mentioned. Aleksey is a prolific CFEngine expert and trainer.
- As a companion to this book, I would recommend reading and exploring the CFEngine Language Concepts page from CFEngine AS, and to always have the CFEngine Reference pages handy for the full details about the CFEngine policy language.
Normally each host is allowed only one connection at a time.↩︎