1. Introduction
I still remember my first programming lesson. The first sentence the coach said was “computers are not mysterious”. Nobody uses the term ‘mysterious’ to describe computers nowadays. It was the case in 1980’s, computers were rare back then.
We are in the “Information Age” now, where computers are a large part of our lives. It seems to me that programming remains mysterious and difficult to the majority of people despite the fact that they spend most of their work hours in front of computers.
Once you have mastered programming, there are many things you can do, such as:
- Rename hundreds of files with a script instead of doing it one by one
- Generate a nice Excel report from raw data instead of typing it in
- Write a document once and use scripts to generate several different formats: HTML (online), PDF, ePub and Kindle
- Turn on or off certain electronic devices when a certain condition is met
- Write a cool iOS App or game
The bottom line is that when you know how software works you will definitely use computers better.
Before we start, just like my coach, I am telling you that “programming is not mysterious”, and you can master it. I believe this book can guide you to the wonderful programming world.
Like many skills, you cannot master programming by reading the book only, you need to do it. Let’s begin.
1.1 Xcode
Coding Swift requires Xcode 6 or later installed on a Mac computer. Xcode is the integrated development environment (IDE) for developing software for OS X and iOS. Xcode (the latest version to date is 8.0) is available free of charge on the Mac App Store.
1.2 Swift Playgrounds in Xcode
Swift Playgrounds, as its name suggests, is an interactive playground for trying out Swift. In playground, Xcode evaluates code as you write it.
Start a new Playground
- In Xcode, select menu “File” → “New” → “Playground…”
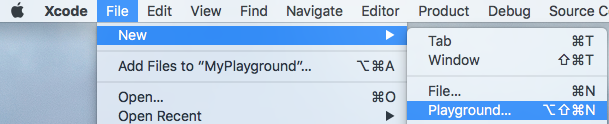
- Select target platform and template
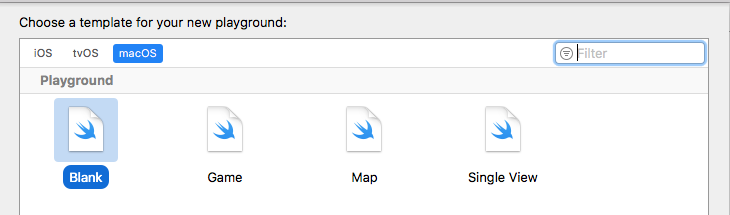
- Choose the location to save the playground
- Playground is shown
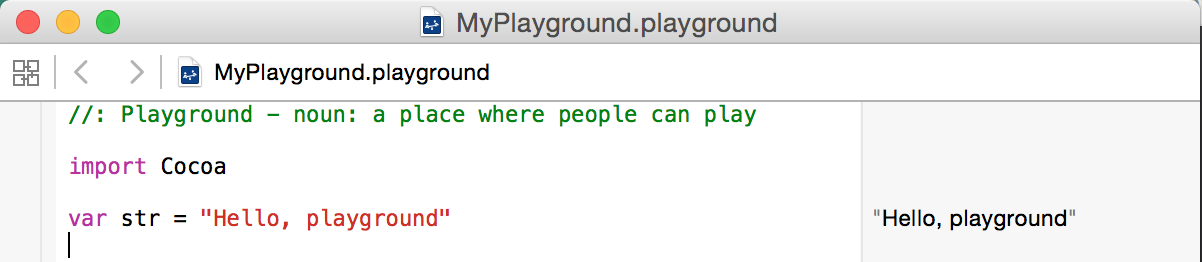
The code in on the left and evaluated output on the right (in a slight darker background).
You are ready to go, type in some Swift code. Xcode supports IntelliSense, i.e. providing code competition and code suggestions.

Show output console
In Xcode Playground, the output of each statement will be shown on the right pane (gray one). To display the whole program’s output, which is always a good idea, show the Debug area as below.

1.3 Swift Projects in Xcode
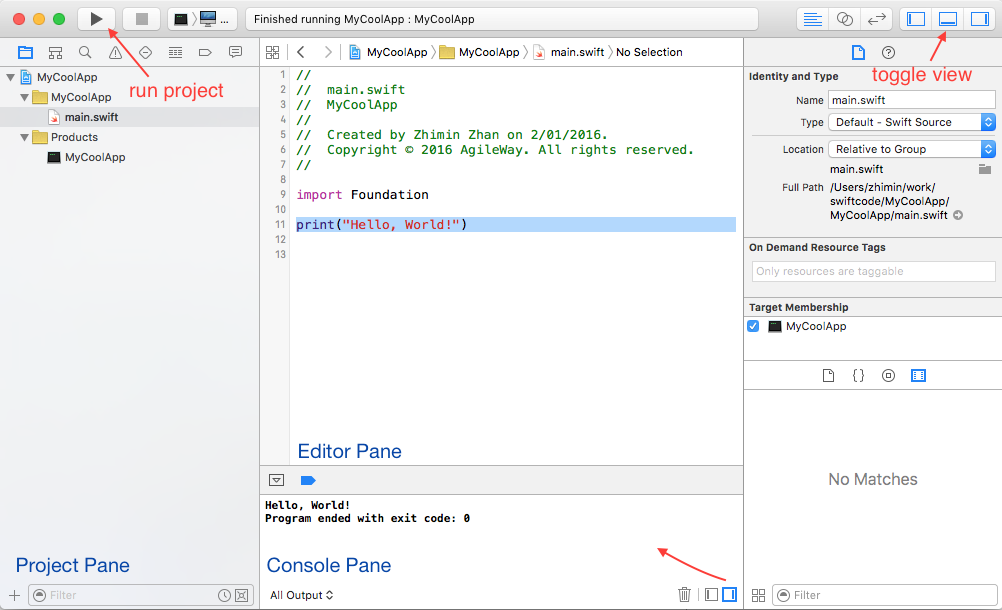
More commonly, we organize code and related files in a folder structure, known as “Project”. When we a Xcode project file (with extension .xcodeproj) in Xcode, all the files in the project are included.
Create a new project
- In Xcode, select menu “File” → “New” → “Project…”

- Select a project template.
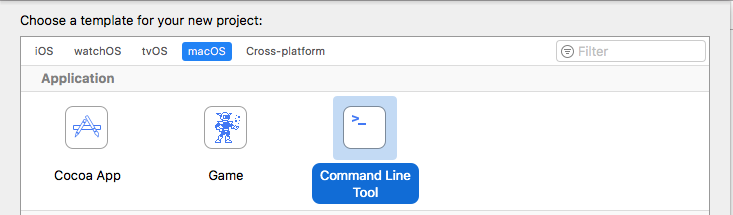
There are quite a number of combinations.
-
macOS - Command Line Tool
The application for running from command line. This will be main project type we will be using up to Chapter 10.
-
macOS - Cocoa App
GUI application on Mac computers.
-
iOS
Apps running on iPhone and iPad.
-
macOS - Command Line Tool
- Enter project name and select destination folder
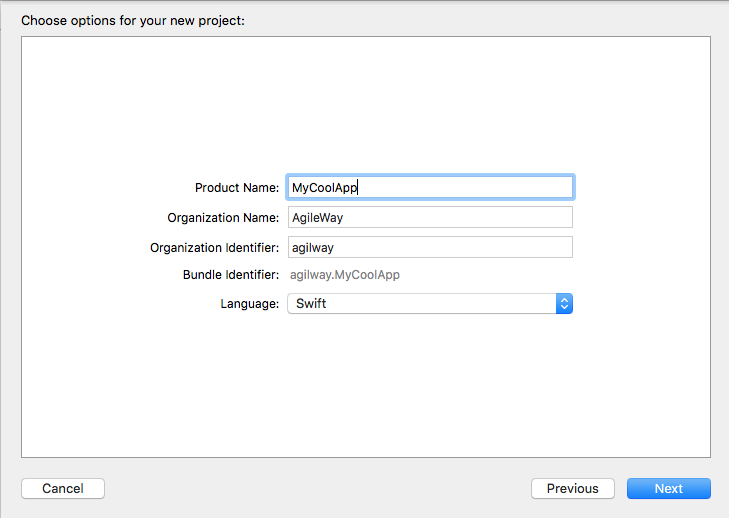
- Project created
1.4 Swift Tutorials
While I believe you can learn basic Swift programming with this book, there are online tutorials that you may use as supplement. For example, read them on your iPad while waiting at bus stops. Here are two good (and free) ones.
1.5 Rhythm for working on the exercises
In the following chapters, each consists of around 5 guided exercises, arranged in order of difficulty. Each guided exercise has five sections:
-
The problem to solve
It usually comes with sample output for easier understanding. Make sure you understand it well.
-
Purpose
What you can learn from this exercise.
-
Analyze
Analyze a problem like a programmer. This is an important step. Quite often we know how to do it but cannot describe it well. Take number sorting as an example; you can sort 5 numbers instantly in head. But how about 100 numbers? This requires you to translate your understanding of sorting step by step into procedures that a computer can execute.
Now write the code for the exercise. No one can learn programming by reading, you have to actually do it. You may refer to the hints section to to help you get through.
-
Hints
Techniques and short executable code that may help you to solve the problem when you get stuck.
-
Solution(s)
Solutions (can be found at Appendix II) to the most of exercises are between 20 to 50 lines of code. The runnable solution scripts can be downloaded at the book site.
If you are struggling to solve an exercise, feel free to check out our solutions (at Appendix II). The exercises are selected to introduce new programming skills/practices as well as previous knowledge. Don’t worry if you cannot get it right the first time, you will have chances to apply in later exercises. As long as you are trying, you are learning.
-
Review
Think about what you have learned, look at the code you just wrote, try apply new-learnt skills to solve similar problems.
1.6 Common Errors
Programmers (new or experienced) encounter code errors every day. I don’t expect you to get the exercises right at the first go. We learn from mistakes.
Typos
It is normal that we make typing mistakes when writing code. Xcode checks the syntax of code before running it. If there are syntax errors in code, the error messages are usually quite helpful for identifying the error. For example, in the code below, line 10 has a typo elwe instead of else.

Xcode highlights compile time errors.

The error message means elwe is undefined (don’t worry if it is not meaningful to you yet, you will understand soon). It helps identify where the error is.
No matching parenthesis or brackets.
Just like Math, if there is a left bracket “(“ in code, there shall be a matching right bracket “)”. There are also matching keywords for certain code structures, such as if { … }. For example, there are two errors in the code below.

- at line 11: missing ‘)’, shall be
(15 - row). - at line 13: missing
}forifat line 8.
Code logic errors
The above two kinds of errors (called syntax errors) are relatively easy to spot, as highlighted in Xcode. The difficult errors for programmers are code logic errors. That is, the code can run without syntax errors, but does not behave as it is supposed to. The ability to debug code errors (find and fix them) separates good programmers from the average. With practice, you will get better on this.
For beginners, I have some practical tips.
-
One step at a time
Write one line of code, run the code immediately. This may sound uninteresting, but in practice, many find it is the most useful tip to learn programming. If newly added or changed code fragment caused the error, a click of ‘Undo’ button (in your editor) will get your code back to previous working state.
-
Work out on paper if necessary
Our brains work differently from computers. We can tell “2, 3, 4, and 6” are actors of “12” (excluding 1 and self) instantly, but we don’t know the “11 and 11443” are factors of “125873”. For computers, there are no differences on calculating the factors for any numbers, because computers follow an algorithm and carry out calculations step by step.
The dilemma is, for many problems, we do know the algorithm, but fuzzy on the details, i.e, the exact steps. When your program is not going anywhere for hours, move away from the computer, get a pencil and start to work out with simple examples. Once you are more clear, turn your understandings into code and try it on the computer.
-
If feeling confused, restart
If you are stuck with existing code, chances are the complexity of the code is beyond your control. Try guessing around to get computers to work as instructed (by your code) is highly unlikely. In this case, it is better to restart from scratch. For most of the exercises in this book, solutions are less than 30 lines of code.
Open terminal
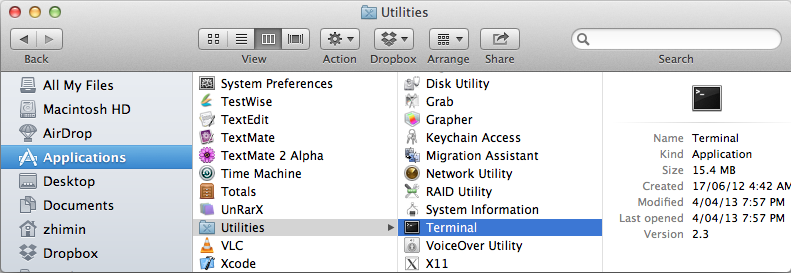
The best way to interact with your programs is from the command line, you might have seen these scenes in some Hollywood movies: hackers typed some commands in some text windows, and something (usually big) happened. That windows that accept user text commands are called terminals.
The application to access the command line in Mac OS X is called ‘Terminal’. Open in Finder: ‘Applications” → ‘Utilities” → ‘Terminal’.
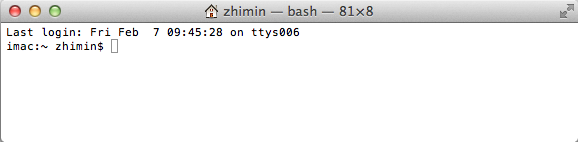
It looks like this:
Type ‘swift --version’, then press Enter key
The Swift version might be different on your machine, this won’t matter.
(cd means ‘change directory’; swift filename means running this swift file.)
You will see the output:
1.7 Interactive Swift
Interactive Swift is a tool that allows the execution of Swift code with immediate response, which can be very helpful for learning Swift syntaxes and debugging simple code errors. Interactive Swift is launched from a command line, run swift from a command line window then try Swift code there.
$ swift
Welcome to Apple Swift version 5.1 (swiftlang-1100.0.270.13 clang-1100.0.33.7).
  1> print("Hello " + "Swift")
Hello Swift
  2>
To exit the application, type “:exit”, “:quit”, or Ctrl+D.
In Appendix 1 (‘Swift in Nutshell’) I summarized the core Swift syntax and usage in examples which you can conveniently run in Swift Console.
1.8 Swift evolves
Swift is a new language, its features and syntax are still evolving, probably too rapidly in my opinion. Thankfully, Xcode provides good hints for upgrading your old version of Swift code.
- 5.1, 2019-09-10 (current stable release)
- 5.0, 2019-03-25
- 4.2, 2018-09-17
- 4.0, 2017-09-19
- 3.0, 2016-09-13
- 2.0, 2015-06-08
- 1.2, 2015-04-18
- 1.0, 2014-09-09
For example, the common print method, which prints out text to console, has changed three times from 1.0 to 2.0.
print("Hello")                        // Swift 1
print("Hello",  appendNewline: false) // Swift 1.2
print("Hello",  terminator: "")       // Swift 2