Chapter 2. Building the IncTicket Application
This chapter will cover how to create the IncTicket application using Keystone.js. At the end of this chapter you should have a general idea of how the framework works, understand how the different pieces interact with each other, and give you an understanding on how to easily create Keystone.js projects with basic functionality. This chapter will get you up and running with a project without too many details to begin with.
This chapter will cover the following points:
- Installing Keystone.js and creating your first project
- Designing models and understanding Mongo collections
- Keystone.js Administration site for your models
- Working with Mongoose.js
- Building views, routes and templates
- Adding pagination to lists
Installing Keystone.js
This section will walk you through installing Keystone.js on a windows machine. The installation process does not differ much from OS to OS as most of the dependent components are cross platform compatible. Since Keystone.js is written in JavaScript, the installation is pretty simple.
Prerequisites
To setup Keystone.js, you are going to need a few prerequisites. These are:
- Node.js
- Yeoman
- NPM
- Mongo DB
We already saw how to install Node.js, NPM and MongoDB in the previous chapter.
Keystone.js uses Node.js as the platform and uses Mongo DB as the storage backend. NPM is the Node Package Manager which enables easy management of Node.js packages from online repositories. It simplifies dependency management so that developers no longer have to manually download and manage scripts. NPM comes preinstalled with a Node.js installation generally.
The easiest way of installing Keystone.js by using Yeoman, a helpful installer that will guide step by step through the process of installing Keystone.js. Yeoman is a set of tools for automating development workflow. It scaffolds out a new application along with writing build configuration, pulling in build tasks and NPM dependencies needed for the build. Keystone.js provides a very handy generator to generate a new project.
First, let’s start by installing yo.
1 c:\> npm install -g yo
Next, to install the yo keystone app generator, use the following command
1 c:\> npm install -g generator-keystone
This installs the generator as a global package and can be used to generate new projects without needing to reinstall the Keystone.js generator.
Creating a new Keystone.js Application
With yo installed, its time to get down to business! We will start off creating the Locally application, since it will be used to understand much of the instructional material in this book. Setting up a new Keystone.js application is pretty trivial, thanks to the handy yo keystone application generator. Let’s start off by creating a directory to save our project.
1 c:\> mkdir incticket
and change into that directory.
1 c:\> cd incticket
Now we can use the ‘yo’ command from Yeoman to generate the project. The generator will guide you through setting up the project with a few questions and then build the project by installing dependencies from npm. Most of the defaults will suffice for the creation of a project. All the settings can be later changed within the new application.
1 c:\incticket> yo keystone
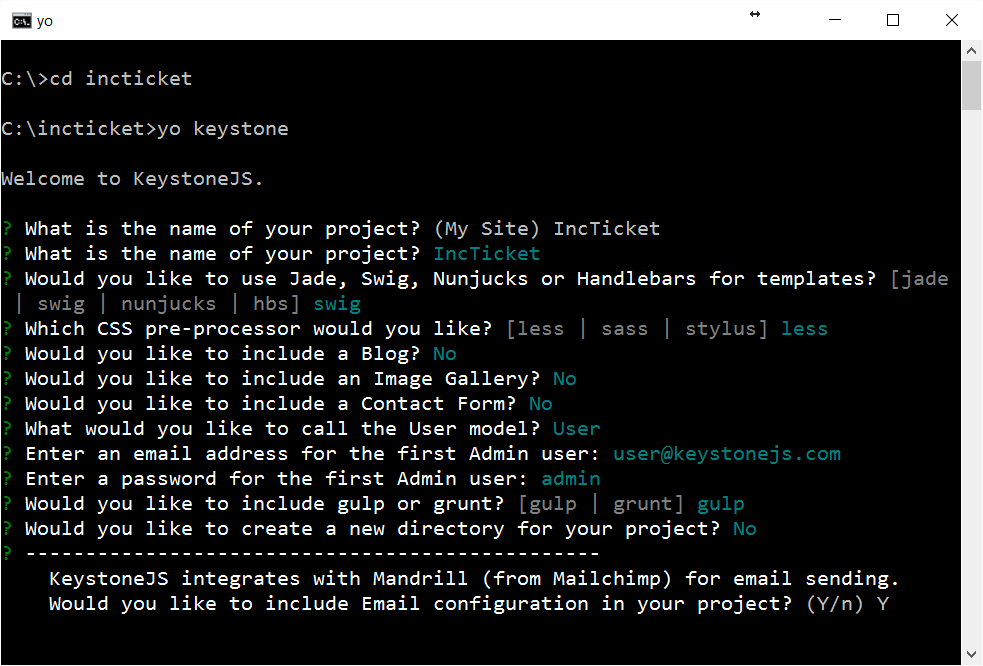
The new project will connect to Mongo DB on local host by default. So if you have Mongo DB up and running, we can serve up Keystone.js using the following command
1 c:\incticket> node keystone
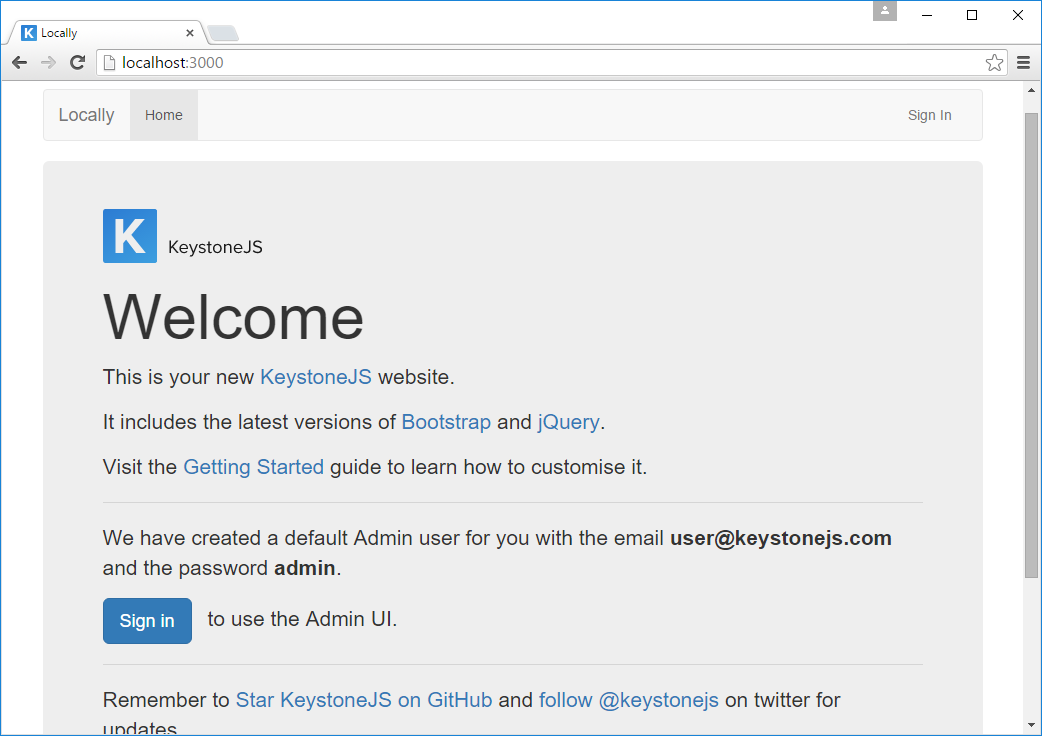
The above command will serve up your project on port 3000. If you navigate to http://localhost:3000, you should see the Keystone.js landing page.
Configuring Your Keystone.js Application
A typical web application goes through a number of deployments in its lifetime: a production push, a staging site, and multiple instances in dev environments maintained by each developer. Although each of those deployments might run the same code, each of these deploys will have environment-specific configurations. The most common example would be database connection settings, such as MongoDB connection url. Developers may share one instance of a development database, while the staging site and production sites each have their own MongoDB instances. Another example would be to use a different cache driver locally than you do on your production server.
A good solution to maintain separate application specific configuration is to use environment variables, and keep the config data out of the code. We get a couple of advantages by using environment variables for saving configuration data:
- The configuration data can be easily changed between environments and even isolated deploys. This leads to less complex deploys which saves time and money.
- There is a decreased chance of the production data leaking out into the wrong hands which reduces the chances that your database might accidentally be wiped.
Keystone.js uses an excellent node.js library, namely dotenv, to load the configuration data at runtime. In a fresh Keystone.js installation, the root directory of your application will contain a .env file. This file can be used to hold all our configuration data. All of the variables listed in this file will be loaded into the process.env global object when your application receives a request. It is recommended you do not commit this file to version control.
Each of the variables in the .env is declared as a key value pair separated by an equals sign. Keys are generally written in upper case. A fresh Keystone.js install .env file would be:
1 COOKIE_SECRET=oQQ*s0pz5(bF4gpmoNwM|BDB~db+qwQ`K>Ik~*R2D;;F(8u["l5<.=&Q9w+Ul$E=
2 MANDRILL_API_KEY=NY8RRKyv1Bure9bdP8-TOQ
To access the configuration variables in our application, we can use them as:
1 var madrillApiKey = process.env.MANDRILL_API_KEY;
By default, Keystone.js tries to connect to a local instance of MongoDB and uses no authentication. However, if you want to specify a MongoDB connection string, it is pretty easy to do so using the .env file.
1 MONGO_URI=mongodb://user:password@localhost:27017/databasename
Project Structure
Let us take a look at the new directory structure to better understand the different parts that make up a Keystone.js project. Below is the default directory structure of a Keystone.js project:
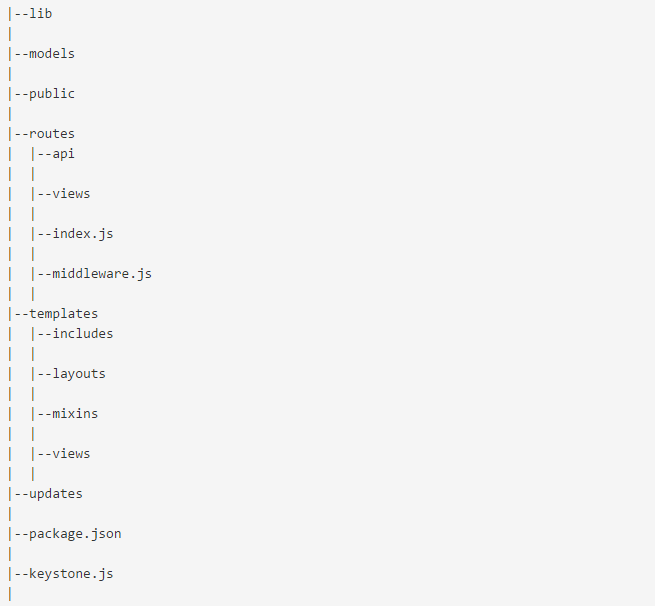
- The lib directory holds any additional libraries that could be needed by our project.
- The models folder holds the data models that our project would need. Example model is a User model that deals with user login and user preferences.
- The public directory holds static content, related to the web application, such as images, CSS, fonts, Javascript. The LESS processor included within the framework will make sure that LESS files associated with the web application is compiled to CSS files during runtime.
- The routes directory contains index.js, middleware.js, and API & views directories.
The index.js file initializes the application routes and associated views. Developers define various routes that respond to HTTP GET, POST & other HTTP verbs. Each route consists of an http protocol, a URL pattern and a view that can be invoked as a response or an inline function.
Middleware.js contains custom code that can be invoked before and after a route has been invoked. This gives the user a powerful option to do custom operations and checks related to authorization, authentication, logging etc.
The APIs directory holds controllers that allow for REST interfaces to be exposed that allow clients written in different languages to uniformly interact with our web application. To understand the APIs better, take a look at the Restful API for Mobile and SPA applications chapter.
- The views directory contains our application views that respond to various routes. Each view may interact with multiple models to fetch data related to a request and render a template with the data.
- The templates directory include html templates that will be rendered per request to a route. The templates are generally composed during runtime by the inclusion of a master layout and various blocks of the page included via separate partial files. The data that the view queries with the help of models is combined with templates by a templating engine and converted to plain HTML for the browser to render. Keystone.js supports various templating engines, each having its own syntax. We will look at Swig, a node.js templating engine in a future chapter.
- The layouts directory will generally contain the master page that defines various blocks of the page where data can be injected before rendering. Each block has an identifying name. When partial templates are included with the master page, the identifying name is used by the templating engine to render the HTML appropriately. Pages can extend the master page to inherit the layout for a consistent appearance throughout the application.
Creating Your First Model/List
Let us begin by creating our first Keystone.js model, also known as List – the Ticket model, which will be used in the application to manage a list of incident tickets for a product. The term model and list will be used interchangibly within the book. A model is a Javascript object that is an instance of the Keystone.List object, in which each attribute represents a field. Keystone.js will create a MongoDB collection for each model defined in the models folder. When you create a model, Keystone offers you a practical API to query the database easily using Mongoose.js.
To begin, create a file named Ticket.js in the models directory with following code:
 1 var keystone = require('keystone');
 2 var Types = keystone.Field.Types;;
 3
 4 var Ticket = new keystone.List('Ticket',{
 5 	autokey: { from: 'title', path: 'slug', unique: true },
 6 });
 7
 8 Ticket.add({
 9         title: { type: String, initial: true, default: '', required: true },
10         description: { type: Types.Textarea },
11         priority: { type: Types.Select, options: 'Low, Medium, High', default: '\
12 Low' },
13         category: { type: Types.Select, options: 'Bug, Feature, Enhancement', de\
14 fault: 'Bug' },
15         status: { type: Types.Select, options: 'New, In Progress, Open, On Hold,\
16  Declined, Closed', default: 'New' },
17         createdBy: { type: Types.Relationship, ref: 'User', index: true, many: f\
18 alse },
19         assignedTo: { type: Types.Relationship, ref: 'User', index: true, many: \
20 false },
21         createdAt: { type: Datetime, default: Date.now },
22         updatedAt: { type: Datetime, default: Date.now }
23     });
24
25 Ticket.defaultSort = '-createdAt';
26
27 Ticket.register();
We begin by requiring the Keystone library so we can use it. A keystone.js list allows us to define the attributes for the model that we intend to work with. The first parameter is a key that is used to identify collections uniquely in your MongoDB database. All documents related to the Ticket list will be saved in a collection within MongoDB named as tickets.
The call to register on our keystone.js list finalizes the model with any attributes and options we set.
Let’s take a look at some of the fields we defined for our model:
- title: This is the field for the ticket title. The field can hold a string describing the purpose for the ticket. The default option can be used to specify any default value for the field if the user does not input a value. The required option is useful to validate that the field has a value before it is saved. A database index is also used to enforce this.
- slug: The slug is used for SEO friendly URLs. The field is defined as part of the List options using the autokey plugin. Autokey automatically generates a key for each model when it is saved, based on the value of another field. The value of the key is accessible via the ‘slug’ field on the object. In this case, we create a slug for each ticket from the title. The unique option indicates that we expect the key to be unique throughout the collection. If we create a ticket with the title set to ‘My First Ticket’ then the automatically generated slug would be similar to ‘my-first-ticket’.
- description: This is the field to will be used to store the description of the ticket. The Textarea field type will display a text area within the admin UI.
- priority: This is a field to the priority of the ticket. We use a select field type, so the value for this field can be set to one of the given choices. The category & status fields are set up in a similar manner.
- createdBy: This field will hold a reference to the user that created a ticket. The field is like a foreign key that defines many to one relationships in a relational database. This field is displayed as an auto-suggest text box in the admin UI that allows us to pick a single user. Setting the many option to false indicates that only a single user can be selected. Setting the index option to true will tell keystone.js that we are interested in a database index to be created for this field. The assignedTo field is a similar relationship field that is used to store a reference to the user that the ticket is currently assigned to. This is the user that will be incharge of resolving the issue mentioned in the ticket.
- createdAt: This datetime field indicates when the ticket was created by the user. Since we are using the default value of Date.now, the date will be saved automatically when creating a new ticket object.
As you can see, Keystone.js comes with different types of fields that you can use to define your models. You can find all field types at http://keystonejs.com/docs/database/#fieldtypes
By setting the defaultSort property on the model, We are telling keystone.js to sort results by the createdAt field in descending order by default when we query the database. We specify descending order by using the negative prefix.
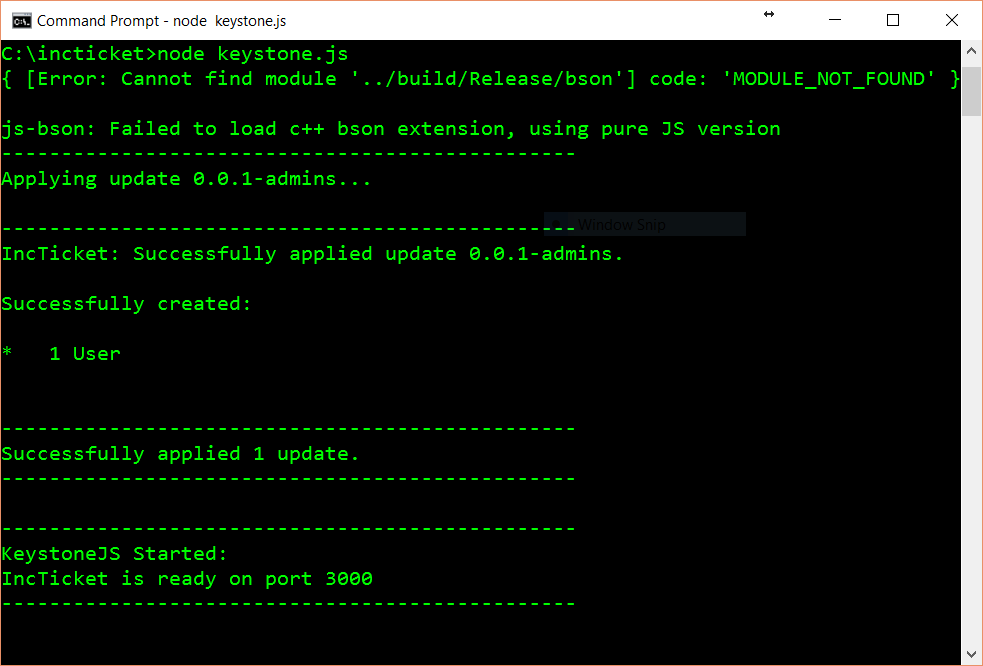
After saving our model, let us restart our application. Use the below command to restart the application via command line
1 node keystone.js
Restarting will cause keystone.js to create collections for our models. In our case, we should see the tickets collection in MongoDB.
Creating an administration site for your models
Now that we have defined the Ticket model, let us see how to create an administration site to manage tickets. Keystone.js comes with a built-in administration interface that is very useful for editing content. The Keystone.js admin site is built dynamically by reading them model metadata and providing a production-ready interface for editing content. You can use it out-of-the-box, configuring how you want your models to be displayed in it.
Creating an admin user
To begin with, we would need a user to manage the admin site. Keystone.js includes code for the creation of a admin user by default when the app is started for the first time. The user is created using the updates framework provided by Keystone.js. Updates provide an easy way to seed your database, transition data when your models change, or run transformation scripts against your database.
The default admin is created with the below code that is stored at /updates/0.0.1-admins.js with the following credentials:
- email - user@keystonejs.com
- password - admin
1 exports.create = {
2 	User: [
3 		{ 'name.first': 'Admin', 'name.last': 'User', email: 'user@keystonejs.com',
4 		password: 'admin', isAdmin: true }
5 	]
6 };
This script automatically creates a default Admin user when an empty database is used for the first time. Updates are run when the app is restarted using node keystone.js command. An update is not applied twice, hence editing the file after starting keystone.js atleast once will not result in changes to admin credentials. We will, however, be able to change the credentials through the admin site.
The Keystone.js administration site
Start up our app using the node keystone.js command and open http://127.0.0.1:3000/keystone/signin in your browser. You should see the administration login page shown below.

Log in using the credentials of the user created in the previous step. You will see the admin site index page, as shown in the following screenshot:
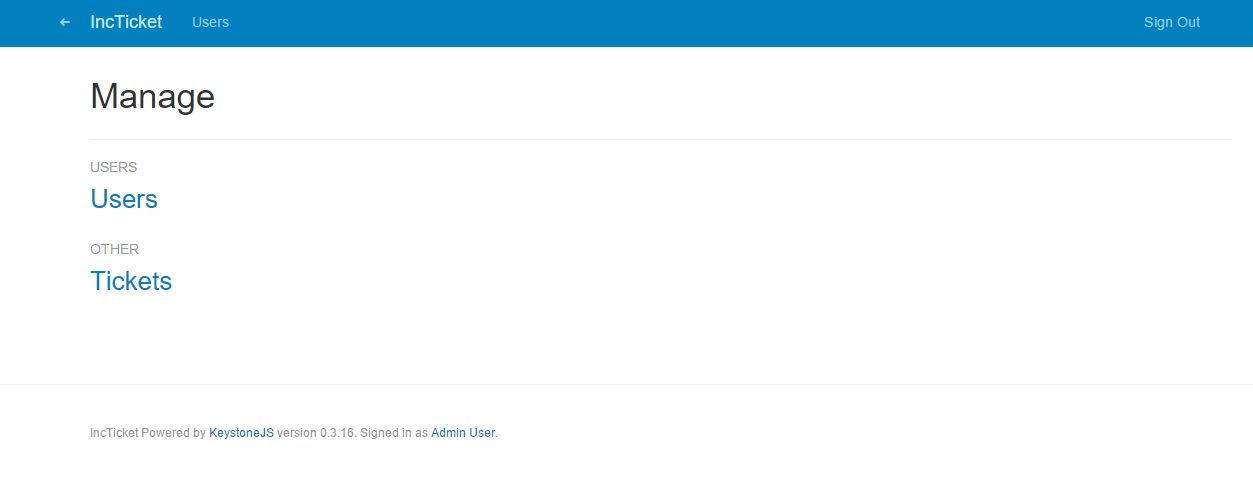
The user model seen on the page is automatically created for us by Keystone.js. If you click on Users you will see the admin user created for us. You can edit the admin user’s email address and password to suit your needs and use the new credentials to login to the application next time.
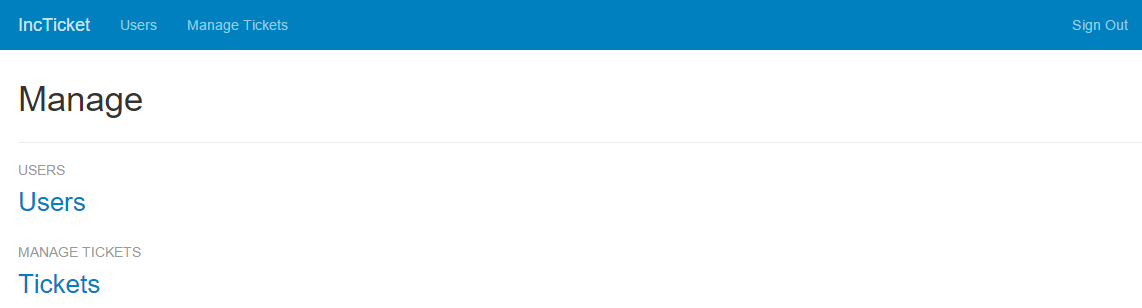
Modifying the admin menu
The menu items in the administration site can be easily configured in the /keystone.js file. The menu items are stored an object in the configuration with ‘nav’ set to be the key. As evident in the screenshot above, Keystone.js classifies any new collections under the ‘OTHER’ header by default. Let’s add the tickets menu item to the menu.
1 // Configure the navigation bar in Keystone's Admin UI
2
3 keystone.set('nav', {
4 	'users': 'users',
5     'manageTickets': 'tickets'
6 });
The first parameter to the nav configuration item is label of the menu item. The second is the collection. After making the above changes, restart the application and the new menu should reflect as below:
Adding models to the administration site
When all the fields and options have been set on our model, a call to Ticket.register() will register the list with Keystone and finalise its configuration.
1 var keystone = require('keystone');
2
3 var Ticket = new keystone.List(...);
4 ...
5 Ticket.register();
When you register a model in Keystone.js, you get a user-friendly interface generated by inspecting the models that allows you to list, edit, create, and delete objects in an intuitive way.
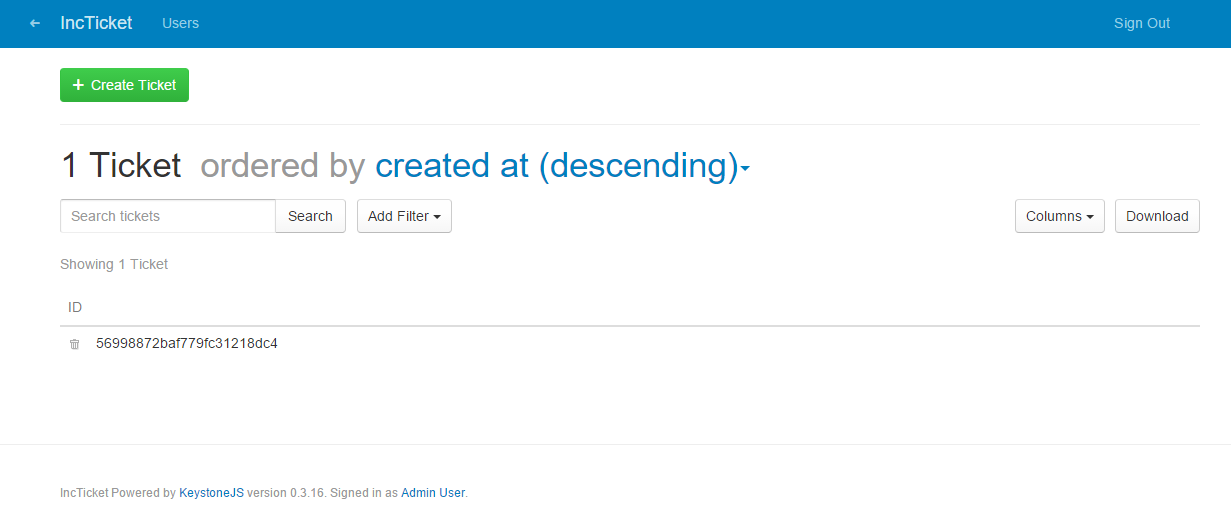
Click on the Tickets link and then click on the ‘Create Ticket’ link to add a new ticket. You will see the create item form popup that Keystone.js has generated dynamically for the model, as shown in the following screenshot:
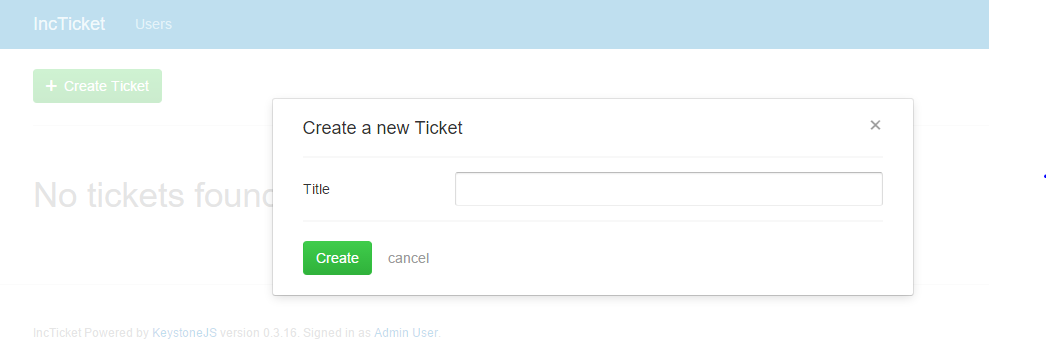
The title field is shown with a text input field in this form as per our definition in the model. The title field was marked with initial: true. This causes the field to be shown in the create item form, in the Admin UI. Let us create a ticket with title ‘My first ticket’. After creation, Keystone.js creates a document in the MongoDB tickets collection and returns the object id. The Object id is a 24 character unique identifier that can be used to identify a document across all collections.
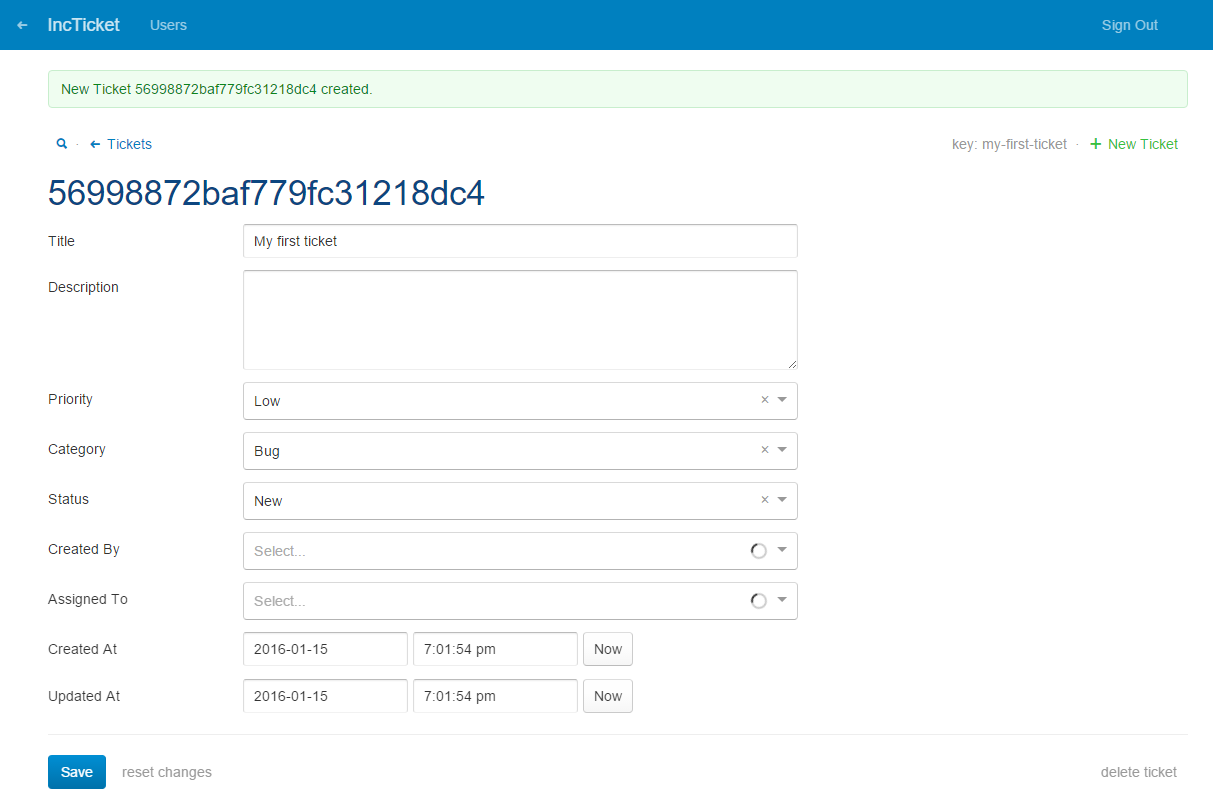
Keystone.js uses different form widgets for each type of field. Even complex fields such as DateTime are displayed with an intuitive interface like a date and time picker form control.
Fill in the form and click on the Save button. You should be shown a successful message indicating your changes were saved. Click on the tickets link to be redirected to the tickets list page as shown in the following screenshot:
Customizing the way models are displayed
On the tickets list page, we see tickets are listed with the object id. This is not very helpful for managing tickets!. Let us now see how we can customize the admin site. Edit the Ticket.js file in the models folder and include the following lines:
1 ...
2 Ticket.defaultColumns = 'title|20%, status|15%, createdBy, assignedTo, createdAt\
3 ';
4 ...
5 Ticket.register();
We can set a few different options on the model to provide more information about how to display the model in the admin site and how to interact with it. The defaultColumns option allows you to set the fields of your model that you want to display in the admin list page. By default only the object id is displayed. In the above piece of code we are specifying that the title, status, createdBy, assignedTo and createdAt as the default columns to display in the Admin UI, with title and status being given column widths.
Restart the app, go back to your browser and reload the ticket list page. Now it will look like this:
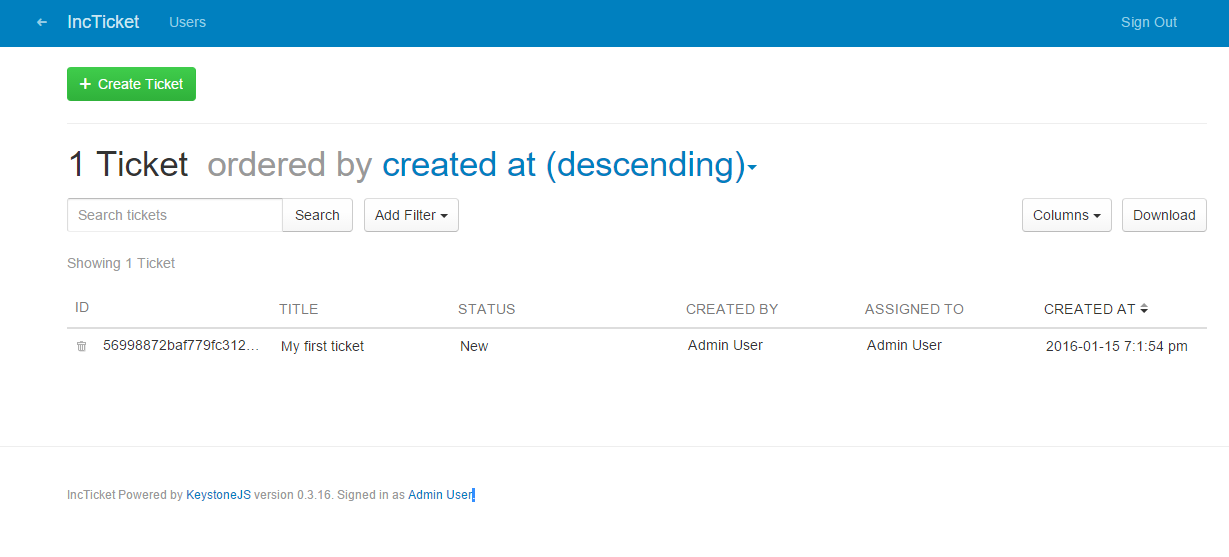
Keystone.js is clever enough to recognize that the createdBy and assignedTo are relationship fields to the User model and pulls the user’s name for display purposes.
As you can also notice, the page heading indicates that the tickets are ordered by createdAt in a descending order. This is due to another option we already setup on our model - the defaultSort option
1 Ticket.defaultSort = '-createdAt';
The admin UI automatically lets us sort data in all the custom columns we added to our defaultColumns option. Tickets can be sorted in ascending or descending order using the arrows next to the column headers. Data can be sorted across columns irrespective of whether they hold string, number, boolean or date values. How cool is that!.
Keystone.js provides very useful and intuitive ways of managing data through the powerful admin interface. This, I believe is the key differentiating factor compared other existing CMS frameworks; even across CMSes based on other programming languages.
Dynamically adding columns to Admin UI
One of the most useful feature for looking at data in the admin interface is the ability to dynamically add columns that we are interested in without having to modify the definition of the model in code. The columns dropdown on the top right lists all the fields defined on our model. Columns that have been listed in the defaultColumns option will appear with tick marks next to them. We can then pick any additional columns that we are interested in working with.
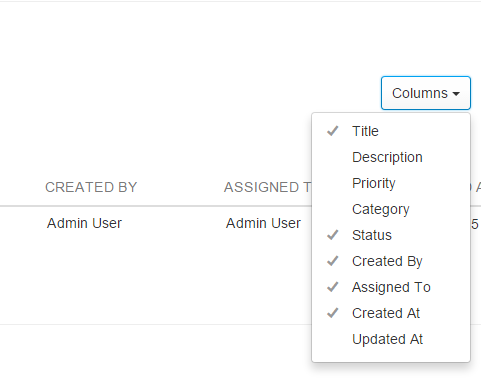
If a custom field was chosen, it will be added to the end of the displayed column headers. We can reset the list of displayed columns to the original state by using the ‘Reset to default’ option that will appear in the dropdown once one or more columns have been selected.
Finding data using the Admin UI
Perhaps the one feature that demonstrates the power of Keystone.js admin interface is the search functionality. The search box below the page header can be used for searching for data. By default the search will look for data in a field that has been specified in the autokey.from path. In the case of searching for tickets that would be the title field. We can also specify a comma-delimited list of fields to use for searching in Admin UI.
1 var Ticket = new keystone.List('Ticket',{
2 	autokey: { from: 'title', path: 'slug', unique: true },
3 	searchFields: 'description',
4 });
Above, we have specified that we are interested in the description field also being included in the search. When we search for a particular keyword, the search is performed using regular expressions to match any part of the saved data. If the search returns only a single search result object, then Keystone.js will automatically take us to the edit page for that result.
The add filter button allows us to select multiple conditions that we can use to filter the search results. As seen in the screenshot below, the search filters are intelligent enough to provide logical options for filtering based on the type of the field that has been specified in the model.
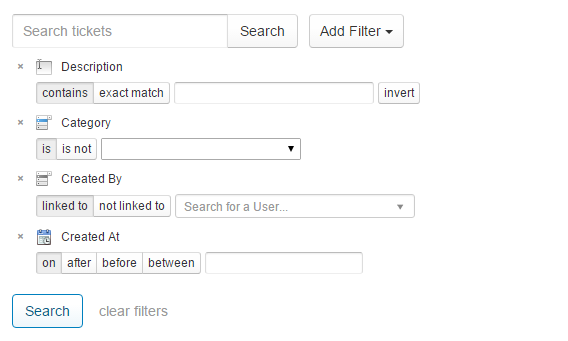
A string field such as description is presented with a text box with options for matching exactly or on a contains condition. The invert option will try to find results that negate the selected condition i.e. if exact match option was selected then it will try to find results that dont exactly match the keywords and if contains was selected then it will try to find results that dont contain the keyword.
A select field such as category is presented with options to match the select choices with a ‘is’ and ‘is not’ option. The dropdown for the select field is autopopulated with the predefined choices defined in the model.
A relationship field such as user is presented with options to find results that are either linked to or not linked to a related user. The UI also provides a very useful ajax based autocomplete text box to find the related user.
A datetime field such as createdAt is presented with multiple options to narrow down the search results. Keystone.js can find results that were created on, created after or before a specific datetime and between two date time ranges. These are critical pieces of functionality, that enhances the usability of an admin UI, that come out of the box with a Keystone.js application.
Creating Your First Route
The first thing that comes to mind, after we visited the url http://localhost:3000 to see if Keystone.js works, is how to create a page that is served as response. To create our own page, we need to define an entry point to our application in the form of a URL and tell Keystone.js to call a particular Javascript function when a visitor accesses this URL. This mapping of a URL to a Javacript function is called a route and forms the core of routing in Keystone.js.
Routes are typically stored within the /routes/index.js file.
Tickets Route
Let us define a couple of routes in Keystone.js that can be used to display a list of tickets and a ticket in detail. The most basic Keystone.js route is simply a combination a URI, a HTTP verb (get, post etc) and a Javascript function that accepts the request, response and an optional callback handler:
1 // Setup Route Bindings
2 exports = module.exports = function(app) {
3 ...
4     app.get('/tickets', function(req, res){
5     	res.send('We will show a list of tickets here');
6     });
7 ...
8 }
If we add the above code to our routes index file and navigate to http://localhost:3000/tickets, we should see the text - ‘We will show a list of tickets here’ displayed on the browser. The route we defined will respond to a HTTP get request. Keystone.js routes can accept the following HTTP verbs:
- get
- post
- put
- head
- delete
- options
- trace
- copy
- lock
- mkcol
- move
- purge
- propfind
- proppatch
- unlock
- report
- mkactivity
- checkout
- merge
- m-search
- notify
- subscribe
- unsubscribe
- patch
- search
- connect
The below piece of code demonstrates how we pass a parameter to a route. Add the below code to the routes index file and we navigate to http://localhost:3000/tickets/test-ticket.
1 // Setup Route Bindings
2 exports = module.exports = function(app) {
3 ...
4     app.get('/tickets/:ticketslug', function(req, res){
5     		res.send('We will show a ticket that has a slug : ' + req.params.ticketslu\
6 g);
7     });
8 ...
9 }
We should see the text - ‘We will show a ticket that has a slug : test-ticket’ displayed on the browser. For this example, we have assumed that test-ticket is the slug for an existing ticket. The req.params collection can be used to get a reference to the value that is bound to :ticketslug url parameter.
URLs for models
In the above route, we saw that :ticketslug was used as a query parameter to refer to the slug for a Ticket object. The complete URL for a ticket model would the /tickets/:ticketslug. This URL is not part of the model yet and in every place we intend to use or link to a Ticket, we will need to manually build the URL by concatenating the slug. To address this issue, we can use virtual functions to build the canonical URL for Ticket objects. The convention we will follow is to add a url() virtual method to the model that returns the canonical URL of the object. Edit your Ticket.js model file and add the following before a call to the register() method:
1 Ticket.schema.virtual('url').get(function() {
2 		return '/tickets/'+this.slug;
3
4 });
The Ticket.schema is a reference to the underlying Mongoose schema which is used by Keystone.List to interact with MongoDB. A virtual function exists on the model but is not persisted to the database. Next, We will use the url() method in our templates rendered by our views.
Creating Your First View
In the previous section we were able to execute a piece of code in response to a HTTP request. Let us now see how we generate useful responses rather than just plain text. A view in Keystone.js terminology is a regular Javascript function attached to the keystone.View object that responds to a page request by generating a response. This response can be the rendered HTML content of a Web page, or a redirect, or a 404 error, or an XML document, or an image or anything.
Views are typically stored in /routes/views directory.
Create the following directories and files inside your application directory:
1 routes/
2     views/
3         index.js
4         tickets/
5             ticketlist.js
6             singleticket.js
Since we have already defined the necessary routes, let us create a view that can respond to those routes. Then, finally, we will create HTML templates to render the data generated by the views. Each view will render a template passing variables to it and will return an HTTP response with the rendered output.
Creating Ticket list and detail views
Let’s start by creating a view to display the list of Ticekts. Create a file named ticketlist.js in /routes/views/tickets. Edit the new file and make it look like this:
 1 var keystone = require('keystone');
 2
 3 exports = module.exports = function(req, res) {
 4
 5 	var view = new keystone.View(req, res);
 6 	var locals = res.locals;
 7
 8 	// locals.section is used to set the currently selected
 9 	// item in the header navigation.
10 	locals.section = 'tickets';
11
12     locals.data = {
13 		tickets: [],
14 	};
15
16     // Load all tickets
17 	view.on('init', function(next) {
18
19 		var q = keystone.list('Ticket').model.find();
20
21 		q.exec(function(err, results) {
22 			locals.data.tickets = results;
23 			next(err);
24 		});
25 	});
26 	// Render the view
27 	view.render('tickets/ticketlist');
28
29 };
You just created your first Keystone.js view. The tickets view takes the request and response object as the parameters. Remember that these parameters are required by all views. In this view, we are retrieving all the tickets when the view is initialized. The view.on('init'...) method is called when the HTTP request comes through the route each time. We query our MongoDB inside this method and set the results to our locals.data.tickets array. These can then be used within the template when it is being rendered.
At the end of the code, we use the render() method provided by Keystone.js to render the list of tickets with the given template. This function takes the the template path. If we specify only the name of the template, Keystone.js will look for a template with that name under /templates/views folder. A view returns a HttpResponse object with the rendered text (normally HTML code). The render() function takes the response context into account, so any variable set within the response.localss variable is accessible by the given template. Templates are rendered by Template Rendering Engines. Keystone.js supports multiple rendering libraries such as Swig, Jade, Ebs. We will look at Swig in depth in a future chapter.
Let’s create a second view to display a single ticket. Create a file named singleticket.js in /routes/views/tickets. Edit the new file and make it look like this:
 1 var keystone = require('keystone');
 2
 3 exports = module.exports = function(req, res) {
 4
 5 	var view = new keystone.View(req, res);
 6 	var locals = res.locals;
 7
 8 	// locals.section is used to set the currently selected
 9 	// item in the header navigation.
10 	locals.section = 'tickets';
11
12     locals.data = {
13 		ticket: {},
14 	};
15
16     // Load all tickets
17 	view.on('init', function(next) {
18
19     var q = keystone.list('Ticket').model.findOne({slug: req.params.ticketslug});
20
21 		q.exec(function(err, result) {
22 			if(result != null)
23 			{
24 				locals.data.ticket = result;
25 			}
26 			else
27 			{
28 				return res.status(404).send(keystone.wrapHTMLError('Sorry, no ticket found! \
29 (404)'));
30 			}
31
32 			next(err);
33 		});
34 	});
35
36
37 	// Render the view
38 	view.render('tickets/singleticket');
39
40 };
This is the ticket detail view. This view takes a ticket slug to retrieve a published ticket with the given slug. Notice that when we created the Ticket model, we added the unique constraint parameter to the slug field. This way we ensure that there will be only one ticket with a slug for a given title, and thus, we can retrieve single tickets by slug. In the detail view, we are using the res.status() to return a HTTP 404 (Not found) exception if no object is found. Finally, we use the render() method to render the retrieved ticket using a template.
Creating templates for your views
We have created routes and views for our application. Now it’s time to add templates to display tickets in a user-friendly way.
Templates are typically stored in /templates/views directory.
Create the following directories and files inside your application directory:
1 templates/
2     layouts/
3         default.swig
4     views/
5         index.swig
6         tickets/
7             ticketlist.swig
8             singleticket.swig
The default.swig file will include the main HTML structure of the website and divide the content into a main content area, header and a footer section. During installation, Keystone.js generates some bootstrap boiler plate code within default.swig for us. The ticketlist.swig and singleticket.swig files will inherit from the default.swig file and be rendered by the ticketlist and singleticket views respectively.
Keystone.js supports many templating languages and Swig is one we will look at. Swig is a powerful template language that allows you to specify how data is displayed on the browser. It is based on template tags, which look like {% tag %} , template variables, which look like {{ variable }} and template filters, which can be applied to variables and look like {{ variable|filter }}. You can see all swig template tags and filters at http://paularmstrong.github.io/swig/docs/.
Let’s look at the default.swig file. All the static assets related to our project such as js, css files are stored in the /public directory. Let’s add a incticket.css stylesheet to the /public/styles folder. This stylesheet will hold application specific styling.
Since Keystone.js uses express.static built-in middleware function in Express to serve static assets, we reference assets as if they resided in the root of the root of the application as shown below:
1 <link href="/styles/incticket.css" rel="stylesheet">
In default.swig, you can see that there are a few {% block %} tags. These tell Keystone.js that we want to define a content block in that area. Templates that inherit from this template can fill the blocks with content. There is a predefined block called content that we can take advantage of.
Let’s edit the tickets/ticketlist.html file and make it look like the following:
1 {% extends "../../layouts/default.swig" %}
2
3 {% block content %}
4
5 <div class="container">
6 <div class="panel panel-primary">
7 <!-- Default panel contents -->
8 <div class="panel-heading">Tickets</div>
9 <div class="panel-body">
10 <p>These are list of tickets in the system.</p>
11 </div>
12
13 <!-- Table -->
14 <table class="table table-striped">
15 {% for ticket in data.tickets %}
16 <tr>
17 <td>
18 <div class=' col-md-1'>
19 <span class="label label-info pull-right">{{ticket.status}}<\
20 /span>
21 </div>
22
23 <a href='{{ticket.url}}'><b>{{ticket.title |capitalize}}</b><a>
24
25 <ul class="ticket-meta">
26 <li> </li>
27 <li>
28 <small>Status</small><a href="" rel="tag">{{ticket.statu\
29 s}}</a>
30 </li>
31 <li>
32 <small>Priority</small><a href="" rel="tag">{{ticket.pri\
33 ority}}</a>
34 </li>
35 <li>
36 <small>Category</small><a href="" rel="tag">{{ticket.cat\
37 egory}}</a>
38 </li>
39 <li>
40 <small>Last Updated</small>
41 <abbr class="last-updated">{{ticket._.createdAt.format('Do MMM\
42 M YYYY')}}</abbr>
43 </li>
44 </ul>
45 </td>
46 </tr>
47 {% endfor %}
48 </table>
49 <div class="panel-footer"></div>
50 </div>
51
52 </div>
53 {% endblock %}
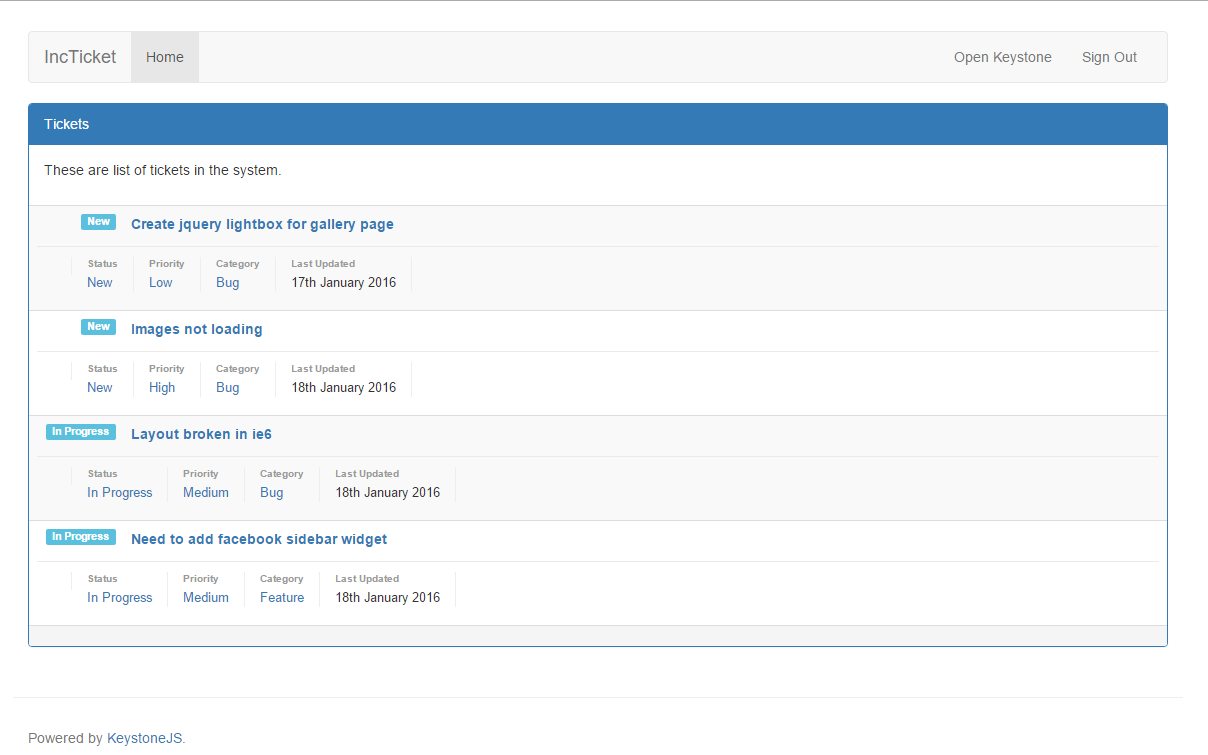
With the {% extends %} template tag, we are telling Keystone.js to inherit from the layouts/default.swig template. Then we are filling the content blocks of the base template with content. We iterate through the tickets and display their title, date, status, priority and category, including a link in the title to the canonical URL of the ticket. In the title of the ticket, we are applying a template filter: capitalize - to upper-case the first letter of the input and lower-case the rest. You can concatenate as many template filters as you wish; each one will be applied to the output generated by the previous one.
Let us also update our route to point to the ticketlist view that we created.
1 // Setup Route Bindings
2 exports = module.exports = function(app) {
3 ...
4    app.get('/tickets', routes.views.tickets.ticketlist);
5 ...
6 }
Open the command prompt and execute the command node keystone.js to restart the application server. Open http://127.0.0.1:3000/tickets/ in your browser and you will see everything running. Note that you need to have some tickets in order to see them here. You should see something like this:
Then, let’s edit the tickets/singleticket.swig file and make it look like the following:
 1 {% extends "../../layouts/default.swig" %}
 2
 3 {% block content %}
 4
 5 	<div class="container">
 6 		<div class="panel panel-primary">
 7         <!-- Default panel contents -->
 8         <div class="panel-heading">Ticket details - {{data.ticket.title}}
 9         </div>
10         <div class="panel-body">
11             <span class="label label-info pull-right">{{data.ticket.status}}</sp\
12 an>
13             <p>{{data.ticket.description}}</p>
14         </div>
15         <ul class="ticket-meta">
16         <li>
17             <small>Status</small><a href="" rel="tag">{{data.ticket.status}}</a>
18         </li>
19         <li>
20             <small>Priority</small><a href="" rel="tag">{{data.ticket.priority}}\
21 </a>
22         </li>
23         <li>
24             <small>Category</small><a href="" rel="tag">{{data.ticket.category}}\
25 </a>
26         </li>
27         <li>
28             <small>Last Updated</small>
29             <abbr class="last-updated">{{data.ticket._.createdAt.format('Do MMMM\
30  YYYY')}}</abbr>
31         </li>
32         </ul>
33         <div class="panel-footer"></div>
34         </div>
35
36 	</div>
37 {% endblock %}
Now, you can go back to your browser and click on one of the ticket titles to see the detail view of a ticket. You should see the template rendered like this:
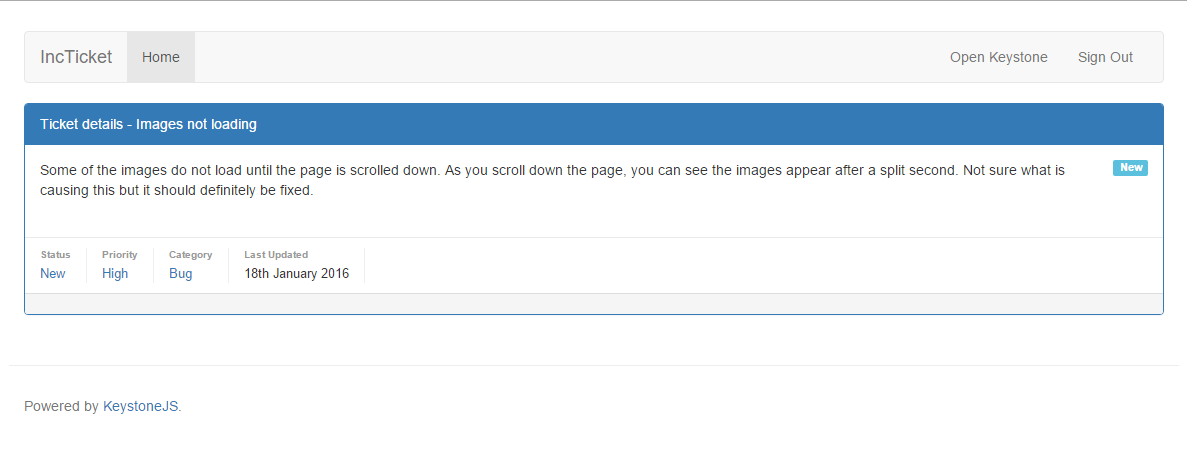
Since we have created a SEO friendly URL for our tickets, the URL should look like http://127.0.0.1:3000/tickets/images-not-loading.
Adding pagination
As your application grows in terms of content, you will soon realize that you need to split the list of tickets across several pages. Keystone.js has a built-in pagination functionality that allows you to manage paginated data easily.
Edit the routes/views/ticketlist.js file as follows:
 1 var keystone = require('keystone');
 2
 3 exports = module.exports = function(req, res) {
 4
 5 	var view = new keystone.View(req, res);
 6 	var locals = res.locals;
 7
 8 	// locals.section is used to set the currently selected
 9 	// item in the header navigation.
10 	locals.section = 'tickets';
11
12     locals.data = {
13 		tickets: [],
14 	};
15
16     // Load all tickets
17 	view.on('init', function(next) {
18
19 		var q = keystone.list('Ticket').paginate({
20                     page: req.query.page || 1,
21                     perPage: 5,
22                     maxPages: 5
23                 });
24
25 		q.exec(function(err, results) {
26 			locals.data.tickets = results;
27 			next(err);
28 		});
29
30 	});
31
32
33 	// Render the view
34 	view.render('tickets/ticketlist');
35
36 };
This is how pagination works:
- We call the List.paginate() which returns a query object. It accepts the following options
- page - page to start at
- perPage - number of results to return per page
- maxPages - optional, causes the page calculation to omit pages from the beginning/middle/end
- We get the page GET parameter that indicates the current page number.
- If the page parameter is not an integer, we retrieve the first page of results.
- We pass the retrieved objects to the template.
When you call exec on a paginated query, it will return a lot of metadata along with the results:
- total: all matching results (not just on this page)
- results: array of results for this page
- currentPage: the index of the current page
- totalPages: the total number of pages
- pages: array of pages to display
- previous: index of the previous page, false if at the first page
- next: index of the next page, false if at the last page
- first: the index of the first result included
- last: index of the last result included
Let us update our ticketlist.swig template to include the pagination links displayed below. We would also need to iterate over data.tickets.results instead of just data.tickets as we did earlier.
1  {% for ticket in data.tickets.results %}
2  ....
3  {% endfor %}
 1 <ul class="pagination">
 2 	{% if data.tickets.totalPages > 1 %}
 3
 4 	{% if data.tickets.previous %}
 5 	<li><a class="page-num" href="?page={{ data.tickets.previous }}">Previous</a></\
 6 li>
 7 	{% else %}
 8 	<li><a class="page-num" href="?page=1">Previous</a></li>
 9 	{% endif %}
10
11 	{% for i,p in data.tickets.pages %}
12 	<li><a class="page-num {% if data.tickets.currentPage == p %} active {% endif %\
13 }" href="?page={% if p == '...' %} {% if i+1 == data.tickets.totalPages %} 1 {% \
14 else %} {{ p }} {% endif %}{% else %}{{ p }}{% endif %}">{{ p }}</a></li>
15 	{% endfor %}
16
17 	{% if data.tickets.next %}
18 	<li><a class="page-num" href="?page={{ data.tickets.next }}">Next</a></li>
19 	{% else %}
20 	<li><a class="page-num" href="?page={{data.tickets.totalPages}}">Next</a></li>
21 	{% endif %}
22
23 	{% endif %}
24 </ul>
Now, open http://127.0.0.1:3000/tickets/ in your browser. You should see the pagination at the bottom of the ticket list and you should be able to navigate through pages:

Summary
In this chapter, you have learned the basics of the Keystone.js web framework by creating functionality for basic ticket listing. You have designed the data models, views, templates, and URLs for your application, including object pagination.