Chapter 9: Assignments
Assignments are a refreshingly simple method for collecting student work. They are a simple and flexible catch-all for things you want to grade that don’t fall into any of the other tool types.
The assignment module allows teachers to collect work from students, review it and provide feedback including grades. The work students submit is visible only to the teacher and not to the other students unless a group assignment is selected.
The assignment module gives you an easy way to allow students to upload digital content for grading. You can ask them to submit essays, spreadsheets, presentations, web pages, photographs, or small audio or video clips. Anything they can store on their hard drives can be submitted in response to an assignment.
Assignments don’t necessarily have to consist of file uploads. You can create offline assignments to remind students of real-world assignments they need to complete. Alternatively, you can ask students to input their answer directly into the assignment itself.
Assignments are a useful tool you can use in creative ways to collect more authentic responses from your students than is possible with the quiz engine. An assignment has an ‘available from’ date before which no students can submit anything, and a due date, after which teachers can choose not to accept submissions any more.
Markers can choose to be notified every time a student submits an assignment, or only for late submissions. Markers can choose to give students feedback in the form of text or uploaded files.
Assignment Types:
The standard assignment submission options available are:
- File submissions (students submit a file for assessment)
- Online text (students can type their responses directly in Moodle)
- Submission comments
- Offline Assignment
Adding an Assignment activity
To create an assignment:
- To add a new Assignment activity to your course, first click the Turn Editing On button.
- Within the required Week or Topic Block click Add an Activity or Resource link. In the Add an activity or resource dialogue box that appears, select Assignment and click Add.
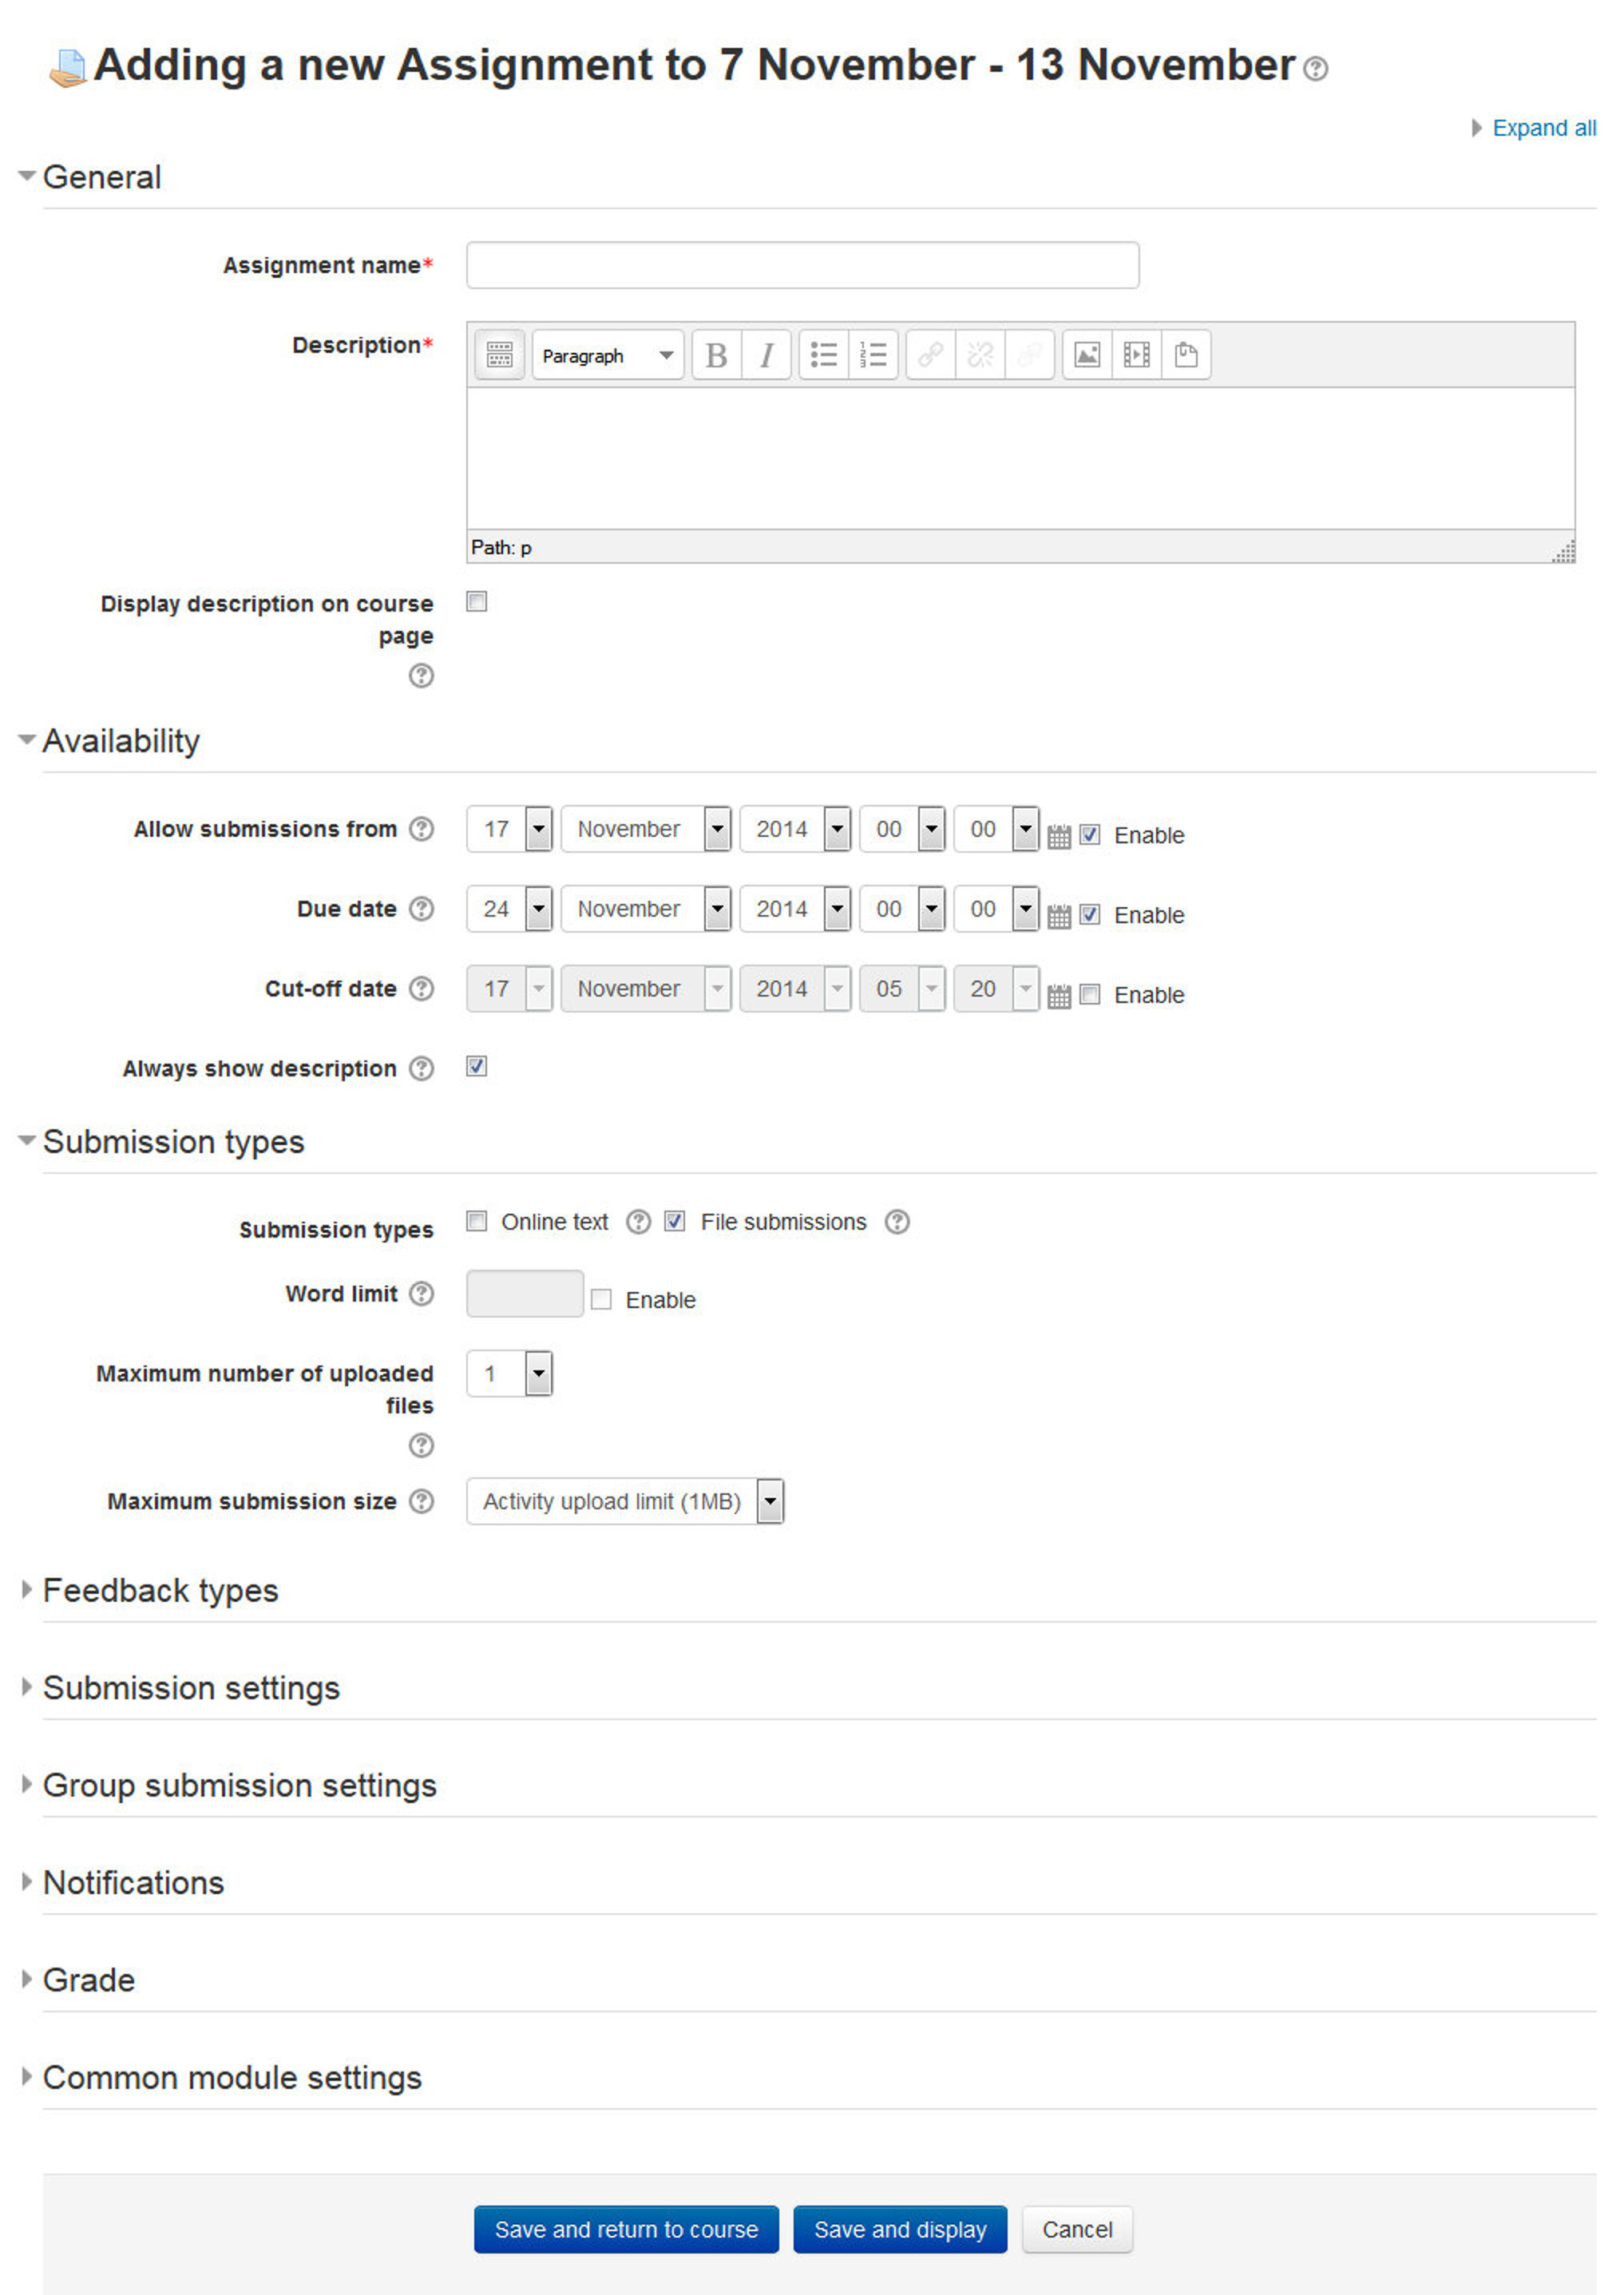
Figure 9-1 Adding a new assignment
The following configuration options are available when creating or editing/updating any Assignment activity. Only General, Availability and Submission types are open by default; the others are collapsed. To expand everything, click the “Expand all” link top right.
- In the General Section: The General section allows you to give your assignment a name and description.
- Assignment name: Give your Assignment a name (e.g. “Report on Topic 1 Content”). The title entered here will be the name that learners see in the course content area. Learners will click on this name to view the details of the assignment and, if applicable, submit their work.
- Description: Provide instructions for your students here so they are clear what they have to do. Click the icon on the left to expand the toolbar and drag the bottom right of the text box out to expand it. You can also provide information or resources related to the assignment, such as a video clip, an image, or a link to a webpage.
- Display description on course page: Enabling this will display the description on the course page just below the link to the assignment activity.
- In the Availability Section:
- Allow submissions from: If enabled, students will not be able to submit before this date. If disabled, students will be able to start submitting right away.
- Due Date: This is when the assignment is due. Submissions will still be allowed after this date but any assignments submitted after this date, are marked as late. To prevent submissions after a certain date - set the assignment cutoff date.
- Cut Off Date: If set, the assignment will not accept submissions after this date without an extension.
- Always show description: If disabled, the Assignment Description above will only become visible to students at the “Allow submissions from” date.
- In the Submission Types Section:
- Submission types: Here you can decide how you wish students to submit their work to you. There are four types of assignment submissions as mentioned in the section above:
- Online Text: Learners can type their response directly in Moodle using the text editor. It’s possible to set a word limit on an online text assignment. Students get a warning if they try to exceed the word limit.
- File Submissions: Learners can upload and edit one or more files of any type the teacher can open. If the student uploads a pdf file, the teacher can annotate it within the browser, and on saving, the annotated file is made available to the student.
- Submission comments: If Site Administrator has enabled then only students will be able to send a message to their teacher when submitting their assignment.
- Offline Activity - If you simply uncheck the above three options then it will result into an offline assignment activity.

Note that if Submission comments are enabled by Site Administrator then students will be able to add a note to their teacher on submitting work. If Blind marking is enabled, student comments display as from “Participant 01 etc.” to avoid revealing identities. These comments will appear in the grading table in the Submission comments column.
- Word Limit: If online text submissions are enabled, this is the maximum number of words that each student will be allowed to submit.
- Maximum number of uploaded files: Here you can decide the maximum number of files which may be uploaded by each learner. (It might be helpful to display the number in the assignment description).
- Maximum submission size: This setting specifies the maximum size per file of each of the files that the students can upload as part of their submission. This maximum upload size may only be equal to or less than the course limit (which in turn may only be equal to or less than the site limit). The maximum size of each file is displayed to students at the point where they upload files.
- Submission types: Here you can decide how you wish students to submit their work to you. There are four types of assignment submissions as mentioned in the section above:
- In the Feedback Type Section:
- Feedback comments: Setting this to yes mean that markers can leave feedback comments for each submission. It enables the Feedback Comments column in the grading table.
- Offline grading worksheet: If set to yes, you will have a link to download the grading list as a spreadsheet. Then you will be able to enter grades and feedback comments offline. When the teacher has completed their grading offline, they can then upload the spreadsheet, confirm the changes and the grades and comments will be transferred over into Moodle’s gradebook
- Feedback files: If enabled, you will be able to upload files with feedback when marking the assignments. These files may be, but are not limited to marked up student submissions, documents with comments or spoken audio feedback.
- Uploading multiple feedback files: It is also possible to upload multiple feedback files as a zip, from the dropdown above the grading list:
- Download the students’ assignments using the “Download all submissions” link from the same dropdown menu;
- Extract the folder offline and add your comments to the student’s submissions. Keep the names the same.
- Select the students’ submissions and zip them into a new folder. Important: Don’t just edit them inside their original folder and re-zip this; it will not work. The folder name does not matter as long as the feedback files have the same names as before.
- Upload this newly zipped folder.
- You will be presented with a confirmation screen displaying your feedback files.
- Comment Inline: If enabled, the submission text will be copied into the feedback comment field during grading, making it easier to comment inline (using a different color, perhaps) or to edit the original text.
- In the Submission Settings Section:
- Require students click submit button: If enabled, students will have to click a Submit button to declare their submission as final. This allows students to keep a draft version of the submission on the system.
- Require that students accept the Submission statement: An administrator can define a “Submission statement”, i.e., a statement where students promise the work is their own and which they must agree to before submitting their work. If the administrator has given teachers the option of using a submission statement or not, then it will be available in the assignment settings screen. When this setting is enabled, students will have to check a button before they can submit their assignment.
- Attempts reopened: This setting allows the teacher to decide how submissions are reopened. It determines how student submission attempts are reopened. The available options are:
- Never - The student submission cannot be reopened.
- Manually - The student submission can be reopened by a teacher.
- Automatically until pass - The student submission is automatically reopened until the student achieves the grade to pass value set in the Gradebook (Categories and items section) for this assignment.
- Maximum attempts: If a student is allowed to resubmit, this setting will determine how many times they can resubmit before they are no longer allowed to do so. After this number of attempts has been made the student’s submission will not be able to be reopened.
- In the Group submission settings Section:
- Students submit in groups: If this box is ticked, then students are able to collaborate on an assignment. This might involve for example, working in the same online text area, or one student uploading an MS PowerPoint which another student downloads, improves and re-uploads to the common assignment area. A group submission will be shared among group members and all members of the group will see each other’s changes to the submission. When grading, the teacher may choose to give a common grade and feedback to all students in the group or to give individual grades and feedback to each member.
- Require all group members submit: If enabled, all members of the student group must click the submit button for this assignment before the group submission will be considered as submitted. If disabled, the group submission will be considered as submitted as soon as any member of the student group clicks the submit button.
- Grouping for student groups: If a particular grouping is selected here, then the gradebook will display any other groups and non-grouped students in the “default group”, while naming the group(s) that are in the chosen grouping. If “none” is selected, then the gradebook will display the names of all groups and put any non-grouped students in the “default group”.
- In the Notifications Section:
- Notify graders about submissions: If enabled, you will receive a message whenever a student submits an assignment, early, on time and late.
- Notify graders about late submission: If enabled then you will receive a message whenever a student submits a late assignment.
- Default setting for “Notify students”: This setting will set the default value for the “Notify students” checkbox on the grading form.
- In the Grade Section:
- Grade:
- Select Points or Scale from the dropdown. If you will not be giving a grade for the assignment, choose No Grade.
- Then select your points or chosen scale.
- Grading Method: Choose the advanced grading method that should be used for calculating grades in the given context. There are 3 options:
- Simple direct grading (entering a grade or scale item)
- Marking guide
- Rubric T> To disable advanced grading and switch back to the default grading mechanism, choose ‘Simple direct grading’.
- Grade Category: This setting controls the category in which this activity’s grades are placed in the gradebook. Any custom Grade Categories that have been created within your site or course will be listed here and will be available for selection. Select the required Grade Category to add this assignment as a Grade item within this Category.
- Blind marking: If this setting is enabled, then you will not see the names of students who have submitted their assignments. Instead, you will see randomly generated Participant numbers. However, after grading the assignment, it is possible for you to see who submitted what by clicking on “Reveal student identities” in the Assignment settings.
- Use marking workflow: When set to Yes, you will be able to specify the stage they are at in their grading of individual assignments. One advantage of using marking workflow is that the grades can be hidden from students until they are set to ‘Released’. The actual list of steps are:
- Not marked (the marker has not yet started)
- In marking (the marker has started but not yet finished)
- Marking completed (the marker has finished but might need to go back for checking/corrections)
- In review (the marking is now with the teacher in charge for quality checking)
- Ready for release (the teacher in charge is satisfied with the marking but wait before giving students access to the marking)
- Released (the student can access the grades/feedback)
- Use marking allocation: If marking workflow is set to Yes, it is possible to enable marking allocation. This means that you can select other teachers to grade or review the submitted work of specific students. Colleagues can monitor progress through the displayed marking workflow states.
- Grade:
- In the Common Module Settings: Common Module settings are same as mentioned in all previous activities. So this time you should choose them as an exercise.
- Click “Save and return to course” button to make your assignment available. Your assignment will appear in your course page. It will also be added to your course calendar and will appear in the Upcoming Events block to remind students when it’s due.
|
|
To see how your assignment appears for your students, select Student from the “Switch role to” drop-down menu in the top-right corner of the course page, next to the “Turn editing on” button. The “Return to my normal role” link at the bottom of each page restores your teacher status. |
Assignment capabilities
The assignment module has only four capabilities:
- Export own submission - This allows a user to export their own assignment submissions to a portfolio. This capability is allowed for the default roles of manager, teacher, non-editing teacher and student.
- Grade assignment - This allows a user to see submissions, add comments to and grade assignments. This capability is allowed for the default roles of manager, teacher and non-editing teacher.
- Submit assignment - This capability allows a user to submit an assignment. This capability is allowed for the default role of student only.
- View assignment - This allows a user to view assignments. This capability is allowed for the default roles of manager, teacher, non-editing teacher, student and guest.
Managing Assignment Submissions
To view your students’ submissions, click on the assignment name in your course page. You’ll see the assignment name and details and a table underneath with details of participants, submitted number of assignments and the submissions which needs grading. Under the table there is a link “View/grade all submissions” which show all assignments that have been submitted. Click on this link.
The assignment submissions page, as shown in Figure 9-2, displays the grading table which contains columns of information about the student, the status of their submission, a link to grade their submission, a link to each submission and feedback comments and files. The list may be sorted by clicking on a particular heading.
By default, 10 submissions are shown per page, though this may be changed at the bottom of the page.
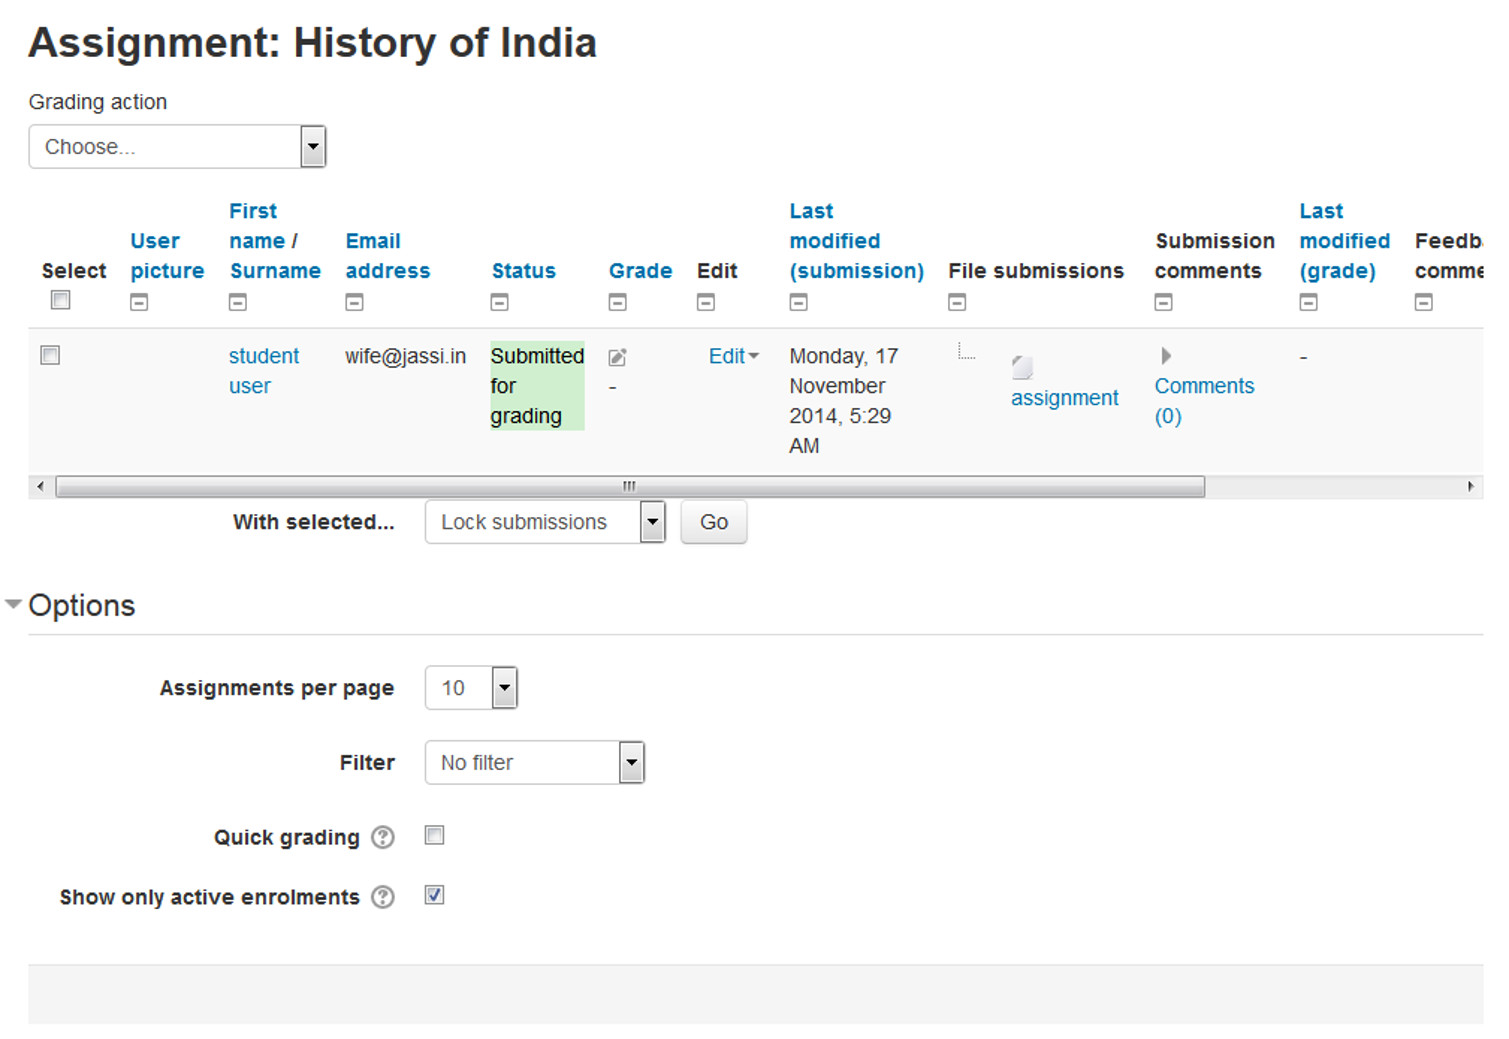
Figure 9-2 Assignment submissions
Grading Assignment Submissions
On the grading table page, you can grade the assignments submissions of all students.
Filtering submissions
A dropdown menu accessed from the ‘Options’ section allows you to filter submissions so you can for example quickly see which students have not submitted yet.
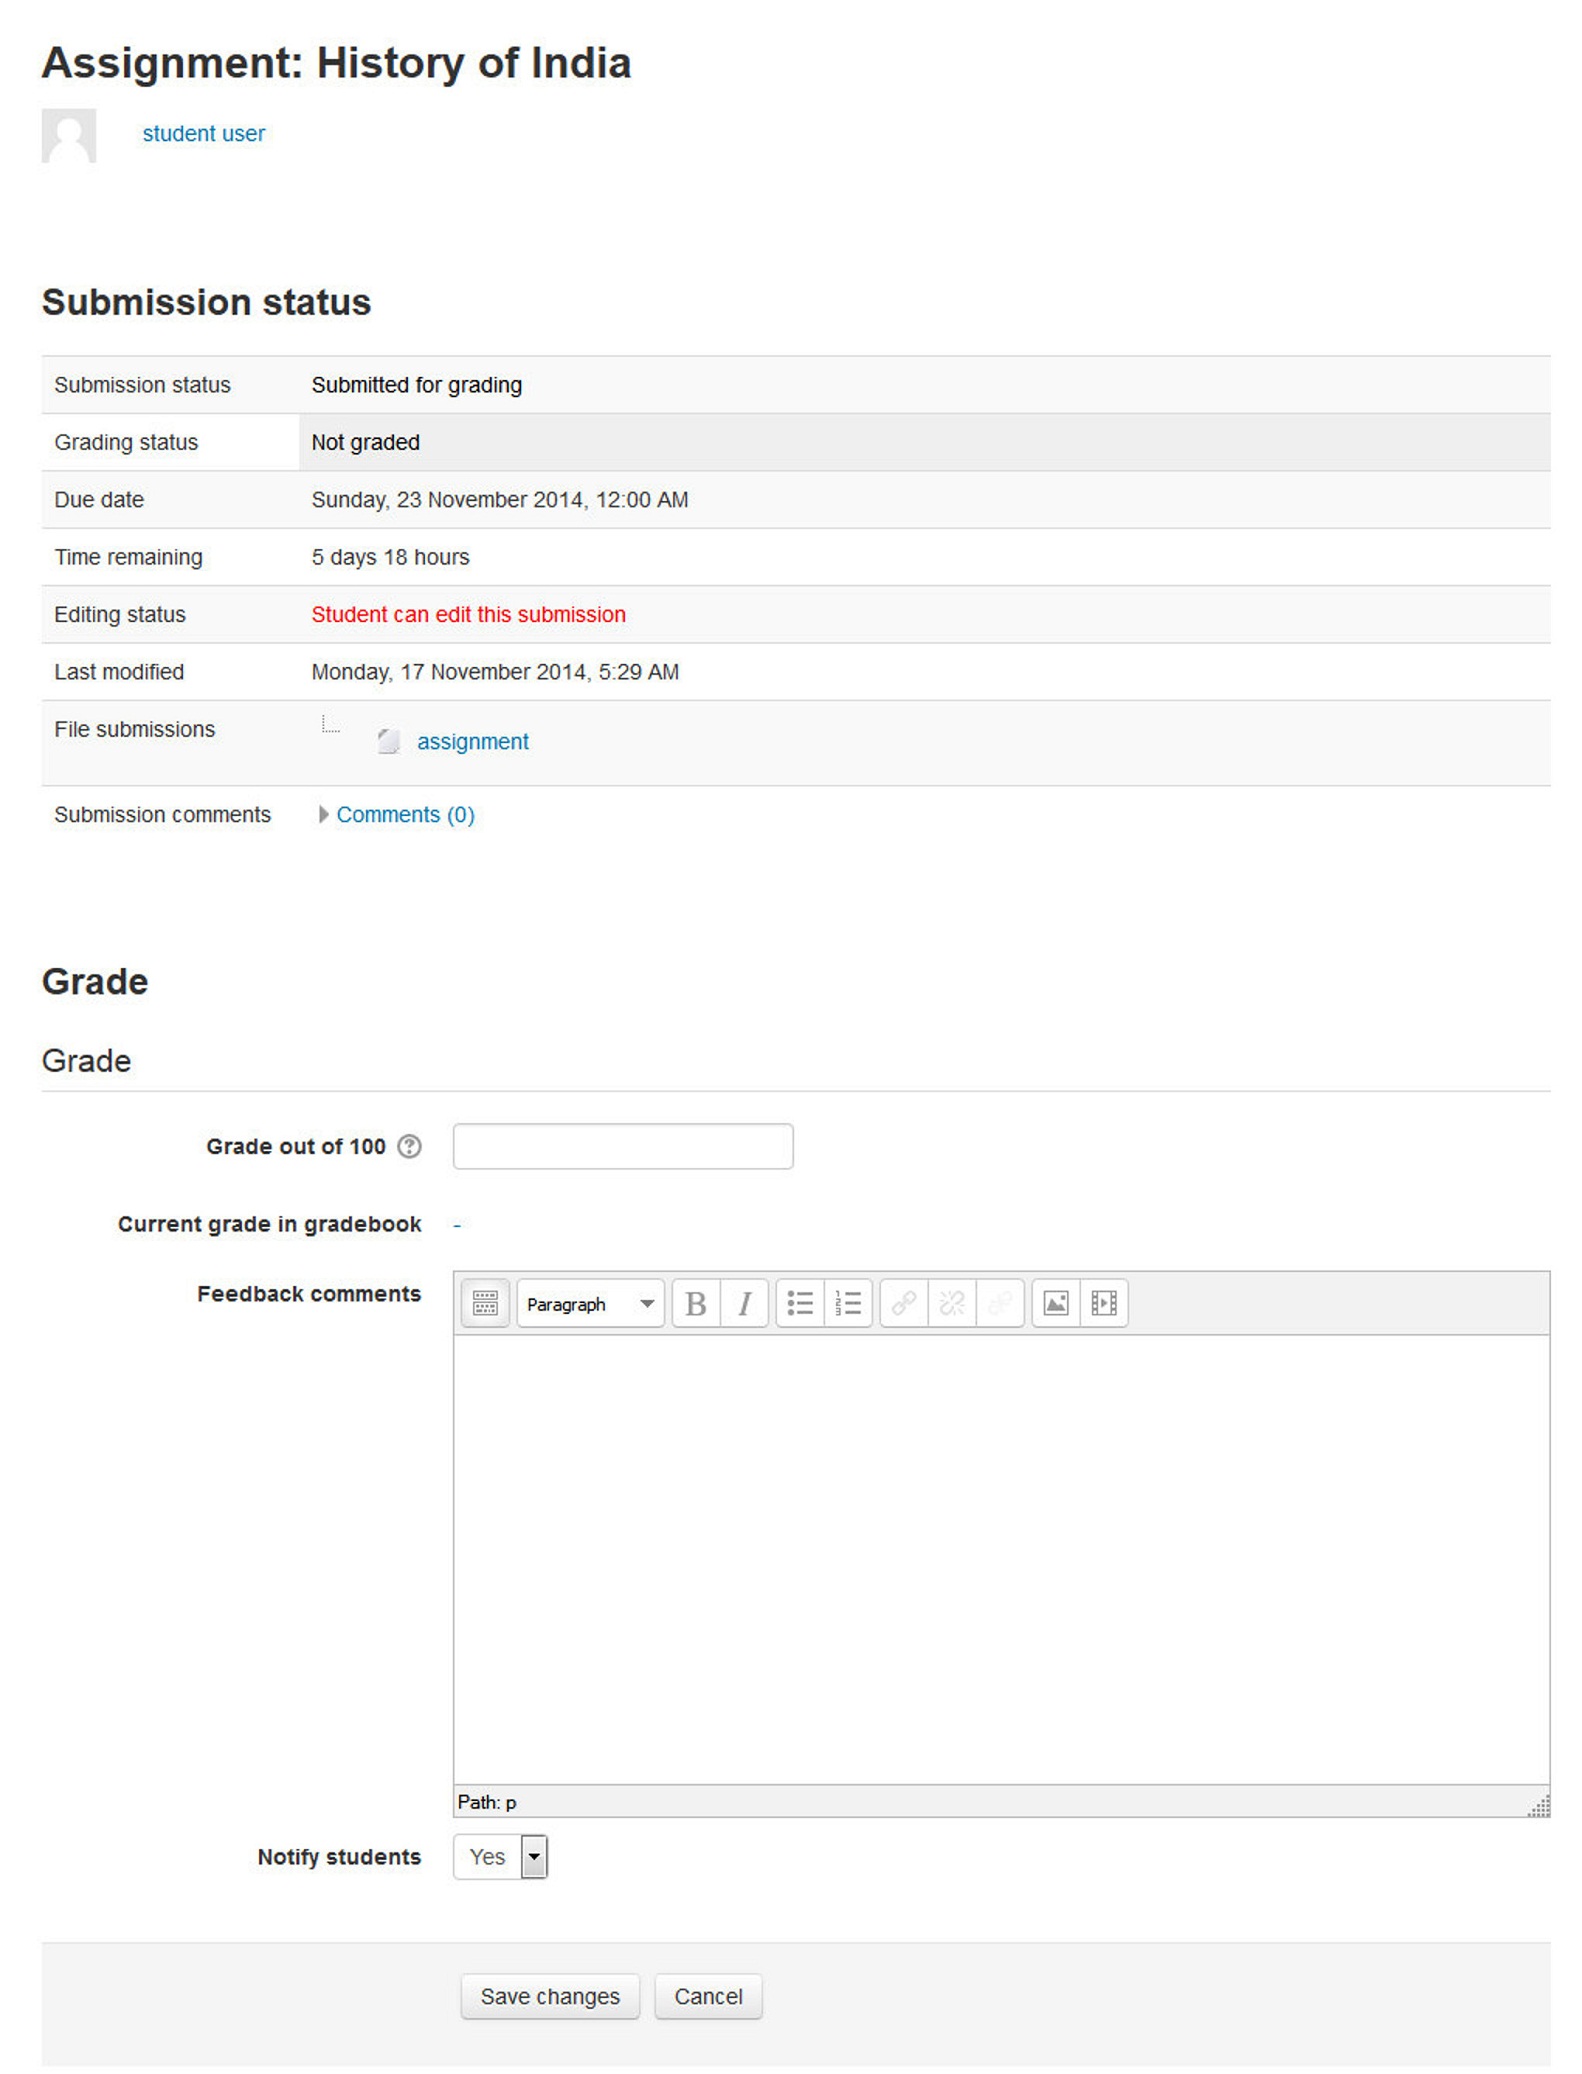
Figure 9-3 Grading assignment
Quick grading
Under Options (scroll to bottom of the page) you can determine your preferences for the number of assignments you wish to display per page. This is also where you can turn on quick grading.
Quick grading allows you to enter grades and a feedback comment (if enabled in Assignment settings) directly into the grading table. Quick grading is not compatible with advanced grading and is not recommended when there are multiple markers.
To quick grade submissions:
- You can enter grades and feedback comments using quick grading. It is now possible to enter grades in decimal format.
- Enter the grades
- Scroll to the bottom of the grading table and click ‘Save all quick grading changes’
- A confirmation screen will appear.
|
|
You will not be able to return a feedback file to your students. |
Students can see their grades and comment in two ways. First, they can click on the assignment link again. They will see their grades and comments below the submission block. Alternatively, they can click on the Grades link in the course Administration block. They will see the grade for the assignment and can then click on the assignment name to get the written feedback.
Effective assignment practices
The two most basic assignment types, offline and upload, are so generic you may find it difficult to use them effectively at first. You may find it useful to think about them as two separate modules sharing a common interface.
Offline assignments are useful for recording grades for real-world activities. You can use this tool to record scores or feedback for student presentations, class participation, performances, sculptures, or any other nondigital performance. You can create a scale to give nonnumeric feedback if you don’t want to give a numeric score to a creative performance.
Uploaded assignments are probably what most people expect when they think about assignments. Remember, you can use these assignment types for any sort of digital content. Most instructors use assignments to collect essays and other word-processing assignments. You can also use them to collect other types of student work. Students could upload PowerPoint slides prior to a presentation. You could assign a what-if scenario using a spreadsheet and ask students to submit it. Students could take a digital photograph of a sculpture or mechanical project and submit it for evaluation.
As long as the file is smaller than the upload maximum, you can create assignments for any sort of digital content. Consider the types of work products you want your students to produce during your course. How many of them could be digital files submitted using an assignment?
Creative Assignment Practices
Table 9-1 shows you which assignment type can be used for which purpose.
| S. No. | You Want.. | You choose.. |
|---|---|---|
| 1 | Students to type shorter or longer responses directly online. | Set Online text to Yes. This works well for younger children who will only manage a sentence or two and works just as well for higher education students who write more. |
| Advantage - quick for the student to get started; no need to use a word-processing program and upload the file. | ||
| Disadvantage - potential worries that if the internet goes down, the work students have typed in and not yet saved might be lost. If the word count is expected to be large, setting Online text to No and File submission to Yes might be a better option. | ||
| 2 | students to submit work you can download in a specified program | Set File submission to Yes, set the number of files you will allow using the Maximum number of uploaded files setting and the file sizes by using the Maximum submission size setting. |
| Advantage - better than students emailing work as the whole class’s work is collated in one space on your course. Markers can provide comments directly on the student work. | ||
| Advantage - with “Attempts reopened” enabled, teachers can see the progression through various drafts of a student’s work. | ||
| Disadvantage - assignments must downloaded to be viewed (but they can be downloaded in bulk) and the teacher needs the appropriate program to open them. | ||
| 3 | students to submit files at different times for a project | Set File submission to Yes, and use Maximum number of uploaded files to set the maximum number of separate files they can upload. |
| Advantage - all project files are in one assignment area for grading so they get a single grade. | ||
| Disadvantage - all project files are in one assignment area for grading - so they can only have a single grade! | ||
| 4 | students to write a response to a video/sound file/image | Set up an assignment allowing online text submission and get students to use the Moodle media icon to add video/sound/image files. |
| 5 | to grade work students have done offline | Uncheck the submission types when setting up the assignment. Students won’t be required to do anything but you can use the assignment to grade them for work done outside of Moodle. |
| 6 | to view, comment on and send back students’ assignments | Set up an assignment allowing file submissions. |
| Advantage: useful for teachers who like using the “comment” options in word-processing programs for example. | ||
| Disadvantage: if students upload other file types, you have to download them, comment and then re-upload them. | ||
| 7 | students to send you a comment or note along with their uploaded work | In the settings, set Submission comments to Yes. |
| 8 | to allow students to redraft and decide when to submit the work | In the settings set Require students click submit button to Yes. Students can then control when their draft work is submitted to the teacher. |
| 9 | students to keep an ongoing journal or do an iterative assignment | In the settings set Require students click submit button to No. Students can continue to make changes to their assignment and at no point do they ‘submit’. If the work will be graded at some point it is recommended that either Prevent late submissions is set to Yes to ensure that no changes can be made after the due date, or all submissions are locked when grading commences to ensure that the work is not altered during grading. |
| Advantage: the work remains in one place and is constantly improved, graded (if needed) and improved again. | ||
| Disadvantage: there is no record/history of previous attempts. The online text assignment does not replicate the display of a journal or blog where each new entry is additional to the previous ones. | ||
| 10 | students to submit work in groups | In the settings, set “Students submit in groups” to Yes. If you just do this, then once one student has submitted, the assignment will be flagged as submitted even if the others haven’t contributed. If you want to ensure everyone has an input, set “Require students click submit button” to Yes and then change “Require all group members to submit” to Yes. The assignment will only be classed as submitted when each member has contributed, and once one student has submitted, the remaining member’s names will be displayed for the group to see who still needs to add their input. |
| 11 | to grade students’ work anonymously | In the settings, choose “Blind marking”. When students submit assignments, their names will be replaced by randomly generated participant numbers so you will not know who is who. |
| 12 | to read and grade student assignments offline | In the settings, choose “Offline grading worksheet”. When students have submitted, click “View/grade all submissions” and you can download their assignments from the link “Download all submission” and download the grading sheet from the link “Download grading worksheet”. You can then edit grades and re-upload the grading worksheet. You can also upload multiple feedback files in a zip from this drop down menu. |
Summary
Assignments are an easy way to gather and track student submissions. Students can submit any type of electronic file to fulfill the requirements. Instead of collecting unwieldy stacks of paper, you can let Moodle track who has turned in a paper and when. The feedback options provide you with an easy way to send grades and/or comments back to the students about their work.