6. Custom Types
Defining custom types with Interfaces
So far in the book I’ve showed you how to use TypeScript as a transpiler that allows you to take advantage of ECMAScript 2015 language features and as a way to guard yourself against many common bugs such as misspelling member names or returning the wrong type from a function. That’s all very valuable, but the real value in using TypeScript is the fact that you can go above and beyond the types that JavaScript provides out of the box and define custom types that describe the data structures and behavior that your application uses.
TypeScript offers three ways to define a custom type - interfaces, classes, and enums - and in this chapter I’m going to start with the easiest of those three: interfaces.
An interface in TypeScript is the same as an interface in just about any other staticly-typed language like C# or Java: it acts as a contract that describes the data and behaviors that the object exposes for others to interact with. In order to define an interface, you use this straightforward syntax:
interface Todo {
}
Here I’ve defined an empty interface called Todo that I’ll use to describe the Todo type that I’ll be using to build the sample application through the rest of the book. I’ll start by defining two properties: a name property to contain the display name of the Todo, and a completed property to indicate whether the Todo has been completed or still remains to be done:
interface Todo {
    name;
    completed;
}
Now, this is perfectly legitimate, but as I just got done describing in the last chapter, since we have the ability to be very descriptive about our types, we should use it! So, let’s specify a type for each of these properties.
Since the name property is going to hold a string value containing the name of the Todo, I’ll specify the string type using the same syntax that I used to apply type information to variables and function parameters last chapter: a colon, followed by the type name:
interface Todo {
    name: string;
    completed;
}
Then I’ll do the same thing with the completed property, defining it as a boolean:
interface Todo {
    name: string;
    completed: boolean;
}
Before I begin using this interface, take a look at the code that TypeScript generates to represent this interface at runtime:
It’s blank! That’s because interfaces are strictly used for compile-time checks only, and have no effect on the code at runtime. Consider interfaces a way to tell TypeScript information about objects to help you catch more errors at build time, but don’t ever rely on them being there at runtime. In fact, the first thing that TypeScript does when it compiles the final JavaScript output is to strip out all of the interface definitions.
Let’s put this new interface to work by applying it to a new variable:
var todo: Todo;
And then I’ll try to assign that variable with an object that doesn’t fit the description that we’ve laid out in the Todo interface. We’ll start with just an empty object by creating an object literal with no members defined:
var todo: Todo = { };
Notice how TypeScript warns us that this object is not compatible with the Todo type because it doesn’t have the name property.
Alternatively, I could go the opposite right and instead of the defining the type of the variable I can specify the type of the object itself using the “casting” syntax, which looks like this:
var todo = <Todo>{ };
However, I tend to stick with the other way because I find it a little bit cleaner to tell TypeScript what type I want the variable to be and have it make sure I’m assigning the right object, rather then the other way around…
var todo: Todo = { };
So, now that I have an object that TypeScript is warning me is not really a Todo, let’s go ahead and add a name property… but instead of defining it as a string type like TypeScript is expecting, let’s try to trick TypeScript and initialize it to a number value instead:
var todo: Todo = {
    name: 123
};
Nope, TypeScript doesn’t like that, either! Now it’s telling us that it did find a property called name, but that property is not compatible with the type of the name property that we defined on the Todo interface… In other words, TypeScript is telling us, “You told me this was supposed to be a string, but you’re trying to set it to a number and I’m not gonna let you do that!”
If we correct this issue by assigning the property to a string…
var todo: Todo = {
    name: 'Pick up drycleaning'
};
TypeScript gives us the next error: that this object is now missing the completed property. At this point we’ve got two options:
- Satisfy the interface by adding a
completedproperty with a boolean value, or… - Decide that maybe not all
Todoinstances really do require a completed property and update the interface to make this property optional by adding a question mark right after the name:interface Todo { name: string; completed?: boolean; }
What this does is tells TypeScript: “Not every Todo object needs to have a completed property in order to be considered a Todo… but, when it does have the completed property, that property should always be a boolean value.”
It’s important to note at this point that interfaces just describe what you intend or expect to happen - they don’t actually enforce the fact that values will be of a certain type or have the expected properties at runtime. To illustrate this point, consider a scenario where these objects are coming from outside of our application, for instance if we were retrieving them from a remote web service through an AJAX call. In this scenario we have no way of controlling what will actually come back from that server, and in fact the server could choose to change its data structure even after our application had been running successfully for some time. When the server changes the data it sends back, our TypeScript interfaces aren’t going to do anything to help guard us against that – but what they will do is allow us to update the interface in one place and more easily fix the issue throughout our application.
Data fields aren’t the only thing that you can define in an interface: you can also specify the behaviors that an object might have by defining method signatures on the interface. To define a method signature, you use the same exact syntax that you use to define a function, except you just drop the function keyword.
Since I am plan to only use this Todo interface to describe the data structure of a Todo object with no behavior, I’ll create a new interface called ITodoService that I will use to do things like create, retrieve, update, and delete Todos:
interface ITodoService {
}
Then, I’ll define some method definitions to give it some behavior.
First I’ll define a method that gets me a single Todo, called getById():
interface ITodoService {
    getById(todoId: number): Todo;
}
This method takes one argument - the number of the Todo to get - and returns a single Todo value.
Then, I’ll define a method that gets me all of my Todos called getAll():
interface ITodoService {
    getAll(): Todo[];
    getById(todoId: number): Todo;
}
This method takes no arguments and returns an array of Todo objects.
Next, I’ll add a method to delete a Todo:
interface ITodoService {
    delete(todoId: number): void;
    getAll(): Todo[];
    getById(todoId: number): Todo;
}
This method takes one argument called todoId which is the numeric ID of the Todo item to delete and it doesn’t return anything which I’ll indicate by using void as the return type.
Finally, I’ll define an add method that’ll let me add new Todos:
interface ITodoService {
    add(todo: Todo): Todo;
    delete(todoId: number): void;
    getAll(): Todo[];
    getById(todoId: number): Todo;
}
This method takes in a Todo object and then returns the newly-created Todo object (which may or may not be the same Todo object that was passed in).
And that’s it - I’ve now shown you how to create two interfaces: one that describes a service that has methods that I can call and another one that simply defines the data structure of an object to make it easier for me to interact with instances of those objects.
Note that I’m not actually going to implement this ITodoService just yet - that’s not what this chapter is about. Instead, I’ll save that for the next chapter where I show you how to create classes that implement interfaces. However, keep reading the rest of the sections in this chapter where I’ll show you all the interesting things that you can do with TypeScript interfaces, such as using the concept of structural typing to match objects to interfaces implicitly.
Using interfaces to describe functions
In the previous sections I showed you how to create an interface that describes the data members or methods of an object. This is great when you’re dealing with a simple object, but in addition to being a dynamic language, JavaScript is also a functional language, meaning that not only can you assign a function to a variable like this:
var $ = function(selector) {
	// Find DOM element
}
But that functions are also objects that can have their own properties and methods as well! In other words, this is perfectly legitimate JavaScript code:
var $ = function(selector) {
    // Find DOM element
}

$.version = 1.12;
If this is legitimate JavaScript code, that means that sooner or later we’re going to want to describe it with an interface, and that’s exactly what I’ll show you how to do in this section.
First, let’s start off with what we already know how to do and give the interface a version property that’s a number type:
interface jQuery {
    version: number;
}
Now, in order to define the function itself we simply add a function property without a name:
interface jQuery {
    (selector: string): HTMLElement;
    version: number;
}
Other than the fact that it doesn’t have a name, all of the normal rules apply: I can specify parameters and return values and everything.
Here I’ve chosen to return an HTMLElement, which is a built-in type that is exactly what it sounds like - a DOM element! That means that if I call this method TypeScript will be able to give me an object with full autocomplete on all the properties and behaviors available to HTML elements.
Once I’ve defined the interface, I can apply it to the function that I’ve defined by using the casting syntax to force TypeScript into treating this function an instance of this interface.
var $ = <jQuery>function(selector) {
    // Find DOM element
}
With this interface defined and applied to the $ variable, I can now call the $ function and get the full typing of the jQuery interface:
var element = $('#container');

In this section, I showed you how to define interfaces that describe functions, and I did using the popular jQuery API as my example. However, for those of you who are familiar with the jQuery API, you know that it offers far more features than just what I’ve shown here. And, not only that, but it also offers a plugin model that lets anyone come along and dynamically add functionality to the API as well.
In the next section, I’ll show you how you can extend this interface to describe all of this functionality without having to actually modify it.
Extending interface definitions
In this chapter I’ve shown you how to define and apply interfaces that describe the properties and methods of an object, but JavaScript is a dynamic language, which means that it is very easy to extend the structure of an object by adding methods and data properties on the fly.
Perhaps the best example of this is the jQuery library and the way it allows you to extend its behavior through its plugin design pattern.
If you’re not familiar with jQuery, it is a library that makes it very easy to work with DOM elements and in fact, I started to describe it with the ‘jQuery’ interface that I made in the last section, and have updated just a little bit to make it behave a little more like the real jQuery library for this demo.
The biggest difference between this interface and the jQuery library, however, is that instead of HTML elements, the real jQuery function returns a jQueryElement, like this:
interface jQuery {
    (selector:  (string | any)): jQueryElement ;
   fn: any;
    version: number;
}
A jQueryElement is a JavaScript object that has helper methods like the data() method which allows you to assign data to an HTML data property, or extract a previously-assigned value from a data property.
In other words, the interface for the jQueryElement (or at least the part that I’m interested in right now) might look like this:
interface jQueryElement {
    data(name: string): any;
    data(name: string, data: any): jQueryElement;
}
And I would use jQuery to modify data properties like this:
var todo = { name: "Pick up drycleaning" };
var element = $('#my-element');
element.data('todo', todo);
var savedTodo = element.data('todo') // returns todo
In the first line I use the jQuery $ function to get a reference to a DOM element. Then, I use the data() method to assign the todo object to the DOM element’s data property named "todo". Finally, I use the data("todo") method again to extract the value I just set by calling it with only the name of the data property that I want to retrieve.
Now, that’s the behavior that comes out of the box in the jQuery library. But, as I mentioned a minute ago, jQuery allows you to extend this API by simply attaching new functions to its fn property, like this custom method that assigns an instance of a Todo to the data of an HTML element, or retrieves the previously-assigned Todo instance:
$.fn.todo = function(todo?: Todo) {

    if(todo) {
        $(this).data('todo', todo)
    } else {
        return $(this).data('todo');
    }

}
What’s more, the jQuery plugin model says that once I add this method to the fn property, I should be able to simply call it from any jQueryElement, just like I called the data() method I just showed. In other words, I should be able to do this:
element.todo(todo);
But, if I try to do that TypeScript yells at me since my custom todo extension method is not listed on the jQueryElement interface, even though I know that jQuery will make it available to me so it should be listed as a valid method!
Of course, I just created the jQueryElement interface so in this example I could fix this by just updating the interface definition to include the new method, like this:
interface jQueryElement {
    data(name: string): any;
    data(name: string, data: any): jQueryElement;

    todo(): Todo;
    todo(todo: Todo): jQueryElement;
}
I could do that, but since jQuery is a third-party library that I didn’t create, let’s assume that this interface was actually created by the jQuery team and not me. In that case, it’s a really bad idea to update their interface to add my own extensions.
Luckily, TypeScript will let you extend any interface without actually changing the original definition, and it’s actually much simpler than you might expect.
Rather than update the jQuery team’s interface, I can create a brand new interface that shares the same exact name as the one that I want to extend:
interface jQueryElement {
    data(name: string): any;
    data(name: string, data: any): jQueryElement;

    todo(): Todo;
    todo(todo: Todo): jQueryElement;
}

interface jQueryElement {
}
With this in place, I can move my custom methods into this new interface, keeping them completely separate from the original interface that the jQuery team owns:
interface jQueryElement {
    data(name: string): any;
    data(name: string, data: any): jQueryElement;
    todo(): Todo;
    todo(todo: Todo): jQueryElement;
}

interface jQueryElement {
    todo(): Todo;
    todo(todo: Todo): void;
}
Now if I look at the autocomplete options for the element I see both the data and the todo methods listed, even though my custom methods were not on the original interface.
Even though it seems like a second definition of the same interface would just conflict with or overwrite the first definition, it doesn’t. Anything added to this second definition (or a third, or any number of additional definitions) will simply be tacked on to the original interface just as if it were directly added directly to it.
Generally speaking, it’s a pretty good idea to only apply this approach to code that you don’t own, as I’ve done in this example. In other words, if I wanted to extend one of the interfaces in my own application - such as the Todo or ITodoService interfaces that I made earlier - I’d be better off just going and adding these new methods directly to the original interface. If, however, I extend the behavior of a third-party library, using this approach is a pretty good way to extend the library’s interface without actually changing the original code.
Defining constant values with enums
In the beginning of this chapter I mentioned that TypeScript offers three different ways to define custom types: interfaces, classes, and enums. I showed you how to define interfaces in the previous two sections, and I’ll spend the whole next chapter showing you how to use classes. So that leaves enums, which is what I’ll cover in this section.
If you’re familiar with the concept of enums from other languages such as C# or Java, enums in TypeScript act in pretty much the same way: they are a way to define a set of meaningful - and constant - values that you can use to replace the “magic” strings and numbers that you would otherwise use.
What’s a “magic” value? The easiest way to explain is to look at an example.
Up to now, I’ve been using a boolean value - either true or false - as the type of the completed property that describes whether a todo is completed or not:
var todo = {
    name: "Pick up drycleaning",
    completed: true
}
But, let’s say instead of that a todo can be in one of several different states: New, Active, Complete, and Deleted.
In other words, instead of that completed property, I want to have a state property, like this:
var todo = {
    name: "Pick up drycleaning",
    state: 1
}
Here I’ve used a number to indicate which state the todo is in, but I’ve got a couple of different options.
I might assign each state a number, like this:
/*
New = 1
Active = 2
Complete = 3
Deleted = 4
*/
Or, I could assign them all a string or a character, like this:
/*
New = 'N'
Active = 'A'
Complete = 'C'
Deleted = 'D'
*/
Whatever values I decide to use, I’ll end up hard-coding those values all throughout my code.
For example, let’s say a todo must be in the “Complete” state in order to delete it, so I’d end up writing this logic:
function deleteTodo(todo: Todo) {

    if(todo.state != 3) {
        throw "Can't delete incomplete task!"
    }

}
This makes a lot of sense right now because I just told you that the value 3 means the “Complete” state. But, what happens when we have to read this in 3 months and we’ve completely forgotten what all of those values are, or a new developer joins the team who just doesn’t know? All of the sudden, this same code is completely unreadable because we have no idea what 3 refers to.
In this case 3 is the “magic number” - a value that is crucial to making the application work, but is completely meaningless without some kind of context. Enums provide that context.
The syntax to define enums in TypeScript is very similar to defining them in other languages such as C# and Java. It looks like this:
enum TodoState {
	New = 1,
	Active = 2,
	Complete = 3,
	Deleted = 4
}
Take a look at what JavaScript code TypeScript generates:
(function (TodoState) {
    TodoState[TodoState["New"] = 1] = "New";
    TodoState[TodoState["Active"] = 2] = "Active";
    TodoState[TodoState["Complete"] = 3] = "Complete";
    TodoState[TodoState["Deleted"] = 4] = "Deleted";
})(TodoState || (TodoState = {}));
Ok, maybe it’s not obvious what this code does.
Instead, copy this generated code, open the developer console of your browser and just paste it in.
Then, inspect the TodoState object to see what it looks like:
TodoState  // {1: "New", 2: "Active", 3: "Complete", 4: "Deleted", New: 1, Activ\
e: 2, Complete: 3, Deleted: 4}
I can see here that the code that TypeScript generated creates two properties on the TodoState object for each enum value I defined: a numeric value with a string key, and a string value with a numeric key.
In other words, TodoState.New translates to the number 1. And, if I have the number 1 and I want to get its name, I can request the name by requesting it from the enum object like this:
TodoState[1] // "New"
Note that, even though this looks like the syntax I’d used to access a value in an array, it is really the syntax you use in order to dynamically access a property on an object.
In this case, I passed the value 1 directly, but most of the time when you use this syntax with an enum, you’re going to be passing in a variable.
For example, I might have a variable named todoState that I assign to an enum value somewhere:
var state = TodoState.New
And then later on in my code I want to display the name of that enum value:
TodoState[state]
Remember, the actual value of the state variable is actually a number:
state // 1
Now that I have my new TodoState enum defined, I’ll revisit and refactor that example from earlier, and instead of hard-coding the number 1 to mean the “New” todo state, I’ll use the enum:
function deleteTodo(todo: Todo) {

    if(todo.state != 1) {
    if(todo.state != TodoState.New) {
        throw "Can't delete incomplete task!"
    }

}
At runtime, this code works pretty much exactly the same as before – in other words, when this expression evaluates it really says “if( todo.state is not equal to 1)”.
In fact, with this enum in place, I can actually update the Todo interface, updating the type of the state property to be TodoState to enforce the fact that consumers may only assign valid values that I’ve defined in the TodoState enum:
interface Todo {
    name: string;
    state: TodoState;
}
Also, in addition to all of those benefits, TypeScript is also able to help me out by giving me a great autocomplete list of TodoStates that I can choose from as I type:

Even though all of this code is still functioning pretty much exactly the same as it did before I introduced enums, using TypeScript’s enum feature offers a simple - yet incredibly powerful - way to reduce those “magic strings” that we find ourselves relying on so often and give meaning to those important values in our code, which ultimately make the code much easier to understand. I think that once you try using enums, you’ll wonder how you ever worked in JavaScript without them.
Anonymous Types
Now that I’ve showed you how to define custom types in TypeScript using interfaces, let me add a little twist: you can actually declare interfaces right in-line anywhere that accepts a type. This approach is called an anonymous type.
For example, let’s say that I have a variable that I want to accept an object that has a name property. Rather than define a whole interface with just one property, I could simply define the type right inline, like this:
var todo: { name: string };
With this anonymous type definition in place, TypeScript will begin enforcing it. For instance, it’ll give me an error if I try to assign an object to this variable that doesn’t have the name property:
todo = { age: 42 };
This can actually be very useful in certain scenarios. Remember in the last chapter when I introduced you to union types with this example to allow consumers to pass in either strings or array values?
function totalLength(x: (string | any[]), y: (string | any[])): number {
    var total: number = x.length + y.length;
    return total;
}
If all I really care about is the length property of these two arguments, why should I restrict them to just string and array types? Why not embrace JavaScript’s dynamic nature and just let in ANY object that has a length property (as long as it’s a number, of course)?
Well, if I replace those union type with anonymous types I can achieve exactly that:
function totalLength(x: { length: number }, y: { length: number }) {
    var total: number = x.length + y.length;
    return total;
}
With this simple change, I’ve now opened the door to any object with a length, making this code dramatically more reusable and, personally speaking, I think it’s also much cleaner and easier to understand.
Keep in mind, there is one issue that still remains and that is there is nothing forcing consumers of this method to pass in two values of the same exact type, therefor allowing them to continue to be able to add the length of an array to the length of a string for example. But, we’ll take care of that issue in the generics chapters. For now, let’s keeping moving on to the next section and check out the other ways that TypeScript allows us to define custom types.
var todo: { name: string };

todo = { age: 41 }

function totalLength(x: { length: number }, y: { length: number }): number {
    var total: number = x.length + y.length;
    return total;
}
Using interfaces to dynamically access object properties
When I first heard about TypeScript and that it was bringing static typing to my beloved dynamically-typed JavaScript language, I wrote it off immediately. After all, for all of the issues JavaScript has, its dynamic nature can be incredibly powerful when you use it correctly! As far as I was concerned, anything that took that dynamic power away was bad in my book.
Of course, as I’ve mentioned several times already, TypeScript doesn’t take away anything from JavaScript.
And, whenever you come across a scenario when you want to ditch static typing and really leverage JavaScript’s dynamic nature, you can always feel free to use the any type to tell TypeScript not to enforce strong typing rules on a given object.
For example, one pattern that I use all the time in my JavaScript code is to leverage a regular object as a collection, in which each of the object’s properties acting as the key for each of the items in the collection, like so:
let todoComments = {
  123: [ "Still need to clean the Bat computer" ],
  456: [ "Waiting to hear back from Alfred." ]
}
In this example, I’ve create an object named todoComments to store an array of comments for each of my Todo objects, using the Todo items’ Id value as the property name.
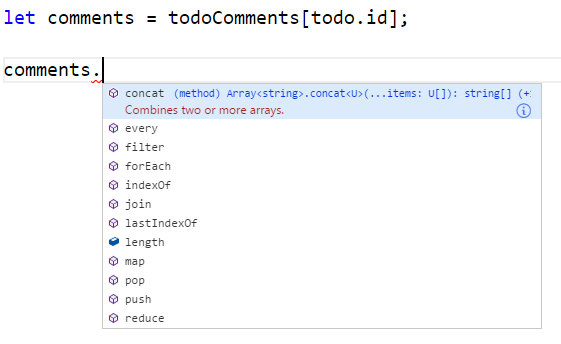
Using this approach, I can access Todo comments like this:
let comments = todoComments[todo.id];
Or, I can add new comments on the fly, like this:
todoComments[todo.id] = [ "Wow, what a great example!" ];
Of course, TypeScript supports this approach just fine right out of the box. The problem comes when we consider the fact that you and I can look at the code and see what it does - that whenever I pass in a Todo item’s Id, I get a collection of strings back - however, TypeScript has no idea about that… unless we tell it.
Luckily, there’s a simple syntax to do this:
interface ITodoCommentsLookup {
    [todoId: number]: string[];
}
What this interface says is that the object that implements it offers an indexer that accepts a number as the key and returns a collection of strings (string[]).
Of course, you apply this interface like any other interface:
let todoComments: ITodoCommentsLookup = {
Then, from there on out, whenever you use the accessor with a number, TypeScript will know that the object returned is an array of strings and will give you the proper static typing behavior:
This technique may not be something that you use every day, but it is one that can be really powerful when it is applicable. So, keep this syntax in mind the next time you want stong typing support on an object that you’ve retrieved using an object’s indexer.