Chapter 1 - The Basics of EC2
People come to the cloud, partly because of the flexibility and the ease with which you can deploy your solution. But to put it in layman’s terms, and in plain English - we need a place to run our applications and running your applications means you need a computer running in the cloud.
That is why I am going to start with AWS EC2 as the first and most basic part of this book.
Elastic Compute Cloud (one E and two C’s - hence the name EC2) is the basic pillar of running your application in the cloud. When you need a instance (the cloudy way of saying a computer or a VM) you go to EC2 to hook you up.
Being the IT geek that I am, I know that I obviously need to have connectivity to a network of some sort in order for a cloud instance to be of any use to me - so the first thing I set out to understand was, AWS networking.
VPC Networking
First things first. Let us understand the concept of a Public IP address and a Private IP and the differences between them. A Public IP is of course one that is accessible from the public internet and a Private IP is not accessible from the outside - it is only accessible from within the network that the instance exists. Let me take an analogy from everyday life that should be easy to understand.
You live in a house on 123 ACME st. in Dudesville. Your house has two floors each with 3 rooms. You want to press the order button for a mirror for your bedroom wall from Amazon, you are prompted to enter your shipping address. It would not enter your mind to enter “my bedroom on the second floor”, because no-one knows where that is. You need to provide a shipping address that everyone knows how to find (that is your Public IP) and not which room you want it delivered to (your Private IP). But when you want to get your kids to clean up their bedroom or put away their laundry, you would not ask to put their laundry away in 123 ACME st. because they are already inside the house - and they know where their room is in the house, how to get there and where they need to go. Your house is your private network - you know how to get from room to room (from one computer to another) and you never need to use your street address (Public IP) when you are inside the house.
By default Amazon creates a VPC for you in every region (I will get into regions and availability zones later on) - and this VPC is tagged as the default VPC (You do not control the IP address range of the VPC).
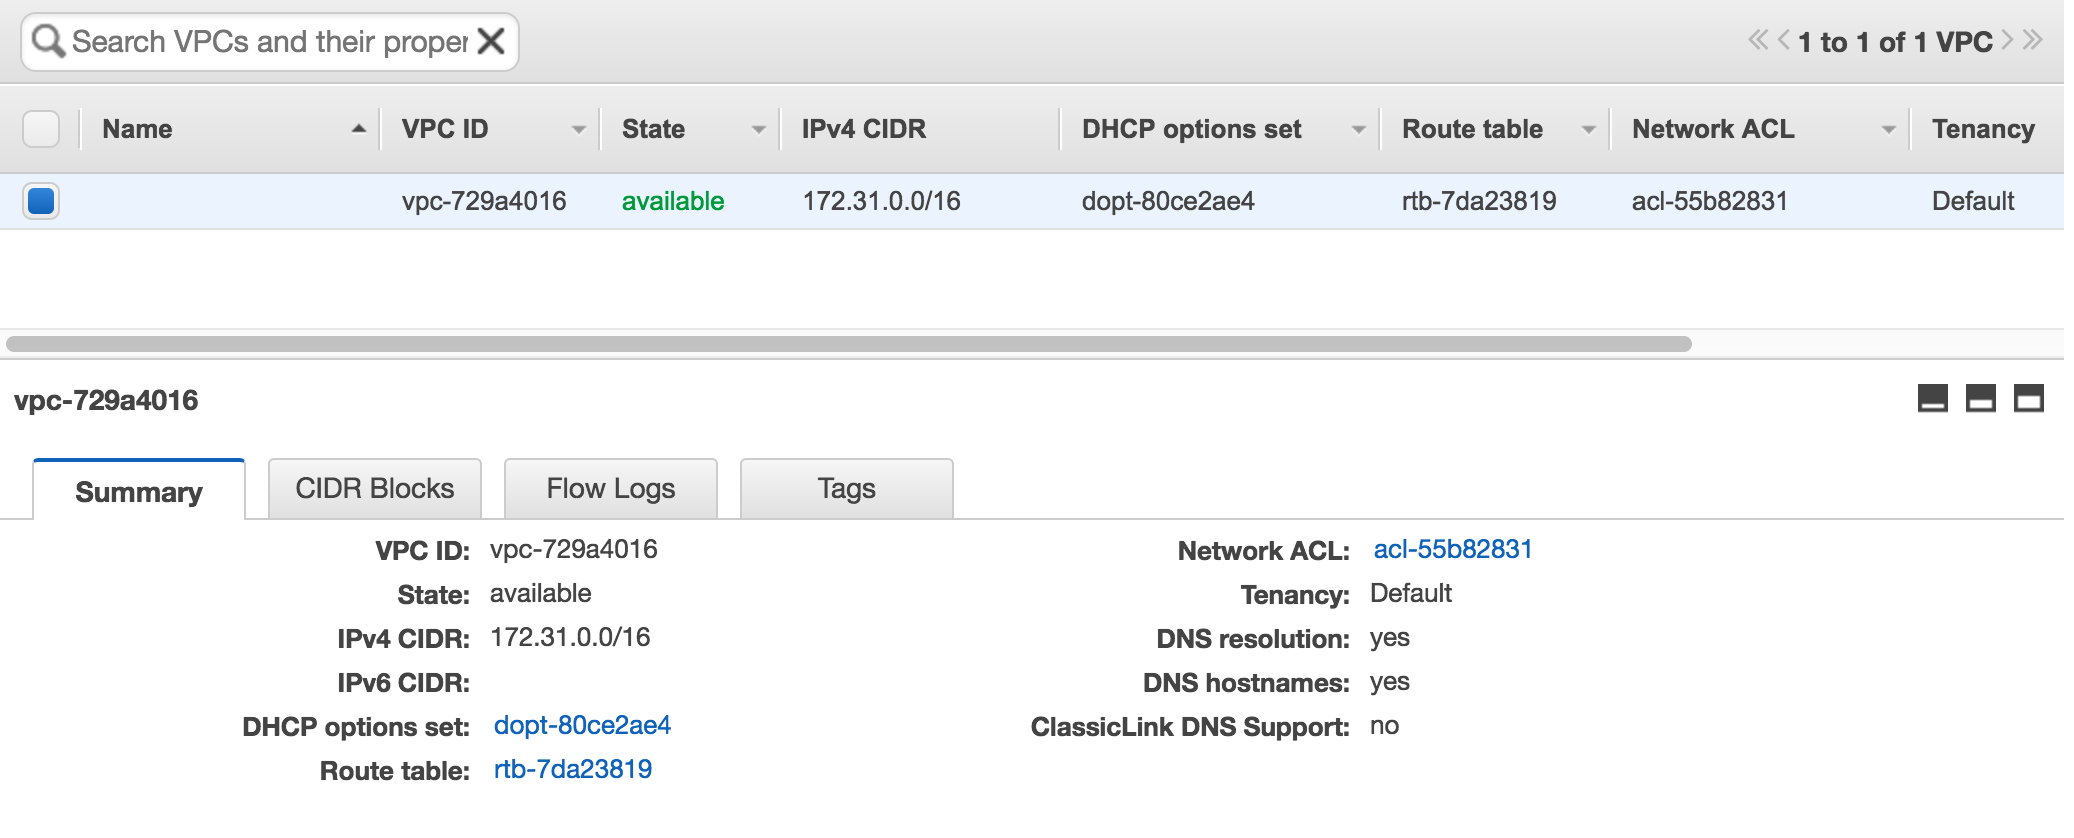
Hold on a Minute..
What is a VPC? An AWS Virtual Private Cloud is your small (or large - depending on your needs) part of real estate in AWS (and this real estate is free of charge). This your boundary,going back to the example above, this would be your plot of land where you can build your house. Will it be a simple caravan? Perhaps a 2 story house or maybe a 60 room palace? You decide - it all depends on your means and your dreams - you can decide. The same goes for your VPC design, it can be practically anything you want (with some limitations)
Public vs. Private Networks
The next concept that is important to understand is the difference between a private and a public network.
A public network is a subnet that will require you to attach a Public IP an instance on that subnet - in order for you to access the rest of the world (download patches, files) and in order for the rest of world to access your instance (serve web pages, for example).
A private network will never be directly accessible from the outside world - meaning instances deployed on a private network - can never be accessed directly from the outside world. You cannot attach a public IP address to an instance on a private network (actually you can manually do this - but it won’t work).
Going back to the house analogy. Your house is built of an exterior and an interior. The exterior has walls and some of these walls have doors and windows - to allow people, air and light into your house. You go through the door - to come into your house and out the door to get to work (that is the public network). But for an interior room inside the house with no exterior walls - you cannot access it from the outside - without coming in through one of the exterior walls, doors or windows. You cannot make an entrance directly from your garden to an interior room. It is physically not possible. You can become creative - by digging tunnels under your room to the garden (why you want to is another whole discussion) or creating a chute to allow air or light in - but that requires more detailed planning and thought.
External Interfaces
Connectivity is everything and connectivity is achieved through a number of connections or gateways. For me this was quite difficult to grasp in the beginning - it is important to understand the differences between them and when each one should will suit your needs.
The Internet Gateway (IGW)
This is connection from your VPC to the world. All traffic from your VPC outside of the AWS cloud - flows through this interface.
There are a couple of points that you need to understand I want to make sure that they are clear because they are crucial.
- There can be only one (I loved the Highlander when I was a kid). One Internet gateway per VPC.
- Your IGW does not have an IP address (at least not one that your are exposed to - AWS does not have public information on how traffic is routed through your IGW to your resources). You cannot ping it, you cannot manage it, you cannot scale it - basically - it is a single line in your routing table - and that is it. AWS takes care of everything else.
- Anything that is routed through the IGW *must* have a public IP address.
I want to explain a bit more about this last point. A paragraph or two ago, we discussed the public subnet. The default route for a public subnet - is the IGW in your VPC. See the diagram below.
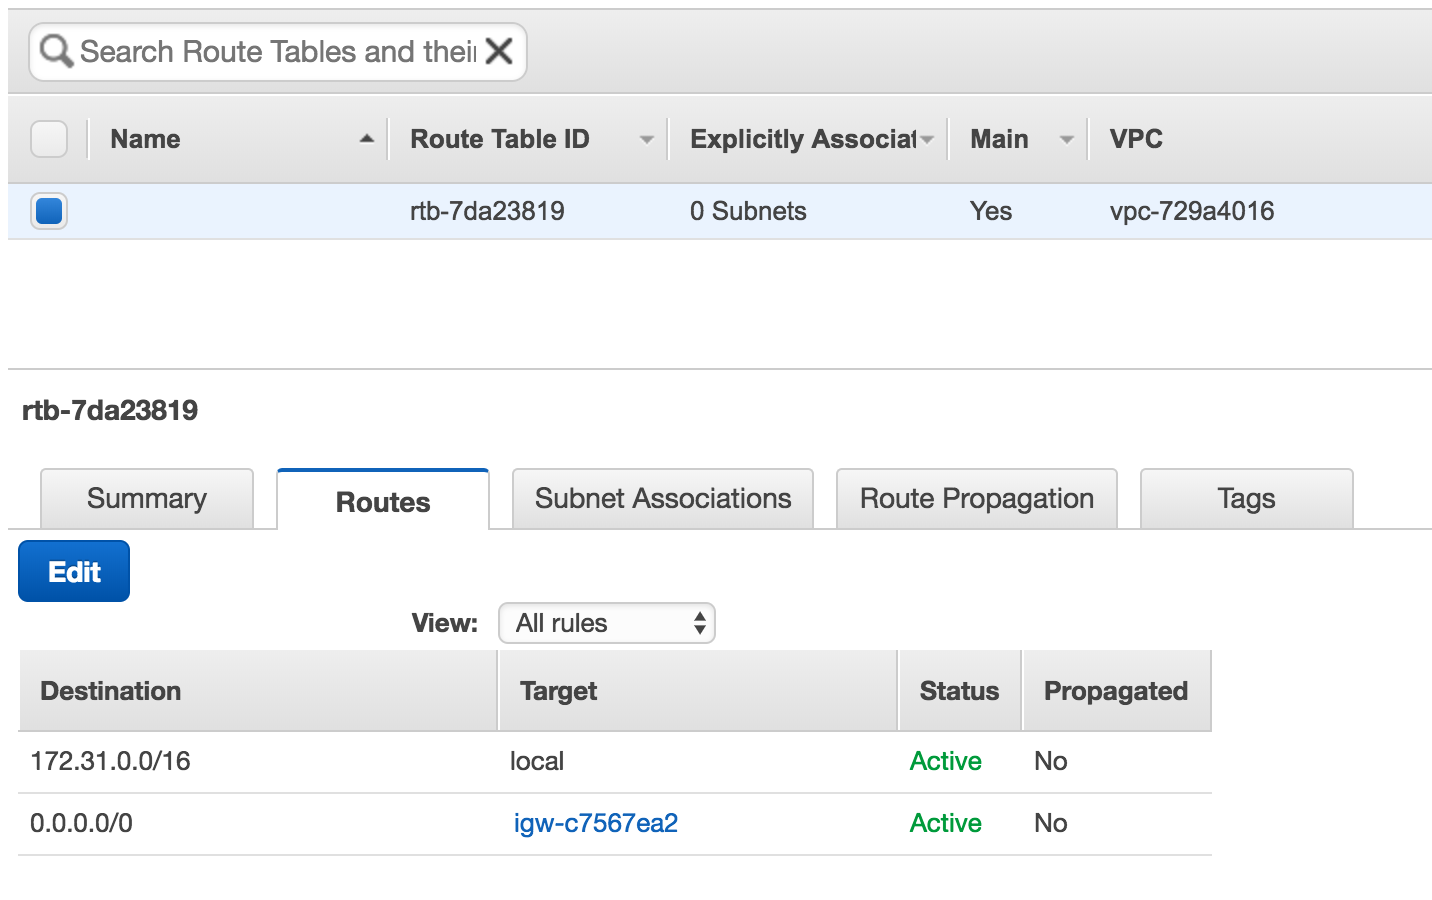
When I wrote that instances on the public subnet must have a public IP address - this is precisely the reason why. You can consider these instances to be sitting basically on the same network (or if it makes it easier to understand - on the same hub - but I am sure it is not an actual physical hub) as the IGW.
Rolling along..
NAT Gateways (NGW)
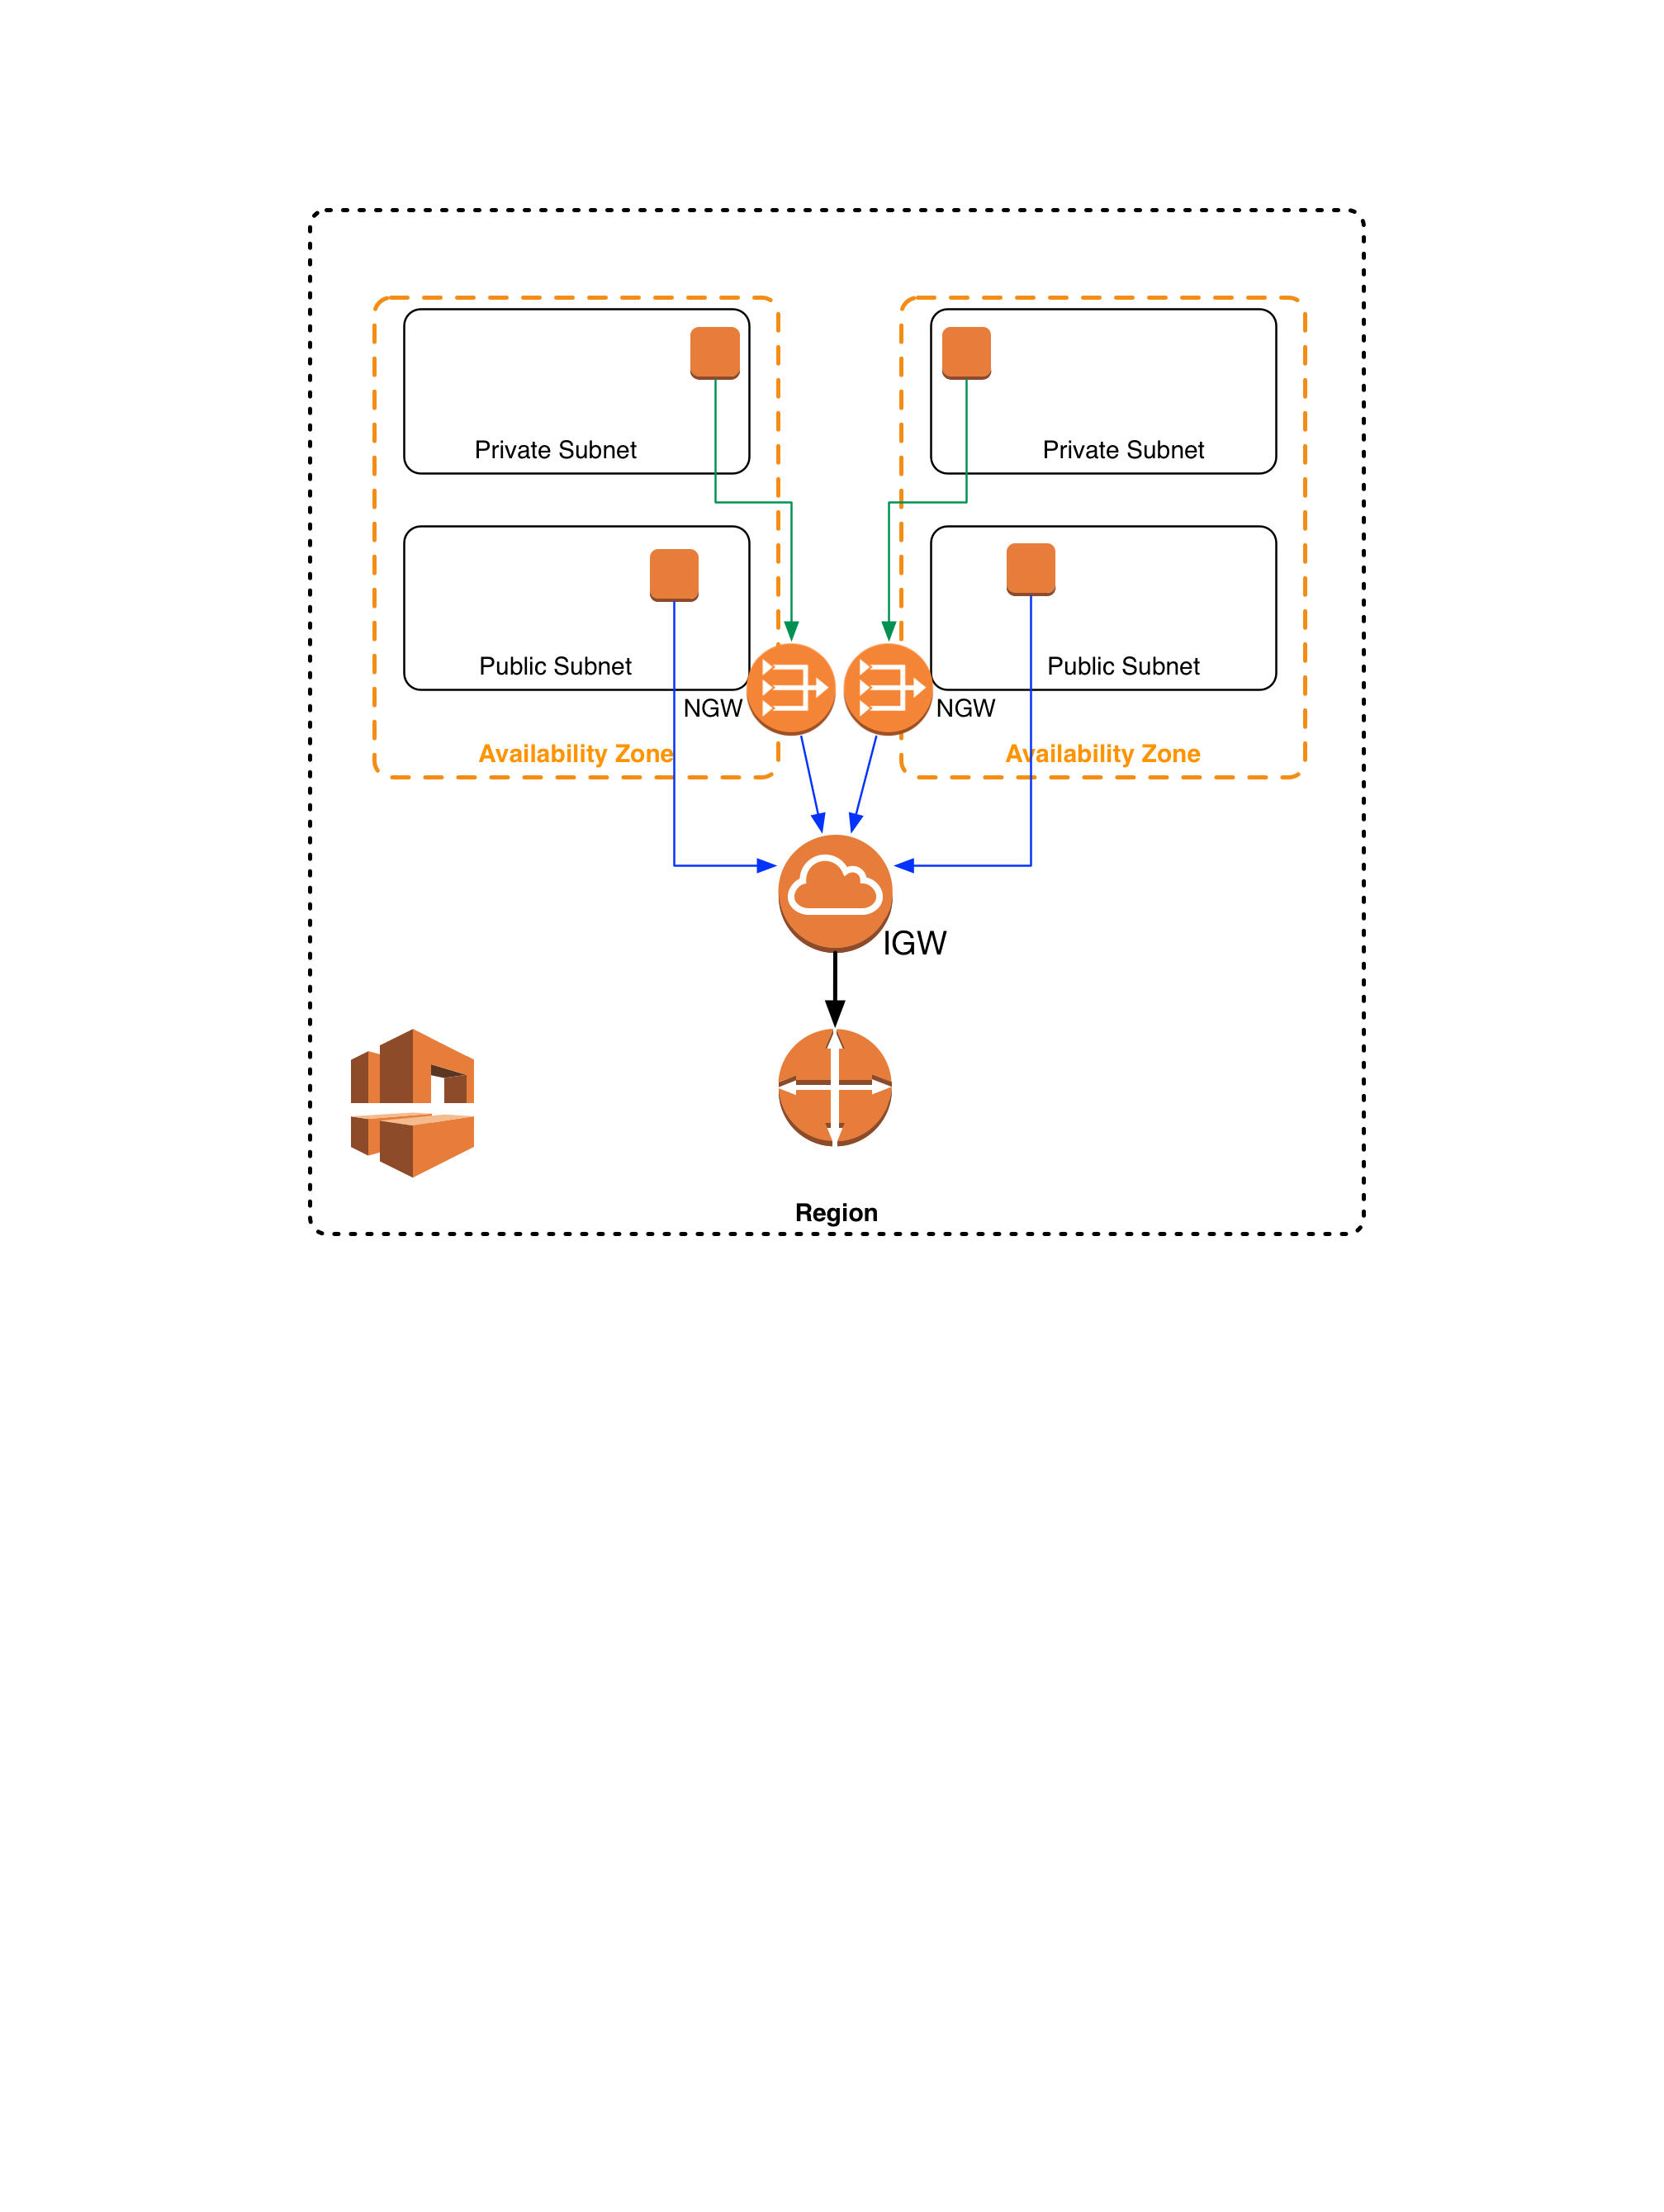
Instances on your private network will probably need to access things on the internet (patches, packages and the what-nots) but as I stressed before they are not connected to the internet - nor to the public subnet - and here is where the NGW comes in.
A NAT Gateway is an AWS service (again not something you can physically manage) deployed for you. To dumb it down a little - this is an instance that has two network interfaces. One on the public subnet and second on the private subnet. Traffic from an instance on a private subnet goes out through the NGW, and comes back in same way.
Let me add some important points you should be aware of.
- You might have noticed that the section title mentioned Gateways - in plural. Unlike the IGW - you can have multiple NGW’s in your VPC. How many exactly? As many as you want - but you can only route traffic from your subnet to a single NGW.
- NGW’s are dependent on a single availability zone. If an availability zone goes down (and yes it happens) then your NGW is also down.
- How many NGW’s should you deploy? One per availability zone (AZ). If you have one AZ (and you should never have a single AZ), then one NGW. If your solution deployed across four AZ’s then you should create 4 NGW’s.
Routing your traffic through the NGW - is also done through the routing table of your VPC.
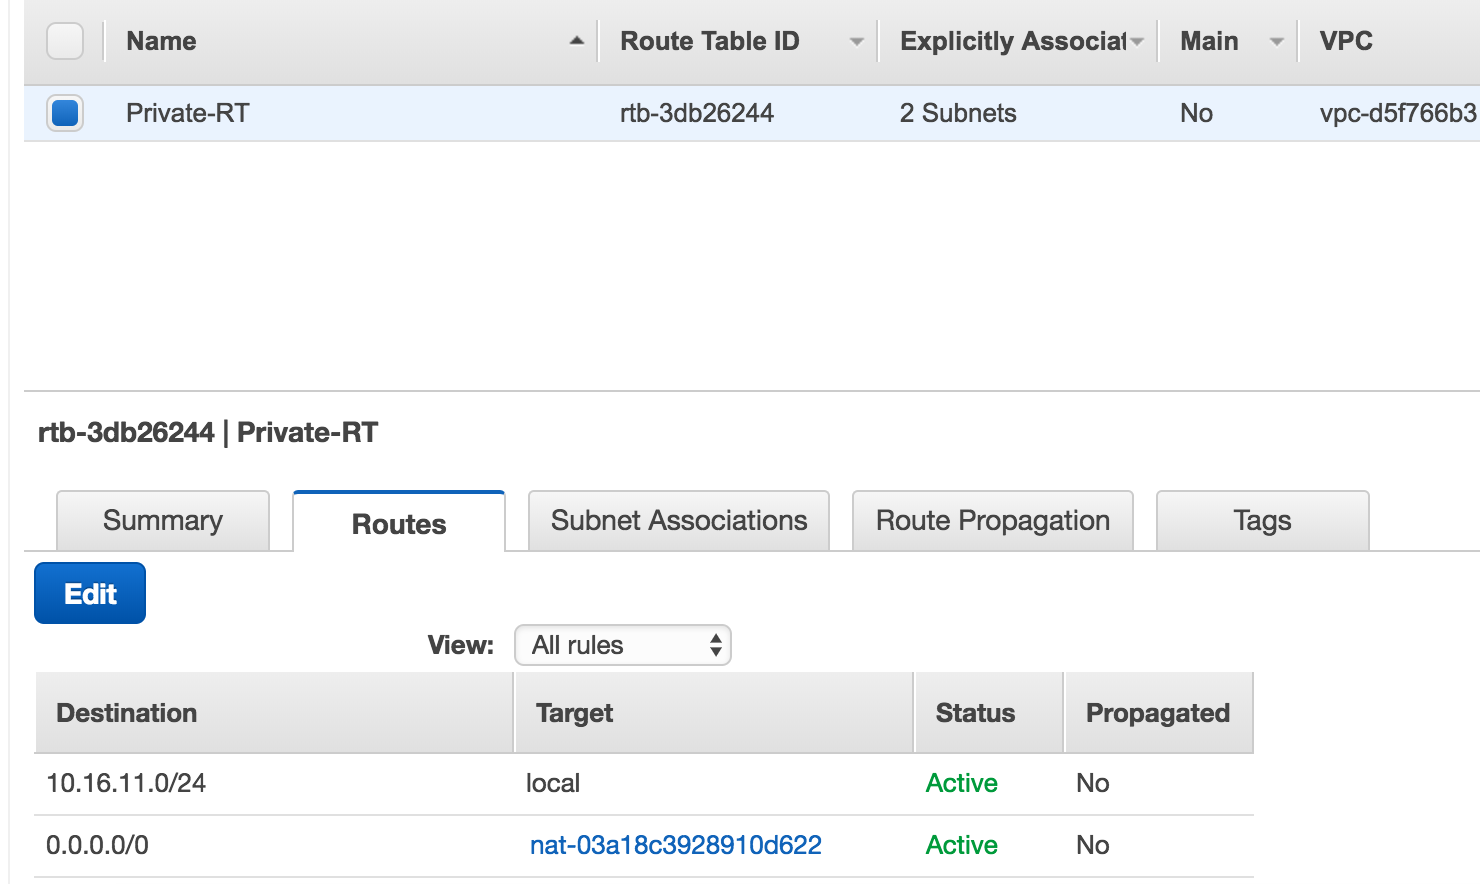
When creating the routes - make sure that the subnet and the NGW are in the same AZ - otherwise you will start wondering why your are getting paged at 03:43 when the shit hits the fan - and nothing is working.
VPN Gateway
In my experience there are certain cases where you actually need to connect your VPC to an network somewhere on the outside. It could be another VPC outside of your AWS region, it could be different cloud provider or it could be a service in your physical datacenter.
You could always set up a point-to-point VPN from a single instance a public subnet - but that doesn’t scale - at all. In comes a site-to-site VPN (as a Service - of course).
I am not going to go into the details of how you create a VPN gateway - the AWS documentation does a great job of explaining precisely how to do this. I am mainly interested in the networking aspect of this gateway.
The VPN Gateway (VPGW) is another destination (similar that of the IGW) in your VPC that you can route traffic through over a VPC connection to the location of your choice.
Ponder on these points.
- The VPGW service of AWS - is redundant (from the public perspective - you have two distinct IP addresses for the connection)
- To provide a fully redundant solution - you will need a highly available endpoint on your side
Before I go onto the next part of my EC2 journey, a quick recap
- There are public and private subnets
- There are 3 ways to route traffic in and out of your VPC - each of these has a valid use case.
- Internet Gateway (IGW)
- NAT Gateway (NGW)
- Virtual Private Gateway (VPGW)
EC2 Instances
OK. Now that I have that part out of the way - let me get into the intricate and mind boggling world of AWS compute instances (don’t worry there is a whole lot more besides the actual compute in AWS EC2).
Types and Families
I love explaining in ways that we can all relate to in our day to day lives. We all have clothes. And to make it simple - let me take a shirt as an example. Small, Medium, Large and Extra Large - assume these are the sizes that you choose from when walk into a store. I use either a Large or an XL - depending on the country that the store is in. I cannot do a medium - otherwise when I lift up my arms - people run aways in horror - because my belly button is out there. With a Small - I have trouble getting it over my head and I have trouble breathing - because it is so tight.
EC2 instances have the same kind of sizing - and these are your Instance Types. The service provided by AWS - dictates (you cannot create your own) what types are available - and they will differ from one instance family to the next.
Families? What is an Instance Family? Back to my real life example. You have your sizes (Large or Extra Large - remember?), but what kind of shirt do I want to buy? A tank top - without sleeves? A crew-cut? A v-neck? A Polo shirt? Buttons? Long sleeves? Short sleeves? With graphics? Without? What color? All these are choices you will make when walking into a store.
Instance families are the range of products you can choose from when walking into the store at AWS.
| General Purpose | Compute Optimized | Memory Optimized | Accelerated Computing | Storage Optimized |
|---|---|---|---|---|
| T2 | C5 | X1 | P3 | I3 |
| M4 | C4 | R4 | P2 | D2 |
| M3 | C3 | R3 | G3 | |
| F1 |
As you can see there is a great deal of choice in the ‘store’ - and each of these have a valid use case (otherwise I assure you that AWS would not offer them). Do they fit every single use case that you have - probably not - but then the question arises - what should I do if I cannot find precisely what I need?
My answer to that question is a simple one. Compromise. Either go up or down in the amount of resources you are using. From my experience the increments are well balanced out with the current instance types you have available to you today (AWS instance types change as time goes on). And if you need more CPU than RAM - move to Compute Optimized family - the price difference between them is zero. An m4.large and a c4.large are the same price - the c4 has faster CPU’s and the m4 has double the RAM and slower CPU’s. Seek and you will find.
AMI’s
Amazon Machine Images - are one of the fundamental pillars upon which you will your build solution on AWS.
We have an image that we use in house for all our deployments - based upon Centos 6.x and 7.x operating systems (but this will be true for what ever OS you choose.)
You can use the Amazon Linux AMI - which offered by AWS themselves, and this includes several obvious benefits, for example, the AMI is maintained by AWS, they provide the support for it, the AMI is constantly updated - and critical patches and updates are automatically applied. The AWS tools are embedded into the image and there is no need to install software to interact with the AWS endpoints.
Importing/Exporting Images.
AWS allows you to import existing images you might have and would like to use also in the cloud. It goes without saying that it is in their best interest - but I would have hoped that they would have made it easier to import AMI’s. The documentation is clear and concise - but for someone that is barely starting out with AWS - to start fiddling around with CLI commands is not something that I would recommend for the faint of heart.
When importing the AMI’s you will not know if they will work until you try and boot them up, and if you made a mistake while packaging the virtual disk - then you will need to upload the files again, until you get it right. The upside is that upload traffic to S3 is free - and you pay for storage consumed by your files. But uploading GB’s of files can take time - a whole lot of time. The total amount of time will depend on your location, your bandwidth, and the size the files that you are dealing with. The smaller your images, and faster the pipe you have - the less amount of time it will take, so don’t go and create images that are 80GB in size the sole reason being, that was the original size when you deployed on bare metal. The larger they are, the longer it will take for your instances to start up.
The other option you have - and this is the route I would suggest you take - is to build your own images - directly from AMI’s that already exist in AWS. You could choose to build it upon Amazon Linux - but it does not have to be. All the major Linux vendors have official images that you can use from the Amazon Marketplace.
I would not be true to myself if I didn’t actually have some code in the first chapter, so I am going to show you how can do this with a simple Ansible playbook.
The example below will assume you already have the following in place:
- An AWS account
- A Linux machine with Ansible installed (version >= 2.2)
- A VPC - with at least one public subnet
- A public keypair defined in the region
  1 ---
  2 - name: Connect to AWS
  3   hosts: localhost
  4   connection: local
  5   gather_facts: True
  6   vars_prompt:
  7     - name: "vpc_id"
  8       prompt: "Please enter your VPC ID (vpc-xzy12345)"
  9       private: no
 10     - name: "region"
 11       prompt: "Please enter your AWS region (for example us-east-1|eu-west-1\
 12 |ca-central-1)"
 13       private: no
 14     - name: "subnet_name"
 15       prompt: "Please enter name of a public subnet in your VPC
 16       private: no
 17     - name: "keypair"
 18       prompt: "Please enter name of your SSH keypair
 19       private: no
 20
 21   vars:
 22     instance_type: t2.small
 23     component_name: centos_image
 24     use_public_ip: "yes"
 25     instance_count: 1
 26     volume_type: gp2
 27     root_disk_size: 2
 28     component_rules:
 29       - proto: tcp
 30         from_port: 22
 31         to_port: 22
 32         cidr_ip: "0.0.0.0/0"
 33
 34   tasks:
 35     - name: Find CentOS 7 AMI
 36       ec2_ami_find:
 37         name: "CentOS Linux 7 x86_64 HVM EBS*"
 38         region: "{{ region }}"
 39         sort: name
 40         sort_order: descending
 41         sort_end: 1
 42       register: centos_image_7
 43
 44     - name: Create Component Specfic SG.
 45       ec2_group:
 46         name: "{{component_name}}_SG"
 47         description: "Security group for {{component_name}} purposes"
 48         vpc_id: "{{ vpc_id }}"
 49         region: "{{ region }}"
 50         rules: "{{component_rules}}"
 51         rules_egress:
 52           - proto: all
 53             cidr_ip: 0.0.0.0/0
 54         state: present
 55       register: component_sg
 56
 57     - name: Tag the security group with a name
 58       local_action:
 59         module: ec2_tag
 60         resource: "{{component_sg.group_id}}"
 61         region: "{{ region }}"
 62         state: present
 63         tags:
 64           Name: "{{component_name}}_SG"
 65
 66     - name: Deploy CentOS 7 instance
 67       ec2:
 68         region: "{{ region }}"
 69         key_name: "{{ keypair }}"
 70         image: "{{ centos_image_7.results[0].ami_id }}"
 71         wait: yes
 72         wait_timeout: 300
 73         group_id: "{{component_sg.group_id}}"
 74         count: 1
 75         monitoring: no
 76         instance_tags:
 77           Name: centos7_instance_temp
 78         vpc_subnet_id: "{{ subnet_name }}"
 79         assign_public_ip: "{{ use_public_ip }}"
 80         instance_type: "{{ instance_type }}"
 81         volumes:
 82           - device_name: /dev/sda1
 83             volume_type: "{{volume_type}}"
 84             volume_size: "{{ root_disk_size }}"
 85             delete_on_termination: True
 86       register: ec2
 87
 88     - name: Add new instance to host group
 89       add_host:
 90         groupname: serversToInstall
 91         hostname: '{{ item }}'
 92         ansible_ssh_user: centos
 93         ansible_ssh_private_key_file: "/Users/msaidelk/.ssh/id_rsa"
 94       with_items:
 95         - "{{ ec2.instances[0].public_ip }}"
 96       register: ec2_ip
 97
 98     - name: Wait for the instances to boot by checking the ssh port
 99       wait_for:
100         port=22
101         delay=60
102         timeout=300
103         state=started
104         host = "{{ item.add_host.host_name }}"
105       with_items: "{{ ec2_ip.results }}"
106
107 ## Instance Configuration
108 - name: Configure nodes
109   hosts: serversToInstall
110   user: centos
111   become: yes
112   become_method: sudo
113   gather_facts: True
114
115   pre_tasks:
116     - name: Generalize image
117       shell: |
118           yum update -y
119           yum install -y cloud-init cloud-utils cloud-utils-growpart dos2uni\
120 x vim iotop wget
121           service rsyslog stop
122           service auditd stop
123           logrotate -f /etc/logrotate.conf
124           rm -f /var/log/*-???????? /var/log/*.gz
125           rm -f /var/log/dmesg.old
126           rm -rf /var/log/anaconda
127           cat /dev/null > /var/log/audit/audit.log
128           cat /dev/null > /var/log/tuned/tuned.log
129           cat /dev/null > /var/log/boot.log
130           cat /dev/null > /var/log/cloud-init-output.log
131           cat /dev/null > /var/log/wtmp
132           cat /dev/null > /var/log/lastlog
133           cat /dev/null > /var/log/grubby
134           rm -rf /var/log/dmesg
135           rm -rf /tmp/*
136           rm -rf /var/tmp/*
137           rm -f ~root/.bash_history
138           unset HISTFILE
139           rm -rf ~root/.ssh/
140           rm -f ~root/anaconda-ks.cfg
141           poweroff
142
143 ### AMI Creation
144 - name: Image creation
145   hosts: localhost
146   connection: local
147   gather_facts: True
148   vars:
149     component_name: centos_image
150
151   tasks:
152     - name: Wait for the instance to shutdown by checking the ssh port
153       wait_for:
154         port=22
155         delay=120
156         timeout=120
157         state=stopped
158         host="{{ hostvars['localhost']['ec2']['instances'][0]['public_ip'] }\
159 }"
160
161     - name: Pause (wait for the instance to stop)
162       pause:
163         seconds: 45
164
165     - name: Create image from CentOS7 instance
166       ec2_ami:
167         region: "{{ region }}"
168         instance_id: "{{ hostvars['localhost']['ec2']['instances'][0]['id'] \
169 }}"
170         name: "Cloud_Walkabout_CentOS_7.0"
171         description: "The Cloud Walkbout Centos 7.0 image"
172         tags:
173           Name: "Cloud_Walkabout_CentOS_7.0"
174         wait: yes
175       register: centos7_image_name
176
177 ### Clean Up
178     - name: Terminate Temporary Instances
179       ec2:
180         state: absent
181         region: "{{ region }}"
182         instance_ids: "{{ item }}"
183       with_items:
184       - "{{ hostvars['localhost']['ec2']['instances'][0]['id'] }}"
185
186     - name: Remove Component Specfic SG.
187       ec2_group:
188         vpc_id: "{{ vpc_id }}"
189         region: "{{ region }}"
190         name: "{{component_name}}_SG"
191         description: "Security group for {{component_name}} purposes"
192         state: absent
Let me explain what this playbook does - step by step.
7-19: Collection of variables from the user (vpc_id, region, network etc.) 22-27: Hard coded variables for instance creation 28-32: To allow SSH into the instance for configuration from anywhere 35-42: Query AWS for the Approved Centos 7 AMI 44-55: Create a security group for the instance to allow SSH 57-64: Tag the Security group with a Name (I will go into tagging in the next section) 66-86: Deploy the instance 88-96: Add the instance into the in-memory inventory for further processing 88-105: Wait for AWS to actually bring the instance up 116-140: Run a shell script to generalize the image 151-161: wait for the instance to stop 163-172: Create an AMI from the instance 174-189: Clean up
One last word on exporting images out of AWS. The documentation explicitly states that you cannot export images out of AWS - that you did not actually import into AWS in the first place. An image that was created based on an AWS AMI that you do not own (as in the example above) will have to stay in AWS - you cannot take it out. This reminds me of the Hotel California lyrics “You can check out any time you want - but you can never leave.”
Tagging
I cannot stress this enough - and it something that you have to implement from day one. Without it - you will get lost in your journey to AWS - and I cannot convey to you how fast it will happen. Tag. Tag. Tag.
Tag everything!
Ok after I have scared the living hell out of you - let me get back to the basics. You have the option of attaching a key value pair to almost any and every resource in AWS. What that key value pair is - is entirely up to you. AWS has a number of basic values that are already created but not populated - for example the Instance Name.

What are these used for? Mainly making heads and tails of what you have in your cloud. Imagine to have to remember instance_ids in order to find something in your cloud? I would prefer to search by name - it is so much easier.
In the second part of this book I will go into some more details about how you should be tagging your resources - and some of the best practices that worked for me - and tools that you can use. For the time being - tag what you can - and start thinking about how you want to mark and identify the resources you are deploying in AWS. The earlier you can come up with a clear plan of how you want to tag - and what information you need to know about your deployments - the better you will be off in the long run.
Here are some leading questions that will help you along and start the discussion (even if it is only with yourself)
- Do I need to who deployed/owns the instance? (Owner)
- Do I need to know which project it belongs to (Project)
- Do I need to differentiate between Production, Staging and Test (Environment)
- Do I need to tag data classification (Secret/TopSecret/Clear)
- Do I need to know what the component is used for (Web/FrontEnd/Database)
Congratulations for staying with me so far. I know that it is a lot to take in for your first chapter and your first part of the journey into AWS. Next up we will go into some more details about connecting environments.