3: Input
In this chapter, we’ll be learning how to take keyboard input. We won’t be moving yet, but we’ll be showing the result in the log.
Steal This Code
Input has historically been difficult in javascript… but luckily, other people have done all the hard work for us! We just need a way to get their hard work into our project. Even more luckily, other people have designed easy ways for us to take their code! It’s truly a wonderful world.
We’re not really “taking” the code, since it is freely given. These are more accurately called “code-sharing” tools, but for the duration of this book we won’t be sharing… just taking. But I encourage you to start sharing your code as soon as you feel comfortable doing so!
Since you’re using ember-cli, you already have access to several of these wonderful code-taking tools- and another tool that ties them together.
To take the particular piece of code we’ll need, type ember install ember-keyboard-shortcuts into the command line. Now you have the library “ember-keyboard-shortcuts” available to you!
This will give you the npm package ‘ember-keyboard-shortcuts’ and the bower package ‘mousetrap’. Npm and bower are both vital tools in everyday programming life, but we won’t see them again in this book.
Be sure to restart your Ember server to get the keyboard shortcuts to load- stop the server in the command line (Ctl + C on OSX), then restart (ember s) after installing the addon.
Bringing it in
You can now access the ‘ember-keyboard-shortcuts’ codebase from within your project, but there’s an intermediate step before you can use any of their code. You need to import it.
At the top of our pac-man.js component, under the Ember import, we’ll import the KeyboardShortcuts mixin.
1 import Ember from 'ember';
2 import KeyboardShortcuts from 'ember-keyboard-shortcuts/mixins/component';
In this code, we’re importing just one mixin- specifically, the mixin that is meant to be used in an Ember component.
If you remember our discussion of modules from chapter 2, you may be able to guess which file in the addon we’re importing this from. If you can’t, no worries- understanding this isn’t core to this book.
What is a mixin? Glad you asked.
Mixins
Remember when we said that PacMan would “inherit” a bunch of properties from Ember.Component? That basically said “Hi PacMan, I’m Ember.Component. You’re going to be just like me, but don’t worry- you can change things”. Mixins say “Hey PacMan, here’s a bundle of new related code you can use if you want.”
How do you mix in a Mixin?
1 import KeyboardShortcuts from 'ember-keyboard-shortcuts/mixins/component';
2 export default Ember.Component.extend(KeyboardShortcuts, {
3   ...
4 })
So after you call extend, but before the {, you put your Mixins (separated by commas). You can mix in as many Mixins as you want.
Inheritance Chain
Now PacMan has a mix of stuff on it from Ember.Component, KeyboardShortcuts, and the PacMan object itself. What happens if something is defined twice? In the general case, a definition on the object itself takes precedence over a definition on the Mixin, which takes precedence over a definition on the parent class. Applied to this specific case, PacMan beats KeyboardShortcuts, which beats Ember.Component. We’ve seen this already with
didInsertElement, which was previously defined on Ember.Component but then overwritten on PacMan.
Defining keyboard shortcuts
After you’ve mixed in the KeyboardShortcuts mixin, you can put the following code into your PacMan class:
1 keyboardShortcuts: {
2   up: function() { console.log('up');},
3 },
The effect of this is that when you hit the ‘up’ key, your browser says ‘up’ (in the console, which I’ll show you how to access soon).
Let’s go over each element of this, starting with hashes.
Hashes
Here’s an example of a hash:
1 {
2   firstName: "Jeffrey",
3   lastName: "Biles",
4   sideBusiness: "EmberScreencasts.com",
5   firstTechnicalBook: "BUILD PACMAN"
6 }
The way to read this is: “first name is Jeffrey, last name is Biles, side business is emberscreencasts.com, and first technical book is BUILD PACMAN”.
In fancy technical terms, you could talk about ‘keys’ and ‘values’, like “The firstName key has a value of Jeffrey”, or “‘firstName: “Jeffrey”’ is a key-value pair”. I bring up those terms partially to be fancy, but also so I can give important messages like “a hash is a set of key-value pairs” and “key-value pairs in a hash are separated by commas”.
1 {
2   key: value,
3   anotherKey: 'anotherValue'
4 }
Beginners: Read the last paragraph and code sample a couple times if you have to. Advanced folks: email me any easier explanations you’ve found.
The value in a key-value pair could be a function. That’s what we’ll use in our keyboardShortcuts hash.
1 keyboardShortcuts: {
2   up: function() { console.log('up');},
3   down: function() { console.log('down');},
4   left: function() { console.log('left');},
5   right: function() { console.log('right');},
6 },
Now that you know what a hash looks like, you may notice one other hash we’ve been using:
1 export default Ember.Component.extend(KeyboardShortcuts, {
2   didInsertElement: function(){...},
3   drawCircle: function(){...},
4   keyboardShortcuts: {...},
5 })
So we can see that the value in each key-value pair can be a function or another hash. It can also be a simpler property, such as a number or a string.
Now that we understand hashes, let’s look at the results of our work.
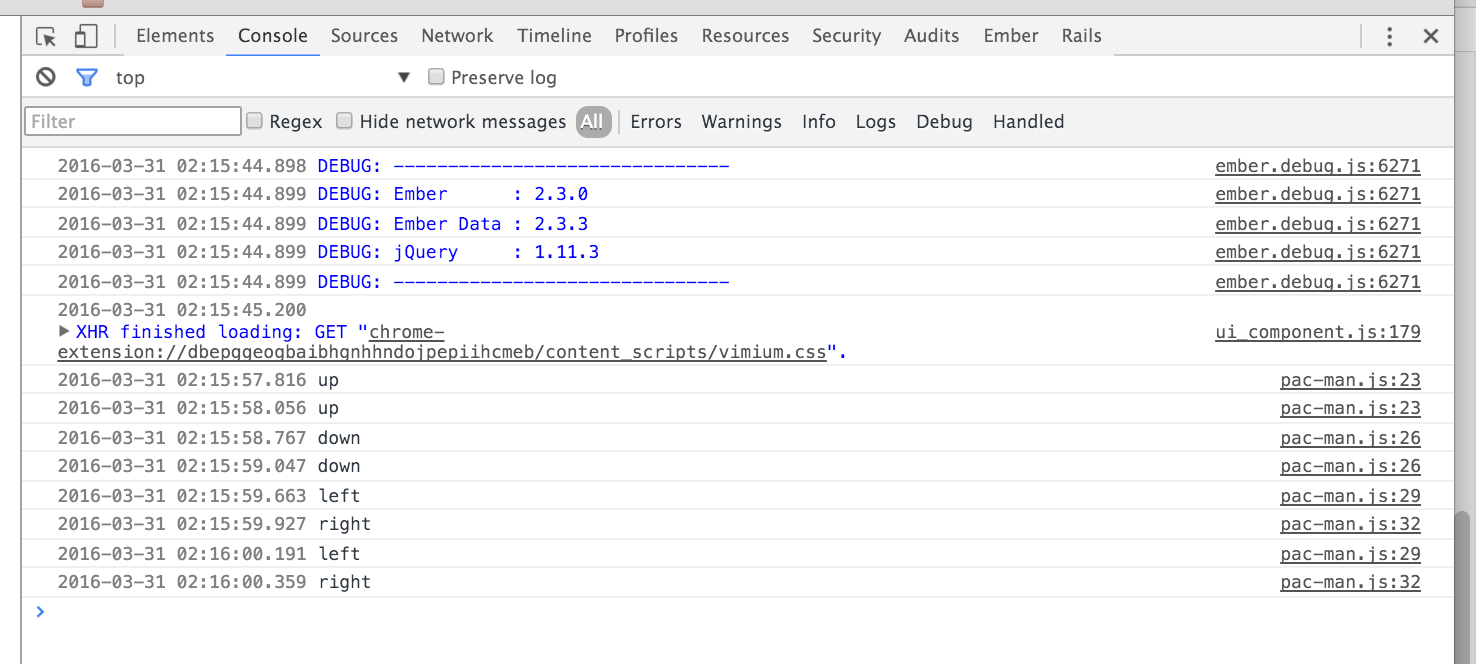
Logging
You’ll notice that after each of the directions in keyboardShortcuts we’ve used a console.log. This says, “Hey browser, put this stuff in the console so the programmer can look at it.”
But where in the browser does it put it?
- Open up Chrome.
- Right click anywhere on the screen.
- Choose “Inspect Element” from the drop-down menu
- Either click the ‘Console’ tab or press the escape key.
Now you’re looking at the console. Hurrah! Click back into the game, then hit some direction keys. If you’ve set up your code like we’ve described, you’ll be seeing the directions printed out.
You can put almost anything into console.log. You can put classes, functions, numbers, strings (what we currently have in there), hashes, and more. You can also put more than one thing in there- just separate them by commas.
Summary
In this chapter, we’ve given our code some… direction. We learned about how to import external libraries, how to use mixins, how to use hashes, and how to log stuff to the console.
The next chapter will use our button pressing to actually change stuff in the game world.