Chapter 1: The Zero Magic Manifesto
If you have tried to build an AI application in the last two years, you have likely felt “Framework Fatigue.”
You install a popular library. You import a ReasoningEngine. You call .run(). It works like magic for the “Hello World” example. But the moment you try to do something real—like editing a specific line in a Python file without deleting the imports—it breaks.
And because you used a framework, you can’t fix it. You are stuck digging through layers of abstract classes, factory patterns, and “Chains” trying to find the one prompt that is causing the hallucination.
We are not going to do that here.
This book is a rebellion against “Magic.” We are going to take the “Zero Magic” approach: build a production-grade coding agent called Nanocode in pure Python. No LangChain, no AutoGPT, no Pydantic.
Why? Because an autonomous agent is not magic. It is just a while loop.
What is an Agent, Really?
Strip away the venture capital marketing, and an “Agent” is just a thermostat.
A thermostat reads the temperature (input), compares it to the target (decision), and turns on the heater (action). Then it waits and repeats. That’s it. An AI agent does the same thing, just with text instead of temperature.
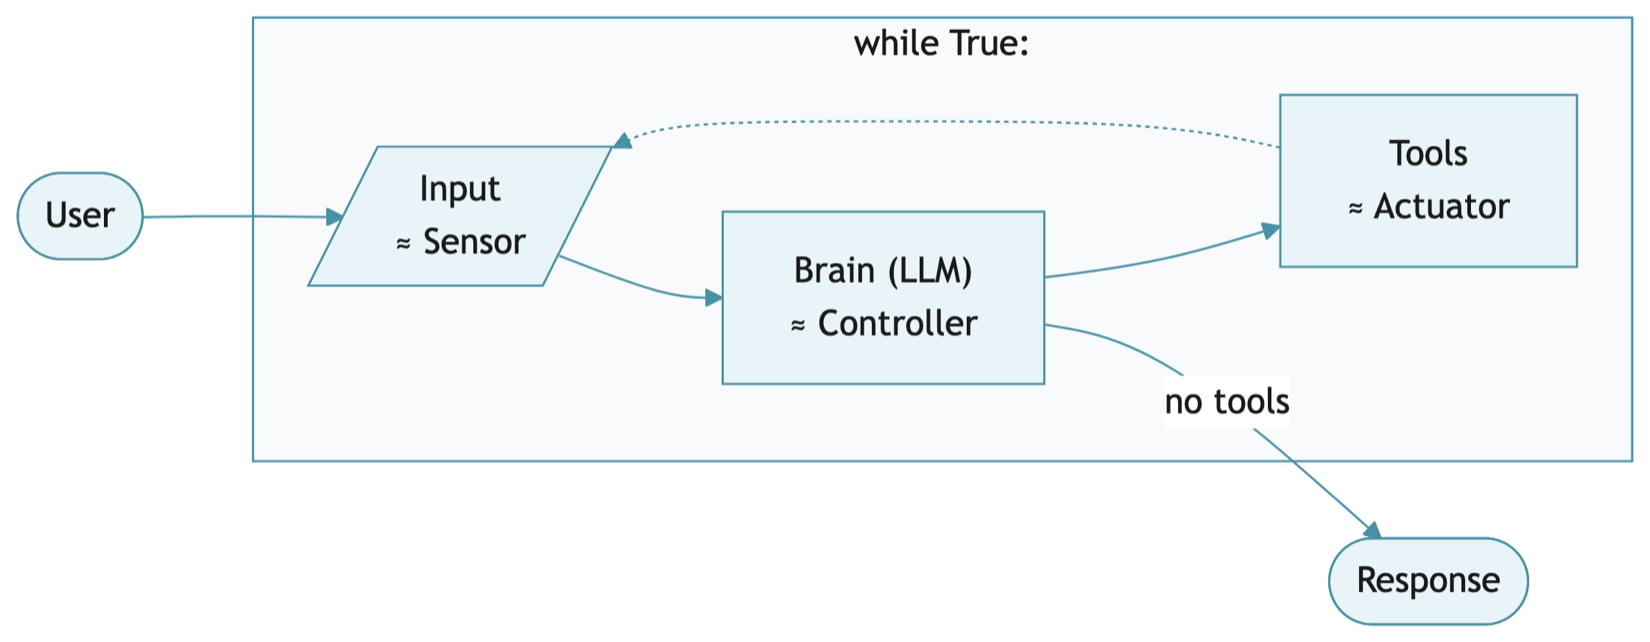
More specifically, an agent has four parts. The Brain is the LLM—a stateless function where you send text and it returns text. It calls Tools—functions like Read File and Run Command—to interact with the outside world. All of this sits inside a Loop (a while True) that keeps cycling until the task is done, with Memory—just a Python list—accumulating the conversation history along the way. (The list dies when the program ends; we’ll add persistent storage in Chapter 6.)
If you can write a while loop, you can build an agent.
By building it from scratch, you will have something the framework users don’t: control. When our agent gets stuck in a loop, you will know exactly which line of code caused it. When the API bill gets too high, you will see exactly where the tokens are leaking.
What We Are Building
Nanocode is a CLI tool that runs in your terminal. You talk to it like a colleague. It reads your files. It runs your commands. It edits your code.
By the end of this book, you will have wired it up to Claude Sonnet 4.6 (or DeepSeek, or a local model via Ollama). You’ll give it hands—tools to read files, write files, and run shell commands—and eyes to search your codebase. And you’ll build a safety harness so it can’t accidentally rm -rf /.
Project Setup
1. Initialize the Project
1 mkdir nanocode
2 cd nanocode
3 git init
2. Create a Virtual Environment
Never install AI tools globally. They conflict with system packages.
1 # Mac/Linux
2 python3 -m venv venv
3 source venv/bin/activate
4
5 # Windows
6 python -m venv venv
7 venv\Scripts\activate
3. Install Dependencies
We only need three libraries:
requests— To talk to the LLM APIs.python-dotenv— To load API keys from a.envfile.pytest— To test our code without making API calls.
Create requirements.txt:
1 requests
2 python-dotenv
3 pytest
Install:
1 pip install -r requirements.txt
4. Secure Your Keys
 |
Warning: If you push your API key to GitHub, bots will scrape it and drain your account within minutes. |
Create .gitignore:
1 .env
2 __pycache__/
3 venv/
4 .DS_Store
5 .nanocode/
The AgentStop Exception
Before we write the event loop, we need a clean exit mechanism. An exception beats break statements scattered across the code.
The Context: Exceptions are not just for errors; they are also a control flow mechanism. When the user types /q, we raise AgentStop. The main loop catches it and exits cleanly.
The Code:
1 # --- Exceptions ---
2
3 class AgentStop(Exception):
4     """Raised when the agent should stop processing."""
5     pass
This goes at the top of nanocode.py. It’s a marker exception—no logic, just a signal.
The Agent Class
Now the core abstraction: the Agent class. It holds state and logic in one place, which makes it easy to test.
The Context: We could put all the logic in main(). But then we’d have to mock input() and print() to test it. By extracting the logic into Agent.handle_input(), we can test it directly.
The Code:
10 class Agent:
11     """A coding agent that processes user input."""
12
13     def __init__(self):
14         pass
15
16     def handle_input(self, user_input):
17         """Handle user input. Returns output string, raises AgentStop to quit."""
18         if user_input.strip() == "/q":
19             raise AgentStop()
20
21         if not user_input.strip():
22             return ""
23
24         return f"You said: {user_input}\n(Agent not yet connected)"
The Walkthrough:
- Lines 13-14: Empty constructor for now. We’ll add
brainandtoolsin later chapters. - Lines 18-19: The
/qcommand raisesAgentStopinstead of returning a special value—the caller decides how to handle shutdown. - Line 24: Echo the input back. This is a placeholder—later, we’ll send this to the Brain.
Defining Success with Tests
Before we write the main loop, we need tests.
Create test_nanocode.py:
 1 import pytest
 2 from nanocode import Agent, AgentStop
 3
 4
 5 def test_handle_input_returns_string():
 6     """Verify handle_input returns a string for normal input."""
 7     agent = Agent()
 8     result = agent.handle_input("hello")
 9     assert isinstance(result, str)
10     assert "hello" in result
11
12
13 def test_empty_input_returns_empty_string():
14     """Verify empty/whitespace input returns empty string."""
15     agent = Agent()
16     assert agent.handle_input("") == ""
17     assert agent.handle_input("   ") == ""
18     assert agent.handle_input("\n") == ""
19
20
21 def test_quit_command_raises_agent_stop():
22     """Verify /q raises AgentStop exception."""
23     agent = Agent()
24     with pytest.raises(AgentStop):
25         agent.handle_input("/q")
26
27
28 def test_quit_command_with_whitespace():
29     """Verify /q works with surrounding whitespace."""
30     agent = Agent()
31     with pytest.raises(AgentStop):
32         agent.handle_input("  /q  ")
Run the tests:
1 pytest test_nanocode.py -v
1 test_nanocode.py::test_handle_input_returns_string PASSED
2 test_nanocode.py::test_empty_input_returns_empty_string PASSED
3 test_nanocode.py::test_quit_command_raises_agent_stop PASSED
4 test_nanocode.py::test_quit_command_with_whitespace PASSED
All green. Our agent handles the basic cases correctly.
 |
Aside: Why pytest? It discovers functions starting with |
The Main Loop
Now the thin I/O wrapper that connects the agent to the terminal:
29 def main():
30     agent = Agent()
31     print("⚡ Nanocode v0.1 initialized.")
32     print("Type '/q' to quit.")
33
34     while True:
35         try:
36             user_input = input("\n❯ ")
37             output = agent.handle_input(user_input)
38             if output:
39                 print(output)
40
41         except (AgentStop, KeyboardInterrupt):
42             print("\nExiting...")
43             break
44
45
46 if __name__ == "__main__":
47     main()
The Walkthrough:
- Lines 30-32: Create the agent and print startup messages.
- Line 36:
input()blocks and waits for the user to type something. - Lines 37-39: Call
handle_input()and print any output. - Lines 41-43: Catch
AgentStop(from/q) orKeyboardInterrupt(from Ctrl+C) and break out of the loop.
|
Aside: Python’s |
Notice the separation: Agent.handle_input() contains all the logic. main() is just I/O glue. This makes the agent testable without mocking stdin/stdout.
Run It
1 python nanocode.py
You should see:
 1 ⚡ Nanocode v0.1 initialized.
 2 Type '/q' to quit.
 3
 4 ❯ hello
 5 You said: hello
 6 (Agent not yet connected)
 7
 8 ❯ /q
 9
10 Exiting...
This is the chassis. The engine comes next.
Wrapping Up
That’s the chassis: an Agent class, a handle_input() method, a while True loop. It doesn’t do anything useful yet—but everything we build from here plugs into this skeleton. The tests make sure we don’t break what already works as we go.