2. Diving into Core Data
In this chapter we will set up a full Core Data stack purely in code, with no assistance from the graphical tools that Xcode provides. The aim here is to show that when you pull it all apart there is nothing terribly mysterious or complicated going on.
Later we will allow ourselves the use of some of the libraries out there to make our lives easier but first we’ll start with a good grounding in the fundamentals so that we will know how those libraries work and won’t get caught out later by ‘magic’ that we don’t understand.
We will now create the beginnings of a simple app that will use Core Data to store a list of tasks; we won’t implement the full app, rather we’ll just focus how to set up Core Data so that we can persist and retrieve our tasks.

|
Check your RubyMotion VersionThe code in this book has been tested primarily against RubyMotion version 2.32. If you are using a different version and you encounter an error, once you are satisfied that the error is not in your own code then you may want to try updating any included gems to the latest version as older versions of gems may be incompatible with more recent versions of RubyMotion. |
App Structure
To get started, we create a new RubyMotion app:
$ motion create CoreDataTasks
Create CoreDataTasks
Create CoreDataTasks/.gitignore
Create CoreDataTasks/app/app_delegate.rb
Create CoreDataTasks/Gemfile
Create CoreDataTasks/Rakefile
Create CoreDataTasks/resources/Default-568h@2x.png
Create CoreDataTasks/spec/main_spec.rb
And update our Rakefile to load in the Core Data framework:
1 Motion::Project::App.setup do |app|
2   # Use `rake config' to see complete project settings.
3   app.name = 'CoreDataTasks'
4   app.frameworks += [ 'CoreData' ]
5 end
That’s it! We now have a freshly-created app which will link in the CoreData
framework when the app is built.
Before we get into the code itself, let’s take a moment to familiarise ourselves with the components of the Core Data stack and how they work together to shuttle our records to and from the data store.
The Core Data Stack
A basic Core Data stack generally involves the following classes:
-
NSManagedObject: Models of the data to be stored, each of which has an associated entity description (NSEntityDescription) -
NSManagedObjectModel: A container for our models, including any relationships between them. -
NSPersistentStore: A place to store our records (a persistent store); in almost all cases you will want this to be an SQLite database (i.e. of typeNSSQLiteStoreType) -
NSPersistentStoreCoordinator: An object to coordinate access to this store -
NSManagedObjectContext: An object which manages access to all of the above
This may look complicated, but in general your application code will only work
with the NSManagedObjectContext instance that you create on application
launch, with the rest being essentially implementation details that your view
controllers and helper classes won’t be concerned with; they will simply use
the context to create and fetch records. In this way the Core Data stack looks
complex but once set up we will spend 99% of our time thinking about and
working with models and the context only.
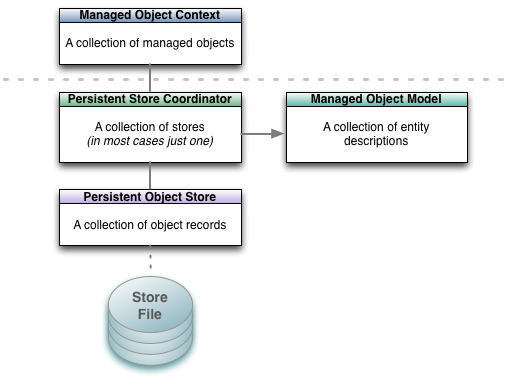
The Core Data stack. In your application you will generally only work with the managed object context; it will then interact with the objects beneath the dotted grey line on your behalf.
Typically, the AppDelegate is responsible for initialising the context (and so
the persistent store and data model) and passing it to the root view
controller. The root view controller would then pass it as appropriate to
child view controllers such as for adding or editing records. In this example
however we will provide access to the context from anywhere in the app via a
Singleton.

|
What is a Singleton?A Singleton is a class which only ever has one instance in a running application. The first time the Singleton class instance is requested the class will instantiate an instance of itself, store it locally and then return it. Subsequent calls will return this instance. This pattern is often used to provide access to a particular class (such as a data manager) throughout the application in a controlled manner while ensuring that there is only ever one instance of the class created during each run. |
To set up our Core Data stack we will step through the following process:
-
Setting up our entities. For our example tasks app we will define a
Taskentity with a description (what is to be done) a priority and a boolean (true/false value) to track whether it has been done or not. -
Create a managed object model containing one entity:
Task. - Set up a persistent store coordinator for this managed object model.
- Create a physical data store and let the coordinator know about it; in doing so we will create an SQLite database file which will be stored in the application’s Documents directory).
- Create a managed object context and link it to the persistent storage coordinator.
Setting up our Entities
The first thing we do is describe the entity that we would like to store.
There is no fixed place that this code needs to go but we will put it in a new
file,
app/task.rb.
The Task class will be of type NSManagedObject and will have one class
method that will return an NSEntityDescription describing the fields it
contains:
app/task.rb
 1 class Task < NSManagedObject
 2   def self.entity
 3     @entity ||= begin
 4       # A task has a description field, a numeric priority (where 5 will
 5       # signify 'no priority' and will otherwise be set between 1 and 4,
 6       # with 1 being the highest priority and 4 the lowest.
 7       # A boolean field `completed` tracks whether the task has been
 8       # completed or not
 9       entity = NSEntityDescription.alloc.init
10       entity.name = 'Task'
11       entity.managedObjectClassName = 'Task'
12       entity.properties =
13               [ 'task_description', NSStringAttributeType,
14                 'priority', NSInteger32AttributeType,
15                 'completed', NSBooleanAttributeType ]\
16               .each_slice(2).map do |name, type, optional|
17         property = NSAttributeDescription.alloc.init
18         property.name = name
19         property.attributeType = type
20         property.optional = false
21         property
22       end
23
24       # Return the entity
25       entity
26     end
27   end
28 end

|
You may be tempted to call the task description field just ‘description’,
but don’t! There is already a |
The class defines just one method, Task.entity that returns an
NSEntityDescription describing the entity. Note that by defining the method
as def self.entity it is a class method that we call on the Task class
directly rather than via a Task instance.
|
|
When setting up your entities, the following field types are available:
|
Setting up the Stack
Now that we have our NSManagedObjectModel we can move on to setting up the
rest of the Core Data Stack. Create a new file, app/tasks_store.rb and type
in the following definition for a Singleton class called TasksStore that we
will use to create a nice interface around the creation and fetching of Tasks:
app/tasks_store.rb
1 class TasksStore
2   def self.shared
3     Dispatch.once { @instance ||= new }
4     @instance
5   end
6 end
We will be able to access the sole instance of this class from anywhere in the
app as TasksStore.shared. The first invocation will create the instance and
store it as @instance, subsequent calls will simply return @instance.
We’re calling new to instantiate the class so we create an initialize
method for the class2. Here is the full
implementation,
we will then step through each part:
app/tasks_store.rb
 1 class TasksStore
 2   def self.shared
 3     Dispatch.once { @instance ||= new }
 4     @instance
 5   end
 6
 7   def initialize
 8     # Initialise the Core Data stack
 9
10     model = NSManagedObjectModel.alloc.init
11     model.entities = [ Task.entity ]
12
13     store = NSPersistentStoreCoordinator\
14             .alloc.initWithManagedObjectModel(model)
15     store_path = File.join(NSHomeDirectory(),
16                            'Documents',
17                            'CoreDataTasks.sqlite')
18     store_url = NSURL.fileURLWithPath(store_path)
19
20     puts "[INFO] Database file path: #{store_path}"
21
22     error_ptr = Pointer.new(:object)
23
24     unless store.addPersistentStoreWithType(NSSQLiteStoreType,
25                                             configuration: nil,
26                                             URL: store_url,
27                                             options: nil,
28                                             error: error_ptr)
29       raise "[ERROR] Failed to create persistent store: " +
30             error_ptr[0].description
31     end
32
33     context = NSManagedObjectContext.alloc.init
34     context.persistentStoreCoordinator = store
35
36     # Store the context as an instance variable of TasksStore
37     @context = context
38   end
39 end
Creating the Managed Object Model
1 model = NSManagedObjectModel.alloc.init
2 model.entities = [ Task.entity ]
For this simple tasks app our object model only contains a single entity,
provided by the class method Task.entity which we implemented earlier.
Creating the Persistent Store
 1 store = NSPersistentStoreCoordinator.alloc\
 2               .initWithManagedObjectModel(model)
 3
 4 store_path = File.join(NSHomeDirectory(),
 5                        'Documents',
 6                        'CoreDataTasks.sqlite')
 7 store_url = NSURL.fileURLWithPath(store_path)
 8
 9 puts "[INFO] Database file path: #{store_path}"
10
11 error_ptr = Pointer.new(:object)
12
13 unless store.addPersistentStoreWithType(NSSQLiteStoreType,
14                                         configuration: nil,
15                                         URL: store_url,
16                                         options: nil,
17                                         error: error_ptr)
18   raise "[ERROR] Failed to create persistent store: " +
19         error_ptr[0].description
20 end
Breaking it down
- We instantiate an
NSPersistentStoreCoordinatorwith the managed object model we’ve just created. - We then set up the persistent store that will store the records: we name the SQLite database file CoreDataTasks.sqlite and place it in the Documents directory where all such local content must live within an app.
- We print the path out to make it easy to get at the database file (when running the app in the simulator) in case we want to access it directly, or delete it and start afresh.
- Finally we pass the persistent store to the coordinator.
|
|
What’s Pointer.new(:object)?A legacy of C, error codes and messages for many methods are stored in an
NSError object that we pass in to the function. When you have need of such
a pointer you can use the |
Creating the Managed Object Context
1 context = NSManagedObjectContext.alloc.init
2 context.persistentStoreCoordinator = store
3
4 # Store the context as an instance variable of TasksStore
5 @context = context
Finally, we create the context and link it to the persistent storage
coordinator. We store the context in an instance variable @context for use
in the rest of the class.
|
|
A Note on the Managed Object ContextThink of the context as a scratch pad where you manage the objects that you are working with in your app. You will use the context to manage object creation, editing, deletion, undo and redo all without necessarily touching the store–you persist all of these changes when it makes sense for your app, e.g. after the user taps a ‘Done’ button after editing, or when the app is sent to the background (the user presses the home button). To persist the records you are working with you will simply ask the context to save itself and, barring any errors, it will handle all of the record creation, deletion, editing, reverts etc. for you. |
Creating, Reading, Updating and Deleting Records
At this point we have a full Core Data stack set up, ready for us to persist
and retrieve Task objects via the managed object context.
Let’s start by adding a method create_task to our TasksStore class that
will let us create a new task:
 1 def create_task(task_description,
 2                 withPriority:priority,
 3                 andCompleted:completed)
 4   task = NSEntityDescription\
 5     .insertNewObjectForEntityForName('Task',
 6                                      inManagedObjectContext: @context)
 7   task.task_description = task_description
 8   task.priority = priority
 9   task.completed = completed
10   task
11 end
12
13 def create_task(task_description)
14   create_task(task_description, withPriority: 5, andCompleted: false)
15 end
|
|
Method Overloading in RubyMotionNote that we have defined the Rather, method definitions with named parameters will look more like
Objective-C methods, with named parameters such as If you have a background primarily in Ruby and not in Objective-C then it
may now look to you like we have two methods called When we get to defining the |
If you build and run the app now you will now be able to create tasks:
1 $ rake
2 (main)> tasks_store = TasksStore.shared
3 (main)> bank = tasks_store.create_task("Go to the bank")
4 => #<Task_Task_:0x8c9ce50>
The task has not been saved yet though, it has only been inserted into the
context in memory but the context has not yet been persisted to the store. So
now let’s create a helper method save_context that will, when called, save
any changes we have made to the context, back to the persistent store (our
SQLite database):
1 def save_context
2   error_ptr = Pointer.new(:object)
3
4   unless @context.save(error_ptr)
5     raise "[ERROR] Error saving the context: #{error_ptr[0].description}"
6   end
7
8   true
9 end
Now if we build and run the app we will be able to persist our tasks to the
store but as yet we don’t have a way to retrieve them, so let’s add a method
get_tasks that will retrieve all tasks from the store:
 1 def get_tasks
 2   request = NSFetchRequest.alloc.init
 3   request.entity = NSEntityDescription\
 4                           .entityForName('Task',
 5                                          inManagedObjectContext: @context)
 6
 7   error_ptr = Pointer.new(:object)
 8
 9   data = @context.executeFetchRequest(request, error: error_ptr)
10
11   if data == nil
12     raise "[ERROR] Error fetching taskss: #{error_ptr[0].description}"
13   end
14
15   data
16 end
Retrieval is a little more involved than creation or saving. What we are doing
is creating an NSFetchRequest, specifying the entity we wish to fetch and
then executing this request without specifying any other criteria (e.g.
filters on the data, or instructions on how to sort the retrieved records).
Core Data therefore hands us back all records for the Task entity.
With these three helper methods in place, now when we build and run our app we can create, persist and fetch our tasks:
 1 $ rake
 2 (main)> tasks_store = TasksStore.shared
 3 => #<TasksStore:0x8e23db0 @context=#<NSManagedObjectContext:0x9c2d440>>
 4 (main)> bank = tasks_store.create_task("Go to the bank")
 5 => #<Task_Task_:0x9c2e170>
 6 (main)> t1 = tasks_store.get_tasks.first
 7 => #<Task_Task_:0x9c2e170>
 8 (main)> t1.task_description
 9 => "Go to the bank"
10 (main)> tasks_store.save_context
11 => true
12 (main)> exit
Now if we build and run the app again we find that we can still access the task that we saved–it has been persisted to the store:
1 $ rake
2 (main)> tasks_store = TasksStore.shared
3 => #<TasksStore:0x8c4d310 @context=#<NSManagedObjectContext:0x8f3f610>>
4 (main)> t1 = tasks_store.get_tasks.first
5 => #<Task_Task_:0x8eca300>
6 (main)> t1.task_description
7 => "Go to the bank"
8 (main)> exit
|
|
Prettier Model RepresentationsLet’s take a moment to make life easier for ourselves by making our tasks
more easily recognisable in the console. At the moment when we work with our
When a Ruby object is printed or otherwise asked to represent itself as a
string, the
|
Searching and Sorting
In most applications we will find ourselves wanting to be able to:
- Look up individual records
- Filter records by certain criteria based on the record attributes (e.g. find all tasks where completed=true)
- Sort the returned records based on their attributes (e.g. sorting tasks by the date that they were created)
In this section we will take each of these in turn and show how they can be implemented.
Looking up Individual Records
A common use case in an iOS app is to display a list of records retrieved from
Core Data in a UITableView. When the view controller is loaded we will
generally load all records into an instance variable (e.g. an NSArray)
within the view controller and provide access to these records via the usual
UITableView delegate methods.
When a user taps a row and we wish to show a detail view for that record, we would typically instantiate the detail view controller and pass it the individual record from our local array rather than requesting it again from Core Data.
As such, there are not many scenarios in which you would typically be
retrieving one and only one record from Core Data. One scenario where you
might do so however is when you are working with nested contexts and you wish
to determine whether the Core Data NSManagedObject that you have is still in
the store, or whether its attributes have changed.
At this stage we have not encountered nested contexts–we are dealing with only one context for our app and as such we don’t need to worry about instances changing in the store without our knowledge; we are only displaying one view controller at a time and each view controller is accessing the same context.
We will revisit this however when we begin working with nested contexts later in the book.
|
|
Avoid Frequent FetchesWhen using a relational database, in most cases it isn’t considered to be bad practice to retrieve a specific record (by its primary key) when it is needed. With Core Data however, even though it is (usually) backed by a relational database you will want to minimise the number of round trips to the store. This is especially true for iOS. When retrieving records, for the best performance you will want to greedily
load more than you might necessarily need, as accessing those records later
from memory will be much faster than making successive trips to the store. For
optimum performance you will need to find the fine line between loading too
much at once (large fetches can cause delays) and loading too little (causing
many subsequent small fetch requests later). Key to this is setting an
appropriate value for the batch size of any The result will be much better response times in your app when users interact with it. |
Filtering Records
We will often want to filter records as we retrieve them from the store. For our tasks app some common use cases could be to filter tasks by their status (completed, not completed), their priority and perhaps a text search on the description of the task itself. In this section we will investigate how we can implement these kinds of filters.
Filtering on Priority and Completion Status
Let’s extend our get_tasks method to allow for optional filtering on the
task priority and its completion status. If we pass in nil for either, or
don’t pass them in, then no filtering will occur. So a call to
get_tasks(priority: 1, completed: false) will return all tasks at priority
level 1 which have not yet been completed, while a bare call to get_tasks
will return all tasks as before.
Replace the previous implementation of get_tasks with this extended version:
 1 def get_tasks(opts = {})
 2   defaults = {priority: nil, completed: nil}
 3   opts = defaults.merge(opts)
 4
 5   request = NSFetchRequest.alloc.init
 6   request.entity = NSEntityDescription\
 7                           .entityForName('Task',
 8                                          inManagedObjectContext: @context)
 9
10   predicates = []
11
12   unless opts[:completed].nil?
13     completed = NSNumber.numberWithBool(opts[:completed])
14     completed_pred = NSPredicate.predicateWithFormat("completed == %@",
15                                                      completed)
16     predicates << completed_pred
17   end
18
19   unless opts[:priority].nil?
20     priority = NSNumber.numberWithInt(opts[:priority])
21     priority_pred = NSPredicate.predicateWithFormat("priority == %@",
22                                                     priority)
23     predicates << priority_pred
24   end
25
26   if predicates.count > 0
27     # Create a compound predicate by ANDing together any predicates
28     # specified thus far.
29     compound_predicate = NSCompoundPredicate\
30                                 .andPredicateWithSubpredicates(predicates)
31     request.setPredicate(compound_predicate)
32   end
33
34   error_ptr = Pointer.new(:object)
35
36   data = @context.executeFetchRequest(request, error: error_ptr)
37
38   if data == nil
39     raise "[ERROR] Error fetching taskss: #{error_ptr[0].description}"
40   end
41
42   data
43 end
Breaking it down
- The method now takes a parameter
optswhich defaults to an empty hash. - We provide our defaults for this hash (in this case they are all nil) and
merge the two so that when you call
get_tasksyou can override these default values. - If a value for either
completedorpriorityis provided then we create a filter predicate expressing the appropriate condition and attach it to the fetch request. - The predicates (of type
NSPredicate) are created using a format string, with the arguments being passed in as objects (%@). - As we are dealing with numeric types in both cases (a boolean is 1 or 0,
priorities are integers) we create and pass in an
NSNumberwhen creating the predicates. - As we can only specify one predicate for a given
NSFetchRequestwe create a compound predicate which is made byANDing each of the predicates together.
Filtering on the Task Description
If we would like to add a search function to our app then we can extend our
get_tasks method to support this using the same approach as before. The
principal difference will be that we will be using a different comparison
operator, CONTAINS rather than ==.
First let’s extend our default arguments to include task_description:
1 defaults = {priority: nil, completed: nil, task_description: nil}
Now we add our predicate, just below the priority predicate:
1 unless opts[:task_description].nil?
2   task_description = opts[:task_description]
3   task_description_predicate = NSPredicate\
4                   .predicateWithFormat("task_description CONTAINS[cd] %@",
5                                        task_description)
6   predicates << task_description_predicate
7 end
The CONTAINS operator simply checks that the value for the attribute on the
left-hand side (task_description) contains the argument on the right-hand
side. We could also have written the predicate using LIKE and with wildcard
* to get the same effect. The extra [cd] options specify that we would
like the search to be case and diacritic insensitive which is generally what
you would like for a search function. There are many more operators and
options described in the official documentation on predicate
syntax.
Our get_tasks method is now quite capable: we can retrieve all tasks or
filter on any combination of priority, completion status or search for a
fragment of a task description name.
Let’s try it out. First let’s add in some more tasks:
 1 $ rake
 2 (main)> tasks_store = TasksStore.shared
 3 (main)> tasks_store.get_tasks
 4 => [Priority: 5 Completed: 0 Description: 'Go to the bank']
 5 (main)> tasks_store.create_task("Do the laundry and dry cleaning")
 6 => Priority: 5 Completed: 0 Description: 'Do the laundry'
 7 (main)> tasks_store.create_task("Go to the supermarket")
 8 => Priority: 5 Completed: 0 Description: 'Go to the supermarket'
 9 (main)> tax_return = tasks_store.create_task("Complete tax return")
10 => Priority: 5 Completed: 0 Description: 'Complete tax return'
11 (main)> tax_return.priority = 1
12 => 1
13 (main)> tax_return.completed = 1
14 => 1
15 (main)> tasks_store.save_context
16 => true
17 (main)> exit
We now have a selection of tasks with a mix of priorities and completion statuses. Let’s exercise the fetching and filtering code:
 1 $ rake
 2 (main)> tasks_store = TasksStore.shared
 3 => #<TasksStore:0x9086600 @context=#<NSManagedObjectContext:0x9155df0>>
 4 (main)> tasks_store.get_tasks
 5 => [
 6   Priority: 5 Completed: 0 Description: 'Go to the bank',
 7   Priority: 1 Completed: 1 Description: 'Complete tax return',
 8   Priority: 5 Completed: 0 Description: 'Go to the supermarket',
 9   Priority: 5 Completed: 0 Description: 'Do the laundry'
10 ]
11 (main)> tasks_store.get_tasks.count
12 => 4
13 (main)> tasks_store.get_tasks(priority: 1)
14 => [Priority: 1 Completed: 1 Description: 'Complete tax return']
15 (main)> tasks_store.get_tasks(priority: 1, completed: false)
16 => []
17 (main)> tasks_store.get_tasks(priority: 1, completed: true)
18 => [Priority: 1 Completed: 1 Description: 'Complete tax return']
19 (main)> tasks_store.get_tasks(priority: 5).count
20 => 3
21 (main)> tasks_store.get_tasks(priority: 5, task_description: "supermarket")
22 => [Priority: 5 Completed: 0 Description: 'Go to the supermarket']
23 (main)> exit
|
|
Predicate Order MattersThe order in which predicates are specified can significantly affect the execution time of a fetch request. In general you will want to place non-textual predicates before textual predicates, and order predicates with the most restrictive predicates first. These two principles can conflict however, so you will need to think about the data you are storing and experiment. In the case of textual vs. non-textual predicates, it would be better to
specify Regarding more and less restrictive predicates, For more on this topic please see the official documentation. |
Updating Records
Updating records is straightforward: you simply retrieve the record
(encapsulated as an NSManagedObject as usual), make changes to the
attributes as necessary, on as many objects as you like, and then save the
context. This is perhaps where the benefits of having the context start to be
apparent: you make all the changes you need to across all objects in the graph
and then persist when it is necessary or convenient to do so.
We have already had one example of this, when we were creating records with which to test our filtering. Here’s another where we retrieve, modify the description of and persist back two tasks. Note how straightforward this is:
 1 $ rake
 2 (main)> tasks_store = TasksStore.shared
 3 => #<TasksStore:0x937d880 @context=#<NSManagedObjectContext:0x93b7b60>>
 4 (main)> task_1, task_2 = tasks_store.get_tasks().last(2)
 5 => [#<Task_Task_:0xff9f640>, #<Task_Task_:0xff9f690>]
 6 (main)> task_1.task_description
 7 => "Go to the supermarket"
 8 (main)> task_1.task_description = "Go to the supermarket and chemist"
 9 => "Go to the supermarket and chemist"
10 (main)> task_2.task_description
11 => "Do the laundry"
12 (main)> task_2.task_description = "Do the laundry and dry cleaning"
13 => "Do the laundry and dry cleaning"
14 (main)> tasks_store.save_context
15 => true
Deleting Records
In the case where an object has no relationships to other objects then deletion is straightforward:
1 @context.deleteObject(aManagedObject)
At this point the object still exists in the store however and won’t be deleted until the context is saved. In this manner you can create, edit and delete several objects in one go and have all of the changes persisted when you save, as long as validation passes on all the objects involved.
We can extend our TasksStore to support deletion by adding a helper method
delete_task as follows:
1 def delete_task(task)
2   @context.deleteObject(task)
3 end
|
|
Deletion and RelationshipsWhen objects are related to each other then we will want to confirm that we have cleaned up any related objects that should no longer exist, and that any objects that should still exist are still consistent, i.e. they still pass validation in the absence of this relationship. |
Sorting Records
In retrieving your records you will often want to order the results, e.g. in alphabetical order, by priority, with completed tasks last and so on.
In our example application we would indeed like to order first by completed status (tasks that are due should come first), then by priority (highest to lowest) and then alphabetically by task description.
We can implement this by adding in three sort predicates into our fetch
request (in the get_tasks method), one for each attribute:
 1 completed_sort = NSSortDescriptor.alloc.initWithKey("completed",
 2                                                     ascending: true)
 3 priority_sort = NSSortDescriptor.alloc.initWithKey("priority",
 4                                                    ascending: true)
 5 description_sort = NSSortDescriptor.alloc.initWithKey("task_description",
 6                                                       ascending: true)
 7
 8 request.setSortDescriptors([ completed_sort,
 9                              priority_sort,
10                              description_sort ])
11
12 error_ptr = Pointer.new(:object)
13
14 data = @context.executeFetchRequest(request, error: error_ptr)
In each case we perform a simple sort in ascending order so that non-completed tasks are first (0 < 1), high priority (e.g. priority 1) tasks come before low priority tasks (e.g. priority 2-5) and finally when those attributes match we sort alphabetically on the task description.
Let’s see this in action. We will fetch our tasks, and then send the first task to the end of the list by completing the task (completed tasks should always come after tasks that are due):
 1 $ rake
 2 (main)> tasks_store = TasksStore.shared
 3 => #<TasksStore:0x904b680 @context=#<NSManagedObjectContext:0x93d8a60>>
 4 (main)> tasks_store.get_tasks
 5 => [Priority: 1 Completed: 0 Description: 'Complete tax return',
 6   Priority: 5 Completed: 0 Description: 'Do the laundry and dry cleaning',
 7   Priority: 5 Completed: 0 Description: 'Go to the bank',
 8   Priority: 5 Completed: 0 Description: 'Go to the supermarket and chemist']
 9 (main)> tax = tasks_store.get_tasks.first
10 => Priority: 1 Completed: 0 Description: 'Complete tax return'
11 (main)> tax.completed = true
12 => true
13 (main)> tasks_store.save_context
14 => true
15 (main)> tasks_store.get_tasks
16 => [Priority: 5 Completed: 0 Description: 'Do the laundry and dry cleaning',
17  Priority: 5 Completed: 0 Description: 'Go to the bank',
18  Priority: 5 Completed: 0 Description: 'Go to the supermarket and chemist',
19  Priority: 1 Completed: 1 Description: 'Complete tax return']
Wrapping Up
At this stage we are able to define entities in our data model from scratch, create, fetch, update and delete instances of them and persist these changes back to the store when we choose to do so. In order to create a fully-fledged production app however we still need to know about correct error handling, migrations and overall design patterns for accessing and working with our data, including the use of nested contexts.
Before we dive further into these topics however let’s first make life easier for ourselves by bringing in two third party libraries: one that lets us write our models in a simple schema language, and the other that will take what we have done so far and reduce it to one line of setup code.
At this point you may be wondering why we didn’t start with these libraries; the reason for this is that while these libraries can save us a lot of time, if we don’t understand how they work then when we inevitably encounter issues then we would be at the mercy of the (perhaps incomplete) documentation and StackOverflow answers, or else we would simply need to go back to the fundamentals to work out what went wrong. Starting with the fundamentals as we have done should, I hope, save you considerable time in the long run.