JavaScript Fundamentals
Practical application is always more important than theory. Therefore, in this course, don’t expect long theory or an opinionated rant about how JavaScript code should be written. The objective of this course is that you understand how JavaScript works from a practical point of view so that you can get started with writing code.
Your First JavaScript Line
When learning programming, we often start with writing and executing a "Hello World!" program that writes the Hello World! message to the output of our choice. In some languages like Java, it takes a lot to write Hello World to the standard output. In JavaScript, we get away with one single line:
1 console.log( "Hello World!" );
The semicolon marks the end of the statement. Semicolons are optional in JavaScript, because they are inserted automatically by the JavaScript interpreter. However, it is good practice to stick to inserting semicolons, because there are some edge cases, when the JavaScript interpreter inserts semicolons to the wrong place.
You may ask, where can I execute this line? Let me give you a few options.
- Open CodePen. CodePen is an online web development sandbox containing boxes for HTML, CSS, and JavaScript code. You need to write your code in the JavaScript box. You can see the result in the console. Whenever you make a change to the JavaScript code, a new line appears in the console.
- You can also write your code at the bottom of the CodePen console. You can see the same result after pressing enter.
- Alternatively, you can open a new tab in your browser. Most browsers are the same in this aspect. This item uses the terminology of Google Chrome in English. After opening a Chrome tab, right click inside the tab and select Inspect from the context menu. Alternatively, you can press
Ctrl + Shift + Iin Windows or Linux, andCmd + Shift + Iin Mac. Once the Chrome developer tools pops up, you can see a menu bar at the top of the developer tools. This menu bar starts with Elements, Console, Network, and so on. Select Console. You can now see a similar console as the CodePen console. The>sign is the prompt. You can enter your JavaScript code after the>.
You will find exercises in the book from time to time. Try solving them on your own. If you get stuck, revise the book until you are comfortable with the material. Some exercises have solutions below the exercise, while you are on your own in case of others.
Exercise 1. Try out the above three methods to run the Hello World! program. Experiment in the Chrome developer tools console what happens if you use console.info, console.warn, or console.error instead of console.log.
Solution: In the Chrome deverloper tools console, check out the color of the message and the icon in front of the message in case of using console.log, console.info, console.warn, and console.error. These colors and icons represent logging levels that are more or less uniform in every programming language. Logging is a way to record what happened in your system. Logging is important for discovering errors in your system in hindsight, and replay what happened exactly.
If you typed the message console.log( "Hello World!" );, you can see the following evaluation:
1 "Hello World!"
2 undefined
The first value is a console log, which is a value written to the console by the console.log function.
The second value is undefined, symbolizing that the console.log function does not have a defined returned value. You don’t have to understand what this means yet until the section on Functions. Until then, just accept that the undefined value will appear after your console log.
Notice your statement can span multiple lines. Press enter inside the expression to separate content into two lines. Reformat your code in the above code editor as follows:
1 console
2    .log(
3         "Hello world!"
4 );
As you can see, you can format JavaScript code in any way you want. The interpreter will not care about the redundant whitespace characters.
If your code spans multiple lines and you are in a console, pressing Enter normally executes the line. If you want to add a newline character without executing the code, press Shift + Enter.
Experiment a bit more with the log. Instead of “Hello World!”, write 5 + 2. You should see the following:
1 > console.log( 5 + 2 );
2 7
3 undefined
> symbolizes the input of the console.
By the way, you don’t even need console.log to write the outcome of the 5 + 2 sum to the standard output:
1 > 5 + 2
2 7
5 + 2 is an expression. The JavaScript interpreter takes this expression and evaluates it. Once this expression is evaluated, its value appears as the output. Notice this is not a log message. In case of a log message, a message is logged, and then the return value of the console.log is written to the console. The return value of console.log is always undefined. As we evaluated the expression directly, we don’t have this undefined second line on the console.
An alternative online development sandbox is JsFiddle. Try it out by entering the following code in the JavaScript box of the editor:
1 document.body.innerText = 'Hello World!';
After entering this code, the text Hello World! appears in the Output. The task of this sandbox is to assemble an HTML page, and this command told the sandbox what to display in the document body.
Congratulations! You managed to write Hello World! to the console twice. Let’s see what we learned:
- console.log writes a log message to the console
-
"Hello World!"is a string. One way to formulate a string is using double quotes. Mind you,'Hello World!'is also a valid string notation in JavaScript - there is a semicolon at the end of the statement. The semicolon itself is optional, but I recommend using it
While reading this tutorial, I encourage you to keep CodePen open, and play around with the examples.
Later we will learn how to
- execute JavaScript in our browser developer tools,
- embed JavaScript in HTML pages,
- execute JavaScript using node.js.
Comments
When writing code, it is important that others can read it too. This is why it is beneficial to comment our code. JavaScript comments are similar to the C++ and Java commenting format. When the JavaScript interpreter reads comments, it completely ignores their content:
- Everything between
/*and*/is ignored by the interpreter - Everything after
//on the same line is ignored by the interpreter.
Examples:
1 let a = 5 + 2; // This is a single line comment lasting until the end of the line.
2
3 /*
4      A comment that can span multiple lines.
5      Everything inside the comment will be ignored by the JavaScript interpreter.
6      let b = 2;
7 */
The above code is interpreted as:
1 let a = 5 + 2;
Everything else is ignored.
Why do we use comments? To avoid ending up in similar situations:
 1 //
 2 // Dear maintainer:
 3 //
 4 // Once you are done trying to 'optimize' this routine,
 5 // and have realized what a terrible mistake that was,
 6 // please increment the following counter as a warning
 7 // to the next guy:
 8 //
 9 // total_hours_wasted_here = 42
10 //
My other favorite is:
1 // I dedicate all this code, all my work, to my wife, Darlene, who will
2 // have to support me and our three children and the dog once it gets
3 // released into the public.
Source: StackOverflow
Summary: write readable code with good comments!
Exercises
Exercise 2: Without running the code, determine what is written to the standard output:
1 console.log( 1 + 2 + 3 + 4 );
2 2 + 4;
3 console.log( 'End' );
Exercise 3: Run the code of Exercise 2 both in CodePen and in your browser.
Exercise 4: Add comment symbols to the code of Exercise 2 such that the program only prints the End message.
Data types in JavaScript
Most programming languages help you create values that symbolize a number, a character in a text, or a longer text. You can also symbolize the concept of true and false values using booleans. You can also create values that symbolize the absence of a value. These values are all called primitive data types.
The name primitive does not come from a negative place. These data types are neither stupid, nor inferior to any other data types we use in JavaScript. The name primitive comes from their simplicity. The other data types you will learn later are composite, and they consist of many primitive data types.
Why are data types important for us?
For instance, whenever you check your emails, go on Facebook, or check your bank account, you always see data: your name, your messages, the current date and time, and in the settings, you can also see other features of your account.
Data have types. We tend to use an integer (whole number, without a fractional part) than text. A checkbox can have two possible values: true or false. These data types are also unique. For each data type, different operations apply, and their possible values are also different.
In JavaScript, there are six primitive types:
- boolean (
trueorfalse) - number (including integers like
1,-2, and floating point numbers like1.1,2e-3) - string (
''or"",'ES6 in Practice'or"ES6 in Practice") - null type (denoted by
null) - undefined (denoted by
undefined) - Symbol (don’t worry about them yet)
We will soon learn more about anomalies arising from restrictions on floating point precision.
For instance, in the 2 * 3 operation, * is the operator symbolizing multiplication. Multiplication has two operands: 2 and 3.
Some important operators are:
-
+stands for addition. Example:2 + 3is5. -
-stands for subtraction. Example:2 - 3is-1. - If there is no operand on the left of
+or-, then+or-becomes a sign. Examples:+3or-2. -
*stands for multiplication. Example:3 * 2is6. -
/stands for division. Example:3 / 2is1.5. -
%stands for the modulus operation, which is the remainder of a number divided by another number using the rules of integer division. Example:5 % 2is1, because5divided by2is2, and the remainder is1. In other words, the mod 2 remainder of 5 is 1. -
**is the power operator. Example:2 ** 3(two to the power of three) is2 * 2 * 2, which is8.
At the bottom of the console in CodePen, there is a line with a > sign. This is where you can enter JavaScript expressions. Let’s try some. Enter the expression you see after the > sign. Then press enter. You can see the result appear on the next line.
 1 > 5
 2 5
 3
 4 > 5 + 2
 5 7
 6
 7 > 7 % 5
 8 2
 9
10 > 5 ** 2
11 25
Operations can be grouped together using parentheses. Parentheses override the priority of executing operations. For instance, in mathematics, multiplication has higher priority than addition. This means, 1 + 2 * 3 is the same as 1 + (2 * 3).
Let’s see an example for using parentheses:
1 >  5 * ( 1 + 2 * ( 3 + 4 ) )
2 // 5 * ( 1 + 2 * 7 )
3 // 5 * ( 1 + 14 )
4 // 5 * 15
5 75
Opposed to mathematics, we do not use brackets or braces to group operations. Parentheses can be used within parentheses. It is also important to construct valid expressions with parentheses, which means that each closing parenthesis should belong to a preceding opening parenthesis.
Similarly to mathematics, different operators have different priority (also referred to as precedence). When an operation has to be performed before another operation, we say that this operator:
- has higher priority,
- binds stronger.
Most operators have either one or two operands. This means the operator transforms either one or two values to a new value. Examples:
- The operands of
5 + 2are5and2. The+operator transforms these operands to7. - The operand of
-(2)is(2). I put parentheses around the2to emphasize that-is an operator and not a symbol to describe an integer.
Operators bind their operands. We have already seen that some operators bind stronger than others. For instance, multiplication binds stronger than addition:
1 5 * 2 + 3 ----> 10 + 3 ----> 13
We have also seen that the priority of operators can be overridden using parentheses:
1 5 * (2 + 3) ----> 5 * 5 ----> 25
The basic arithmetic operations (+, -, *, /, **) and the two signs (+, -) have the following priority:
- Signs:
+or-can stand in front of a number. This sign is evaluated first. - Power:
**binds the strongest out of the operators with two operands. - Multiplication and division:
*and/ - Finally, addition and subtraction:
+and-
The modulus operation was not placed in the above priority order, because most of the time, you won’t need it in a complex expression. In the unlikely case you used it together with other operators, use parentheses. The % operator binds just as strongly as multiplication and division does. However, when using % in a complex expression, parentheses increase the readability of your code.
Exercise 5: Determine the type of the following expressions.
7 % 2"""false"- true
2.5
Exercise 6: Calculate the value of the following expressions:
5 - -12 - 2 * 22 + 2 * 3 ** 2
Exercise 7: Suppose you invest a hundred thousand dollars. Use JavaScript to determine how much money you will have after 1, 2, 5, and 20 years, provided that the annual interest rate is 2%. Help: an annual interest rate of 2% means that you will get 102% of your current money in one year. The ratio between 102% and the current amount (100%) is 1.02.
Exercise 8: Determine which expressions are valid.
2 ** 2 ** 2 ** 2( 1 ) + (2 * ( 3 ) )( 1 + 2 ) * ( 3 * 4 ) ) * ( ( ( 5 - 2 ) * 3 )- ( 2 + 2)
The number type
Handling numbers is mostly straightforward. You have the four arithmetic operations ( +, -, *, /) available for addition, subtraction, multiplication, and division respectively.
The % operator is called modulus. a % b returns the remainder of the division a / b. In our example, 7 / 5 is 1, and the remainder is 2. The value 2 is returned.
The ** operator is called the exponential operator. 5 ** 2 is five raised to the second power.
Exercise 9. Match the following expressions with the possible values below.
Expressions:
5 ** 2 + 111 * 11 - (-4)1e2 - 11 * 8 - 2 * 2 / 4
Values: 26, 711, 11, 165, 125.
Let’s see some more surprising floating point operations.
1 > 0.1 + 0.2
2 0.30000000000000004
3
4 > 3.1e-3
5 0.0031
Some more info on floating points. Due to the way how numbers are represented, 0.1 + 0.2 is not exactly 0.3. This is normal and occurs in most programming languages.
3.1e-3 is the normal form of 0.0031. Read it like the exact value of 3.1 times ten to the power of minus three. Although the form is similar to 3.1 * (10 ** -3), there are subtle differences. 3.1e-3 describes the exact value of 0.0031. 3.1 * (10 ** -3) describes a composite expression that needs to be calculated:
1 > 3.1 * (10 ** -3)
2 0.0031000000000000003
Floating point arithmetics does not even make this expression exact.
If you need precise values, you have two options: one is rounding or truncating the result, and the other is to convert the floating point operands to integer numbers. For instance, instead of 0.25 dollars, you can write 25 cents. This works when you always expect the same number of precision after the decimal point.
Let’s see an example for rounding:
1 > 0.1 + 0.2
2 0.30000000000000004
3
4 > Number( 0.1 + 0.2 ).toFixed( 1 );
5 0.3
In the above example, the precision of the result is fixed to one decimal point.
The division 0 / 0 or using mismatching types creates a special number called not a number or NaN. Ironically, we will soon see that the type of the NaN value is number.
1 > 0 / 0
2 NaN
3
4 > 'ES6 in Practice' * 2
5 NaN
The latter is interesting to Python users, because in Python, the result would have been 'ES6 in PracticeES6 in Practice'. JavaScript does not work like that.
There is another interesting numeric value: Infinity.
 1 > 1 / 0
 2 Infinity
 3
 4 > Infinity * Infinity
 5 Infinity
 6
 7 > -1 / 0
 8 -Infinity
 9
10 > 1e308
11 1e+308
12
13 > 1e309
14 Infinity
JavaScript registers very large numbers as infinity. For instance, ten to the power of 309 is represented as infinity. Division by zero also yields infinity.
Let’s see some strings.
1 > 'ES6 in ' + 'Practice'
2 "ES6 in Practice"
Exercise 10. Determine the type and value of the following numbers:
(1 - 1) / 0(1 - 1) / 1 * 05e05 ** 0 / 05 ** (0 / 0)
Strings and escape sequences
Moving on to string data:
1 > 'ES6 in ' + 'Practice'
2 "ES6 in Practice"
The plus operator concatenates strings. Concatenation means that you write the contents of two strings after each other. Concatenation means that you join the values on the left and on the right of the concatenation operator (+).
A frequent question is, how to write quotes inside a string if quotes represent the boundaries of a string. In JavaScript, there are multiple solutions:
1 // Solution 1:
2 console.log( '--- "This is a quote" ---' );
3
4 // Solution 2:
5 console.log( "--- 'This is a quote' ---" );
6
7 // Solution 3:
8 console.log( "--- \"This is a quote\" ---" );
You can use any number of double quotes inside single quotes, and any number of single quotes inside double quotes. However, using a single quote inside a string defined using single quote would mean that we terminate the string. The same holds for using a double quote inside a string defined using double quotes.
As both single quotes and double quotes are used frequently, the need arises to use both the single quote and the double quote characters inside a string at any time. We can do this by escaping the quote using the \ (backslash) character.
Examples for escape sequences:
-
\'and\": single or double quote characters. In JavaScript, escaped quotes do not start or terminate a string. -
\n: newline character. We can put a line break in the string, making the character after\nappear on the next line. -
\\: as the backslash character creates an escape sequence, it is a special character itself and has to be escaped. The first backslash tells the JavaScript interpreter that a special character is coming. The second backslash says that this character is the backslash. This escape sequence is important to keep in mind when describing Windows file paths in JavaScript or node.js:
1 > console.log( `c:\\js\\hello.js` )
2 "c:\js\hello.js"
Multiline strings can be created using template literals. This comes handy when saving HTML markup in a string:
1 > console.log( `
2   <p>
3     paragraph
4   </p>
5   <ul>
6     <li>first list item</li>
7     <li>second list item</li>
8   </ul>
9 ` );
The above expression prints the text in-between backticks, including the newline characters. The usage of template literals is an advanced topic, we will not deal with them in this chapter.
Exercise 11. Write the following JavaScript strings in the console of your developer tools:
- “JavaScript is easy”, at least until it’s not.
- Save everything to the
C:\Documentsfolder. - Write the following countdown using one
console.logstatement:
1 3
2 2
3 1
4 START!
Strings are immutable which means that their value cannot be changed. The word immutable comes from the fact that strings cannot be mutated. If strings were mutable, we would be able to change the b character in the 'abc' string without creating a new string. In reality, in order to make an 'aXc' string from an 'abc' string, we need to create a new string from scratch.
Similarly, the result of "a" + "b" is a brand new string: "ab". Even after the result is created, "a" and "b" stay in memory. This is why strings are immutable in JavaScript.
If any of the operands of plus is an integer, while the other operand is a string, then the result becomes a string. JavaScript automatically converts the operands of an operator to the same type. This is called automatic type casting:
1 > 1 + '2'
2 "12"
3
4 > '1' + 2
5 "12"
Rules may become confusing, so don’t abuse automatic type casting. Most software developers do not know these rules by heart, as it generally pays off more to write code that is obvious and understandable for everyone.
Examples:
 1 > 1 + +"2" // +"2" gives a sign to "2", converting it to a number
 2 3
 3
 4 > 1 + Number("2")
 5 3
 6
 7 > 1 + Number.parseInt( "2", 10 )
 8 3
 9
10 > 1 + Number.parseInt( "2" )
11 3
All conversions work. The first relies on giving a sign to a numeric string which converts it to a number. Then 1+2 becomes 3. The second type cast is more explicit: you use Number to wrap a string and convert it to a number.
I recommend using the third option: Number.parseInt with a radix. parseInt converts a string into a number. The second argument of parseInt is optional: it describes the base in which we represent the number. Most of the time, we use base 10 values.
Let’s see some more Number.parseInt values:
 1 > Number.parseInt("ES6 in Practice")
 2 NaN
 3
 4 > Number.parseInt( "10", 2 )
 5 2
 6
 7 > Number.parseInt( "a" )
 8 NaN
 9
10 > Number.parseInt( "a", 16 )
11 10
Strings that do not start with a number are often NaN. "10" in base 2 is 2. The character "a" is not interpreted in base 10, its value is NaN. The same "a" character in base 16 is 10.
Number.parseInt recognizes the starting characters of a string as integer numbers, and throws away the rest:
1 Number.parseInt( "1234.567 89" )
2 1234
The dot is not a character present in integer numbers, so everything after 1234 is thrown away by Number.parseInt.
You can also use Number.parseFloat to parse floating point. It parses the floating point number until the terminating space:
1 Number.parseFloat( "1234.567 89" )
2 1234.567
Exercise 12. Select the values out of the following list that have the type number.
+"1"Number.parseInt("")Number("1")1 + "1""1" + 11 + +"1"
Exercise 13. Determine the value of the following expressions:
Number.parseInt( "1.25" )Number.parseInt( "1 2" )Number.parseInt( "5", 2 )Number.parseInt( "15", 2 )Number.parseInt( "f", 16 )Number.parseInt( "ES6" )Number.parseInt( "ES6", 16 )
The boolean type
Let’s see some booleans values. Booleans are either true or false.
The ! operator symbolizes negation. !true becomes false, while !false becomes true.
1 > !true
2 false
3
4 > !false
5 true
An arbitrary value can be converted to boolean using the Boolean function:
 1 > Boolean(0)
 2 false
 3
 4 > Boolean(1)
 5 true
 6
 7 > Boolean(2)
 8 true
 9
10 > Boolean(null)
11 false
The !operator not only negates a value, but also converts it to a boolean. For instance, the negation of a string can be described as follows:
- the empty string (
"") is evaluated asfalseby default in a boolean expression. Negating this value yieldstrue. - An arbitrary at least one character long string is evaluated as
truein a boolean expression. Negating this value yieldsfalse.
1 > !""
2 true
3
4 > !" "
5 false
In JavaScript, we differentiate between truthy and falsy values. These values are not necessarily booleans. Their value only becomes true or false after a type conversion.
A truthy value is a value
vfor whichBoolean(v)istrue. Example truthy values are: nonzero integers, strings containing at least one character. A falsy value is a valuewfor whichBoolean(w)isfalse. Example falsy values are: empty string,0,null,undefined.
Question: Why do we need type conversion using the Boolean function?
Answer: Because otherwise automatic type conversion would produce unintended results. For instance, in the expression 2 == true, both sides of the comparison are converted to numbers. As the value of Number(true) is 1, the 2 == 1 expression is evaluated to false:
1 2 == true ---> 2 == Number(true) ---> 2 == 1 ---> false
2
3 2 == false ---> 2 == Number(false) ---> 2 == 0 ---> false
Furthermore, null and undefined are neither true, nor false:
 1 > null == true
 2 false
 3
 4 > null == false
 5 false
 6
 7 > undefined == true
 8 false
 9
10 > undefined == false
11 false
However,
-
Boolean( null )andBoolean( undefined )are bothfalse -
!nulland!undefinedare bothtrue -
!!nulland!!undefinedare bothfalse
Similarly to the Boolean function, double negation also converts an arbitrary value into boolean:
- if
vis truthy, then!visfalse, and!!vistrue - if
wis falsy, then!wistrue, and!!wisfalse
Examples:
 1 > !!""
 2 false
 3
 4 > !!"a"
 5 true
 6
 7 > !!0
 8 false
 9
10 > !!1
11 true
12
13 > !!NaN
14 false
15
16 > !!Infinity
17 true
18
19 > !!null
20 false
21
22 > !!undefined
23 false
We can compare two numbers with >, >=, ==, ===, <=, <. We will discuss the difference between == and === soon. For the rest of the operators, the result of the comparison is a boolean.
1 > 5 <= 5
2 true
3
4 > 5 < 5
5 false
6
7 > !(5 < 5)   // ! stands for negation. !true = false, !false = true.
8 true
The = symbol is not used for comparison. It is used for assigning a value to a variable (see later).
For values a and b, a == b is true if and only if both a and b can be converted to the same value via type casting rules. This includes:
-
null == undefinedis true - If an operand is a string and the other operand is a number, the string is converted to a number
- If an operand is a number and the other operand is a boolean, the boolean is converted to a number as follows:
truebecomes1, andfalsebecomes0.
Don’t worry about the exact definition, you will get used to it.
For values a and b, a === b is true if and only if a == b and both a and b have the same types.
 1 > 5 == '5'   // '5' is converted to 5
 2 true
 3
 4 > 5 === '5'  // types have to be the same
 5 false
 6
 7 > 0 == ''    // '' is converted to 0
 8 true
 9
10 > 0 === ''   // types have to be the same
11 false
12
13 > NaN == NaN // I know... just accept this as something odd and funny
14 false
The negation of == is !=. Read it as is not equal to. For instance, !(a == b) becomes a != b. It is time mentioning that you are free to use parentheses to group your values and override the default priority of the operators.
The negation of === is !==.
1 > 5 != '5'
2 false
3
4 > 5 !== '5'
5 true
Exercise 14: Choose the values that (1) are true, (2) are truthy.
1"""false"!!"false"0 == ''0 === ''0 != !10 !== !11 != !11 !== !1nullundefined-
null == undefined null === undefined
So far, all operators have been unary or binary meaning that they bind one or two values:
- the expression
5 + 2has the operands5and2 - the expression
+'2'has the operand'2'
Recall that operators bind their operands. Some operators are said to bind stronger than others. For instance, multiplication binds stronger than addition:
1 5 * 2 + 2 ----> 10 + 2 ----> 12
Also recall that is possible to override the precedence of the operators with parentheses:
1 5 * (2 + 2) ----> 5 * 4 ----> 20
There is one ternary operator in JavaScript.
The value of a ? b : c is:
-
bifais truthy -
cifais falsy
It is important to note the difference between 2 == true and !!2.
 1 > 2 == true    // true is converted to 1
 2 false
 3
 4 > !!2          // 2 is a truthy value
 5 true
 6
 7 > 2 == true ? 'the condition is true' : 'the condition is false'
 8 "the condition is false"
 9
10 > !!2 ? 'the condition is true' : 'the condition is false'
11 "the condition is true"
I have seen the nastiest bug in my life in a code, where a condition was in a format num == true. As I never felt like learning boring definitions, my lack of knowledge shot me in the foot, because I assumed the opposite conversion in 2 == true. I can save you some headache by highlighting this common misconception. In 2 == true, true is converted to 1, and not the other way around.
null, undefined, symbol types
Null, undefined, and Symbols are primitive types.
Null represents an intentional absence of a primitive or composite value of a defined variable.
Undefined represents that a value is not defined. We will deal with the difference between null and undefined later.
A Symbol() is a unique value without an associated literal value. They are useful as unique keys, because Symbol() == Symbol() is false. Imagine a symbol as a unique key that opens one specific lock, in a world, where each created key is different from all other keys previously created. At this stage, just accept that symbols exist. You don’t have to use them for anything yet.
 1 > null
 2 null
 3
 4 > undefined
 5 undefined
 6
 7 > void 0
 8 undefined
 9
10 > Symbol('ES6 in Practice')
11 [object Symbol] {}
The value undefined can also be created using the void prefix operator.
Symbols can have a string description. This string description does not have an influence on the value of the symbol:
1 > Symbol('a') == Symbol('a')
2 false
Exercises
Exercise 15: Without running the code, determine the values written to the standard output:
1 // A. Arithmetics
2 console.log( 2*2+4 );
3
4 // B. Ternary operator
5 console.log( 3 % 2 ? 'egy' : 'nulla' );
6
7 // C. Not a Number
8 console.log( (0/0) == NaN );
Once you are done, verify your answers by running the code.
Exercise 16: Convert the following hexadecimal (base 16) values into base 10 and base 2: 0, F, ff, FFFFFF, 99, 10.
Hint: you can convert a value from decimal (base 10) into binary (base 2) in the following way:
1 Number( 2 ).toString( 2 );
2 // --> "10"
3
4 Number( 3 ).toString( 2 );
5 // --> "11"
Exercise 17: Without evaluating the expression, estimate the difference of the base 10 value 2 ** 24 and the hexadecimal value FFFFFF. Create a JavaScript expression that calculates this difference.
Exercise 18: Which data type would you use to model the following data? In case you chose a number type, choose whether you would use an integer or a floating point.
- your name
- your bank account number (assuming it only contains digits)
- your age
- whether you are over 18 or not
- the price of a book is 9 dollars 95 cents
Variables: let, const, and var
In the first few sections, we learned how to use datatypes and how to perform operations on different types of data. However, based on our current knowledge, if we want to perform the same calculation twice in our code, we have to manually copy either the formula or the result. Variables help us automatize and simplify this process by enabling us to access the result of an operation within our code.
First of all, in the below example, you have to know that console.log may print any number of arguments separated by commas. In the console, the values appear next to each other separated by a space.
1 > console.log( 1, 2, 3 )
2 1 2 3
Open the console of Google Chrome by right clicking on a website, selecting Inspect from the context menu, and then selecting the Console tab. In the console, you can type the following expressions:
 1 > 1
 2 1
 3
 4 > 2 + 3
 5 5
 6
 7 > 'JavaScript'
 8 "JavaScript"
 9
10 > JavaScript
11 Uncaught ReferenceError: JavaScript is not defined
12     at <anonymous>:1:1
While in the first three cases you get two integer and one string results, in the fourth case, you get a reference error. This error appears, because JavaScript is a variable, and this variable had not been created in the code.
Before creating this variable, let’s clarify what a variable is. In computer programming, variables are like drawers, where we store values.
The let keyword
We can create variables with the let keyword. Think of a variable like a drawer. Let declares a variable, which means to you that a drawer is created with a handle. Declaration is a process that creates a drawer, and hands the key of the drawer to us so that we can access its contents.
1 let myDrawer;
You can put a value in your drawer:
1 myDrawer = '$1.000';
In order to access the value, you have to grab the handle of the drawer and open it. In this example, you have a drawer called myDrawer. It contains a string written '$1.000' on it. To access your thousand bucks, you have to open the drawer:
1 > myDrawer
2 '$1.000'
You can assign an initial value to your variable with the = sign. This is called assignment, because we assign a value to a variable. The first assignment in the lifecycle of a variable is called definition or initialization.
The declaration and initialization steps can be combined in one step. Let’s create a second drawer, where we both declare and initialize a variable:
1 let mySecondDrawer = '$500';
Initialization can occur either in the same statement where you declared the variable (see declaredAndDefined), or after the declaration (see declaredButOnlyLaterDefined). You may access a declared variable even if you have not initialized it. Its value becomes undefined.
 1 let declaredAndDefined = 5;
 2
 3 let declaredButOnlyLaterDefined;
 4 declaredButOnlyLaterDefined = declaredAndDefined ** 2;
 5
 6 let declaredButNotDefined;
 7
 8 console.log(
 9     declaredAndDefined,
10     declaredButOnlyLaterDefined,
11     declaredButNotDefined
12 );
- The variable
declaredAndDefinedis declared on the same line where it is defined - The variable
declaredButOnlyLaterDefinedis only defined later in another line - The variable
declaredButNotDefinedis not defined at all, therefore, its value becomesundefined
Let’s see what happens if we move the line declaredButNotDefined below the console.log statement.
 1 let declaredAndDefined = 5;
 2
 3 let declaredButOnlyLaterDefined;
 4 declaredButOnlyLaterDefined = declaredAndDefined ** 2;
 5
 6 console.log(
 7     declaredAndDefined,
 8     declaredButOnlyLaterDefined,
 9     declaredButNotDefined
10 );
11 // The following error message is displayed:
12 // ReferenceError: deklaraltDeNemDefinialt is not defined
13
14 let declaredButNotDefined;
If you execute the above code, a ReferenceError should be displayed while executing the console.log statement. This is because the following sequence of events: you ask for the contents of your post box in the post office. However, the box you are asking for does not exist in the post office. This box is only accessible once you create it using the statement let declaredButNotDefined.
1 console.log( declaredButNotDefined ); // ReferenceError
2
3 let declaredButNotDefined;
Constants
Constants behave in a similar way as variables. Constants can be created using the const keyword:
1 const PI = 3.14;
The value of a constant cannot be changed later:
1 PI = 2;
2 Uncaught TypeError: Assignment to constant variable.
As the value of constants stay unchanged, they have to be initialized in the same statement where they are declared. If we forget this necessary step, we get an error message:
1 const c;
2 Uncaught SyntaxError: Missing initializer in const declaration
Scope of a variable
The scope of a variable shows where the variable is visible and where it is not.
In JavaScript, there are many different scopes available:
- Global scope
- Block scope (
let,const) - Function scope (
var) - Lexical scope (see later)
- Module scope (we will not deal with this scope here)
In most programming languages, the first two scopes are available. Function scope is a unique feature of JavaScript. Since the 2015 version of JavaScript, ES6 (or ES2015), function scope is losing its popularity, as the well known block scoped let and const variables emerged.
Regarding block scope, blocks can be created anywhere in your code. Blocks are created using braces ({ and }):
1 {
2     // This is a block
3 }
Variables created using let and const are only visible inside the block where they are created:
1 {
2     let box = 5;
3     console.log( box );
4 }
The above code displays the value of box.
1 {
2     let innerBox = 6;
3 }
4 console.log( innerBox );
In the above code segment, we get a ReferenceError as soon as we reach the console.log statement:
1 VM124:4 Uncaught ReferenceError: belsoDoboz is not defined
This is because the innerBox is not visible from outside the box.
Global scope
Similarly to other programming languages, JavaScript also has global variables. For instance, you have already used the global console variable to log messages. Besides console, open the Google Chrome developer tools console to explore other global variables:
 1 > document.location.href
 2 "http://zsoltnagy.eu"
 3
 4 > document.location.host
 5 "zsoltnagy.eu"
 6
 7 > screen.width
 8 1920
 9
10 > let globalVariable = true
11 true
12
13 > globalVariable
14 true
15
16 > secondGlobalVariable = true
17 true
18
19 > secondGlobalVariable
20 true
As you can see, it is possible to create global variables in the global scope. It does not matter if you use let, const, or a var (see later) keyword to create these variables, or you just write an assignment.
In case of an assignment, the following happens:
- The program checks if there is a variable declared locally in the same block (
let,const) or function (var). - if not, the program checks blocks and functions encapsulating the block or function, where our variable was declared from inside - out. This is the process of accessing the lexical scope, and we will deal with this later in depth.
- If there are no variables defined in the lexical scope, the global scope is accessed, a global variable is created, and its value is set to the value of the assignment.
In the following example, we will only use blocks for simplicity, as we have not learned how function scope works.
 1 // first file:
 2
 3 {
 4     let firstBox = 1;
 5     {
 6         firstBox = 2;
 7         secondBox = 3;
 8         console.log( firstBox, secondBox );
 9     }
10 }
If we execute the above code, the values 2 3 are printed to the console. The variable firstBox exists in the block encapsulating the block we are in. The variable secondBox was created using an assignment, and there are no var, let, or const variables declared with this name. Therefore, this variable exists in the global scope.
Now let’s suppose the contents of the first file have been loaded, and we also load the following code segment titled second file:
1 // second file:
2
3 {
4     let firstBox = 4;
5     {
6         console.log( firstBox, secondBox );
7     }
8 }
Once we execute this code, the values 4 3 are printed. The variable firstBox is defined in the block outside the block of the console.log. The variable secondBox is global, and it was created when loading firstFile. The secondBox variable is from now on shared across all files that we load.
1 // third file:
2 console.log( secondBox );
Executing this code also has access to the secondBox global variable.
1 // fourth file:
2 console.log( firstBox );
The result of loading the fourth file is a ReferenceError, because firstBox does not exist inside this scope: it only exists within the block it was defined in first file and second file.
1 VM5519:1 Uncaught ReferenceError: firstBox is not defined
2     at <anonymous>:1:14
Using global variables is not advised. Most often the time, global variables are created because of a mistake from a developer. Remember, if you forget the let, const, or var keywords in front of a variable assignment, you create a global variable.
The var keyword and function scope
In order to fully understand how the var keyword works, you need to know what functions are. We will learn functions later. For now, it is enough if you accept that variables declared using var are visible inside a function.
Functions can be created using the function keyword:
1 var globalBox = 2;
2 function scope() {
3     var functionScopedBox = 1;
4     console.log( globalBox );
5 }
6
7 scope(); // we call the function to execute its content
8 console.log( globalBox );
9 console.log( functionScopedBox );
The globalBox variable is accessible from everywhere in the code. However, when console logging the functionScopedBox variable in the last line, we get the following error message:
1 Uncaught ReferenceError: functionScopedBox is not defined
1 {
2     var box = true;
3 }
4 console.log( box );
This code is executed without problems, and the variable created inside the block is accessible also outside the block. This is a direct consequence of box being function scoped. As there are no functions encapsulating box, it is global scoped.
Naming variables
Variables should be named in a descriptive way. We need to use the name of the variable to describe what kind of data it stores. A good variable name is like a good comment. Best practices for coming up with a good variable name include:
- the variable describes its content in the best possible way,
- from all possible variable names, choose the shortest name
For instance, out of invoiceSum and invoiceItemSum, the former perfectly grasps the essence of what the variable stores. This is because it is obvious that an invoice contains items without grasping this piece of information in the name of the variable.
It is common practice to start writing variable names using lower case letters. If the variable name contains multiple words, we concatenate them as one word and capitalize the first letter of each word starting from the second word. This variable naming is called camel case (camelCaseVariable).
Creating multiple variables in one statement
One programming best practice is to create all variables we use later to describe a procedure or function, and then perform all the operations on these variables. Example:
1 let name = "Zsolt";
2 let website = "zsoltnagy.eu";
3
4 console.log( name, website );
5 // other operations...
We can abbreviate the variable declarations by using a comma:
1 let name = "Zsolt",
2     website = "zsoltnagy.eu";
Similarly, we can also declare variables and define them later:
1 let name, website;
2
3 name = "Zsolt";
4 website = "zsoltnagy.eu";
Exercises: let, const, var
Exercise 19: Without running the code, determine what is written to the standard output:
1 let a;
2 console.log( 'a: ' + a );
3 a = 5;
4 console.log( 'a: ' + a );
Exercise 20: Without running the code, determine what is written to the standard output:
1 let a = 5;
2 {
3     let a = 2;
4     a += 1;
5     console.log( 'a: ' + a );
6 }
7 console.log( 'a: ' + a );
Exercise 21: Without running the code, determine what is written to the standard output:
1 let a = 5;
2 {
3     console.log( 'a: ' + a );
4     let a = 2;
5 }
Exercise 22: In a previous section, we calculated the value of the FF hexadecimal number in base 10 and base 2. Change the code below such that we only run the Number.parseInt( 'FF', 16 ) calculation once. Hint: use variables.
1 console.log(
2     'FF in base 10:',
3     Number.parseInt( 'FF', 16 ),
4     '\nFF in base  2:',
5     Number.parseInt( 'FF', 16 ).toString( 2 )
6 );
Exercise 23: Continue the previous exercise, and suggest another modification to introduce a variable that eliminates a duplicated calculation.
Exercise 24: Which variable names follow good naming conventions in real life software?
variablenowTimestampfirstParametereurodollarrate
Arrays
An array is an ordered list of items. The items may be of any type. You know, in most post offices, there are hundreds or thousands of post boxes. Each post box may or may not contain something. Each post box has a numeric handle. Post box 25 may be your box. You unlock it, grab its handle, and access its contents.
The trick is that in case of arrays, you have to imagine the post boxes with handles called keys of 0, 1, 2, and so on. Typically, arrays have continuous keys.
1 let days = [ 'Monday', 'Tuesday', 'Wednesday', 'Thursday', 'Friday' ];
If you are looking for post box 3 among the days post office, you get Thursday, because Monday is the 0th element, Tuesday is the 1st element, Wednesday is the 3rd element, and Thursday is the 4th element of the array.
Arrays do not have to contain elements of the same type. We can place strings, null, undefined, symbols, objects, and other arrays in the array:
1 let storage = [ 1, 'Monday', null ];
According to an joke, Bill Gates once visited a lower grade class and asked children to start counting to ten. One of the children stood up and said, one, two, three, four, five, six, seven, eight, nine, ten. Bill Gates thanked for the efforts of the kid and asked someone else. A second kid stood up and started counting: one, two, three, four… Bill Gates already knew the result, so he thanked the second student for his efforts and asked someone else. Then came a third kid forward and started counting: zero, one, two, three… and this is when the kid got hired by Microsoft.
The takeaway of this story is that each element of the array can be accessed using an index starting from zero:
1 > days[0]
2 'Monday'
3
4 > days[4]
5 'Friday'
6
7 > days[5]
8 undefined
In the third example, we indexed out of the array.
Arrays have lengths:
1 > days.length
2 5
We often need to access the last element of an array. For instance, the days array has a length of 5. Indexing of an array starts with 0. Therefore, the last index is 4. In general, the index of the last element equals the length of the array minus 1:
1 > days.length - 1
2 4
3
4 > days[ days.length - 1]
5 'Friday'
Remark: In some other languages, such as Python, we can refer to the last element of a list using the index
-1. In Python,days[-1]is the same asdays[len(days) - 1]. The index of-1is interpreted as the first element counting backwards from the end of the list. In JavaScript, we cannot use this way of indexing.
You can add elements to the beginning and to the end of the array.
1 > days.push( 'Saturday' );
2
3 > console.log( days ); // add 'Saturday' to the end
4 ["Monday", "Tuesday", "Wednesday", "Thursday", "Friday", "Saturday"]
5
6 > days.unshift( 'Sunday' ); // add 'Sunday' to the beginning
7 ["Sunday", "Monday", "Tuesday", "Wednesday", "Thursday", "Friday", "Saturday"]
You can also remove these elements from the array: - Pop removes the last element from the array and returns it. - Shift removes the first element from the array and returns it.
1 > let element = days.pop();
2 > console.log( element, days );
3 "Saturday" ["Sunday", "Monday", "Tuesday", "Wednesday", "Thursday", "Friday"]
4
5 > let secondElement = days.shift();
6 > console.log( element, days );
7 "Sunday" ["Monday", "Tuesday", "Wednesday", "Thursday", "Friday"]
Similarly to objects, you can delete any element from the array. The value undefined will be placed in place of this element:
1 > delete days[2]
2 ["Monday", "Tuesday", undefined, "Thursday", "Friday"]
The values of an array can be set by using their indices, and equating them to a new value. You can overwrite existing values, or add new values to the array. The indices of the added values do not have to be continuous:
1 > days[2] = 'Wednesday';
2 > days[9] = 'Wednesday';
3 > console.log( days );
4 ["Monday", "Tuesday", "Wednesday", "Thursday", "Friday", undefined, undefined, undef\
5 ined, undefined, "Wednesday"]
Strings also provide access to their characters as if a string was an array of characters:
1 const str = 'Hello';
2
3 console.log( str[1], str[4], str[5] );
4 // --> e o undefined
The element at index 1 is the character e. The element at index 4 is the fifth character of the string, o. If we tried to access the element at index 5 of the string, we would get the sixth character of the array. This would make us index out from the array though. In JavaScript, indexing out from an array or string is possible: we just get an undefined value.
Our last language construct is the slice method. Unsurprisingly, this method slices an array, returning a new array with a continuous subset of elements.
We can specify the beginning of the slice as follows:
1 let days = [ 'Monday', 'Tuesday', 'Wednesday', 'Thursday', 'Friday' ];
2
3 > console.log( days.slice( 1 ) )
4 [ 'Tuesday', 'Wednesday', 'Thursday', 'Friday' ]
5
6 > console.log( days.slice( 4 ) )
7 [ 'Friday' ]
The beginning of the slice is the index of the first element we want to see in the slice. This number can also be zero, in which case we make a shallow copy of the original array:
1 let daysCopy = days.slice( 0 );
2 daysCopy[0] = '???';
3
4 console.log( days );
5 // [ 'Monday', 'Tuesday', 'Wednesday', 'Thursday', 'Friday' ]
6
7 console.log( daysCopy );
8 // [ '???', 'Tuesday', 'Wednesday', 'Thursday', 'Friday' ]
If you know the difference between a shallow copy and deep copy, be aware that slice creates the former. Otherwise, at this stage, it is enough to understand that slice always returns a new array, copying its elements.
For a useful slicing operation, we also need a way to specify the end of the slice. In JavaScript, the end of the slice is specified as the index of the first element we do not want to see in the array.
 1 // Monday - Wednesday:
 2 // - we start with the 0th element,
 3 // - the first element we don't want is at index 3
 4 > days.slice( 0, 3 )
 5 [ 'Monday', 'Tuesday', 'Wednesday' ]
 6
 7 // Thursday:
 8 // - we start at index 3
 9 // - the first element we don't want is at index 4
10 > days.slice( 3, 4 )
11 [ 'Thursday' ]
Specifying the end of the slice is optional. This means, days.slice( 1 ) is the same as days( 1, days.length ).
Remark: as many developers learn Python, it’s worth noting that Python uses the colon in the index for slicing.
days[0:3]is the same asdays( 0, 3 ). Whenever we have a zero on any side of the column in Python, that zero is optional:days[:3]is the same asdays[0:3],days[2:]is the same asdays.slice( 2 )in JavaScript, anddays[:]is the same asdays.slice( 0 )in JavaScript. We can see how similar some programming languages are to each other. You are better off learning the thought process, and then the syntax will be easy.
As with most topics, bear in mind that we are just covering the basics to get you started in writing code. There are multiple layers of knowledge on JavaScript arrays. We will uncover these lessons once they become important.
Exercises: Arrays
Exercise 25: Without executing the code, determine what is written to the console:
 1 let array = [ 7, 15, 32, 9, '3', '11', 2 ];
 2
 3 // A.
 4 console.log( array[3] );
 5
 6 // B.
 7 console.log( array[7] );
 8
 9 // C.
10 console.log( array.pop() );
11
12 // D.
13 console.log( array );
14
15 // E.
16 console.log( array.shift() );
17
18 // F.
19 console.log( array );
20
21 // G.
22 console.log( array.push( 6 ) );
23
24 // H.
25 console.log( array );
Exercise 26: Without executing the code, determine what is written to the console:
 1 const days = [
 2     'Monday',
 3     'Tuesday',
 4     'Wednesday',
 5     'Thursday',
 6     'Friday'
 7 ];
 8
 9 console.log( days[2] );
10 console.log( days[1][2] );
11 console.log( days[ days.length - 1][1] );
The Object type
This section will introduce the Object type. We will only learn the basics here.
An object is data structure with String or Symbol keys and arbitrary values. Imagine it like a machine that accepts a key, and gives you a value. Some people call this data structure associative array, others call it hashmap. These names may sound fancy, but essentially we mean the same damn thing.
Side note: we will only deal with String keys for now. Symbol keys are also allowed for strings. This is an advanced topic, you will learn it later.
An associative array is like human memory. In order to get access to a memory, we need an association, which is a handle or a key. This key unlocks the memory by providing access to it. The address of associative memory is therefore content. In JavaScript, we will use strings to describe this content.
1 let author = {
2   name: null,
3   website: "zsoltnagy.eu",
4   age: 35
5 }
6
7 console.table( author );
Run the above code in the console of Google Chrome developer tools. You can see that console.table enumerates the keys and values of the author object in a tabular format.
Similarly, console.log( author ) also logs the author object, but in this log, we need more clicks to read the keys and values.
The members of the author object can be accessed using a dot. For instance, author.name gives you read and write access to the name property of the author object. For instance, we can read the author.name value and log it using console.log( author.name ). To change the value of the name property, we have to wrtie author.name = 'Zsolt'.
1 author.name = "Zsolt";
2 console.log( author.name, author.website )
3 // Prints: Zsolt zsoltnagy.eu
It is possible to delete members of an object using the delete operator:
1 delete author.name
2 console.log( "Author name: ", author.name )
3 // Prints: Author name: undefined
If a field in an object is deleted or not even declared, the value of this field is undefined.
1 let o = {};
2
3 > o.name
4 undefined
An object contains fields. A field in an object can be referenced in the following ways:
- the already introduced dot notation:
object_name.member_name - bracket (associative array) notation:
object_name[ string_or_symbol_value ]
Let’s explore how we can select a member of an object if the corresponding key is in a variable:
1 let key = 'website';
2
3 // How can we select author.website?
The solution is to use the bracket notation and get author[ key ]. The value inside the brackets is converted to a key.
1 author[ key ]
2 // Prints: zsoltnagy.eu
We already know that the key of an object is a string. If we supply a key of different type inside the brackets, then this key is automatically converted to a string:
1 const key = 1;
2 const street = {};
3
4 street[ key ] = 'house';
5
6 console.log( street );
After executing the above code, the value { "1": "house" } is printed to the console.
A member of an object can be another object:
1 let car = { numberPlate: 'ABC123' };
2
3 let garage = {
4     size: 1,
5     parking: car
6 }
Here we can see that the garage has an integer size and an object propery called parking.
We typically build objects using braces by enumerating key-value pairs inside an opening brace and a closing brace. Once an object is built, we can add more properties to it:
1 garage.owner = { name: 'Zsolt' };
In the above example, we changed the value of garage.owner from the default undefined to an object.
We saw that we can refer to members of an object in two ways:
- dot notation: the value of
garage[size]is1, - bracket notation:
garage['size']is1.
The two notations are equivalent.
It is important to note that in the bracket notation, you need a value that can be converted to a string and does not throw an error. Therefore, if you try to retrieve garage[ nonExistingKey ], you get an error.
We will learn a lot more about objects later.
Exercises: objects
Exercise 27: Create an object that models a lottery poll. A lottery poll is defined by its time. We model this time using a string of format "2020-11-25 18:20". We also store the prize, which is also a string of form "20.000.000$". We also store five numbers that can range between 1 and 90. These values are stored in an array.
Exercise 28: Suppose the following object is given:
 1 let ticket = {
 2     from: {
 3         airport: 'HAN',
 4         date: '2020-11-05',
 5         time: '09:40'
 6     },
 7     to: {
 8         airport: 'AAA',
 9         date: '2020-11-05',
10         time: '11:25'
11     },
12     name: 'Java Script',
13     passport: '123456XY'
14 }
Using this object, write the following values to the console:
- start and arrival time and date,
- name,
- passport id,
- airport code of the destination.
Exercise 29: Create an object that contains an infinitely long chain of object references. For instance, if you call your object tree, make sure tree.tree, tree.tree.tree, tree.tree.tree.tree etc. are all available.
1 let tree = { leaf: "fruit" };
2
3 // Write your solution here such that the below logs
4 // all write "fruit"
5
6 console.log( tree.leaf );            // "fruit"
7 console.log( tree.tree.leaf );       // "fruit"
8 console.log( tree.tree.tree.leaf );  // "fruit"
9 // ...
Exercise 30: Suppose there is a safe object. The safe is opened by a secret key combination "123456". Create a reference that unlocks the safe and provide access to the value belonging to the key "123456".
1 let safe = { "123456": "$10.000" };
Exercise 31: We learned that the key of an object can either be a string or a symbol. Suppose that there is a variable declared and defined as let num = 5;. Consider the following code:
1 let num = 5;
2 let o = {};
3
4 o[ num ] = true;
5
6 console.log( o, o[ 5 ], o[ "5" ] );
Run the above code in your console and check the output. Explain what happens to the 5 key in o[ 5 ] that results in the log you saw.
Now let’s create a variable containing the "5" string, and run this code:
1 let text = '5';
2
3 o[ 'text' ] = false;
4
5 console.log( o, o[ 5 ], o[ "5" ] );
Run the above code and explain what happens when querying o[ 5 ].
Exercise 32: Create a map object with keys of the values of array arr. The values belonging to the keys are universally true. Use the console.table function to inspect the map object in Chrome developer tools.
 1 let arr = [1, 5, 3, 1];
 2
 3 let map = {};
 4
 5 // Write valid JavaScript code in place
 6 // of the  ____ symbols to add key-value pairs to map.
 7 // ____arr[0]____ = true;
 8 // ____arr[1]____ = true;
 9 // ____arr[2]____ = true;
10 // ____arr[3]____ = true;
11
12 console.table( map );
Exercise 33: Modify the previous exercise such that instead of true, the values belonging to keys arr[0], arr[1], arr[2], arr[3] are their respective indices 0, 1, 2, 3. Before running your code, determine the key-value pairs stored in the object map.
 1 let arr = [1, 5, 3, 1];
 2
 3 let map = {};
 4
 5 // Write valid JavaScript code in place
 6 // of the  ____ symbols to add key-value pairs to map.
 7 // ____arr[0]____ = 0;
 8 // ____arr[1]____ = 1;
 9 // ____arr[2]____ = 2;
10 // ____arr[3]____ = 3;
11
12 console.table( map );
Functions
Think of a function like a mathematical function giving you a relationship between input and output variables. If you don’t like maths, think of a function like a vending machine. You give it some coins and a number, and it gives you a bottle of cold beverage.
1 function add( a, b ) {
2     return a + b;
3 }
This function definition describes the relationship between its input variables a and b, and the return value of the function.
The return statement returns the value of the function. When calling the add function with arguments a and b, it computes the value a+b and returns it. Example:
1 > add( 5, 2 )
2 7
Try to modify the input variables. The return value also changes. Try to call the add function with one variable, e.g. add( 5 ), and see what happens.
Functions are useful to create reusable chunks of code that you can call with different arguments. We will write more useful functions once you learn the basics of control structures.
You can also define functions without placing the name between the function keyword and the argument list. This structure is great if you want create a reference to it using a variable. Remember, the variable subtract is a handle to a drawer. This time, your drawer contains a function.
1 let subtract = function( a, b ) {
2     return a - b;
3 }
There is another popular notation first introduced in ES6: the fat arrow notation.
1 let multiply = ( a, b ) => a * b;
The fat arrow describes the relationship between the argument list and the return value. In other words, it expects two values, a and b, and transforms these values to a * b.
Arrow functions are typically used when the input can be transformed to an output that can be calculated using the input variables:
1 function functionName( a, b, ... ) {
2     return value;
3 }
4
5 // conversion:
6 var functionName = ( a, b, ... ) => value;
If there is only one input argument, you may omit the parentheses around it:
1 let square = a => a * a;
All functions can be called using their references:
1 > add( 2, 3 )
2 5
3 > subtract( 2, 3 )
4 -1
5 > multiply( 2, 3 )
6 6
7 > square( 2 )
8 4
When a function does not return anything, its return value becomes undefined:
1 > let empty = function() {}
2
3 > empty()
4 undefined
The JavaScript interpreter always inserts a return undefined; statement at the end of each function. This is the default return value of every function. This default value can be overridden by the developer by specifying a return statement.
Variables inside the function are not the same as variables outside the function:
 1 let coins = 5;
 2 function addOne( coins ) {
 3     coins = coins + 1;
 4     return coins;
 5 }
 6
 7 > addOne( coins )
 8 6
 9 > coins
10 5
The coins variable inside the function is valid inside the scope of the function. It shadows the variable coins outside the function. Therefore, adding one to the internal coins variable does not have any effect on the external value. To see the execution of this code in action, follow this URL.
We learned earlier that variables declared using var are function scoped. Function arguments are also function scoped:
1 let coins = 5; // this is a global variable even if var was used
2 function addOne( coins ) {
3     // the inner coins variable shadows the global coins
4     // only the inner coins variable is accessible
5     coins = coins + 1;
6     return coins;
7 }
When there is a variable both inside and outside a function, the inner variable is said to shadow the outer variable whenever we execute code inside the function. This is what happened to the coins variable. Operations modifying the value of the inner coins variable do not affect the value of the outer coins variable.
Without changing execution of the code, we can safely rename the inner variable to illustrate that the two variables are different and only the inner variable is modified inside the function:
1 let coins = 5;
2 function addOne( innerCoins ) {
3     innerCoins = innerCoins + 1;
4     return innerCoins;
5 }
Exercises: functions
Exercise 34: Let’s recall a possible solution of the number conversion exercise:
1 let hexadecimalValue = 'FF';
2 let baseTenValue = Number.parseInt( hexadecimalValue, 16 );
3 console.log(
4     hexadecimalValue + ' in base 10:',
5     baseTenValue,
6     '\n' + hexadecimalValue + ' in base  2:',
7     baseTenValue.toString( 2 )
8 );
Write a function that expects a string containing a correctly formatted hexadecimal number, converts this hexadecimal value to base 10 and base 2, and console logs the result:
1 > convert( 'ACE' )
2 ACE in base 10: 2766
3 ACE in base  2: 101011001110
Exercise 35: Write a head comment to the function you created in the previous exercise. Head comments describe the parameters, the return value, and a one sentence summary of what the function does. Head comments typically have the following format:
1 /**
2  *  One sentence summary of the function
3  *
4  *  @param  string    description of the parameter
5  *  @return undefined
6  */
Immediately Invoked Function Expression
Be mindful that this section contains a regular JavaScript interview question. The question is:
Question: What is an IIFE (Immediately Invoked Function Expression)?
The short answer is, we create a function and immediately invoke it.
We learned that we can create a function using the function keyword:
1 function f() {
2     console.log( "f() has been executed" );
3 }
In order to invoke the function, we need to add two parentheses after the name of the function:
1 f();
2 // Logs: f() has been executed
We can combine the function definition and invocation if we place the () right after the function definition. To do that, we need to put the function definition in parentheses too:
1 (function f() {
2     console.log( "f() has been executed" );
3 })();
4 // Logs: f() has been executed
Don’t forget the parentheses around the function definition. If you omit them, you get an error message:
1 function f() {
2     console.log( "f() has been executed" );
3 }();
4 // Error: Uncaught SyntaxError: Unexpected token )
The name of function f does not have any significance in the code, it acts like a comment. We can safely omit the name f, creating an anonymous function.
1 (function() {
2     console.log( "The function has been executed" );
3 })();
It is also possible to pass parameters to immediately invoked function expressions:
1 (function( text ) {
2     console.log( text );
3 })( "The function has been executed" );
In the parametrized version, you can write any value in place of the string "The function has been executed".
Starting from ES2015, the 2015 specification of JavaScript, immediately invoked function expressions can also be created using arrow functions:
1 ( text => console.log( text ) )( "Done." );
This format is not a surprise, because text => console.log( text ) can be substituted by console.log itself. It expects a text variable, writes it to the console, and returns undefined. If we make this substitution, we get the following expression:
1 ( console.log )( "Done." );
The parentheses around console.log can also be omitted resulting in:
1 console.log( "Done." );
Exercises: Immediately Invoked Function Expressions
Exercise 36: Create an immediately invoked function expression that expects two numeric parameters and returning the sum of these two parameters. You can assume that the parameters are numbers, you don’t have to check their types.
Variable Scopes and Shadowing
This section will be challenging, therefore, read it multiple times to let the material sink in.
Let’s summarize what we learned about scopes:
1 let global = true;  // global variable
2 {
3     let block = true; // block scope
4 }
5
6 (function() {
7     var functionScoped = true; // function scope
8 })();
Global variables are visible everywhere.
Block scoped variables are visible within the block they are created in, but they are not visible outside the block.
The last example is an immediately invoked function expression. This is a function that we immediately invoked using the () symbols. Variables created using var inside this function invocation are visible inside the function, but not outside it.
Let’s see what happens if we nest multiple immediately invoked function expressions:
 1 var functionScoped = 'Sun';
 2 let x = 1;
 3 (function outer() {
 4     var functionScoped = 'Moon';
 5     (function inner() {
 6         console.log( '----Function----' );
 7         console.log( 'x: ', x );
 8         console.log( 'functionScoped: ', functionScoped );
 9     })();
10 })();
After the execution of the program, the following is written on the console:
1 ----Function----
2 x: 1
3 functionScoped: Moon
It does not matter if the x variable is declared using let, var, or const. We could even omit the keyword representing the scope, as either way, x is created in the global scope, therefore, it will be a global variable. Therefore, the value of x is visible everywhere in the code, so in the inner function, we can console log its value.
Inside the inner function, we can access all variables of the outer function, regardless of whether they are declared using var, let, or const, or they come from the outside.
Both in the inner and outer functions, we can access variables that were created in the same scope where the outer function was created. In this specific situation, it’s the global scope.
The above explanation is not complete though. According to the explanation so far, in both outer and inner, we would have access to two functionScoped variables. One has a value 'Moon', while the other has a value 'Sun'. In reality though, we only have access to one of the variables.
If we move outwards from the inner scope, we can only access the closest variable with a given name. In case of functionScoped, this variable is in the outer scope. The functionScoped variable in the outer scope therefore shadows the global functionScope variable.
In other words, the 'Moon' shadows the 'Sun', giving you a total eclipse from the perspective of the inner and outer scopes. This is why we can only see the 'Moon' in the console.log statement in the inner scope.
Based on this explanation, you can have an idea of what lexical scope is for functions. Lexical scope gives you access to
- all variables within a given function,
- all variables in the function containing the scope we are examining recursively,
- if two variables have the same name in a lexical scope, the variable that is defined closest to the scope we are examining shadows all variables with the same name that are outside this scope.
The same explanation holds for block scope:
 1 let blockScoped = 'Sun';
 2 let x = 1;
 3 {
 4     let blockScoped = 'Moon';
 5     {
 6         console.log( '----Block----' );
 7         console.log( 'x: ', x );
 8         console.log( 'blockScoped: ', blockScoped );
 9     }
10 }
Exercises: variable scopes and shadowing
Exercise 37: Without running the program, determine the value written to the console:
 1 // Global scope
 2 let x = 1;
 3 {
 4     // block A
 5     let x = 2;
 6     {
 7         // block B
 8         let x = 3;
 9     }
10     {
11         // block C
12         console.log( x );
13     }
14 }
Exercise 38: Rewrite the code of the previous exercise such that you use var instead of let, and you use immediately invoked function expressions instead of blocks.
The typeof operator
In some cases, we may want to check the type of a value we hold in a variable. To perform this task, we will introduce the typeof operator.
Let’s recall the concept of an operator and an operand:
For instance, in the 2 * 3 operation, the multiplication sign (*) is the operator, and the operands are 2 and 3.
The typeof operator accepts one operand and returns a string. This string describes the type of an object.
1 typeof ''         // "string"
2 typeof 0          // "number"
3 typeof true       // "boolean"
4 typeof {}         // "object"
5 typeof []         // "object"
6 typeof null       // "object"
7 typeof undefined  // "undefined"
8 typeof Symbol()   // "symbol"
There is just one problem: arrays, objects, and the null value have the same type. It would be great if we could differentiate between them. Fortunately, ES6 solves the array problem:
1 > Array.isArray( [1, 2] )
2 true
3 > Array.isArray( {a: 1} )
4 false
Regarding the null value, a simple comparison does the trick:
1 let name = null;
2
3 > name === null
4 true
Functions have the type "function":
1 function two() { return 2; }
2
3 typeof two
4 "function"
Exercises - typeof operator
Exercise 39: Without executing the code, determine the values of the following variables:
 1 let a = typeof '';
 2 let b = typeof a;
 3 let c = typeof x;
 4 let d = typeof 25;
 5 let e = typeof null;
 6 let f = typeof 25 + ' ';
 7 let g = typeof (NaN === NaN);
 8 let h = typeof null;
 9 let i = '' + 1;
10 let j = typeof i;
Requesting Input from the User
When I started programming back in the days, I mainly studied from books, because back in the 90s, I didn’t have access to Internet. I can recall a thick programming book I had. As I worked my way through the examples of the book, I had one question in mind all the way through making progress in the book: how can I get an input from the user?
After a while, I searched for a function that lets me enter an input, and I didn’t find this function at all. I asked myself, if it is so hard to get an input, then why am I learning programming?
Eventually, I had to go to an Internet café to find the answer. In hindsight, I found out that user input was not even considered in the thick book I wrote.
As I recalled these memories, I concluded that I don’t want to create a book, where I leave you wondering about how to enter input. Therefore, in this section, you will learn about two methods to get input from the user. These are:
- Prompt window,
- HTML5 forms.
There are many other ways to get user input, such as an API connection or a direct database connection in case of node.js. A node.js program also helps you process files. However, in this section, we will stick to introducing the capabilities of Prompt windows and HTML5 forms.
Prompt window
You can use the prompt statement to create a window with a textfield and get data from the user:
1 let value = prompt( 'Enter a number' );
Once this expression is executed, a popup appears on screen with the 'Enter a number' message, an input field, and two buttons: OK and Cancel. If you press the Cancel button, the prompt function returns null in the code. If you press the OK button, the prompt function returns the text that the user entered in the input field. If the input field is left empty, the return value after pressing OK becomes the empty string ("").
Suppose that the user entered the value 25. As the prompt function returns a string, this value is available as a string:
1 > console.log( value, typeof value);
2 "25" string
HTML5 Forms
This section only serves as an introduction to how data can be extracted from an HTML page using JavaScript. Our goal here is not deep understanding, but rather illustration of possibilities, so that you know what to expect from JavaScript.
Open a new tab in your Google Chrome browser, and open the developer tools console. Run the following code:
1 document.body.innerHTML = `
2   Age: <input type="text" name="age" class="js-age">
3   <input type="checkbox" class="js-accept-toc" id="accept-toc">
4   <label for="accept-toc">Accept the terms and conditions</label>
5 `;
After running this code, the contents of the website you were viewing got replaced by a textfield and a checkbox. Don’t worry, the change is only effective in your browser, no-one else can see these changes from other computers.
You can modify the value of the textfield and checkbox from the browser. Let’s learn how we can access these values using JavaScript.
We can extract the contents of the Age field in the following way:
1 let age = document.querySelector( '.js-age' ).value
The expression on the right hand side of the equation returns the string content of the textfield that has the class js-age. This return value is stored in the age variable.
The '.js-age' string is a selector, where the dot means that we are selecting an HTML element that has a class equal to the value after the dot. As the input field containing the age has an attribute class="js-age", the selector retrieves the correct input field.
The same field could have been selected with many other selectors such as:
-
'[type=text]', -
'[name=age]'.
A checkbox can either be checked or unchecked. Similarly to the textfield example, we can use a class selector to retrieve the DOM node we are looking for. However, this time, instead of the value property, we need to retrieve the checked property:
1 let isChecked = document.querySelector( '.js-accept-toc' ).checked
The isChecked variable describes a boolean expression that can either be true or false, depending on whether the checkbox is checked or not.
Some more operators
We will soon write conditions and loops. In these two control structures, a few operators come handy:
-
+=,-=,*=,/=,%=etc. are abbreviations for adding a value to a variable.a += 1is the same as writinga = a + 1. -
++xincreases the value ofxby1, then returns the increased value -
x++returns the original value ofx, then increases its value by1 -
--xdecreases the value ofxby1, then returns the decreased value -
x--returns the original value ofx, then decreases its value by1
Examples:
 1 let a = 1;
 2
 3 a *= 2;            // a = a * 2;
 4 console.log( a );  // 2
 5
 6 a += 1;            // a = a + 1;
 7 console.log( a );  // 3
 8
 9 a %= 2;            // a = a % 2;
10 console.log( a );  // 1
11
12 ++a;               // If ++a is not on the right hand side of an asignment,
13                    // its effect is the same as writing a = a + 1;
14 console.log( a );  // 2
15
16 a++;               // If a++ is not on the right hand side of an assignment,
17                    // its effect is the same as writing a = a + 1;
18 console.log( a );  // 3
19
20 --a;               // If --a is not on the right hand side of an asignment,
21                    // its effect is the same as writing a = a - 1;
22 console.log( a );  // 2
23
24 a--;               // If a-- is not on the right hand side of an asignment,
25                    // its effect is the same as writing a = a - 1;
26 console.log( a );  // 1
I know, the difference between ++x and x++ may not make sense to you right now. I argue that in most cases, it should not even make a difference as long as you want to write readable code.
Both x++ and ++x have a main effect and a side effect. As a main effect, they return a value. Either x, or x + 1, depending on whether you write the ++ after the x or before.
 1 let a, aplusplus, plusplusa;
 2
 3 a = 1;
 4 aplusplus = a++;
 5 console.log( "a: ", a, "aplusplus: ", aplusplus );
 6 // a:  2 aplusplus:  1
 7
 8 a = 1;
 9 plusplusa = ++a;
10 console.log( "a: ", a, "plusplusa: ", plusplusa );
11 // a:  2 plusplusa:  2
The a++ expression first returns the original value of a. This original value is stored in the aplusplus variable. Then, as a side effect, the expression increases the value of a by 1.
The ++a expression first executes its side effect by increasing the value of a by 1. Then the main effect of ++a is executed, which is the returning of the increased value. This increased value is stored in the ++a variable.
The same code can be written without relying on any side effects:
 1 let a, aplusplus, plusplusa;
 2
 3 a = 1;
 4 aplusplus = a;
 5 a = a + 1;      // or: a += 1;
 6 console.log( "a: ", a, "aplusplus: ", aplusplus );
 7 // a:  2 aplusplus:  1
 8
 9 a = 1;
10 a = a + 1;      // or: a += 1;
11 plusplusa = a;
12 console.log( "a: ", a, "plusplusa: ", plusplusa );
13 // a:  2 plusplusa:  2
The below code illustrates the sequence in which the main effect and the side effect of these operations are executed:
 1 y = x++;  // First (main effect):  y = x;
 2           // Second (side effect): x = x + 1;
 3
 4 y = ++x;  // First (side effect):  x = x + 1;
 5           // Second (main effect): y = x;
 6
 7 y = x--;  // First (main effect):  y = x;
 8           // Second (side effect): x = x - 1;
 9
10 y = --x;  // First (side effect):  x = x - 1;
11           // Second (main effect): y = x;
Let’s see another example:
1 let a = 1;
2
3 a *= 2;  // a = a * 2;
4 console.log( '2++: ', a++ );
5 console.log( '--3: ', --a );
The side effect of a++ and ++a is that they increase the value of x after returning a value, or before returning a value respectively. Notice that in the above example, the first console log prints the value of 2++, which is 2. After this line is terminated, and before the next line is started, the value of a becomes 3 due to the side effect. Then we print the value --3, which is 2. The side effect of --a is that the value of a got decreased by 1 before the returned value got printed.
There are two more operators that come handy when formulating boolean conditions.
Suppose you are checking whether a variable is an array and it has a positive length. The and conjuncion is denoted by the && operator:
 1 function isNonEmptyArray( x ) {
 2     return Array.isArray( x ) && x.length > 0;
 3 }
 4
 5 > isNonEmptyArray( 5 )
 6 false
 7 > isNonEmptyArray( [] )
 8 false
 9 > isNonEmptyArray( [1] )
10 true
The value 5 is not an array, so Array.isArray( 5 ) becomes false. A false value in conjunction with anything is false:
1 > false && false
2 false
3 > false && true
4 false
Therefore, the second operand of the && operator is not even executed. This is good, because 5.length would have thrown an error. We can rely on the && operator not executing the right hand side expression in case the left side is evaluated as false. This simplification is called a shortcut.
If the left hand side is true, the right hand side is executed. In this case, the value of the and expression becomes the value of the right hand side expression:
1 > true && false
2 false
3 > true && true
4 true
5 > true && 'value'
6 'value'
We can also define an or relationship between operands. For instance, suppose we have a function that returns true for numbers and strings:
 1 function numberOrString( x ) {
 2     return typeof x === 'number' || typeof x === 'string'
 3 }
 4
 5 > numberOrString( NaN )
 6 true
 7 > numberOfString( '' )
 8 true
 9 > numberOrString( null )
10 false
The or operator works as follows: in case of a || b, if a is true, then b is not even evaluated. This is the or shortcut. Once we know that a variable is a number, we don’t have to check if the same variable is a string too. We already know that the function should return true.
Example for shortcut: if we know that a variable contains a number, then it is useless to check if the type of the value stored in the same variable is a string. Once we know it is a number, the numberOrString function can safely return the result.
The value of a || b is true, whenever:
-
ais truthy. In this case,bis not even evaluated. -
ais falsy andbis truthy.
Why is evaluation important? Because a and b can be expressions with side effects. These side effects are only executed if we evaluate the expressions they are in.
The value NaN was mentioned previously.
When formulating a condition that checks if a value is NaN, we have the problem that NaN == NaN is false. The value NaN does not equal to itself. How can we then check if a value is NaN? The answer is, use Number.isNaN().
1 let notNumber = NaN;
2
3 > notNumber == NaN
4 false
5
6 > Number.isNaN( notNumber )
7 true
Exercises: Operators
Exercise 41: Without running the code, determine what is written to the console:
 1 // A. ternary operator
 2 let a = 3;
 3 console.log( a%2 ? 'one' : 'zero' );
 4
 5 // B. side effects
 6 ++a;
 7 a *= 3;
 8 a %= 5;
 9
10 // C. shortcut
11 a > 2 && console.log( 'Is this line written to the console?' );
12 a > 2 || console.log( 'What about this one?' );
Exercise 42: Write the following conditions as JavaScript boolean expressions.
- The value of the
agevariable should be at least18 - The value of the
agevariable should be between20and30, including the values20and30 - The value of the
agevariable cannot be between20and30. It cannot be20and cannot be30. - The value of the
agevariable cannot be even. - The value of the
agevariable has two digits, and the first digit is smaller than the second digit. Hint: theMath.floorfunction accepts a floating point number and returns the truncated value of this number, where we get rid of the fractional part of the number. For instance,Math.floor( 1.8 )is1.
Exercise 43: Determine the main effect and side effects of the expressions in front of the comments A and B:
1 let condition = true;
2
3 condition && console.log( 'A' ); // A
4 condition || console.log( 'B' ); // B
An Introduction to Control Structures
It is time to learn what a JavaScript program looks like. In this section, we will learn the three main elements of describing the control flow of a program. These are: sequence, selection, and iteration.
First of all, every program has an entry point and an exit:
Flowchart start and end statesThis diagram is called a flowchart describing the control flow of a program.
Let’s explore what happens between these two endpoints.
So far we have learned the fundamentals of coding so that we can create the individual building blocks of a program. These building blocks include:
- declaring and defining variables,
- computing values,
- creating data of simple or complex types,
- invoking functions,
- formulating conditions,
- requesting input from the user.
We can already write these instructions after each other in sequence.
Sequence
Executing instructions one after the other is called sequencing. A sequence of instructions is executed one after the other. Example:
1 Ask for prompt user input;
2 Convert the user input to a number;
3 Get the last digit of the converted input;
4 Write the result to the console.
The flowchart of this sequence of instructions is as follows:
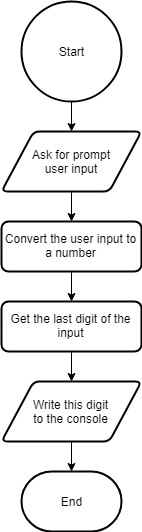
Sequence of instructionsIn a flowchart describing a sequence of instructions, we distinguish between four types of nodes:
- Start node: entry point
- End node: exit point
- Trapezium: input or output operation such as requesting user input or writing a value to the console
- Rectangle: operations performed on data
A flowchart is read from top to bottom, moving from the start node towards the end node. The description of a flowchart can be vague or mathematically accurate. For instance, we could use variable names to make the contents of the flowchart more relatable to writing code:
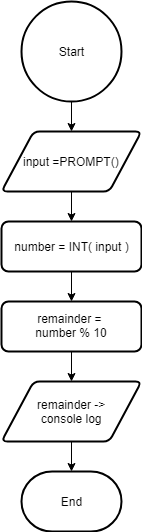
Sequence of instructions using variablesUsing JavaScript functions is not necessary. It is enough if we can describe what a node in our flowchart should do. The objective of a flowchart is not to document how your program works. The aim of using flowcharts is for you to learn the fundamentals of programming.
During sequential execution, we execute instructions in sequence. Given that you have learned many JavaScript instructions, you can write many different programs.
Sequencing is not enough though to write sophisticated programs. For instance, you already know how to write conditions in JavaScript. However, I haven’t told you yet how these conditions can be used in your code. You will soon learn that conditions are used to perform both selection between branches of code, and iteration on a code segment.
Another example is the creation of arrays. We already know how to create an array of arbitrary length. However, we cannot yet traverse this array based on the content you have read so far. This is where iteration will help you.
Let’s explore these two control structures one by one.
Selection
When performing selection, we branch off based on a condition. If the condition is true, we visit one branch. If the condition is false, we visit another branch. We select our branch based on whether our condition. Let’s see an example:
1 Ask for prompt user input;
2 If this value is empty:
3     Write "invalid value"
4 Else:
5     Write "valid value"
When writing a selection operation, the program branches off. Based on the values in the condition, we choose one branch out of the two:
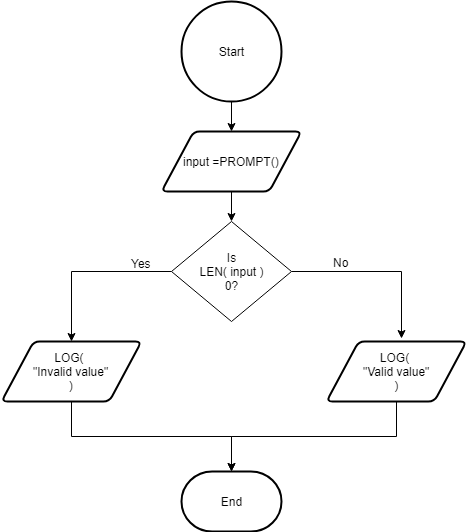
Flowchart of selectionWe denote selections by a diamond with one input and two outputs. Based on the condition written inside the diamond, we choose one output or the other.
You might recall an operator before that implements selection: the ternary operator. The above program can be written using the ternary operator in the following way:
1 let input = prompt();
2 console.log( input.length == 0 ? "invalid value" : "valid value" );
The ternary operator is great when we have to choose between values. Its use is limited though, when we have to execute complex operations, especially if they have side-effects. This is why we will learn the if - else statement and switch to perform selection.
Although we will learn about if and switch statements later, as an introduction, let’s explore how selection is written in JavaScript:
1 let input = prompt();
2 if ( input.length == 0 ) {
3     console.log( 'invalid value' );
4 } else {
5     console.log( 'valid value' );
6 }
This structure is self-explanatory. If the condition inside the if is true, we execute the block right after it. Otherwise, we execute the second block. You can write a sequence of instructions inside each block, and even create block scoped variables there.
Iteration
When performing iteration, we repeat an instruction or a set of instructions as long as a condition stays true.
Iteration is useful for multiple reasons. The most evident benefit of using iteration is that you don’t have to manually copy-paste code that you repeat multiple times. For instance, when logging the elements of an array of length 10000, you might want to avoid writing ten thousand console log statements in your code:
1 console.log( arr[0] );
2 console.log( arr[1] );
3 console.log( arr[2] );
4 ...
5 console.log( arr[9999] );
Writing ten thousand console log statements is only possible, because you know how long your array is. In programming, the length of an array can often change. For instance, if you have a website, where the user presses a button, you can build an array of todo items by taking some input field values and saving them in the array as todo items. When printing the contents of your todo list, you cannot rely on knowing in advance how many items there would be in your todo array at the time of running your code. Therefore, writing this code is not possible:
1 console.log( arr[0] );
2 console.log( arr[1] );
3 console.log( arr[2] );
4 ...
5 console.log( arr[arr.length - 1] );
What you need, is a control structure performing iteration. This control structure would iterate from 0 to arr.length - 1, take each value, and log each element of the array one by one:
1 for each *i* between 0 and arr.length - 1:
2     LOG( arr[*i*] );
The flowchart of this iteration looks as follows:

Flowchart of iterationIteration has the same symbol as selection, with the exception that its input comes from two sources. One source is when we enter the iteration for the first time. Another source is coming from the below, where we finished executing the statements inside the iteration.
We will learn many language constructs to perform iteration. These include:
- loops such as
while,do-while,for,for..in,for..of - recursion, which is a name for a function calling itself directly or indirectly. Direct recursion means that we execute function
f, and one of our statements inside the function is callingf. Indirect recursion occurs during the execution of functionf, if we call another functiong, which may callf. Example for direct recursion:
1 function printArray( arr ) {
2     if ( arr.length > 0 ) {
3         console.log( arr[0] );
4         printArray( arr.slice( 1 ) );
5     }
6 }
Once you run printArray( [1, 3, 5, 1] ), you can see that the result is 1, 3, 5, 1 printed on screen, one value in each line.
If you remember how an if statement works from above, you have learned everything else to understand the printArray function. We first print the element with index 0, then we create a slice from the array. This slice keeps all elements from the array except the one printed to the console. We repeat this process until we run out of elements in the array.
Unfortunately, this solution is not only inconvenient, but it is also resource intensive. Somewhere between ten and a hundred thousand elements, the program throws a stack overflow error, because it can’t handle that many recursive function calls at once. Therefore, we will learn loops to simplify iteration from the above function to a simple and understandable form such as the following:
1 for ( let value of arr ) {
2     console.log( value );
3 }
Without jumping ahead too much, you can interpret this code such that you take each value of arr, and print it.
I hope this simplification is exciting enough for you to continue with the next sections on selection and iteration.
Selection in Depth: if-else and switch
The time has come, when we can fit the puzzle pieces together. You have learned about different primitive and composite types. You know how to check these types. You know the basic functions and arithmetic (addition, subtraction, multiplication etc.) and logical (true or false) operations in JavaScript.
There are only two things missing.
So far, we can write a sequence of instructions that perform a calculation. In software development, there are three types of control structures:
- sequence: writing instructions one after the other
- selection: either execute one set of instructions, or another
- iteration: execute a set of instructions a finite or infinite number of times
if statement
As you already know how to sequence instructions one after the other, it is time to learn about selection and iteration. Let’s start with selection:
1 if ( condition ) {
2     instruction1;
3     instruction2;
4     //...
5 }
The instructions inside the if-branch are only executed if condition is truthy.
Notice the space between the if and the opening parentheses. This space is there to indicate that if is a keyword and not a function. Although this space is not mandatory, I highly recommend it for readability reasons.
1 function printNumber( x ) {
2     if ( typeof x === 'number' ) {
3         console.log( x + ' is a number.' );
4     }
5 }
6
7 > printNumber( 5 )
8 5 is a number.
9 undefined
The first value is the console log. The second value is the return value of the printNumber function. Remember, if the return value of a function is not specified, it returns undefined.
If we call the printNumber function with a non-numeric value, it does not print the console log, because the instructions inside the if branch are only executed, whenever the condition inside the if statement is truthy.
1 > printNumber( '' )
2 undefined
It is a bit awkward that we don’t print anything in case the input is not a number. You already know everything to write a program that does this. The thought process is the following:
- if
xis a number, print it - if
xis not a number, print the message"The input has to be a number."
We now know everything to write the printNumber function:
1 function printNumber( x ) {
2     if ( typeof x === 'number' ) {
3         console.log( x + ' is a number.' );
4     }
5     if ( typeof x !== 'number' ) {
6         console.log( 'The input has to be a number.' );
7     }
8 }
The second biggest problem with this solution is that we are writing too much for no reason.
The main problem with this solution is called lack of abstraction. Imagine that one day somebody comes and realizes that the condition typeof x === 'number' has to be modified. If you forget changing the second condition, you create an inconsistency in your code. We prefer thinking less when we don’t have to. Therefore, I recommend another solution, where we only have one condition:
1 function printNumber( x ) {
2     if ( typeof x === 'number' ) {
3         console.log( x + ' is a number.' );
4     } else {
5         console.log( 'The input has to be a number.' );
6     }
7 }
Notice the else keyword. The else branch is only executed if the original condition is not true.
We can cascade this approach further, because after the else, you can have another condition:
 1 function logLampColor( state ) {
 2     if ( state === 1 ) {
 3         console.log( 'Red' );
 4     } else if ( state === 2 ) {
 5         console.log( 'Amber' );
 6     } else if ( state === 3 ) {
 7         console.log( 'Green' );
 8     } else {
 9         console.log( 'Wrong lamp state' );
10     }
11 }
The beauty of the above code is that you can read it as if it was plain English. If the state is 1, then log Red. Otherwise if the state is 2, then log Yellow. And so on.
The generic form of an if-else if-else statement is as follows:
 1 if ( condition1 ) {
 2     statements1;
 3 } else if ( condition2 ) {
 4     statements2;
 5 } else if ( condition3 ) {
 6     statements3;
 7 } else {
 8     statements4;
 9 }
10 statement_after_if_else;
It is possible to have more than two else if branches. Also note that statement_after_if_else; is executed right after entering any of the branches in the if-else if-else if-else construct. Interpret the code as follows:
- If
condition1is truthy, thenstatements1is executed. Then we exit from the longif-elsestatement, and runstatements_after_if_else. - If
condition1is falsy, butcondition2is truthy, then we runstatements2. Afterwards, we exit from the longif-elsestatement, and runstatements_after_if_else. - If
condition1andcondition2are both falsy, butcondition3is truthy, then we runstatements3. Afterwards, we exit from the longif-elsestatement, and runstatements_after_if_else. - If you reach this point,
condition1,condition2, andcondition3are all falsy. This branch describes all other cases and runsstatements4. Then we exit theif-elsestatements, and runstatements_after_if_else.
The else branch is never necessary. For instance, the following construct is perfectly valid:
1 if ( condition1 ) {
2     statement1;
3     statement2;
4 } else if ( condition2 ) {
5     statement3;
6     statement4;
7 }
When there is only one statement after an if statement, the use of braces is not mandatory. For instance, suppose you are writing a function that displays a message on screen:
1 function displayMessage( message ) {
2     if ( typeof message !== 'string' ) return;
3     // display the string message
4 }
When we verify the input arguments, often times it is worth creating single line if statements to exit from the function in case of invalid input. The typical form of these exit conditions is as follows:
1 if ( condition ) statement;
We will soon talk about some common mistakes beginner developers make. The above format is often desirable, because it avoids the beginner mistake number 3, writing a second statement indented after the if statement.
Let’s see another example for an exit condition:
 1 function countdown( num ) {
 2     if ( typeof num !== "number" || num <= 0 ) return;
 3     console.log( num );
 4     countdown( num - 1 );
 5 }
 6
 7 > countdown( 3 )
 8 3
 9 2
10 1
In the first line of the function body, we exit from the function whenever num is not a positive number. If num is a positive number, we print its value, and we call the same countdown function, with a value one less than the current value of num. We will talk about this technique later. At this stage, let’s concentrate on the exit condition on the first line. We used just one line for the same exit condition that could have required three lines with braces:
1 function countdown( num ) {
2     if ( typeof num !== "number" || num <= 0 ) {
3         return;
4     }
5     console.log( num );
6     countdown( num - 1 );
7 }
In both cases, it is mandatory to have an exit condition in the countdown function, not only because of verifying the input, but also because this is the only way to terminate an infinitely long iteration. If we don’t give ourselves a way to exit, we run around the same loop forever. At least in theory. In practice, a stack overflow error terminates the program after a given number of iterations.
Generally, the usage of braces is highly recommended due to readability reasons.
Some common beginners errors about if statements:
1. six lines instead of one for a simple assignment
Let’s introduce this mistake with an example. Suppose we ask the user to enter a number. As text user input is always in string format, we convert this string to a number. Then we call a function that prints if this value is greater than 100.
1 let input = prompt( 'Enter a number:' );
2 let num = Number.parseInt( input, 10 );
3 console.log( isGreaterThanHundred( num ) );
Remark: if input is not a number, then Number.parseInt returns NaN. The NaN value is not greater than 100.
Let’s write the isGreaterThanHundred function. Its return value is true whenever num is greater than 100. Otherwise, the return value is false.
1 function isGreaterThanHundred( num ) {
2     if ( num > 100 ) {
3         return true;
4     } else {
5         return false;
6     }
7 }
For the sake of this explanation, let’s create a returnValue variable, and place this value after the if-else statement:
 1 function isGreaterThanHundred( num ) {
 2     let returnValue;
 3
 4     if ( num > 100 ) {
 5         returnValue = true;
 6     } else {
 7         returnValue = false;
 8     }
 9
10     return returnValue;
11 }
Let’s examine the value of returnValue:
-
returnValueistrue, whenevernum > 100istrue -
returnValueisfalse, whenevernum > 100isfalse
In other words, returnValue is nothing else but the value of the boolean expression num > 100:
1 function isGreaterThanHundred( num ) {
2     let returnValue;
3
4     returnValue = num > 100;
5
6     return returnValue;
7 }
The two versions are equivalent. Obviously, we can continue simplifying the three statements in the function body and writing a one liner return num > 100;. However, the point of this section is not to simplify the function further. The point is that we can simplify if-else statements of the following form:
1 let value;
2 if ( condition ) {
3     value = true;
4 } else {
5     value = false;
6 }
If condition is a boolean value, the above code can be substituted by just one assignment:
1 let value = condition;
If condition is not a boolean value, you can use Boolean or double negation to convert it to a boolean. Using Boolean is more descriptive, especially for beginners.
Using Boolean:
1 let value = Boolean( condition );
Examples:
 1 > Boolean( 0 )
 2 false
 3
 4 > Boolean( 1 )
 5 true
 6
 7 > Boolean( 2 )
 8 true
 9
10 > Boolean( "" )
11 false
12
13 > Boolean( " " )  // non-empty string
14 true
15
16 > Boolean( undefined )
17 false
18
19 > Boolean( {} )
20 true
Double negation can also be used instead of the Boolean constructor:
1 let value = !!condition;
Examples:
 1 > !!0
 2 false
 3
 4 > !!1
 5 true
 6
 7 > !!2
 8 true
 9
10 > !!""
11 false
12
13 > !!" "  // non-empty string
14 true
15
16 > !!undefined
17 false
18
19 > !!{}
20 true
To make your code more readable, I suggest avoiding double negation and explicitly using the Boolean constructor.
2. Unnecessary nesting of if statements
Example: Suppose a variable num is given. If this variable contains a number, perform the following operation: write the text "even" if num is even.
Our first solution translates the text to code word by word, line by line:
1 if ( typeof num === "number" ) {
2     if ( num % 2 === 0 ) {
3         console.log( "pรกros" );
4     }
5 }
Note that the nested if statements are not necessary. We can also write them in one statement:
1 if ( typeof num === "number" && num % 2 === 0 ) {
2     console.log( "pรกros" );
3 }
Remark: here we took advantage of the shortcut property of Boolean expressions. If A is false in an A && B expression, then the whole expression becomes false, without evaluating the value of B. In other words, if num is not a number, then we don’t even evaluate the num % 2 === 0 expression.
Summary:
1 if ( condition1 ) {
2     if ( condition2 ) {
3         statement;
4     }
5 }
While the above code is syntactically correct, notice we can just join the two statements with the and operator:
1 if ( condition1 && condition2 ) {
2     statement;
3 }
3. Wrong formatting by avoiding braces
The below code is dangerously misleading, especially for those familiar with Python:
1 if ( condition )
2     statement1;
3     statement2;
In reality, the above code is translated to this:
1 if ( condition ) {
2     statement1;
3 }
4 statement2;
If you are learning Python, this code may surprise you, because in Python, indentation can form blocks of code just like how braces form blocks in JavaScript. Bear in mind that in JavaScript, whitespace characters bear little role in structuring your code.
Example: suppose an inexperienced developer wrote the following code:
1 function logInput( value ) {
2     if ( typeof value !== "string" )
3         console.warn( "Wrong input", value );
4         return;
5     console.log( "The input was: ", value );
6 }
The developer meant that for non-string values, we print a warning message and exit from the function. For string inputs, we log the value.
In reality, the code is translated as follows:
1 function logInput( value ) {
2     if ( typeof value !== "string" ) {
3         console.warn( "Wrong input", value );
4     }
5     return;
6     // unreachable code
7     console.log( "The input was: ", value );
8 }
This means, the last console.log line becomes unreachable, and the input is never logged.
This is why it is not a good idea to avoid braces in an if statement. The only exception is the previously mentioned exit condition:
1 if ( condition ) statement;
Here, it is intentionally hard to write another statement indented in such a way that software developers may think the new statement belongs to the body of the if statement.
4. Erroneous negation
Suppose we have a red and a yellow lamp. We model their state using Boolean values: if the value of the lamp is true, it is turned on. If the value of the lamp is false, it is turned off.
Task: write Boolean expressions to model the following states:
- The red and the yellow lamps are both on.
- The red or the yellow lamp is on.
- The red and the yellow lamps are not on simultaneously.
- Either the red lamp is off, or the yellow lamp is off.
- It is not true that the red or the yellow lamp is on.
- Neither the red, nor the yellow lamps are on.
We will refer to the red and yellow lamps with the variables red and yellow respectively.
Solution:
Part (1) is easy, because the text can be directly translated to the value of red && yellow. If we used this expression in an if statement, we would write the following:
1 if ( red && yellow ) {
2     // ...
3 }
Part (2) describes the red || green condition. Note that the or-expression contains the case when both the red and the yellow lamps are on.
To avoid ambiguity, think of the or-expression as a relation between the inputs and the output such that the output is true whenever at least one of the inputs are true.
The expression can be written in the following way in an if statement:
1 if ( red || yellow ) {
2     // ...
3 }
The last four points are more difficult. As long as you cannot write conditions as if they were your reflexes, your friend is a tool called the truth table. A truth table gives you the result belonging to each possible input combinations.
For instance, let’s see the truth table of red && yellow. We will need it later. In order for red && yellow to be true, we need both inputs to be true. Based on this information, fill out the outputs of the following truth table:
1     Inputs      |     Output
2 red     yellow  | red && yellow
3 ----------------|----------------
4 false   false   | _____
5 false    true   | _____
6  true   false   | _____
7  true    true   | _____
You will soon read the correct solution. Before that, let’s construct the truth table of the OR operator (|| in JavaScript). The value of red || yellow is true whenever at least one of the two inputs, red or yellow, are true. Based on this information, fill out the outputs of the following truth table:
1     Inputs      |     Output
2 red     yellow  | red || yellow
3 ----------------|----------------
4 false   false   | _____
5 false    true   | _____
6  true   false   | _____
7  true    true   | _____
Let’s now see the solutions. The truth table of the and relationship only contains one row with a true output: the output is only true if both inputs are true:
1     Inputs      |     Output
2 red     yellow  | red && yellow
3 ----------------|----------------
4 false   false   | false
5 false    true   | false
6  true   false   | false
7  true    true   |  true
The truth table of the or relationship contains three true rows, as our condition is that at least one of the inputs should be true:
1     Inputs      |     Output
2 red     yellow  | red || yellow
3 ----------------|----------------
4 false   false   | false
5 false    true   |  true
6  true   false   |  true
7  true    true   |  true
Let’s recall the following sentence: Note that the or-expression contains the case when both the red and the yellow lamps are on. In English, the word or is often used in an exclusive sense. For instance, “we can either eat chocolate or mango ice cream.” Chances are, if a human hears this statement, they may think they have to choose between the two and they don’t even consider that they can get both ice cream flavors. In computer science, the || (or) expression also covers the possibility of a true value for both inputs.
In order to fully understand boolean logic, we need one more truth table: negation.
1 Input  | Output
2  red   | !red
3 -----------------
4 false  | true
5  true  | false
Negation is easy. If the input is true, the output is false. If the input is false, the output is true.
Part (3) states that “the red and the yellow lamps are not on simultaneously”. As this statement looks harder to model than the previous ones, let’s start with the truth table. The expression belonging to part (3) is true whenever at least one of the inputs is false:
1     Inputs      | Output
2 red     yellow  | (3)
3 ----------------|----------------
4 false   false   |  true
5 false    true   |  true
6  true   false   |  true
7  true    true   | false
Let’s compare the truth table of (3) and (1):
1     Inputs      | (1)           | (3)
2 red     yellow  | red && yellow |
3 ----------------|----------------------
4 false   false   | false         |  true
5 false    true   | false         |  true
6  true   false   | false         |  true
7  true    true   |  true         | false
We can conclude that (3) is the negation of (1):
- (3) is
truewhenever (1) isfalse - (3) is
falsewhenever (1) istrue
Remark: let’s recall the truth table of negation. The output is the inverse of the input. Here (1) can be regarded as the input, while (3) is the output.
If we wrote some JavaScript code:
1 let firstStatement = red && yellow;
2
3 let thirdStatement = !firstStatement;
Let’s substitute the value of firstStatement in the expression !firstStatement. The result is:
1 let thirdStatement = !( red && yellow );
If we used this statement in a condition of an if statement, we would get the following:
1 if ( !( red && yellow ) ) {
2     // ...
3 }
Part (4): “Either the red lamp is off, or the yellow lamp is off.” Let’s construct the boolean expression first this time:
-
!red: the red lamp is off -
!yellow: the yellow lamp is off -
!red || !yellow: either the red lamp is off or the yellow lamp is off (or both are off)
In a JavaScript if statement:
1 if ( !red || !yellow ) {
2     // ...
3 }
Let’s see the truth table of expression (4):
1     Inputs      |   Output (4)
2 red     yellow  | !red || !yellow
3 ----------------|----------------
4 false   false   |  true
5 false    true   |  true
6  true   false   |  true
7  true    true   | false
Is this truth table familiar? That’s it. This is the truth table of expression (3).
What does this imply?
This implies that expressions (3) and (4) are equivalent:
!( red && yellow )!red || !yellow
One way to describe this equivalence is the following:
- If we look at the last line of the truth table, we get the statement: “it is not true that both red AND yellow are on”.
- If we look at the first three lines of the truth table, we get the statement: “either red is off or yellow is off (or both are off)”.
Part (5): “It is not true that the red or the yellow lamp is on.” Note that by saying “it is not true that”, we negate whatever we write after it. In this case, we are negating that “the red or the yellow lamp is on”.
Therefore, we need to negate red || yellow:
1 if ( !( red || yellow ) ) {
2     // ...
3 }
This is what the corresponding truth tables look like:
1  red    yellow  red || yellow  !( red || yellow )
2 -------------------------------------------------
3 false   false | false         |  true
4 false   true  |  true         | false
5  true   false |  true         | false
6  true   true  |  true         | false
This condition succeeds whenever none of the lamps are on. This is what condition (6) describes:
Part (6): “Neither the red, nor the yellow lamps are on”. Using a JavaScript expression: !red && !yellow.
1 if ( !red && !yellow ) {
2     // ...
3 }
As expressions (5) and (6) are equivalent, we can conclude that:
!( red || yellow)!red && !yellow
are the same.
We can conclude that the exact wording is very important. Some beginner software developer, most business people, and many product managers cannot tell the subtle difference between some of the above statements. Often times the words “and” and “or” are interchanged. Therefore, being a software developer is a responsibility: often times the software developer points out these inconsistencies in the specification of a request.
Let’s recall these expressions:
-
!(red && green): not red and green, a.k.a. not (red and green) -
!red && !green: not red and not green
Some beginner developers tend not to notice the difference between the two forms. In reality, the difference is big:
1 red    green   !(red && green)  !red && !green
2                !red || !green   !(red || green)
3 false  false    true             true
4 false  true     true            false
5 true   false    true            false
6 true   true    false            false
Compare the above expressions with their negations:
1 red    green   red && green   red || green
2 false  false   false          false
3 false  true    false          true
4 true   false   false          true
5 true   true    true           true
We can conclude that
-
!(red && green)is the negation ofred && green -
!red || !greenis the negation ofred || green
In general, you can always refer to the de Morgan equalities for negation:
-
not( A and B ) = not( A ) or not( B ), -
not( A or B ) = not( A ) and not( B ).
Remember, when you move negation inside or outside in an expression, and changes to or, and or changes to and.
For instance, if you say, the lamp state is “not (red and yellow)”, the statement is equivalent to: “the lamp state is not red or not yellow”. Most people, especially non-developers say “the lamp state is not red and not yellow”, which is an incorrect translation of the original statement. If you can’t see the difference yet, not a problem. Review the above truth tables, and you will sooner or later understand the details.
This small, but significant difference can be a source of huge errors.
Example: Let’s model another statement: “The red lamp is on or the yellow lamp is off”.
Solution:
- “Red lamp is on” is true if
redistrue - “Yellow lamp is off” is true if
yellowisfalse, i.e.!yellowistrue - There is an or between the two statements, so the end result is
red || !yellow.
As we have not modeled a statement like this, it is worth filling out a truth table. First, fill out the output values:
1     Inputs      |   Output
2 red     yellow  | red || !yellow
3 ----------------|----------------
4 false   false   | _____
5 false    true   | _____
6  true   false   | _____
7  true    true   | _____
- Wherever
redistrue, the output is alsotrue. Therefore, the third and the fourth lines of the truth table contain atrueoutput. - Wherever
yellowisfalse, the output istrue. Therefore, the first and the third lines of the truth table have atrueoutput.
1     Inputs      |   Output
2 red     yellow  | red || !yellow
3 ----------------|----------------
4 false   false   |  true
5 false    true   | false
6  true   false   |  true
7  true    true   |  true
Observing the second line, we know that it is not true that red is false and yellow is true:
1 !( !red && yellow )
Using the de Morgan rule:
-
!( A && B )becomes!A || !B -
Ais!red -
Bisyellow
Substituting the values of A and B:
1 !( !red && yellow ) ---> !!red || !yellow
Substituting !!red with red:
1 red || !yellow
We can also derive the same result from the three true statements:
- Both
redandyellowaretrue -
redistrueandyellowisfalse -
redisfalseandyellowisfalse
There is an OR relationship between the above three statements:
1 (red && yellow) || (red && !yellow) || (!red && !yellow)
Notice that the first two terms can be simplified:
1 (red && yellow) || (red && !yellow)
becomes
1 red && (yellow || !yellow)
As (yellow || !yellow) is universally true, the expression becomes red.
Subsituting red in place of the first two terms, we get:
1 red || (!red && !yellow)
Here, think a bit more:
- if
redistrue, the whole expression istruewithout evaluating the right hand side - if
redis false, the right hand side is evaluated:!red && !yellowbecomes!false && !yellow, which in turn becomes!yellow
So after the simplifications, we are left off with the same expression as before: red && !yellow.
You may ask, what does all this have to do with programming? Why do I have to read this stuff?
The answer is simple: when you write an if statement, which format would you prefer?
1 if ( red && !yellow ) {
2     // ...
3 }
or
1 if ( (red && yellow) ||
2      (red && !yellow) ||
3      (!red && !yellow) ) {
4     // ...
5 }
If you prefer simplicity, it might be useful to double down on simplifying logical expressions.
In some cases, logical expressions containing multiple terms cannot be simplified further.
Example: Let’s examine the statement “When looking at the red and the yellow lamps, exactly one lamp is on.” Formulate a boolean condition.
Although this statement contains an and, this statement has nothing to do with the logical and. Let’s write the truth table of this expression:
1     Inputs      |   Output
2 red     yellow  | exactly one is on
3 ----------------|------------------
4 false   false   | false
5 false    true   |  true
6  true   false   |  true
7  true    true   | false
Using the method used in the previous example, we can either
- enumerate the
truerows and join their corresponding boolean expressions with an||, - enumerate the
falserows, join their corresponding boolean expressions with an||, and then negate the end result
We will do the former approach. As an exercise, do the second approach yourself, and conclude that the two forms are equivalent.
The second and the third rows are true:
- Second row:
!red && yellow - Third row:
!yellow && red
Joining the two expressions:
1 if ( (!red && yellow) || (!yellow && red) ) {
2     // ...
3 }
Remark: this expression is the exclusive or operation. In JavaScript, the exclusive or (XOR) logical operation does not have a symbol.
Using just logical expressions, &&, ||, and negation, it is not possible to simplify this value further in JavaScript.
This does not mean though, that you should use the above complex statement in logical expressions. A simple implementation is counting the on states:
 1 let count = 0;
 2 if ( red ) {
 3     count += 1;
 4 }
 5 if ( yellow ) {
 6     count += 1;
 7 }
 8 if ( count === 1 ) {
 9     // ...
10 }
This is a bit too verbose, so we can simplify using the ternary operator:
1 let count = ( red ? 1 : 0 ) + ( yellow ? 1 : 0 );
2 if ( count === 1 ) {
3     // ...
4 }
There are still gains to be made. Look at the truth table of this expression. Clearly analyze the true rows and the false rows. What can you see?
1     Inputs      |   Output
2 red     yellow  | red XOR yellow
3 ----------------|------------------
4 false   false   | false
5 false    true   |  true
6  true   false   |  true
7  true    true   | false
- When the output is
true, the inputs are______. - When the output is
true, the inputs are______.
Fill in the blanks. I will soon reveal the answer so that you can verify if you are on the right track. But first, if you have found an answer, try to fill in the blanks and formulate a simple condition that’s true whenever the output of the above truth table is true:
1 if ( _____ ) {
2     // ...
3 }
Fill in the blanks solution: notice that the inputs are different in the second and in the third row. Therefore, when the output is true, the inputs are different. So different is the value of the first blank. The second blank should contain a phrase that indicates that the output is false whenever the inputs are the same.
Regarding the third blank, the condition should describe that the inputs are different. A simple condition that describes this is red != yellow.
Exercises: if-else
Exercise 44. Write a function that returns the maximum of two numbers.
1 max2( 1, 2 )
2 // --> 2
3 max2( 2, 1 )
4 // --> 2
Exercise 45. Create a random number between 1 and 50 using the following expression:
1 Math.trunc( Math.random() * 50 ) + 1
Write a function that requests the user to enter a number between 1 and 50. Depending on the value entered by the user, the program prints one of the following messages:
- “Your guess is too low. Try again!”
- “Your guess is too high. Try again!”
- “The correct result is 36.” (assumint 36 is the correct answer)
- “Your guess should be between 1 and 50. Try again!”
- “Invalid format. Try again!”
Help: The prompt( "question: " ) command writes its argument, and asks the user to enter a value in a textfield. The return value of prompt is the string typed by the user.
switch statement
There is an abbreviated version for a long chain of if-else statement: the switch operator. Switch is like a telephone operator. It puts you through some code in case the correct value is stored in your variable. There is also a default line, saying “the number you have dialed is invalid”.
 1 function logLampColor( state ) {
 2   switch( state ) {
 3     case 1:
 4       console.log( 'Red' );
 5       break;
 6     case 2:
 7       console.log( 'Amber' );
 8       break;
 9     case 3:
10       console.log( 'Green' );
11       break;
12     default:
13       console.log( 'Wrong lamp state' );
14   }
15 }
16
17 logLampColor( 1 );
Try this code example out. Play around with it. Check what happens if you remove the break commands. Check what happens if you call this function with other arguments.
Now that you got a feel for the switch statement, let me explain it. You have a variable inside the switch. This variable may have values. We jump to the case label for which state is equal to the label value.
Then we start executing the code.
If there was no break at the end of the code segment belonging to a label, execution would continue on the next code line. It does not matter that it is now under another label. Code just jumps through the labels.
This is why we have a break statement at the end of each code segment belonging to a label. The break statement jumps out of the closest switch statement, and your program continues execution after the switch statement.
We have two reasons not to include a break statement after a label:
- we use a
returnstatement instead, - we intentionally fall onto the next label (discouraged).
Example:
1 function getLampColor( state ) {
2 switch( state ) {
3 case 0:
4 case 1:
5 return 'Red';
6 case 2:
7 return 'Amber';
8 case 3:
9 return 'Green';
10 }
11 }
12
13 getLampColor( 1 );
In this example, both cases 0 and 1 return 'Red'.
Notice you already know another way to return values without if-else:
1 function getLampColor( state ) {
2 return state == 1 ? 'Red' : 'Green';
3 }
The ternary operator gives you red if the state is 1, and green otherwise.
We can place another ternary expression in place of 'Green' to add more lamp states:
1 function getLampColor( state ) {
2 return state == 1 ? 'Red' :
3 state == 2 ? 'Amber' :
4 state == 3 ? 'Green' :
5 'Error';
6 }
Some people don’t like this way of writing code. You can hit up their rant about how awful this construct is under the name of ternary operator abuse. I personally do not share their opinion, but this does not matter. If you believe you should use it, use it.
Exercises: switch
Exercise 46. Rewrite the following code using a switch statement and cases:
1 if ( a == 1 ) {
2 console.log( 'One' );
3 } else if ( a == 2 ) {
4 console.log( 'Two' );
5 } else if ( a == 3 ) {
6 console.log( 'Three' );
7 }
Exercise 47. Rewrite the following code using a switch statement and cases:
1 if ( a > 0 ) {
2 console.log( 'Positive' );
3 } else if ( a < 0 ) {
4 console.log( 'Negative' );
5 } else {
6 console.log( 'Zero' );
7 }
Exercise 48. Convert the following code to an equivalent version without using switch. Hint: you can use if-else statements, the ternary operator, or even function calls.
1 let state = 2;
2
3 switch( state ) {
4 case 1:
5 console.log( 'One' );
6 break;
7 case 2:
8 case 3:
9 console.log( 'Two or Three' );
10 case true:
11 console.log( 'True' );
12 break;
13 default:
14 console.log( 'Default' );
15 }
16 console.log( 'Done' );
Iteration: Loops and Recursion
Now that we know how selection works, let’s move on to learn about iteration.
Recursive function calls
Let’s start with an introductory example. First, we’ll create a simple array:
1 let numbers = [19, 65, 9, 17];
If these numbers look familiar to you, yes, they form the level select cheat code of the Sega classic, Sonic 2.
Exercise: Using what you already know, calculate the sum of the elements of the numbers array. The numbers array can contain arbitrary elements.
Solution: We have learned how to write if-else statements, functions, operators. The problem is, we have not learned how to sum more than two numbers. Therefore, we need some inspiration to solve this riddle.
We know that the sum of the elements of an empty list is 0.
We also know that the sum of elements of a list of lenth 1 equals the only element of the list.
Suppose we can somehow sum the first i elements of the numbers list and store it in the variable S. Using the value S, we can sum the first i + 1 elements of the list: S + numbers[i].
Ha valahogy a lista első i elemét összegezni tudjuk, és ez az összeg S, akkor a lista első i+1 elemének az összege S + numbers[i].
In tabular form:
1 index numbers[index] previous sum new sum
2 0 19 0 0 + 19 = 19
3 1 65 19 19 + 65 = 84
4 2 9 84 84 + 9 = 93
5 3 17 93 93 + 17 = 110
We have created our first loop. Each iteration of the loop is characterised by an index ranging between 0 and numbers.length - 1. During each iteration, two things change:
- the index,
- the sum.
All we need to do is note the value of the index and the sum in each iteration. Perform all the iterations by looping through the whole array.
We need to know when to end the iteration. We finish iterating once the value of index reaches numbers.length.
Let’s turn this idea into code. We will use a function to perform an iteration of the loop.
For the sake of simplicity, we will do the exact opposite of what our original idea was. In the original idea, we took the sum of the first i elements and added the i + 1th element to the sum. Here, we take the first element, and add it to the sum of the rest of the list. This small difference determines if the sum is calculated from left to right or right to left. As a benefit, our function will be more compact.
1 function sum( array ) {
2 return array.length === 0 ? 0 :
3 array[0] + sum( array.slice( 1 ) );
4 }
If the list is empty, zero is returned as the sum.
If the list is not empty, we take its first element, and add it to the sum of the remaining elements. Example:
Step 1. sum( [ 19, 65, 9, 17 ] ). The first element is 19.
Step 2. 19 + sum( [ 65, 9, 17 ] )
Step 3. 19 + 65 + sum( [ 9, 17 ] )
Step 4. 19 + 65 + 9 + sum( [ 17 ] )
Step 5. 19 + 65 + 9 + 17 + sum( [] )
Step 6. 19 + 65 + 9 + 17 + 0
After the last step, the sum becomes 110.
We have successfully created iteration using functions. Iteration is a piece of code that we run over and over again. Although we are using functions now, at a later stage, we will use loops to implement iteration.
A loop is like a cheap song. This reminds me of Berlin, where every third person claims they are a DJ. Once I had a “DJ” neighbour too. Fortunately, the property management didn’t tolerate his activities. I can still recall as he was “working” on the same melody for half a year. Over and over again… until someone called the police.
Take a short melody, repeat it a hundred times. You get a song. Simple, isn’t it? Programming is similar: take a code segment and run it many times.
Although it is possible to use functions to implement iteration, this solution is rarely recommended. In the future, we will learn how to write iteration using loops. This form becomes a lot more compact than the function form, let alone the performance benefits.
To introduce an important concept that helps you understand loops, let’s reorganize the solution a bit:
1 function sum( array ) {
2 return sumHelper( array, 0, 0 );
3 }
4
5 function sumHelper( array, index, previousSum ) {
6 if ( index >= array.length ) return previousSum;
7 var newSum = previousSum + array[index];
8 sumHelper( array, index + 1, newSum );
9 }
By using default function argument values, we can make this solution even more compact:
1 function sum( array, index = 0, previousSum = 0 ) {
2 if ( index >= array.length ) return previousSum;
3 return sum( array, index + 1, previousSum + array[index] );
4 }
When the value of index or previousSum is not given, the default value is used. So sum( [1, 2] ) is the same as sum( [1, 2], 0, 0).
Let’s use arrow functions and the ternary operator to simplify the function even more:
1 const sum = ( array, index = 0, previousSum = 0 ) =>
2 index >= array.length ?
3 previousSum :
4 sum( array, index + 1, previousSum + array[index] );
Although loops are often more performant in JavaScript than recursion, the expressive power of well written recursion if surprisingly good. We can just read the code line by line:
- Line 1: You take an array, an index starting with zero, and the previous sum starting with zero.
- Line 2: Once you reach the end of the array…
- Line 3: …you return the accumulated sum.
- Line 4: Otherwise, you add one to the index, accumulate the current value of the array in the sum, and continue the iteration.
An intermediate state of the iteration is described by the index and previousSum variables. These variables are called accumulator variables.
Exercises: Recursion
Exercise 49. Adott egy egész számokat tartalmazó tömb. Írd ki console.log segítségével egymás alá külön sorba a tömb elemeit. Használj rekurziót.
Exercise 50. Írj egy függvényt, amely kiszámol egy sorozatot. Ennek a sorozatnak az első két eleme 1 és 1. A harmadik elemtől a sorozat következő eleme az előző két elem összege. Hívjuk ezt a sorozatot fibonacci sorozatnak:
1 fib( 1 ) = 1
2 fib( 2 ) = 1
3 fib( 3 ) = fib( 1 ) + fib( 2 ) = 2
4 fib( 4 ) = fib( 2 ) + fib( 3 ) = 3
5 fib( 5 ) = fib( 3 ) + fib( 4 ) = 5
6 ...
While loop
It is generally harder to write iteration using functions than using built-in loops. Therefore, we will introduce the while loop:
1 while ( condition ) {
2 statements;
3 }
As long as condition is true, statements are executed. These statements change the internal state of the application such that sooner or later the condition becomes false. This is when we can exit the loop.
Let’s create a function that sums the values of an array:
1 let numbers = [19, 65, 9, 17, 4, 1, 2, 6, 1, 9, 9, 2, 1];
2
3 function sumArray( values ) {
4 let sum = 0;
5 let i = 0;
6 while ( i < values.length ) {
7 sum += values[i];
8 i += 1;
9 }
10 console.log( 'The loop was executed ' + i + ' times' );
11 return sum;
12 }
13
14 sumArray( numbers );
The variable i keeps track of how many times the loop is executed.
First the JavaScript interpreter examines the condition in the while loop. As i is 0 and numbers.length is 13, we conclude the condition is true.
If the condition is true, we execute the body of the while loop. So we add the ith element of the array to the sum, and increase the loop variable by 1.
Then we compare 1 against the length of the array, 13. As 1 is smaller than 13, we execute the loop body again. The sum variable now stores 19 + 65 = 84. The value of i becomes 2.
We continue this until i becomes 13. Then we realize the condition i < numbers.length becomes false. Once the condition of the while loop becomes false, we continue with the code after the while loop.
This is an important concept, so let’s spend a bit more time on the execution. I am using a resource you will find weird: pythontutor.com. I know, we are learning JavaScript. The author of the website has a great JavaScript engine too, so don’t worry, we are not learning Python. The code being executed is valid JavaScript code.
Start moving the slider from left to right to see how the value of the variables change.
The below content may or may not work for you. If you cannot see the example below, please click this link instead.
Exercises: While loop
Exercise 51. Let’s recall the map structure from a previous exercise:
1 let arr = [1, 5, 3, 1];
2
3 let map = {};
4
5 map[ arr[0] ] = true;
6 map[ arr[1] ] = true;
7 map[ arr[2] ] = true;
8 map[ arr[3] ] = true;
9
10 console.table( map );
Write a function that builds a similar map structure from an arbitrary array. Use a while loop!
Exercise 52. Recall the base 16 to base 10 / base 2 converter:
1 /**
2 * Prints hexadecimalValue in base 2 and base 10.
3 *
4 * @param string hexadecimal number in correct format
5 * @return undefined
6 */
7 function convert( hexadecimalValue ) {
8 let baseTenValue = Number.parseInt( hexadecimalValue, 16 );
9 console.log(
10 hexadecimalValue + ' in base 10:',
11 baseTenValue,
12 '\n' + hexadecimalValue + ' in base 2:',
13 baseTenValue.toString( 2 )
14 );
15 }
16
17 convert( 'ACE' )
18 // --> ACE in base 10: 2766
19 // ACE in base 2: 101011001110
Rewrite the numeric base converter function such that you can enter an arbitrary base as a second argument of the convert function. Make sure the program only accepts integers greater than or equal to 2. Example:
1 convertAll( 'ACE', [12, 10, 8, 4, 3, 2] )
2 // --> ACE in base 12: 1726
3 ACE in base 10: 2766
4 ACE in base 8: 5316
5 ACE in base 4: 223032
6 ACE in base 3: 10210110
7 ACE in base 2: 101011001110
The do-while loop
We have a few more loops to go. The do-while loop executes the loop body at least once, and checks the condition before the end.
1 let numbers = [19, 65, 9, 17, 4, 1, 2, 6, 1, 9, 9, 2, 1];
2
3 function sumArray( values ) {
4 if ( values.length == 0 ) return 0;
5 let sum = 0;
6 let i = 0;
7 do {
8 sum += values[i];
9 i += 1;
10 } while ( i < values.length );
11 console.log( 'The loop was executed ' + i + ' times' );
12 return sum;
13 }
14
15 sumArray( numbers );
Notice the first line in the function. We have to exit the sumArray function before reaching the do-while loop in case the array is empty. Otherwise, the code works in the exact same way as the while loop, except that the condition for running the loop again is at the bottom.
We mainly use do-while loops for input validation. The user inputs a value, then we check its validity.
Let’s use the prompt function to get a value.
prompt( 'message' ) opens a dialog displaying message. A textfield appears in the dialog, where you can enter a value. Once you press the OK button, the prompt function returns a string.
Example:
1 let name = '';
2 do {
3 name = prompt( 'Enter a name!' );
4 } while ( name.length == 0 );
This is where the do-while loop makes sense, because we can be sure we need to enter data at least once. In the example summing array members, using the do-while loop is technically possible, but it does not make sense, because the simple while loop is easier.
Exercises: the do-while loop
Exercise 53. You can create a random number between 1 and 50 using the following code:
Math.trunc( Math.random() * 50 ) + 1
Create a function that generates a random number, and then asks the user for input between 1 and 50. Repeat asking the user for input until the user doesn’t guess a previously generated random number correctly.
(a) Use a do-while loop (b) Use recursion
The for loop
You will now learn another loop that is perfect for iteration: the for loop. This loop combines several lines of code into one. The execution of the for loop is identical to the while loop:
1 initialization_of_loop_variable;
2 while ( condition ) {
3 statements;
4 increment_loop_variable;
5 }
6
7 for ( initialization_of_loop_variable; condition; increment_loop_variable ) {
8 statements;
9 }
The for loop has everything you need in one line. You don’t have to mix your loop body with the increment of the loop variable. The execution of the for loop is as follows:
initialization_of_loop_variable- check
condition. Ifconditionis falsy, exit the for loop -
statementsin the loop body -
increment_loop_variable, then go back to step 2
Rewrite the sumArray function using a for loop. Here is the example with the while loop:
1 let numbers = [19, 65, 9, 17, 4, 1, 2, 6, 1, 9, 9, 2, 1];
2
3 function sumArray( values ) {
4 let sum = 0;
5 let i = 0;
6 while ( i < values.length ) {
7 sum += values[i];
8 i += 1;
9 }
10 return sum;
11 }
12
13 sumArray( numbers );
Don’t continue reading before you solve this exercise. Please change the while loop into a for loop.
Welcome back!
I hope you liked the exercise. To verify your solution, check this code:
1 for ( let i = 0; i < values.length; i += 1 ) {
2 sum += values[i];
3 }
This code should go in place of
1 let i = 0;
2 while ( i < values.length ) {
3 sum += values[i];
4 i += 1;
5 }
Notice you can declare variables in the initializer part of the for loop. The rest of the code works exactly like the while loop.
Let’s simplify the for loop a bit further: you can write i++ or ++i in place of i += 1:
1 for ( let i = 0; i < values.length; ++i ) {
2 sum += values[i];
3 }
In some programming competitions, people tend to count downwards instead of upwards. The reason is that computing values.length costs some nanoseconds more than checking if the value of i is positive:
1 for ( let i = values.length - 1; i >= 0; --i ) {
2 sum += values[i];
3 }
These wannabe geniuses don’t stop there by the way. They go even further:
1 for ( let i = values.length; i; sum += values[--i] );
Weird, isn’t it? Instead of iterating from 12 to 0, we iterate from 13 to 1. The condition i is true as long as its value stays non-zero. This is the easiest check a computer can make with an integer.
Suppose i is 13. values[--i] is interpreted as values[12], because first we decrease the value of i, then we equate the expression --i to the new value of i. This is a unique case when writing i-- would have been incorrect, because our array does not even have an element at index 13.
Don’t worry if you don’t feel like understanding this optimization technique. Once you read this article for the tenth time, you will most likely get it. It’s normal. Oh, and by the way, I discourage using such optimizations. Readability always trumps these slight edges. Sometimes you can save seconds in your code, so don’t bother with the nanoseconds. It’s like being penny-wise and pound-fool.
Another reason to avoid looking smart and optimizing your code is that JavaScript interpreters actually optimize code for you. This is a very easy and straightforward optimization. You don’t have to bother doing it yourself. Just stick to this version of the for loop:
1 for ( let i = 0; i < values.length; ++i ) {
2 sum += values[i];
3 }
Exercises: for loop
Exercises 54 and 55. Recall the two exercises in the while loop secion. Rewrite your solutions using the for loop.
The for..in and for..of loops
Our next simplification is the for..in loop. Why bother iterating an i variable if a loop can take care of it for us?
1 let values = [19, 65, 9, 17, 4, 1, 2, 6, 1, 9, 9, 2, 1];
2 let sum = 0;
3
4 for ( let i in values ) {
5 sum += values[i];
6 }
7
8 console.log( sum );
The for..in loop enumerates all the available indices of the values array from 0 to 12 in ascending order.
I have another simplification for you. What if I said, “why bother using a variable for iteration at all, if we could enumerate the values of the array?”. In ES6, there is a loop called the for...of loop, which does exactly that.
1 let values = [19, 65, 9, 17, 4, 1, 2, 6, 1, 9, 9, 2, 1];
2 let sum = 0;
3
4 for ( let value of values ) {
5 sum += value;
6 }
7
8 console.log( sum );
That’s all. Go back to the editor and substitute the for..in and the for..of constructs in place of your for loop. It works exactly the same way.
We are almost done. Just two small constructs.
We can use break or continue inside the loops:
-
breakexits the closest loop it is in, and continues with the next command, -
continueskips out from the loop body, and jumps back to the condition of the loop.
Example: sum every second element of the numbers array:
1 let numbers = [19, 65, 9, 17, 4, 1, 2, 6, 1, 9, 9, 2, 1];
2
3 function sumArray( values ) {
4 let sum = 0;
5 for ( let i in values ) {
6 if ( i % 2 == 0 ) continue;
7 sum += values[i];
8 }
9 return sum;
10 }
11
12 sumArray( numbers );
This example is artificial, because we could have written i += 2 in a simple for loop to jump to every second value. So we are testing continue just for the sake of the example. Whenever i is even, continue moves execution back to the next iteration of i in values.
Notice that we don’t have to use braces around just one statement in the code if it is followed by an if statement or a loop:
1 if ( i % 2 == 0 ) continue;
is the same as
1 if ( i % 2 == 0 ) {
2 continue;
3 }
We still prefer braces, because wrong code formatting may lead to many sources of error. For example, some people might think that statement1 and statement2 belongs to the loop body.
1 while ( condition )
2 statement1;
3 statement2;
Wrong!
If we added the braces, we would get the following code:
1 while ( condition ) {
2 statement1;
3 }
4 statement2;
This must be very confusing for people familiar with Python. statement2 is outside the loop.
You already know what a break statement looks like, because we learned it when dealing with the switch statement. It is doing the same thing in loops. Suppose we want to break out from the loop whenever the sum exceeds 100:
1 let numbers = [19, 65, 9, 17, 4, 1, 2, 6, 1, 9, 9, 2, 1];
2
3 function sumArray( values ) {
4 let sum = 0;
5 for ( let i in values ) {
6 sum += values[i];
7 if ( sum >= 100 ) {
8 break;
9 }
10 }
11 return sum;
12 }
13
14 sumArray( numbers );
I placed the break in braces on purpose to show you that break breaks out of switch statements and loops, not from if statements. When break is executed, control is handed over to the statement after the loop: return sum.
In this specific example, we don’t even need a break, because instead of breaking out of the loop, we can return the sum:
1 let numbers = [19, 65, 9, 17, 4, 1, 2, 6, 1, 9, 9, 2, 1];
2
3 function sumArray( values ) {
4 let sum = 0;
5 for ( let i in values ) {
6 sum += values[i];
7 if ( sum >= 100 ) return sum;
8 }
9 return sum;
10 }
11
12 sumArray( numbers );
Technically, this is an example, where I would suggest a more flexible for loop:
1 let numbers = [19, 65, 9, 17, 4, 1, 2, 6, 1, 9, 9, 2, 1];
2
3 function sumArray( values ) {
4 let sum = 0;
5 for ( let i = 0; i < values.length && sum <= 100; ++i ) {
6 sum += values[i];
7 }
8 return sum;
9 }
10
11 sumArray( numbers );
Exercises: for..in and for..of
Exercise 56: Create a function that expects an array of numbers and returns the largest number in the array. Example:
1 max([19, 65, 9, 17, -99])
2 // --> 65
3
4 max([])
5 // --> null
The Spread Operator, Destructuring, and Rest Parameters
The Spread operator, Destructuring, and Rest parameters are three related features. Let’s introduce them with an example. Let’s first introduce the Spread operator with an example:
Spread Operator
We will introduce the spread operator via examples. The difference between examples and exercises is that you haven’t read everything you need to solve these examples in the easiest possible way. While you can try solving these examples, please always read the reference solutions.
Example 1: Suppose that you have two baskets containing fruits:
1 const Basket1 = [ 'Apple', 'Pear', 'Strawberry' ];
2 const Basket2 = [ 'Banana', 'Peach' ];
Create a new array that contains all fruits that are in Basket1 or Basket2.
Solution: First we have to create a new array.
1 const MergedBasket = [];
Then, we have to place the contents of Basket1 and Basket2 in the new array:
1 for ( let fruit of Basket1 ) {
2 MergedBasket.push( fruit );
3 }
4 for ( let fruit of Basket2 ) {
5 MergedBasket.push( fruit );
6 }
We can check that the result is correct:
1 > console.log( MergedBasket )
2 (5) ["Apple", "Pear", "Strawberry", "Banana", "Peach"]
It is not too comfortable to write this much just for a simple merge. Let’s introduce the spread operator that helps you solve the same problem faster.
For values v1, v2, v3, the spread operator works as follows: ...[v1, v2, v3] becomes v1, v2, v3.
At first glance, you may have some uncertainties surrounding this construct, and I fully understand why. After all, writing ...[1,2,3] in the console gives you a syntax error:
1 > ...[1, 2, 3]
2 Uncaught SyntaxError: Unexpected number
This means, you cannot write comma separated values everywhere in your code. Let’s see some basic use cases, where comma separated values can occur:
- array elements:
[1, 2, 3], - argument list of a function or method:
Math.max(1, 2)
Regarding array elements, let’s see what happens if we place the ...[1, 2, 3] expression in an array:
1 > [...[1, 2, 3]]
2 [1, 2, 3]
We got back a flat array with the same elements. If we examine these lines a bit more deeply, you can see that this operation came with some side-effects:
1 const numbers = [1, 2, 3];
2 const spreadNumbers = [...numbers];
3
4 spreadNumbers[0] = 5;
5
6 console.log( spreadNumbers ); // Printed value: [5, 2, 3]
What is the value of numbers[0]?
1 > numbers
2 (3) [1, 2, 3]
As you can see, numbers[0] is 1, because spreadNumbers is not the same array as numbers. After the elements of numbers were copied to spreadNumbers, their elements were the same. However, The two arrays were different. We managed to make a shallow copy of the original array using the Spread operator.
Making a shallow copy is a type of cloning. Cloning is a complex operation in computer science, and it is outside the scope of this introductory topic. In a later chapter, we will revisit this construct.
Second solution of Example 1: Now that we know how the spread operator and shallow copying works, let’s recall that our task can be translated tou copying the contents of two baskets into a third basket. To solve this exercise, we need to place the shallow copy of Basket1 and Basket2 in the same array:
1 const Basket1 = [ 'Apple', 'Pear', 'Strawberry' ];
2 const Basket2 = [ 'Banana', 'Peach' ];
3
4 const MergedBasket = [ ...Basket1, ...Basket2 ];
No for...of loops are needed. The spread operator solves everything.
Exercises: Spread operator
Exercise 57. Fill in the blanks such that the result of executing this code becomes 1 7 3. Do not use any numeric digits in your solution.
1 let A = [1, 2, 3];
2 let B = _____;
3 B[0] += 1;
4 console.log(
5 A[0],
6 B[0] + B[1] + B[2],
7 B.length
8 );
Destructuring Arrays
Now that you know how array members can be spread, let’s learn another role of the ... operator.
Suppose array A is given as [1, 2, 3, 4, 5]. How can we retrieve the first, second, and third elements of this array one by one?
You already know the bracket notation that helps you retrieve these values:
1 const first = A[0],
2 second = A[1],
3 third = A[2];
This is a lot of writing. Fortunately, ES6 introduces a shorter way of defining these variables: a destructuring assignment.
1 const [first, second, third] = A;
The two notations are equivalent. In both cases, first, second, and third get the first, second, and third value from A respectively. The three assignments are executed in parallel as follows:
1 const [first, second, third] = A;
2
3 const [first, second, third] = [1, 2, 3, 4, 5];
4
5 const first = 1, second = 2, third = 3; // 4 and 5 are thrown away.
Destructuring is called destructuring, because it takes a structure on the right hand side, and destructures it such that it can assign values to the structure on the left hand side.
Question 1: What happens if we are only interested in the third and the fifth elements of the array?
Answer 1: we can use commas to indicate that a value needs to be dropped. By placing two commas in front of the third variable on the left hand side describes a destructuring assignment, where the first two values are thrown away. Similarly, we can place two commas between the third and the fifth elements to make sure that the fourth value is dropped.
1 const [,,third,,fifth] = [1, 2, 3, 4, 5]
2
3 > third
4 3
5 > fifth
6 5
Question 2: What happens if we omit the const keyword in front of the above destructuring assignment?
Answer 2: The destructuring assignment stays valid in case third and fifth had not been defined before. The only drawback of this form is that third and fifth become global variables, which are discouraged in general.
1 [,,third,,fifth] = [1, 2, 3, 4, 5] // third and fifth become globals
Assuming that third and fifth are declared in a block or function scope not equal to the global scope, these variables do not become globals.
1 const third, fifth;
2 [,,third,,fifth] = [1, 2, 3, 4, 5]
If only one of the variables are declared, using const throws a JavaScript error.
1 let third;
2
3 > let [,,third,,fifth] = [1, 2, 3, 4, 5]
4 Uncaught SyntaxError: Identifier 'third' has already been declared
If third was assigned a value before, its value is reassigned by the destructuring assignment:
1 let third = -1, fifth = -1;
2
3 [,,third,,fifth] = [1, 2, 3, 4, 5]
4
5 > third
6 3
Obviously, if third is assigned a value as a constant, the destructuring assignment throws an error:
1 const third = 1, fifth = 2;
2
3 [,,third,,fifth] = [1, 2, 3, 4, 5]
Question 3: What happens if I place constants on the left of a destructuring assignment?
Answer 3: A JavaScript error is thrown. A destructuring assignment cannot be used for filtering. JavaScript is not Prolog, where the left hand side and the right hand side are unified. In destructuring, all we do is destructure the right hand side so that the values on the left hand side are assigned a value.
1 > const [1,,third,,fifth] = [1, 2, 3, 4, 5]
2 Uncaught SyntaxError: Invalid destructuring assignment target
Question 4: Can I retrieve the sixth element of an array of length 5?
Answer 4: Yes. The process is similar to retrieving A[5]. The corresponding value becomes undefined.
1 const [,,,,,sixth] = [1, 2, 3, 4, 5]
2
3 > sixth
4 undefined
Question 5: Can I use the spread operator on the right hand side of destructuring assignments?
Answer 5: As the right hand side of an array destructuring assignment is an array, any operators that help build the array can be used without constraints:
1 const B = [1, 2, 3];
2 const [first, second,,,fifth] = [...B, 4, 5]
Rest Parameter of Destructuring Assignments
Before the sixth question, let’s define the head and the tail of a list.
In JavaScript, we represent lists as arrays. The head of A is 1. The tail of A is [2, 3, 4, 5].
Question 6: Can I use the spread operator on the left hand side of destructuring assignments?
Answer 6: No. On the left hand side, the ... operator may only be used to define a rest parameter. Consequently, the name of the ... operator in this position is rest operator, as the role of this operator is not spreading values, but collecting them. The rest parameter collects all the remaining values of the array on the right hand side of the destructuring assignment. No arguments may follow a rest parameter:
1 const [head, ...tail] = [1, 2, 3, 4, 5]
2
3 > head
4 1
5 > tail
6 [2, 3, 4, 5]
The following assignment is invalid:
1 > [...rest,] = [1, 2, 3, 4, 5]
2 Uncaught SyntaxError: Rest element must be last element
If all the elements of an array are consumed before reaching a rest parameter, the value of the rest parameter becomes []:
1 [,,,,,,,,,,,,,...rest] = [1, 2, 3, 4, 5]
2
3 > rest
4 []
Exercises: Destructuring
Exercise 58. Swap the following two variables using one assignment:
1 let swap = 'swap';
2 let me = 'me';
Exercise 59. Create one destructuring assignment inside the for loop that helps you calculate the nth Fibonacci number. Reminder:
fib( 1 ) = 1fib( 2 ) = 1-
fib( n ) = fib( n-1 ) + fib( n-2 );
1 function fib( n ) {
2 let fibCurrent = 1;
3 let fibLast = 1;
4
5 if ( n <= 2 ) return n;
6
7 for ( let fibIndex = 1; fibIndex < n; ++fibIndex ) {
8 // Ide illessz be egy destrukturáló kifejezést
9 }
10
11 return fibCurrent;
12 }
Exercise 60. What variable values does the following expression create?
1 let node = { left : { left: 3, right: 4 }, right: 5 };
2
3 let { loft, right : val } = node;
Function Rest Parameter and Array Destructuring
In the upcoming example, we use the ... operator as rest parameters. Rest parameters behave in a slightly more constrained way than the spread operator spreading the values of an array into comma separated values. This difference can be illustrated by the following two functions:
const invalidFunction = function( ...args, lastArgument ) { /* ... */ }const validFunction = function( firstArgument, ...args ) { /* ... */ }
In theory, both functions accept a variable number of arguments. Suppose we call them with the argument list 1, 2, 3.
In case of invalidFunction, determining the argument values is not possible.
1 > let [ ...args, lastArgument ] = [1, 2, 3]
2 Uncaught SyntaxError: Rest element must be last element
3
4 > const invalidFunction = function( ...args, lastArgument ) {}
5 Uncaught SyntaxError: Rest parameter must be last formal parameter
Both in the destructuring exercise and in the function definition, ... symbolizes a rest parameter. Rest parameters may only occur at the end of an array. Consequently, in a function argument list, the ... rest parameter may only occur at the end of the argument list of the function. When violating this rule, a SyntaxError is thrown.
In case of validFunction, we have an easy task to determine the argument values:
1 let [ firstArgument, ...args ] = [ 1, 2, 3 ]
2
3 > firstArgument
4 1
5 > args
6 [2, 3]
Notice that calling a function is a destructuring assignment. The left hand side of the destructuring assignment is the argument list of the function definition. The right hand side is consists of the argument list the function is called with. On the left hand side of a destructuring assignment, the ... operator is used to describe a rest parameter.
Example: Write a function that accepts a variable number of arguments. Each argument should be a number. The return value of the function is the difference of the largest and smallest argument value.
Solution: We will use rest parameters to describe this function.
1 const maxMinDifference = function( ...args ) {
2 let min = args[0], max = args[0];
3 for ( let value of args ) {
4 if ( value < min ) min = value;
5 if ( value > max ) max = value;
6 }
7 return max - min;
8 }
9
10 > maxMinDifference( 19, 65, 9, 17 );
11 56
Exercises: Function Rest Parameter and Array Destructuring
Exercise 61.: Create a function that prints all its arguments one by one such that each argument is printed on a different line. Whenever the argument list is empty, the value undefined is printed. Use recursion and rest parameters!
Using JavaScript with HTML and CSS
The goal of this section is not to teach you the basics of CSS or JavaScript button click event handling, but to show you how HTML, CSS, and JavaScript is structured.
Creating the Markup
When visiting a website, we define its HTML markup, some styling information, and some dynamic functionality.
Markup is written in HTML. HTML stands for Hyper-Text Markup Language. We will not introduce HTML in detail, so in case you don’t know how to write simple HTML documents, check out this article followed by this tutorial.
Let’s create a simple example with a form. We will place a textfield in a form, and a button that displays a greeting in the form of an alert box.
1 <!doctype html>
2 <html lang="en">
3 <head>
4 <title>Greetings</title>
5 </head>
6 </body>
7 <form>
8 <input type="text"
9 class="tf-large js-name"
10 placeholder="name">
11 <button class="btn-large js-hello">Greet</button>
12 </form>
13 </body>
14 </html>
As an editor, you can use Sublime Text, Atom.io, or Visual Studio Code. Experiment with the text editor of your choice a bit.
Create a GreetingProject folder on your computer and save the above file there. Name it greeting.html. Create a js and a styles folder in your folder. You should have the following folder structure:
1 GreetingProject
2 [-] js
3 [-] styles
4 ----greeting.html
If you double click the greeting.html file, it opens in a browser. You can see a textfield there, where you can enter your name. Unfortunately, when you press the Greet button, the text you enter in the textfield is gone. This is what we will fix with JavaScript.
Adding JavaScript code
When you create an HTML form, pressing a button submits the form by default. Submitting a form reloads the page. Once you reload the page, the data entered in the textfield is lost. This is what we will prevent now.
Create a form.js file inside the js folder, and place the following content there:
1 function helloListener( event ) {
2 event.preventDefault();
3 console.log( 'button pressed' );
4 }
5
6 const helloButton = document.querySelector( '.js-hello' );
7 helloButton.addEventListener( 'click', helloListener );
First, we created a helloListener function. This function prevents the default action of the event, which is the submission of the form.
The second line in the function creates a console log that appears in the developer tools of your browser. More on this later.
The last line attaches the helloListener function to the button. We tend to use js- prefixed classes to refer to elements in the Document Object Model, also known as the DOM. The document.querySelector function takes a selector string, in this case a class name, and locates the node in the DOM that has this class. Check out the HTML file, you can see the same class in the class list of the button.
Once we located the .js-hello button, we can add an event listener function to it. This function takes an event, and can perform any JavaScript action ranging from manipulating the contents you can see on screen to calling a service or an API on the web, saving your data in a persistent storage.
There is only one problem with this code: we don’t have access to it in the HTML file. Let’s change this by adding an HTML tag at the bottom of the body.
1 <!doctype html>
2 <html lang="en">
3 <head>
4 <title>Greetings</title>
5 </head>
6 </body>
7 <form>
8 <input type="text"
9 class="tf-large js-name"
10 placeholder="name">
11 <button class="btn-large js-hello">Greet</button>
12 </form>
13 <script src="js/form.js"></script>
14 </body>
15 </html>
If you did everything correctly and saved all the files, after opening the greeting.html file in your browser, the name does not disappear once you press the Greet button.
Note that there are other ways to insert JavaScript code into an HTML document. I highly recommend sticking to the above method, but for completeness, feel free to read this article.
JavaScript is executed in the browser using the JavaScript interpreter. JavaScript is an interpreted language, which means that it runs JavaScript as it appears in the file without compiling it to an intermediate representation.
Developer Tools
Each browser has developer tools. For simplicity, I will use Google Chrome in this article, but most browsers have similar functionality.
Right click on your website anywhere inside the browser window, and select Inspect from the context menu. You will find yourself inside the developer tools. Find the Console tab. Assuming you have clicked on the button, you can find the following there:
1 button pressed
2 >
You can execute any JavaScript expression by writing it after the > prompt:
1 button pressed
2 > 2+2
3 4
4 > helloButton
5 <button class="btn-large js-hello">Greet</button>
The helloButton variable stores a DOM node, fully accessible in JavaScript.
Greeting the User
Let’s use the console to get the name entered in the textfield
1 > document.querySelector( '.js-name' )
2 <input type="text" class="large-text js-name" placeholder="name">
3 > document.querySelector( '.js-name' ).value
4 Zsolt
Instead of a console log, we need to get the value of the textfield and display a greeting in an alert box:
1 function helloListener( event ) {
2 event.preventDefault();
3 const name = document.querySelector( '.js-name' ).value;
4 alert( 'Hello, ' + name + '!' );
5 }
6
7 const helloButton = document.querySelector( '.js-hello' );
8 helloButton.addEventListener( 'click', helloListener );
The + operator on strings concatenates strings. The alert function creates an alert box.
If you test the code, you can see that everything is in place.
Styling
We know that
- the static markup providing information on the structure of the website is in the HTML file,
- the dynamic functionality goes in the JavaScript files.
Many people think that the look and feel of the page is also defined in the HTML file. This approach is wrong. Styling is separated from HTML.
We describe styles in CSS (Cascading Style Sheets) files.
1 .tf-large {
2 font-size: 1.5rem;
3 padding: 1rem;
4 }
5
6 .btn-large {
7 font-size: 1.5rem;
8 padding: 1rem;
9 font-weight: bold;
10 }
Similarly to JavaScript, we need to reference the CSS file from the HTML document. We do it in the head using a <link> tag:
1 <!doctype html>
2 <html lang="en">
3 <head>
4 <title>Greetings</title>
5 <link rel="stylesheet" href="styles.css">
6 </head>
7 </body>
8 <form>
9 <input type="text"
10 class="large-text js-name"
11 placeholder="name">
12 <button class="btn-large js-hello">Greet</button>
13 </form>
14 <script src="js/form.js"></script>
15 </body>
16 </html>
If you reload the page, you can see the changes on screen.
There are other ways to insert stylesheets into the HTML documents, but stick to external files so that you separate concerns. HTML should contain markup, CSS should contain styles. If you need more information on the basics of CSS, check out w3schools.com.
HTML classes: separation of concerns
Recall the button <button class="btn-large js-hello">Greet</button>. You can see two classes in there, btn-large and js-hello. The first class is used solely for styling, and the second class is used solely for referencing in JavaScript.
No-one forces you to write code this way, but it pays off to separate classes for styling and functionality. When multiple people work on the same codebase, this separation pays off. This way, a person responsible for styling can add, delete, or rename any styling classes without affecting functionality. JavaScript developers can do the same thing with the js- prefixed classes.
js-prefixed classes should be used for functionality, while regular classes should be used for styling.
Why aren’t we using HTML IDs?
You may know from your studies or previous work that we can also reference DOM nodes using their ID attributes:
1 <div id="intro">This is an introduction</div>
If you have the above node in the DOM, you can reference it using
1 document.getElementById( 'intro' )
The problem with ID attributes is that they have to be unique for the whole document. If you violate this rule, you get an HTML error.
In big websites and applications, most developers never know the context in which their markup will appear. Chances are that if you use an ID attribute name, someone else will do the same elsewhere.
As two DOM nodes cannot have the same ID, using ID attributes is not advised in most cases.
Once a business owner asked me to try out his affiliate plugin, because it was not working for him. Sure enough, I filled in the form, but once I pressed register, nothing happened. I checked the developer tools of the browser, and it turned out that there were some duplicated ID attributes in the markup.
I asked him how many times he included the affiliate plugin. He said, once for desktop computers, and once for mobile. He proudly told me that he made the mobile version hidden when someone checks it in a desktop.
Unfortunately, he only managed to hide it using a CSS style (display: none). The markup was in his document with the exact same ID attributes as the other version.
1 <div id="affiliate-plugin" class="desktop">
2 <!-- Content goes here -->
3 </div>
4 <div id="affiliate-plugin" class="mobile hidden">
5 <!-- Content goes here -->
6 </div>
The above markup is erronous due to the duplicated ID attributes. My entrepreneur friend, lacking web development knowledge, lost hours on not knowing the fundamentals. You can now save these hours next time you encounter a similar situation.
What do we do with multiple JavaScript and CSS files?
In large projects, placing all the JavaScript code in one file is not advised for development. Therefore, we often have hundreds if not thousands of JavaScript and CSS files.
Placing all these files in the HTML markup is not advised either, because enumerating hundreds of files in the markup is neither convenient, nor efficient. You may also encounter JavaScript errors if you include the JavaScript files in the wrong order.
For large projects, use Webpack and npm (Node Package Manager) to bundle your files into one file that you can include in your markup.
You can learn more on npm modules and Webpack in my article. The syntax may be a bit too advanced for you at this stage. You will understand everything if you sign up for my ES6 Minitraining at the bottom of this article.
In a large project, I highly recommend that you learn and use SASS. SASS not only enriches your CSS syntax, but it helps you structure it better. Check out my SitePoint article titled CSS Architecture and the Three Pillars of Maintainable CSS on this topic.