How To Use The Coach’s Guide Series
As agile coaches we often find ourselves running workshops or training sessions with people we are coaching. We put a great deal of effort into creating the plans for these sessions to help the participants get value. Over the past 2 years we have collected a lot of these plans. This series is our way of sharing these workshop and training plans with other agile coaches to enable you to run similar workshops.
All the books in this series are structured in a similar way, this section explains the concepts you’ll need to effectively use any of the books in the series. We’ve put it here at the start of the book, so that if you’ve used any of the other books in the series you don’t need to read through this again, it’s the same in each book.
4Cs Plans
Each chapter in these books includes a 4Cs plan. The technique comes from a training style called Training from the BACK of the room (TFTBOTR) developed by Sharon Bowman.
TFTBOTR is based on how adults learn and is focused on maximising learning and retention. TFTBOTR describes four parts that should be included in any training plan. These parts are known as the 4Cs and are described below.
- C1 – Connections: To get participants to connect with each other and the trainers, and to connect participants to what they might already know about the topic
- C2 – Concepts: Some facts and theoretical concepts about the topic
- C3 – Concrete Practice: An activity or simulation to experience the topic
- C4 – Conclusion: An opportunity for participants to evaluate what they have learned about the topic
Another important part of TFTBOTR is making sure you use a variety of methods to keep people engaged. Read more about it in this article on the Six Trumps by Sharon Bowman.
After using this technique extensively for training, we started using it for workshops as well. The 4Cs plan is a great way to weave new information or a technique into a working meeting. You can use C2, the concept stage to talk briefly about a technique, then spend time in C3, getting practice on using the technique on your work items.

|
NoteOccasionally it makes sense to swap the order of the C2 and C3. For some topics it is better for people to experience what you are talking about with Concrete Practice first, and then for you to teach the theory. This is especially true if you have a great game or simulation to illustrate the point. When we do this we just put the C3 in the C2 block of the template, and vice versa. |
We drive all our workshops and courses from these 4Cs plans. If you usually train from slides this might take time to get used to. We print out the 4Cs plans and refer to them during the course or workshop to see what’s up next and if we are on track.
We have created our own template for the 4Cs plans. The template can be found in the Coach Toolkit for each book. Use it to create your own training plans.
Here is a short overview to help you understand the template.
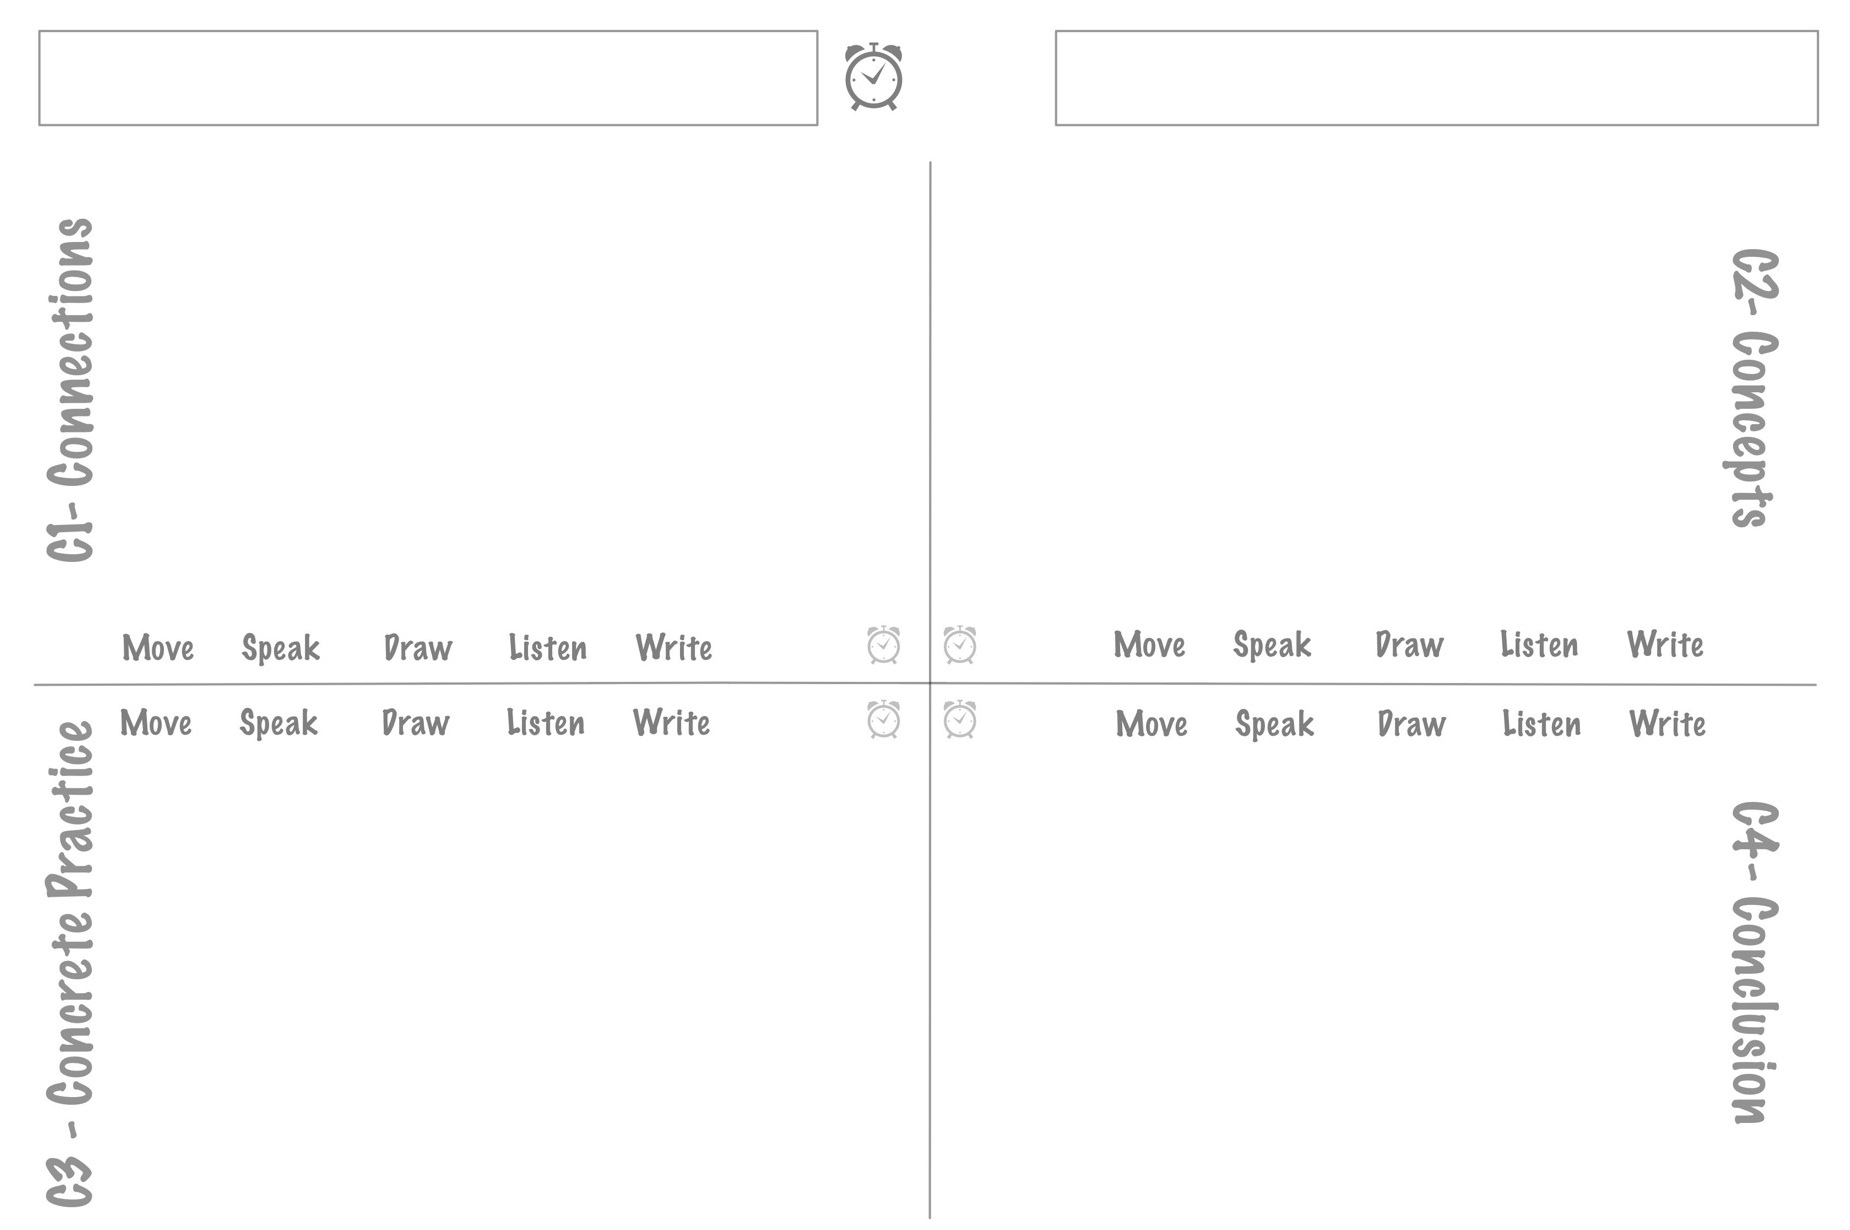
- The box in the top left corner is for the name of the topic.
- The big clock icon gives the time for the entire plan; the smaller clock icons in each quadrant gives the time needed for that section.
- The box in the top right corner has a space for you to enter the time for a section. For example 9:00 to 9:30 am. This helps you stay on track during the training. These are not filled in on the training plans we provide. We suggest you fill them in when you have planned your training.
- The rest of the page has a quadrant for each of the 4Cs. C1 covers connection activities. C2 is for concepts and is quite often a short lecture. C3 is for concrete practices or some activity to help people understand what they have learned. C4 contains conclusions of how people might apply the learning.
- At the bottom of each quadrant you can circle what the participants are doing in each section: Move, Speak, Draw, Listen, Write. This helps ensure that you have sufficient variety in each topic.
Chapter Layout
Each chapter contains the following:
- overview of the topic covered in the 4Cs plan
- 4Cs training plan
- notes on delivering each 4Cs part
- slides used for the topic
- exercises used for the topic.
Once you have a feel for what each topic covers you can structure your own workshops using one or more topics depending on your goal and time available.
Coach Toolkit
Each book in the series includes a Coach Toolkit which you can download from Leanpub. The toolkit contains the following items.
Training plans: PDF combining all the 4Cs training plans. You should print these out and use them when you train. You will notice that these plans are handwritten, we find them much easier to create and change by hand than if they are typed.
Slides: PPTX containing all the slides used. These slides were created using scanned hand drawings. Some slides have been edited to allow you to insert your own details. For these slides we used Lauren C. Brown font as it closely matches the handwriting on the other slides. If you prefer not to use slides you can recreate these images on flipcharts.
4C template: Use this blank template to create your own 4Cs plans on new topics.
Agreement Cards: PDF of cards used in the Getting Started chapter of each book. We printed and laminated them and use them in nearly every workshop we run. You don’t need to use all the cards each time. Look through the cards before each workshop and decide which agreements are appropriate. The cards help make sure you don’t forget anything important.
Workbook: DOC containing all the pages of a participant workbook. You should print one per participant for them to fill in. Feel free to edit the order and cover page of the workbook. Many of the workbook images were created in Omnigraffle and pasted as images into the workbook.
Handouts: Not all books in this series contain a workbook, since we generally only use workbooks in training courses. For topics that work well individually we provide PDFs of handouts that can be printed for each participant.
Other materials: PDFs containing materials to be printed and used in various chapters. Each chapter will reference these if they are needed. These are different in each book.
Room layout
We have trained in a variety of venues around the world, including a computer training centre, a bar and a tent! Room layout can have a significant impact on your training.
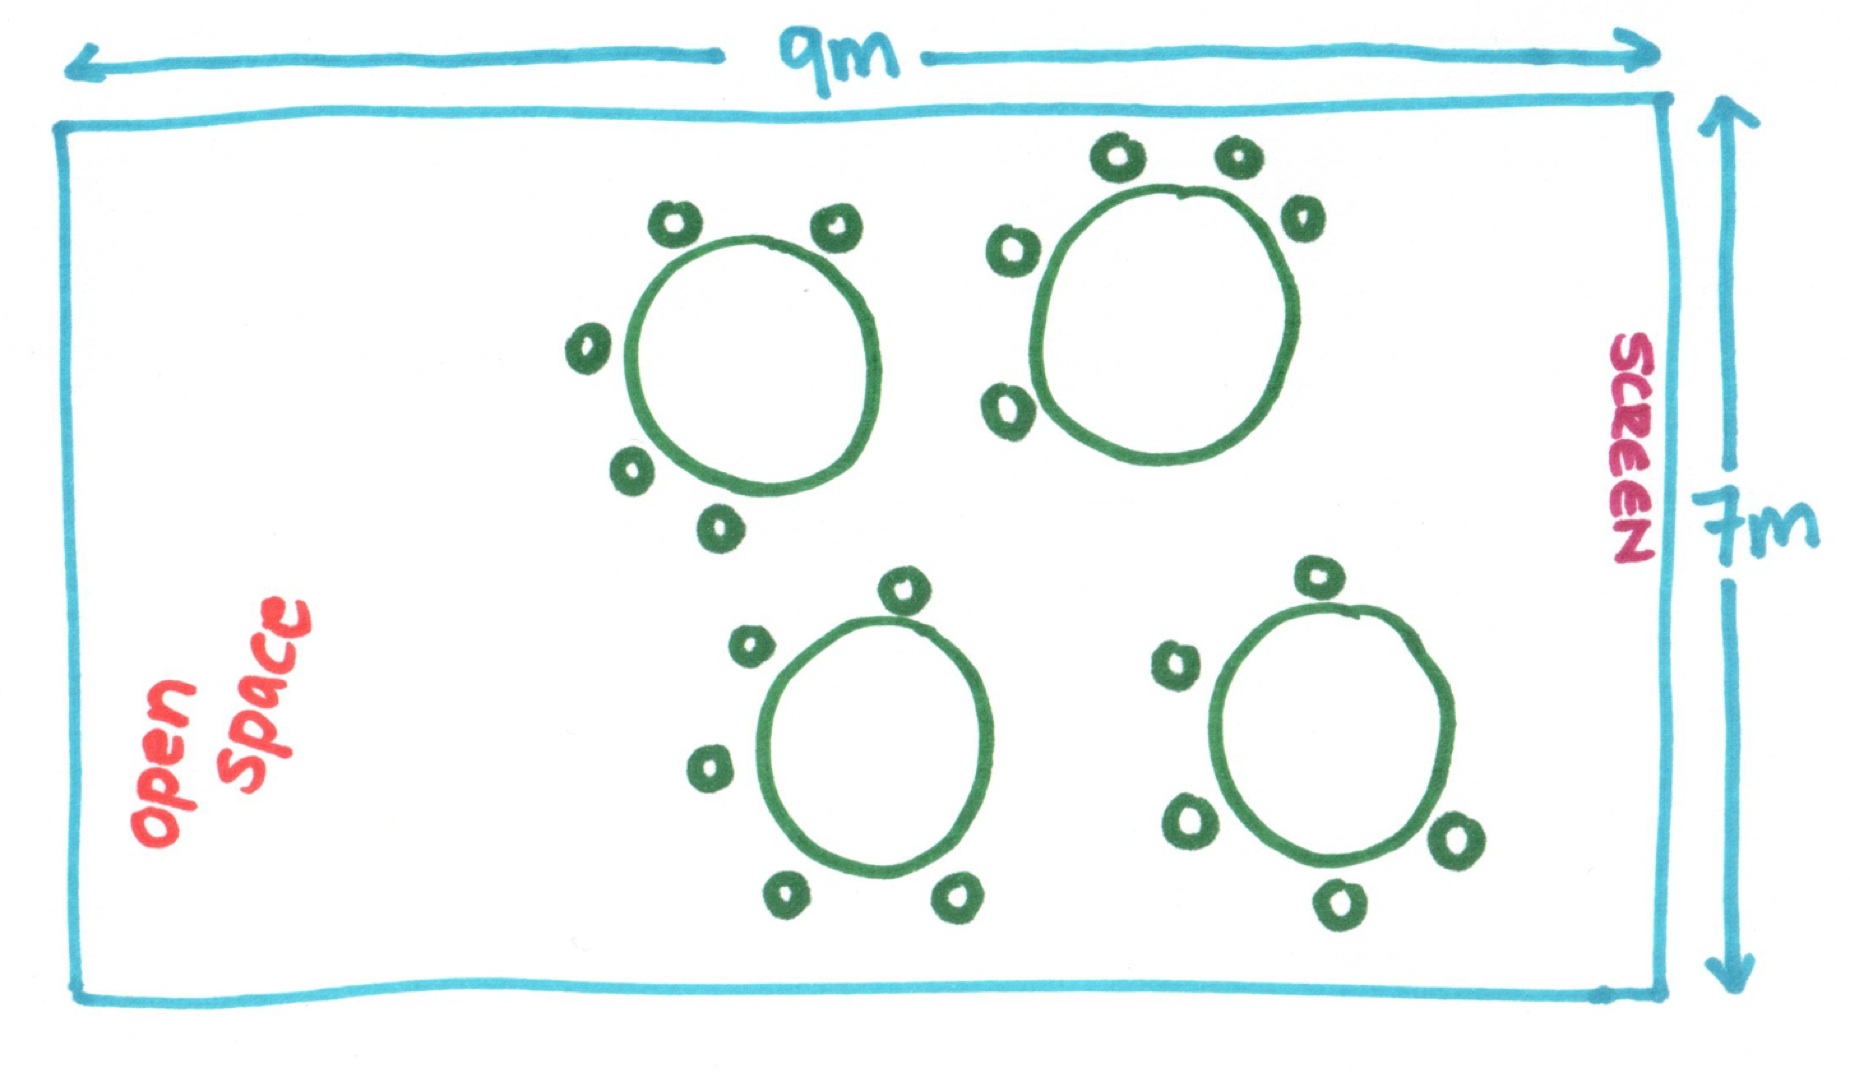
Our preferred room layout is cabaret style. i.e. small round tables seating groups of five to seven comfortably. The room should be large enough to have open space for some of the discussions. We look for a room with dimensions 7m x 9m for 20 people, with four tables. Ideally the tables should be small enough (around 1.5m–2m diameter) that people can easily talk to everyone at the table, but still have place for everyone to take notes.
Don’t worry about allocating seats when people arrive. The Getting Started chapter includes an activity for the participants to self-organise into appropriate groups.
If you are facilitating an in house workshop with only six participants, try find a room with a small round table so that everyone can sit close to each other.
When to change exercises
Feel free to change the training plans and activities to suit the class size and time available. We have delivered most of the chapters to groups varying from five to 50 people. As a result we have developed activities that scale well, but it is a good idea to be aware of the size of the group when planning your activities.
All 4Cs plans give times for each activity. These are just guidelines; any activity can be adjusted based on time available. It is often useful to have two exercises on hand, a longer and a shorter one, so that you can adjust if you find yourself with more or less time available.
If you are working with large groups, be aware that debriefing exercises can take much longer. To save time you can have teams debrief in their table group and then ask one or two table groups for their insights. Also remember that some exercises speak for themselves and don’t have to be debriefed - this is the beauty of TFTBOTR.
What else do you need?
We are able to run most of the workshops in this series with our standard training kit. We keep this packed in a small suitcase on wheels so we can take it wherever we go. Below is a list of what you’ll find in our kit. Some books in this series require specific items, these are listed in the Introduction for each book. Each chapter also contains a full list of materials you need for that topic’s training plan, in case you plan to deliver just one topic.

|
Standard training kit
|
|
|
NoteIf you are doing a lot of training, we recommend investing in some high-quality markers in different colours. Our favourite markers are from Neuland. They offer large, refillable, water-based markers in a great range of colours. |
All the techniques referenced in the training plans are available in the Appendix. If you aren’t sure what to do for a Standing Survey or Fast Pass, check the Appendix.
After the workshop or course
Whenever we train or run workshops we take photos. These include action shots during any activities and discussions as well as any flipcharts we use and posters people create.
After the workshop or course we put these photos together in a PDF, and send this to all participants as a reminder of the workshop or course. This photobook is useful if you don’t use slides and participants want some materials to reference afterwards. We also send links to further reading on any topics that came up in the Q&A that were not fully answered.