
Table of Contents
- Foreword
- 1. Thinking in tmux
- 2. Terminal fundamentals
- 3. Practical usage
- 4. Server
- 5. Sessions
- 6. Windows
- 7. Panes
- 8. Configuration
- 9. Status bar and styling
- 10. Scripting tmux
- 11. Tips and tricks
- 12. Takeaway
- Appendix: Cheatsheets
- Appendix: Installing tmux
- Appendix: tmux on Windows 10
- Appendix: Troubleshooting
Foreword
Nearly all my friends use tmux. I remember going out at night for drinks and the three of us would take a seat at a round table and take out our smart phones. This was back when phones still had physical “QWERTY” keyboards.
Despite our home computers being asleep or turned off, our usernames in the IRC
channel we frequently visited persisted in the chatroom list. Our screens were
lit by a kaleidoscope of colors on a black background. We ssh’d with ConnectBot
into our cloud servers and reattached by running screen(1).
As it hit 2AM, our Turkish coffee arrived, the |away status indicator trailing
our online nicknames disappeared.
It was funny noticing, even though we knew each other by our real names, we sometimes opted to call each other by our nicks. It’s something about how personal relationships, formed online, persist in real life.
It seemed as if it were orchestrated, but each of us fell into the same ebb and flow of living our lives. No one told us to do it, but bit by bit, we incrementally optimized our lifestyles, personally and professionally, to arrive at destinations seeming eerily alike.
Like many things in life, when we act on autopilot, we sometimes arrive at similar destinations. This is often unplanned.
So, when I write an educational book about a computer application, I hope to write it for human beings. Not to sell you on tmux, convince you to like it or hate it, but to tell you what it is and how some people use it. I’ll leave the rest to you.
About this book
I’ve helped thousands learn tmux through my free resource under the name The Tao of tmux, which I kept as part of the documentation for the tmuxp session manager. And now, it’s been expanded into a full-blown book with refined graphics, examples, and much more.
You do not need a book to use or understand tmux. If you want a technical manual, look at the manpage for tmux. Manpages, however, are rarely sufficient to wrap your brain around abstract concepts; they’re there for reference. This learning book is the culmination of years of explaining tmux to others online and in person.
In this book, we will break down tmux by its objects, from servers down to panes. It also includes a rehash of terminal facilities we use every day to keep us autodidacts up to speed with what is what. I’ve included numerous examples of projects, permissively licensed source code, and workflows designed for efficiency in the world of the terminal.
tmux is a tool I find useful. While I don’t attach it to my personal identity, it’s been part of my daily life for years. Besides the original resource, I’ve written a popular tmux starter configuration, a pythonic tmux library, and a tmux session manager.
I am writing this from vim running in a tmux pane, inside a window, in a session running on a tmux server, through a client.
A word to absolute beginners: Don’t feel you need to grasp the concepts of the command line and terminal multiplexing in a single sitting. You have the choice of picking out concepts of tmux you like, according to your needs or interests. If you haven’t installed tmux yet, please view the Installation section in the Appendix of the book.
Follow @TheTaoOfTmux for updates or share on Twitter!
Styles
Formatted text like this is source code.
Formatted text with a $ in front is a terminal command. $ echo 'like this'.
The text can be typed into the console, without the dollar character. For more
information on the meaning of the “dollar prompt”, check out What is the
origin of the UNIX $ (dollar) prompt?
on Super User.
In tmux, shortcuts require a prefix key to be sent beforehand.
For instance, Prefix + d will detach a tmux client from its session. This
prefix, by default, is <Ctrl-b>, but users can override it. This is discussed in
greater detail in the prefix key section and configuration.
How this book is structured
First, anything involving installation and hard technical details are in the Appendix. A lot of books use installation instructions as filler in the early chapters. For me, it’s more of not wanting to confuse beginners.
For special circumstances, like tmux on Windows 10, I decided adding screenshots is best, since many readers may be more comfortable with a visual approach.
Thinking in tmux goes over what tmux does and how it relates to the GUI desktops on our computers. You’ll understand the big picture of what tmux is and how it can make your life easier.
Terminal Fundamentals shows the text-based environments you’ll be dealing with. It’s great for those new to tmux, but also presents technical background for developers, who learned the ropes through examples and osmosis. At the end of this section, you’ll be more confident and secure using the essential components underpinning a modern terminal environment.
Practical usage covers common bread-and-butter uses for you to use tmux immediately.
Server gives life to the unseen workhorse behind the scenes powering tmux. You’ll think of tmux differently and may be impressed a client-server architecture could be presented to end users so seamlessly.
Sessions are the containers holding windows. You’ll learn what sessions are and how they help organize your workspace in the terminal. You’ll learn how to manipulate and rename and traverse sessions.
Windows are what you see when tmux is open in front of you. You’ll learn how to rename and move windows.
Panes are a terminal in a terminal. This is where you get to work and do your magic! You’ll learn how to create, delete, move between, and resize panes.
Configuration discusses customization of tmux and sets the
foundation for how to think about .tmux.conf so you can customize your own.
Status bar and styling is devoted to the customization of the status line and colors in tmux. As a bonus, you’ll even learn how to display system information like CPU and memory usage via the status line.
Scripting tmux goes into command aliases and the advanced and powerful Targets and Formats concepts.
Technical stuff is a glimpse at tmux source code and how it works under the hood. You may learn enough to impress colleagues who already use tmux. If you like programming on Unix-like systems, this one is for you.
Tips and tricks wraps up with a whirlwind of useful terminal tutorials you can use with tmux to improve day to day development and administration experience.
Cheatsheets are organized tables of commands, shortcuts, and formats grouped by section.
Donations
If you enjoy my learning material or my open source software projects, please consider donating. Donations go directly to me and my current and future open source projects and are not squandered. Visit http://www.git-pull.com/support.html for ways to contribute.
Formats
This book is available for sale on Leanpub and Amazon Kindle.
It’s also available to read for free on the web.
Errata
This is my first book. I am human and make mistakes.
If you find errors in this book, please submit them to me at tao.of.tmux <AT> nospam git-pull.com.
You can also submit a pull request via https://github.com/git-pull/tao-of-tmux.
I will update digital versions of the book with the changes where applicable.
Thanks
Thanks to the contributors for spotting errors in this book and submitting errata through GitHub. In addition, readers like Graziano Misuraca, who looked through the book closely, providing valuable feedback.
Some copy, particularly in cheatsheets, comes straight out of the manual of tmux, which is ISC-licensed.
Book Updates and tmux changes
This book was written for tmux 2.3, released September 2016.
As of January 2017, it’s trivial to push out minor changes to Leanpub. Kindle is harder.
tmux does intermittently receive updates. I’ve accommodated many over the past 5 years on my personal configurations and software libraries set with continuous integration tests against multiple tmux versions. Sometimes, publishers overplay version numbers to make it seem as if it’s worth striking a new edition of a book over it. It’s effective for them, but I’d rather be honest to my readership.
If you’re considering keeping up to date with new features and adjustments to tmux,
the CHANGES file in the
project source serves as a way to see what’s updated between official releases.
1. Thinking in tmux
In the world of modern computing, user interaction has 2 realms:
- The text realm
- The graphical realm
tmux lives in the text realm in which fixed-width fonts appear in a rectangular grid in a window, like in a terminal from the 1980s.
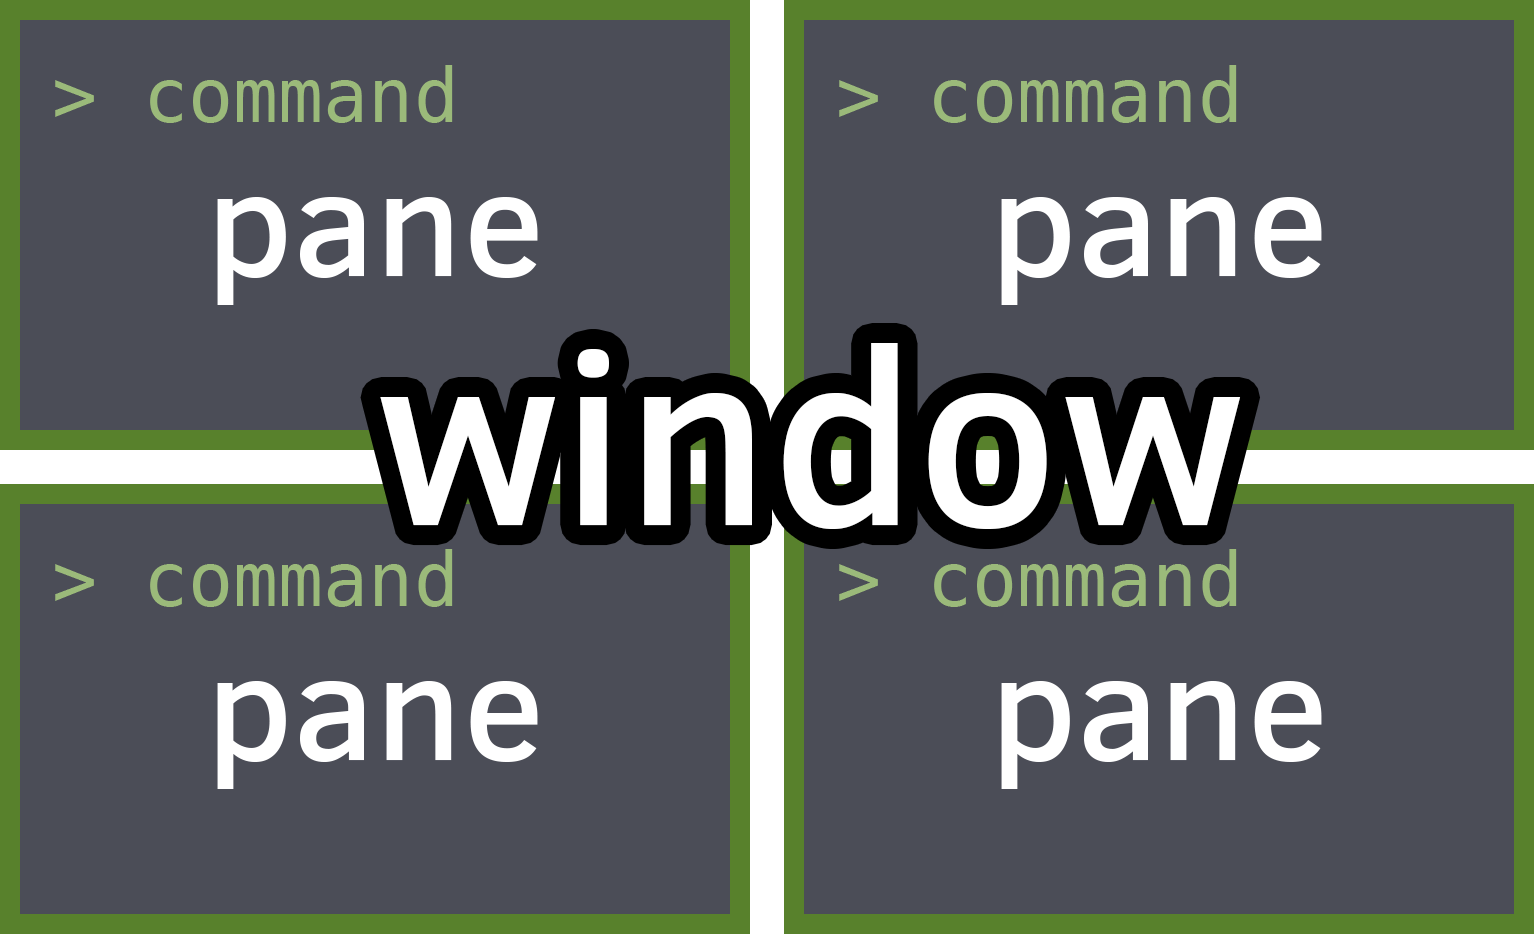
Window manager for the terminal
tmux is to the console what a desktop is to GUI apps. It’s a world inside the text dimension. Inside tmux, you can:
- multitask inside the terminal, run multiple applications
- have multiple command lines (pane) in the same window
- have multiple windows (window) in the workspace (session)
- switch between multiple workspaces, like virtual desktops
| tmux | “Desktop”-Speak | Plain English |
|---|---|---|
| Multiplexer | Multi-tasking | Multiple applications |
| simultaneously. | ||
| Session | Desktop | Applications are visible here |
| Window | Virtual Desktop or | Desktop containing its own screen |
| applications | ||
| Pane | Application | Performs operations |
Just like in a graphical desktop environment, they throw in a clock, too.

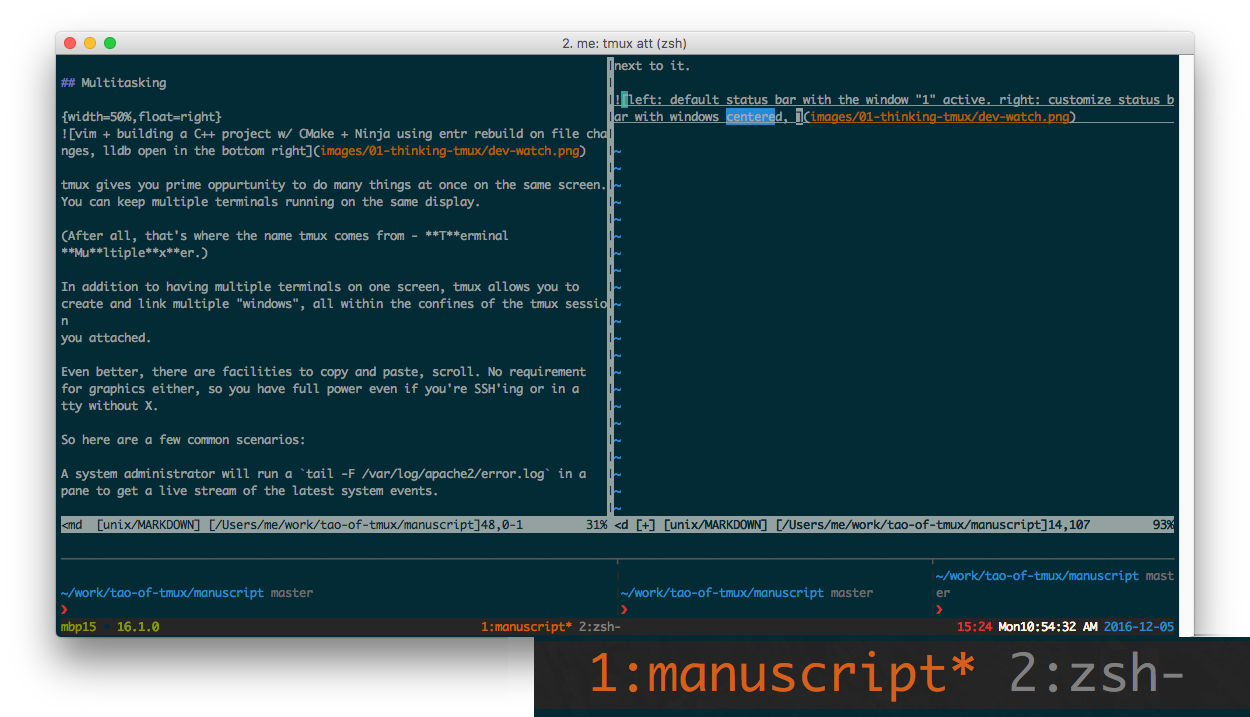
Multitasking
tmux allows you to keep multiple terminals running on the same screen. After all, the abbreviation “tmux” comes from - Terminal Multiplexer.
In addition to multiple terminals on one screen, tmux allows you to create and link multiple “windows” within the confines of the tmux session you attached.
Even better, you can copy and paste and scroll. No requirement for graphics either, so you have full power, even if you’re SSH’ing or on a system without a display server such as X.
Here are a few common scenarios:
- Running
$ tail -F /var/log/apache2/error.login a pane to get a live stream of the latest system events. - Running a file watcher, like watchman, gulp-watch, grunt-watch, guard, or entr. On file change, you could do stuff like:
- Keeping a text editor, like vim, emacs, pico, nano, etc., open in a main pane,
while leaving two others open for CLI commands and building via
makeorninja.
With tmux, you quickly have the makings of an IDE! And on your terms.
Keep your applications running in the background
Sometimes, GUI applications will have an option to be sidelined to the system tray to run in the background. The application is out of sight, but events and notifications can still come in, and the app can be instantly brought to the foreground.
In tmux, a similar concept exists, where we can “detach” a tmux session.
Detaching can be especially useful on:
- Local machines. You start all your normal terminal applications within
a tmux session, you restart X. Instead of losing your processes as you
normally would if you were using an X terminal, like xterm or konsole, you’d
be able to
tmux attachafter and find all the processes inside that were alive and kicking all along. - Remote SSH applications and workspaces you run in tmux. You can detach your tmux workspace at work before you clock out, then the next morning, reattach your session. Ahhh. Refreshing. :)
- Those servers you rarely log into. Perhaps, a cloud instance you log into 9
months later, and as a reflex,
tmux attachto see if there is anything on there. And boom, you’re back in a session you’ve forgotten about, but still jogs your memory to what you were tweaking or fixing. It’s like a hack to restore your memory.
Powerful combos
Chatting on irssi or weechat, one of the “classic combos”, along with a bitlbee server to manage AIM, MSN, Google Talk, Jabber, ICQ, even Twitter. Then, you can detach your IRC and “idle” in your favorite channels, stay online on instant messengers, and get back to your messages when you return.

Some keep development services running in a session. Hearty emphasis on development, you probably will want to daemonize and wrap your production web applications, using a tool like supervisor, with its own safe environmental settings.
You can also have multiple users attach their clients to the same sessions, which is great for pair programming. If you were in the same session, you and the other person would see the same thing, share the same input, and the same active window and pane.
The above are just examples; any general workspace you’d normally use in a terminal could work, especially projects or repetitive efforts you multitask on. The tips and tricks section will dive into specific flows you can use today.
Summary
tmux is a versatile addition to your terminal toolbelt. It helps you cover the gaps between multitasking and workspace organization you’d otherwise lose, since there’s no GUI. In addition, it includes a nice ability to detach workspaces to the background and reattach later.
In the next chapter, we will touch on some terminal basics before diving deeper into tmux.
2. Terminal fundamentals
Before getting into tmux, a few fundamentals of the command line should be reviewed. Often, we’re so used to using these out of street smarts and muscle memory, a great deal of us never see the relation of where these tools stand next to each other.
Seasoned developers are familiar with Zsh, Bash, iTerm2, konsole, /dev/tty, shell scripting, and so on. If you use tmux, you’ll be around these all the time, regardless whether you’re in a GUI on a local machine or SSH’ing into a remote server.
If you want to learn more about how processes and TTYs work at the kernel level (data structures and all), the book The Design and Implementation of the FreeBSD Operating System (2nd Edition) by Marshall Kirk McKusick is nice, particularly, Chapter 4, Process Management and Section 8.6, Terminal Handling. The TTY demystified by Linus Åkesson (available online) dives into the TTY and is a good read.
Much more exists to glean off the history of Unix, 4.2 BSD, etc. I probably could have a coffee / tea with you discussing it for hours. You could look at it from multiple perspectives (The C Language, anything from the Unix/BSD lineage, etc.), and some clever fellow would likely chime in, mentioning Linux, GNU, and so on. It’s like Game of Thrones; there’s multiple story arcs you can follow, some of which intersect. A few good video resources would be A Narrative History of BSD by Marshall Kirk McKusick, The UNIX Operating System by AT&T, Early days of Unix and design of sh by Stephen R. Bourne.
POSIX standards
Operating systems like macOS (formerly OS X), Linux, and the BSDs, follow something similar to the POSIX specification in terms of how they square away various responsibilities and interfaces of the operating system. They’re categorized as “Mostly POSIX-compliant”.
In daily life, we often break compatibility with POSIX standards for reasons of
sheer practicality. Operating systems, like macOS, will drop you right into Bash.
make(1),
a POSIX standard, is GNU Make on macOS by
default. Did you know, as of September 2016, POSIX Make has no conditionals?
I’m not saying this to take a run at purists. As someone who tries to remain compatible in my scripting, it gets hard to do simple things after a while. On FreeBSD, the default Make (PMake) uses dots between conditionals:
IF
.ENDIF
But on most Linux systems and macOS, GNU Make is the default, so they get to do:
IF

ENDIF
This is one of the many tiny inconsistencies that span operating systems, their userlands, their binary / library / include paths, and adherence / interpretation of the Filesystem Hierarchy Standard or whether they follow their own.
These differences add up. A good deal of software infrastructure out
there exists solely to abstract the differences across them. For example: CMake,
Autotools, SFML, SDL2, interpreted programming languages, and their standard
libraries are dedicated to normalizing the banal differences across
BSD-derivatives and Linux distributions. Many, many #ifdef preprocessor
directives in your C and C++ applications. You want open source, you get choice,
but be aware; there’s a lot of upkeep cost in keeping these upstream projects
(and even your personal ones) compatible. But I digress, back to terminal stuff.
Why does it matter? Why bring it up? You’ll see this stuff everywhere. So, let’s separate the usual suspects into their respective categories.
Terminal interface
The terminal interface can be best introduced by citing official specification, laying out its technical properties, interfaces, and responsibilities. This can be viewed in its POSIX specification.
This includes TTYs, including text terminals and X sessions within them. On
Linux / BSD systems, you can switch between sessions via <ctrl-alt-F1>
through <ctrl-alt-F12>.
Terminal emulators
GUI Terminals: Terminal.app, iterm, iterm2, konsole, lxterm, xfce4-terminal, rxvt-unicode, xterm, roxterm, gnome terminal, cmd.exe + bash.exe
Shell languages
Shell languages are programming languages. You may not compile the code
into binaries with gcc or clang,
or have shiny npm package manager for them, but a
language is a language.
Each shell interpreter has its own language features. Like with shells, many will resemble the POSIX shell language and strive to be compatible with it. Zsh and Bash should be able to understand POSIX shell scripts you write, but not the other way around (we will cover this in shell interpreters).
The first line of shell file is the shebang
statement, which points to the interpreter to run the script in. They normally
use the .sh extension, but they can also be .zsh, .csh and so on if
they’re for a specific interpreter.
Zsh scripts are implemented by the Zsh shell interpreter, Bash scripts by Bash. But the languages are not as closely regulated and standardized as, say, C++’s standards committee workgroups or python’s PEPs. Bash and Zsh take features from Korn and C Shell’s languages, but without all the ceremony and bureaucracy other languages espouse.
Shell interpreters (Shells)
Examples: POSIX sh, Bash, Zsh, csh, tcsh, ksh, fish
Shell interpreters implement the shell language. They are a layer on top of the kernel and are what allow you, interactively, to run commands and applications inside them.
As of October 2016, the latest POSIX specification covers in technical detail the responsibilities of the shell.
For shells and operating systems: each distro or group does their own darn thing. On most Linux distributions and macOS, you’ll typically be dropped into Bash.
On FreeBSD, you may default to a plain vanilla sh unless you specify
otherwise during the installation process. In Ubuntu, /bin/sh used to be
bash (Bourne Again Shell) but
was replaced with dash
(Debian Almquist Shell). So,
here, you are thinking “hmm, /bin/sh, probably just a plain old POSIX shell”;
however, system startup scripts on Ubuntu used to allow non-POSIX scripting
via Bash. This is because specialty shell languages, such as
Bash and Zsh, add helpful and practical features, but they’re not portable.
For instance, you would need to install the Zsh interpreter across all your
systems if you rely on Zsh-specialized scripting. If you conformed with POSIX
shell scripting, your scripting would have the highest level of compatibility
at the cost of being more verbose.
Recent versions of macOS include Zsh by default. Linux distributions
typically require you to install it via package manager and install it to
/usr/bin/zsh. BSD systems build it via the port system, pkg(8)
on FreeBSD, or pkg_add(1) on OpenBSD,
and it will install to /usr/local/bin/zsh.
It’s fun to experiment with different shells. On many systems, you can use
chsh -s to update the default shell for
a user.
The other thing to mention is, for chsh -s to work, you typically need to have
it added to /etc/shells.
Summary
To wrap it up, you will hear people talking about shells all the time. Context is key. It could be:
- A generic way to refer to any terminal you have open. “Type
$ topinto your shell and see what happens.” (Press q to quit.) - A server they have to log into. Before the era of the cloud, it would be popular for small hosts to sell “C Shells” with root access.
- A shell within a tmux pane.
- If scripting is mentioned, it is likely either the script file, an issue related to the scripts’ behavior, or something about the shell language.
But overall, after this overview, go back to doing what you’re doing. If shell is what people say and they understand it, use it. The backing you have here should make you more confident in yourself. These days, it’s an ongoing battle catching our street smarts up with book smarts.
In the next chapter, we will touch some terminal basics before diving deeper into tmux.
3. Practical usage
This is the easiest part; open your terminal and type tmux, hit enter.
You’re in tmux.
The prefix key
The prefix is how we send commands into tmux. With this, we can split windows, move windows, switch windows, switch sessions, send in custom commands, you name it.
And it’s a hump we have to get over.
It’s kind of like Street Fighter. In this video game, the player inputs a combination of buttons in sequence to perform flying spinning kicks and shoot fireballs; sweet. As the player grows more accustomed with the combos, they repeat moves by intuition, since they develop muscle memory.
Without understanding how to send command sequences to tmux via the prefix key, you’ll be dead in the water.
Key sequences will come up later if you use Vim, Emacs, or other TUI (Terminal User Interface) applications. If you haven’t internalized the concept, let’s do it now. Prior experience command sequences in TUI/GUI applications will come in handy.
When you memorize a key combo, it’s one less time you’ll be moving your hand away from the keyboard to grab your mouse. You can focus your short-term memory on getting stuff done, resulting in fewer mistakes.
The default leader prefix is <Ctrl-b>. While holding down the control key,
press b.
You’ve detached the tmux session you were in. You can reattach via $ tmux
attach.
Nested tmux sessions
You can also send the prefix key to nested tmux sessions. For instance, if
you’re inside a tmux client on a local machine and you SSH into a remote machine
in one of your panes, on the remote machine, you can attach the client via tmux
attach as you normally would. To send the prefix key to the machine’s tmux
client, not your local one, hit the prefix key again.
So, if your prefix key is the default, <Ctrl-b>, do <Ctrl-b> + b again,
then hit the shortcut for what you want to do.
Example: If you wanted to create a window on the remote machine, which would normally
be <Ctrl-b> + c locally, it’d be <Ctrl-b> + b + c.
Hereinafter, the book will refer to shortcuts by Prefix. Instead
of <Ctrl-b> + d, you will see Prefix + d.
Session persistence and the server model
If you use Linux or a similar system, you’ve likely brushed through Job Control,
such as fg(1), jobs(1).
tmux behavior feels similar, like you ran <Ctrl-z> except, technically, you
were in a “job” all along. You were just using a client to view it.
Another way of understanding it: <Ctrl-b> + d closed the client connection,
therefore, ‘detached’ from the session.
Your tmux client disconnected from the server instance. The session, however, is still running in the background.
It’s all commands
Multiple roads can lead you to the same behavior. Commands are what tmux uses to define instructions for setting options, resizing, renaming, traversing, switching modes, copying and pasting, and so forth.
-
Configs are the same as automatically running commands via
$ tmux command. - Internal tmux commands via
Prefix+:prompt. - Settings defined in your configuration can also set shortcuts, which can
execute commands via keybindings via
bind-key. - Commands called from CLI via
$ tmux cmd - To pull it all together, source code files are prefixed
cmd-.
Summary
We’ve established tmux automatically creates a server upon starting it. The server allows you to detach and later reattach your work. The keyboard sequences you send to tmux require understanding how to send the prefix key.
Keyboard sequences, configuration, and command line actions all boil down to the same core commands inside tmux. In our next chapter, we will cover the server.
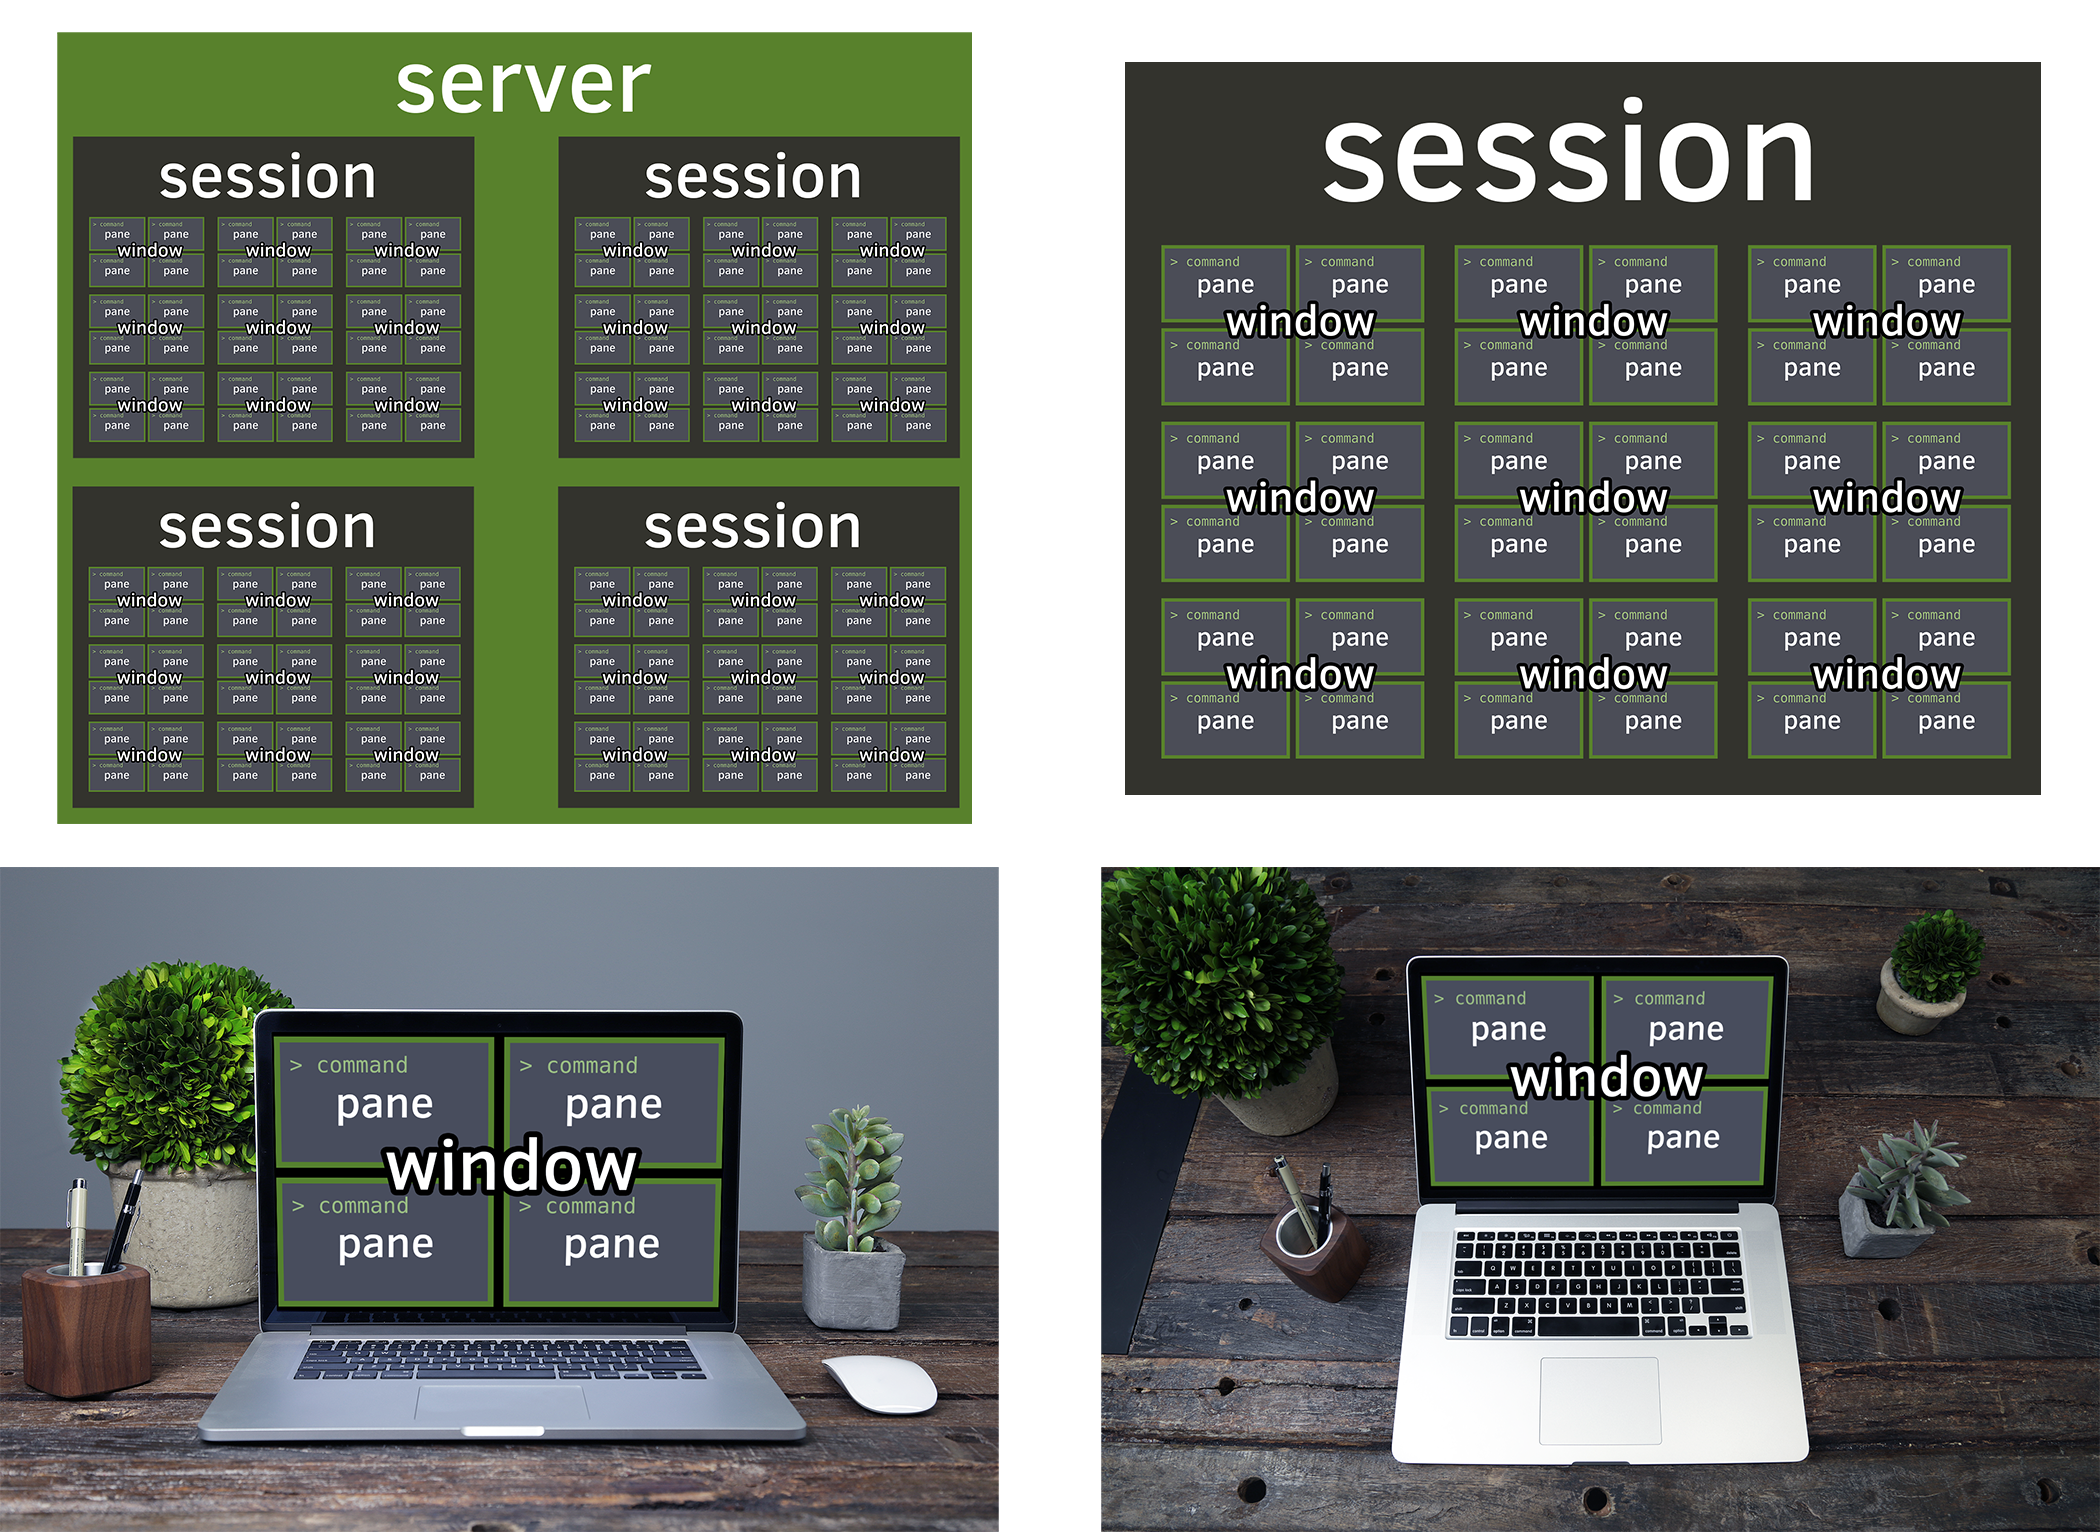
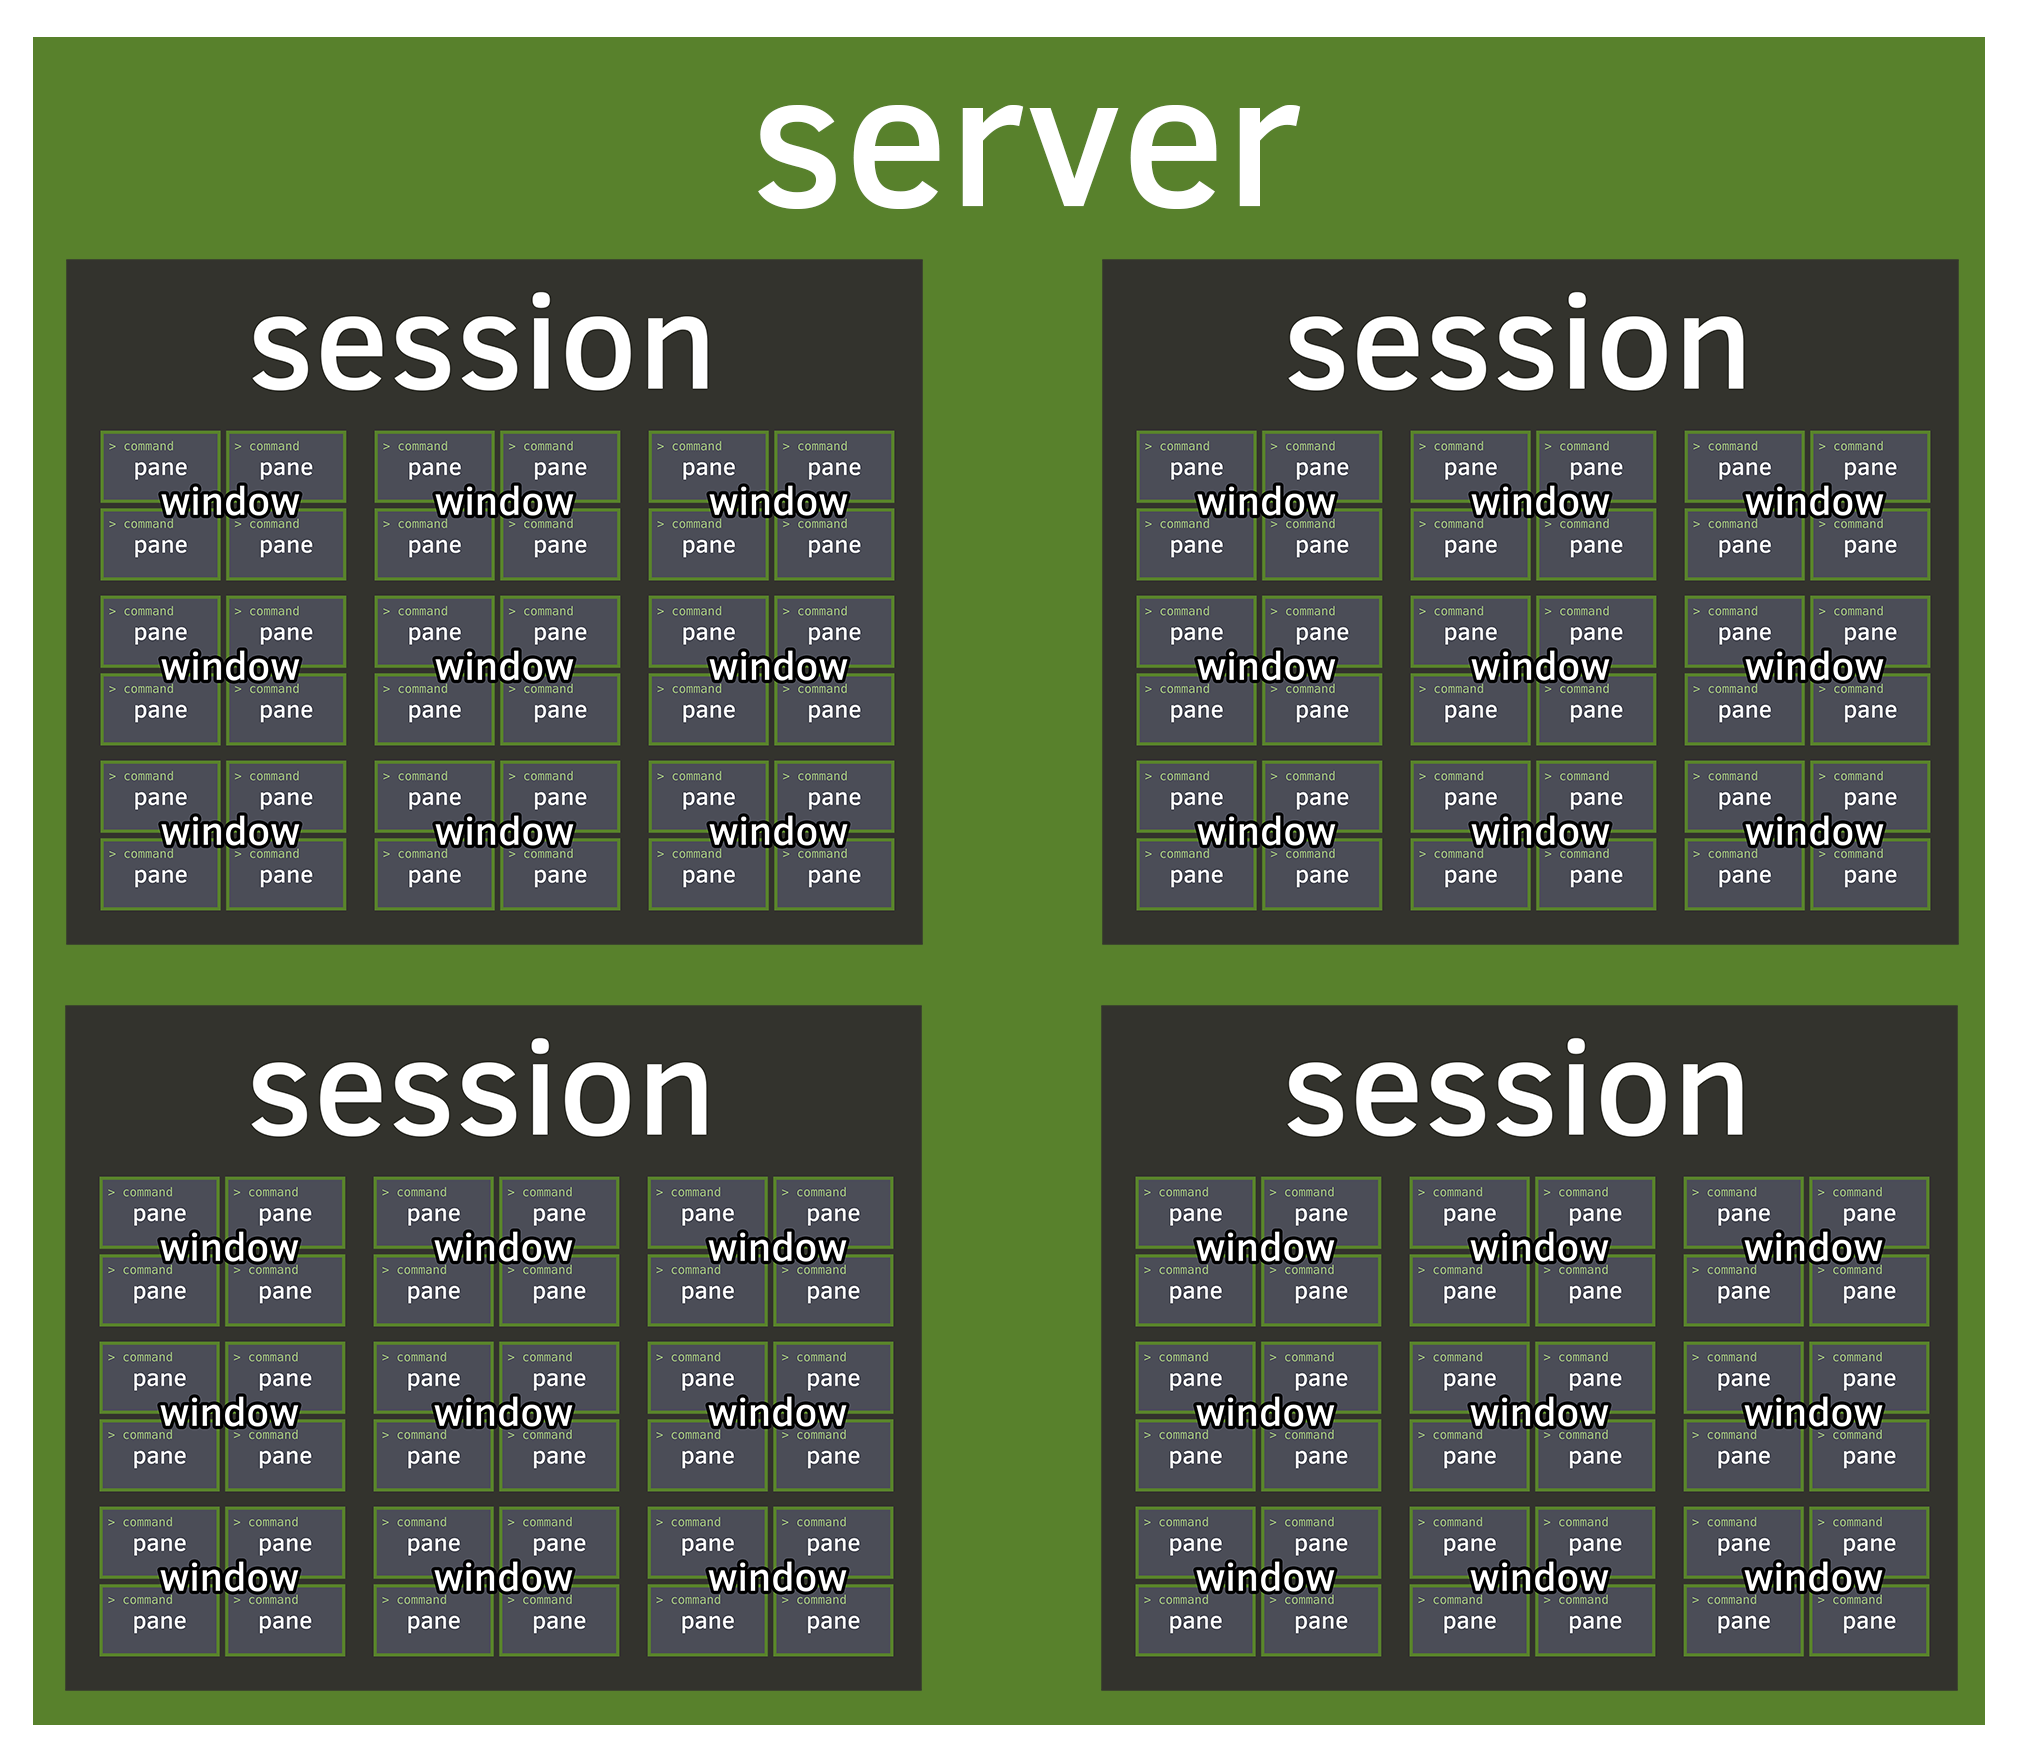
4. Server
The server holds sessions and the windows and panes within them.
When tmux starts, you are connected to a server via a socket connection. What you see presented in your shell is merely a client connection. In this chapter, we uncover the invisible engine enabling your terminal applications to persist for months or even years at a time.
What? tmux is a server?
Often, when “server” is mentioned, what comes to mind for many may be rackmounted hardware; to others, it may be software running daemonized on a server and managed through a utility, like upstart, supervisor, and so on.
Unlike web or database software, tmux doesn’t require specialized configuration settings or creating a service entry to start things.
tmux uses a client-server model, but the server is forked to the background for you.
Zero config needed
You don’t notice it, but when you use tmux normally, a server is launched and being connected via a client.
tmux is so streamlined, the book could continue to explain usage and not even mention servers. But, I’d rather you have a true understanding of how it works on systems. The implementation feels like magic, while living up to the unix expectations of utilitarianism. One cannot deny it’s exquisitely executed from a user experience standpoint.
How is it utilitarian? We’ll go into it more in future chapters, where we dive into Formats, Targets, and tools, such as libtmux I made, which utilize these features.
It surprises some, because servers often beget a setup process. But servers being involved doesn’t entail hours of configuration on each machine you run on. There’s no setup.
When people think server, they think pain. It invokes an image of digging
around /etc/ for configuration files and flipping settings on and off just to
get basic systems online. But not with tmux. It’s a server, but in the good way.
Stayin’ alive
The server part of tmux is how your sessions can stay alive, even after your client is detached.
You can detach a tmux session from an SSH server and reconnect later. You can detach a tmux session, stop your X server in Linux/BSD, and reattach your tmux session in a TTY or new X server.
The tmux server won’t go away until all sessions are closed.
Servers hold sessions
One server can contain one or multiple sessions.
Starting tmux after a server already is running will create a new session inside the existing server.
How servers are “named”
The default name for the server is default, which is stored as a socket in
/tmp. The default directory for storing this can be overridden via setting
the TMUX_TMPDIR environment variable.
So, something like:
export TMUX_TMPDIR=$HOME
$ tmux
Will give you a tmux directory created within your $HOME folder. On OS X,
your home folder will probably be something like /Users/yourusername. On
other systems, it may be /home/yourusername. If you want to find out, type
$ echo $HOME.
Clients
Servers will have clients (you) connecting to them.
When you connect to a session and see windows and panes, it’s a client connection into tmux.
You can retrieve a list of active client connections via:
These commands and the other list- commands, in practice, are rare. But, they
are part of tmux scriptability should you want to get creative. The scripting tmux
chapter will cover this in greater detail.
Clipboard
tmux clients wield a powerful clipboard feature to copy and paste across sessions, windows, and panes.
Much like vi, tmux handles copying as a mode in which a pane is temporarily placed. When inside this mode, text can be selected and copied to the paste buffer, tmux’s clipboard.
The default key to enter copy mode is Prefix + [.
- From within, use
[space]to enter copy mode. - Use the arrow keys to adjust the text to be selected.
- Press
[enter]to copy the selected text.
The default key to paste the text copied is Prefix + ].
In addition to the “copy mode”, tmux has advanced functionality to
programmatically copy and paste. Later in the book, the Capturing pane content
section in the Scripting tmux chapter goes into
$ tmux capture-pane and how you can use targets to copy pane
content into your paste buffer or files with $ tmux save-buffer.
Summary
The server is one of the fundamental underpinnings of tmux. Initialized automatically to the user, it persists by forking into the background. Running behind the scenes, it ensures sessions, windows, panes, and buffers are operating, even when the client is detached.
The server can hold one or more sessions. You can copy and paste between sessions via the clipboard. In the next chapter, we will go deeper into the role sessions play and how they help you organize and control your terminal workspace.
5. Sessions
Welcome to the session, the highest-level entity residing in the server instance. Server instances are forked to the background upon starting a fresh instance and reconnected to when reattaching sessions. Your interaction with tmux will have at least one session running.
A session holds one or more windows.
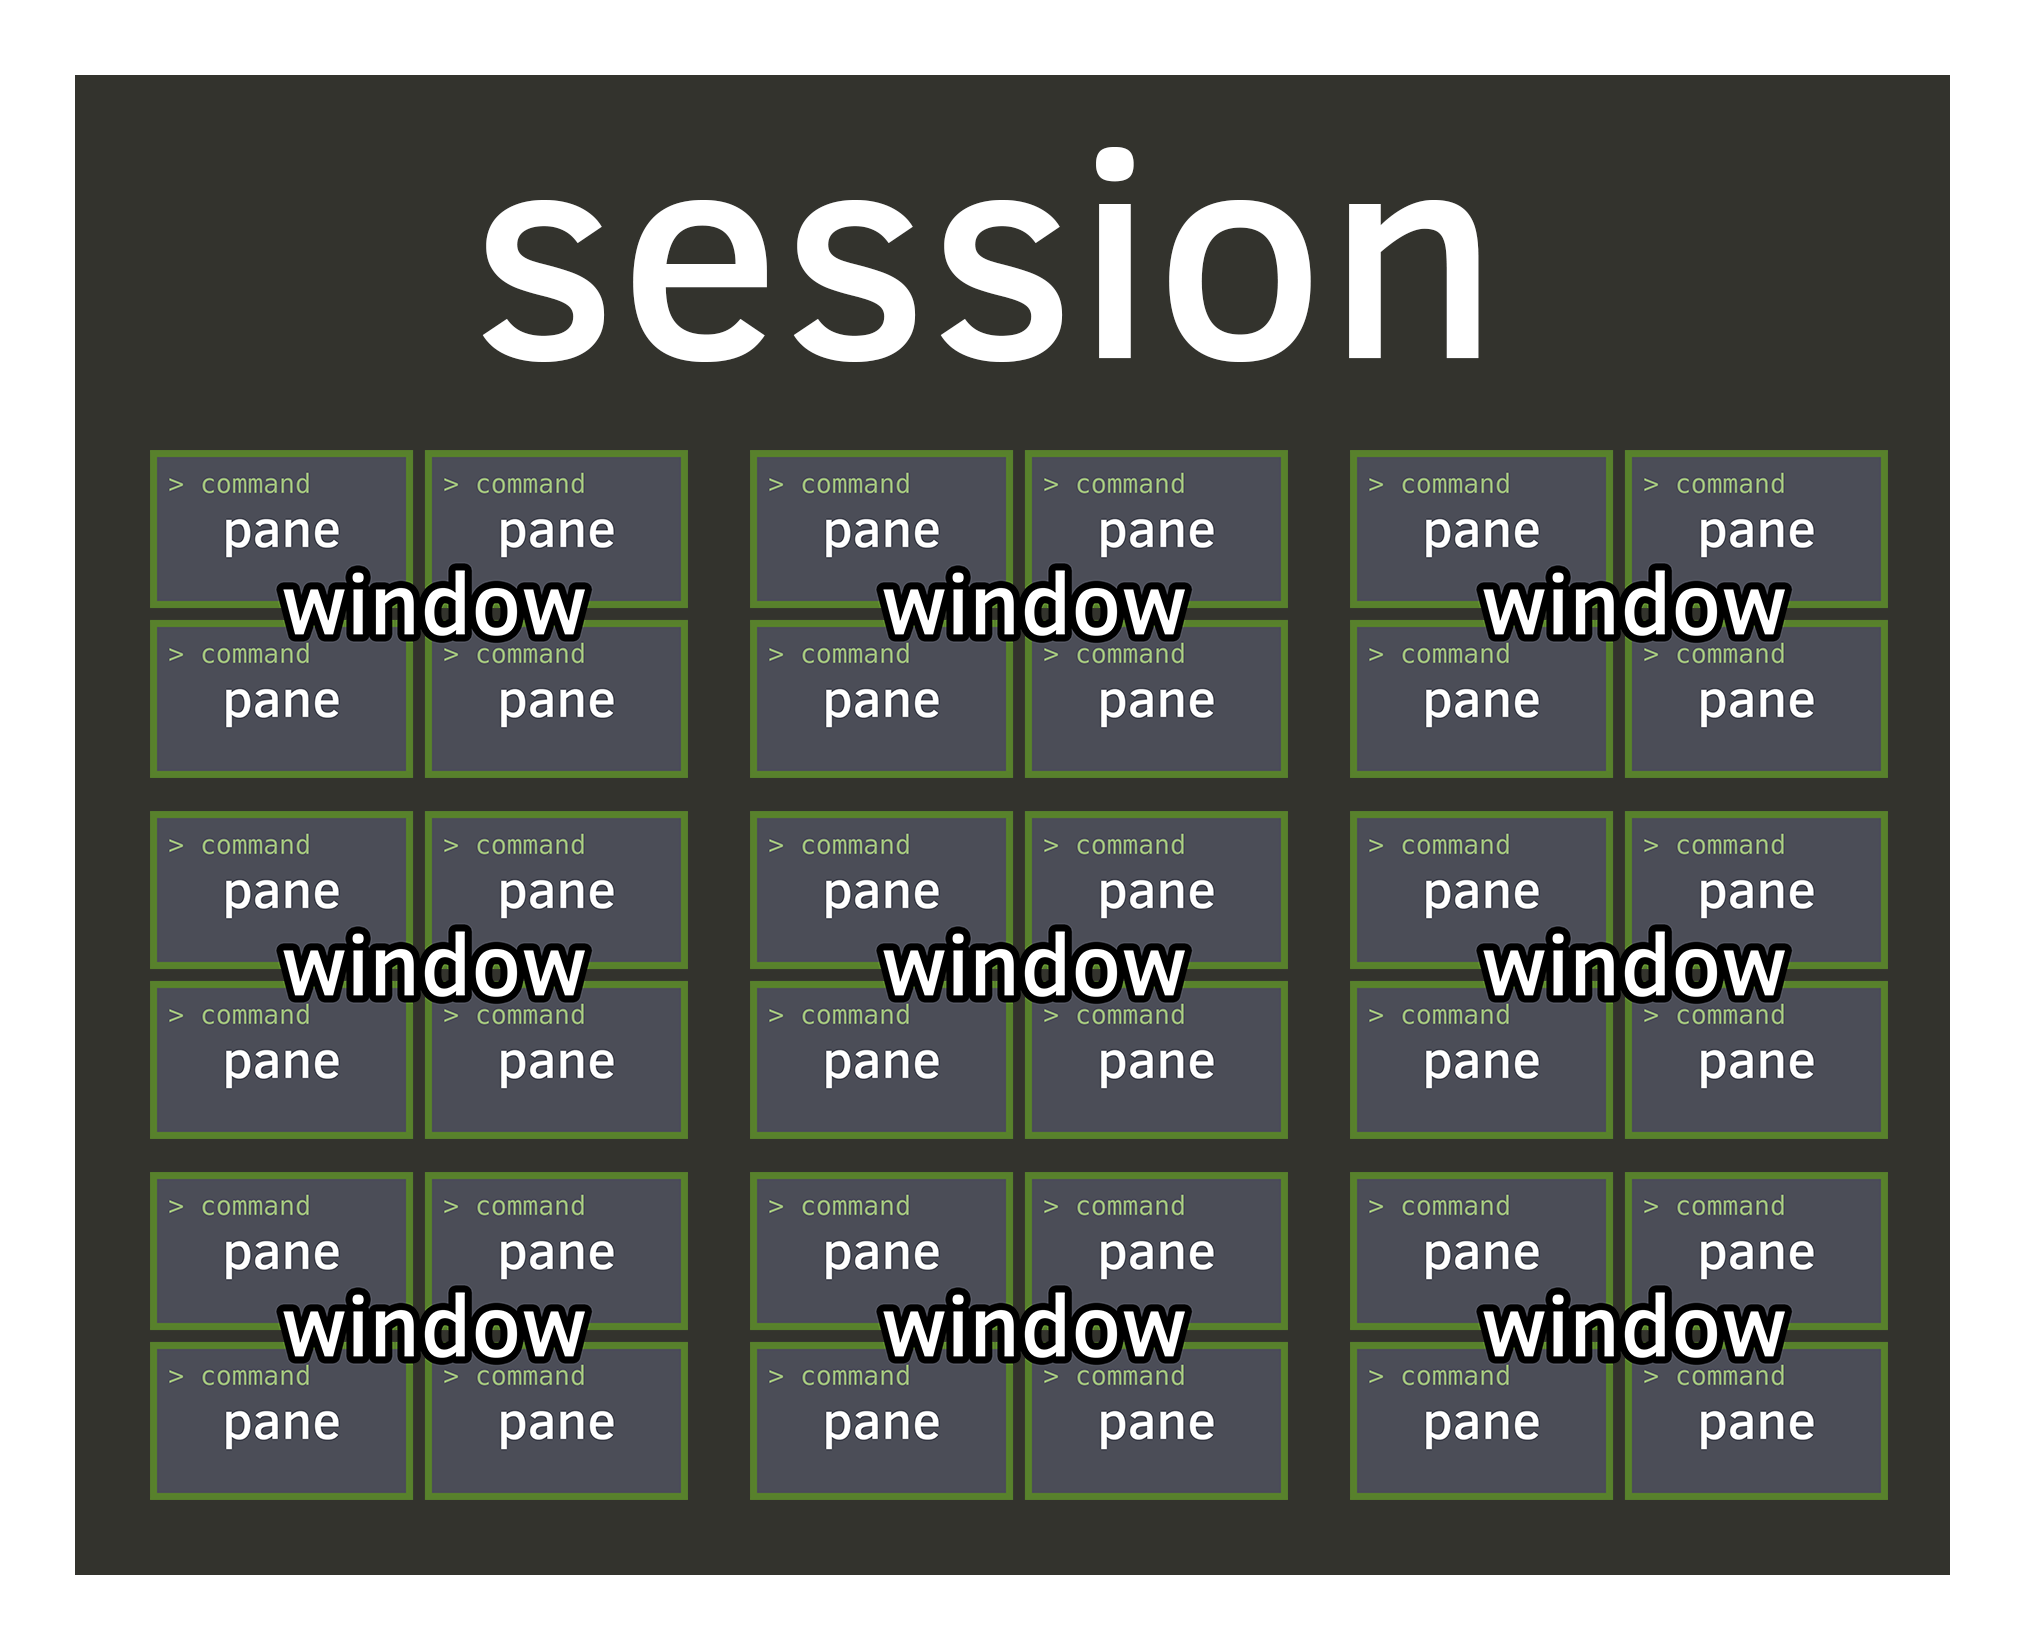
The active window will have a * symbol next to it.
Creating a session
The simplest command to create a new session is typing tmux:
The $ tmux application, with no commands is equivalent to
$ tmux new-session. Nifty!
By default, your session name will be given a number, which isn’t too descriptive. What would be better is:
'my rails project'
Switching sessions within tmux
Some acquire the habit of detaching their tmux client and reattaching via
tmux att -t session_name. Thankfully, you can switch sessions from within
tmux!
| Shortcut | Action |
|---|---|
Prefix + (
|
Switch the attached client to the previous session. |
Prefix + )
|
Switch the attached client to the next session. |
Prefix + L
|
Switch the attached client back to the last |
| session. | |
Prefix + s
|
Select a new session for the attached client |
| interactively. |
Prefix + s will allow you to switch between sessions within the same tmux
client.
This command name can be confusing. switch-client will allow you to traverse
between sessions in the server.
Example usage:
If already inside a client, this will switch to a session, named “dev”, if it exists.
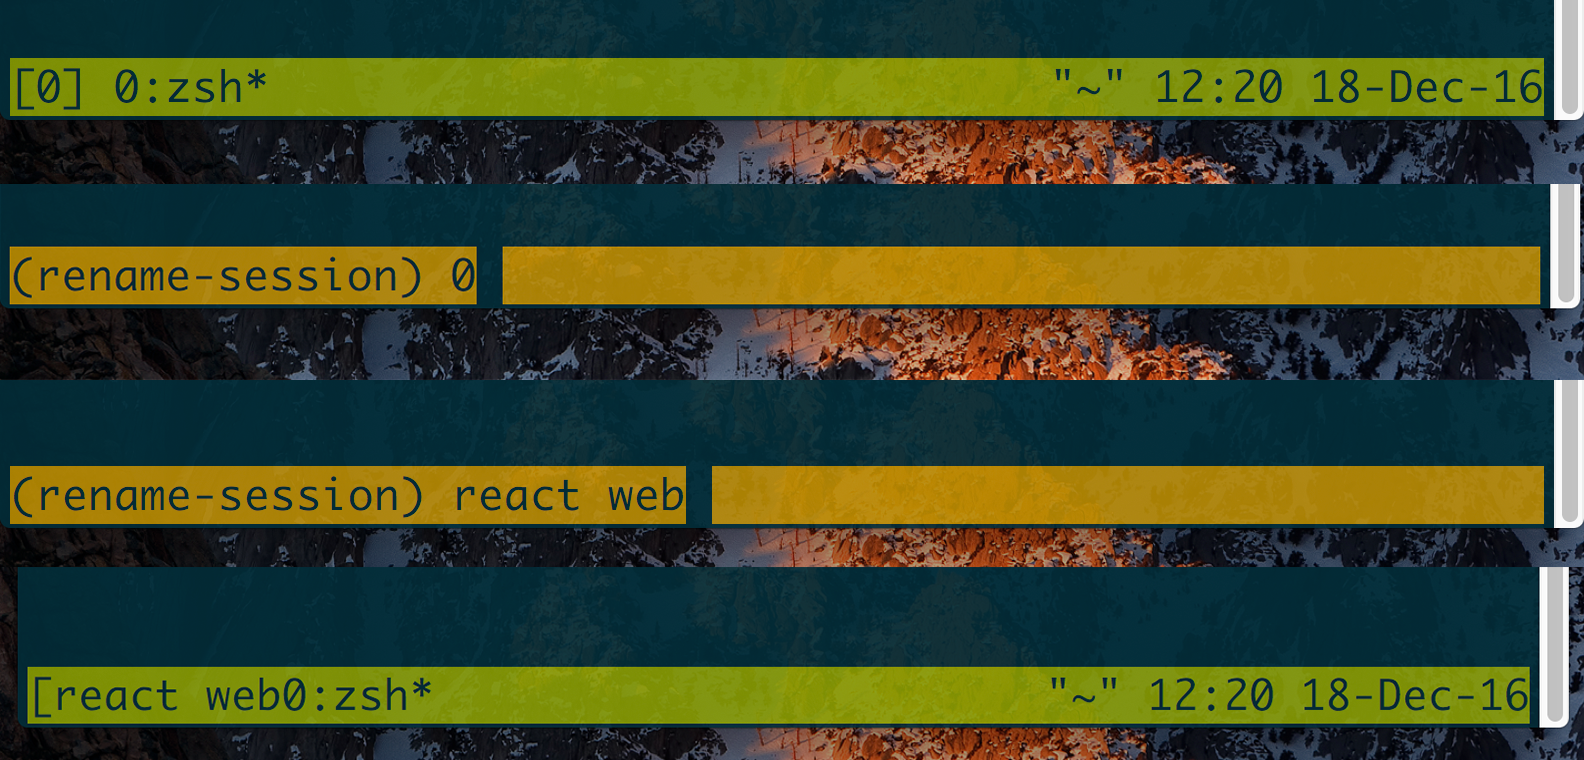
Naming sessions
Sometimes, the default session name given by tmux isn’t descriptive enough. It only takes a few seconds to update it.
You can name it whatever you want. Typically, if I’m working on multiple web projects in one session, I’ll name it “web”. If I’m assigning one software project to a single session, I’ll name it after the software project. You’ll likely develop your own naming conventions, but anything is more descriptive than the default.
If you don’t name your sessions, it’ll be difficult to keep track of what the session contains. Sometimes, you may forget you have a project opened, especially if your machine has been running for a few days, weeks, or months. You can save time by reattaching your session and avoid creating a duplicate.
You can rename sessions from within tmux with Prefix + $. The status bar
will be temporarily altered into a text field to allow altering the session
name.
Through command line, you can try:
1 "my session"
Does my session exist?
If you’re scripting tmux, you will want to see if a session exists.
has-session will return a 0 exit code
if the session exists, but will report a 1 exit code and print an error if a
session does not exist.
1
It assumes the session “1” exists; it’ll just return 0 with no output.
But if it doesn’t, you’ll get something like this in a response:
1
> can't find session 1
To try it in a shell script:
if tmux has-session -t 0 ; then
echo "has session 0"
fi
Summary
In this chapter, you learned how to rename sessions for organizational purposes and how to switch between them quickly.
You’ll always be attached to a session when you’re using a client in tmux. When the last remaining session is closed, the server will close also.
Think of sessions as workspaces designed to help organize a set of windows, analogous to virtual desktop spaces in GUI computing.
In the next chapter, we will go into windows, which, like sessions, are also nameable and let you switch between them.
6. Windows
Windows hold panes. They reside within a session.
They also have layouts, which can be one of many preset dimensions or a custom one done through pane resizing.
You can see the current windows through the status bar at the bottom of tmux.
Creating windows
All sessions start with at least one window open. From there, you can create and kill windows as you see fit.
Window indexes are numbers tmux uses to determine ordering. The first window’s
index is 0, unless you set it via base-index in your configuration.
I usually set -g base-index 1 in my tmux configuration, since 0 is after 9 on
the keyboard.
Prefix + c will create a new window at the first open index. So, if you’re
in the first window, and there is no second window created, it will create
the second window. If the second window is already taken, and the third hasn’t
been created, it will create the third window.
If the base_index is 1 and there are 7 windows created, with the 5th window
missing, creating a new window will fill the empty 5th index, since it’s the
next one in order and nothing is filling it. The next created window would be
the eighth.
Naming windows
Just like with sessions, windows can have names. Labelling them helps keep track of what you’re doing inside them.
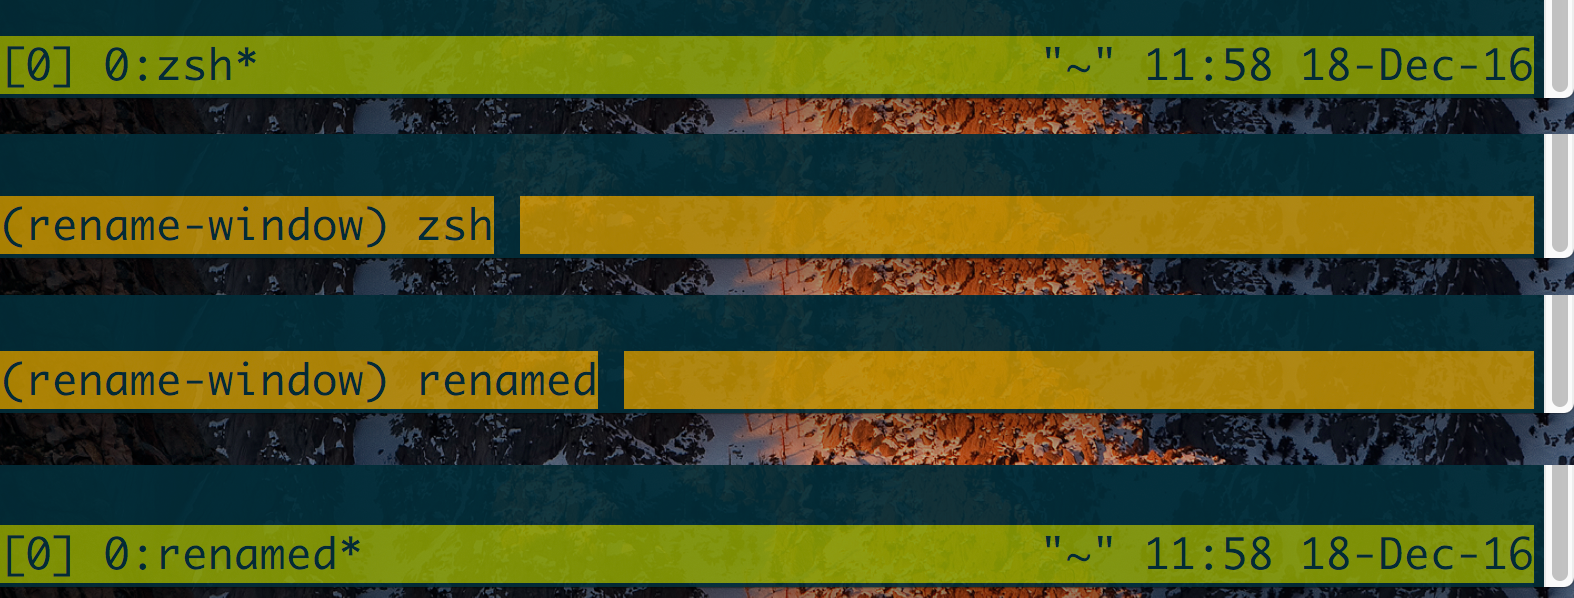
When inside tmux, the shortcut Prefix + , is most commonly used. It
opens a prompt in the tmux status line, where you can alter the name of the
current window.
The default numbers given to windows also become muscle memory after a while. But naming helps you when you’re in a new tmux flow and want to organize yourself. Also, if you’re sharing tmux with another user, it’s good practice to give a hint what’s inside the windows.
Traversing windows
Moving around windows is done in two ways, first, by iterating through via
Prefix + p and Prefix + n and via the window index, which takes you
directly to a specific window.
Prefix + 1, Prefix + 2, and so on… allows quickly navigating to
windows via their index. Unlike window names, which change, indexes are
consistent and only require a quick key combo for you to invoke.
Prompt for a window index (useful for indexes greater than 9) with Prefix +
'. If the window index is 10 or above, this will help you a lot.
Bring up the last selected window with Prefix + l.
A list of current windows can be displayed with Prefix + w. This also gives
some info on what’s inside the window. Helpful when juggling a lot of things!
Moving windows
Windows can also be reordered one by one via move-window and its
associated shortcut. This is helpful if a window is worth keeping open but not
important or rarely looked at. After you move a window, you can continue to
reorder them at any point in time after.
The command $ tmux move-window can be used to move windows.
The accepted arguments are -s (the window you are moving) and -t, where you
are moving the window to.
You can also use $ tmux movew for short.
Example: move the current window to number 2:
Example: move window 2 to window 1:
The shortcut to prompt for an index to move the current window to is Prefix +
..
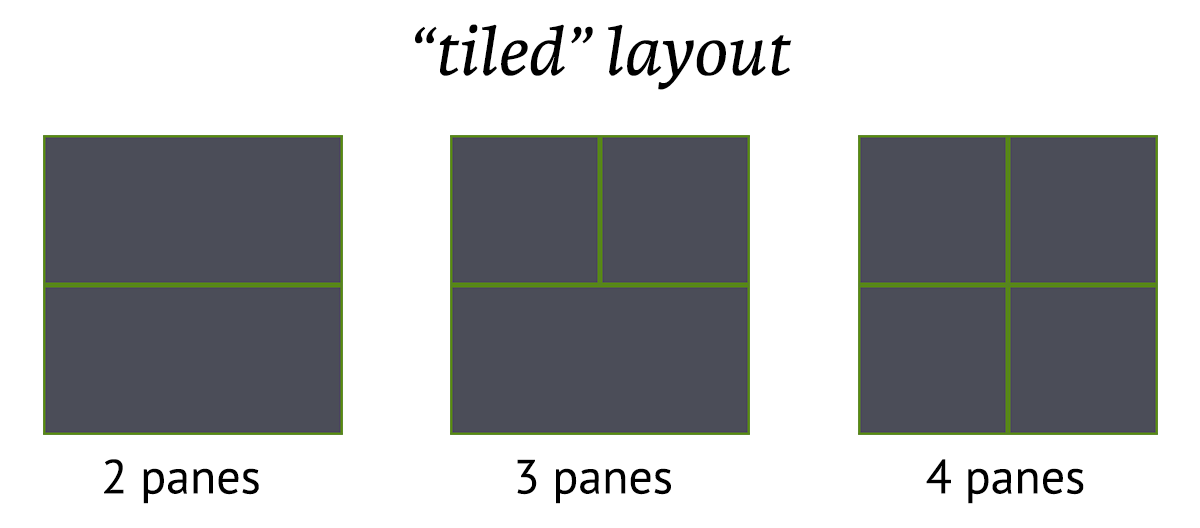
Layouts
Prefix + space switches window layouts. These are preset configurations
automatically adjusting proportions of panes.
As of tmux 2.3, the supported layouts are:
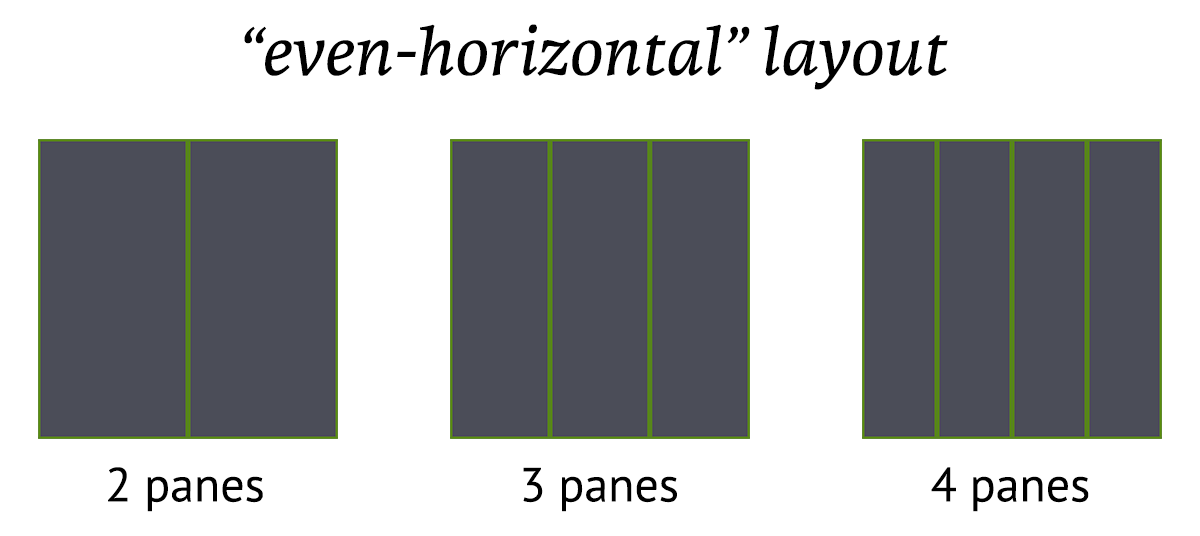
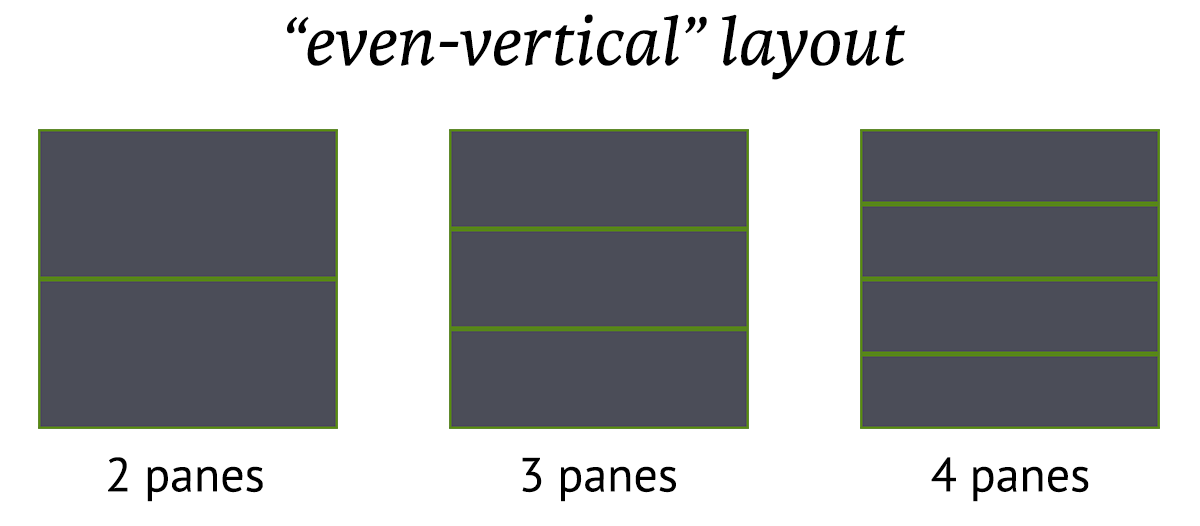
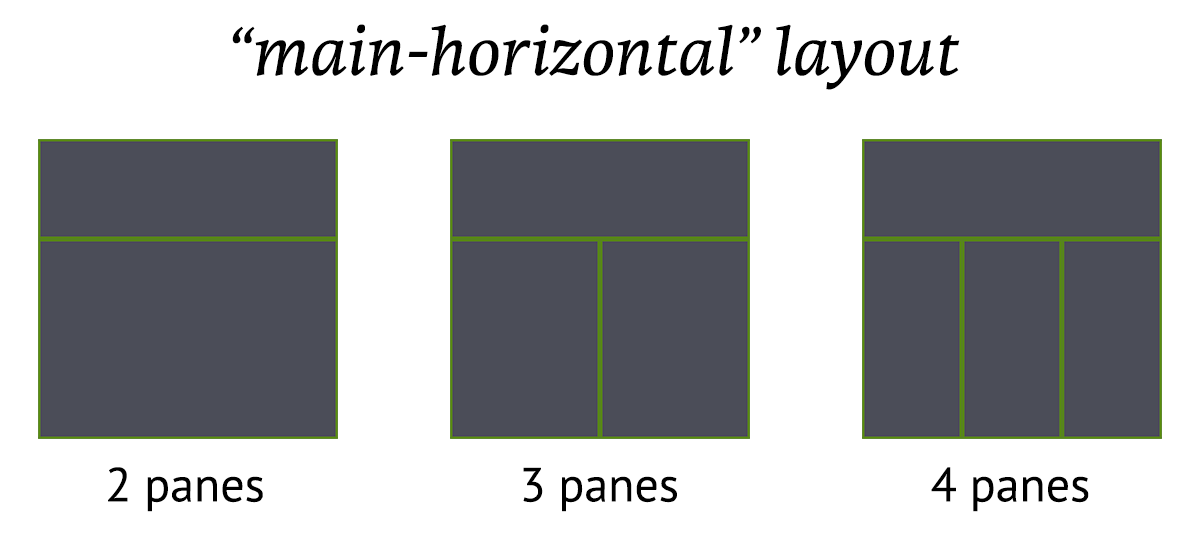
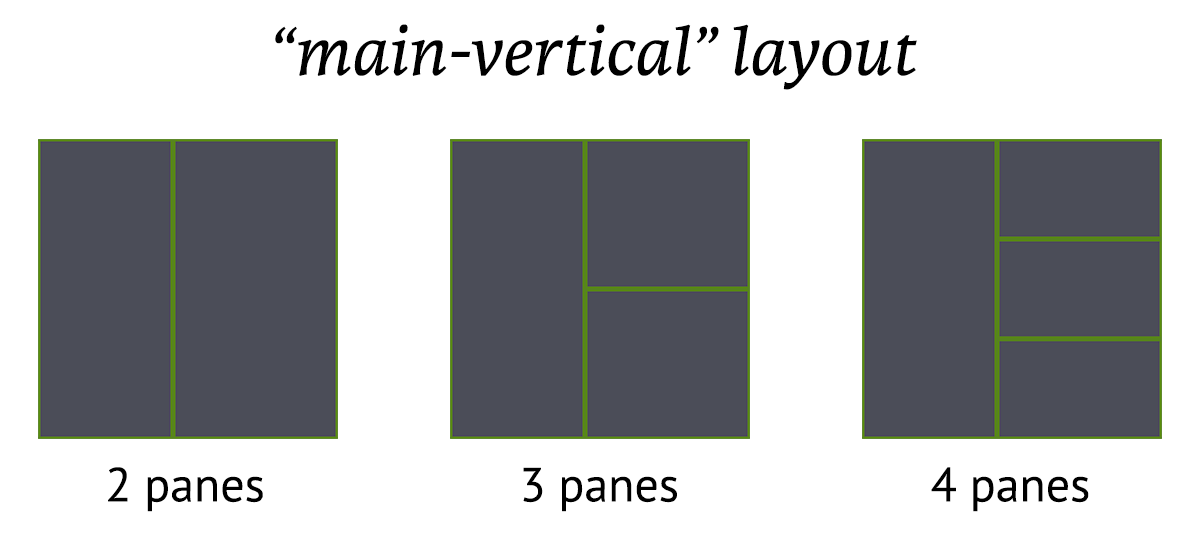
Specific touch-ups can be done via resizing panes.
To reset the proportions of the layout (such as after splitting or resizing
panes), you have to run $ tmux select-layout again for the layout.
This is different behavior than some tiling window managers. awesome and xmonad, for instance, automatically handle proportions upon new items being added to their layouts.
To allow easy resetting to a sensible layout across machines and terminal dimensions, you can try this in your config:
bind m set-window-option main-pane-height 60\; select-layout main-horizontal
This allows you to set a main-horizontal layout and automatically set the
bottom panes proportionally on the bottom every time you do Prefix + m.
Layouts can also be custom. To get the custom layout snippet for your current window, try this:
# awk(1)
$ tmux lsw -F "#{window_active} #{window_layout}" | awk '$1{print $2}'
# grep(1) + cut(1)
$ tmux lsw -F "#{window_active} #{window_layout}" | grep "^1" | cut -d " " -f2
To apply this layout:
"#{window_active} #{window_layout}" | awk '$1{print $2}'
> 5aed,176x79,0,0[176x59,0,0,0,176x19,0,60{87x19,0,60,1,88x19,88,60,2}]
# Alternant to above:
$ tmux lsw -F "#{window_active} #{window_layout}" | grep "^1" | cut -d " " -f2
# resize your panes or try doing this in another window to see the outcome
$ tmux select-layout "5aed,176x79,0,0[176x59,0,0,0,176x19,0,60{87x19,0,60,1,88x\
19,88,60,2}]"
Closing windows
There are two ways to kill a window. First, exit or kill every pane in the
window. Panes can be killed via Prefix + x or by Ctrl + d within
the pane’s shell. The second way, Prefix + &, prompts if you really
want to delete the window. Warning: this will destroy all the window’s panes,
along with the processes within them.
From inside the current window, try this:
Another thing, when scripting or trying to kill the window from outside, use a target of the window index:
If you’re trying to find the target of the window to kill, they reside in the number
in the middle section of the status line and via $ tmux
choose-window. You can hit “return” after you’re in choose-window to go back to
where you were previously.
Summary
In this chapter, you learned how to manipulate windows via renaming and changing
their layouts, a couple of ways to kill windows in a pinch or in when shell
scripting tmux. In addition, this chapter demonstrated how to save any tmux
layout by printing the window_layout template variable.
If you are in a tmux session, you’ll always have at least one window open, and you’ll be in it. And within the window will be “pane”; a shell within a shell. When a window closes all of its panes, the window closes too. In the next chapter, we’ll go deeper into panes.
7. Panes
Panes are pseudoterminals encapsulating shells (e.g., Bash, Zsh). They reside within a window. A terminal within a terminal, they can run shell commands, scripts, and programs, like vim, emacs, top, htop, irssi, weechat, and so on within them.

Creating new panes
To create a new pane, you can split-window from within the current
window and pane you are in.
| Shortcut | Action |
|---|---|
Prefix + %
|
split-window -h (split horizontally) |
Prefix + "
|
split-window -v (split vertically) |
You can continue to create panes until you’ve reached the limit of what the terminal can fit. This depends on the dimensions of your terminal. A normal window will usually have 1 to 5 panes open.
Example usage:
# Create pane horizontally, $HOME directory, 50% width of current pane
$ tmux split-window -h -c $HOME -p 50 vim

# create new pane, split vertically with 75% height
tmux split-window -p 75
Traversing Panes
| Shortcut | Action |
|---|---|
Prefix + ;
|
Move to the previously active pane. |
Prefix + Up / |
Change to the pane above, below, |
Down / Left / |
to the left, or to the |
Right |
the right of the current pane. |
Prefix + o
|
Select the next pane in the current window. |
Zoom in
To zoom in on a pane, navigate to it and do Prefix + z.
You can unzoom by pressing Prefix + z again.
In addition, you can unzoom and move to an adjacent pane at the same time using a pane traversal key.
Behind the scenes, the keybinding is a shortcut for $ tmux resize-pane -Z. So,
if you ever wanted to script tmux to zoom/unzoom a pane or apply this
functionality to a custom key binding, you can do that too, for instance:
This would have Prefix + y zoom and unzoom panes.
Resizing panes
Pane size can be adjusted within windows via window layouts
and resize-pane. Adjusting window layout switches the proportions and order of
the panes. Resizing the panes targets a specific pane inside the window
containing it, also shrinking or growing the size of the other columns or rows.
It’s like adjusting your car seat or reclining on a flight; if you take up more
space, something else will have less space.
| Shortcut | Action |
|---|---|
Prefix M-Up |
resize-pane -U 5 |
Prefix M-Down |
resize-pane -D 5 |
Prefix M-Left |
resize-pane -L 5 |
Prefix M-Right |
resize-pane -R 5 |
Prefix C-Up |
resize-pane -U |
Prefix C-Down |
resize-pane -D |
Prefix C-Left |
resize-pane -L |
Prefix C-Right |
resize-pane -R |
Outputting pane to a file
You can output the display of a pane to a file.
'cat >>~/output.#I-#P'
The #I and #P are formats for window index and pane index, so
the file created is unique. Clever!
Summary
Panes are shells within a shell. You can keep adding panes to a tmux window
until you run out of room on your screen. Within your shell, you can tail -F
log files, write and run scripts, and run curses-powered
applications, like vim, top, htop, ncmpcpp, irssi, weechat, mutt, and so on.
You will always have at least one pane open. Once you kill the last pane in the window, the window will close. Panes are also resizable; you can resize panes by targeting them specifically and changing the window layout.
In the next chapter, we will go into the ways you can customize your tmux shortcuts, status line, and behavior.
8. Configuration
Most tmux users break away from the defaults by creating their own customized configurations. These configurations vary from the trivial, such as adding keybindings, and adjusting the prefix key, to complex things, such as decking out the status bar with system stats and fancy glyphs via powerlines.
Configuration of tmux is managed through .tmux.conf in your $HOME directory.
The paths ~/.tmux.conf and $HOME/.tmux.conf should work on OS X, Linux, and
BSD.
Configuration is applied upon initially starting tmux. The contents of the
configuration are tmux commands. The file can be reloaded later via
source-file, which is discussed in this chapter.
For a sample config, I maintain a pretty decked out one at https://github.com/tony/tmux-config. It’s permissively licensed, and you’re free to copy and paste from it as you wish.
Reloading configuration
You can apply config files in live tmux sessions. Compare this to source or
“dot”
in the POSIX standard.
Prefix + : will open the tmux prompt, then type:
:source /path/to/config.conf
And hit return.
$ tmux source-file /path/to/config.conf can also achieve the same result via
command line.
Note that reloading the configuration only re-runs the configuration file. It will not reset keybindings or styling you apply to tmux.
How configs work
The tmux configuration is processed just like run commands
in a ~/.zshrc or ~/.bashrc file. bind r source ~/.tmux.conf in the tmux
configuration is the same as $ tmux bind r source ~/.tmux.conf.
You could always create a shell script prefixing tmux in front of commands
and run it on fresh servers. The result is the same. Same goes if you manually
type in $ tmux set-option and $ tmux bind-key commands into any terminal (in
or outside tmux).
This in .tmux.conf:
Is the same as having no .tmux.conf (or $ tmux -f/dev/null) and typing:
in a newly started tmux server.
The important thing to internalize is that a tmux configuration consists of
setting server options (set-option -s), global session (set-option -g), and
window options (set-window-option -g).
The rest of this chapter is going to proceed cookbook-style. You can pick out
these tweaks and add them to your .tmux.conf and reload.
Server options
Server options are set with set-option -s option value.
Tweak timing between key sequences
Terminal coloring
If you’re having an issue with color detail in tmux, it may help to set
default-terminal to screen-256color.
This sets the TERM variable in new panes.
Session options
Aside from the status bar, covered in the next chapter, most user configuration will be custom keybindings. This section covers the few generic options, and the next section goes into snippets involving keybindings.
Base index
This was mentioned earlier in the book, but it’s a favorite tweak of many tmux users, who find it more intuitive to start their window counting at 1, rather than the default, 0. To set the starting number (base index) for windows:
Setting base-index assures newly created windows start at 1 and count upwards.
Window options
Window options are set via set-option -w or set-window-option. They are the
same thing.
Automatic window naming
Setting automatic-rename alters the name of the window based upon its active
pane:
Automatic renaming will be disabled for the window if you rename it manually.
Keybindings
Prefix key
The default prefix key in tmux is <Ctrl-b>. You can customize
it by setting a new prefix and unsetting the default. To set the prefix to
<Ctrl-a>, like GNU Screen, try this:
set-option -g prefix C-a
unbind-key C-b
bind-key a send-prefix
New window with prompt
Prompt for window name upon creating a new window, Prefix + C (capital C):
Vi copy-paste keys
This is comprised of two-parts: Setting the mode-keys window option to vi and
setting the vi-copy bindings to use v to begin selection and y to yank.
hjkl / vi-like pane traversal
Another one for vi fans, this keeps your right hand on the home row when moving directionally across panes in a window.
Further inspiration
For more ideas, I have a .tmux.conf you can copy-paste from on the internet at
https://github.com/tony/tmux-config/blob/master/.tmux.conf.
In the next chapter, we will go into configuring the status line.
9. Status bar and styling
The status bar, or status line, serves as a customizable taskbar in the bottom of tmux. It is comprised of 3 sections. The status fields on either side of the status line are customizable. The center field is a list of windows.

The status-left and status-right option can be configured with variables.
It’s configurable through the .tmux.conf file and modifiable live
through using $ tmux set-option.
Window status symbols
This window list is between the left and right status bar regions.
tmux indicates status of a window through symbols. See below:
| Symbol | Meaning |
|---|---|
| * | Denotes the current window. |
| - | Marks the last window (previously selected). |
| # | Window is monitored and activity has been detected. |
| ! | A bell has occurred in the window. |
| ~ | The window has been silent for the monitor-silence interval. |
| M | The window contains the marked pane. |
| Z | The window’s active pane is zoomed. |
Reminder: A pane can be zoomed via Prefix + z. To unzoom,
press Prefix + z or move left / right / up / down panes.
Date and time
status-left and status-right accept variables for the date.
This happens via piping the status templates through format_expand_time
in format.c, which routes right into strftime(3)
from time.h.
A full list of variables can be found in the documentation for strftime(3).
This can be viewed through $ man strftime on Unix-like systems.
Shell command output
You can also call applications, such as tmux-mem-cpu-load, conky, and powerline.
For this example, we’ll use tmux-mem-cpu-load. This works on Unix-like systems
like FreeBSD, Linux distributions, and macOS.
To build from source, you must have CMake and git, which
are available through your package manager. You must have a C++ compiler. On
macOS, install Xcode CLI Utilities. You can do this by going to Applications ->
Utilities, launching Terminal.app and typing $ xcode-select --install.
macOS can use Homebrew to install the CMake and git package.
Major Linux distributions package CMake, clang, and git.
Before this step, you can cd into any directory you’re ok keeping code in.
cd tmux-mem-cpu-load
$ mkdir ./build
$ cd ./build
$ cmake ..
$ make
# macOS, no sudo required
$ make install
# Linux, BSD will require sudo / root to install
$ sudo make install
If successful, you should see the output below:
[100%] Built target tmux-mem-cpu-load
Install the project...
-- Install configuration: "MinSizeRel"
-- Installing: /usr/local/bin/tmux-mem-cpu-load
You can remove the source code you cloned from the computer. The compiled application is installed.
You can now add #(tmux-mem-cpu-load) to your status-left or status-right
option. In the “Dressed up” example below, I
use status-left and also theme it to be green:
#[fg=green,bg=default,bright]#(tmux-mem-cpu-load)
So to apply it to your theme, you need to double check what you already have. You may have information on there you want to keep.
" "#{=21:pane_title}" %H:%M %d-%b-%y"
Copy what you had in response (or change, rearrange as you see fit) then add the
#(tmux-mem-cpu-load) to it. You can apply the new status line in your current
tmux session via $ tmux set-option -g status-right:
'"#{=21:pane_title}" #(tmux-mem-cpu-load) %H:\
%M %d-%b-%y'
Also, note how I switched out the double quotes on either side of the option with single quotes. This is required, since there are double quotes inside.
You can do this with anything, for instance, try adding uptime.
This could be done by adding #(uptime) to your status line. Typically the
output is pretty long, so trim it down by doing something like this:
#(uptime | cut -f 4-5 -d " " | cut -f 1 -d ",")`
In the next section, we go into how you can style (color) tmux.
Styling
The colors available to tmux are:
-
black,red,green,yellow,blue,magenta,cyan,white. - bright colors, such as
brightred,brightgreen,brightyellow,brightblue,brightmagenta,brightcyan. -
colour0throughcolour255from the 256-color set. default- hexadecimal RGB code like
#000000,#FFFFFF, similar to HTML colors.
Status line
You can use [bg=color] and [fg=color] to adjust the text color and
background within for status line text. This works on status-left and
status-right.
Let’s say you want to style the background:
Command: $ tmux set-option status-style fg=white,bg=black
In config: status-style fg=white,bg=black
In the examples at the end of the chapter, you will see complete examples of how colors can be used.
Clock styling
You can style the color of the tmux clock via:
Reminder: Clock mode can be opened with $ tmux clock-mode or Prefix + t.
Pressing any key will exit clock mode.
Prompt colors
The benefit of wrapping your brain around this styling is you will see
it message-command-style, message style and so on.
Let’s try this:
fg=yellow,blink\; set-option -ag message-st\
yle bg=black

Styling while using tmux
So, you want to customize your tmux status line before you write the changes to your config file.
Start by grabbing your current status line section you want to edit, for instance:
Also, you can try to snip off the variable with | cut -d' ' -f2-:
Then, add the options to your configuration.
To be sure your configuration fully works, you can start it in a different
server via tmux -Lrandom, verify the settings, and close it. This is helpful
to make sure your config file isn’t missing any styling info.
Toggling status line
The tmux status line can be hidden, as well. Turn it off:
And, turn it on:
The above is best for scripting, but if you’re binding it to a keyboard shortcut, toggling, or reversing the current option, it can be done via omitting the on/off value:
Bind toggling status line to Prefix + q:
Example: Default config

This is an example of the default config you see if your tmux configuration has no status styling.
Example: Dressed up
status on
status-interval 1
status-justify centre
status-keys vi
status-left "#[fg=green]#H #[fg=black]• #[fg=green,bright]#(uname -r | cut -c 1\
-6)#[default]"
status-left-length 20
status-left-style default
status-position bottom
status-right "#[fg=green,bg=default,bright]#(tmux-mem-cpu-load) #[fg=red,dim,bg\
=default]#(uptime | cut -f 4-5 -d " " | cut -f 1 -d ",") #[fg=white,bg=default]\
%a%l:%M:%S %p#[default] #[fg=blue]%Y-%m-%d"
status-right-length 140
status-right-style default
status-style fg=colour136,bg=colour235
# default window title colors
set-window-option -g window-status-fg colour244 # base0
set-window-option -g window-status-bg default
# active window title colors
set-window-option -g window-status-current-fg colour166 # orange
set-window-option -g window-status-current-bg default
Configs can print the output of an application. In this example, tmux-mem-cpu-load is providing system statistics in the right-side section of the status line.
To build tmux-mem-cpu-load, you have to install CMake and have a C++ compiler, like clang or GCC.
On Ubuntu, Debian, and Mint machines, you can do this via $ sudo apt-get
install cmake build-essential. On macOS w/ brew via $ brew
install cmake.
Source: https://github.com/tony/tmux-config
Example: Powerline

The most full-featured solution available for tmux status lines is powerline, which heavily utilizes the shell command outputs, not only to give direct system statistics, but also to generate graphical-like styling.
To get the styling to work correctly, special fonts must be installed. The easiest way to use this is to install powerline fonts, a collection of fixed width coder fonts patched to support Wingdings-like symbols.
Installation instructions are on Read the Docs. For a better idea:
psutil, a required dependency of powerline, is a cross-platform tool to gather system information.
Assure you properly configured python with your PATHs, and try this:
Summary
Configuring the status line is optional. It can use the output of programs installed on your system to give you specialized information, such as CPU, ram, and I/O usage. By default, you’ll at least have a window list and a clock.
In addition, you can customize the colors of the status line, clock, and prompt. By default, it’s only a green bar with dark text, so take some time to customize yours, if you want, and save it to your configuration.
In the next chapter, we will go into the command line and scripting features of tmux.
10. Scripting tmux
The command line shortcuts and options in tmux is an area often uncharted.
I will use tables in this chapter. Never get a feeling you have to commit a table to memory immediately. Not my intention, but every person’s way of using tmux is slightly different. I want to cover points most likely to benefit people’s flows. Full tables are in the cheatsheets.
Aliases
tmux supports a variety of alias commands. With aliases, instead of typing
$ tmux attach-session to attach a session, $ tmux attach could do the trick.
Most aliases come to mind via intuition and are a lot friendlier than typing the full hyphenated commands.
| Command | Alias |
|---|---|
| attach-session | attach |
| break-pane | breakp |
| capture-pane | capturep |
| display-panes | displayp |
| find-window | findw |
| join-pane | joinp |
| kill-pane | killp |
| kill-window | killw |
| last-pane | lastp |
| last-window | last |
| link-window | linkw |
| list-panes | lsp |
| list-windows | lsw |
| move-pane | movep |
| move-window | movew |
| new-session | new |
| new-window | neww |
| next-layout | nextl |
| next-window | next |
| pipe-pane | pipep |
| previous-layout | prevl |
| previous-window | prev |
| rename-window | renamew |
| resize-pane | resizep |
| respawn-pane | respawnp |
| respawn-window | respawnw |
| rotate-window | rotatew |
| select-layout | selectl |
| select-pane | selectp |
| set-option | set |
| set-window-option | setw |
| show-options | show |
| show-window-options | showw |
| split-window | splitw |
| swap-pane | swapp |
| swap-window | swapw |
| unlink-window | unlinkw |
If you know the full name of the command, if you were to chop the hyphen (-) from the command and add the first letter of the last word, you’d get the shortcut, e.g., swap-window is swapw, split-window is splitw.
Pattern matching
In addition to aliases, tmux commands and arguments may all be accessed via
fnmatch(3)
patterns.
For instance, you need not type $ tmux attach-session every time. First,
there’s the alias of $ tmux attach, but additionally, more
concise commands can be used if they partially match the name of the command or
the target. tmux’s pattern matching allows $ tmux attac, $ tmux att, $ tmux at
and $ tmux a to reach $ tmux attach.
Every tmux command has shorthands; let’s try this for $ tmux new-session:
# ...
$ tmux new-s
and so on, until:
The limitation, as seen above, is command matches can collide. Multiple commands
begin with new-. So, if you wanted to use matches, $ tmux new-s for a new
session or $ tmux new-w for a new window would be the most efficient way. But,
the alias of $ tmux new for new session and $ tmux neww for new windows is
even more concise than matching, since the special alias exists.
Patterns can also match targets with window and session names. For
instance, a session named mysession can be matched via mys:
Matching targets will fail if a pattern matches more than one item. If 2
sessions exist, named mysession and mysession2, the above command would
fail. To target either session, the complete target name must be specified.
Targets
If a command allows target specification, it’s usually done through -t.
Think of targets as tmux’s way of specifying a unique key in a relational database.
| Entity | Prefix | Example |
|---|---|---|
| server | n/a | n/a, uses socket-name and socket-path |
| client | n/a | n/a, uses /dev/tty{p,s}[000-9999] |
| session | $ | $13 |
| window | @ | @2313 |
| pane | % | %5432 |
What I use to help me remember:
So, sessions are represented by dollar signs ($) because they hold your projects (ostensibly where you make money or help someone else do it).
Windows are represented by the at sign (@). So, windows are like referencing / messaging a user on a social networking website.
Panes are the fun one, represented by the percent sign (%), like the default prompt for csh and tcsh. Hey, makes sense, since panes are pseudoterminals!
When scripting tmux, the symbols help denote the type of object, but also serve as a way to target something deeply, such as the pane, directly, without needing to know or specify its window or session.
Here are some examples of targets, assuming one session named mysession and a
client at /dev/ttys004:
attach-session [-t target-session]
detach-client [-s target-session] [-t target-client]
# If within client, -t is assumed to be current client
$ tmux detach-client -s mysession
has-session [-t target-session]
# Pattern matching session name
$ tmux has-session -t mys
$ tmux kill-session [-t target-session]
$ tmux list-clients [-t target-session]
$ tmux lock-client [-t target-client]
$ tmux lock-session [-t target-session]
$ tmux new-session [-t target-session]
# Create new-session in the background
$ tmux new-session -t newsession -d
$ tmux refresh-client [-t target-client]
$ tmux rename-session [-t target-session] session-name
# If within attached session, -t is assumed
$ tmux rename-session renamedsession
$ tmux show-messages [-t target-client]
$ tmux suspend-client [-t target-client]
# If already in client
$ tmux suspend-client
# Bring client back to the foreground
$ fg
$ tmux switch-client [-c target-client] [-t target-session]
# Within current client, -c is assumed
$ tmux switch-client -t othersession
Formats
tmux provides a minimal template language and set of variables to access information about your tmux environment.
Formats are specified via the -F flag.
You know how template engines, such as mustache, handlebars ERB in ruby, jinja2 in python, twig in PHP, and JSP in Java, allow template variables? Formats are a similar concept.
The FORMATS (variables) provided by tmux have expanded greatly
since version 1.8. Some of the most commonly used formats as of tmux 2.3 are
listed below. See the appendix section on formats for a
complete list.
Let’s try to output it:
"#{window_id} #{window_name}"
> @0 zsh
Here’s a cool trick to list all panes with the x and y coordinates of the cursor position:
"#{pane_id} #{pane_current_command} \
#{pane_current_path} #{cursor_x},#{cursor_y}"
> %0 vim /Users/me/work/tao-of-tmux/manuscript 0,34
%1 tmux /Users/me/work/tao-of-tmux/manuscript 0,17
%2 man /Users/me/work/tao-of-tmux/manuscript 0,0
Variables are specific to the objects being listed. For instance:
Server-wide variables: host, host_short (no domain name), socket_path,
start_time and pid.
Session-wide variables: session_attached, session_activity,
session_created, session_height, session_id, session_name,
session_width, session_windows and all server-wide variables.
Window variables: window_activity, window_active, window_height,
window_id, window_index, window_layout, window_name, window_panes,
window_width and all session and server variables.
Pane variables: cursor_x, cursor_y, pane_active, pane_current_command,
pane_current_path, pane_height, pane_id, pane_index, pane_width,
pane_pid and all window, session and server variables.
This book focuses on separating the concept of server, sessions,
windows, and panes. With the knowledge of targets and formats, this
separation takes shape in tmux’s internal attributes. If you list-panes all
variables up the ladder, including window, session and server variables are
available for the panes being listed. Try this:
"pane: #{pane_id}, window: #{window_id}, \
session: #{session_id}, server: #{socket_path}"
> pane: %35, window: @13, session: $6, server: /private/tmp/tmux-501/default
pane: %38, window: @13, session: $6, server: /private/tmp/tmux-501/default
pane: %36, window: @13, session: $6, server: /private/tmp/tmux-501/default
Listing windows isn’t designed to display variables for pane-specific properties. Since a window is a collection of panes, it can have 1 or more panes open at any time.
"window: #{window_id}, panes: #{window_panes} \
pane_id: #{pane_id}"
> window: @15, panes: 1 pane_id: %40
window: @13, panes: 3 pane_id: %36
window: @25, panes: 1 pane_id: %50
This will show the window ID, prefixed by an @ symbol, and the number of panes
inside the window.
Surprisingly, pane_id shows up via list-windows, as of tmux 2.3. While this
output occurs in this version of tmux, it’s undefined behavior. It’s advised to
keep use of -F scoped to the objects being listing when scripting to avoid
breakage. For instance, if you want the active pane, use #{pane_active} via
$ tmux list-panes -F "#{pane_active}".
By default, list-panes will only show panes in a window, unless you specify
-a to output all on a server or -s [-t session-name] for all panes in a
session:
1.0: [176x29] [history 87/2000, 21033 bytes] %0
1.1: [87x6] [history 1814/2000, 408479 bytes] %1 (active)
1.2: [88x6] [history 1916/2000, 464932 bytes] %2
2.0: [176x24] [history 9/2000, 2262 bytes] %13
2.1: [55x11] [history 55/2000, 7395 bytes] %14
And the -t flag lists all panes in a window:
0: [176x29] [history 87/2000, 21033 bytes] %0
1: [176x36] [history 1790/2000, 407807 bytes] %1 (active)
2: [88x6] [history 1916/2000, 464932 bytes] %2
The same concept applies to list-windows. By default, The -a flag will list
all windows on a server, -t lists windows within a session, and omitting -t
will only list windows within the current session inside tmux.
1: zsh* (3 panes) [176x36] [layout f9a4,176x36,0,0[176x29,0,0,0,176x6,0,30{87\
x6,0,30,1,88x6,88,30,2}]] @0 (active)
2: zsh- (5 panes) [176x36] [layout 55ef,176x36,0,0[176x24,0,0,13,176x11,0,25{\
55x11,0,25,14,58x11,56,25[58x7,56,25,16,58x3,56,33,17],61x11,115,25,15}]] @6
Controlling tmux
tmux allows sending keys, including Ctrl via C- or ^, alt (Meta) via M-,
and special key names. Here’s a list of special keys straight from the manual:
Up, Down, Left, Right, BSpace, BTab, DC (Delete), End, Enter,
Escape, F1 to F12, Home, IC (Insert), NPage/PageDown/PgDn,
PPage/PageUp/PgUp, Space, and Tab.
If special keys are not matched, the defined behavior is to send it as a string to the pane, character by character.
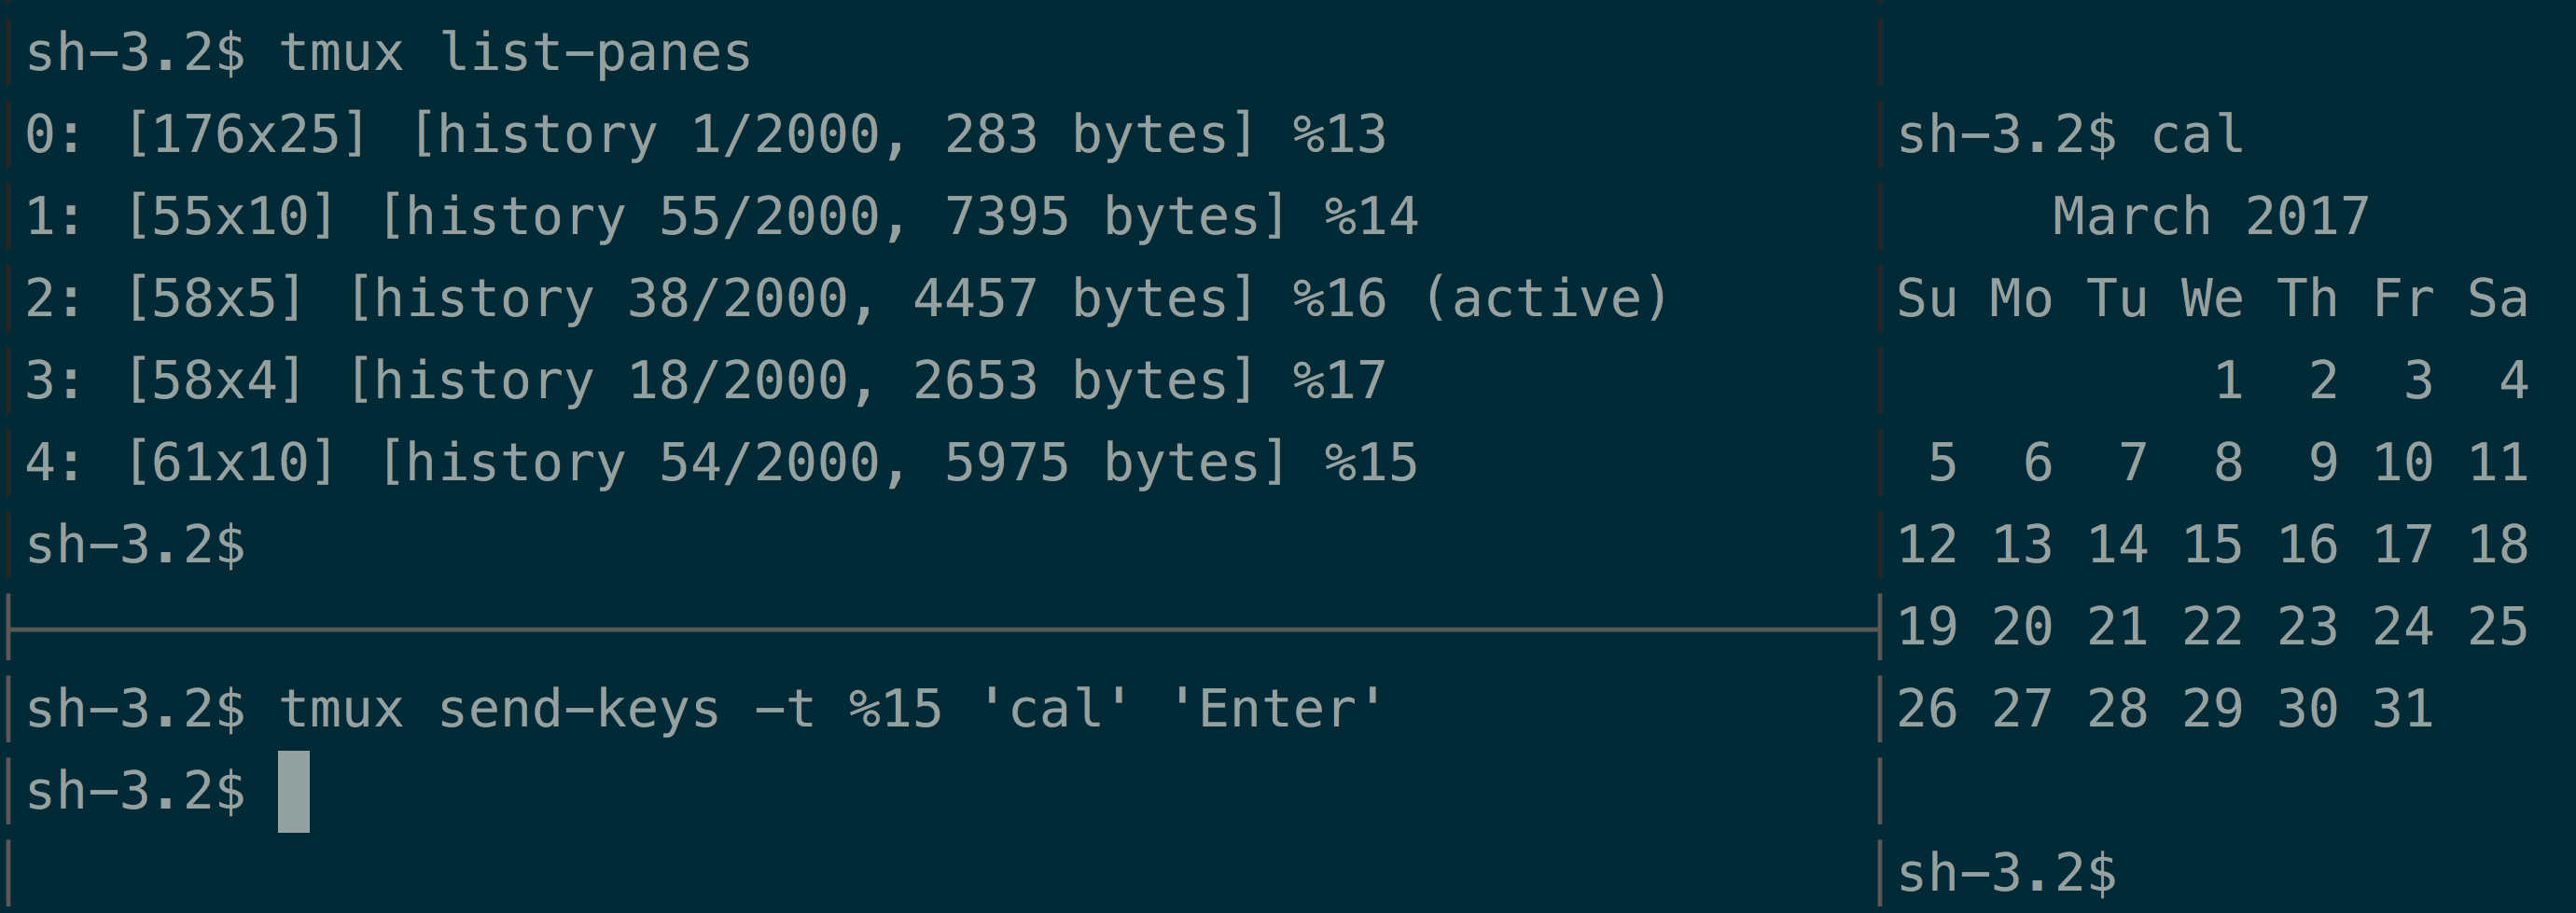
For this example, we will use send-keys through tmux prompt, because omitting
target (-t) will direct the command to the current pane, but the keys sent will
sometimes print before the prompt.
Open tmux command prompt via Prefix + : and type this after the ::
send-keys echo 'hi'
Hit enter. This inserted hi into the current active pane. You can also use targets to specify which pane to send it to.
Let’s now try to send keys to another pane in our current window. Create a second pane via splitting the window if one doesn’t exist. You can also do this exercise outside of tmux or inside a scripting file and running it.
Grab a pane ID from the output of list-panes:
0: [180x57] [history 87/2000, 21033 bytes] %0
1: [89x14] [history 1884/2000, 509864 bytes] %1 (active)
2: [90x14] [history 1853/2000, 465297 bytes] %2
%2 looks good. Replace %2 with the pane you want to target. This sends cal
to the input:
'cal'
Nice, let’s cancel that out by sending a SIGINT:
'C-c'
This cancelled the command and brought up a fresh input. This time, let’s send
an Enter keypress to run cal(1).
'cal' 'Enter'
This outputs in the adjacent pane.
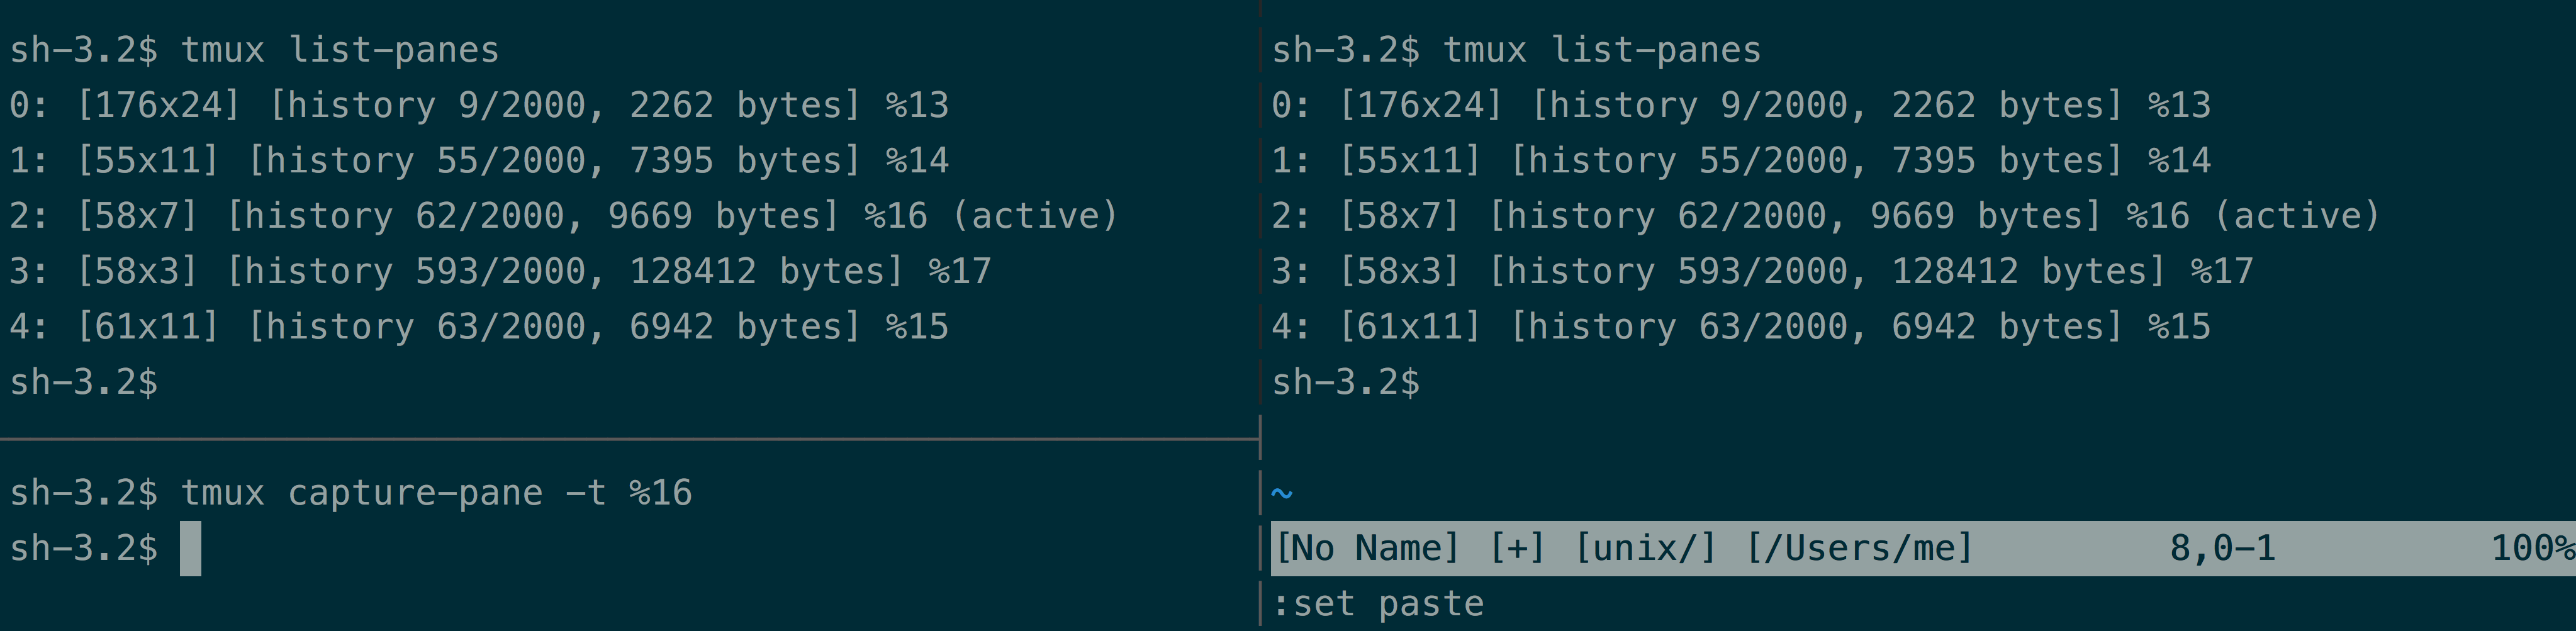
Capturing pane content
$ tmux capture-pane will copy a panes’ contents.
By default, the contents will be saved to tmux’s internal clipboard, the paste
buffer. You can run capture-pane within any pane, then navigate to an
editor, paste the contents (don’t forget to :set paste and go into insert mode
with i in vim), and save it to a file. To paste, use Prefix +
] inside the pane you’re pasting into.
You can also add the -p flag to print it to stdout.
From there, you could use redirection
to place the output into a file. Let’s do >> so we don’t accidentally
truncate a file:
As an alternative to redirection, you can also use save-buffer. The -a flag
will get you the same behavior as appended output direction.
To check what’s inside:
Like with send-keys, targets can be specified with -t. Let’s
copy a pane into tmux’s clipboard (“paste buffer”) and paste it into a text
editor in a third pane:
Remember, you can also copy, paste, and send-keys to other windows and sessions also. Targets are server-wide.
Summary
tmux has a well-devised and intuitive command system, enabling the user to
access bread and butter functionality quickly. At the same time, tmux provides
a powerful way of retrieving information on its objects between list-panes,
list-windows and list-sessions and formats. This makes tmux not only
accessible and configurable, but also scriptable.
The ability to retrieve explicitly and reliably, from a session down to a pane. All it takes is a pane’s ID to capture its contents or even send it keys. Used by the skilled programmer, scripting tmux can facilitate orchestrating terminals in ways previously deemed unrealistic; anything from niche shell scripts to monitor and react to behavior on systems to high-level, intelligent and structured control via object oriented libraries, like libtmux.
In the next chapter, we delve into optimizations that showcase the latest generation of unix tools that build upon old, time-tested concepts, like man pages and piping, while maintaining portability across differences in platforms and graceful degradation to ensure development tooling works on machines missing optional tools. Also, the chapter will introduce session managers, a powerful, high-level tool leveraging tmux’s scripting capabilities to consistently load workspace via a declarative configuration.
11. Tips and tricks
Read the tmux manual in style
$ man tmux is the command to load up the man page for tmux. You can do the
same to find instructions for any command or entity with a manpage entry; here
are some fun ones:
most(1), a solid PAGER,
drastically improves readability of manual pages by acting as a syntax
highlighter.
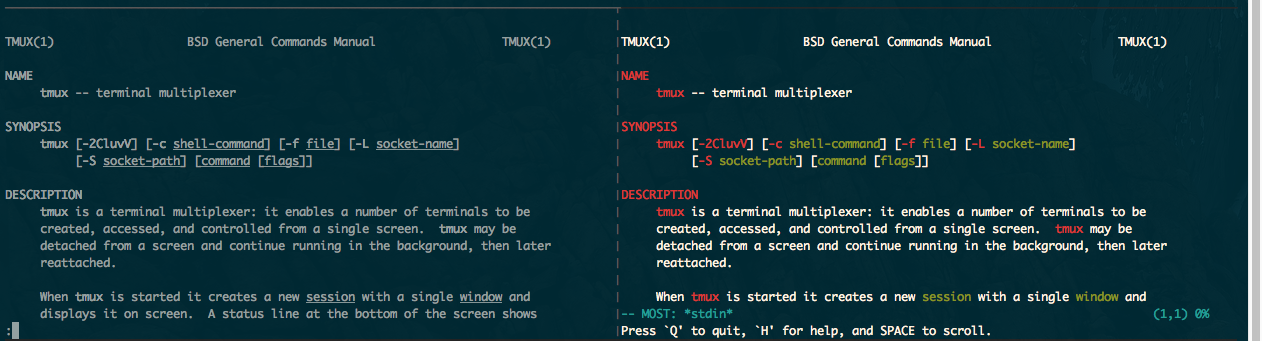
To get this working, you need to set your PAGER environmental variable
to point to the MOST binary. You can test it like this:
PAGER=most man ls
If you found you like most, you’ll probably want to make it your default
manpage reader. You can do this by setting an environmental variable in your
“rc” (Run Commands) for your
shell. The location of the file depends on your shell. You can use $ echo
$SHELL to find it on most shells). In Bash and zsh, these are kept in
~/.bashrc or ~/.zshrc, respectively:
export PAGER="most"
I often reuse my configurations across machines, and some of them may not have
most installed, so I will have my scripting only set PAGER if most is
found:
#!/bin/sh

if command -v most > /dev/null 2>&1; then
    export PAGER="most"
fi
Save this in a file, for example, to ~/.dot-config/most.sh.
Then you can source it in via
your main rc file.
source $HOME/.dot-config/most.sh
Patterns like these help make your dot-configs portable, cross-platform, and modular. For inspiration, you can fork, copy, and paste from my permissively- licensed config at https://github.com/tony/.dot-config.
Log tailing
Not tmux specific, but powerful when used in tandem with it, you can run a
follow (-f) using tail(1).
More modern versions of tail have the -F (capitalized), which checks for file
renames and rotation.
On OS X, you can do:
and keep it running in a pane while log messages come in. It’s like Facebook newsfeed for your system, except for programmers and system administrators.
For monitoring logs, multitail provides a terminal-friendly solution. It’d be an Inception moment, because you’d be using a log multiplexer in a terminal multiplexer.
File watching
In my never-ending conquest to get software projects working in symphony with code changes, I’ve come to test many file watching applications and patterns. Pursuing the holy grail feedback loop upon file changes, I’ve gradually become the internet’s unofficial connoisseur on them.
File watcher applications wait for a file to be updated, then execute a custom command, such as restarting a server, rebuilding an application, running tests, linters, and so on. It gives you, as a developer, instant feedback in the terminal, empowering a tmux workspace to have IDE-like features, without the bloat, memory, and CPU fans roaring.
I eventually settled on entr(1), which works
superbly across Linux distros, BSDs and OS X / macOS.
The trick to make entr work is to pipe a list of files into it to watch.
Let’s search for all .go
files in a directory and run tests
on file change:
| entr -c go test ./...
Sometimes, we may want to watch files recursively, but we need it to run
reliably across systems. We can’t depend on ** existing to grab files
recursively, since it’s not portable. Something more POSIX-friendly would be
find . -print | grep -i '.*[.]go':
| grep -i '.*[.]go' | entr -c go test ./...
To only run file watcher if entr is installed, let’s wrap in a conditional
command -v
test:
if command -v entr > /dev/null; then find . -print | grep -i '.*[.]go' | \
entr -c go test ./...; fi
And have it fallback to go test in the event entr isn’t installed. This
allows your command to degrade gracefully. You’ll thank me when you use this
snippet in conjunction with a session manager:
if command -v entr > /dev/null; then find . -print | grep -i '.*[.]go' | \
entr -c go test ./...; else go test ./...; fi
If the project is a team or open source project, where a user never used the command before and could be missing a required software package, we can give a helpful message. This shows a notice to the user to install entr if not installed on the system:
if command -v entr > /dev/null; then find . -print | grep -i '.*[.]go' | \
entr -c go test ./...; else go test ./...; echo "\nInstall entr(1) to \"
echo "run tasks when files change. \nSee https://eradman.com/entrproject/"; fi
Here’s why you want patterns like above: You can put it into a Makefile
and commit it to your project’s VCS,
so you and other developers can have access to this reusable command across
different UNIX-like systems, with and without certain programs installed.
Note: You may have to convert the indentation within the Makefiles from spaces
to tabs.
Let’s see what a Makefile with this looks like:
watch_test:
    if command -v entr > /dev/null; then find . -print | grep -i '.*[.]go' | en\
tr -c go test ./...; else go test ./...; echo "\nInstall entr(1) to run tasks w\
hen files change. \nSee https://eradman.com/entrproject/"; fi
To run this, do $ make watch_test in the same directory as the Makefile.
But it’s still a tad bloated and hard to read. We have a couple tricks at our
disposal. One would be to add continuation to the next line with a trailing
backslash (\):
watch_test:
    if command -v entr > /dev/null; then find . -print | \
    grep -i '.*[.]go' | entr -c go test ./...; \
    else go test ./...; \
    echo "\nInstall entr(1) to run tasks on file change. \n"; \
    echo "See https://eradman.com/entrproject/"; fi
Another would be to break the command into variables and make subcommands. So:
WATCH_FILES= find . -type f -not -path '*/\.*' | \
grep -i '.*[.]go$$' 2> /dev/null

test:
        go test $(test) ./...

entr_warn:
        @echo "-------------------------------------------------"
        @echo " ! File watching functionality non-operational ! "
        @echo "                                                 "
        @echo " Install entr(1) to run tasks on file change.    "
        @echo " See https://eradman.com/entrproject/            "
        @echo "-------------------------------------------------"

watch_test:
        if command -v entr > /dev/null; then ${WATCH_FILES} | \
        entr -c $(MAKE) test; else $(MAKE) test entr_warn; fi
$(MAKE) is used for portability. One reason is recursive calls, such
as here. On BSD systems, you may try invoking make via gmake
(to call GNU Make specifically). This
happened to me, while building PDFs for the book AlgoXY.
I had to write a patch to
make it properly use $(MAKE) for recursive calls.
The $(test) after go test allows passing a shell variable with arguments
in it. So, you could do make watch_test test='-i'. For examples of a similar
Makefile in action, see the one in my tmuxp project.
The project is licensed BSD (permissive), so you can grab code and use it
in compliance with the LICENSE.
One more thing, let’s say you’re running a server, like Gin,
Iris, or Echo.
entr -c likely won’t be restarting the server for you. Try entering the -r
flag to send a SIGTERM to the
process before restarting it. Combining the current -c flag with the new -r
will give you entr -rc:
run:
        go run main.go

watch_run:
        if command -v entr > /dev/null; then ${WATCH_FILES} | \
        entr -c $(MAKE) run; else $(MAKE) run entr_warn; fi
Session Managers
For those who use tmux regularly to perform repetitive tasks, such as opening the same software project, viewing the same logs, etc., frequent tasks will often lead to the creation of tmux scripts.
A user can use plain shell scripting to build their tmux sessions. However, scripting is error prone, hard to debug, and requires tmux to split windows into panes in a certain order. In addition, there’s the burden of assuring the shell scripts are portable.
A declarative configuration in YAML or JSON configuration abstracts out the commands, layout, and options of tmux. It prevents the mistakes and repetition scripting entails. These applications are called tmux session managers, and in different ways, they programmatically create tmux workspaces by running a series of commands based on a config.
Teamocil and Tmuxinator are the first ones I tried. By far, the most popular one is tmuxinator. They are both programmed in Ruby. There’s also tmuxomatic, where you can “draw” your tmux sessions in text and have tmuxomatic build the layout.
I sort of have a home team advantage here, as I’m author of tmuxp. Already having used teamocil and tmuxinator, I wrote my own in python instead of ruby, with many more features. For one, it builds on top of libtmux, a library which abstracts tmux server, sessions, windows and panes to build the state of tmux sessions. In addition, it can save active tmux sessions fo a layout file (JSON or yaml), more flexible configuration options, and it will even offer to attach exiting sessions, instead of redundantly running script commands against the session if it’s already running.
So, in tmuxp, we’ll hollow out a tmuxp config directory with $ mkdir ~/.tmuxp
then create a YAML file at ~/.tmuxp/test.yaml:
session_name: 4-pane-split
windows:
- window_name: dev window
  layout: tiled
  shell_command_before:
    - cd ~/                    # run as a first command in all panes
  panes:
    - shell_command:           # pane no. 1
        - cd /var/log          # run multiple commands in this pane
        - ls -al | grep \.log
    - echo second pane         # pane no. 2
    - echo third pane          # pane no. 3
    - echo forth pane          # pane no. 4
gives a session titled 4-pane-split, with one window titled dev window with
4 panes in it. 3 in the home directory; the other is in
/var/log and is printing a list of all files ending with .log.
To launch it, install tmuxp and load the configuration:
# verify tmuxp is installed, if not you need to fix your `PATH`
# to point to your python bin folder. More help below.
$ tmuxp load ~/.tmuxp/test.yaml
If tmuxp isn’t found, there is a troubleshooting entry on fixing your paths in the appendix.
More code and examples
I’ve dusted off a C++ space shooter and a new go webapp I’ve been playing with. They’re licensed under MIT so, you can use them, copy and paste from them, etc:
- C++14 space shooter minigame - side scrolling shmup demo (sdl2, cmake, json resource manifests, Linux/BSD/OS X compatible)
- Go tmux web frontend - display current tmux session and window information via browser (gin, bower)
Both support tmuxp load . within the project directory to load up the project.
Make sure to install entr(1) beforehand!
tmux-plugins and tpm
tmux-plugins and tmux package manager are a suite of tools dedicated to enhancing the experience of tmux users.
- tmux-resurrect: Persists tmux environment across system restarts.
- tmux-continuum: Continuous saving of tmux environment. Automatic restore when tmux is started. Automatic tmux start when computer is turned on.
- tmux-yank: Tmux plugin for copying to system clipboard. Works on OSX, Linux and Cygwin.
- tmux-battery: Plug and play battery percentage and icon indicator for Tmux.
12. Takeaway
In this book, we’ve taken an organized approach to understanding tmux. As you use tmux more and more, continue to come back and use this resource to help wrap your brain around concepts. You do not have to understand the intricacies of tmux, let alone the terminal, in a single sitting. Acclimation happens over time.
tmux’s userbase varies in skill level. Some readers of this book may have just
learned how to use the Prefix key yesterday. Others are looking to tweak their
configurations and host it in their “dot files” on github. There also exists a
very clever hacker who utilizes the advanced scripting capabilities tmux
offers to pilot the terminal in ways previously thought impossible.
We’ve covered the server, session, window, and pane concepts. Panes are shells, AKA pseudoterminals or PTYs. The command system. That configuration is basically a file filled with commands. An overview of the target system lets you specify objects to interact with tmux commands. A breeze through formats, a template system with variables to retrieve information on tmux’s current state. How to send keystrokes and copy from tmux panes programmatically. A lot of terminal tricks that work across platforms and well with tmux, including a file watching workflow to run linting, testing, and build commands on file changes. Two permissively licensed open source projects for demonstration. A tmux configuration you can copy and paste from. An object oriented tmux API wrapper and a tmux session manager.
If you liked this book, please leave a review on Amazon and Goodreads. I would also appreciate you leaving something in my tip jar. I am an independent software developer and could use all the help I can get.
If you found an error or have a suggestion, please contact me at
tao.of.tmux@git-pull.com. I want this book to be the best it can be.
If you are having technical difficulties with Kindle, please send me your
receipt and I will comp you a leanpub coupon.
Appendix: Cheatsheets
These are taken directly from tmux’s manual pages, tabled and organized by hand into sections for convenience.
Commands
Session
| Command | Action |
|---|---|
| no command | Short-cut for new-session
|
attach-session |
Attach or switch to a session |
choose-session |
Put a window into session choice mode |
has-session |
Check and report if a session exists on the server |
kill-session |
Destroy a given session |
list-sessions |
List sessions managed by server |
lock-session |
Lock all clients attached to a session |
new-session |
Create a new session |
rename-session |
Rename a session |
Window
| Command | Action |
|---|---|
choose-window |
Put a window into window choice |
find-window |
Search for a pattern in windows |
kill-window |
Destroy a given window |
last-window |
Select the previously selected |
link-window |
Link a window to another |
list-windows |
List windows of a session |
move-window |
Move a window to another |
new-window |
Create a new window |
next-window |
Move to the next window in a sesssion |
previous-window |
Move to the previous window in session |
rename-window |
Rename a window |
respawn-window |
Reuse a window in which a command has exited |
rotate-window |
Rotate positions of panes in a window |
select-window |
Select a window |
set-window-option |
Set a window option |
show-window-options |
Show window options |
split-window |
Splits a pane into two |
swap-window |
Swap two windows |
unlink-window |
Unlink a window |
Pane
| Command | Action |
|---|---|
break-pane |
Break a pane from an existing into a new window |
capture-pane |
Capture the contents of a pane to a buffer |
display-panes |
Display an indicator for each visible pane |
join-pane |
Split a pane and move an existing one into the new space |
kill-pane |
Destroy a given pane |
last-pane |
Select the previously selected pane |
list-panes |
List panes of a window |
move-pane |
Move a pane into a new space |
pipe-pane |
Pipe output from a pane to a shell command |
resize-pane |
Resize a pane |
respawn-pane |
Reuse a pane in which a command has exited |
select-pane |
Make a pane the active one in the window |
swap-pane |
Swap two panes |
Keybindings
| Shortcut | Action |
|---|---|
C-b |
Send the prefix key (C-b) through to the |
| application. |
Miscellaneous
| Shortcut | Action |
|---|---|
C-z |
Suspend the tmux client. |
r |
Force redraw of the attached client. |
t |
Show the time. |
~ |
Show previous messages from tmux, if any. |
f |
Prompt to search for text in open windows. |
d |
Detach the current client. |
D |
Choose a client to detach. |
? |
List all key bindings. |
: |
Enter the tmux command prompt. |
Copy/Paste
| Shortcut | Action |
|---|---|
# |
List all paste buffers. |
[ |
Enter copy mode to copy text or view the history. |
] |
Paste the most recently copied buffer of text. |
Page Up |
Enter copy mode and scroll one page up. |
= |
Choose which buffer to paste interactively from a |
| list. | |
- |
Delete the most recently copied buffer of text. |
Session
| Shortcut | Action |
|---|---|
$ |
Rename the current session. |
Session Traversal
| Shortcut | Action |
|---|---|
L |
Switch the attached client back to the last |
| session. | |
s |
Select a new session for the attached client |
| interactively. |
Window
| Shortcut | Action |
|---|---|
c |
Create a new window. |
& |
Kill the current window. |
i |
Display some information about the current window. |
, |
Rename the current window. |
Window Traversal
| Shortcut | Action |
|---|---|
0 to 9 |
Select windows 0 to 9. |
w |
Choose the current window interactively. |
M-n |
Move to the next window with a bell or activity |
| marker. | |
M-p |
Move to the previous window with a bell or activity |
| marker. | |
p |
Change to the previous window. |
n |
Change to the next window. |
l |
Move to the previously selected window. |
' |
Prompt for a window index to select. |
Window Moving
| Shortcut | Action |
|---|---|
. |
Prompt for an index to move the current window |
Pane
| Shortcut | Action |
|---|---|
x |
Kill the current pane. |
q |
Briefly display pane indexes. |
% |
Split the current pane into two, left and right. |
" |
Split the current pane into two, top and bottom. |
Pane Traversal
| Shortcut | Action |
|---|---|
; |
Move to the previously active pane. |
Up, Down |
Change to the pane above, below, to the left, or to |
Left, Right |
the right of the current pane. |
o |
Select the next pane in the current window. |
Pane Moving
| Shortcut | Action |
|---|---|
C-o |
Rotate the panes in the current window forwards. |
M-o |
Rotate the panes in the current window backwards. |
{ |
Swap the current pane with the previous pane. |
} |
Swap the current pane with the next pane. |
! |
Break the current pane out of the window. |
Pane Resizing
| Shortcut | Action |
|---|---|
M-1 to M-5 |
Arrange panes in one of the five preset layouts: |
| even-horizontal, even-vertical, main-horizontal, | |
| main-vertical, or tiled. | |
C-Up, C-Down |
Resize the current pane in steps of one cell. |
C-Left, C-Right |
|
M-Up, M-Down |
Resize the current pane in steps of five cells. |
M-Left, M-Right |
Formats
Copy / paste
| Variable name | Description |
|---|---|
| buffer_name | Name of buffer |
| buffer_sample | Sample of start of buffer |
| buffer_size | Size of the specified buffer in bytes |
Clients
| Variable name | Description |
|---|---|
| client_activity | Integer time client last had activity |
| client_created | Integer time client created |
| client_control_mode | 1 if client is in control mode |
| client_height | Height of client |
| client_key_table | Current key table |
| client_last_session | Name of the client’s last session |
| client_pid | PID of client process |
| client_prefix | 1 if prefix key has been pressed |
| client_readonly | 1 if client is readonly |
| client_session | Name of the client’s session |
| client_termname | Terminal name of client |
| client_tty | Pseudo terminal of client |
| client_utf8 | 1 if client supports utf8 |
| client_width | Width of client |
| line | Line number in the list |
Panes
| Variable name | Description |
|---|---|
| alternate_on | If pane is in alternate screen |
| alternate_saved_x | Saved cursor X in alternate screen |
| alternate_saved_y | Saved cursor Y in alternate screen |
| cursor_flag | Pane cursor flag |
| cursor_x | Cursor X position in pane |
| cursor_y | Cursor Y position in pane |
| insert_flag | Pane insert flag |
| keypad_cursor_flag | Pane keypad cursor flag |
| keypad_flag | Pane keypad flag |
| mouse_any_flag | Pane mouse any flag |
| mouse_button_flag | Pane mouse button flag |
| mouse_standard_flag | Pane mouse standard flag |
| pane_active | 1 if active pane |
| pane_bottom | Bottom of pane |
| pane_current_command | Current command if available |
| pane_current_path | Current path if available |
| pane_dead | 1 if pane is dead |
| pane_dead_status | Exit status of process in dead pane |
| pane_height | Height of pane |
| pane_id | Unique pane ID (Alias: #D) |
| pane_in_mode | If pane is in a mode |
| pane_input_off | If input to pane is disabled |
| pane_index | Index of pane (Alias: #P) |
| pane_left | Left of pane |
| pane_pid | PID of first process in pane |
| pane_right | Right of pane |
| pane_start_command | Command pane started with |
| pane_synchronized | If pane is synchronized |
| pane_tabs | Pane tab positions |
| pane_title | Title of pane (Alias: #T) |
| pane_top | Top of pane |
| pane_tty | Pseudo terminal of pane |
| pane_width | Width of pane |
| scroll_region_lower | Bottom of scroll region in pane |
| scroll_region_upper | Top of scroll region in pane |
| scroll_position | Scroll position in copy mode |
| wrap_flag | Pane wrap flag |
Sessions
| Variable name | Description |
|---|---|
| session_alerts | List of window indexes with alerts |
| session_attached | Number of clients session is attached to |
| session_activity | Integer time of session last activity |
| session_created | Integer time session created |
| session_last_attached | Integer time session last attached |
| session_group | Number of session group |
| session_grouped | 1 if session in a group |
| session_height | Height of session |
| session_id | Unique session ID |
| session_many_attached | 1 if multiple clients attached |
| session_name | Name of session (Alias: #S) |
| session_width | Width of session |
| session_windows | Number of windows in session |
Windows
| Variable name | Description |
|---|---|
| history_bytes | Number of bytes in window history |
| history_limit | Maximum window history lines |
| history_size | Size of history in bytes |
| window_activity | Integer time of window last activity |
| window_activity_flag | 1 if window has activity |
| window_active | 1 if window active |
| window_bell_flag | 1 if window has bell |
| window_find_matches | Matched data from the find-window |
| window_flags | Window flags (Alias: #F) |
| window_height | Height of window |
| window_id | Unique window ID |
| window_index | Index of window (Alias: #I) |
| window_last_flag | 1 if window is the last used |
| window_layout | Window layout description, ignoring zoomed |
| window panes | |
| window_linked | 1 if window is linked across sessions |
| window_name | Name of window (Alias: #W) |
| window_panes | Number of panes in window |
| window_silence_flag | 1 if window has silence alert |
| window_visible_layout | Window layout description, respecting |
| zoomed window panes | |
| window_width | Width of window |
| window_zoomed_flag | 1 if window is zoomed |
Servers
| Variable name | Description |
|---|---|
| host | Hostname of local host (alias: #H) |
| host_short | Hostname of local host (no domain name) |
| (alias: #h) | |
| socket_path | Server socket path |
| start_time | Server start time |
| pid | Server PID |
Commands
For $ tmux list-commands.
| Variable name | Description |
|---|---|
| command_hooked | Name of command hooked, if any |
| command_name | Name of command in use, if any |
| command_list_name | Command name if listing commands |
| command_list_alias | Command alias if listing commands |
| command_list_usage | Command usage if listing commands |
Appendix: Installing tmux
macOS / OS X
brew
macports
fink
Linux
Ubuntu / Mint / Debian, etc.
CentOS / Fedora / Redhat, etc.
dnf:
yum:
Arch Linux (pacman)
Gentoo (portage)
BSD
FreeBSD
pkg(1)
pkg_add(1)
OpenBSD
As of OpenBSD 4.6, tmux is part of the base system.
If you are using an earlier version:
NetBSD
Windows 10
Check out the tmux on Windows 10 appendix section.
Appendix: tmux on Windows 10
As of Windows 10 build 14361, you can run tmux via the Linux Subsystem feature.
Usage requires enabling Developer mode via the “For Developers” tab in the “Update & security” settings.
After enabling, open “Windows Features”. You can find it by searching for “Turn Windows features on or off”. Then check “Windows Subsystem for Linux (Beta)”.
You may be asked to restart.
Then open Command Prompt as you normally would (Run cli.exe). Then type
It will prompt you to agree to terms, create a user. In my build, tmux was
already installed! But if it’s not, type sudo apt-get install tmux.
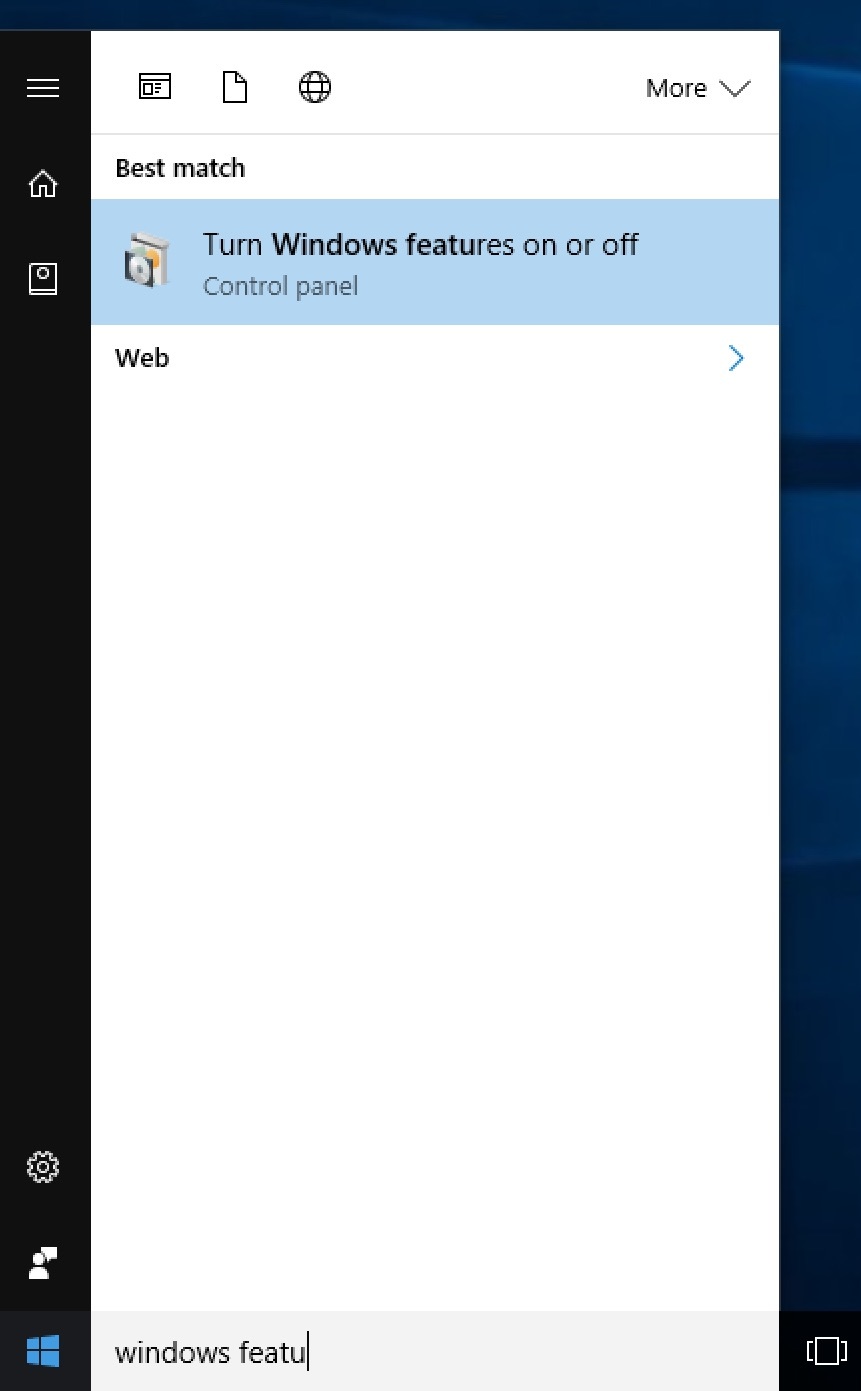
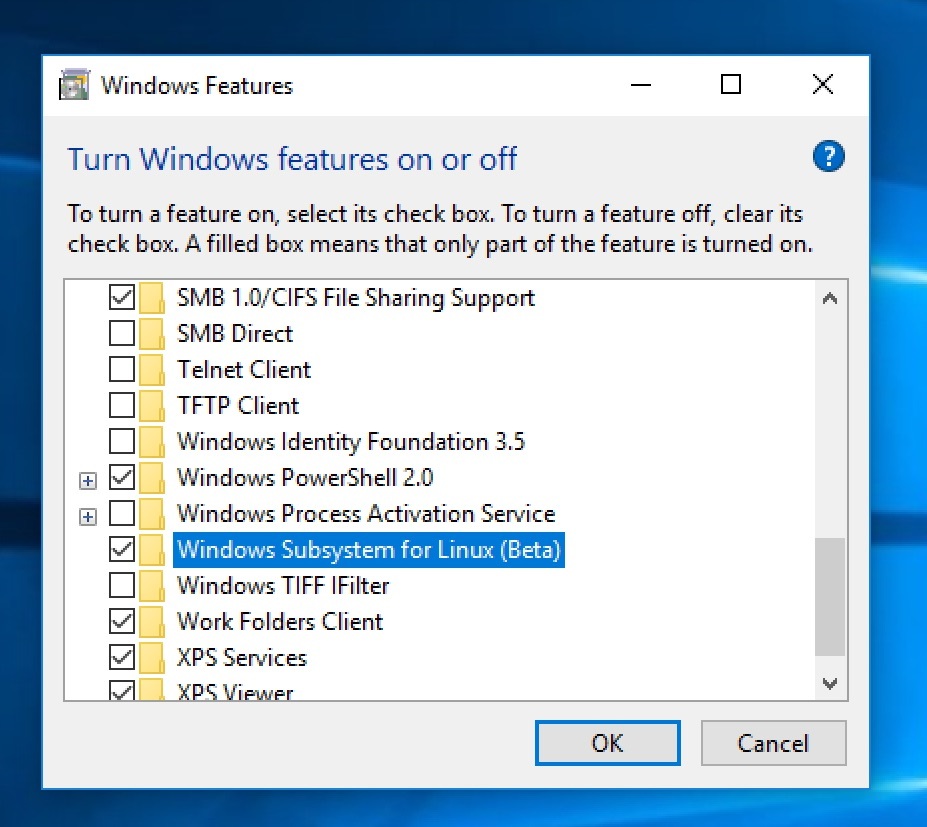
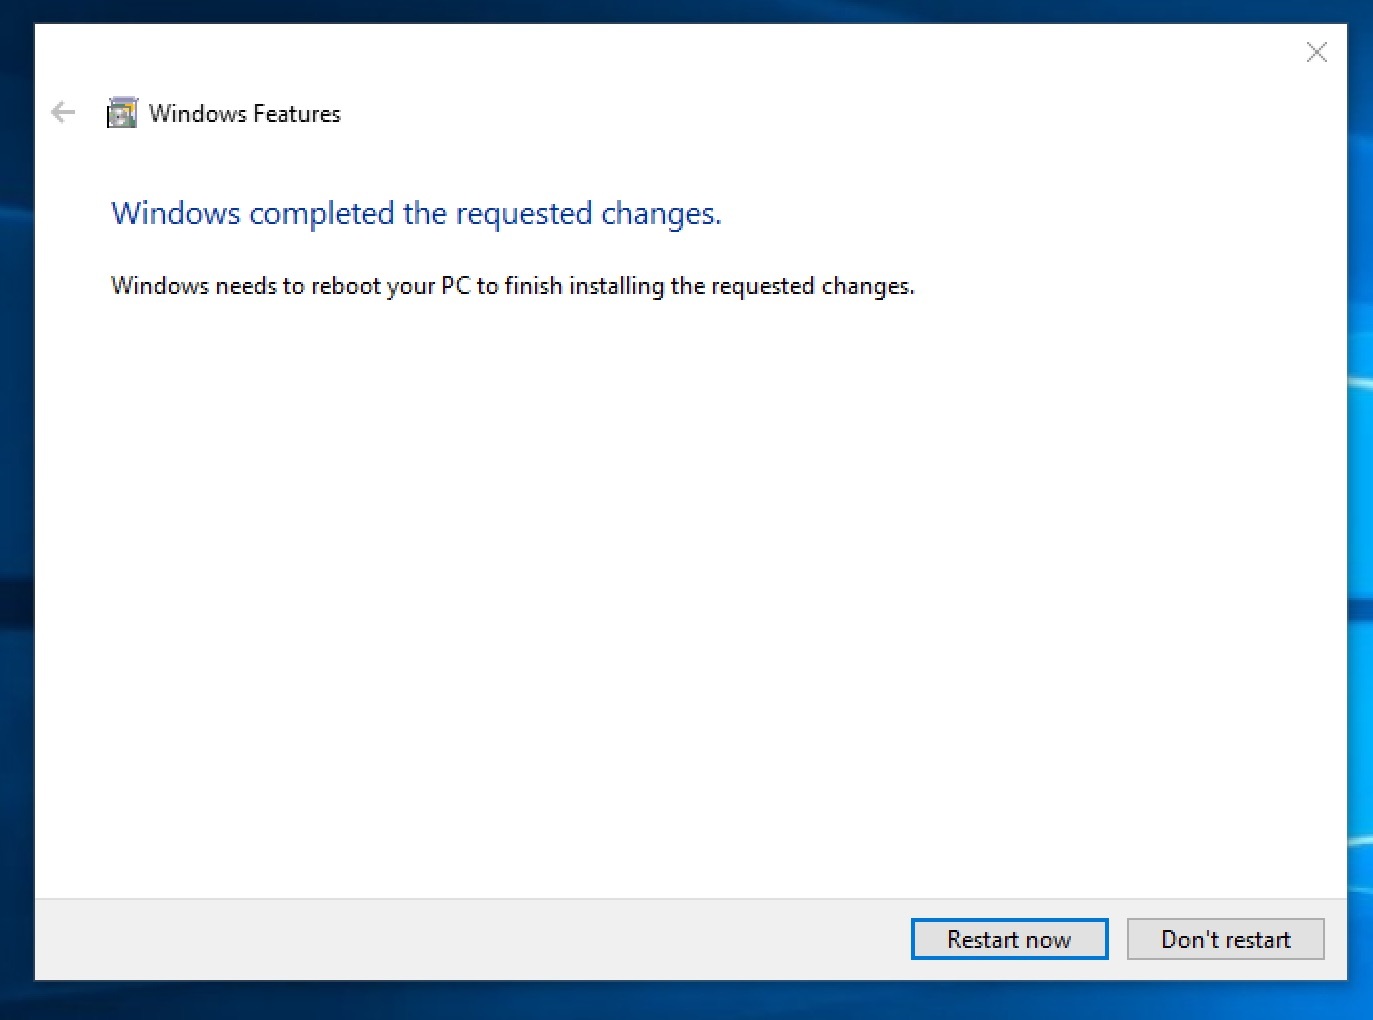
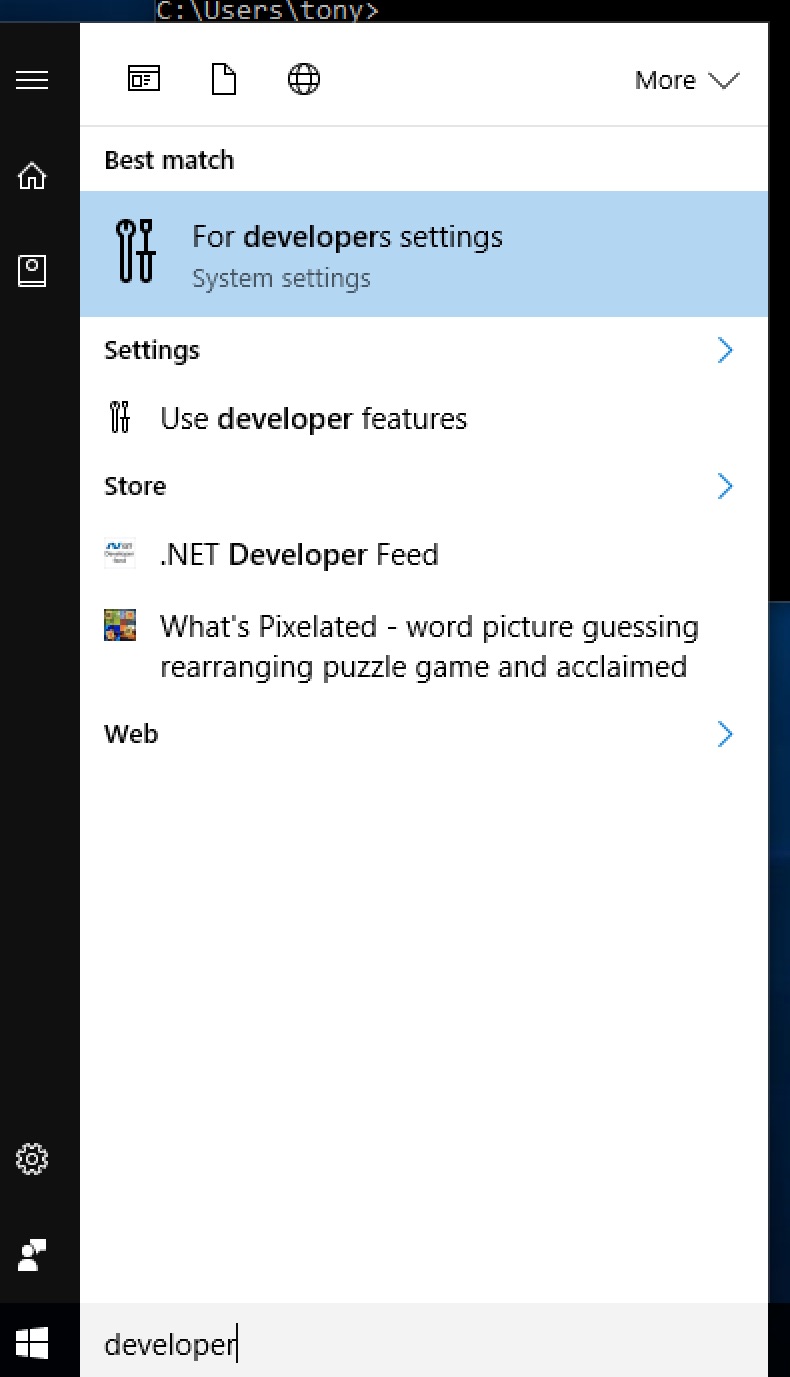
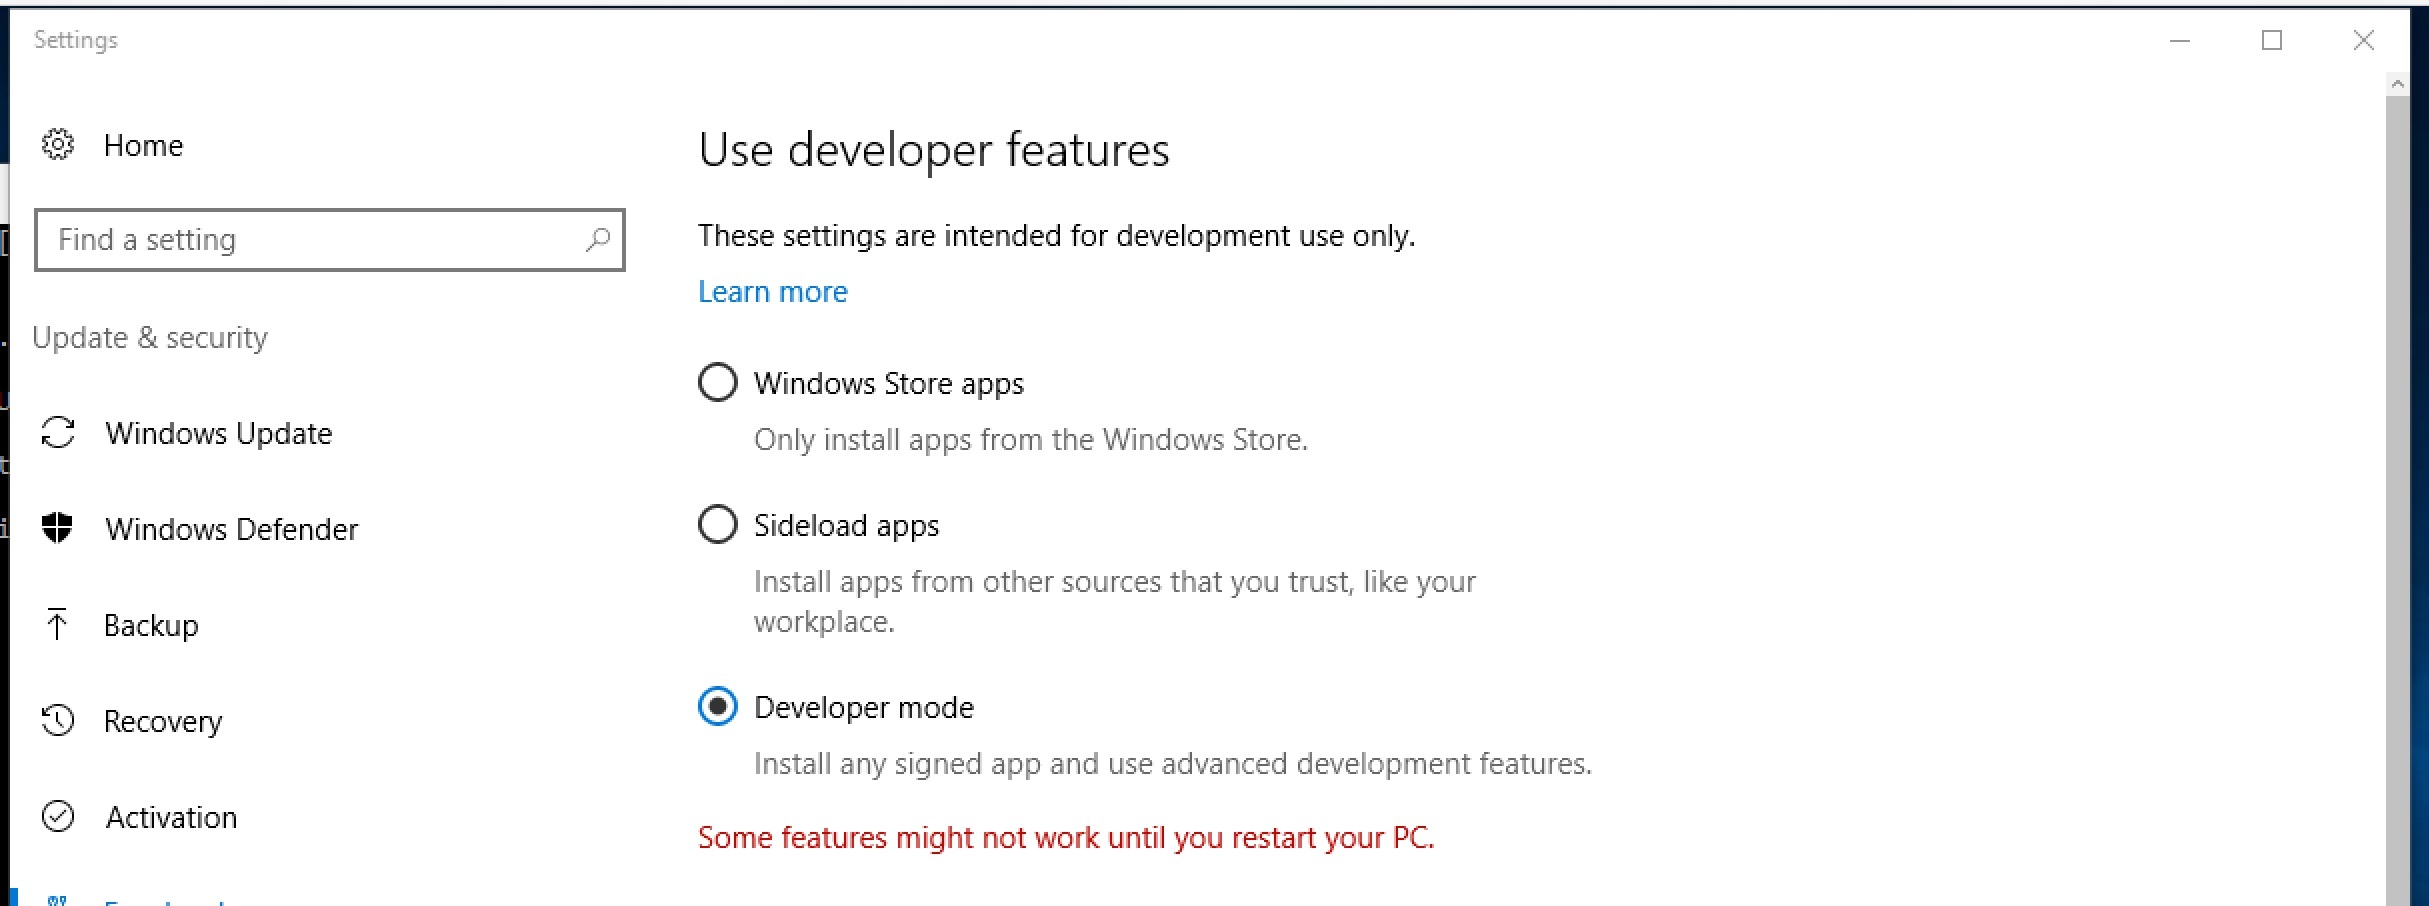
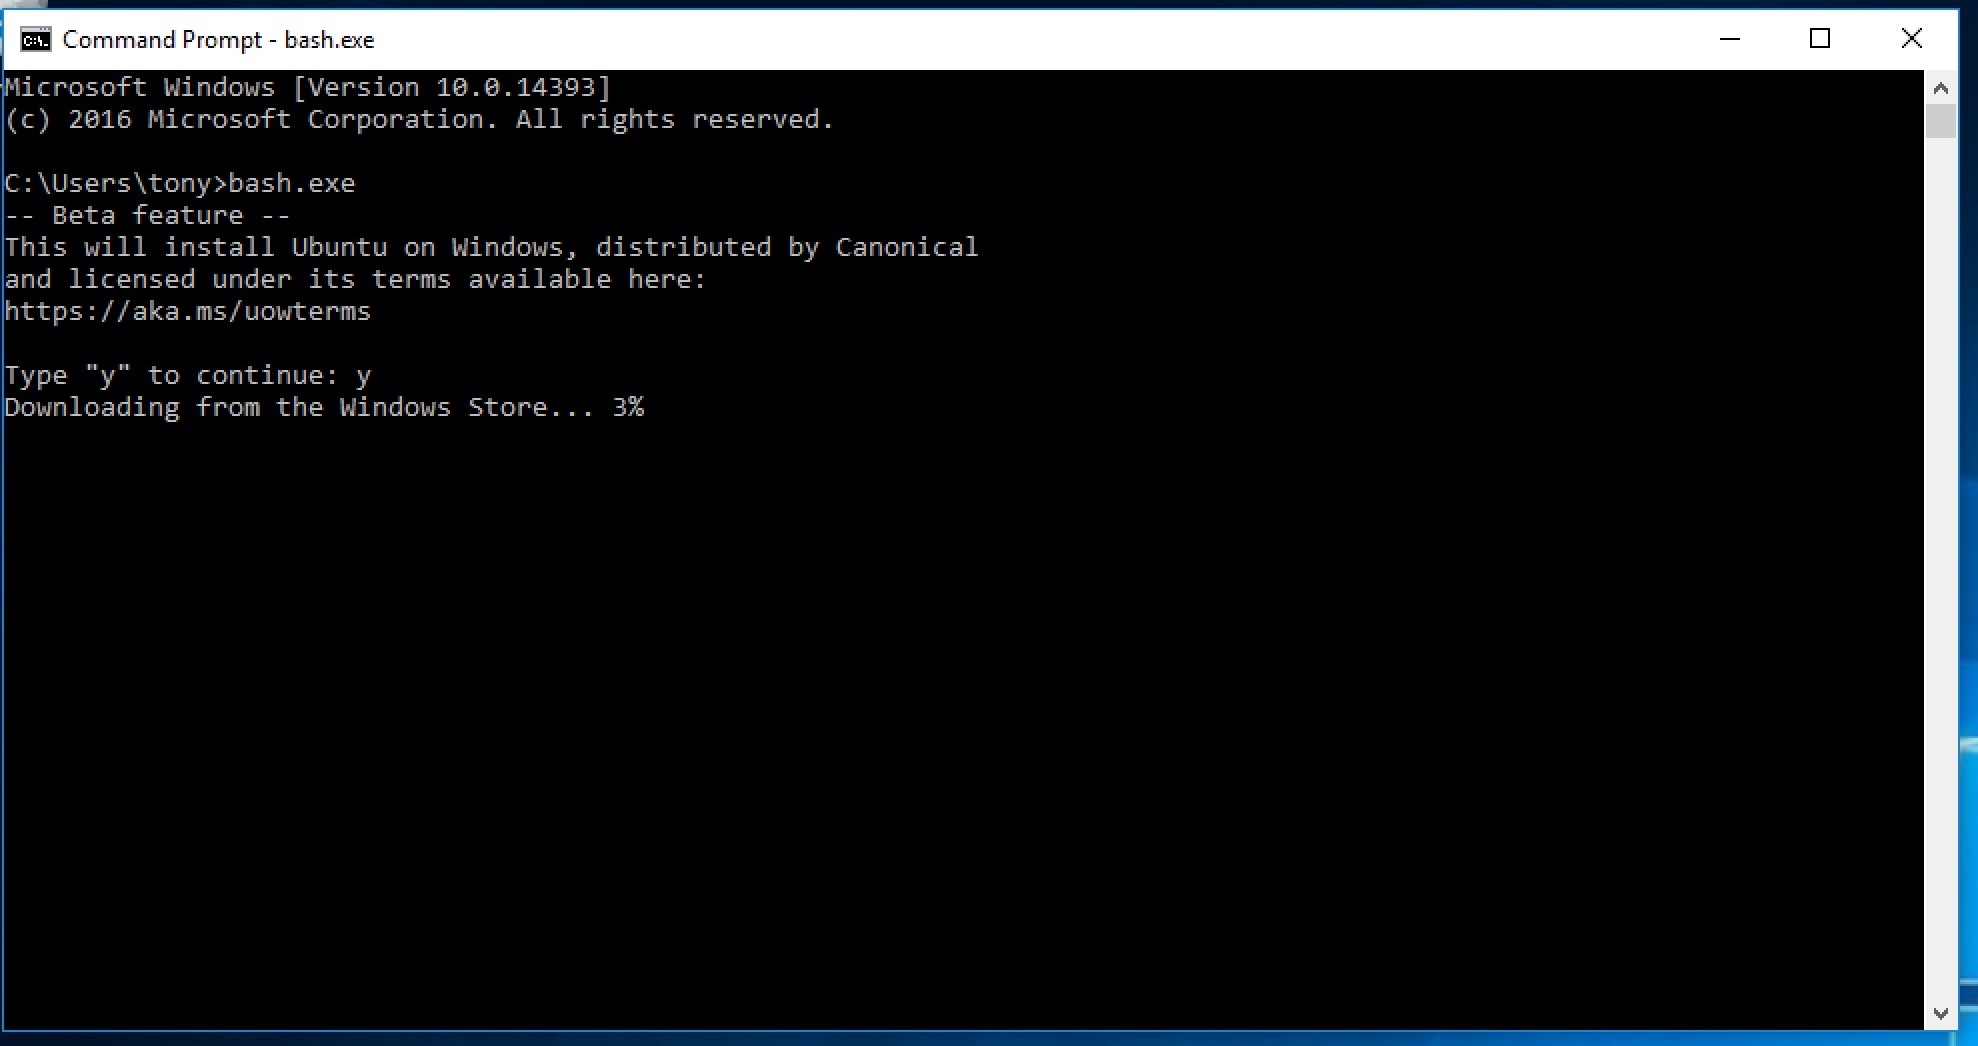
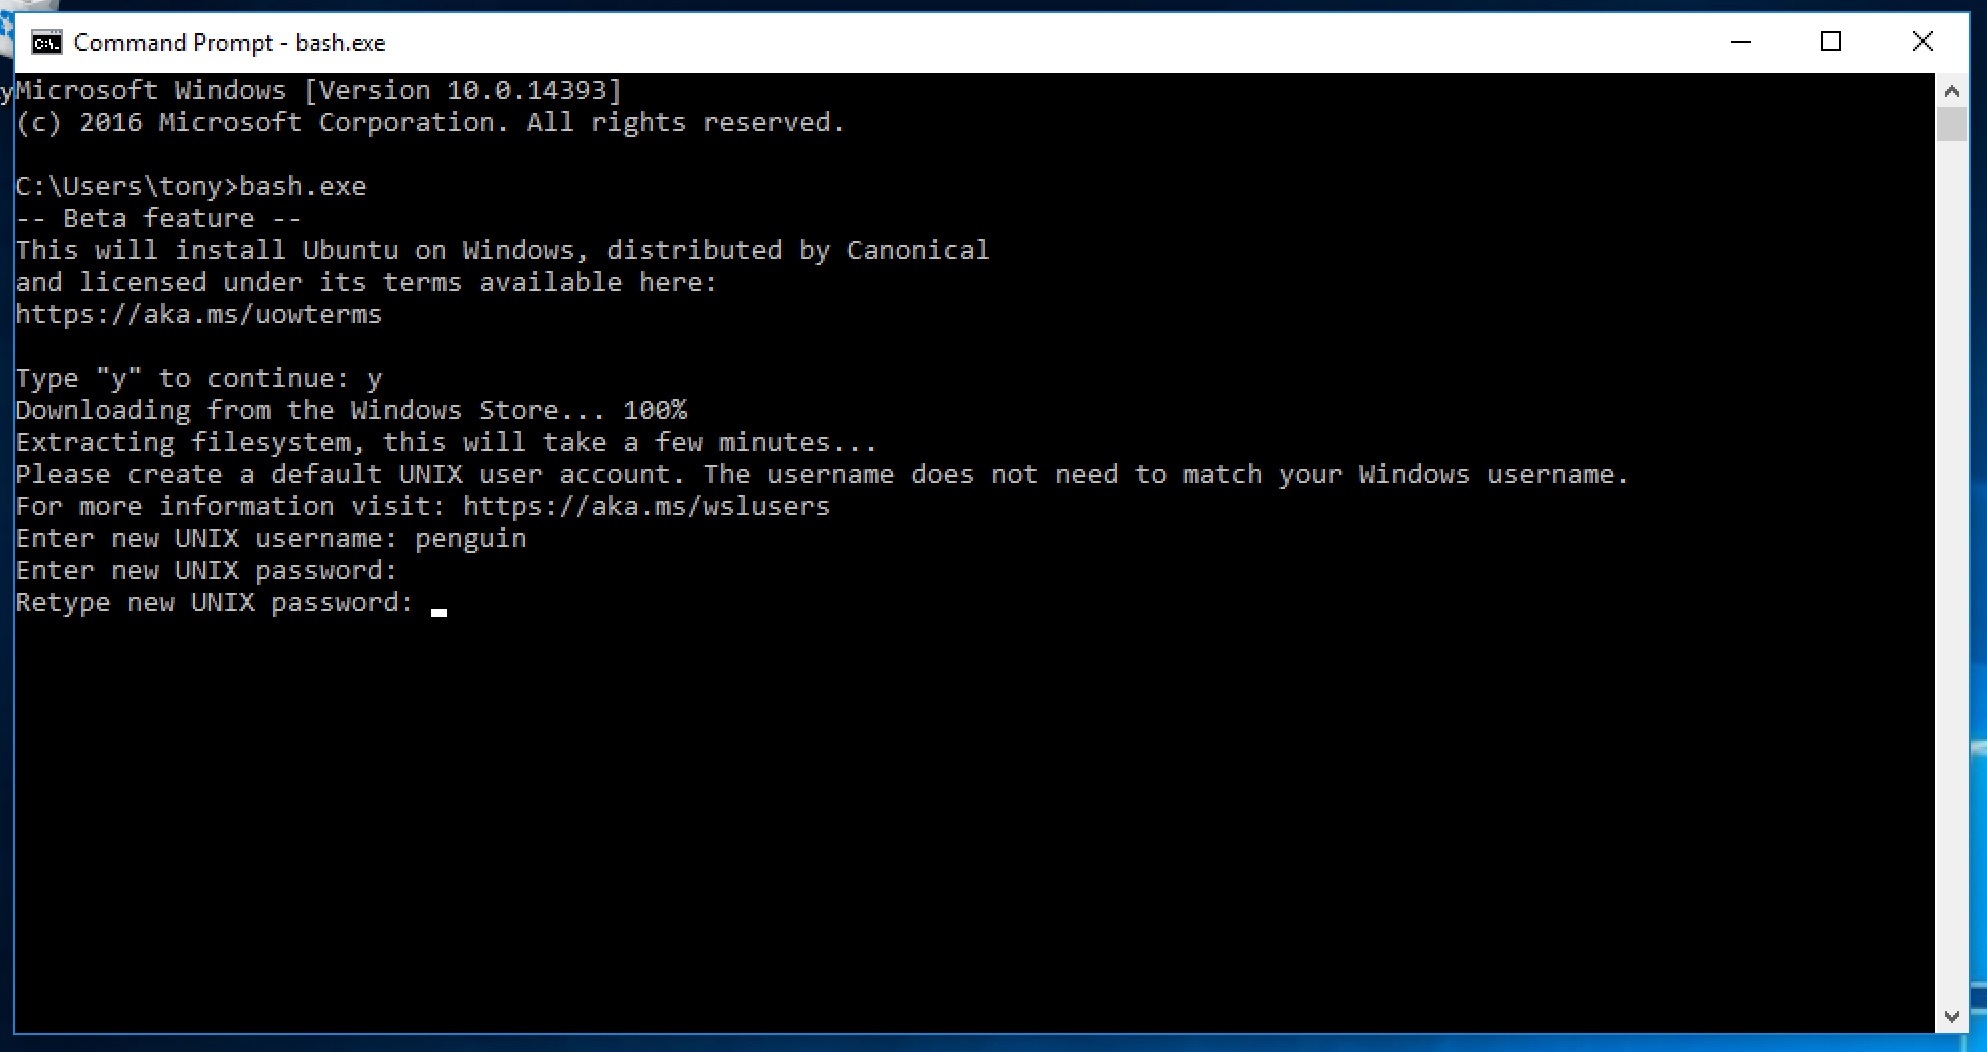
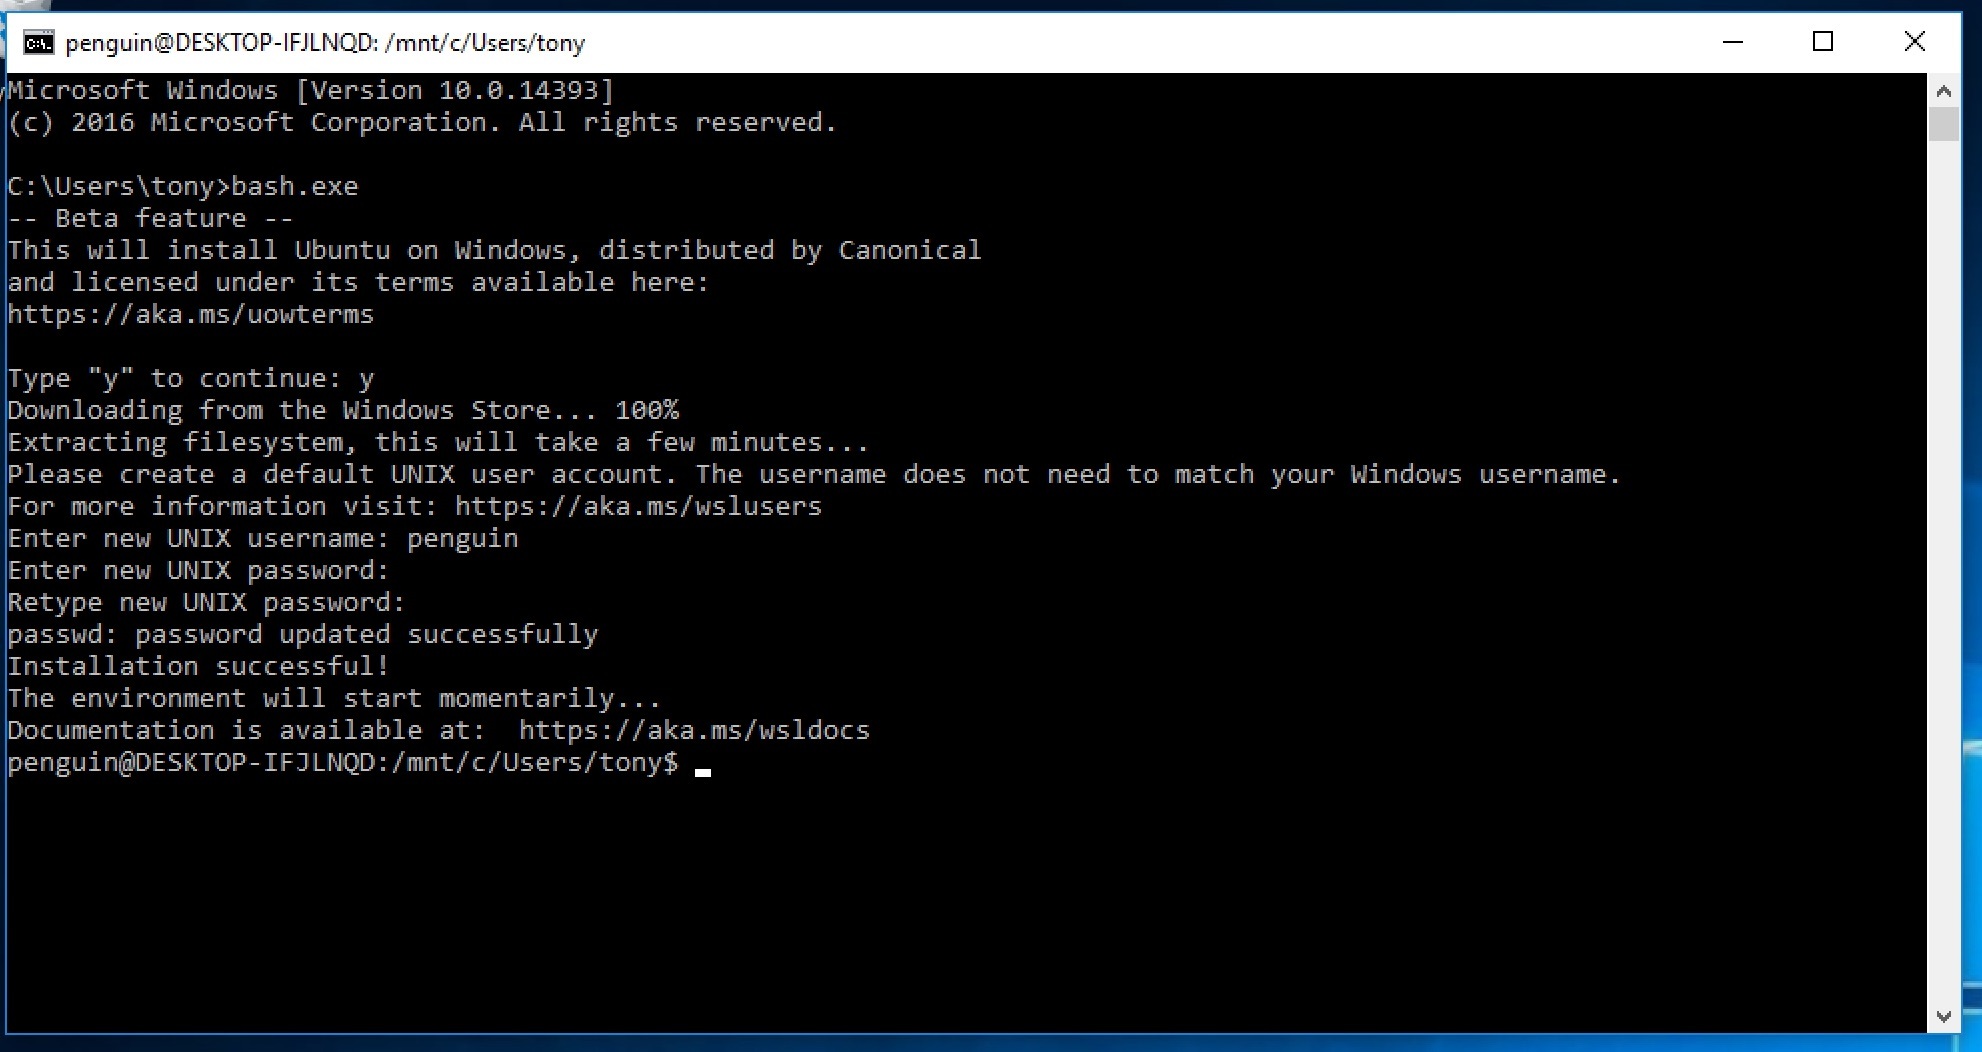
yourusername@COMPUTERNAME-ID321FJ:/mnt/c/Users/username$ tmux
This should allow you to run tmux within bash.exe.
This is a real ubuntu installation, so you can continue to install
packages via sudo apt-get install **packagename** and update packages
via sudo apt-get update && sudo apt-get upgrade.
Appendix: Troubleshooting
E353: Nothing in register * when pasting on vim
If you are using macOS / OS X with vim inside tmux, you may get the error
E353: Nothing in register * when trying to paste.
Try installing reattach-to-user-namespace
via brew.
tmuxp: command not found and powerline: command not found
This is due to your site package bin path (where application entry points are installed) not being in your paths. To find your user site packages base directory:
This will get you something like /Users/me/Library/Python/2.7 on macOS with
Python 2.7 or /home/me/.local on Linux/BSD boxes.
The applications are in the bin/ folder inside. So, concatenate the two and
apply them to your PATH. This
can be done automatically on every shell session by using one of these in your
~/.bashrc or ~/.zshrc:
export PATH=/Users/me/Library/Python/2.7/bin:$PATH     # macOS w/ python 2.7
export PATH=$HOME/.local/bin:$PATH                     # Linux/BSD
export PATH="`python -m site --user-base`/bin":$PATH   # May work all-around
Then open a new terminal, or . ~/.zshrc / . ~/.bashrc in your current one.
Then you can run $ tmuxp -V, $ tmuxp load and $ powerline tmux right
commands.