Microsoft Store and Apps
The Microsoft Store helps you can find, download, and buy apps and games, plus digital movies and TV shows and more.
Get to know the Microsoft Store
The Microsoft Store—which is often simply referred to as the Store or the Store app—provides access to a lot of different types of content. As such, it’s a busy and dense app, with links to each of its major content areas—Home, Gaming, Entertainment, Productivity, and Deals—at the top.
As you navigate into each of those content areas, you’ll see that they each visually resemble the Home view, with promoted content, editorial picks, and so on. Navigation is straightforward, and the built-in search functionality lets you search across each of these content areas from a single place, and with various filtering capabilities.
Before you start
Before you download any apps or games, there are a few things you should configure.
Sign-in with your Microsoft account
You must sign-in with your Microsoft account to purchase any paid content—apps, games, or videos—from the Store. If you use your Microsoft account to sign-in to Windows, you’re all set: You are automatically signed in to the Store app as well. But if you’re using a local user account, you will need to sign-in to the Store with a Microsoft account before you can proceed.
To do so, launch Store, select the little account picture to the left of the search box, and then choose Sign in from the drop-down menu that appears. A window appears prompting you to sign-in
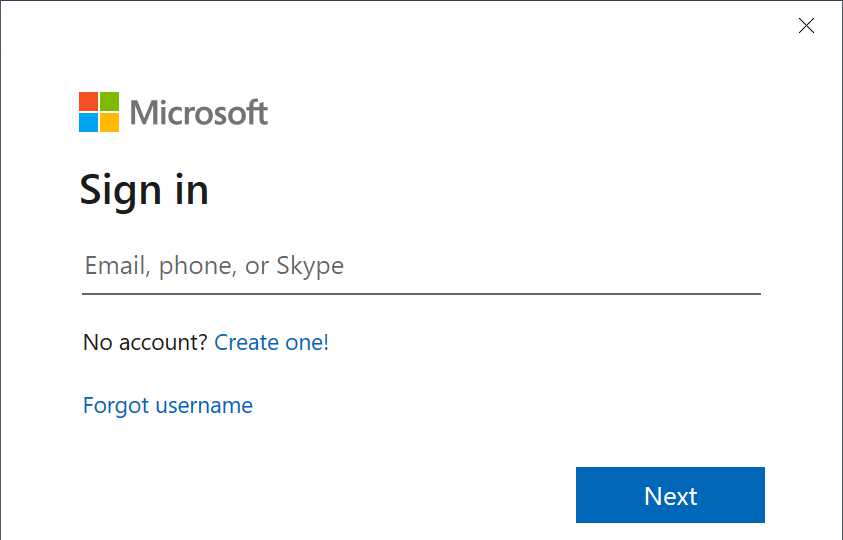
After signing in to your Microsoft account—a process that will include entering your account name and either your password or a two-step verification prompt—you will be prompted to use this account everywhere.
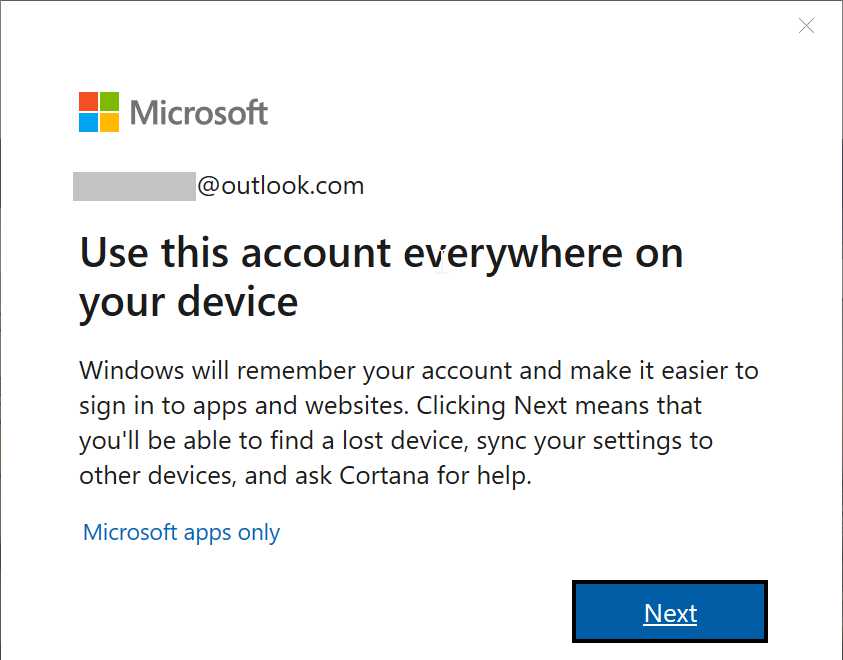
If you select the Next button here, Windows will switch your local user account to a Microsoft account. So do not select Next if you wish to continue using your local user account.
If this isn’t what you want, you can select the “Microsoft apps only” link. Then, in the future, when you use other Store apps that let you sign-in to your Microsoft account, you can optionally choose to do so using the account you just configured.
Manage your account and payment options
You should also spend a few moments to ensure that Store is set up correctly for your account and whatever payment method(s) you prefer to use for paid apps and other content. That way, you won’t need to hunt around for credit card or other payment information the first (or next) time you want to buy something.
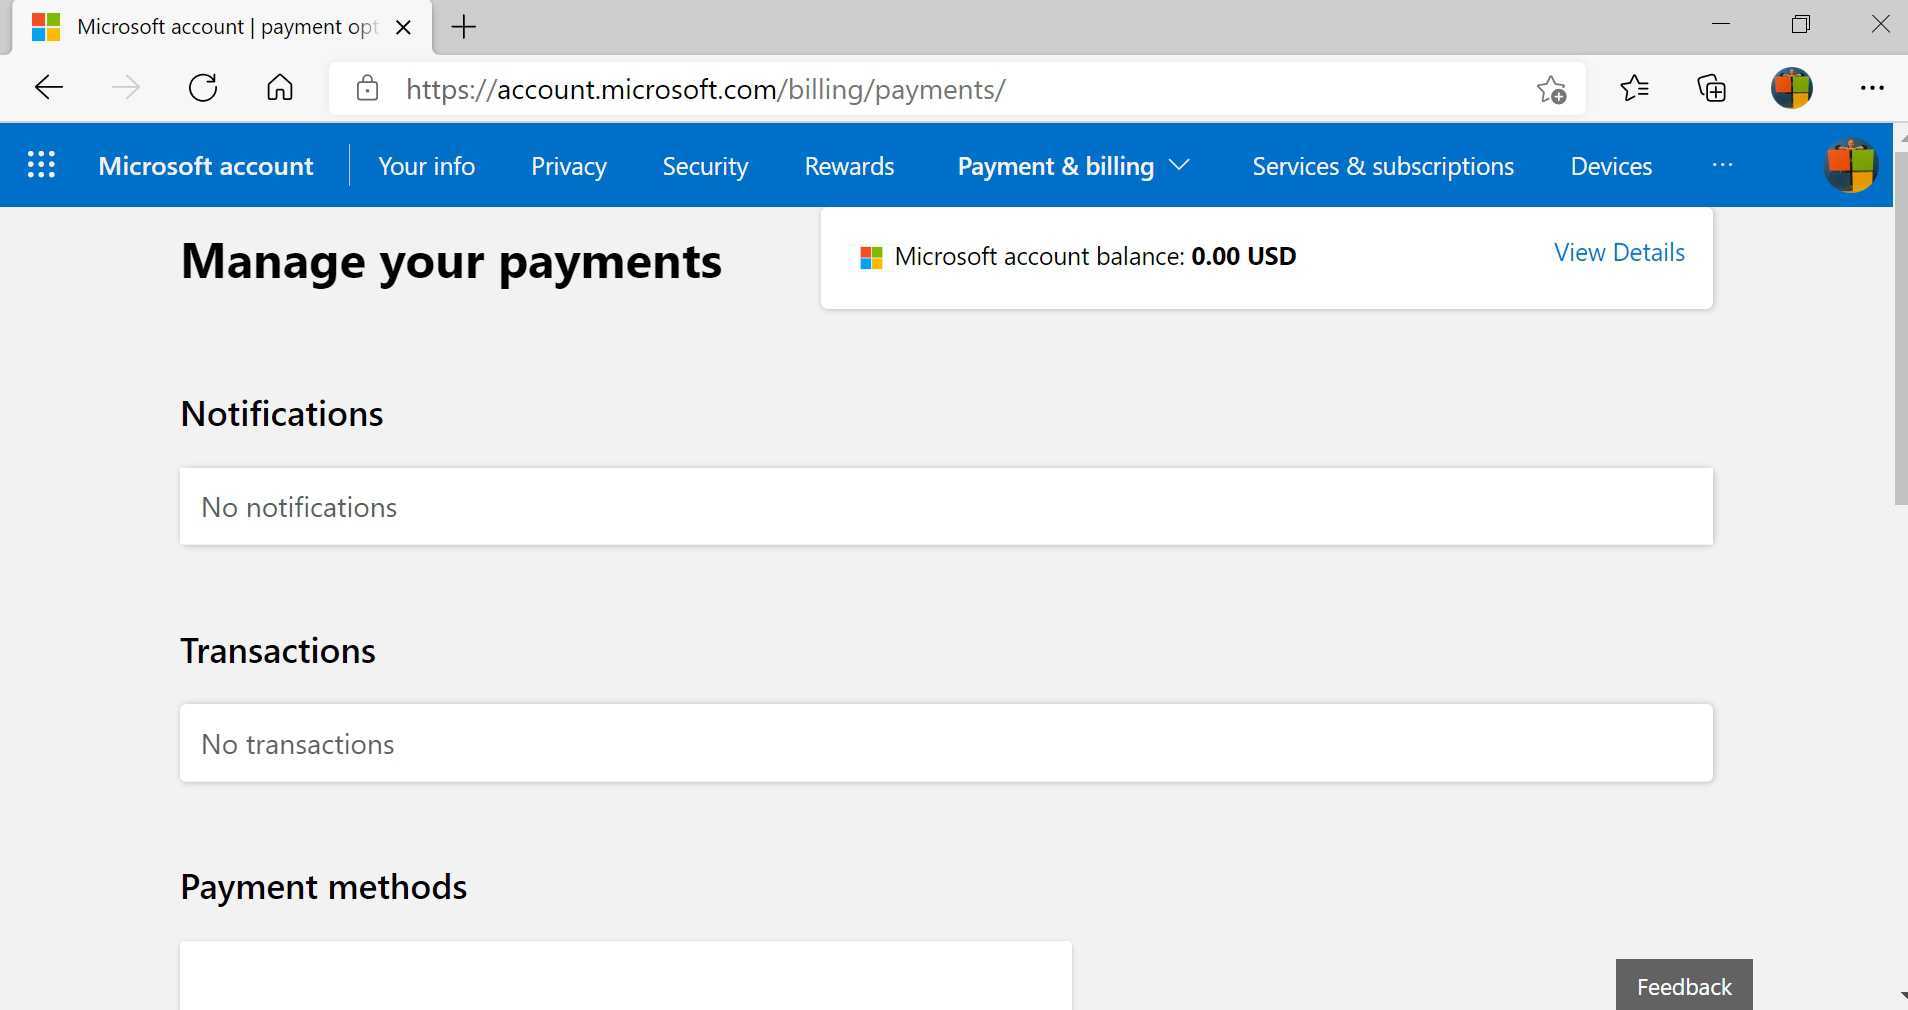
You configure this information from from Microsoft account web site at account.microsoft.com. Once signed in, navigate to Payments & billing > Payment options.
From that web page, you can create, delete, and manage payment options tied to your Microsoft account. These include credit and debit cards, a Microsoft gift card account balance, mobile billing through your wireless carrier, and PayPal.
Manage your connected PCs and devices
Microsoft lets you download Store apps and games to up to 10 Windows PCs at once. You can manage the list of those PCs from the Microsoft Account web site as well.
You do so from the Microsoft account website by navigating to Devices > Microsoft Store device management or by navigating directly to the Microsoft Store device management page.

If you see any out-of-date PCs in this list, you can remove them by selecting the appropriate “Unlink” link.
Find and install apps and games
The Microsoft Store offers a variety of ways to find and then install apps and games. This process will be obvious to anyone who has used a mobile app store in the past decade. That said, there are a few unique items of interest related to acquiring apps and games from the Microsoft Store.
Find an app or game after you’ve downloaded it
Windows goes out of its way to make sure you can find apps you’ve just installed.
First, a pop-up notification banner will appear in the lower-right corner of the screen. If you respond to this notification quickly enough—it disappears after a few seconds—you can select it to launch the newly-installed app.
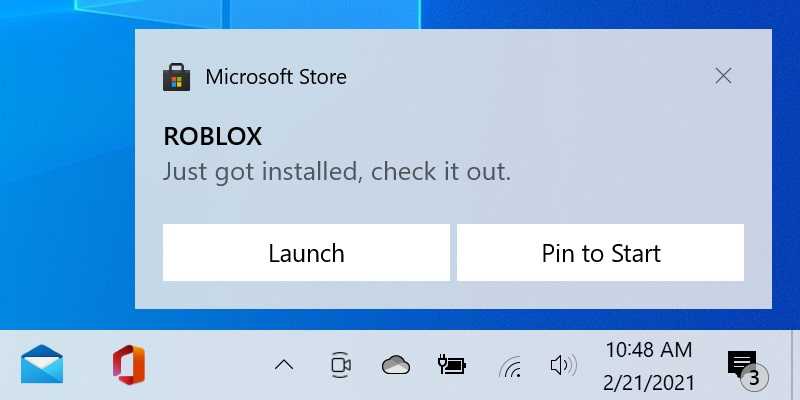
If you miss that notification, no worries: It is still available from the Action Center (which is described in a bit more detail later in this chapter). You can open Action Center by selecting its icon in the lower-right of the screen (to the right of the clock), or by typing WINKEY + A. You’ll see the notification in the list, and if you select it here, the newly-installed app will launch.
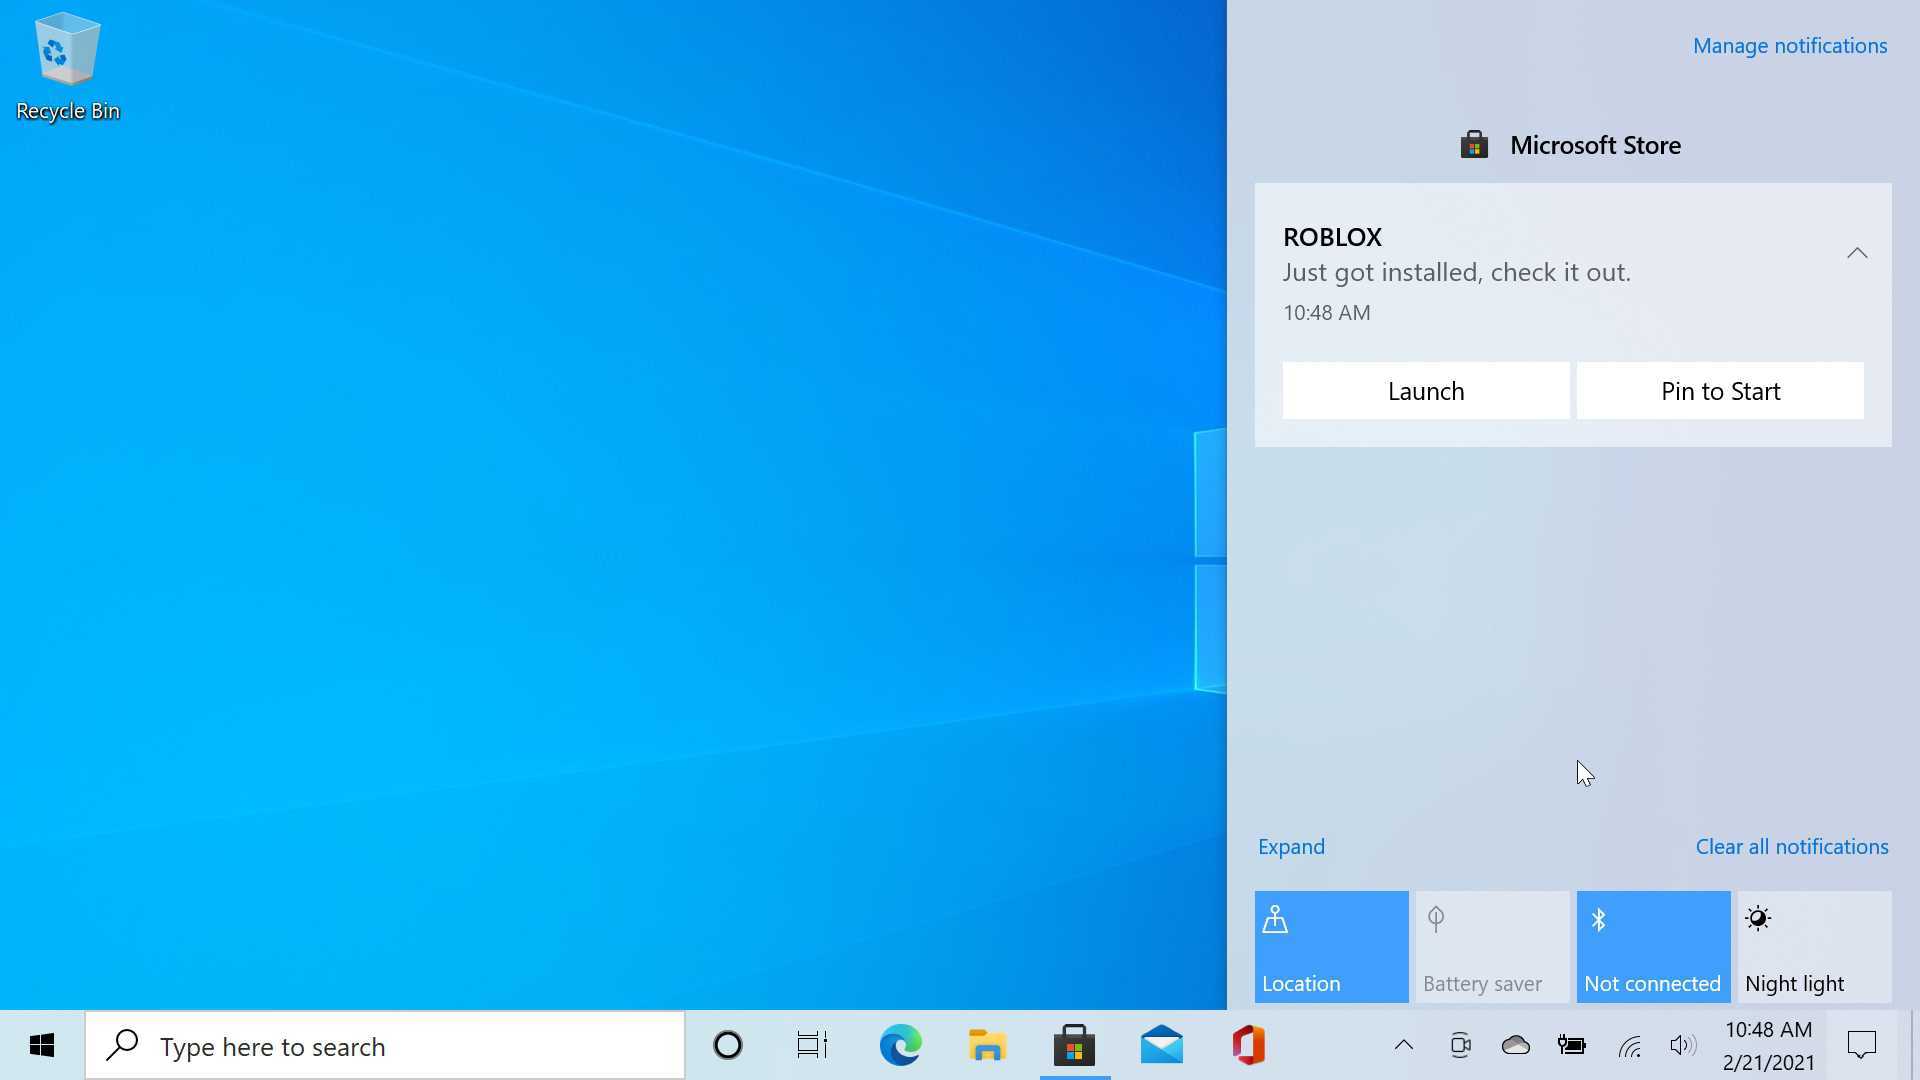
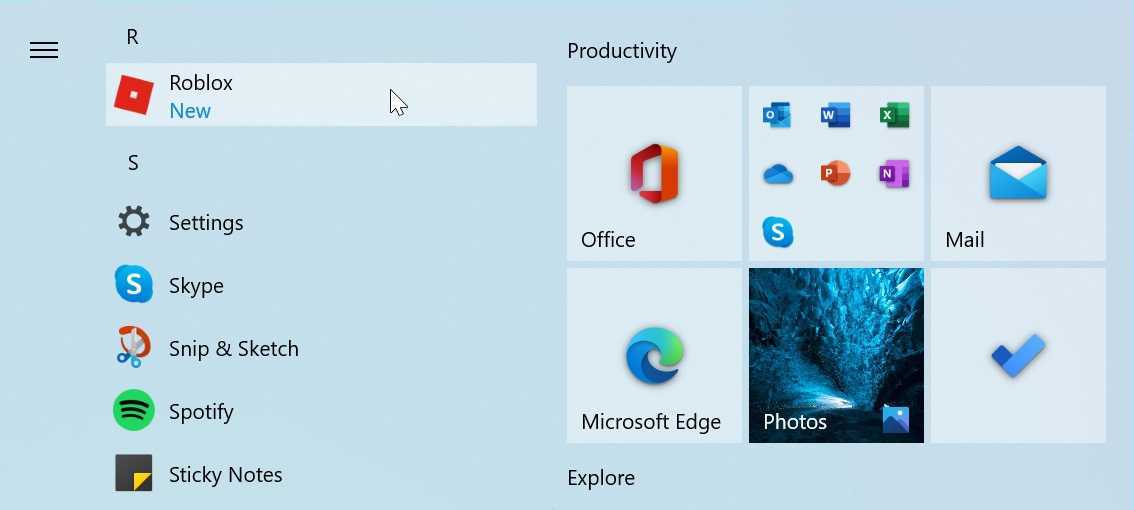
You can also access recently-installed apps in Start. Typically, these apps will appear in two places, the Recently added list at the top of the All Apps list and then alphabetically in that list. You will see a “New” tag next to its name in the list.
Find apps and games you’ve already purchased or downloaded
The Store app helps you find the apps, games, and other content you’ve already purchased and downloaded across all of your PCs. This makes it relatively easy to find them and download and install them again. This can be useful if you’ve received a new PC or have uninstalled an app and now wish to get it back.
To see this list, open the See more menu in Store and choose My Library. Here, you can see your most recent apps and games.
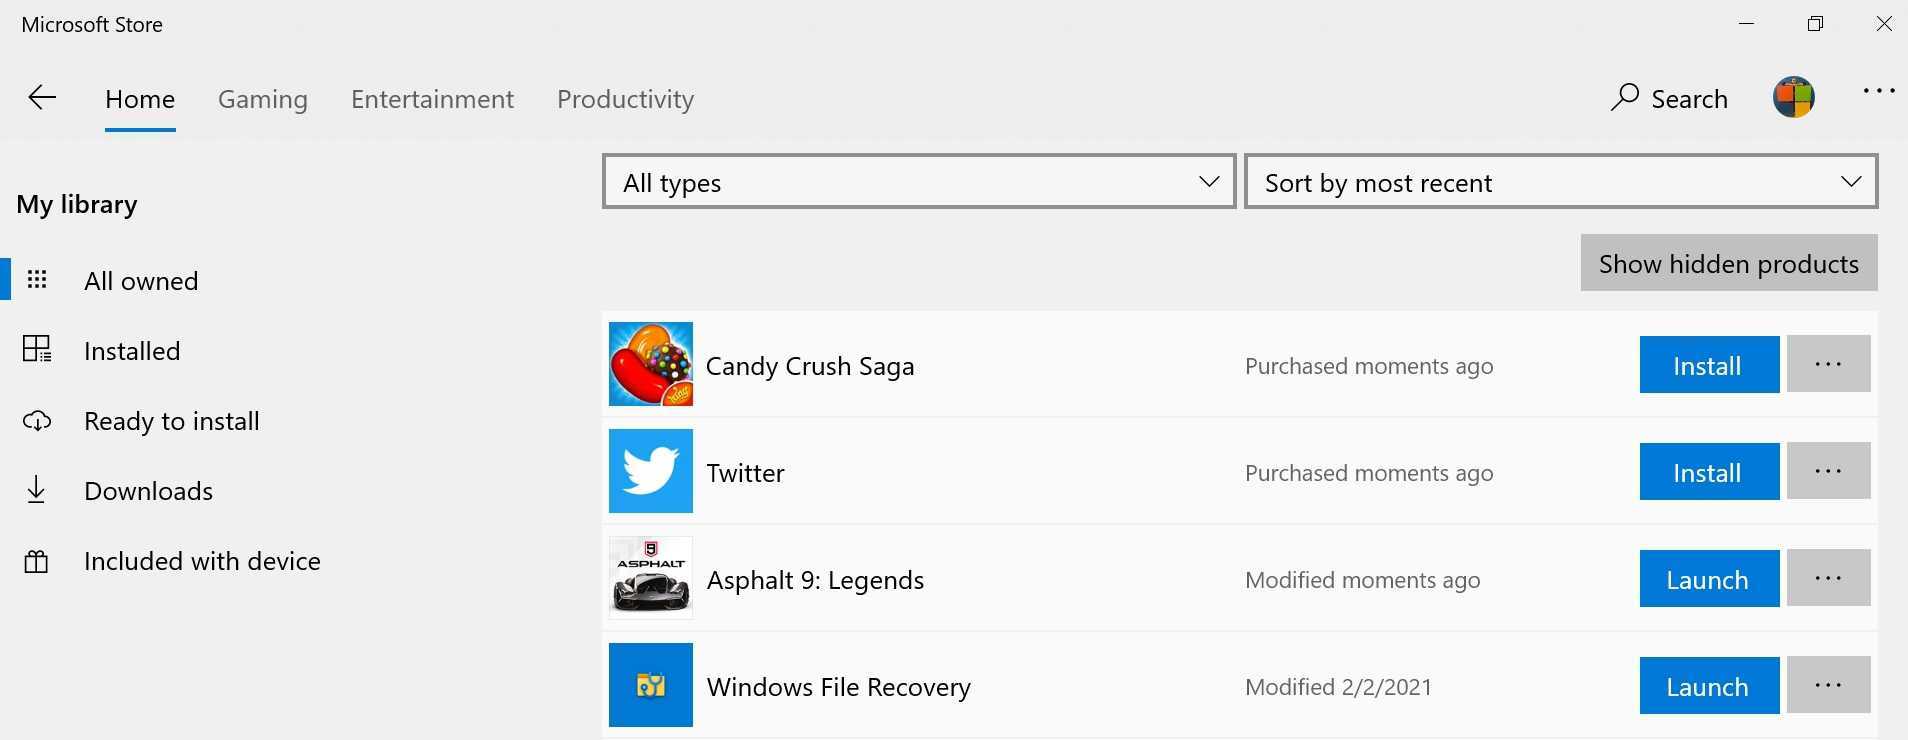
You can perform a number of useful actions here:
Download and install an app. To download and install a previous purchase or download, select the Download button next to that item.
Hide an app. Embarrassed by a poor app or game choice? Just select the More Actions (“…”) button next to that item in the list and then choose Hide. Hiding an app doesn’t remove it from your account, of course, and you can always access it from the web (at account.microsoft.com/billing/orders) or from your other PCs.
Filter and sort the list. By default, the My Library view displays all of your content. But you can filter the list only to show apps, games, or video content. You can likewise sort the list by most recent (the default) or by name.
View other lists of your content. The options on the left—All owned, Installed, Ready to install, and Downloads—let you view certain parts of your library more easily.
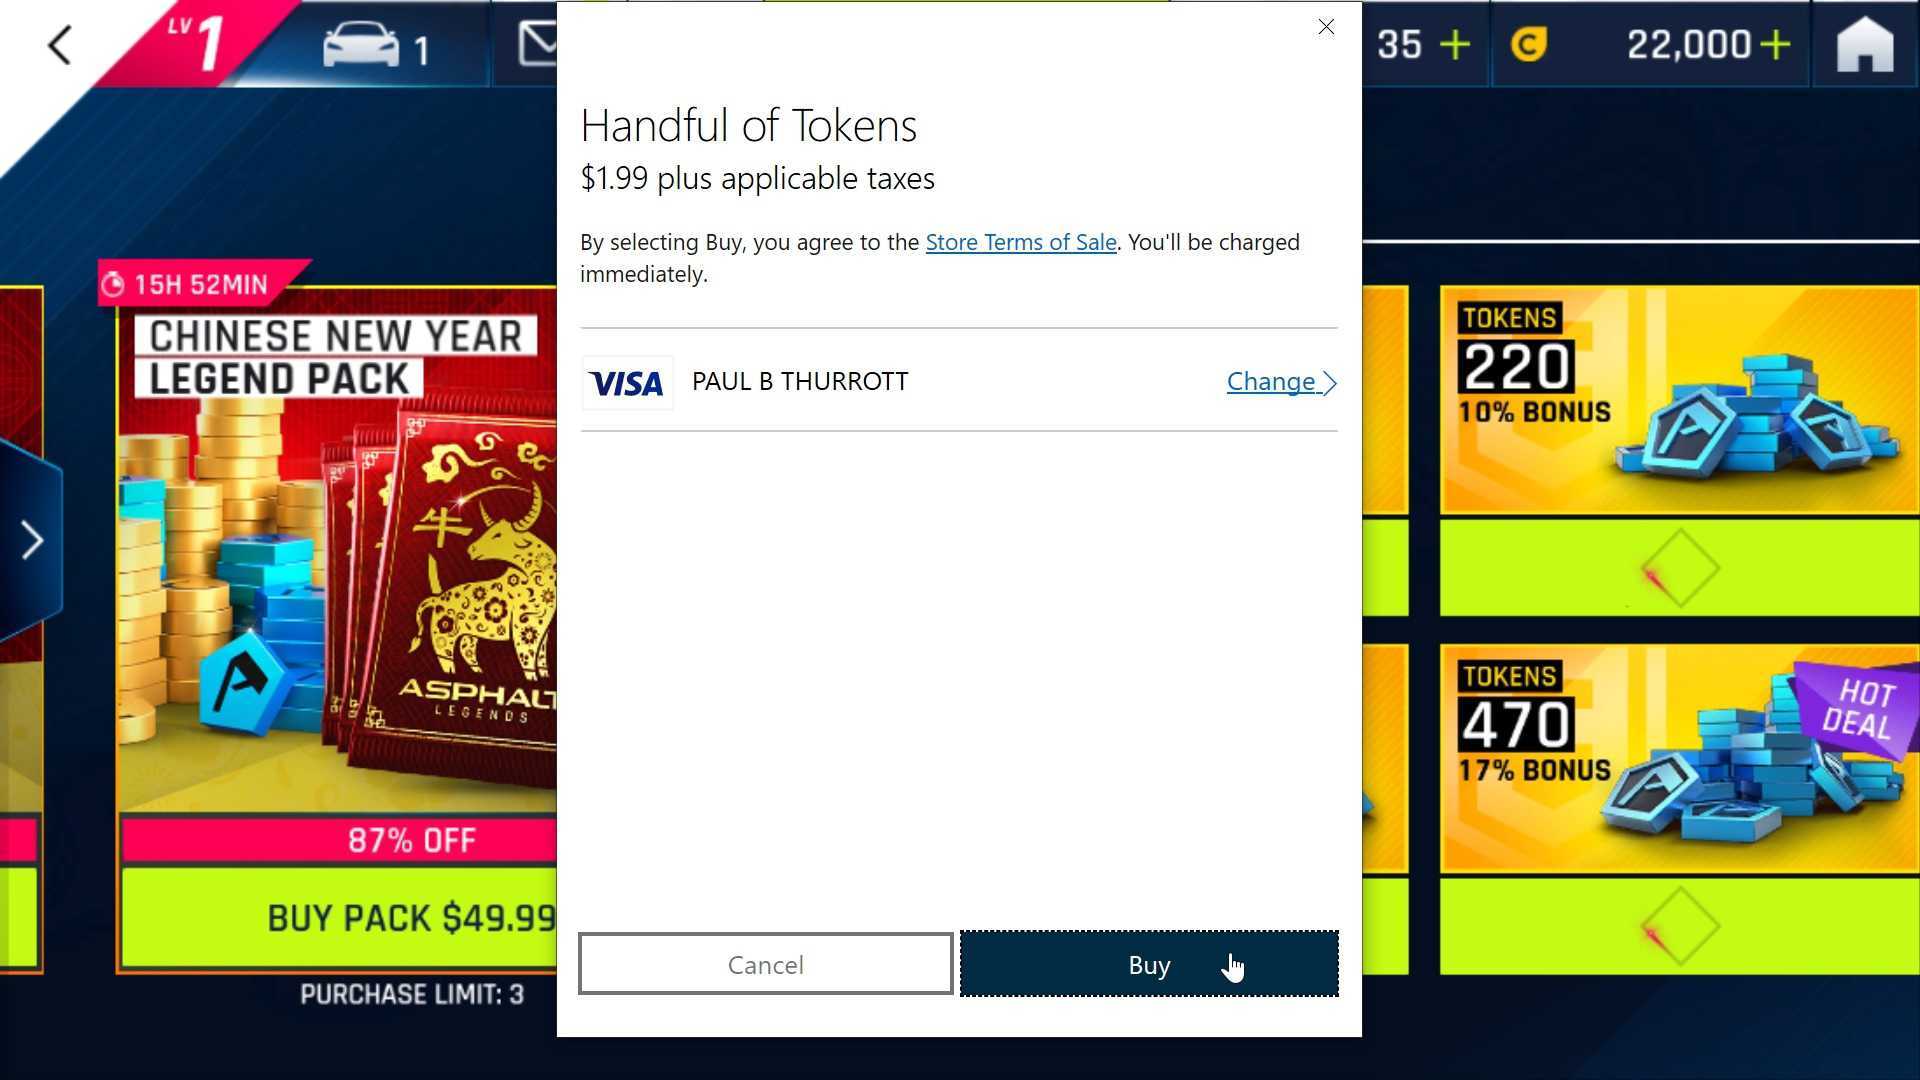
Purchase an app or game
As you might imagine, purchasing a paid app or game requires a few more steps than downloading a free (or previously purchased) item. You will be prompted to sign-in—using your password or a Windows Hello-based authentication action—and then asked to confirm which payment method you prefer to use.
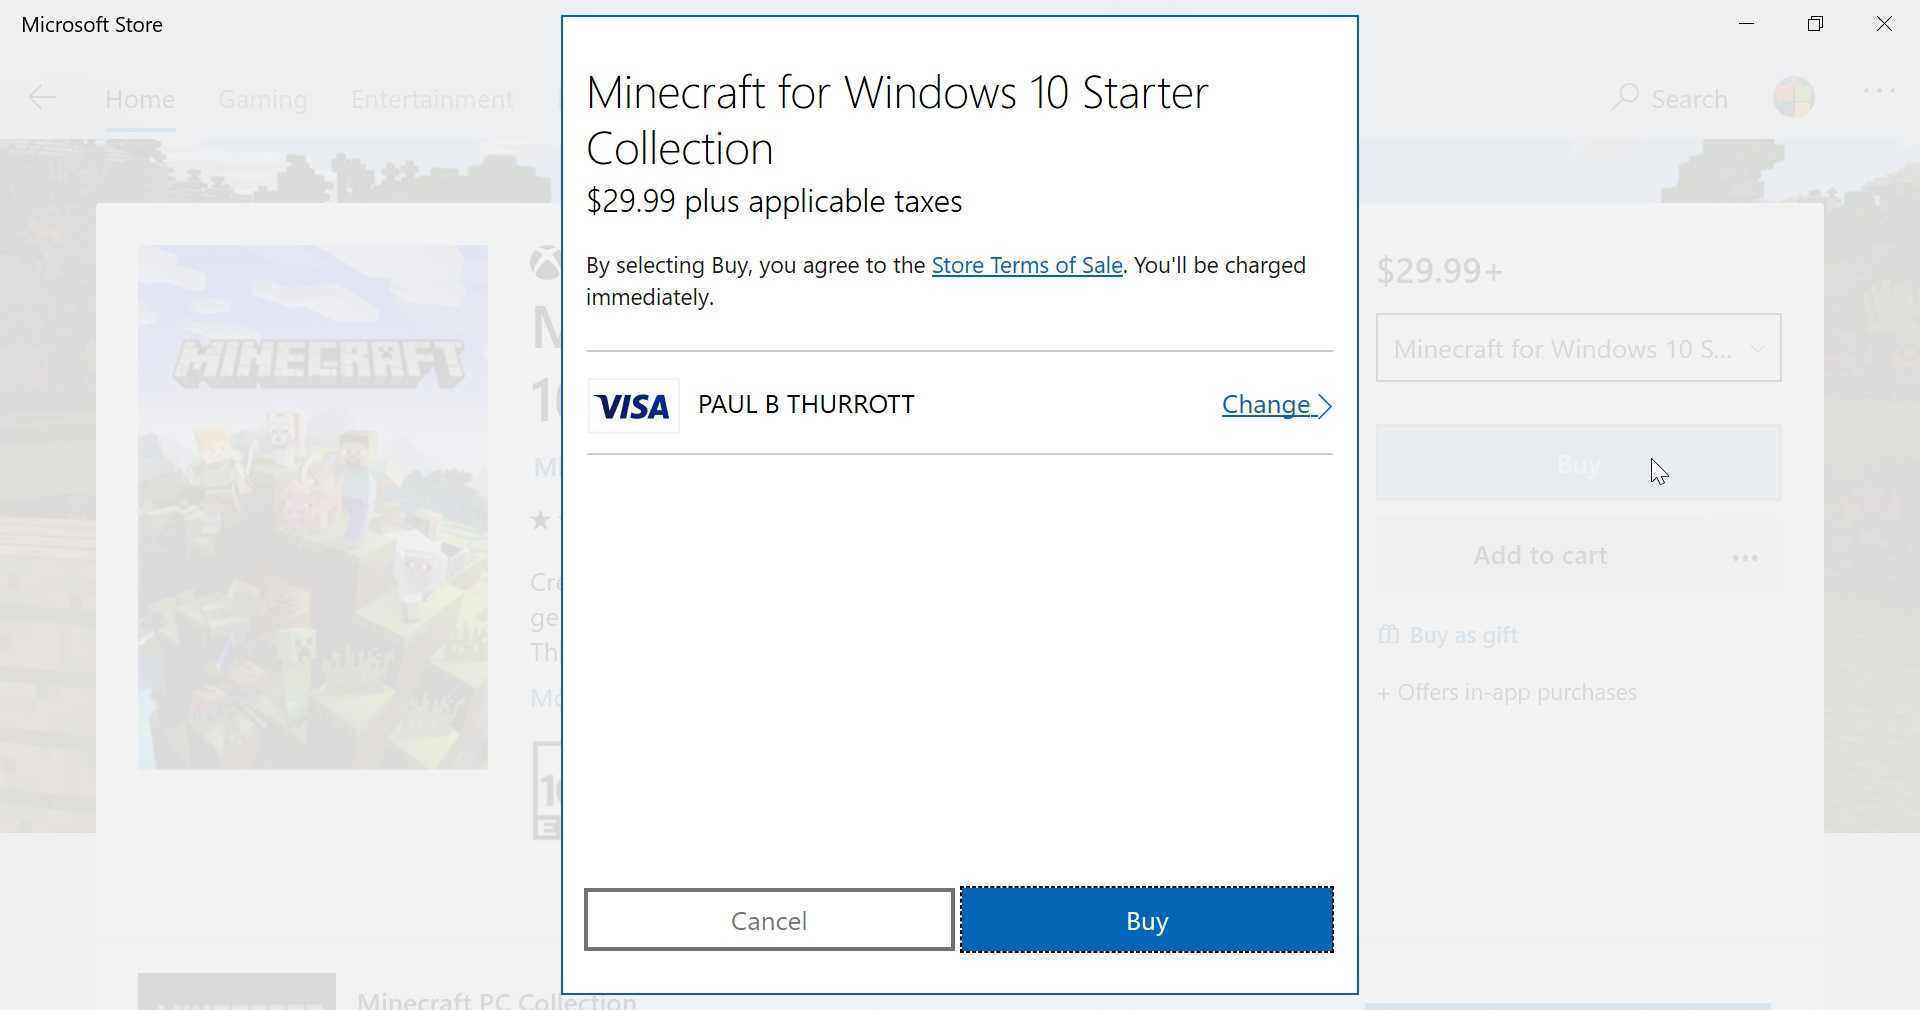
From there, the download process proceeds normally.
Make an in-app purchase
Some free apps—especially games—offer in-app purchases, which is one way for developers to monetize their work without requiring an upfront, one-time payment. (Another approach is to provide in-app advertising.) The types of in-app purchases you’ll see will vary from app to app, but the purchase process is the same. Like any Store purchase, you will need to sign-in and choose a payment method.
Update apps
By default, the Microsoft Store will automatically keep every Store app on your PC up to date, downloading and installing updates in the background as they appear. We think this behavior is desirable and beneficial for most users, and we don’t recommend changing it.
However, some may wish to monitor app updates and manually install these updates when they become available. To do so, open Store settings (See more > Settings). At the top of this display you will see an option, “Update apps automatically.” If you wish to disable automatic app updates for some reason, change this to Off.
You can also manually check for app updates: Open the Downloads and updates view (See more > Downloads and updates) and then select the Check for updates button.
Manage app notifications
Like mobile apps on Android and iOS, Store apps don’t need to be running to keep you up-to-date: They can display pop-up notification banners to alert you when something happens.
For example, the Mail app can notify you when new email messages arrive. And the News app can be configured to display notifications when important news breaks. But these banners aren’t the only place you can see app notifications: They will also display in Action Center, on your lock screen, and/or via the app’s live tile in Start.
Configure how app notifications work
That’s a lot of notifications, so you may wish to spend some time configuring how notifications work. You do so by navigating to Settings > System > Notifications & actions.
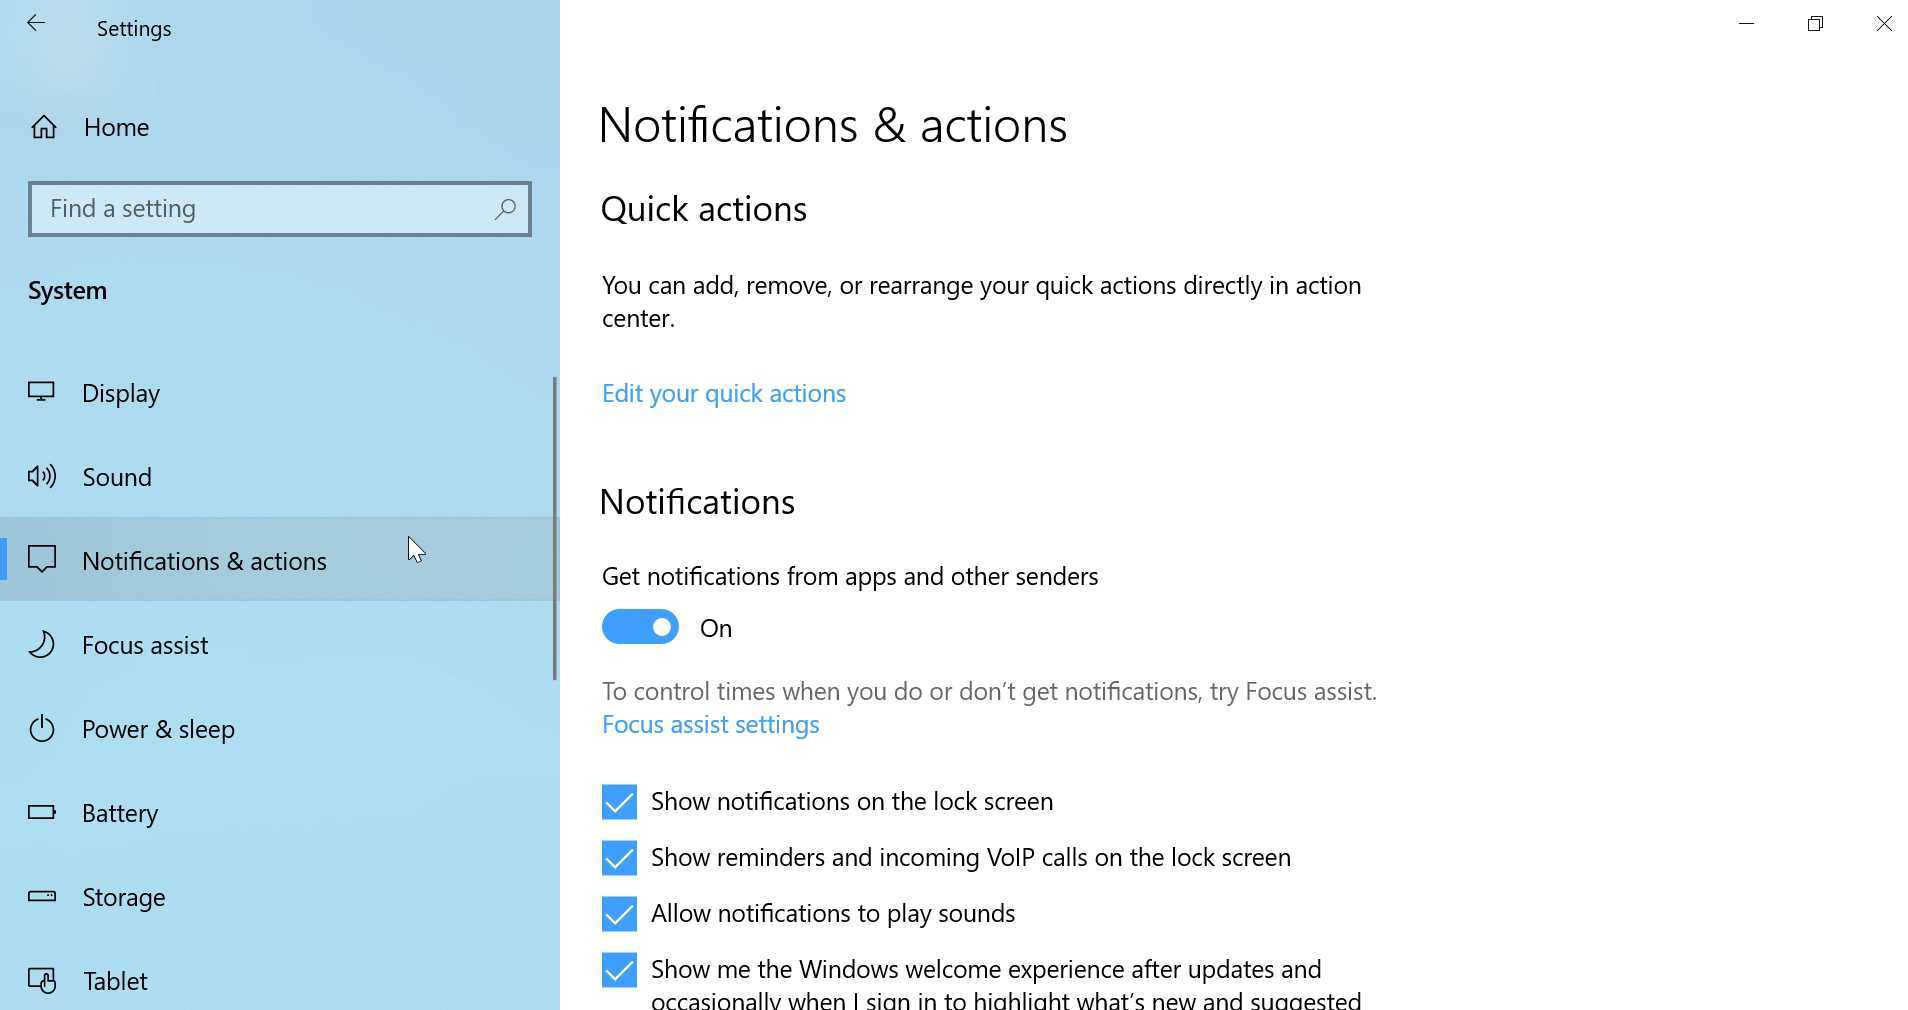
There are many options here. And while most are obvious enough—you can globally enable or disable pop-up notification banners and whether those banners appear over the lock screen, for example—the list of applications at the bottom is of particular interest. From here, you can configure how individual apps handle notifications.
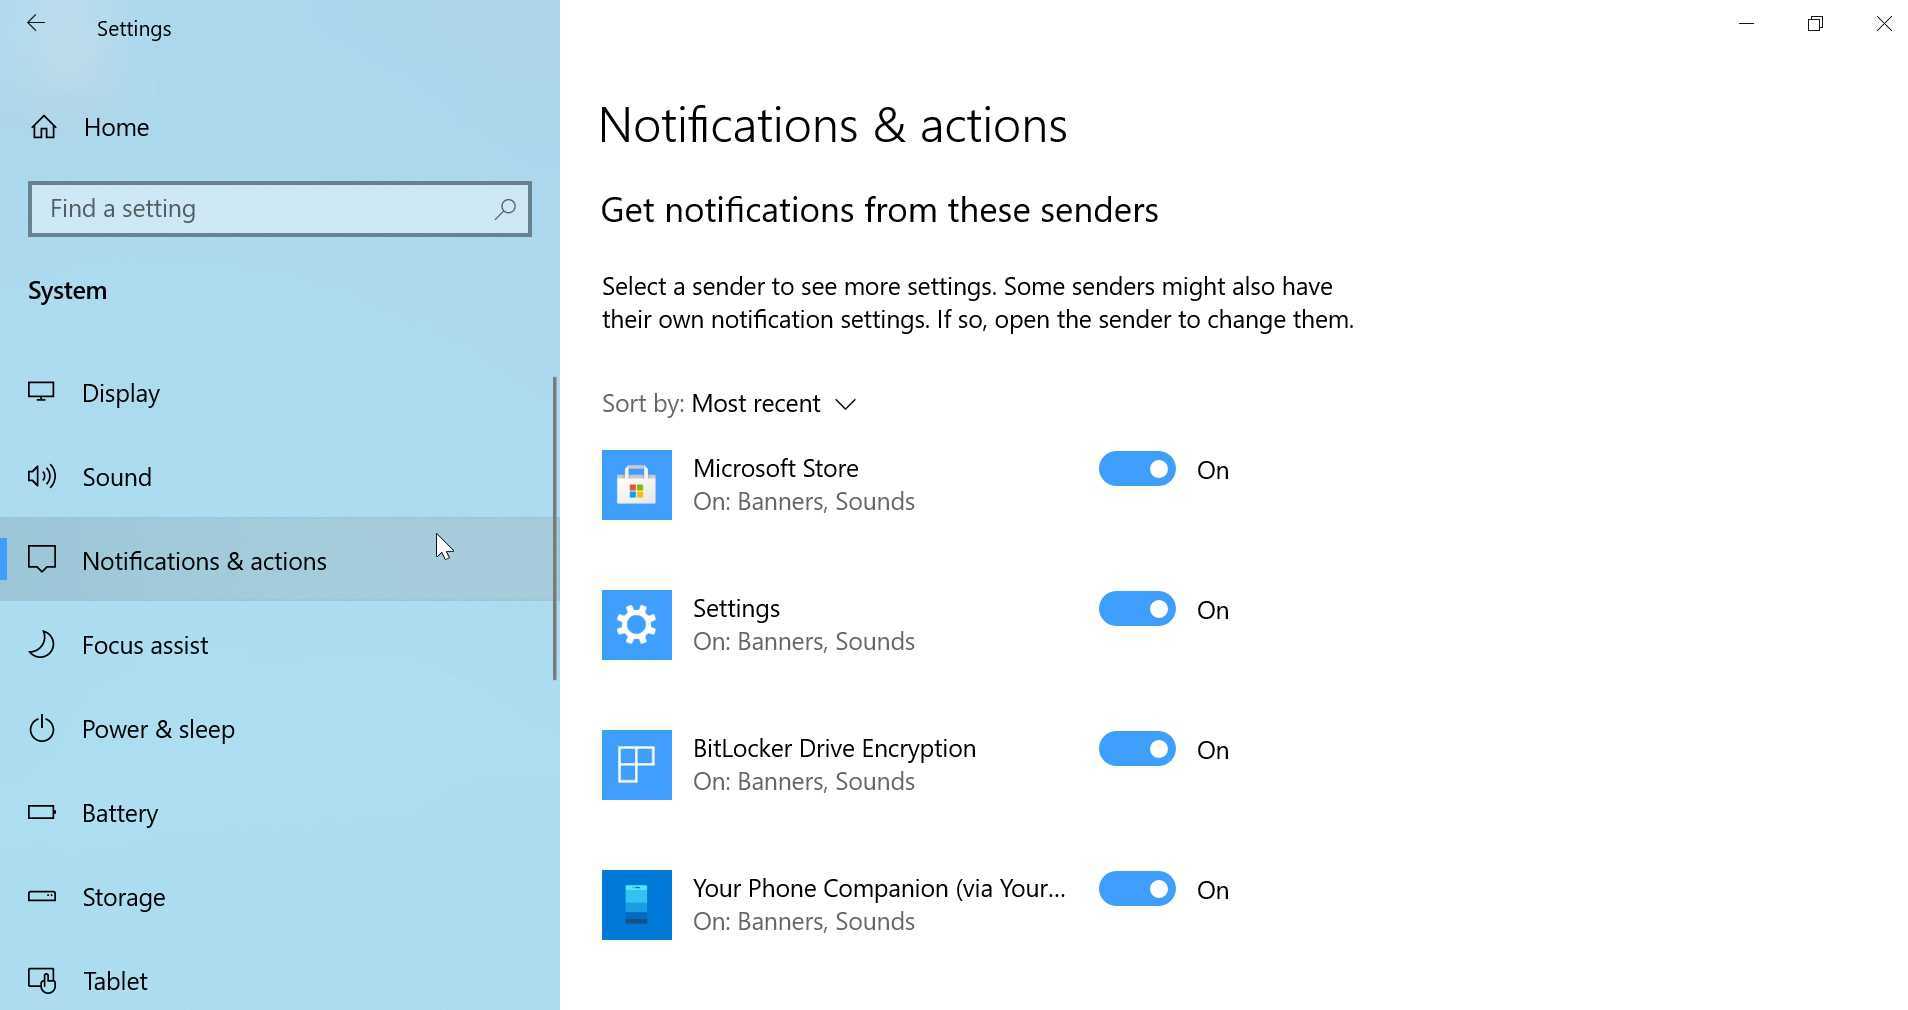
To disable all notifications for an individual app, just select the appropriate On/Off slider. Or, you can configure notifications in a more detailed way: When you select an app, you will see a list of notification options just for that app.

This page gives you much more control over app notifications: You can determine how and where they appear, whether a sound plays during a notification, and even an app’s priority level in Action Center.
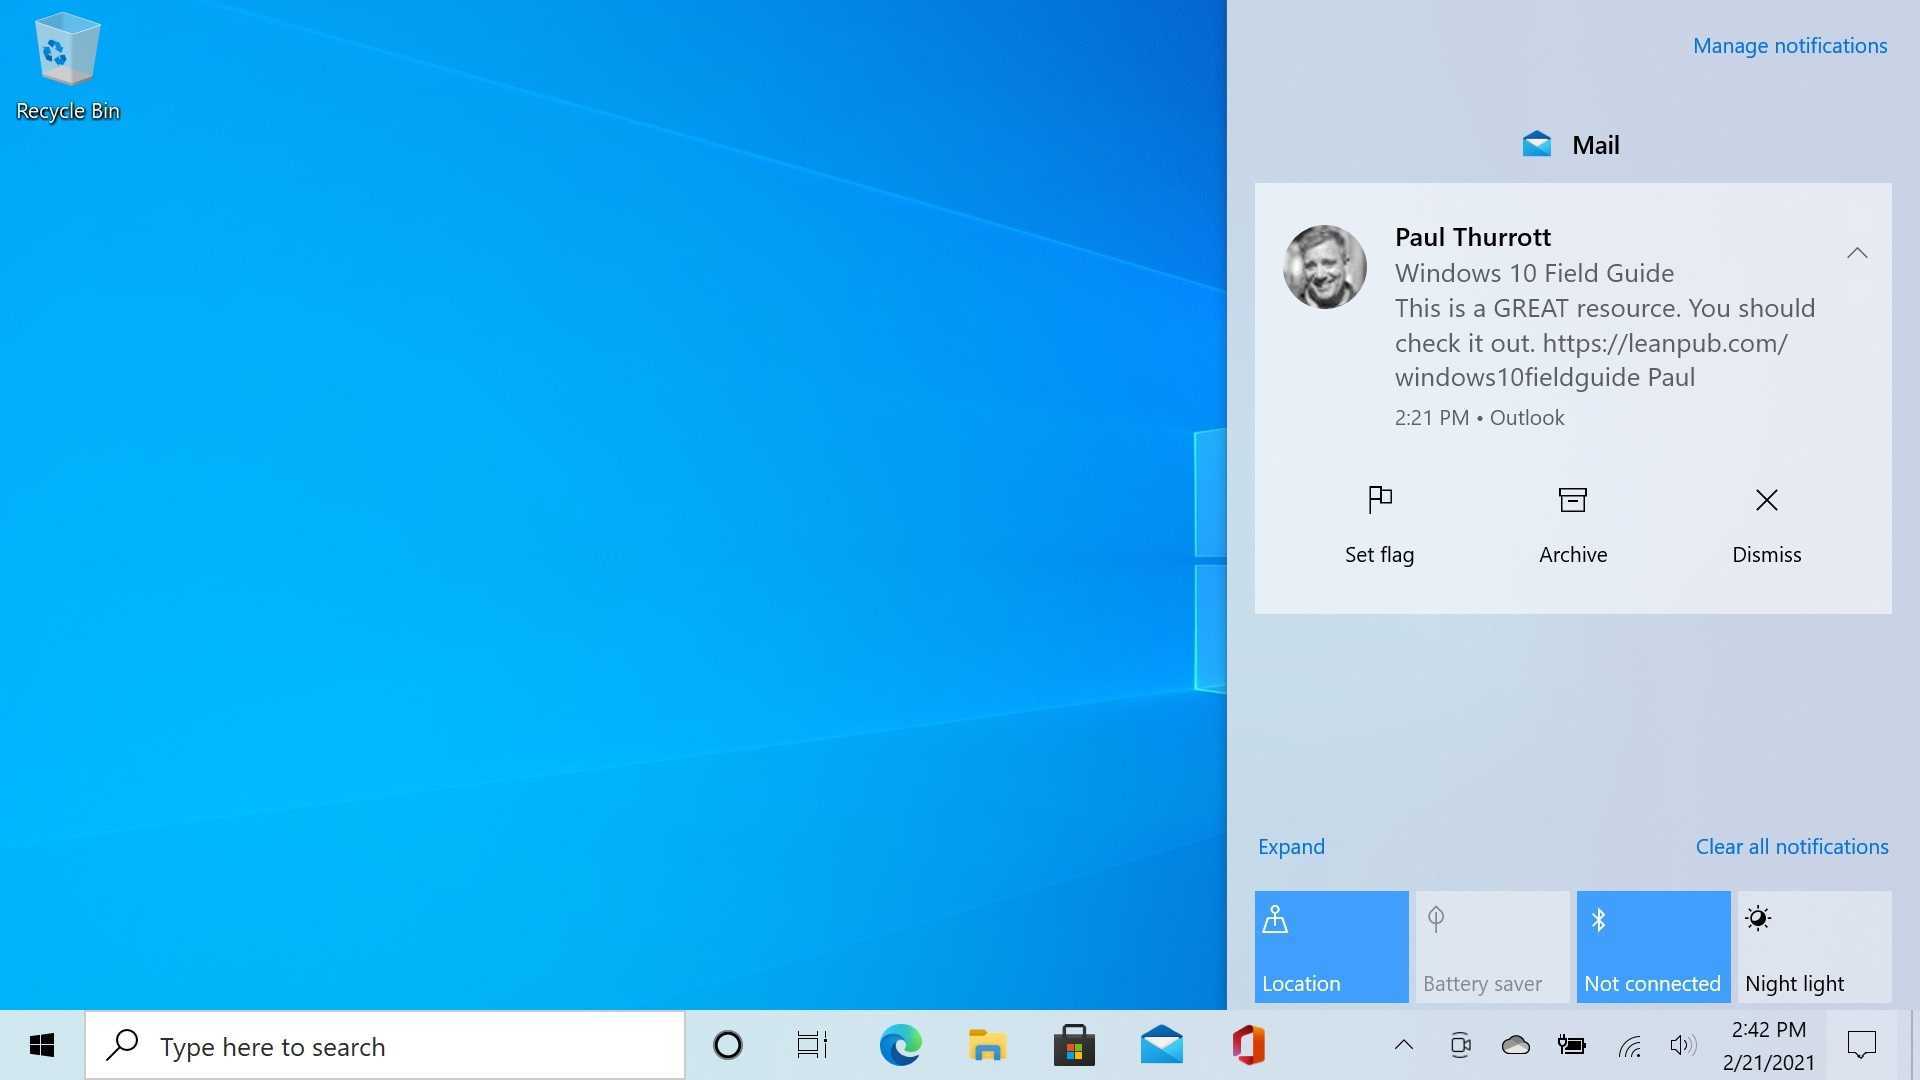
Handle an app notification as it appears
Notification banners appear as little windows in the lower-right corner of the screen. They will appear regardless of what you’re doing in Windows for the most part—they appear over the desktop, over apps, and over the lock screen by default—though their display is disabled during full-screen games.
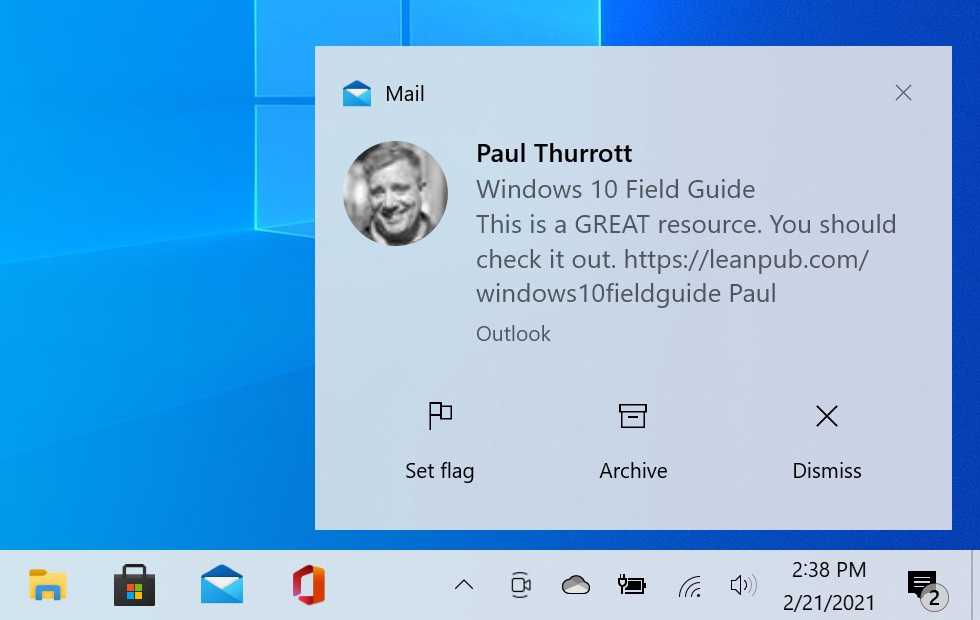
Notification banners vary by app. Some are interactive and provide options right on the window for dealing with the notification. In the image above, for example, you can see that Mail app notifications let you flag, archive, or delete a new email message right from the banner, without any need to launch the app.
As noted, if you select a notification banner before it disappears—they only stay visible for a few seconds—the underlying app that triggered that notification will open. But if you ignore or miss a notification banner, you can later view it and other notifications in the Action Center, as described below.
Handle previous app notifications
Action Center is the interface in Windows for managing notifications and quick actions, which are often-needed system functions like network settings, Airplane mode, and the like.
Action Center is a pane that appears on the right side of the desktop, but it is hidden by default. To display it, select the Action Center button towards the far right of system tray.
You don’t need to actively check Action Center for new notifications. It will subtly alert you when there are missed notifications via a number in a bubble overlay on top of the Action Center button. This number indicates how many new notifications await.

To access an app that triggered a notification, select the notification in the Action Center list. For example, if you select a newly-installed app as seen above, that app will launch.
You can interact with many notifications directly from Action Center, just as you can with notification banners. When you mouse over a notification in the Action Center, two new icons appear: A Clear (“x”) button, which is used to remove that notification, and a Settings (gear) icon.
Selecting the Settings icon displays a menu with two choices: “Go to notification settings,” which loads the Settings app, and “Turn off all notifications for [app name].”
See what’s new from the lock screen
Apps can optionally provide notifications over the lock screen so you can see what’s new when the PC is locked. But there are multiple places to look at if you wish to configure how notifications work on the lock screen.
Enable or disable lock screen notifications globally
In the section Manage app notifications, above, we described how you can manage how each Store app on your PC handles notifications. Among those options is one related to the lock screen. To see this, navigate to Settings > System > Notifications & actions. There, you will see an option titled “Show notifications on the lock screen.”
When enabled—as it is the default—notification banners will appear over the lock screen. So if you’re not interested in lock screen notifications, this is where you turn that off.
Determine whether individual app notifications appear over the lock screen
You can also determine whether apps can display content in notification banners over the lock screen on an app-by-app basis. That is, you might leave lock screen notifications enabled globally, but disable those notifications for some individual apps.
To do so, navigate to Settings > System > Notifications & actions. Then, select an app from the list under Get notifications from these senders. On the page that appears, you can enable or disable the option “Hide content when notifications are on lock screen.”
Personalize how notifications work on the lock screen
As discussed in the Personalize chapter, the lock screen also provides another form of notifications, called status updates. These are configured in Settings > Personalization > Lock screen. If you scroll down a bit, you’ll see a section called Choose which apps show quick status on the lock screen. Here, you can configure app icons for detailed status and quick status updates.
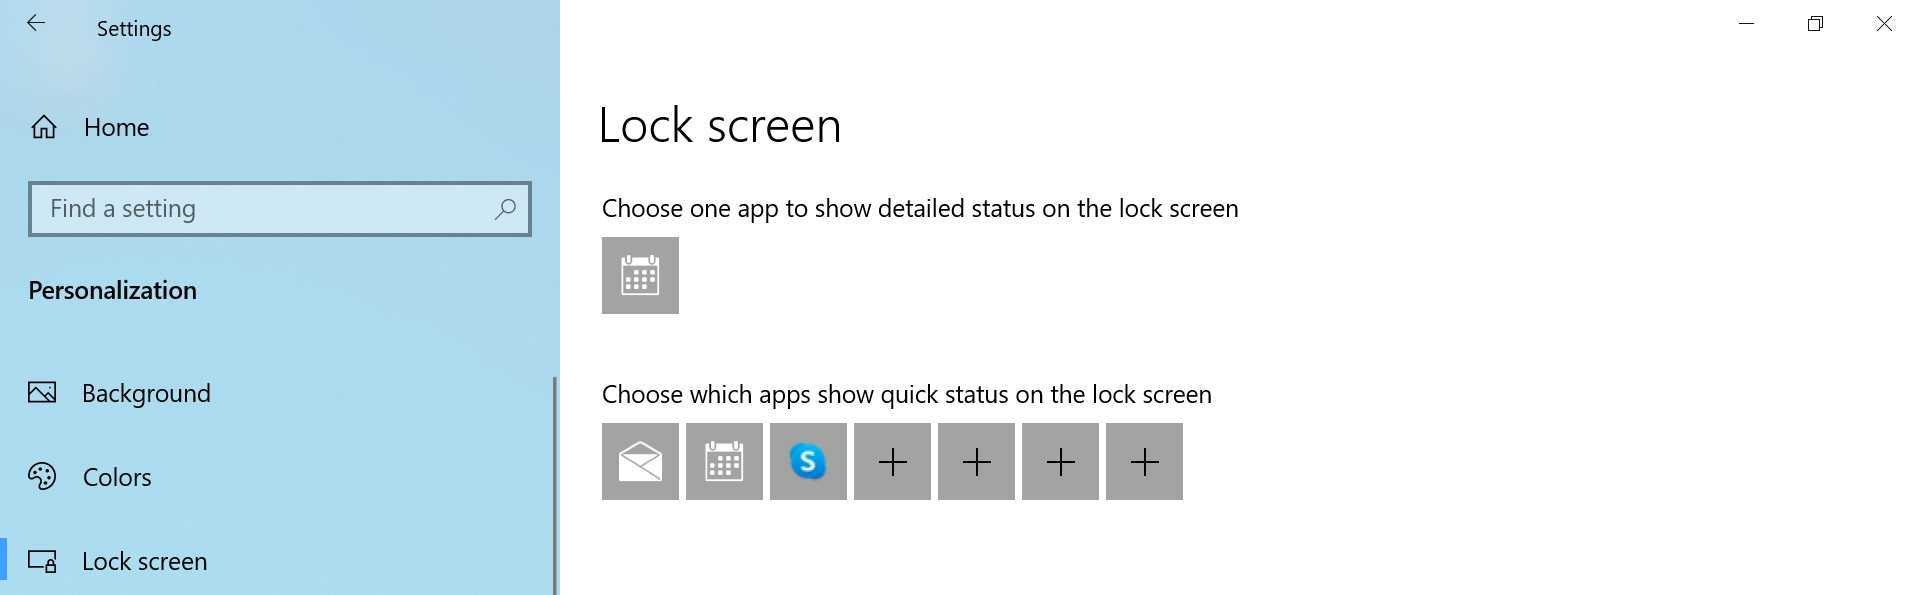
Windows lets you to have just a single app configured to display a detailed status, which isn’t really all that detailed; it’s usually just a short line of text. But lock screen status updates are pretty limited, too. You can configure up to seven apps that can display quick status notifications, and these are even less useful, and generally just provide an app icon with a number indicating how many notifications you’ve missed.
Worse, none of these lock screen notifications are actionable. That is, you cannot tap one, sign-in and go right to that app. Instead, you will need to manually find and launch any app that provided a notification.
See notifications in Start
Windows displays live tiles on the right side of your PC’s Start menu, and you can add and remove tiles and further customize their behavior as you see fit. By design, these tiles are more dynamic than the static icons of the past, and many are configured to display live, at-a-glance information.
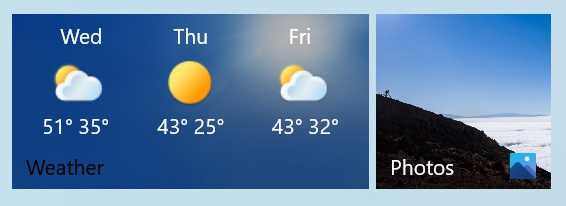
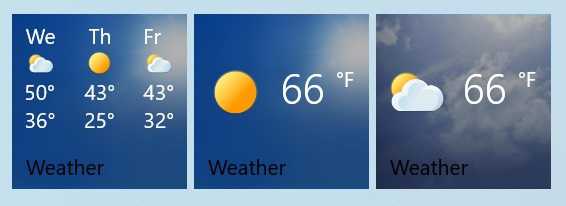
Live tiles help apps communicate what’s going on without forcing you to manually open each of them in turn. For example, the Weather app’s tile will display the forecast on its Start tile. And the News app will display recent headlines.
In addition to this behavior, some apps let you pin secondary tiles to Start as well. You do this from within the app, and how you do so varies from app to app.
The Mail app, for example, lets you pin individual email folders to Start. And Weather, shown here, lets you pin a favorite location to Start. In this way, you can see multiple forecasts at the same time.
Uninstall an app
Windows lets you uninstall apps—and desktop applications—in a variety of ways. But the easiest, perhaps, is to do so from Start.
To get started, just find the app you wish to remove anywhere in Start—the All Apps list, the tiles area, whatever—right-click (or, with touch, tap and hold) and choose Uninstall (or More > Uninstall) from the pop-up menu that appears.
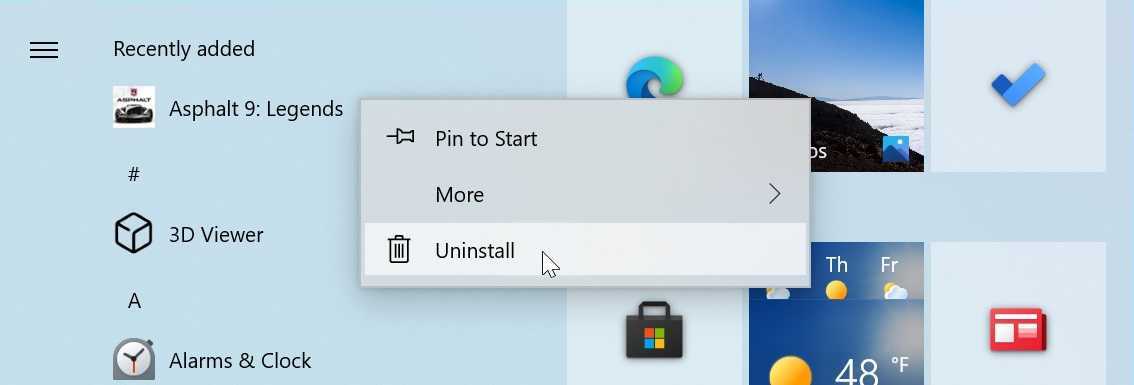
If you are uninstalling a Store app, you’ll be asked to confirm this decision.
If you are uninstalling a desktop application, the process is slightly different. The Programs and Features control panel will appear so you can then uninstall the application from there.
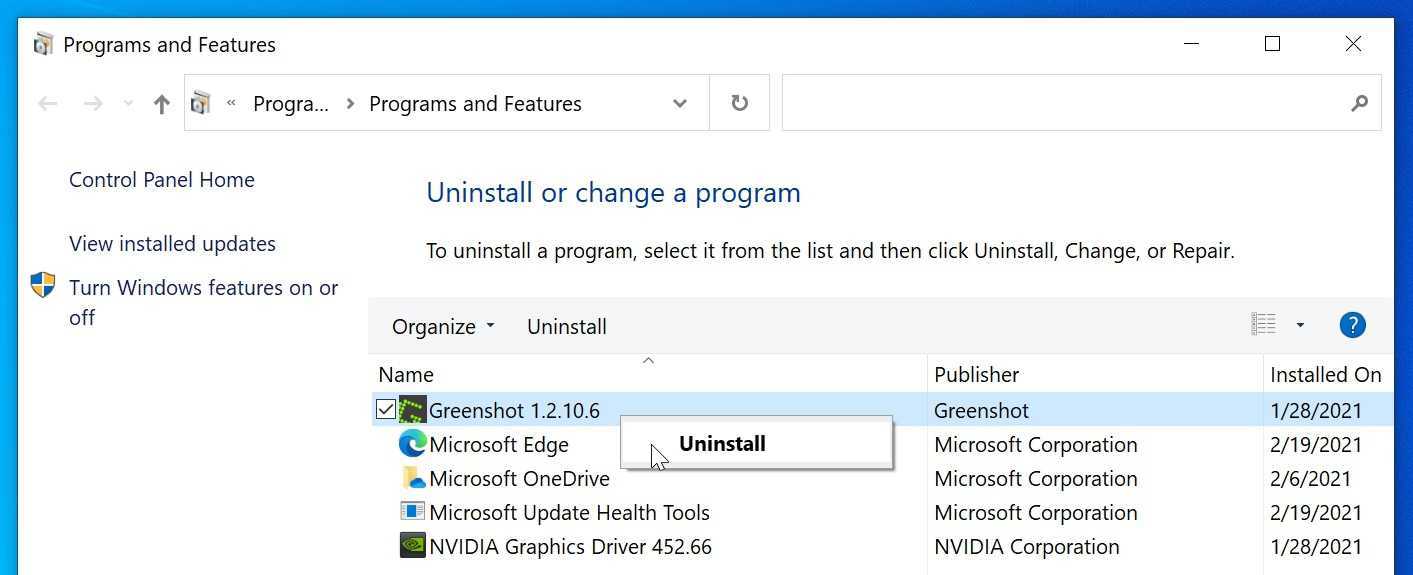
What you see next will vary somewhat according to the application, and some desktop applications also provide other options, such as the ability to add or remove features or fix a problem. Some will also require you to reboot the PC to complete the uninstall process.
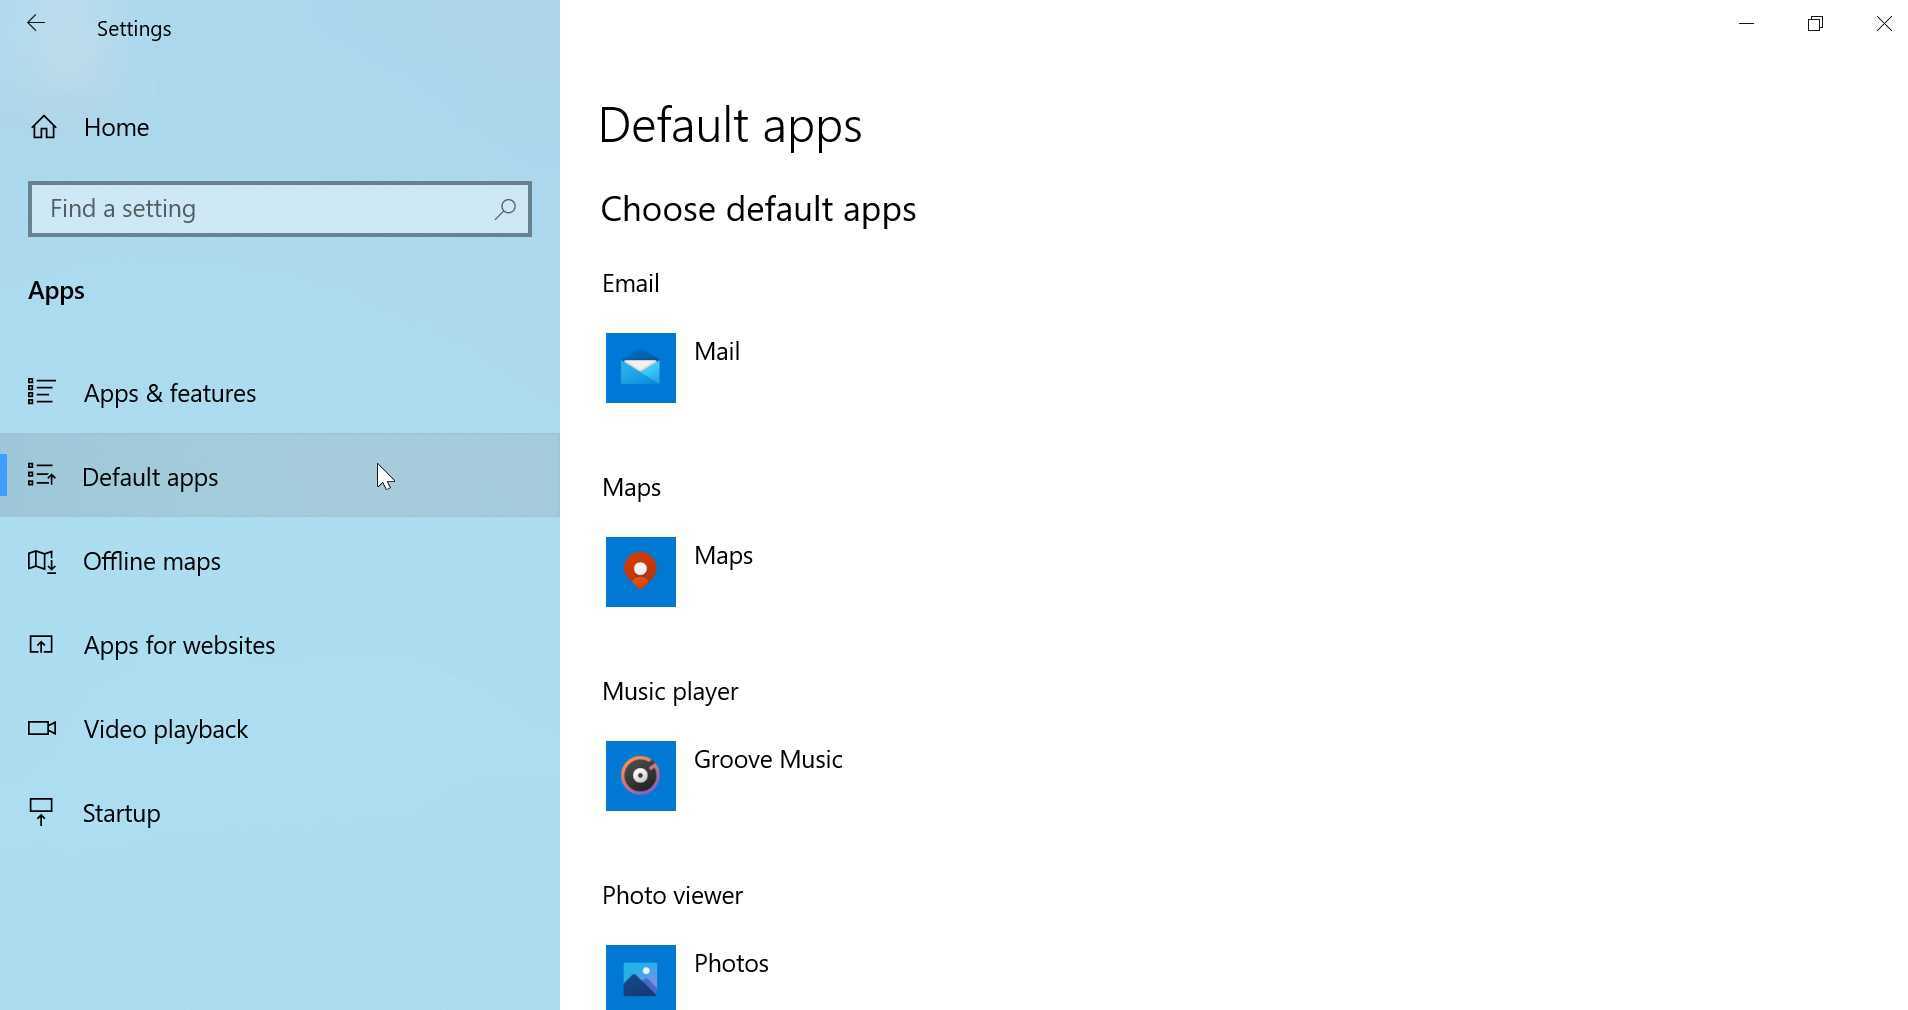
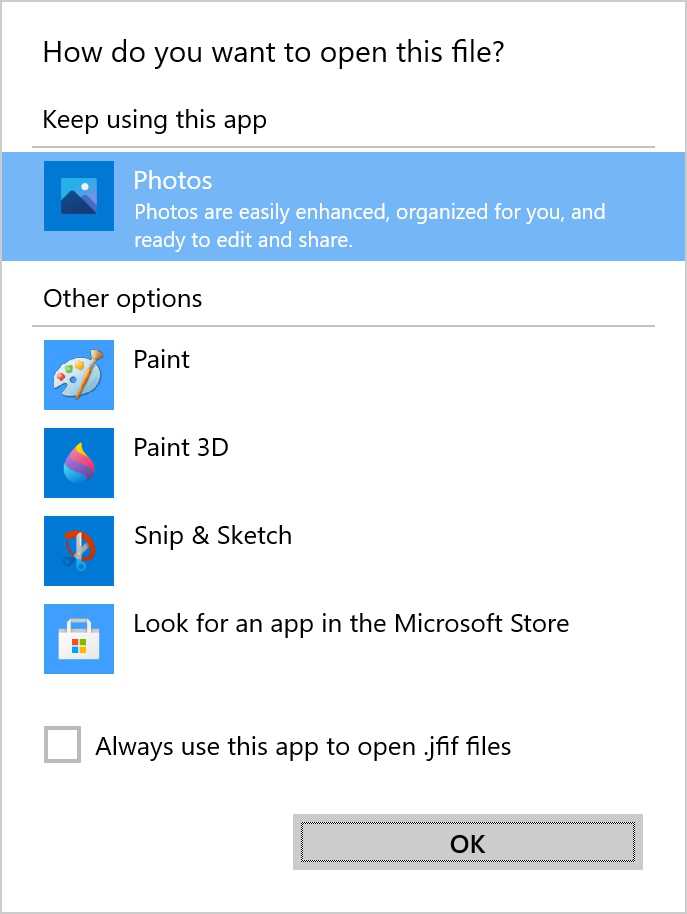
Configure default apps
Windows provides a Default apps interface in Settings so that you can determine which apps respond to specific actions, such as opening common file types. To see this, navigate to Settings > Apps > Default apps.
To change the default app for a particular action—Email, Maps, Music player, and so on—simply select the app that is currently configured. A pop-up will appear, providing you with a list of the available options.
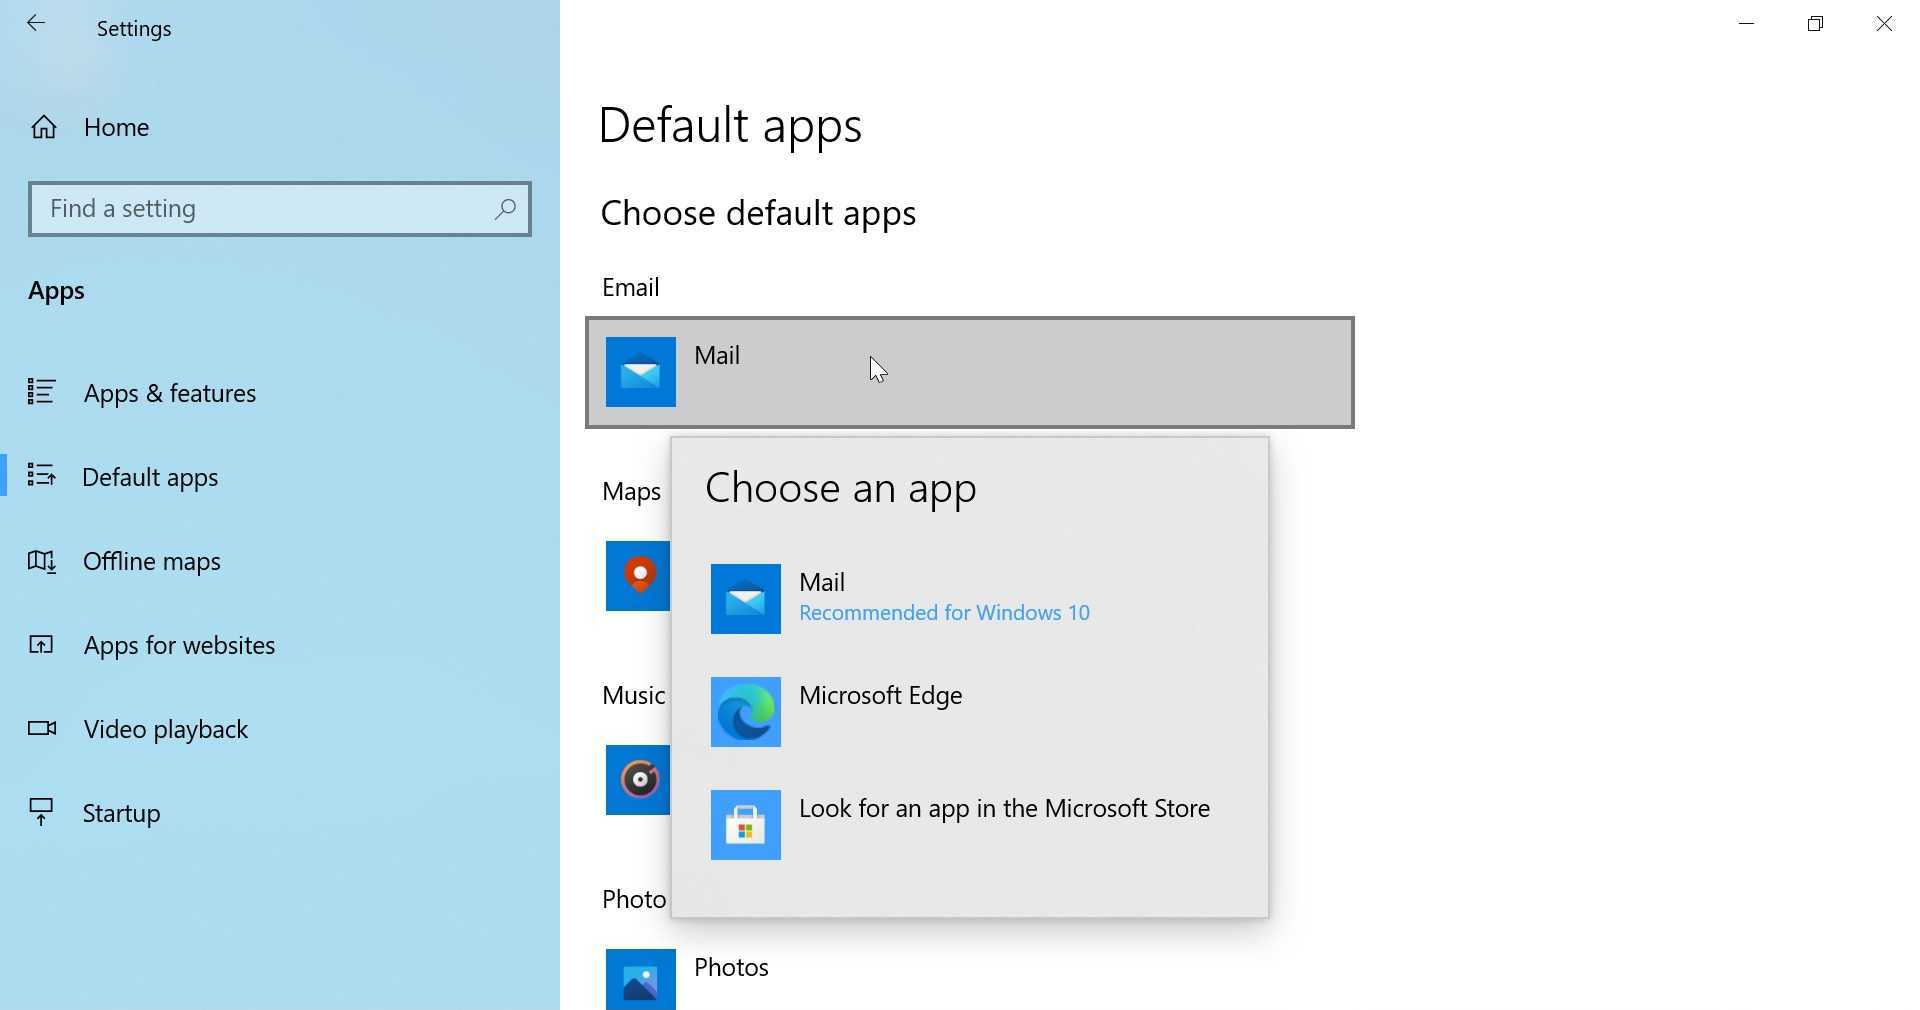
You will also be given the option to choose a default app the first time you open certain file types for the first time. You can use the pop-up that appears to choose an app for just this one time. Or you can also select the “Always use this app” link to make it permanent.
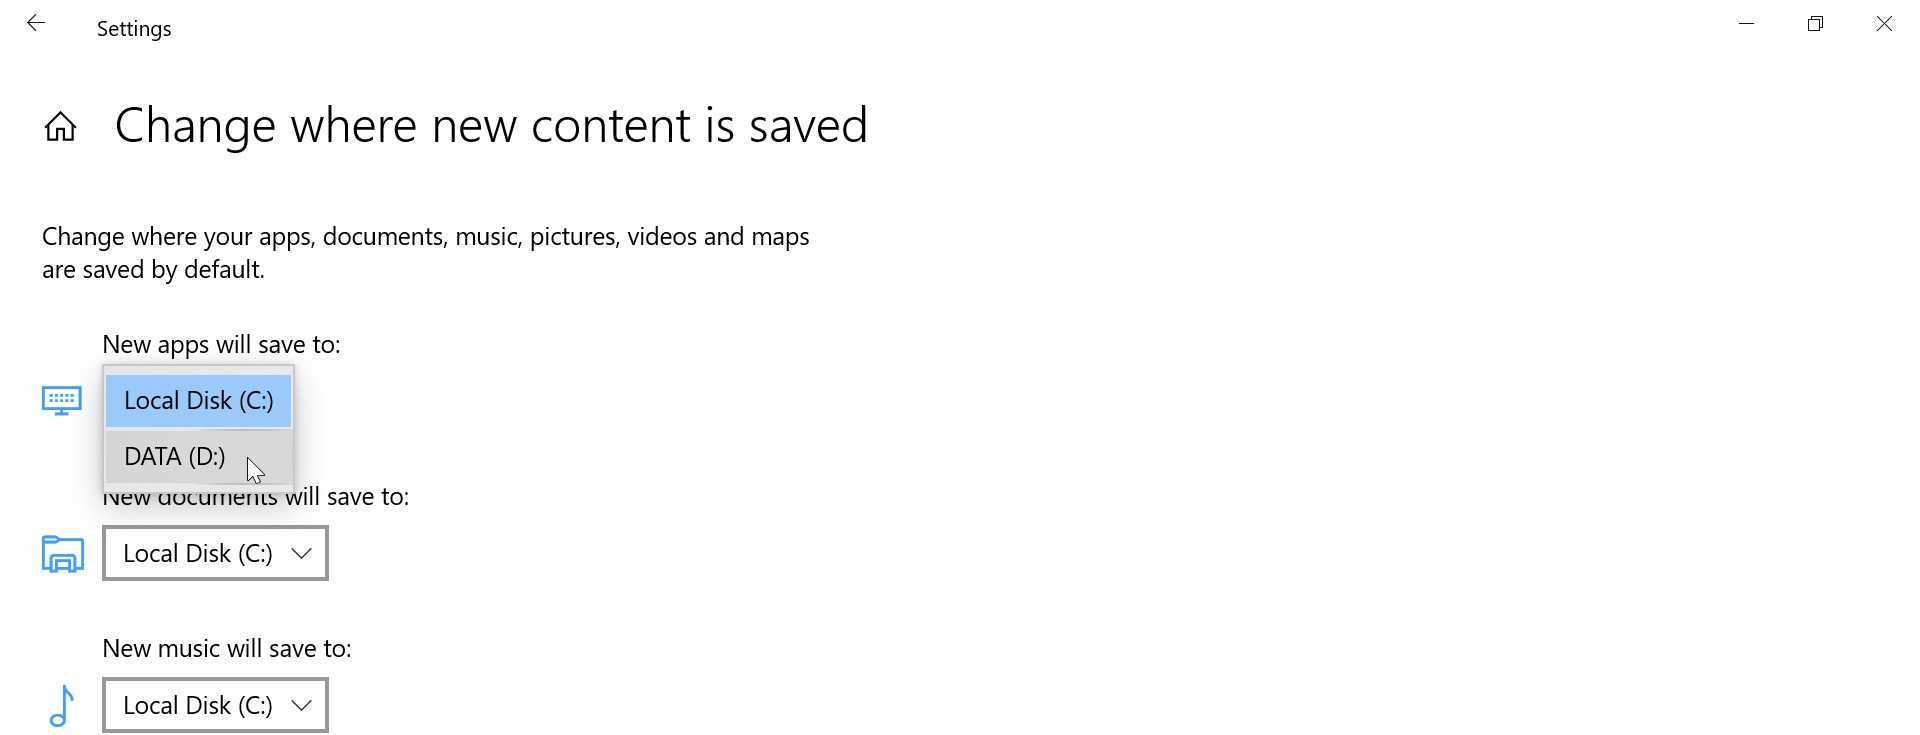
Configure where apps are located
By default, apps are installed on your C: drive. But if your PC has multiple drives or partitions, you can change the default location and, in many cases, move Store apps to a new location.
Determine where new app installs are located
To determine where apps are installed by default, navigate to Settings > System > Storage. Then, select the link “Change where new content is saved” under More storage settings.
To change new app installs to another drive, select the drop-down under “New apps will save to:” and change the location.
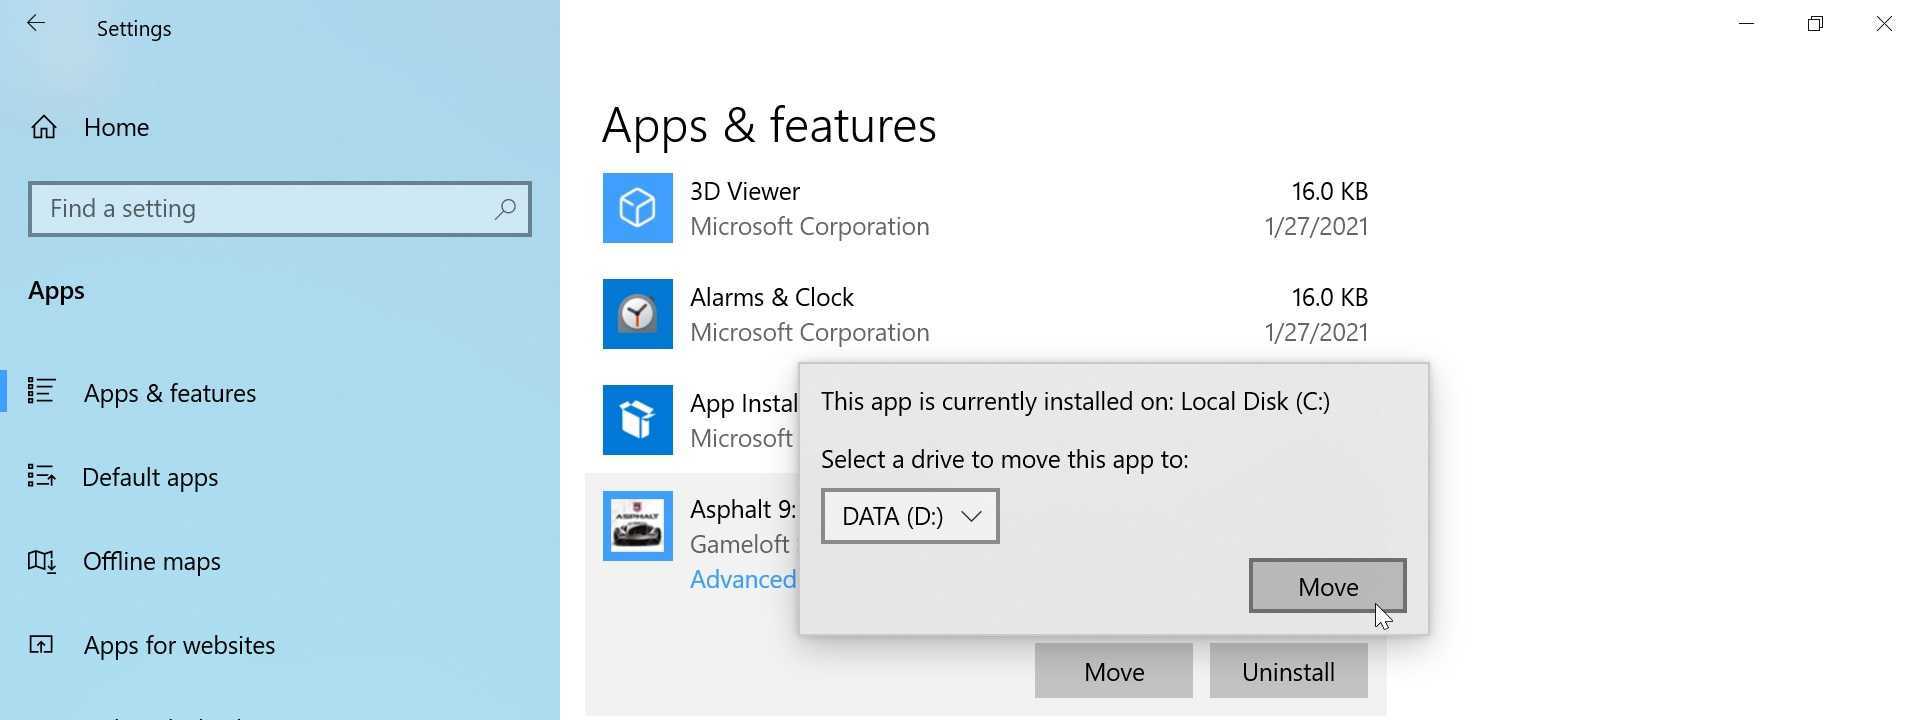
Move an app to a new location
You can also move most Store apps to a different drive. This is helpful if you are running out of space on a drive, or have installed a new drive for this purpose.
To do so, navigate to Settings > Apps > Apps & features. Then, select the app you wish to move. When you do, it expands to reveal Move and Uninstall buttons. Select Move and then, when prompted, the drive to which you’d like to move the app.