Getting Started
This chapter is about how to get started using Git. It begins with a general introduction to version control systems, moves on to how to get Git running on your system, and finishes with how to start actually using Git. By the end of this chapter you should understand why Git exists and, more importantly, why you should use it.
About Version Control
What is version control, and why should you care? Version control is a technique for managing changes to files over time. This makes it possible to revert a file back to a previous version, revert an entire project back to a previous version, review changes made over time, see who made a change that might be causing a problem, and more. Even though the examples in this book use version control to manage computer source code files, in reality you can use version control to manage any type of file.
Local Version Control Systems
One popular version control method is to copy files into another directory (perhaps with a name cleverly containing a version number or the current date and time) each time you make a change. This approach is very common because it’s so simple, but it’s also incredibly error prone. It’s easy to forget which directory you should be using and accidentally open the wrong file or copy over files when you don’t mean to.
To deal with this issue, programmers long ago developed version control systems (VCSs) based on the concept of a simple version database on the local disk that contains all the changes to their files (see Figure 1-1).
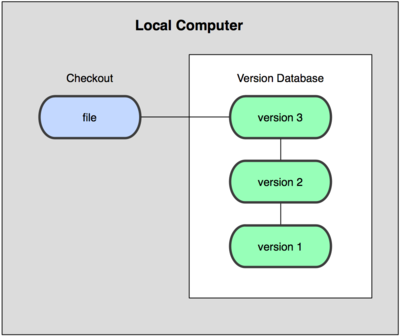
Figure 1-1. Local version control diagram.
One of the more popular VCSs was a system called RCS, which is still distributed with many computers today. Even the popular Mac OS X operating system includes RCS when you install the Developer Tools. This tool basically works by keeping patch sets (that is, the differences between files) from one revision to another. Using these patch sets, RCS can then recreate what any file looked like at any point in time by applying the necessary patches.
Centralized Version Control Systems
The next major issue that people encounter is needing to collaborate with developers on other systems. To deal with this problem, centralized version control systems (CVCSs) were developed. These systems, such as CVS, Subversion, and Perforce, rely on a single server that contains the version database. Clients check files in and out from that remote server. This has been the standard for version control for many years (see Figure 1-2).
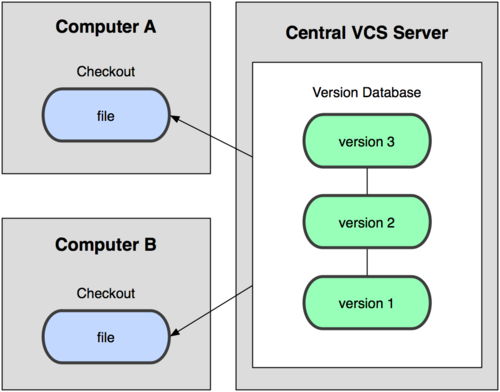
Figure 1-2. Centralized version control diagram.
This approach offers many advantages, especially over local VCSs. For example, everyone can see, to a certain degree, what everyone else working on the project is doing. Administrators can have fine-grained control over who can do what, and it’s far easier to administer a CVCS than it is to deal with local repositories on every client.
However, this approach also has some serious downsides. The most obvious is the single point of failure the centralized server presents. If that server goes down for an hour, then during that time nobody can collaborate at all or save changes to anything they’re working on. If the file system the central version database is stored on becomes corrupted, and proper backups haven’t been kept, you lose absolutely everything — the entire history of the project except whatever copies people happen to have on their local machines. Local VCS systems suffer from this same problem — whenever you have the entire history of a project in a single place, you risk losing everything.
The other problem is how to resolve conflicts when multiple developers need to work on the same file at the same time. One extreme solution would be for the first user to lock the file to prevent others from making any changes to it. Problems arise when many developers need to make changes to the same file, or if a developer who locked a file goes on vacation. CVCSs often come with tools to help resolve change conflicts but this work has to be done by hand, and simply isn’t acceptable in large projects.
Distributed Version Control Systems
This is where distributed version control systems (DVCSs) step in. In a DVCS (such as Git, Mercurial, Bazaar, or Darcs), clients don’t just check out the latest snapshot of files. Rather, they fully mirror the version database, otherwise known as the repository, on their local disk. Thus, if any server dies, any of the client repositories can be copied back to the server after it’s rebuilt. Every client really contains a full backup of the repository (see Figure 1-3).
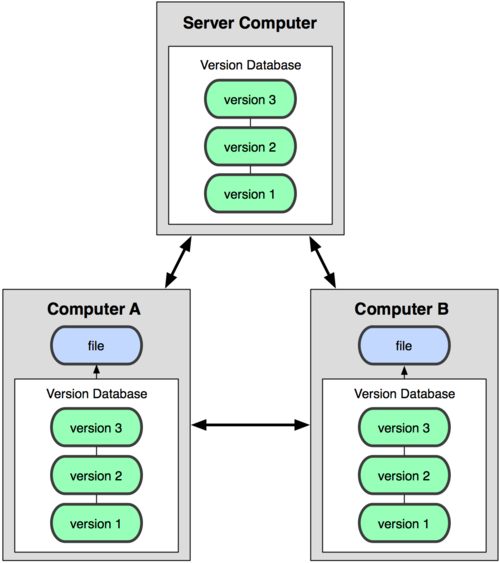
Figure 1-3. Distributed version control diagram.
Furthermore, many of these DVCSs deal pretty well with sharing remote repositories, so you can collaborate with many other people who are all working simultaneously on the same project. This allows doing things in ways that aren’t possible in centralized systems.
A Short History of Git
As with many great things in life, Git began with a bit of creative destruction and fiery controversy. The Linux kernel is an extremely large open source software project — large both in the amount of code and also in the number of people working on it. For most of the early lifetime of the Linux kernel (1991–2002), changes to its source code were passed around as patches and archived files. This eventually became impossibly unwieldy so in 2002, Linus Torvalds, the creator of Linux, moved the Linux kernel project to a DVCS called BitKeeper. Although BitKeeper was a proprietary product, the company behind it agreed to allow the Linux project to use it free-of-charge, subject to certain conditions.
In 2005, this agreement broke down, and the tool’s free-of-charge status was revoked. This prompted the Linux development community to develop their own DVCS based on some of the lessons they learned while using BitKeeper. Some of the goals of the new system were:
- Speed
- Simple design
- Strong support for non-linear development (thousands of parallel branches)
- Fully distributed
- Able to handle large projects like the Linux kernel efficiently (speed and data size)
Since its birth in 2005, Git has evolved and matured, and yet retains these critical qualities. It’s incredibly fast, it’s very efficient with large projects, and it has an incredible branching system for non-linear development (See Chapter 3).
Git Basics
So, what is Git? This is an important question, because if you understand what Git is and the fundamentals of how it works, then using it effectively will be much easier. As you learn Git, try to clear your mind of the things you may know about other VCSs, such as Subversion and Perforce. This will help avoid subtle confusion. Git stores and thinks about information much differently than these other systems, even though the user interface is fairly similar. Understanding those differences is key.
Snapshots, Not Differences
The major difference between Git and other VCSs is the way Git records changes to files. Conceptually, most other systems (CVS, Subversion, Perforce, Bazaar, and so on) organize the information they keep as a set of files along with the changes made to each file over time, as illustrated in Figure 1-4. Also, with some early VCSs you would checkout individual files, make changes to them, and then check them back in again.
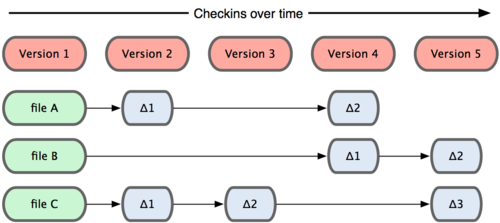
Figure 1-4. Other systems tend to store data as changes to a base version of each file.
Git doesn’t work this way. Instead, Git stores its data more like a collection of directory trees. Every time you commit, or save the state of your project, Git basically copies all your files into a new directory tree in the Git repository. This is a bit of an exaggeration — to be efficient, if files haven’t changed since the previous commit, Git doesn’t store the files again — it just stores a pointer to the previous version already in the repository. Git thinks about its data more like Figure 1-5.
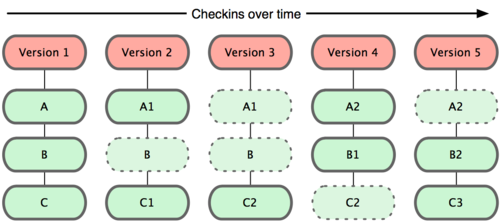
Figure 1-5. Git stores data as snapshots of the project over time.
This is an important distinction between Git and nearly all other VCSs. This efficient collection of multiple directory trees allows some incredibly powerful tools to be built. I’ll explore some of the benefits Git gains by storing files this way when I cover branching in Chapter 3.
All Repositories Are Technically Equivalent
Another major difference between Git and other systems is that technically there’s no difference between the copies of the repositories located on the workstations of the developers working on the project. The fact that one repository is used as the official project repository is a management decision, not a technical distinction. Sure, it means that all changes must be somehow copied to the official repository, and eventually to the repositories on developer’s workstations. Fortunately, as you’ll see, Git is very good at doing these things. But the point is that there’s no way to recognize that a particular repository is the official project repository simply by looking at it. I’ll talk a lot more about this in Chapter 5.
Nearly Every Operation Is Local
Most operations in Git only use local resources — generally nothing is needed from another computer on the network. If you’re used to a CVCS, where most operations suffer from network latency, this aspect of Git alone will make you think that the gods have blessed Git with unworldly powers. Because you have the entire history of the project right there on your local disk, most operations seem almost instantaneous.
For example, to retrieve the history of a project, Git doesn’t need to access a remote server — Git simply reads the history directly from your local repository. This means you see the project history almost instantly. To see the changes between the current version of a file and the version from a month ago, Git can retrieve both versions of the file locally and also compare them on the local machine, instead of having to either ask a remote server to do it or to fetch an older version of the file from a remote server.
This also means that there is very little you can’t do when you’re offline. If you’re on an airplane or a train and want to do a little work, you can do so happily until you get back online. If you go home and your internet connection is down, you can still work. In many other systems, it’s either impossible or painful to get any work done when you’re offline. In Perforce, for example, you can’t do much when you aren’t connected to the server. In Subversion and CVS, you can edit files, but you can’t commit changes because your repository is inaccessible. This may not seem like a huge deal, but you may be surprised what a big difference it can make.
Git Has Integrity
Every file in Git is checksummed before it’s stored. This means it’s impossible to change the contents of any file without Git knowing about it. This functionality is built into Git at the lowest levels and is integral to its philosophy. You can’t lose information in transit or experience file corruption without Git being able to detect it.
The method that Git uses for this checksumming is called an SHA-1 hash. This is a 40-character string composed of hexadecimal characters (0–9 and a–f), and is calculated based on the contents of a file. An SHA-1 hash looks something like this:
1 24b9da6552252987aa493b52f8696cd6d3b00373
You’ll see these SHA-1 hash values all over the place in Git because they’re used so much. In fact, Git stores everything not by file name but by the SHA-1 hash value of its contents. The only way to reference the file is by that checksum. I’ll be talking about this in great detail later.
Git Generally Only Adds Data
When you do something in Git, you almost always only add to the Git repository. It’s very difficult to get Git to do anything that is not undoable or that erases data in any way. As in any VCS, you can lose or mess up changes you haven’t committed yet. But after you commit a change into Git, it’s very difficult to lose.
This makes using Git a joy because I know I can experiment without any danger of screwing things up. For a more in-depth look at how Git stores its data and how to recover data that seems lost, see Chapter 9.
The Three Locations
Now it’s time to become familiar with the three places that you’ll need to be aware of when working with Git. These are the working directory, the staging area, and the Git repository.
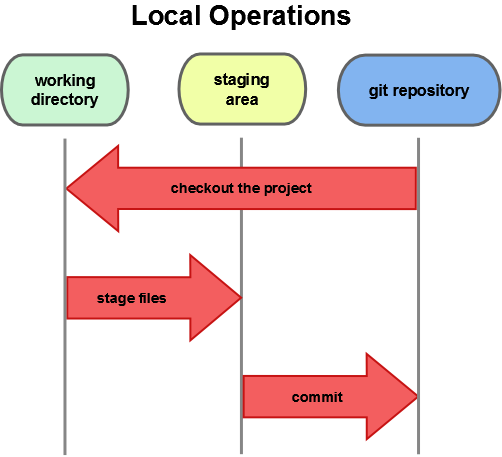
Figure 1-6. Working directory, staging area, and Git repository.
The working directory is a directory tree containing a copy of one version of a project. This is where you make modifications to the project. You can put this anywhere on your local disk where you have write permission.
The staging area is something unique to Git. Think of it as a special directory tree that stores a copy of what will go into your next commit. It’s sometimes referred to as the index, but it’s becoming standard to refer to it as the staging area.
The Git repository is where Git stores everything it needs to keep track of your project. Think of it as holding snapshots of every directory tree you’ve ever committed. This is the most important part of Git, and it’s what’s copied when you clone a Git repository from another computer.
The Three States
Now, pay attention. This is the main thing to remember about Git if you want the rest of your learning experience to go smoothly. Git has three states that each file that Git manages can be in: committed, modified, and staged. Committed means that a snapshot containing the file has been safely recorded in the Git repository. Modified means that you’ve changed the file in the working directory since the last commit. Staged means that you’ve copied the file into the staging area.
The basic Git workflow goes something like this:
- Modify files in your working directory.
- Stage the files, adding copies of them to your staging area.
- Commit, which creates a snapshot of all the files in the staging area and stores that snapshot permanently in your Git repository.
Files that are either staged or are in the Git repository are also called tracked files. This is another way of saying that Git is managing these files. There’s no reason for Git to manage all files in your working directory. After all, some files, like scratch, object, executable, and temporary editor files, can easily be regenerated or have a limited lifespan. You’ll learn how to tell Git to ignore files like these. Any files that aren’t tracked or ignored are called untracked files.
You’ll learn more about these states in Chapter 2.
Installing Git
Let’s start using Git. First things first — you have to install it. You can get it a number of ways. The two most common are to install it from source or to use a package manager.
Installing from Source
It’s generally best to install the latest version of Git from source. Each new version of Git tends to include useful enhancements and bug fixes, so getting the latest version is often the best route if you feel comfortable building software from source. It’s also the case that some Linux distributions contain very old packages so unless you’re on a very up-to-date distro, installing from source may be your best bet.
To install Git, you need to have the following libraries that Git depends on: curl, zlib, openssl, expat, and libiconv. For example, if you’re on a system that has yum (such as Fedora or RedHat) or apt-get (such as a Debian-based system), use one of these commands to install all of the dependencies.
1 $ yum install curl-devel expat-devel gettext-devel \
2   openssl-devel zlib-devel
3
4 $ apt-get install libcurl4-gnutls-dev libexpat1-dev gettext \
5   libz-dev libssl-dev
When you’ve installed all the necessary dependencies, go ahead and grab the latest snapshot from the Git web site.
1 http://git-scm.com/download
Then, compile and install what you downloaded.
1 $ tar -zxf git-1.8.4.2.tar.gz
2 $ cd git-1.8.4.2
3 $ make prefix=/usr/local all
4 $ sudo make prefix=/usr/local install
The version numbers shown here might be different when you read this.
After this is done, you can also update Git using Git itself.
1 $ git clone git://git.kernel.org/pub/scm/git/git.git
Installing on Linux
To install Git on Linux, you can generally use the basic package-management tool that comes with your distribution. If you’re on Fedora, use yum.
1 $ yum install git
Or, if you’re on a Debian-based distribution like Ubuntu, try apt-get.
1 $ apt-get install git
Installing on Mac
There are two easy ways to install Git on a Mac. The easiest is to use the graphical Git installer, which you can download from the Google Code page (see Figure 1-7).
1 http://code.google.com/p/git-osx-installer
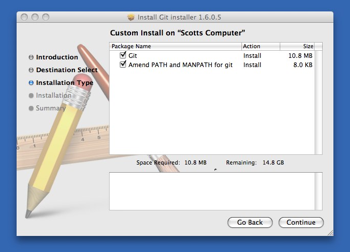
Figure 1-7. Git OS X installer.
The other common way is to install Git via MacPorts (http://www.macports.org). If you have MacPorts installed, install Git via
1 $ sudo port install git-core +svn +doc +bash_completion +gitweb
You don’t have to add all the extras, but you’ll probably want to include +svn in case you ever have to use Git with Subversion repositories (see Chapter 8).
Installing on Windows
Installing Git on Windows is very easy. The msysGit project has one of the easier installation procedures. Simply download the installer exe file from the GitHub page, and run it.
1 http://msysgit.github.com/
After it’s installed, you have both a command-line version (including an SSH client that will come in handy later) and a standard GUI version.
A note on Windows usage: you should use Git with the provided msysGit shell (Unix style) since it allows you to use the command line examples shown in this book. If you need, for some reason, to use the native Windows console, you have to use double quotes instead of simple quotes for parameters with spaces in them and you must quote the parameters ending with the circumflex accent (^) if they’re last on the command line, since the circumflex accent is a continuation symbol in Windows.
First-Time Git Setup
Now that you’ve installed Git, you’ll want to do a few things to customize your Git environment. You only have to do these things once. They stick around between upgrades. You can also change them at any time by running the commands again.
The git config command gets and sets configuration variables that control many aspects of how Git looks and operates. These variables can be stored in three different files, each of which covers a different level of control.
-
/etc/gitconfig: contains values used by every user on the system in all repositories. If you add the--systemoption togit config, it reads and writes from this file. -
~/.gitconfig: contains your personal configuration values for all your repositories. Make Git read and write to this file by adding the--globaloption. -
.git/configin whatever Git repository you’re currently using: contains configuration values specific to that single repository. This is what’s accessed when you rungit configwith no options.
Each level overrides values from the previous level, so values in .git/config trump those in /etc/gitconfig.
On Windows systems, Git looks for the .gitconfig file in the $HOME directory (%USERPROFILE% in Windows’ environment), which is C:\Documents and Settings\$USER or C:\Users\$USER for most people, depending on Windows version ($USER is %USERNAME% in Windows’ environment). Git also still looks for /etc/gitconfig, although it’s relative to the MSys root, which is wherever you decide to install Git on your Windows system when you run the installer.
Your Identity
The first thing you should do after installing Git is to set your user name and e-mail address. This is important because every Git commit uses this information so it’s immutably baked into the commits you pass around.
1 $ git config --global user.name "John Doe"
2 $ git config --global user.email johndoe@example.com
Again, you only need to do this once if you use the --global option because Git always uses that information for anything you do on your system. To override these with a different name or e-mail address for specific projects, run git config without the --global option when you’re in that project’s working directory.
Your Text Editor
Now that your identity is set up, configure the text editor that Git uses when you need to enter a message. By default, Git uses your system’s default text editor, which is generally Vi or Vim. If you want to use a different text editor, such as Emacs, run
1 $ git config --global core.editor emacs
Your Diff Tool
Another useful option to configure is the default tool Git uses to resolve merge conflicts. For example, to use vimdiff, run
1 $ git config --global merge.tool vimdiff
Git accepts kdiff3, tkdiff, meld, xxdiff, emerge, vimdiff, gvimdiff, ecmerge, and opendiff. You can also set up a custom tool (see Chapter 7 for more information about doing that).
Checking Your Settings
To check your settings, run git config --list to show all the settings Git can find.
1 $ git config --list
2 user.name=Scott Chacon
3 user.email=schacon@gmail.com
4 color.status=auto
5 color.branch=auto
6 color.interactive=auto
7 color.diff=auto
8 ...
You may see keys more than once because Git might read the same key from different files (/etc/gitconfig and ~/.gitconfig, for example). In this case, Git uses the last value for each key it sees.
You can also check the value of a specific key by running git config {key}.
1 $ git config user.name
2 Scott Chacon
Getting Help
If you ever need help while using Git, there are three ways to see manpages for any of the Git commands.
1 $ git help <verb>
2 $ git <verb> --help
3 $ man git-<verb>
For example, you can see the manpage for the git config command by running
1 $ git help config
If the manpages and this book aren’t enough and you need in-person help, try the #git or #github channel on the Freenode IRC server (irc.freenode.net). These channels are regularly filled with hundreds of people who are all very knowledgeable about Git and are often willing to help.
Summary
You should now have a basic understanding of what Git is and how it’s different from the CVCSs you may have been using. You should also now have a working version of Git on your system that you’ve set up with your personal identity. It’s now time to learn some Git basics.