Executing a Basic Test
So you’re ready to take the next step in PowerShell development by build Pester tests? That’s great! To give you a peek at what you’re in for in this book, let’s go through what it takes to build a simple Pester test.
If the concepts covered in this chapter don’t make sense now, don’t worry, you’ll get the most in-depth information on what you’re doing here in the chapters to come.
Installing Pester
Pester is preinstalled on Windows 10 and later, and on Windows Server 2016 or later. Pester currently works back to PowerShell v2. If you have the PowerShell Package Manager installed, you can use the Install-Module command to install Pester. If not, head to the project’s GitHub page to download it as a ZIP file. When you extract the ZIP file, Pester will need to be in your C:Program FilesWindowsPowerShellModules folder or any other folder in your’PSModulePath’ environment variable. You can look at this environment variable by running $env:PSModulePath.
Also, when you download Pester, your browser might mark the downloaded ZIP file as potentially unsafe. If so, use the Unblock-File command to unblock the ZIP file before extracting it. You can also right-click the file, and select Properties from Windows Explorer to find an Unblock button.
Creating a Test
In your PowerShell console with Pester installed, you can quickly create a simple project. Pester provides a command called New-Fixture that scaffolds out a single PowerShell script and test file to work with. However, this command is now considered legacy and will be removed from future versions Pester. Don’t worry, though, creating a simple test is straightforward.
To build a Pester test, you need, at a minimum, two files: a PS1 script which contains code to test and a test script file. Create a folder called Pester101 somewhere, a PS1 script called Pester101.ps1 and an associated test script file called Pester101.Tests.ps1. Below is some code to get that done for you.
PS> New-Item -Path 'C:\Pester101' -ItemType Directory
PS> New-Item -Path 'C:\Pester101\Install-Pester.ps1' -ItemType File
PS> New-Item -Path 'C:\Pester101\Install-Pester.Tests.ps1' -ItemType File
Inside of Install-Pester.ps1, create a single function (you’ll learn Pester loves functions), called Install-Pester and leave it blank. The function name can be anything.
1 function Install-Pester { param() }
Once you have the Install-Pester.ps1 script created, now add the following code to the Install-Pester.Tests.ps1 file at the top. The first three lines code aren’t related to Pester, per se; it’s merely a way to dot sourcing the function inside of Install-Pester.ps1 to make available inside of this test script. The describe block below that is where the magic happens.
1 $here = Split-Path -Parent $MyInvocation.MyCommand.Path
2 $sut = (Split-Path -Leaf $MyInvocation.MyCommand.Path).Replace(".Tests.", ".")
3 . "$here\$sut"
4
5 describe 'Install-Pester' {
6     it 'does something useful' {
7         $true | Should -Be $false
8     }
9 }
Congratulations! You’ve officially created your first Pester test!
Running the Test
Now that you have a basic test scaffold built out let’s run the test as-is and see what happens. At this point, you haven’t put any code into the Install-Pester function in the Install-Pester.ps1 file. The function does nothing.
If you’re not already, change to the C:Pester101 folder then run Invoke-Pester.
PS> cd C:\Pester101
PS> Invoke-Pester
When Invoke-Pester runs, it will automatically look for any files ending with Tests.ps1 in the same folder you’re in or any subfolders. If it finds one, it runs it.

Notice the [-] and red text. This indicator means that the test has failed. Below that indicator, it will tell you why. In this instance, it has failed because the boolean value $false was supposed to be $true which, as you probably know, is not valid.
Writing A Passing Test
So you’ve failed but don’t sweat, I’ll help you pass this test. Open up the C:Pester101Install-Pester.ps1 file in your favorite editor and insert a single line Write-Output "Working!" as shown below.
function Install-Pester {
    param()
    Write-Output "Working!"
}
Save the file and now open the C:Pester101Install-Pester.Tests.ps1 file. Replace the entire describe section with the below code.
describe 'Install-Pester' {
    it 'outputs a string' {
        Install-Pester | Should -Be 'Working!'
    }
}
Now, run Invoke-Pester again while in the C:Pester101 folder and see what happens.
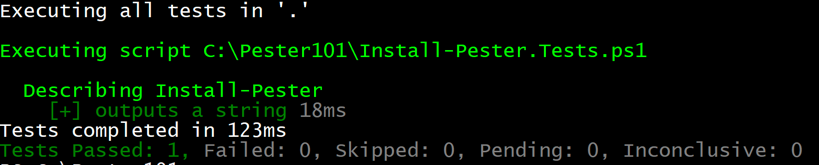
Notice now that your test has passed indicated by the [+] and green text.
How this Worked
You’ve now successfully gone through all there is to create and run tests in Pester, but how did that work anyway?
- You created two files; Install-Pester.ps1 and Install-Pester.Tests.ps1 in the C:Pester101 directory.
The Install-Pester.ps1 script represented the code to test. The Install-Pester.Tests.ps1 script held the tests to run against the code in Install-Pester.ps1.
- When
Invoke-Pesterwas run while inside of the C:Pester101 directory, it looked for all scripts ending in .Tests.ps1. - Once
Invoke-Pesterfound all of the scripts, it then ran each one (in this case, a single one). - When the Install-Pester.Tests.ps1 test script was run, it dot sourced the Install-Pester.ps1 script so that Pester could run the
Install-Pesterfunction inside. - Pester then executed that function inside of the test (doing nothing at all the first time) and then compared the boolean value
$truewith the boolean value$false. Since the test was expecting$trueto be$false, it failed. - On the second round, Pester dot sourced the
Install-Pesterfunction again, ran it and this time captured the output ofWorking!. It then compared that output to the expected output ofWorking!. Since they were both the same, the test passed.
Summary
We just covered what a basic Pester test looks like. Of course, you’re going to get a lot more involved in this book covering real-world scenarios and in-depth tutorials. Strap in and get ready for a full soup to nuts tour of testing PowerShell scripts using the Pester testing framework!