Foreword
Git is such a ubiquitous technology in software now that it’s easy to take for granted. It’s also very easy to ‘get by’ with a little knowledge of it. Every day I come across very smart people who ‘only use three commands’ in git.
Usually that’s fine, but the reason I’ve come across them is because something’s happened and they’re bewildered, and they don’t know where to turn.
It’s my argument that the software community is woefully under-served when it comes to learning about git, and that mastering it pays massive dividends, and not just when using git!
If you want to learn git, you either find:
- Impenetrable man pages full of jargon that assumes you understand far more than you do
- One-liners to solve your particular problem, leaving you no better off the next time you want to do something
- Git ‘guides’ that are like extended man pages - theoretical, full of jargon, and quite hard to follow
All of the above is what this book tries to address.
If you’ve ever been confused by things like:
- Why your merge failed
- Why you can’t push your changes
- The difference between add and push
- What a ‘fast forward’ is
- What a ‘rebase’ is and why it’s important
then this book is for you.
It uses the ‘Hard Way’ method to ensure that you have to understand what’s needed to be understood to read those impenetrable man pages and take your understanding deeper when you need to.
Enjoy!
Introduction to Git
How Important is this Section?
This section sets the scene for why source control tools exist, where Git fits in to that landscape, and some key concepts and confusions in this space.
You might skip it if you’re really in a hurry, but I recommend coming back to it later at least once to check that you have a full picture of Git’s broader context and big ideas.
What is Source Control?
If you’re not familiar with source control, it solves a simple problem: how do you and your colleagues keep track of changes in your codebase?
You might start by:
- Sending each other updated files
- Emailing each other when files change
- Keeping tar files in a central location with version numbers
However, whenever the project scales in size, you encounter problems:
- If more developers are involved, there is a communication overhead to track all the changes
- If there are more projects running concurrently on the same codebase, then tracking what is changing what will get complicated
- If multiple developers are working on the same files at the same time, then the changes need to be co-ordinated so that they don’t conflict with each other
- If there are more projects running concurrently on the same codebase, then tracking what is changing what will get complicated
- If multiple developers are working on the same files at the same time, something needs to co-ordinate the changes
A source control tool is a system that helps manage that complexity.
It’s a database of files and the histories of their states. Like a database, you have to learn the skills necessary to work on it before you feel the benefit.
I’m old enough to remember a time when people complained about using source control at all! These days, NOT using source control for projects is almost unheard of (but it still happens, believe me).
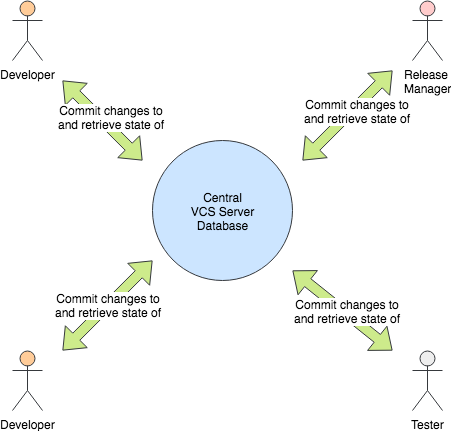
Before Git existed, there were what might be called traditional source control tools.
Traditional source control tools (such as CVS and SVN) had a centralised
architecture. You communicated with a server which maintained the state of the
source code. This could mean several things:
- The source control database could get very big
- The history could get very messy
- Managing your checkouts of code could get complicated and painful
In the old world, if you checked out source code, that was a copy of some code that was inferior in status to the centralised version.
As far as the user was concerned, code was in one of two states:
- Local changes (“dirty”)
- Committed
Committed was synonymous with ‘pushed to the server’. My local changes could not be shared with anyone else until I committed and pushed them to the server.
Git, by contrast, is fundamentally distributed. Each Git repository is a full copy of each other Git repository it is copied from. It is not a “link” to a server, or a “shadow” copy of another repository. You can make reference to the origin repository, but you do not have to. All code databases (in Git, CVS or SVN) are known as repositories.
Now remember this, because I’ll be repeating it often:
ALL GIT REPOSITORIES ARE BORN EQUAL!
Git was created so people could work on the Linux kernel across the globe, and offline. So there is no concept of a central server that holds the ‘golden’ source. Instead people maintain their own source code database (ie their own repository) and reconcile, copy from, and integrate with other repositories.
Linus Torvalds (the creator of Git and Linux) likes to joke that he’s made the Internet his back-up system.
The Four Phases of Git Content
In the Git world you have four phases your code can go through:
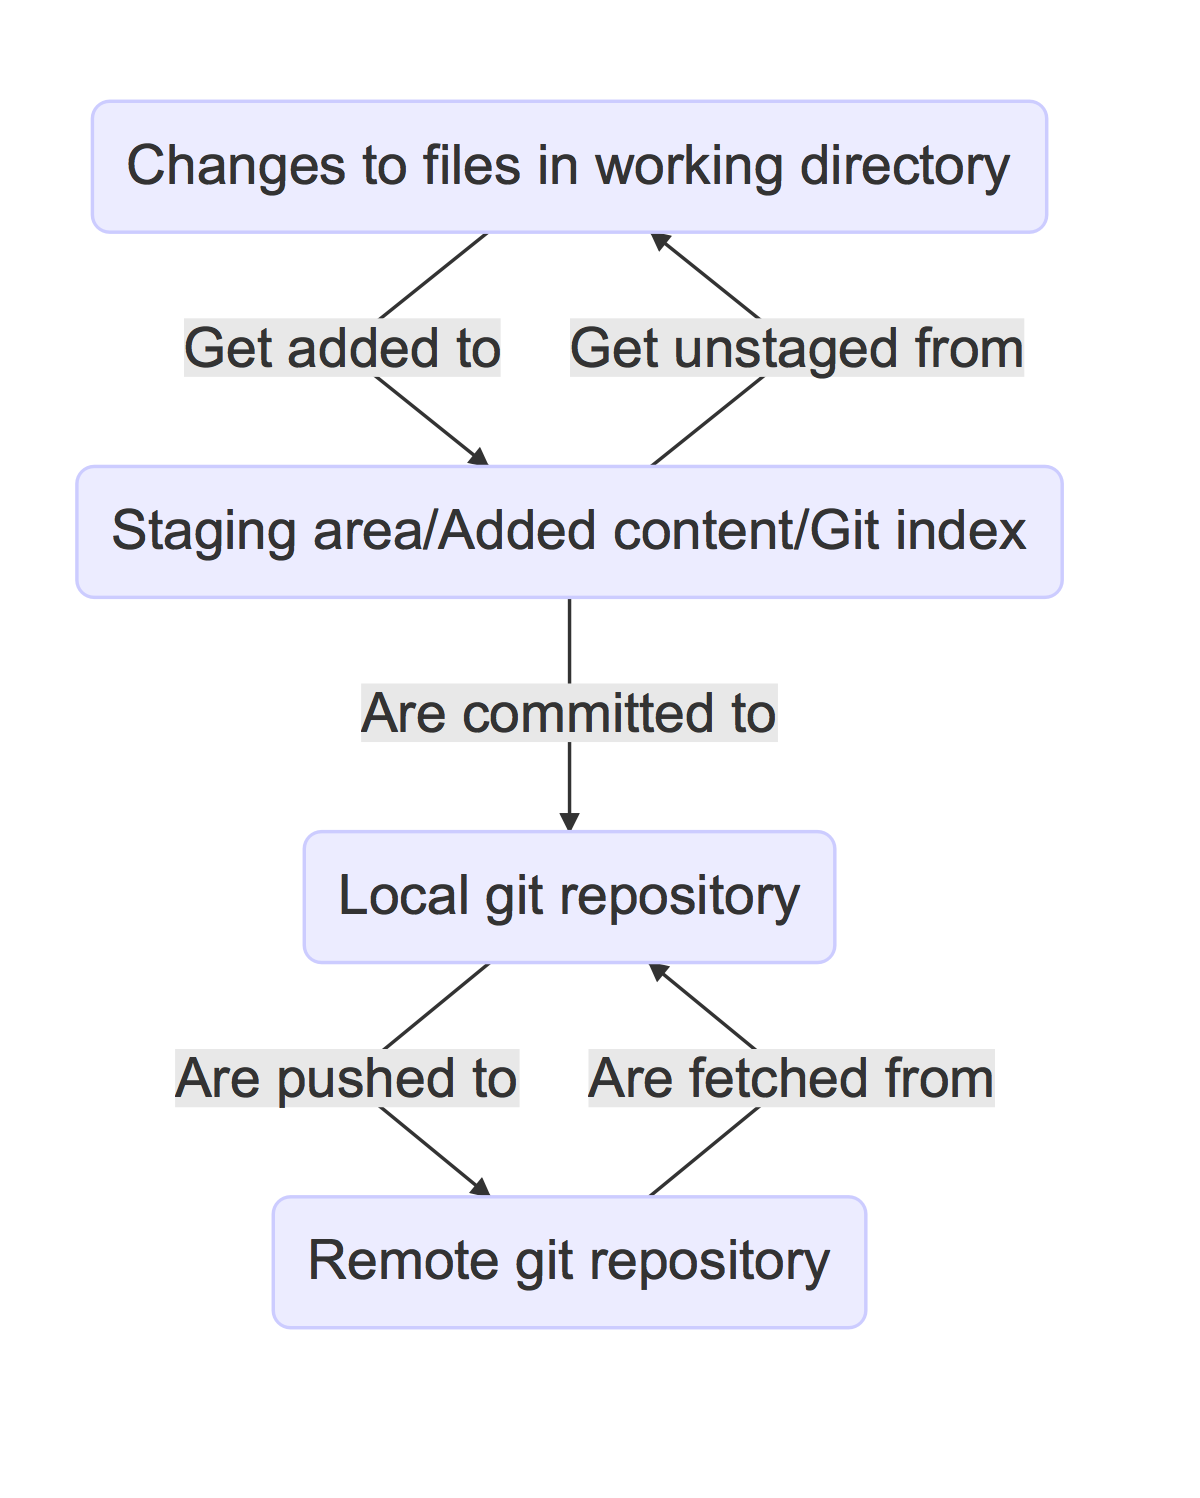
Understanding these four stages are key to understanding Git.
If this seems over-complicated now, it won’t as you grow to know and love Git. If you’ve ever been confused by Git, it’s likely because these stages were not understood properly.
You can get by with Git without knowing too much about how it works, but you will hit limits in your understanding as you want to do more with it.
Don’t worry about memorizing the stages now, just be aware that it is important. Over time the understanding will become second nature.
Branches
In case you’ve not looked at a source control tool before, branching is a core concept.
A series of changes to a repository might look like this:

The letters have no specific meaning here - they simply stand for a bunch of changes to lines grouped together.
Here change A is made, then B, then C. This might be informally called the
main line. Most of the time in Git it’s called the ‘master’.
But let’s say someone wants to make an experimental change but not affect the
main line. Then they might branch the code at point C:
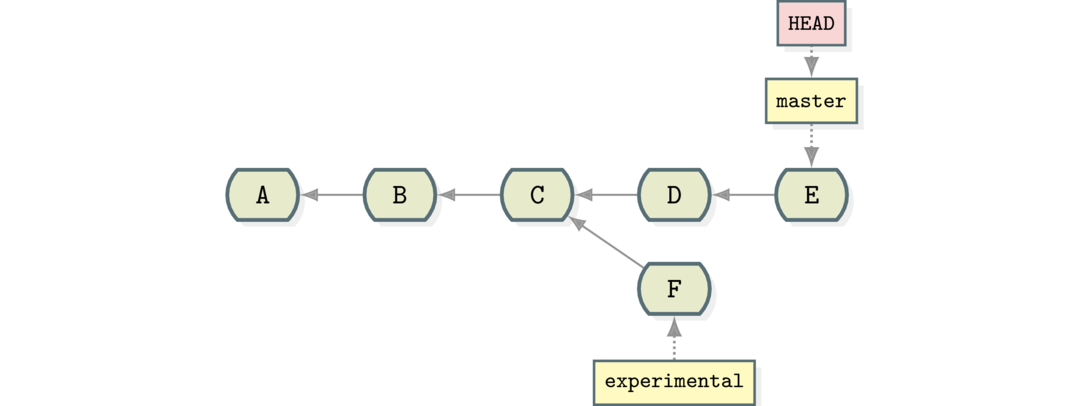
Study the above diagram and make sure you understand it.
While the main line has continued with changes D and E, another branch has
been created from C that has one change: F made to it. This experimental
branch does not include the D and E changes, and the master branch does
not include the experimental changes.
That way users can choose to get a view of the source on the main line branch or the experimental one.
That’s all a branch is: a set of changes from a specific point in time.
But What About GitHub?
Earlier I said that:
ALL GIT REPOSITORIES ARE BORN EQUAL!
In practice, some repositories are more equal than others (eg GitHub). This is a matter of convention within a project.
Most people use GitHub as their reference or upstream repository (ie the ‘primary’ one), but I could just as easily use a GitHub repository as a secondary or downstream repository for my workflow - it’s up to me (indeed I do this for some of my private repos).
GitHub’s de facto status as a centralised repository (and all the machinery that assumes its existence and continuous uptime) is the reason every GitHub outage causes a flurry of smart-alec comments about Git supposedly being a decentralised source control tool that relies on one central system.
More seriously, being a distributed source control tool makes Git more challenging to understand than traditional version control system (VCS) (aka source control management (SCM)) tools, which is one of the reasons why services like GitHub become central references: to keep things simple for the typical user.
Here’s a couple of diagrams that might help describe the differences between the decentralised and server-based VCS tools:
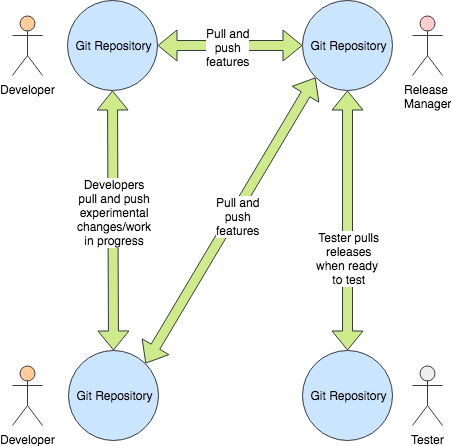
In a distributed source control, rather than everyone talking to one central source code ‘server’, the tool operates as a set of separate repositories that can ‘pull’ and ‘push’ changes to each other if the ‘owner’ of the repository agrees.
This is why the phrase ‘pull request’ exists. When you make a ‘pull request’ you are saying to the owner of the other repository ‘please take a change I’ve made in my repository and apply it to yours’. The operation could just as easily go the other way!
The first step to mastering Git is understanding this equality of repos.
The first step to mastering Git is understanding this equality of repos.
Other Verson Control Systems (VCSes)
If you’re already familiar with other VCSes, Git has some key differences you should bear in mind as you learn about it.
- History is more malleable.
You can change the history in your own copy of the repository and others’ (assuming you have the appropriate permission to push to them).
- Branching is cheap
In most traditional VCSes (such as CVS and Subversion) it’s very slow to branch
a repository (O(n) (‘order n’) to number of files).
In Git it’s an O(1) (an ‘order 1’ step).
This makes experimentation with branching much easier.
Branch deletion is also a common and cheap operation.
This changes the typical workflow in a lot of cases.
- Commits are made across the whole project
In contrast to other source control tools, changes are made across the whole project, not per file.
One consequence of this is that moving/renaming files involves no loss of history for that file. This is a massive win over CVS, for example, which is file-oriented.
- No version numbers
Git does not automatically number versions of files/changes. It instead assigns a hash (effectively random) to the change to the repository which is used to refer to it.
Assumptions
At this point I assume you have:
- A command line to work with
- Access to basic Linux GNU tools (such as
touch,grep) - Installed
git
Ensure that you have set your details up as per the below commands.
Run this to determine whether you are already good to go:
1 $ git config --list | grep ^user
If you saw two lines of output with user.email= and user.name= at the
start, then you are already set up.
If you got nothing, then run the below commands, replacing with your email address and username:
2 $ git config --global user.email "you@example.com"
3 $ git config --global user.name "Your Name"
What You Learned
- What Git is
- The four stages of Git content
- Setting up
git - Differences to other SC systems
- ALL GIT REPOSITORIES ARE BORN EQUAL!
Exercises
1) Install git and set up your config. Set up user.email and user.name using
the --global flag.
2) Find out where the global git config is stored.
3) Research the other config items that are in the file and some of those that are not.
Git Basics
This section covers:
git init- The
.gitfolder git loggit statusgit addgit commitgit diff
How Important is this Section?
This section is essential because these are the basic tools you will most often use with Git.
Initialize A Git Repository
To initialise a Git repository, run git init from within the root folder of
the source you want to manage.
1 $ mkdir lgthw_git_basics
2 $ cd lgthw_git_basics
3 $ git init
This initialises a database in the folder .git locally. Your repository is
entirely stored within this .git folder. There are no other files elsewhere on
your filesystem you need to be concerned about to work with this repository.
(There are config files for Git, but these are global to the host. You can
ignore them for now.)
Have a look at the files within your .git folder by typing in:
4 $ cd .git
5 $ ls
It’s not part of the scope of this course to go into detail about all the Git internals files seen here. You will cover some of them as we go into the course, though.
What is worth being aware of here are:
- The
HEADfile - The
configfile
HEAD
The HEAD file is key - it points to the current branch or commit ID you are
currently ‘on’ within your Git repository.
If you look at the file, you will see its contents contain the string:
refs/heads/master
This is an internal representation of the default master branch. Let’s have a
look at the HEAD file.
6 $ cat HEAD
ref: refs/heads/master
The file’s contents links the ‘HEAD’ of the repository to the
refs/heads/master file.
Git Configuration
The config file stores information about your repository’s local
configuration, for example what branches and remote repositories your repository
is aware of. Again, it’s a plain text file with a basic config structure:
7 $ cat config
[core]
        repositoryformatversion = 0
        filemode = true
        bare = false
        logallrefupdates = true
        ignorecase = true
        precomposeunicode = true
Again, don’t be concerned with understanding what it all means yet. Just be aware of its existence.
The git log Command
If you want to look at the history of this repository, run the git log command:
8 $ cd ..
9 $ git log
fatal: bad default revision 'HEAD'
You have a problem! This repository has no history to look at. So what happened?
Git has followed the HEAD pointer to the refs/heads/master entry and found
nothing there! And indeed there is nothing there:
10 $ ls .git/refs/heads/master
You will need to create a history for git log to return something useful.
The git status Command
As is often the case, git status is your friend:
11 $ git status
Remember this command! A quick git status has got me out of many a sticky
situation with Git by telling me what is going on, and even advising me on what
to do next.
Here it’s telling you where the HEAD is pointed at (the non-existent master
branch), and that there is nothing to commit.
Create a file and check status again:
12 $ git status
13 $ touch mycode.py
14 $ git status
On branch master

Initial commit

Untracked files:
  (use "git add <file>..." to include in what will be committed)

        mycode.py
You are now advised that you have an untracked file. Git has detected that it exists but the repository is not aware of it.
Make Git aware of it by adding it to the repository.
The git add Command
The add command tells Git to start tracking files in what’s called the local
index.
15 $ git add mycode.py
16 $ git status
You have added a file to the index ready to be committed to the repository.
Remember the four stages you looked at before:
You created your file ((1) local changes), then added/staged it to the index (2).
Still you have no history! Git has simply been made aware of the file, and you
must make a commit to initiate Git’s history.
17 $ git log
fatal: bad default revision 'HEAD'
So you will need to commit it to the repository to get a history.
The git commit Command
The git commit command tells Git to take a snapshot of all added content at
this point.
18 $ git commit
19 $ git log
commit e5fb099e952e8754b54f9b99be93d62e3fce0fcaAuthor: ianmiell <ian.miell@gmail.com>Date: Tue Apr 26 07:46:58 2016 +0100 Some messageNow that Git is aware of the mycode.py file you can make a change to it and
see how the local change looks using git diff.
The git diff Command
20 $ vi mycode.py
21 $ git diff
Again, you can see what’s going on by looking at the status. You can commit
changes to files and add at the same time by doing git commit -a
22 $ git status
23 $ git commit -a
24 $ git status
git log now shows the history of the file:
25 $ git log
Cleanup
To clean up after the above work:
26 $ cd ..
27 $ rm -rf lgthw_git_basics
What You Learned
git init- The .git folder
-
HEAD- a pointer to where in the history you are git loggit statusgit addgit commitgit diff
Exercises
1) Create a git repository.
2) Add and commit a file to the repository.
3) Commit a few more changes, and then run git log to view the history.
Cloning a Repository
This section covers:
git clonegit reset
The git clone command is the way you create copies of Git repositories to work
on.
The git reset command is a way of returning to a previous or known state. As
you play with Git and learn it you will (and should!) often make mistakes in
your local repositories. In these situations many users remove the entire
repository and re-clone when often all that’s needed is a hard reset.
How Important is this Section?
Cloning is an essential part of working with Git.
git reset is a very useful command to know as you learn and experiment with Git, and is very frequently used in practice once learned.
Cloning
In this section you’re going to play with the contents of your repository by deleting its content and seeing what your options are to recover state.
1 $ mkdir lgthw_git_clone
2 $ cd lgthw_git_clone
3 $ git clone https://github.com/ianmiell/shutit
4 $ cd shutit
5 $ ls .git
There’s a .git folder, just as before. Remember that:
ALL GIT REPOSITORIES ARE BORN EQUAL!
This is a Git repository just the same as the one you’ve cloned, and you own it. Its only connection with the repository you cloned from can be seen if you run:
6 $ grep -A2 'remote "origin"' .git/config
[remote "origin"]
        url = git@github.com:ianmiell/shutit
        fetch = +refs/heads/*:refs/remotes/origin/*
You will see a new section that indicates where this Git repository was cloned from, and gives that remote a name by default: origin.
This is a sneak preview of what we will cover in Part III - Remote Repository Management. For now we are going to focus on learning about local repositories.
Accidental Deletion
Recall (again) the four stages of data in Git repositories:
Run these commands, in which you will look at the repository a little, and then make a disastrous mistake.
7 $ git log
This shows you a default history of the repository. Page through a few times
by hitting ‘space’ or ‘down’ and you will see how far it goes back. Hit q to
stop viewing it and return to the command line.
8 $ git log --oneline
Another way to view the log is one line per commit, which is much more concise and useful for many purposes. Obviously, some information is lost here.
9 $ git log --oneline --graph
Now you’ve added the --graph flag and you get a visual representation of the
history. Parsing this graph can be tricky, so don’t worry about understanding
exactly what you see yet. But keep it in mind if you ever have to figure out
what went on in a repository’s past.
Using git log to view the history on the terminal is one of the most powerful
tools you will have at your disposal if you are responsible for a shared
repository.
Now you’re going to clone the repository so you’ve got a copy to mess around with.
10 $ cd ..
11 $ git clone shutit cloned_shutit
12 $ cd cloned_shutit
It’s worth at this point reminding yourself of the .git folder.
13 $ ls .git
Have a look around and see how it differs from the repository you originally
cloned into the shutit folder.
Now you get distracted and type:
14 $ rm -rf ../cloned_shutit/*
Oops. You just deleted your cloned repository.
15 $ ls .git
Hmmm, why is the .git folder still there?
This is nothing to do with Git, rather it’s due to how bash interprets the *
character. Don’t worry about this if it makes no sense to you, but consider
buying the sister book to this ‘Learn Bash the Hard Way’, available at
https://leanpub.com/learnbashthehardway to learn more.
Just quickly here I will explain: the * character does not match files
beginning with ‘.’ - the command ls ignores them similarly. This is just a
convention of Linux (and other) operating systems.
You have cloned the repository, and ‘accidentally’ deleted all the files under Git’s control in this cloned repository. This kind of disaster happens all the time, often when you start to use Git, and more often when you are on a tight deadline.
What can you do?
One option often used is to wipe the entire checkout folder and re-clone, but there is another way, and it’s quite instructive.
The git reset Command
You can use git reset to recover the state of the Git repository in various
ways.
By default, Git will recover whatever has been added to the index/staging area and place it in your working directory.
By contrast a, git reset --hard will blitz all local and added changes,
reverting your checkout to a just-cloned and committed state.
Back to our friend git status:
16 $ git status
What does this tell you about the state you’re in?
Now you’re going to make another ‘mistake’:
17 $ git add .
Oh dear. You’ve not only deleted your files, you’ve added the deletions to
the staging/index area of the Git repository.
Help me, git status!
18 $ git status
In most versions, git status now reports that the deleted files are ready to
be committed, but there’s also a helpful message at the top about using git
reset (this message may vary depending on the Git version you are using,
or even not be there at all). If there’s a message like that, read it
carefully, then type:
19 $ git reset --mixed
20 $ git status
Yes, I know that’s not what git status told you to do. But it’s the same thing
--mixed is the default flag that git reset uses.
Based on what the git status output was, can you work out what point you’ve
reverted to with git reset?
The --mixed flag takes items out of their ‘added’ status, but keeps them
altered in the current working folder (or ‘working tree’, as the Git often call
it).
Now do the same delete/add cycle over, but git reset --hard this time rather
than the default --mixed:
21 $ rm -rf ../cloned_shutit/*
22 $ git add .
23 $ git reset --hard
24 $ git status
What does git status tell you now? Have the files been returned? Have a look
at what git log tells you.
So --hard not only takes items out of their ‘added’ status, they make the
working tree state consistent with what was last committed. You can effectively
lose your changes with the --hard flag.
What does this tell you about the .git folder? (Hint: how do you think the
content was returned to the folder?)
What flag do you think should be the default to git reset? Why? (There’s no
right answer, by the way, it’s just worth thinking about why the default was
chosen, to embed the knowledge).
Cleanup
25 $ cd ../..
26 $ rm -rf lgthw_git_clone
What You Learned
- The
git clonecommand - Some new
git logflags - The
git resetcommand - The difference between
git reset’s--hardand--mixedflags
Exercises
1) Check out a git repository from either your company repository or GitHub.
2) Browse the git log for that repository.
3) Look at the man page for git log and explore the options. Don’t worry
about understanding everything in there, but play with the options and try to
work out what is going on.