Deploying Go Web Apps to Heroku
There are plenty of definitions for “cloud computing” online, and for the most part, they generally point to the same thing: taking applications and running them on infrastructure other than your own. Companies or individuals who offload or effectively “outsource” their hardware and/or applications are running those apps “in the cloud.”
Cloud Computing Service Levels
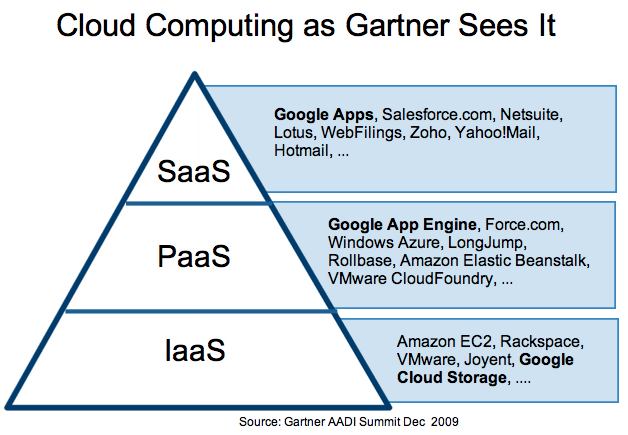
In the figure below, you can see how the analyst firm Gartner segregates cloud computing into three distinct classes of service.
Cloud Computing Service Levels
SaaS
Let’s start at the highest level: software applications that are only available online fall into the “Software-as-a-Service” category, also known as “SaaS”. The simplest example to understand is e-mail. For personal e-mail, people typically select from a variety of free web-based e-mail servers such as Google’s Gmail, Yahoo!Mail, or Microsoft’s Hotmail, rather than setting up all of the above through their provider. Not only is it “free” (supported through advertising), but users are freed from any additional server maintenance. Because these applications run (and store their data online), users no longer need to worry about managing, saving, and backing up their files. Of course, now it becomes Google’s responsibility to ensure that your data is safe and secure. Other examples of SaaS include Salesforce, IBM’s NetSuite, and online games.
IaaS
On the opposite end of the spectrum, we have “Infrastructure-as-a-Service,” or “IaaS,” where you outsource the hardware. In such cases, it’s not just the computing power that you rent; it also includes power, cooling, and networking. Furthermore, it’s more than likely that you’ll need storage as well. Generally IaaS is this combination of compute and cloud storage.
When you choose to run your applications at this cloud service level, you’re responsible for everything on the stack that is required to operate above it. By this, we mean necessities such as the operating system followed by additional (yet optional services) like database servers, web servers, load-balancing, monitoring, reporting, logging, middleware, etc. Furthermore, you’re responsible for all hardware and software upgrades, patches, security fixes, and licensing, any of which can affect your application’s software stack in a major way.
PaaS
In the middle, we have “Platform-as-a-Service,” or “PaaS.” At this service level, the vendor takes care of the underlying infrastructure for you, giving you only a platform with which to (build and) host your application(s). Gone are the hardware concerns of IaaS, yet with PaaS, you control the application it’s your code unlike as the SaaS level where you’re dependent on the cloud software vendor. The only thing you have to worry about is your application itself.
Systems like Google App Engine, Salesforce’s Heroku and force.com, Microsoft Azure, and VMwares Cloud Foundry, all fall under the PaaS umbrella.
A number of Platform-as-a-Service (PaaS) providers allow you to use Go applications on their clouds.
Heroku is a new approach to deploying web applications. Forget about servers; the fundamental unit is the app. Develop locally on your machine just like you always do. When you’re ready to deploy, use the Heroku client gem to create your application in their cloud, then deploy with a single git push. Heroku has full support for Go applications.
We shall soon see how we can deploy an app to Heroku.
Create an account on Heroku
Please ensure that you are connected to the internet and then create an account on Heroku (obviously do this only once). If you don’t have one, then signup. It’s free and instant. A free account can have upto 5 apps without registering your credit card.
Install the Heroku Toolbelt
The Heroku Toolbelt ensures that you have access to the Heroku command-line client, Foreman which is used to run applications locally, and the Git revision control system that is used to deploy sites to Heroku.
Once installed, you’ll have access to the heroku command from your command window. Log in using the email address and password you used when creating your Heroku account:
1 $ cd $GOPATH/src/github.com/SatishTalim/webapp_h
2 $ heroku login
3 Enter your Heroku credentials.
4 Email: golangchallenge@gmail.com
5 Password:
6 Could not find an existing public key.
7 Would you like to generate one? [Yn]
8 Generating new SSH public key.
9 Uploading ssh public key /Users/satish/.ssh/id_rsa.pub
Create a Procfile
Create a Procfile to tell Heroku what command to run for the web process in our app. The Procfile should be created in the folder $GOPATH/src/github.com/SatishTalim/webapp_h and contains:
1 web: webapp_h
Use Git
In order to deploy to Heroku we’ll need the app stored in Git. In the same folder i.e. $GOPATH/src/github.com/SatishTalim/webapp_h type:
1 $ git init
2 $ git add -A .
3 $ git commit -m "code"
Install Godep
The recommended way to manage Go package dependencies on Heroku is with Godep, which helps build applications reproducibly by fixing their dependencies.
Before installing Godep ensure that you have Mercurial installed (check that you have an hg command) and have set the path environment variable for mercurial for eg. c:\Mercurial.
Now let us install Godep:
1 $ go get github.com/kr/godep
Now save your dependencies:
1 $ godep save
This will save a list of dependencies to the file Godeps/Godeps.json, and copy their source code into Godeps/_workspace.
Add these new files to git:
1 $ git add -A .
2 $ git commit -m "dependencies"
Now we’re ready to ship this to Heroku.
Heroku deploy
Create a new Heroku app, telling it to use the Go Heroku Buildpack to build your Go code:
1 $ heroku create -b https://github.com/kr/heroku-buildpack-go.git
2 Creating tranquil-bastion-1774... done, stack is cedar
3 BUILDPACK_URL=https://github.com/kr/heroku-buildpack-go.git
4 http://tranquil-bastion-1774.herokuapp.com/ | git@heroku.com:tranquil-bastion-1774.git
5 Git remote heroku added
Push the code to Heroku:
 1 $ git push heroku master
 2 Initializing repository, done.
 3 Counting objects: 11, done.
 4 Delta compression using up to 4 threads.
 5 Compressing objects: 100% (8/8), done.
 6 Writing objects: 100% (11/11), 1.29 KiB | 0 bytes/s, done.
 7 Total 11 (delta 0), reused 0 (delta 0)
 8
 9 -----> Fetching custom git buildpack... done
10 -----> Go app detected
11 -----> Installing go1.2... done
12 -----> Running: godep go install -tags heroku ./...
13 -----> Discovering process types
14        Procfile declares types -> web
15
16 -----> Compressing... done, 1.7MB
17 -----> Launching... done, v4
18        http://tranquil-bastion-1774.herokuapp.com deployed to Heroku
19
20 To git@heroku.com:tranquil-bastion-1774.git
21  * [new branch]      master -> master
Your app should be up and running. Visit it with:
1 $ heroku open
2 Opening tranquil-bastion-1774... done
That’s it - you now have a running Go app on Heroku!